

Page 1
r
/
r
/
r
/
r
/
r
/
r
/
r
/
r
/
INSTALLATION INSTRUCTIONS
200801 / 200801-2
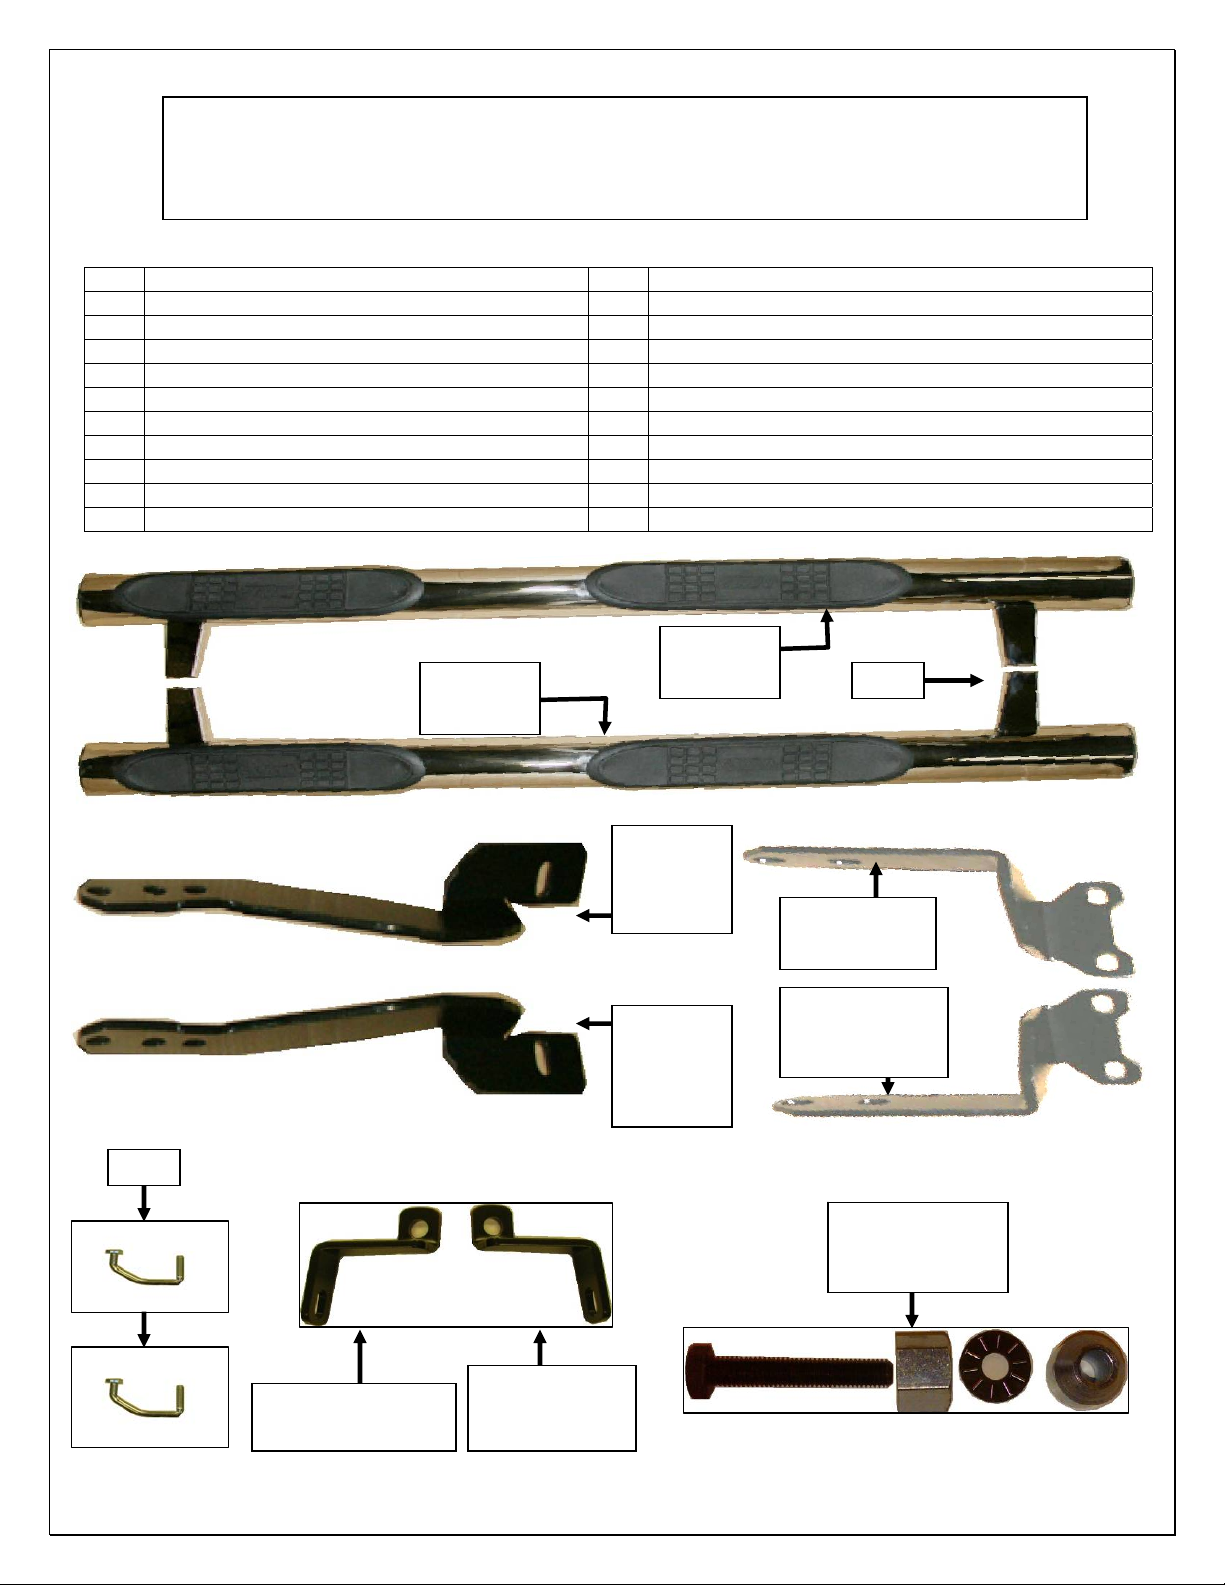
PARTS LIST:
Qty Description Qty Description
1 Driver/Left Sidebar 3 Rive Nuts
1 Passenger/Right Sidebar 8 10mm x 35mm Hex Bolts
1 Driver/Left Front Mounting Bracket 8 10mm lock nuts
1 Passenger/Right Front Mounting Bracket 16 10mm Flat washers
1 Driver/Left Rear Mounting Bracket 4 8mm x 30mm Hex Bolts
1 Passenger/Right Rear Mounting Bracket 10 8mm Flat washers
1 Driver/Left Front Brace Bracket 6 8mm Lock washers
1 Passenger/Right Front Brace Bracket 4 8mm Nuts
2 C Bolts 2 25mm x shims
1 Rive nut tool
C Bolt
Passenge
Front Brace Bracket
2009-2010 SUBARU FORRESTER
Passenge
Right Side
Drive
Right Side
Left Side
Front Brace
Bracket
Drive
Side
Drive
Left
Side Front
Mounting
Bracket
Passenge
Right Side
Front
Mounting
Bracket
Left
Drive
Rear Mounting
Passenge
Side Rear
Mounting Bracket
Front
Left Side
Right
Rive Nut Tool
(Put together as is
laid out example)
Page 1 of 5 4/15/2010)
Page 2

PROCEDURE:
1. REMOVE CONTENTS FROM BOX. VERIFY ALL PARTS ARE PRESENT. READ
INSTRUCTIONS CAREFULLY BEFORE STARTING INSTALLATION.
2. Starting with the passenger/right side-front of the vehicle, located at the bottom of the frame
rail just behind the tire are (2) holes on the frame rail (Fig 1) shows location, select (1) C Bolt
(1) 25mm shim and (1) 8mm flat washer place the flat washer followed by the shim on the C
Bolt and then take the C Bolt and place it threw one of the hole in the frame rail threw to the
other side and out the other hole (Fig 2) shows placement.
3. Select the passenger side front Mounting Bracket from the list of parts above, position the
Mounting Bracket onto the installed C Bolt, Secure it with (1) 8mm Flat Washers, (1) 8mm
Lock Washers and (1) 8mm Hex Nuts, (Fig 3). Snug but do not tighten hardware at this time.
4. Next, select the Passenger/right side brace bracket from the list of parts above and place it up
to where it comes in contact with the front mounting bracket and floor board, (Fig 4), there is a
plastic push pin (remove this pin) now with the pin removed assemble the Rive nut tool
supplied. (See Fig 4A for tool assembly). Ounce assembled thread a rive nut on to the tread
part of the tool insert the rive nut into the hole from where the push pin came out from, Holding
the rive nut up to the hole firmly place a wrench on the bottom of the rive nut tool (Note: this
bolt you do not want it to turn). only turn the large nut on the tool clockwise as much as
possible with a second wrench, this will cause the rive nut to collapse on its self securing it to
the vehicles floor board (Fig 4B shows tool with rive nut and procedure outside of hole)
once you have secured the rive nut to the floor board unscrew the large nut from the tool
counter clock wise, this will remove tension from the tool then unscrew the bolt from the rive
nut. (See Fig 4C for rive nut secured in hole)
5. Place the Passenger/right side brace bracket up and into place secure it to the rive nut with (1)
8mm hex bolt (1) 8mm flat washer (1) 8mm lock washer Line up the other end of the Support
Bracket up with the front mounting bracket and secure it with (1) 8mm hex bolt (2) 8mm flat
washers (1) 8mm lock washer and (1) 8mm nut. (Fig 5) shows mounting bracket attached
snug but do not tighten hardware.
6. Moving to the passenger/right side rear of the vehicle, remove the factory tow strap bracket
(Fig 6) shows location of bracket ounce remove select the Passenger/right side rear bracket
and secure it with the factory bolts that secured the tow strap bracket (Fig 7) shows mounting
bracket attached. Snug but do not tighten hardware at this time.
7. Next, select the passenger/right sidebar and fasten it to the front mounting bracket with the
included (2) 10mm x 35mm Hex head bolts, (4) 10mm flat washers and (2) 10mm lock nuts
(Fig 8 & 8A) shows front & back brackets attached. Do not tighten at this time. Repeat this
step for rear Sidebar mounting.
8. Level and align Sidebar properly; then tighten all hardware at this time (Fig 9) shows sidebar
attached installation complete.
9. Repeat steps 2-8 for Driver/left Sidebar.
10. Do periodic inspections to the installation to make sure all hardware is secure and tight.
Page 2 of 5 4/15/2010)
Page 3

(1)
To protect your investment, wax this product after installing. Regular waxing is recommended to
add a protective layer over the finish. Do not use any type of polish or wax that may contain abrasives
that could damage the finish.
For stainless steel: Aluminum polish may be used to polish small scratches and scuffs on the finish.
Mild soap may be used also to clean the Sidebar.
For gloss black finishes: Mild soap may be used to clean the Sidebar.
Fig 1 Fig 2
C Bolt placed in holes
Location of
holes for C bolt
(1) 25mm shim
(1) 8mm flat washer
Fig 3
Passenger front
bracket attached to
C Bolt
Fig 4
Plastic push
pins to be
removed
Attached with
(1) 8mm flat washer
(1) 8mm lock washer
(1) 8mm nut
Fig 4A
Rive nut tool assembled
(Example shown with
rive nut installed)
(1) 8mm X 50mm hex
bolt
(1) 8mm thrush bearing
(1) 8mm end cap
8mm rive nut
Page 3 of 5 4/15/2010)
Page 4

Fig 4B
Rive nut tool procedure
(outside of hole)
DO NOT COLLASPE
RIVENUT OUTSIDE OF HOLE
THIS VIEW BELOW IS ONLY
TO SHOW PROCEEDURE
OUTSIDE OF HOLE
Rive nut
With a wrench turn the
large nut clock wise
until rive nut is fully
collapsed
Place a wrench on the
bolt so it does not turn
while turning the nut
above
Place a wrench on the
bolt so it does not turn
while turning the nut
above
Nut
Nut
Place a wrench on the
nut and turn it clock
wise until it collapses
the rive nut inside the
hole
Place a wrench on the
bolt so it does not turn
while turning the nut
above
Page 4 of 5 4/15/2010)
Page 5

Fig 4C
Rive nut installed
Fig 5
Brace bracket secured
to rive nut with
(1) 8mm hex bolt
(1) 8mm flat washer
(1) 8mm lock washer
Brace bracket secured
to mount bracket with
(1) 8mm hex bolt
(2) 8mm flat washer
(1) 8mm lock washer
(1) 8mm nut
Fig 6
Remove tow strap
Fig 8 Fig 9
Front bracket
Fig 8A
Rear bracket
Fig 7
Rear mount
bracket installed
with factory bolts
Brace bracket secured
to mount bracket
(1) 8mm hex bolt
(2) 8mm flat washer
(1) 8mm lock washer
(1) 8mm nut
Installation completed
Attach sidebar to
brackets with
(2) 10mm hex bolt
(4) 10mm flat washer
(2) 10mm lock nuts
Page 5 of 5 4/15/2010)
 Loading...