


Promaster 144Z
Owner/Operator Manual-- Manuel du proprietaire/utilisateur- Betriebsanlei-
tung -- Eigenaars/gebruikshandleiding- Instruktionsbog -- Manuale d'uso/
del proprietario -- Manual del propietario/operador- Brukerhandboken -
Instruktionsboken -- Omistajan/kuljettajan k_ytt6ohjekirja --Instrukcj¢
obsfugi/operatora -- PyKOBOACTBO BnaAenbL_a/nonb3OBaTen,q -- Navod k
obsluze/pro obsluhu -- Manual do Operador / Proprietario
992312 21HP 144Z
',_' ENGLISH
'__' FRAN(_AIS
(._D_' DEUTSCH
_', NEDERLANDS
',_* DANSK
'_ ITALIANO
'_-_' ESPANOL
',_._N_'NORSK
'_' SVENSKA
'_) SUOMI
'._L_, POLSKI
,'_ PYCCKVIH R3blK
,--_'_j (_ESKY
,_, PORTUGUESE
00678500 10/06
Printed in USA

AriensCompany
655WestRyanStreet
RO.Box157
Brillion,Wisconsin54110-0157
USA
Telephone(920)756-2141
Facsimile(920)756-2407
ECDECLARATIONOFCONFORMITYISSUEDBYTHEMANUFACTURER-
Dt_CLARATIONDECONFORMITI_ CE I_MISE PAR LE FABRICANT-
EU-0BEREINSTIMMUNGSERKL_,RUNG DES HERSTELLERS - VERKLARING VAN
OVEREENSTEMMING VOOR DE EU, AFGEGEVEN DOOR DE FABRIKANT- EF
OVERENSSTEMMELSESERKL,ZERING UDSTEDT AF FABRIKANTEN - DICHIARAZlONE
DI CONFORMITA CE RILASCIATA DAL PRODUTTORE - DECLARACION DE
CONFORMIDAD CE EMITIDA POR EL FABRICANTE - EF-SAMSVARSERKL/ERING FRA
PRODUSENTEN - EG-DEKLARATIONEN OM OVERENSST_,MMELSE UTF_,RDAD AV
TILLVERKAREN -VALMISTAJAN ANTAMA EY-VAATIMUSTENMUKAISUUSVAKUUTUS -
DEKLARACJA ZGODNOCECI Z PRZEPISAMI EC WYDANA PRZEZ PRODUCENTA -
DECLARA(_,O DE CONFORMIDADE CE EMITIDA PELO FABRICANTE - PROHL/_,SENi
O SHODi CE, VYDANI _ V"/ROBCEM
We the undersigned, ARIENS COMPANY, certify that: -- Nous, soussign6s ARIENS COMPANY, certifions que :-- Der
Unterzeichnete, ARIENS COMPANY, bescheinigt, dass -- Wij, de ondergetekenden, ARIENS COMPANY, verklaren dat: --
Undertegnede, ARIENS COMPANY, attesterer, at:-- La sottoscritta societ_ ARIENS COMPANY certifica che: -- Nosotros, los
abajo firmantes, ARIENS COMPANY, certificamos que: -- Undertegnede, ARIENS COMPANY, bekrefter at: -- Undertecknad,
ARIENS COMPANY, intygar att: -- Allekirjoittanut, ARIENS COMPANY, vakuuttaa, ett_: -- My, ni_'ej podpisani, ARIENS
COMPANY, ogwiadczamy, _'e: -- My, nLepodepsani, ARIENS COMPANY, prohla_ujeme, _e: -- N6s, abaixo assinados,
certificamos em nome da ARIENS COMPANY, que
Type: Type : Typ:
Type: Type: Tipo:
Tipo: Type: Typ:
Tyyppi: Typ: Typ:
Tipo: trawnikowa - SamojHzdn5 travnH seka_4kas rotujHcHmi no_i-- Tractor cortador de relva -
Trade Name: Appellation commerciale : Handelsbezeichnung: Handelsnaam: Firmanavn: Nome Ariens
commerciale: Nombre comercial: Handelsnavn: Handelsbeteckning: Kauppanimi: Nazwa
handlowa: Nome da Marca: Obchodni nazev:
Model: Modele: Modell: Model: Model: Modello: Modelo: Modell: Modell: Malli: Model: Modelo: 992312
Model:
Cutting Width: Largeur de coupe : Schnittbreite: Maaibreedte: Ktippebredde: Larghezza di tagtio: 112
Ancho de corte: Klippebredde: Klippbredd: Leikkuuleveys: Szerokocia: Largura de corte: Sieka
zabiru:
Conforms to: Est conforme & : Mit den Anforderungen der folgenden Richtlinien 0bereinstimmt: Voldoet aan: Er i overensstemmelse
med: €: conforme a: Cumpte con: Er i samsvar med: Overensst&mmer med: T&ytt&& seuraavat vaatimukset: Jest zgodny z: De acordo
com: Odpovida normi:
98/37/EC, 89/336/EEC;
2000/14/EC Conformity Assessment Annex VI. AnnexeVI de I'evaluation de conformit& Konformit_tsbewertung,Anhang Vl. BijlageVI voor
beoordeling vanovereenstemming.Vurdering afoverensstemmelse Anneks VI. AnnessoVI dellavalutazione di conformit& Anexo VI de laevaluaci6n de la
conformidad. Samsvarsvurdering ettervedlegg Vl. Bed6mning av 6verensst_mmelse Bilaga Vl. Vaatimustenmukaisuudenarviointi, liite Vl. DodatekVl,
Ocena zgodnooeci.Anexo VI da Avalia9_ode Conformidade. Posouzeni shody p_iloha VI.
Representative Measured Sound Power Level (Lwa) - Niveau de
puissance acoustique representatif mesure (Lwa) - Repr_sentativer
gemessener Ger_uschpegel (Lwa)- Representatief gemeten geluidsniveau
(Lwa) - Repraesentativt, malt st_jeffektniveau (Lwa) - Livello di potenza
sonora rappresentativo rilevato (Lwa) - Nivel de potencia acQstica
representativo medido (Lwa) - Representativt malt lydeffektniva (Lwa) -
Representativ uppm_tt Ijudniva (Lwa) - Tyypillinen mitattu _nitehotaso
(Lwa) - Zmierzony reprezentatywny poziom mocy akustycznej (Lwa) -
Representativni hodnota zmerene hladiny hlucnosti (Lwa) - Nivel de
Pot6ncia de Som Medido Representativo (Lwa)
Riding Rotary Lawn Mower -- Tondeuse a gazon autoportee rotative -- Aufsitz-Sichelm_her -- Rijdende roterende
grasmaaier -- Havetraktor med roterende knive -- Trattorino con unita di taglio rotativa -- Tractor cortacesped
giratorio -- Plentraktor med rotorklipper - Sittrotorgr_sklippare - Ajoleikkuri -- Samobie_:na rotacyjna kosiarka
Guaranteed Sound Power Level (Lwa) - Niveau de puissance
acoustique garanti (Lwa) - Garantierter Ger_uschpegel (Lwa) - Garantierter
Ger_uschpegel (Lwa) - Garanteret st_jeffektniveau (Lwa) - Livello di
potenza sonora garantito (Lwa) - Nivel de potencia acQstica garantizado
(Lwa) - Garantert lydeffektniva (Lwa) - Garanterad uppm_tt Ijudniva (Lwa) -
Taattu _nitehotaso (Lwa) - Gwarantowany reprezentatywny poziom mocy
akustycznej (Lwa) - Zarucovana hodnota hladiny hlucnosti (Lwa) - Nivel
de Pot_ncia de Som Medido Garantido (Lwa)
992312:99 dBA
992312: 100dB A
2
J

jJ
Notified Body - Organisme notifie - Zertifizierungsstelle -
Aangemelde instantie - Bemyndiget organ - Organismo notificato -
Organismo notificado - Teknisk kontrollorgan - AnmNt organ -
Ilmoitettu laitos - Organ za_wiadczajatcy - Organismo Certificador
- Pov_fena osoba
Fred J. Moreaux:
Quality and Conformance Manager (Keeper of Technical File)
Responsable de ta qualite et de ta conformite des produits
(Depositaire de la fiche technique) Manager Qualit&tssicherung und
Konformit&t (Archivar der technischen Akte) Kwaliteits- en
normalisatiemanager (Beheerder van technische bestand) Chef for
kvalitet og overensstemmelse (Indehaver af tekniske data)
Responsabite della qualit& e della conformit& del prodotto
(Depositario del file tecnico) Gerente de calidad y conformidad
(Depositario del archivo tecnico) Kvalitet- og samsvarsansvarlig
(innehaver av teknisk ill) Chef for kvalitet och
produktOverensst&mmelse (Innehavare av tekniska data) Laadusta
ja vaatimustenmukaisuudesta vastaava johtaja (Teknisen tiedoston
haltija) Kierownik do spraw jako_ci i zgodno_ci
(Przechowuja_cy Dokumentacj_ Techniczna) Gestor de Qualidade e
Conformidade (Zelador de Arquivos Tecnicos) Manager jakosti a
shody (spravce technicke dokumentace)
SNCH
11, Route de Luxembourg
L-5230 Sandweiler
Ariens Company
Brillion, WI 54110-0157 USA
Signature Signature Unterschrift
Handtekening Underskrift Firma Firma
Signatur Namnteckning Altekirjoitus
Podpis Assinatura Podpis
09/12/2006
Date Date Datum
Datum Dato Data
Fecha Dato Datum
PNv_ys Data Data
Datum
CE Sound and Vibration - Bruits et vibrations CE - CE Ger_iusch- und Vibrationswerte - CE Geluid en trilling - CE
stoj og vibration - Livello sonoro e vibrazioni CE - Sonido y vibracion CE - CE-lyd og -vibrasjon - CE Ijudniv& och
vibrationer - CE, melu ja t_irin_i- CE D:_wi_pkui Wibracji - Som e Vibrag_o CE - CE zvuk a vibrace - (Ref. EN836-2001)
992312
Oper. Ear Sound Pressure (Lpa) in dBA - Pression acoustique aux oreittes de t'operateur
(Lpa) en dBA - Ger&uschpegel am Ohr des Bedieners (Lpa) in dBA - Geluidsdruk bij het oor van
de gebruiker (Lpa) in dBA - Strejtryk ved brugerens ere (Lpa) m&It i dBA - Pressione sonora
alt'orecchio delt'operatore (Lpa) in dBA - Presi6n de sonido en el oido (Lpa) in dBA - Lydtrykk ved
fererens ere (Lpa) inn dBA - Ljudeffekt vid f5rarens Oron (Lpa) i dBA - Kuljettajan korvaan
kohdistuva &&nenpaine (Lpa), dBA-Robocze cicenienie akustyczne na uchu (Lpa)w decybelachA
- Oper. Press_o do Som no Ouvido (Lpa) em dBA - Provozni hladina akustickeho tlaku (Lpa) v
dBA
Vibration Measure (m/sec2) at Operator: Mesure des vibrations (m/s2) au niveau de
l'operateur: Vibration (m/s2) an des Bedieners: Gemeten trilling bij (m/sec2): Vibrationsm&linger
(m/s2) ved brugerens: Vibrazioni percepite dalt'operatore (m/sec2): Medida de vibraci6n (m/seg2)
en el operador: Vibrasjonsm&ling (m/s2) ved f_rerens: Vibrationsm&tt (m/s2) vid f_rarens: T_rin_
(m/s2) kuljettajan: Pomiar wibracji (m/sec2) u operatora: Medida de Vibrag_o (m/seg.2) no
Operador: Hodnota vibraci (m/s2) u obsluhy:
Hands - Mains - H_nde - De handen van de gebruiker - Haender- Mani- Manos - Hender-
H_nder- K_siss_ - R6ce - Ruce - M_os
Seat - Siege - Sitz - Stoel - De bestuurdersplaats - Saede - Sedile - Asiento - Sete - S_te -
Istuimella - Fotel - Siedzenie - Assento - Sedadlo 0.82
88
1.6

Safety ....................................... 5
Assembly .................................... 10
Controls and Features .......................... 11
Operation .................................... 12
Maintenance Schedule ......................... 16
Service and Adjustments ....................... 17
Storage ...................................... 25
Troubleshooting .............................. 26
Accessories .................................. 27
Service Parts ................................. 27
Specifications ................................ 28
THE MANUAL
Before operation of unit, carefully and completely read your
manuals. The contents will provide you with an
understanding of safety instructions and controls during
normal operation and maintenance.
All reference to left, right, front, or rear are given from
operator sitting in the operation position and facing the
direction of forward travel.
SERVICE AND REPLACEMENT PARTS
"1 When ordering publications, replacement
I model &
I serial
I number
I label from
product
I registration
I here.
L
parts, or making service inquiries, know the
Model and Serial numbers of your unit and
engine.
Numbers are located on the product
registration form in the literature package.
They are printed on a serial number label,
located on the frame of your unit (Figure 1).
PRODUCT REGISTRATION
The Ariens dealer must register the product at the time of
purchase. Registering the product will help the company
process warranty claims or contact you with the latest
service information. All claims meeting requirements during
the limited warranty period will be honored, whether or not
the product registration card is returned. Keep a proof of
purchase if you do not register your unit.
Customer Note: If dealer does not register your product,
please fill out, sign and return the product registration card to
Ariens or go to www.ariens.com on the internet.
UNAUTHORIZED REPLACEMENT PARTS
Use only Ariens replacement parts. The replacement of any
part on this equipment with anything other than an Ariens
authorized replacement part may adversely affect the
performance, durability, and safety of this unit and may void
the warranty. Ariens disclaims liability for any claims or
damages, whether regarding warranty, property damage,
personal injury or death arising out of the use of
unauthorized replacement parts.
NOTE: To locate your nearest Ariens dealer, go to
www.ariens.com on the internet.
Figure 1
• Record Unit Model and Serial numbers here.
• Record Engine Model and Serial numbers here.
OF3510
DISCLAIMER
Ariens reserves the right to discontinue, change, and
improve its products at any time without public notice or
obligation to the purchaser. The descriptions and
specifications contained in this manual were in effect at
printing. Equipment described within this manual may be
optional. Some illustrations may not be applicable to your
unit.
DEALER DELIVERY
Dealer should:
1. Test brakes after unit is assembled to be sure
adjustment has not been disturbed in shipment (See
Adjust the Parking Brake on page 22). Wheel brakes
are properly adjusted at factory.
GB - 4 Copyright 2006 Ariens Company
2.Checkthesafetyinterlocksystemtomakesurethatit
isfunctioningproperly.Withoperatoronseat,unitmust
notstartunlessthesteeringleversareinneutral(N),
theparkingbrakeengaged,andthePowerTakeoff
(PTO)isdisengaged(Off).Enginemuststopif
operatorleavesseatwhensteeringleversareinany
drivepositionorPTOisengaged(On).SeeSafety
Interlock System on page 12.
3. Fill out Original Purchaser Registration Card and
return the card to Ariens.
4. Explain Ariens Limited Warranty Policy.
5. Explain recommended lubrication and maintenance.
Advise customer on adjustments. Instruct customer on
controls and operation of unit. Discuss and emphasize
the Safety Precautions. Give customer
Owner/Operator, Parts, and Engine Manuals. Advise
customer to thoroughly read and understand them.
Customer Note: Your Dealer has been provided complete
setup and preparation instructions which must be completed
prior to you taking delivery of this unit. The dealer is required
to review important information in this manual with you
before or upon delivery of the unit or attachment.
WARNING: This cutting machine is capable of
amputating hands and feet and throwing objects.
Failure to observe the safety instructions in the
manuals and on decals could result in serious injury
or death.
Slopes are a major factor related to loss-of-control
and tip-over accidents. Operation on all slopes
requires extra caution.
Tragic accidents can occur if the operator is not
alert to the presence of children. Never assume that
children will remain where you last saw them.
Gasoline is extremely flammable and the vapors
are explosive, handle with care.
Disengage attachment, stop unit and engine,
remove key, engage parking brake, and allow
moving parts to stop before leaving operator's
position.
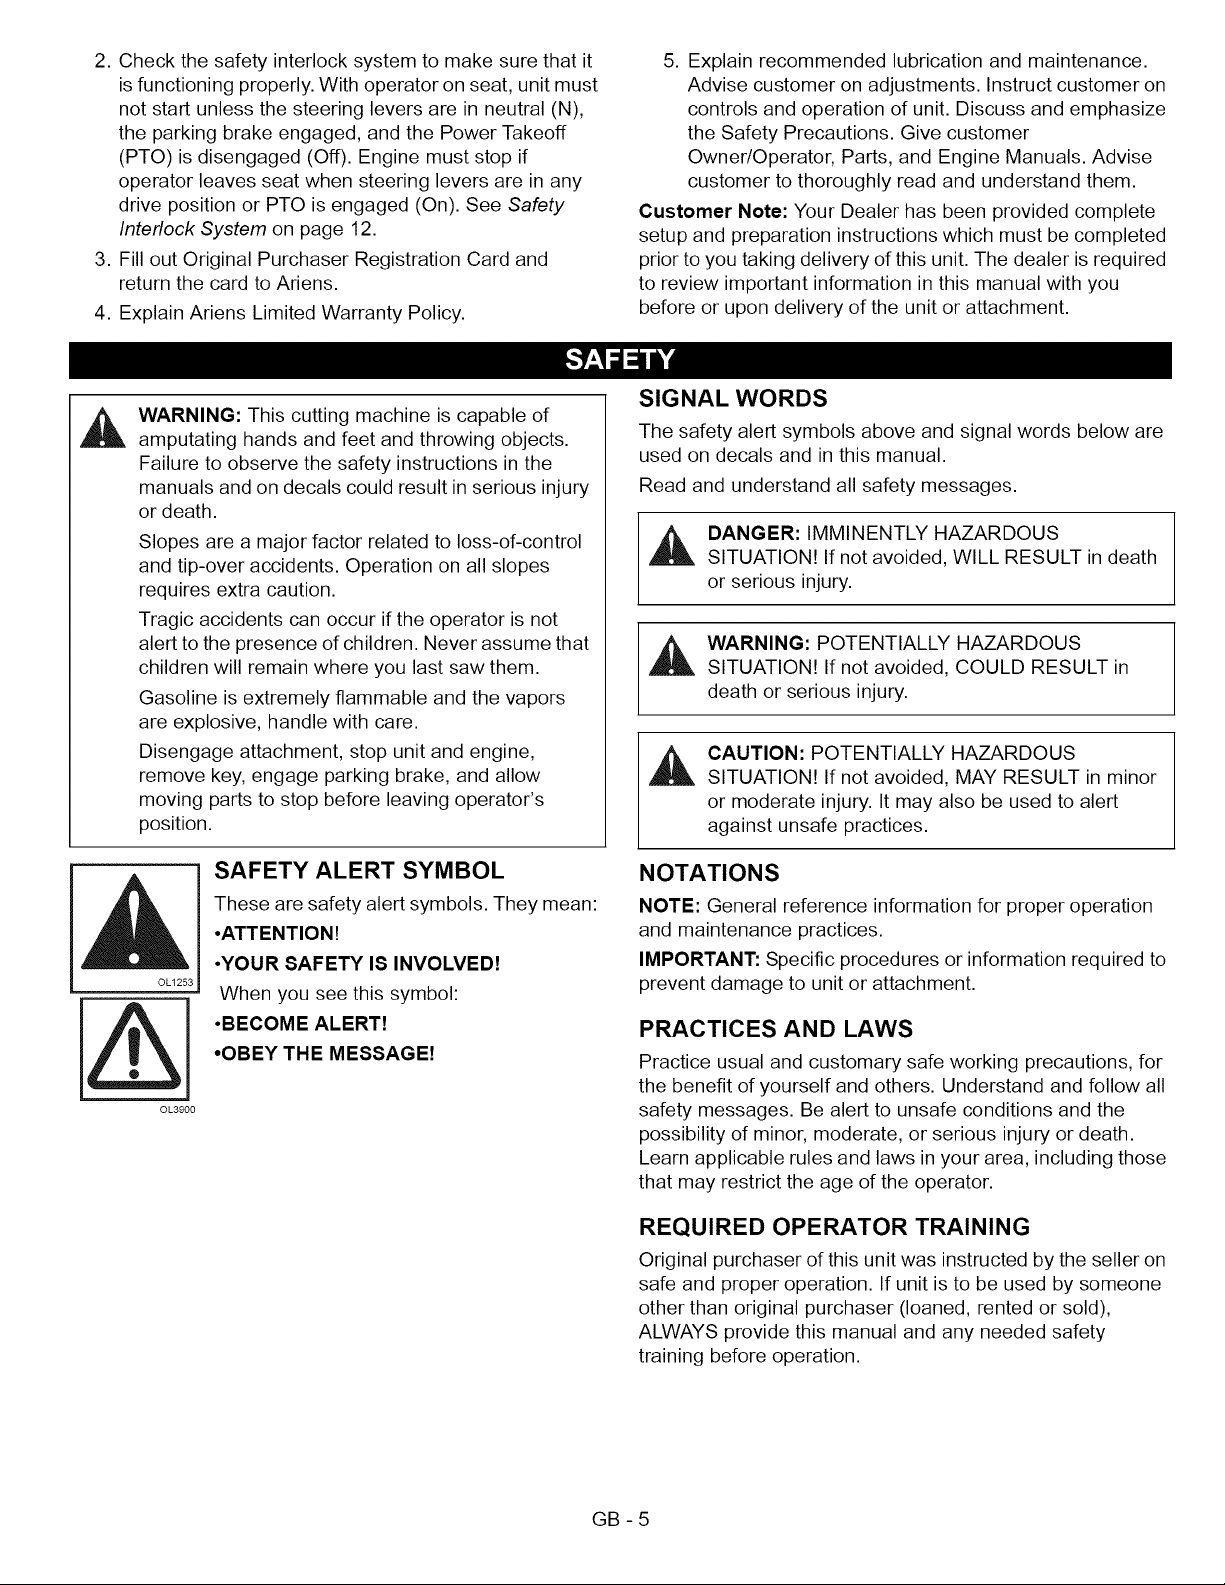
SAFETY ALERT SYMBOL
These are safety alert symbols. They mean:
-ATTENTION!
OLI253 1
•YOUR SAFETY IS INVOLVED!
When you see this symbol:
•BECOME ALERT!
•OBEY THE MESSAGE!
OL3900
SIGNAL WORDS
The safety alert symbols above and signal words below are
used on decals and in this manual.
Read and understand all safety messages.
_ ANGER: IMMINENTLY HAZARDOUS
SITUATION! If not avoided, WILL RESULT in death
or serious injury.
_ WARNING: POTENTIALLY HAZARDOUS
SITUATION[ If not avoided, COULD RESULT in
death or serious injury.
CAUTION: POTENTIALLY HAZARDOUS
SITUATION! If not avoided, MAY RESULT in minor
or moderate injury. It may also be used to alert
against unsafe practices.
NOTATIONS
NOTE: General reference information for proper operation
and maintenance practices.
IMPORTANT: Specific procedures or information required to
prevent damage to unit or attachment.
PRACTICES AND LAWS
Practice usual and customary safe working precautions, for
the benefit of yourself and others. Understand and follow all
safety messages. Be alert to unsafe conditions and the
possibility of minor, moderate, or serious injury or death.
Learn applicable rules and laws in your area, including those
that may restrict the age of the operator.
REQUIRED OPERATOR TRAINING
Original purchaser of this unit was instructed by the seller on
safe and proper operation. If unit is to be used by someone
other than original purchaser (loaned, rented or sold),
ALWAYS provide this manual and any needed safety
training before operation.
GB - 5

SAFETY DECALS AND LOCATIONS
ALWAYS replace missing or damaged Safety Decals. Refer
to Figure 2 for Safety Decal locations.
@©
@o
OF1627
Figure 2
1. DANGER!TO AVOID SERIOUSINJURY OR
DEATH
Read Owner/Operator Manual.
OLI801
Keep children and others away from unit while
operating.
0L4370
Never direct discharge toward other people.
Thrown objects can cause injury. Remove
objects that could be thrown by the blade.
OL0910
Look down and behind before and while backing.
OL4460
Keep children out of work area and under
watchful care of a responsible adult.
01_4470
NEVER CARRY CHILDREN.
OL4480
Go up and down slopes, not across.
DO NOT operate on slopes over 17°.
OL4450
• If machine stops going uphill, stop blade and back down
slowly.
• Avoid sudden turns.
• Keep safety devices (guards, shields, switches, etc.) in
place and working.
• Check interlock system per manual before use.
• Understand location and function of all controls.
• Never allow operation by untrained persons.
2. DANGER!
Look down and behind before and while backing.
Keep children out of work area and under
watchful care of a responsible adult.
OL4470
Keep children and others away from unit while
operating.
GB-6
0L4370
L_Shut offengine,removekey,readmanualbefore
makinganyrepairsoradjustments.-->
3. PINCH POINT
_ Avoid pinch points.
4. DANGER! ROTATING PARTS
Always keep feet and hands away from rotating
_ parts.
OL3030
Always stand clear of discharge area. Do not
direct discharge toward other people.
OL0910
_ Keep people away from unit while operating.
OL3292
/z'&'%_
(.r'_ _" NO STEP! Always keep feet away from rotating
.... parts.
0L4420
_ AVOID INJURY. Stay clear of rotating parts.
5. HOT SURFACES!
operation. ALWAYS allow parts to cool.
i ,,. -_ DO NOT touch parts which are hot from
OS073I
6. ROTATING PARTS
_ AVOID INJURY. Stay clear of rotating parts.
OF3450
7. DANGER!
AVOID INJURY. Stay clear of rotating parts.
OL4730
SAFETY RULES
Read, understand, and follow all safety practices in
Owner/Operator Manual before beginning assembly. Failure
to follow instructions could result in personal injury and/or
damage to unit.
ALWAYS remove key and/or wire from spark plug before
assembly. Unintentional engine start up can cause death or
serious injury.
Complete a walk around inspection of unit and work area to
understand:
• Work area • Your unit •All safety decals
Determine which attachments are needed and can be used
safely.
Inspect unit before each use for: missing or damaged decals
and shields, correctly operating safety interlock system, and
deterioration of grass catchers. Replace or repair as
needed.
ALWAYS check overhead and side clearances carefully
before operation. ALWAYS be aware of traffic when
operating along streets or curbs.
Keep children and people away.
Keep children out of work area and under watchful care of a
responsible adult.
Keep area of operation clear of all toys, pets, and debris.
Thrown objects can cause injury.
Check for weak spots on docks, ramps or floors. Avoid
uneven work areas and rough terrain. Stay alert for hidden
hazards or traffic.
DO NOT operate near drop-offs, ditches, or embankments.
Unit can suddenly turn over if a wheel is over the edge of a
cliff or ditch, or if an edge caves in.
Data indicates that operators, age 60 and above, are
involved in a larger percentage of riding mower related
injuries. These operators should evaluate their ability to
operate the riding mower safely enough to protect
themselves and others from serious injury.
Read the entire Owner/Operator manual and other training
material. If the operator or the mechanic cannot read the
manual, it is the owner's responsibility to explain it to them.
Only the user can prevent and is responsible for accidents or
injuries occurring to themselves, other people or property.
Only trained adults may operate or service unit. Training
includes actual operation.
Local regulations may restrict the age of the operator.
NEVER allow children to operate or play on or near unit. Be
alert and shut off unit if children enter area.
NEVER operate unit after or during the use of medication,
drugs or alcohol. Safe operation requires your complete and
unimpaired attention at all times.
DO NOT wear loose clothing or jewelry and tie back hair that
may get caught in rotating parts.
Wear adequate outer garments.
NEVER wear open sandals or canvas shoes during
operation. Wear adequate safety gear, protective gloves and
footwear.
Wear proper footwear to improve footing on slippery
surfaces.
Always wear safety goggles or safety glasses with side
shields when operating mower.
GB - 7
Movingpartscancutoramputatefingersorahand.Wrap
blade(s)orwearglovestoservice.Onmultiblademowers,
rotationofonebladewillcauseallbladestorotate.
NEVERplaceyourhandsoranypartofyourbodyor
clothinginsideornearanymovingpartwhileunitisrunning.
ALWAYSkeephandsandfeetawayfromallrotatingparts
duringoperation.Rotatingpartscancutoffbodyparts.
ALWAYSkeepbodyandhandsawayfrompinholesor
nozzleswhichejecthydraulicfluidunderpressure.
DONOTtouchpartswhicharehot.Allowpartstocool.
ALWAYSkeephandsandfeetawayfromallpinchpoints.
Fumesfromtheengineexhaustcancausedeathorserious
injury.DONOTrunengineinanenclosedarea.Always
providegoodventilation.
Read,understand,andfollowallinstructionsinthemanual
andonthemachinebeforestarting.
Understand:
• Howtooperateallcontrols
• Thefunctionsofallcontrols
• HowtoSTOPinanEmergency
• Brakingandsteeringcharacteristics
• Turningradiusandclearances
Keepsafetydevicesorguardsinplaceandfunctioning
properly.NEVERmodifyorremovesafetydevices.
Do not operate without either entire grass catcher or the
discharge guard in place.
Stop engine before removing grass catcher or unclogging
chute.
Ensure Safety Interlock System is functioning properly. DO
NOT operate unit if safety interlock is damaged or disabled.
Start and operate unit only when seated in operator's
position. Steering control levers must be in neutral, PTO
disengaged and parking brake set when starting engine.
Use care when approaching blind corners, shrubs, trees or
other objects that may obscure vision.
Dust, smoke, fog, etc. can reduce vision and cause an
accident. Mow only in daylight or good artificial light.
Avoid slippery surfaces. Always be sure of your footing.
DO NOT mow on wet grass. Reduced traction could cause
sliding and effect the machine's stability.
Watch for traffic when operating near or crossing roadways.
Never carry passengers.
DO NOT try to stabilize the machine by putting your foot on
the ground.
Never direct discharge towards persons or property that may
be injured or damaged by thrown objects. Use extreme
caution on gravel surfaces.
Always stand clear of the discharge area.
ALWAYS disengage PTO, stop unit and engine, remove key,
engage parking brake and allow moving parts to stop before
leaving operator's position.
Never engage PTO while raising attachment or when
attachment is in raised position.
DO NOT operate at too fast a rate. DO NOT change engine
governor settings or over-speed engine. Slow down before
turning.
DO NOT operate in reverse unless absolutely necessary.
ALWAYS look down and behind before and while backing.
Stop and inspect equipment if you strike an object or if there
is an unusual vibration. Repair, if necessary, before
restarting. Never make adjustments or repairs with the
engine running.
Mower blades are sharp and can cut you. Wrap the blade(s)
or wear gloves, and use extra caution when servicing them.
NEVER weld or straighten mower blades.
Rotation of one blade may cause rotation of the other
blades.
Take all possible precautions when leaving unit unattended.
Shut off engine. Remove wire from spark plug and secure it
away from spark plug.
ALWAYS remove key to prevent unauthorized use.
Know the weight of loads. Limit loads to those you can
safely control and the unit can safely handle.
Disengage PTO when attachment is not in use. ALWAYS
turn off power to attachment when travelling, crossing
driveways, etc.
Mow up and down slopes, not across them.
DO NOT operate on slopes of more than 17 degrees.
Use of a Rollover Protection System (ROPS) is
recommended for slope operation. See Attachments and
Accessories.
Always wear a seat belt when operating unit using a
Rollover Protection System (ROPS).
Keep all movements on the slope slow and gradual. Do not
make sudden changes in speed or direction.
Avoid starting or stopping on the slope. If tires lose traction,
disengage the blades and proceed slowly straight down the
slope.
If you cannot back up a slope or you feel uneasy on it, do not
mow it.
DO NOT park on slopes unless necessary. When parking on
slope always chock or block wheels. Always set parking
brake.
Use a slow speed. Tires may lose traction on slopes even
though the brakes are functioning properly.
Do not bypass transmission when on a slope.
Tow only with a machine that has a hitch designed for
towing. Do not attach towed equipment except at the hitch
point.
Follow the manufacturer's recommendations for weight
limits for towed equipment and towing on slopes.
NEVER allow children or others in or on towed equipment.
On slopes, the weight of the towed equipment may cause
loss of control.
Travel slowly and allow extra distance to stop.
GB-8
Useextracarewhenloadingorunloadingunitontotraileror
truck.
Secureunitchassistotransportvehicle.NEVERsecure
fromrodsorlinkagesthatcouldbedamaged.
DONOTtransportmachinewhileengineisrunning.
ALWAYSturnoffpowertoattachmentandshutofffuelwhen
transportingunit.
Keepunitfreeofdebris.Cleanupoilorfuelspills.
Thisproductisequippedwithaninternalcombustiontype
engine.DONOTuseunitonornearanyunimproved,
forest-coveredorbrushcoveredlandunlessexhaustsystem
isequippedwithasparkarrestermeetingapplicablelocal,
stateorfederallaws.Asparkarrester,ifitisused,mustbe
maintainedineffectiveworkingorderbyoperator.
Fuelishighlyflammableanditsvaporsareexplosive.
Handlewithcare.Useanapprovedfuelcontainer.
NOsmoking,NOsparks,NOflames.ALWAYSallowengine
tocoolbeforeservicing.
NEVERfillfueltankwhenengineisrunningorhotfrom
operation.
NEVERfillordrainfueltankindoors.
Replacefuelcapsecurelyandcleanupspilledfuel.
Neverfillcontainersinsideavehicleoronatruckortrailer
bedwithaplasticliner.Alwaysplacecontainersonthe
groundawayfromyourvehiclebeforefilling.
Whenpractical,removegas-poweredequipmentfromthe
truckortrailerandrefuelitontheground.Ifthisisnot
possible,thenrefuelsuchequipmentonatrailerwitha
portablecontainer,ratherthanfromagasolinedispenser
nozzle.
Keepthenozzleincontactwiththerimofthefueltankor
containeropeningatalltimesuntilfuelingiscomplete.Do
notusea nozzlelock-opendevice.
Iffuelisspilledonclothing,changeclothingimmediately.
AvoidElectricShock.Objectscontactingbothbattery
terminalsatthesametimemayresultininjuryandunit
damage.DONOTreversebatteryconnections.
Reverseconnectionsmayresultinsparkswhichcancause
seriousinjury.Alwaysconnectpositive(+)leadofchargerto
positive(+)terminal,andnegative(-)leadtonegative(-)
terminal.
ALWAYSdisconnectnegative(-)cableFIRSTandpositive
(+)cableSECOND.ALWAYSconnectpositive(+)cable
FIRST,andnegative(-)cableSECOND.
ExplosiveGasesfrombatterycancausedeathorserious
injury.Poisonousbatteryfluidcontainssulfuricacidandits
contactwithskin,eyesorclothingcancausesevere
chemicalburns.
Noflames,Nosparks,Nosmokingnearbattery.
ALWAYSwearsafetyglassesandprotectivegearnear
battery.Useinsulatedtools.
DONOTTIPbatterybeyonda45° angleinanydirection.
ALWAYSkeepbatteriesoutofreachofchildren.
Batteryposts,terminalsandrelatedaccessoriescontain
leadandleadcompounds,chemicalsknowntotheStateof
Californiatocausecancerandreproductiveharm.Wash
handsafterhandling.
ALWAYSblockwheelsandknowalljackstandsarestrong
andsecureandwillholdweightofunitduringmaintenance.
Releasepressureslowlyfromcomponentswithstored
energy.
NEVERattempttomakeanyadjustmentstounitwhile
engineisrunning(exceptwherespecificallyrecommended).
Stopengine,removekeyorsparkplugwireandwaitforall
movingpartstostopbeforeservicingorcleaning.
Checkparkingbrakeoperationfrequently.Adjustand
serviceasrequired.
ALWAYSmaintainunitinsafeoperatingcondition.Damaged
orwornoutmufflercancausefireorexplosion.
Maintainorreplacesafetyandinstructionlabels,as
necessary.
NEVERstoreunitwithfuelinfueltank,insideabuilding
whereanyignitionsourcesarepresent.
Shutofffuelandallowenginetocoolcompletelybefore
storinginclosedareaorcoveringunit.
Cleangrassanddebrisfromunit,especiallyfromaround
mufflerandengine,to helppreventfires.
Forextendedstorage,shutofffuelandcleanunitthoroughly.
Seeenginemanualforproperstorage.
Lowercuttingdeckunlessapositivemechanicallockis
used.
Useonlyattachmentsoraccessoriesdesignedforyourunit.
Checkallhardwareatregularintervals,especiallyblade
attachmentbolts.Keepallhardwareproperlytightened.
Checkattachmentcomponentsfrequently.Ifwornor
damaged,replacewithmanufacturer'srecommendedparts.
GB- 9
_ ARNING: AVOID INJURY. Read and understand
entire Safety section before proceeding.
UNIT ASSEMBLY
Package Contents:
Unit, Mower Deck and Literature Pack
Unpack Unit
Remove unit and all other components from shipping
container. Open bypass valves (see MOVING THE UNIT
WITH THE ENGINE OFF on page 15). Push unit from
container onto a level surface. Close bypass valves.
Check Tire Pressure
See SPECIFICATIONS on page 28.
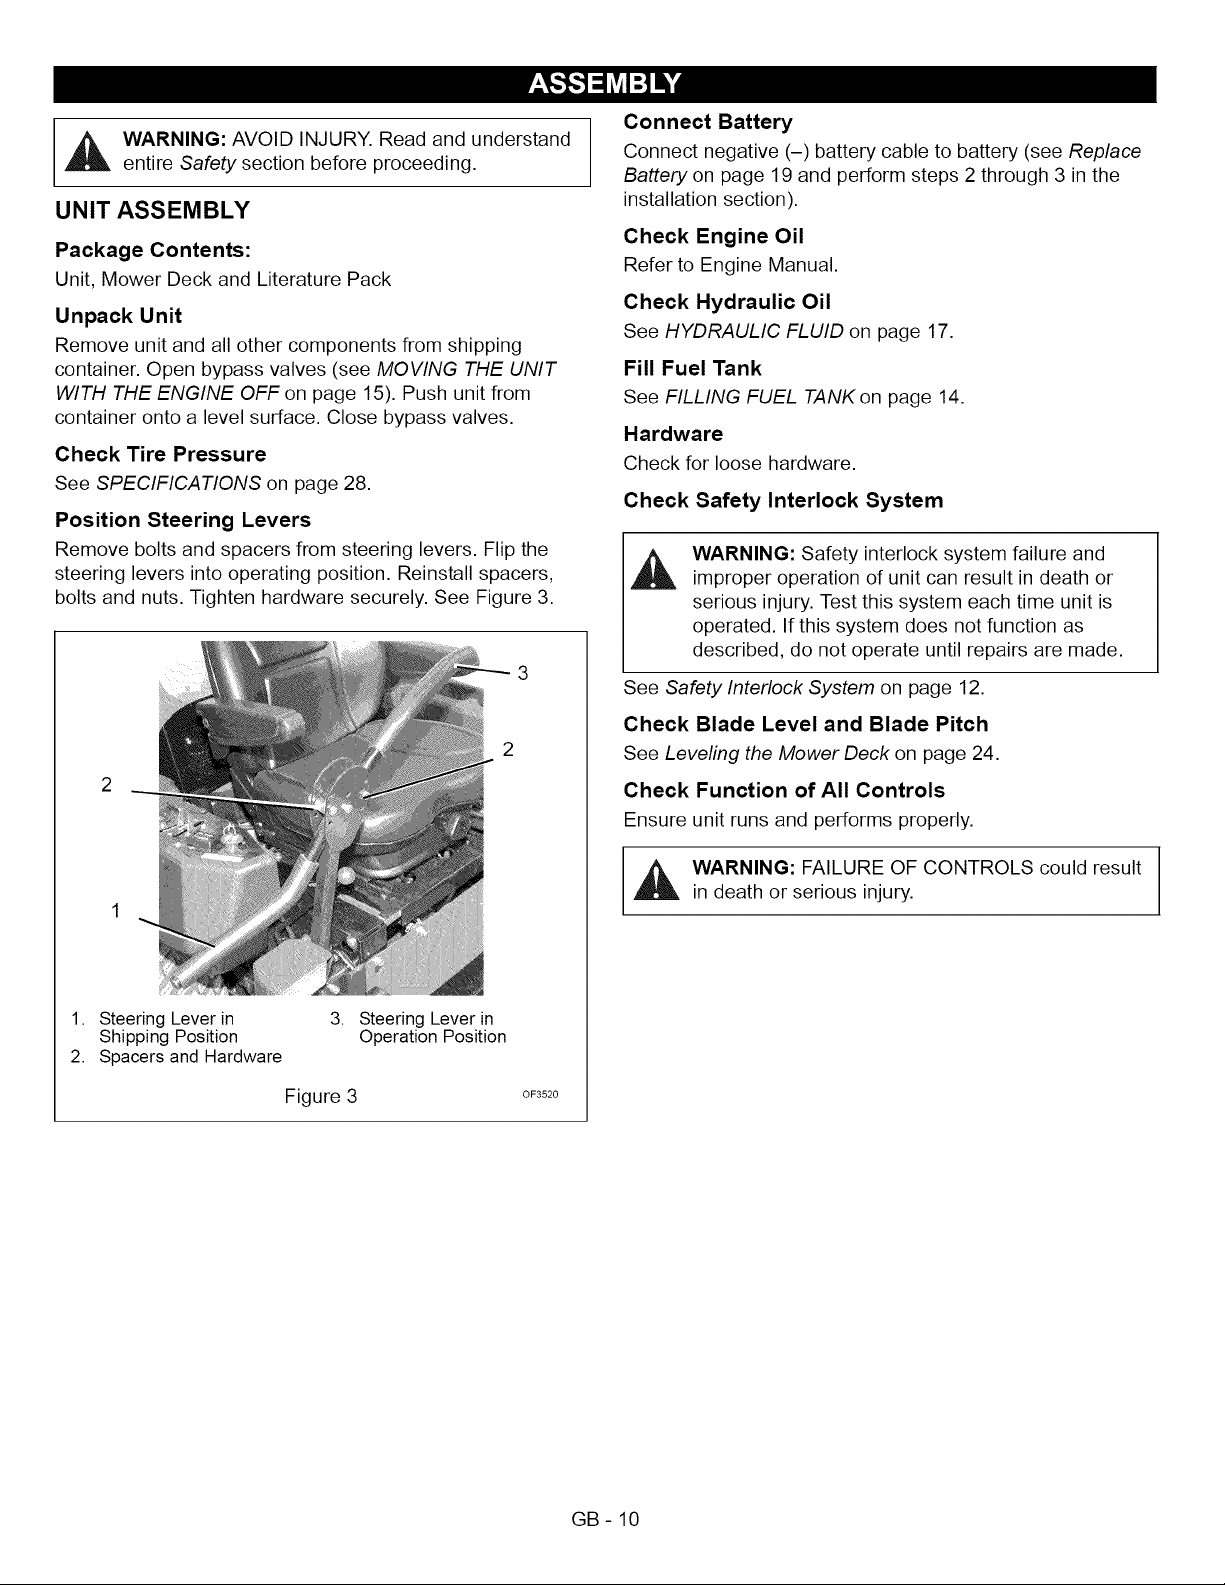
Position Steering Levers
Remove bolts and spacers from steering levers. Flip the
steering levers into operating position. Reinstall spacers,
bolts and nuts. Tighten hardware securely. See Figure 3.
3
Connect Battery
Connect negative (-) battery cable to battery (see Replace
Battery on page 19 and perform steps 2 through 3 in the
installation section).
Check Engine Oil
Refer to Engine Manual.
Check Hydraulic Oil
See HYDRAULIC FLUID on page 17.
Fill Fuel Tank
See FILLING FUEL TANK on page 14.
Hardware
Check for loose hardware.
Check Safety Interlock System
WARNING: Safety interlock system failure and
improper operation of unit can result in death or
serious injury. Test this system each time unit is
operated. If this system does not function as
described, do not operate until repairs are made.
See Safety Interlock System on page 12.
Check Blade Level and Blade Pitch
See Leveling the Mower Deck on page 24.
Check Function of All Controls
Ensure unit runs and performs properly.
1. Steering Lever in
Shipping Position
2. Spacers and Hardware
3. Steering Lever in
Operation Position
Figure 3
OF3520
_ ARNING: FAILURE OF CONTROLS could result
in death or serious injury.
GB- 10
15
17
18
16
13
12
2O
11
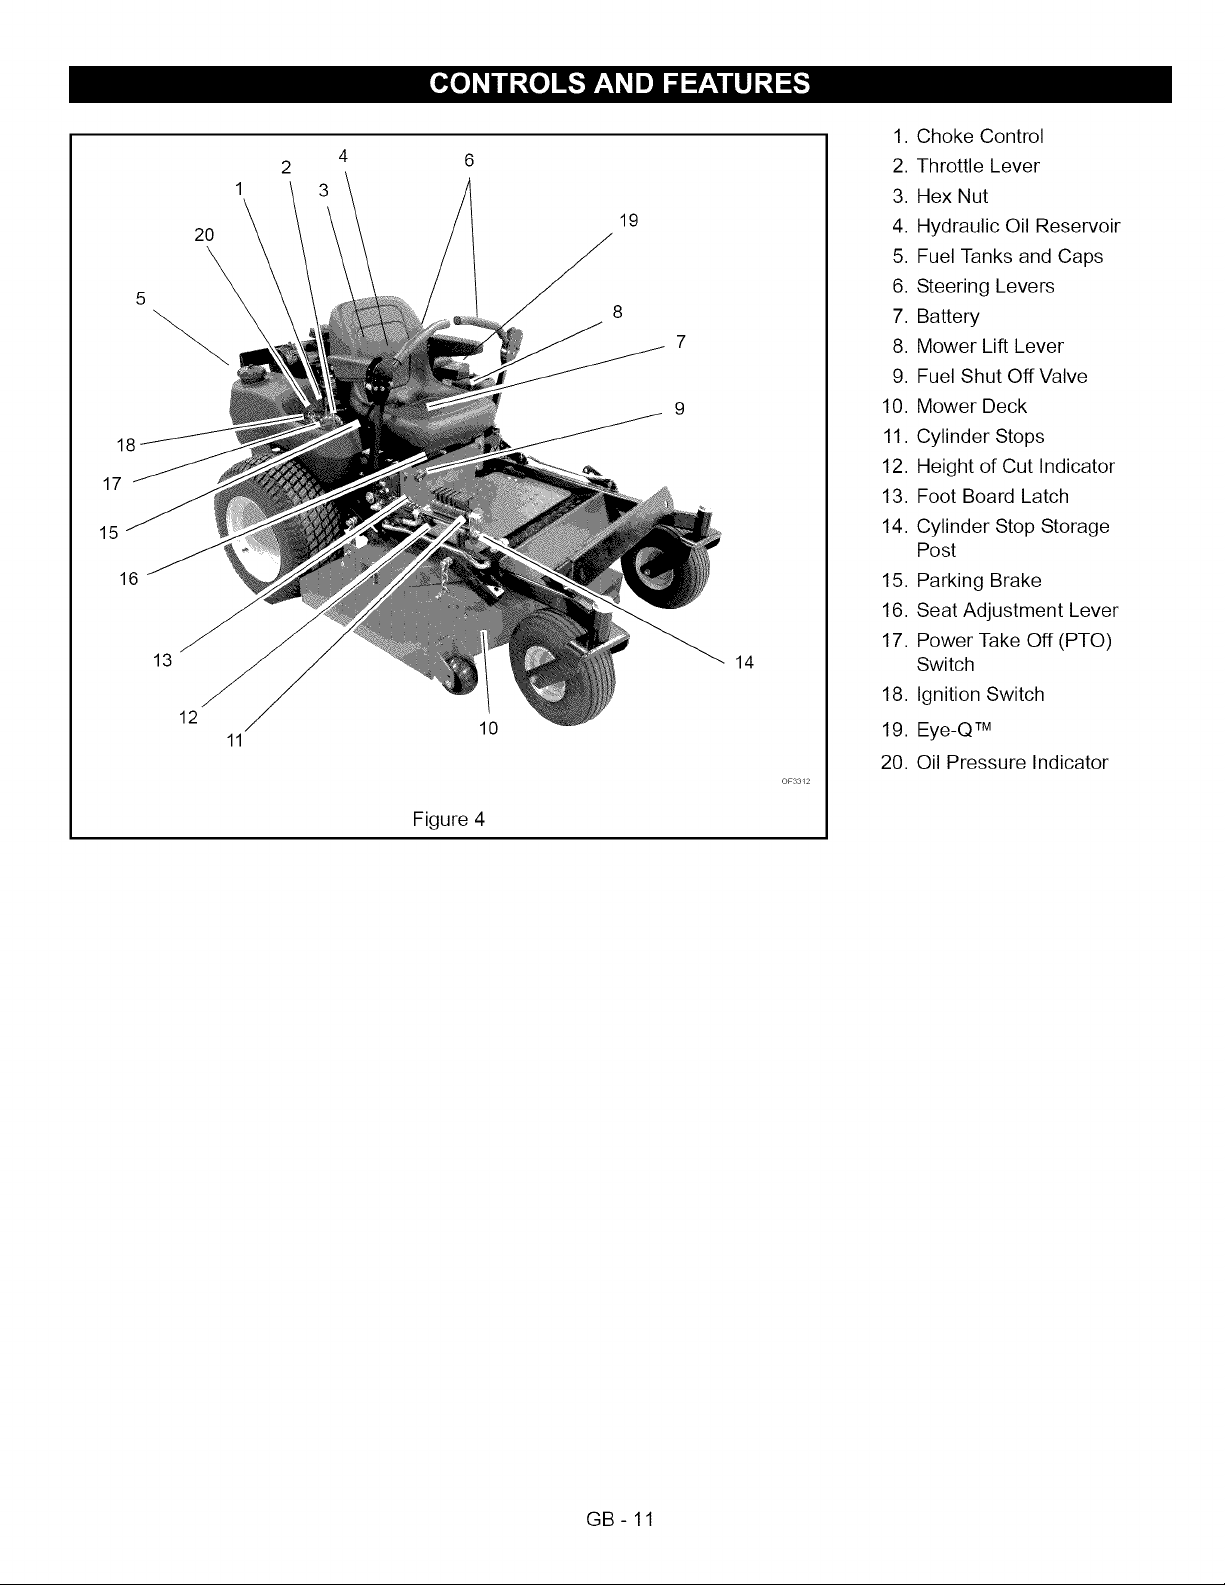
1. Choke Control
6
2. Throttle Lever
3. Hex Nut
19
4. Hydraulic Oil Reservoir
5. Fuel Tanks and Caps
6. Steering Levers
7. Battery
8. Mower Lift Lever
9. Fuel Shut Off Valve
10. Mower Deck
11. Cylinder Stops
12. Height of Cut Indicator
13. Foot Board Latch
14. Cylinder Stop Storage
Post
15. Parking Brake
16. Seat Adjustment Lever
17. Power Take Off (PTO)
14
Switch
18. Ignition Switch
10
19. Eye-QTM
20. Oil Pressure Indicator
Figure 4
GB-11
_ ARNING: AVOID INJURY. Read and understand
entire Safety section before proceeding.
Steering Levers
CONTROLS and FEATURES
See Figure 4 for Controls and Features locations.
Safety Interlock System
WARNING: Safety interlock system failure and
improper operation of unit can result in death or
serious injury. Test this system each time the unit is
operated. If this system does not function as
described, do not operate until repairs are made.
Perform the following tests to ensure the safety interlock
system is working properly. If the unit does not perform as
stated, contact your Ariens dealer for repairs.
IMPORTANT: With the parking brake engaged, the steering
levers must be locked in neutral.
IMPORTANT: With the parking brake disengaged, the
engine must not start and the engine must shut off if the
operator leaves the seat.
Test Steering PTO Parking Engine
Levers Brake
STARTING INTERLOCK
1
2
3
5*
Eye.Q TM
Neutral Off Engaged
Neutral On Engaged
Neutral Off Disengaged
OPERATING INTERLOCK (ENGINE ON)
Neutral On Engaged Shuts Off
Neutral Off Disengaged Shuts Off
* Operator lifts off seat.
Monitors equipment performance,
operator performance, and
equipment maintenance. See
Eye-Q Owner's Manual for how to
access these features.
Starts
Doesn't Start
Doesn't Start
A
C
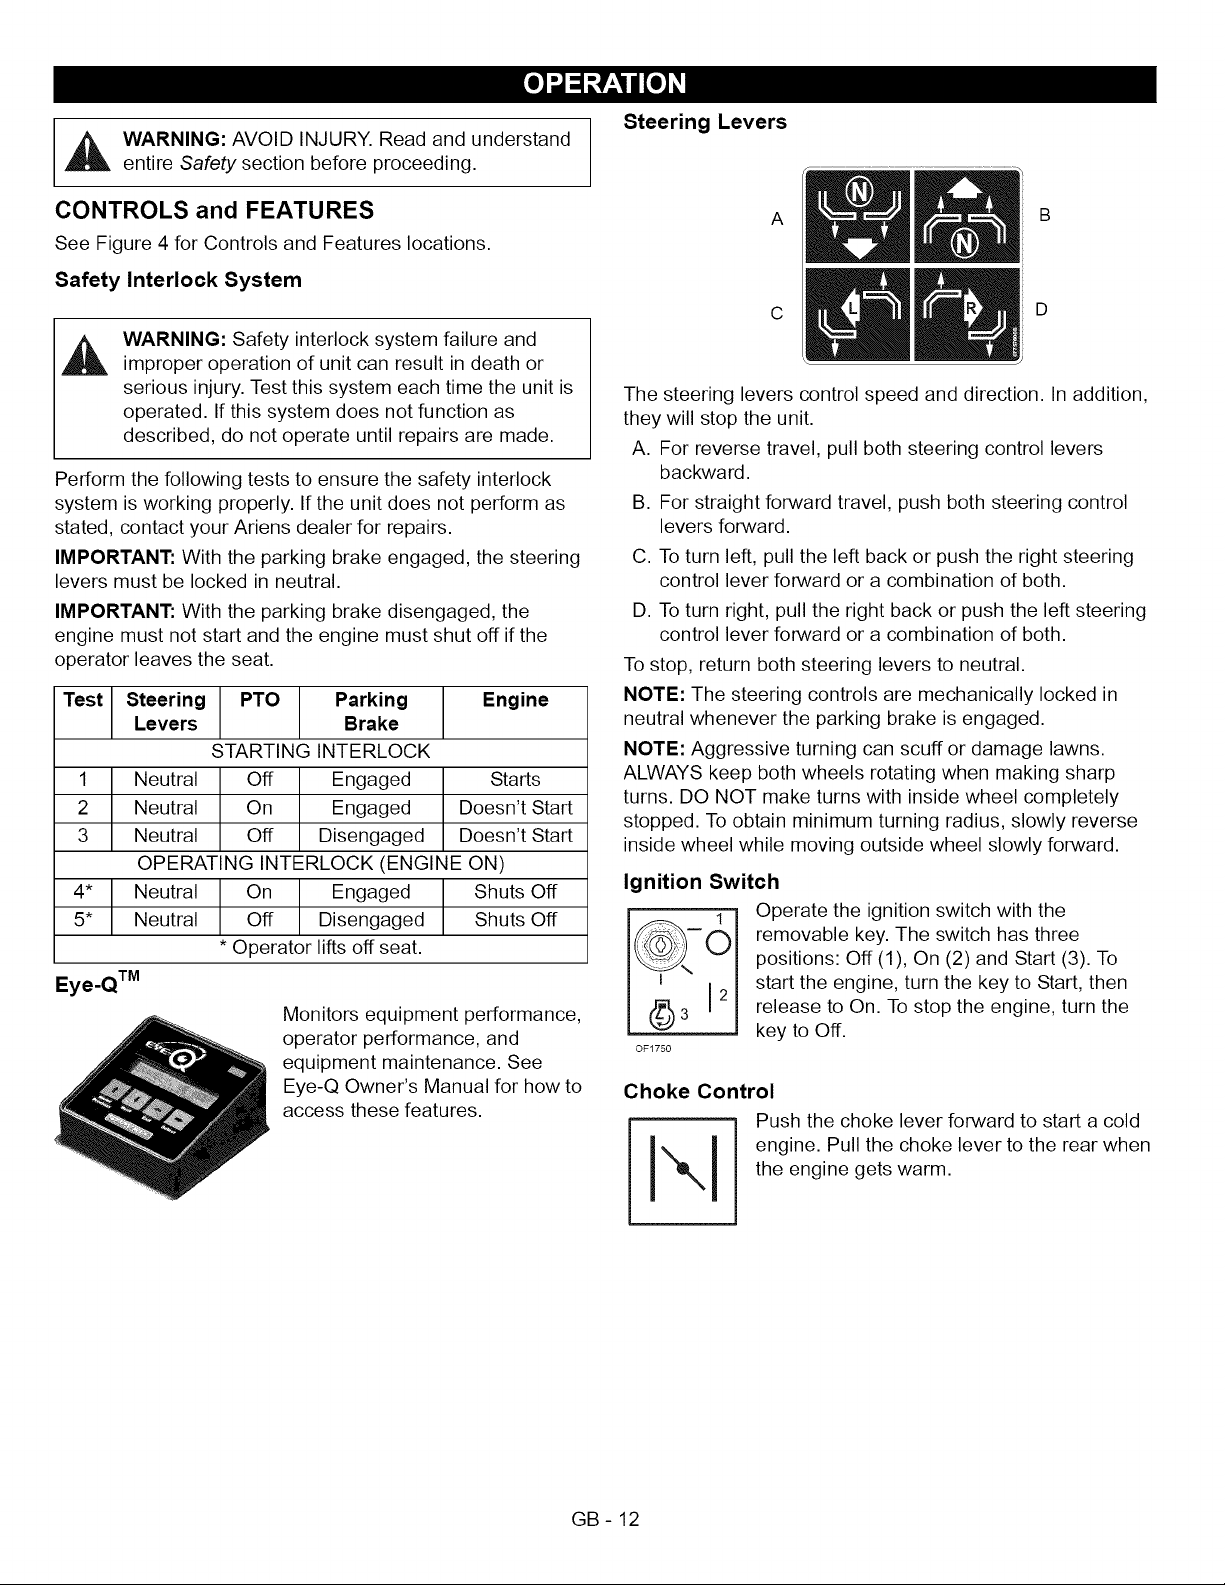
The steering levers control speed and direction. In addition,
they will stop the unit.
A. For reverse travel, pull both steering control levers
backward.
B. For straight forward travel, push both steering control
levers forward.
C. To turn left, pull the left back or push the right steering
control lever forward or a combination of both.
D. To turn right, pull the right back or push the left steering
control lever forward or a combination of both.
To stop, return both steering levers to neutral.
NOTE: The steering controls are mechanically locked in
neutral whenever the parking brake is engaged.
NOTE: Aggressive turning can scuff or damage lawns.
ALWAYS keep both wheels rotating when making sharp
turns. DO NOT make turns with inside wheel completely
stopped. To obtain minimum turning radius, slowly reverse
inside wheel while moving outside wheel slowly forward.
Ignition Switch
Operate the ignition switch with the
removable key. The switch has three
positions: Off (1), On (2) and Start (3). To
start the engine, turn the key to Start, then
release to On. To stop the engine, turn the
OF1750
Choke Control
key to Off.
Push the choke lever forward to start a cold
B
D
GB- 12
I N,_ _ engine. Pull the choke lever to the rear when
the engine gets warm.
i
Throttle Lever
1
Changes the engine speed.
Fast (1) -Increases engine speed.
Fuel Shut-Off Valve
Control fuel flow from left or right fuel tank.
Open the valve to operate the engine. Turn
the valve to Off when storing or transporting
the unit.
OF1881
Parking Brake Lever
1. Pull lever up to engage parking brake.
Slow (2) - Decreases engine speed.
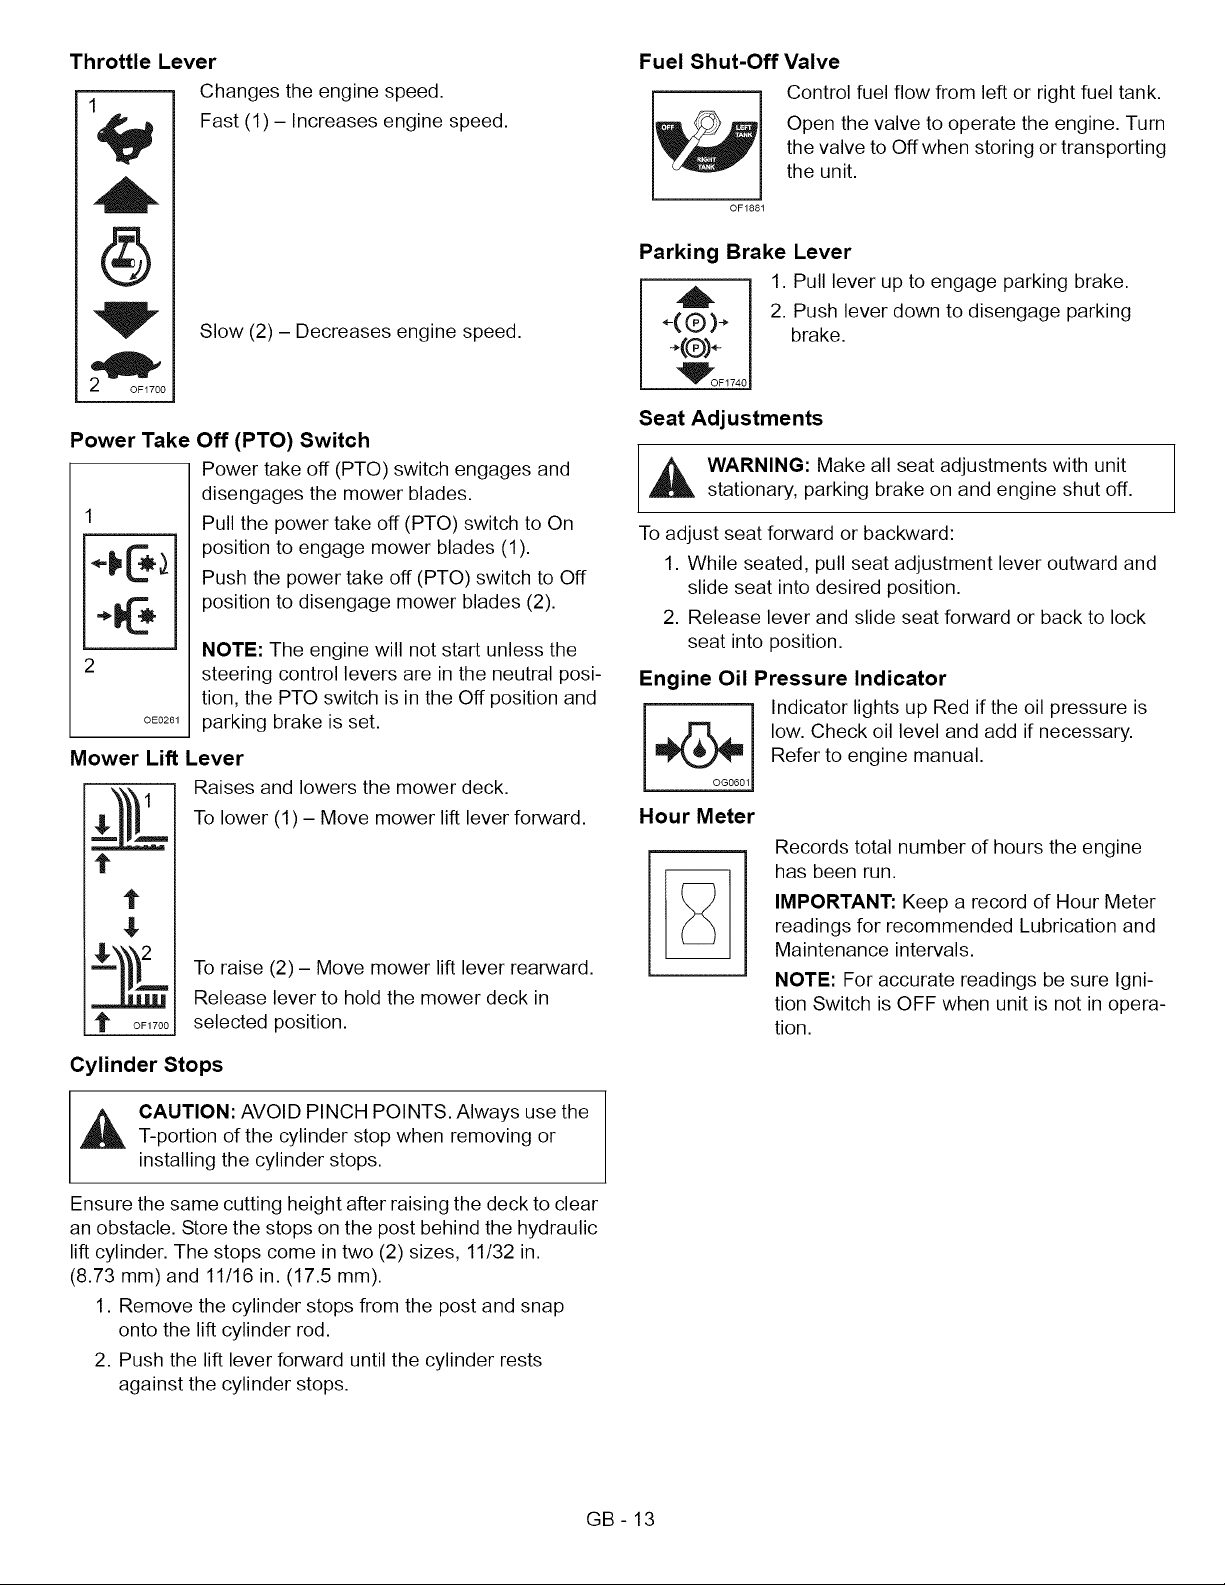
Power Take
Off (PTO) 8witch
Power take off (PTO) switch engages and
disengages the mower blades.
Pull the power take off (PTO) switch to On
position to engage mower blades (1).
Push the power take off (PTO) switch to Off
position to disengage mower blades (2).
NOTE: The engine will not start unless the
steering control levers are in the neutral posi-
tion, the PTO switch is in the Off position and
OE0261
parking brake is set.
Mower Lift Lever
To lower (1)- Move mower lift lever forward.
Raises and lowers the mower deck.
t"
t"
$
To raise (2) - Move mower lift lever rearward.
Release lever to hold the mower deck in
t OF1700
selected position.
,_(Q)_, 2. Push lever down to disengage parking
÷(Q)÷ brake.
"_'OF1740
Seat Adjustments
_ WARNING: Make all seat adjustments with unit
stationary, parking brake on and engine shut off.
To adjust seat forward or backward:
1. While seated, pull seat adjustment lever outward and
slide seat into desired position.
2. Release lever and slide seat forward or back to lock
seat into position.
Engine Oil Pressure Indicator
Refer to engine manual.
i ndicator lights up Red if the oil pressure is
low. Check oil level and add if necessary.
I
Hour Meter
Records total number of hours the engine
has been run.
IMPORTANT: Keep a record of Hour Meter
readings for recommended Lubrication and
Maintenance intervals.
NOTE: For accurate readings be sure Igni-
tion Switch is OFF when unit is not in opera-
tion.
Cylinder Stops
,_ CAUTION: AVOID PINCH POINTS. Always use the
T-portion of the cylinder stop when removing or
installing the cylinder stops.
Ensure the same cutting height after raising the deck to clear
an obstacle. Store the stops on the post behind the hydraulic
lift cylinder. The stops come in two (2) sizes, 11/32 in.
(8.73 mm) and 11/16 in. (17.5 mm).
1. Remove the cylinder stops from the post and snap
onto the lift cylinder rod.
2. Push the lift lever forward until the cylinder rests
against the cylinder stops.
GB- 13
FILLING FUEL TANK STARTING AND SHUT OFF
CAUTION: Read entire Owner/Operator Manual,
WARNING: AVOID INJURY. Read and understand
entire Safety section before proceeding.
Clutch Manual, and Engine Manual first. DO NOT
attempt to start engine at this time.
Add fuel to Fuel Tank as needed. See your Engine Manual
for correct type and grade of fuel.
To add fuel to the fuel tank:
1. Place unit in an open or well-ventilated open area.
2. Stop the engine.
3. Clean the fuel cap and the area around the fuel cap to
prevent dirt from entering the fuel tank. Remove the
cap from the fuel tank.
4. Fill the fuel tank to within 1 in. (25 mm) below bottom of
filler neck.
5. Replace fuel cap and tighten.
6. Clean up any spilled fuel.
PRE-START
,i_ CAUTION: Make sure all hardware is tight, all
safety devices are in place and all adjustments are
made correctly.
1. Check Safety Interlock System
If this system does not function as described do not operate
until repairs are made.
2. Check Air Cleaner
Check air filter for dirt. Clean as required. Follow Engine
Manual Maintenance Schedule.
NOTE: DO NOT operate starter more than 15 seconds per
minute, as overheating and damage can occur. If engine will
not start, see TROUBLESHOOTING on page 26 or refer to
Engine Manual.
NOTE: The engine will not start unless the steering control
levers are in the neutral position, the PTO switch is in the off
position, and parking brake is engaged.
To start:
1. If the engine is cold, move the choke control to the On
position. If the engine is warm or hot, do not use
choke.
,
Move the throttle to 3/4 Fast position. See Engine
Manual for detailed instructions.
3.
Put the ignition key in the switch and turn it to the Start
position.
4.
As soon as the engine starts, release the key.
5.
Move the choke control to the Off position from the
Choke position. Wait until the engine is running
smoothly before operation.
To shut off:
1. Bring the steering levers to neutral. Disengage the
PTO and engage the parking brake.
2. Move the throttle lever to the Slow position.
3. Turn the ignition key to the Off position.
3. Check Engine Fuel and Crankcase Oil
Check and add fuel if required. Check that engine crankcase
oil is full. Follow Engine Manual Maintenance Schedule.
4. Check Tire Pressure
5. Check Hydraulic Fluid Level
6. Adjust Seat
Be sure all controls can be reached safely from operator's
position.
7. Set Cutting Height
Make sure the deck is set to the correct cutting height.
STOPPING IN AN EMERGENCY
The unit can be stopped immediately at any time by turning
the ignition key to the Off position.
OPERATING MOWER
1. Start engine.
2. Move throttle lever 3/4 Fast position.
IMPORTANT: Never engage the PTO if the mower is
plugged with grass or other material.
3. Engage PTO to engage mower blades.
4. Move throttle lever to fast.
5. Release parking brake.
,i_ WARNING: Move the steering control levers slowly
and keep the throttle control lever at slow speed
until you learn how to operate the unit.
6. Use steering levers to move the unit.
7. Disengage PTO to stop mower blades.
GB- 14
PARKING
To park the unit:
1. Bring the steering levers to neutral. Turn off PTO.
2. Move the throttle lever to the Slow position.
3. Engage the parking brake.
4. Lower the attachment.
5. Turn the ignition key to the Off position and remove the
key.
MOVING THE UNIT WITH THE ENGINE OFF
IMPORTANT: Never tow unit.
1. Shut OFF engine.
2. Place seat in the service position (See SERVICE
POSITION on page 17).
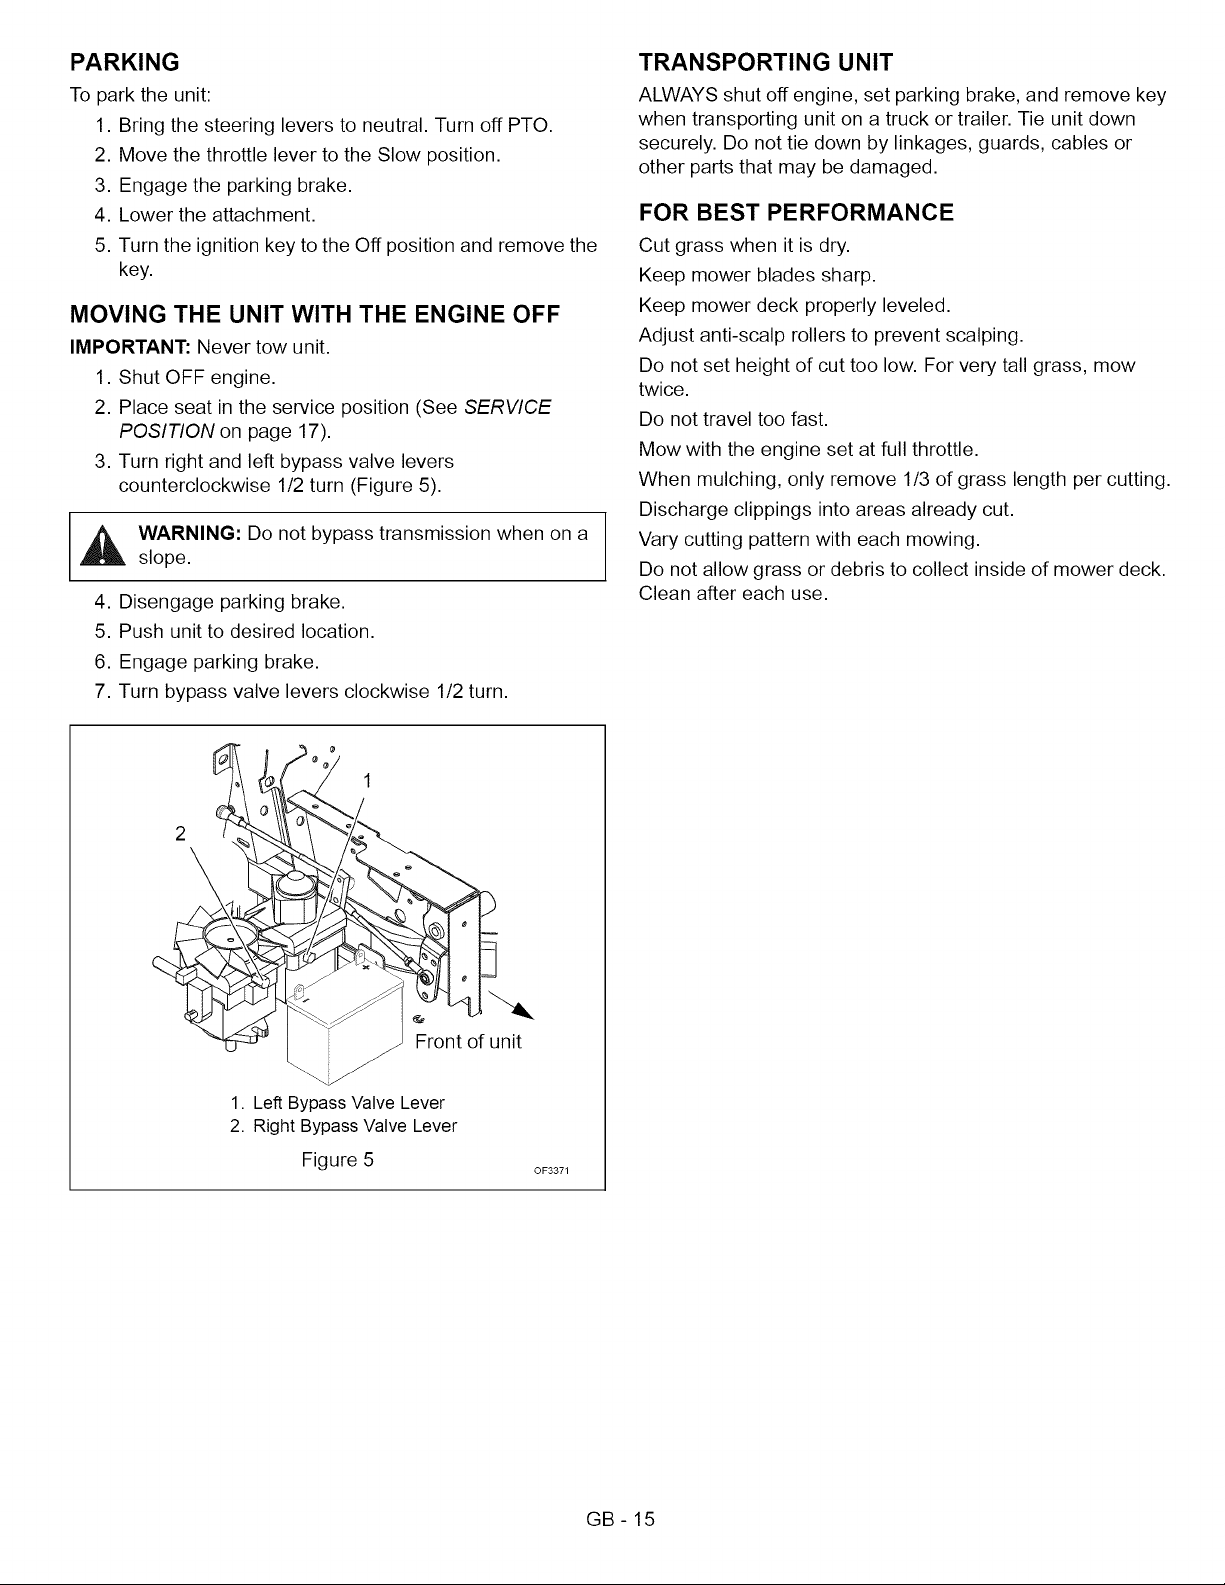
3. Turn right and left bypass valve levers
counterclockwise 1/2 turn (Figure 5).
_ ARNING: Do not bypass transmission when on a
slope.
4. Disengage parking brake.
5. Push unit to desired location.
6. Engage parking brake.
7. Turn bypass valve levers clockwise 1/2 turn.
TRANSPORTING UNIT
ALWAYS shut off engine, set parking brake, and remove key
when transporting unit on a truck or trailer. Tie unit down
securely. Do not tie down by linkages, guards, cables or
other parts that may be damaged.
FOR BEST PERFORMANCE
Cut grass when it is dry.
Keep mower blades sharp.
Keep mower deck properly leveled.
Adjust anti-scalp rollers to prevent scalping.
Do not set height of cut too low. For very tall grass, mow
twice.
Do not travel too fast.
Mow with the engine set at full throttle.
When mulching, only remove 1/3 of grass length per cutting.
Discharge clippings into areas already cut.
Vary cutting pattern with each mowing.
Do not allow grass or debris to collect inside of mower deck.
Clean after each use.
2
1. Left Bypass Valve Lever
2. Right Bypass Valve Lever
Figure 5
Front of unit
OF3371
GB- 15
WARNING: AVOID INJURY. Read and understand
entire Safety section before proceeding.
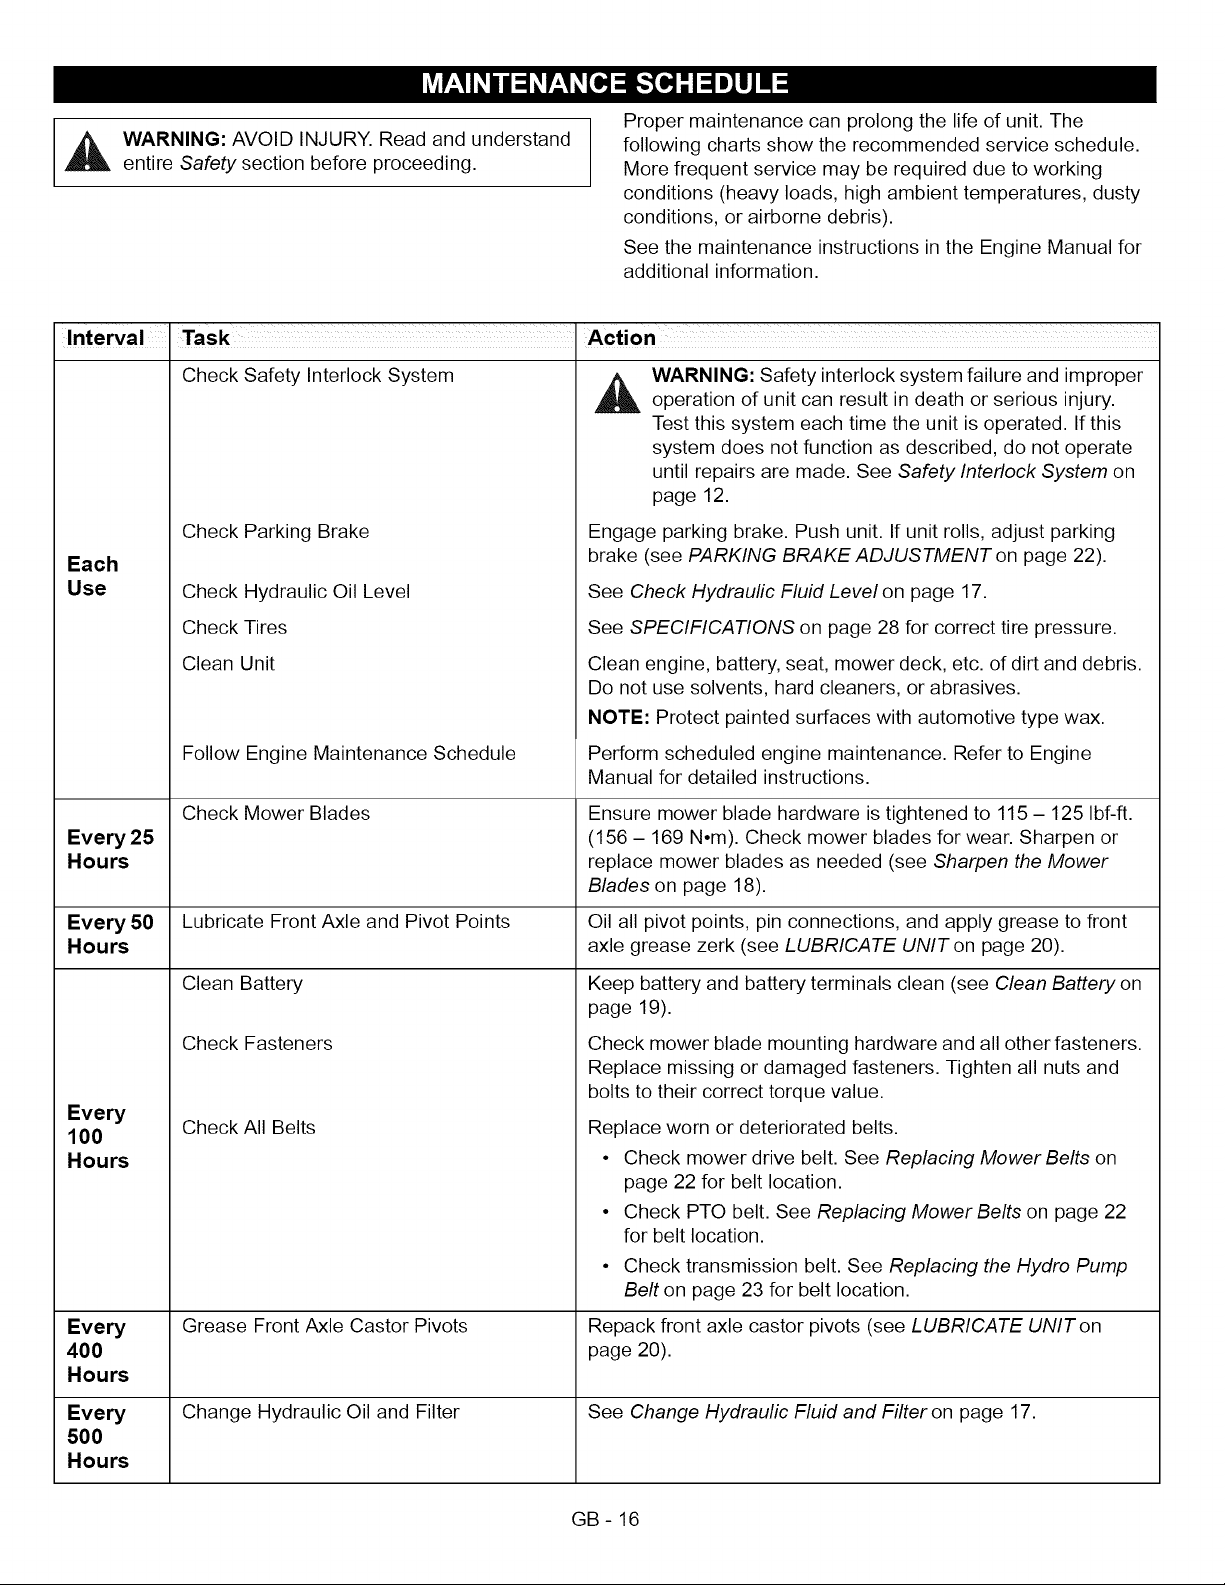
Interval Task Action
Check Safety Interlock System
_b ARNING: Safety interlock system failure and improper
Proper maintenance can prolong the life of unit. The
following charts show the recommended service schedule.
More frequent service may be required due to working
conditions (heavy loads, high ambient temperatures, dusty
conditions, or airborne debris).
See the maintenance instructions in the Engine Manual for
additional information.
operation of unit can result in death or serious injury.
Test this system each time the unit is operated. If this
system does not function as described, do not operate
until repairs are made. See Safety Interlock System on
page 12.
Check Parking Brake
Each
Use
Every 25
Hours
Every 50 Lubricate Front Axle and Pivot Points Oil all pivot points, pin connections, and apply grease to front
Hours axle grease zerk (see LUBRICATE UNITon page 20).
Every
100
Hours
Every
400
Hours
Check Hydraulic Oil Level
Check Tires
Clean Unit
Follow Engine Maintenance Schedule
Check Mower Blades
Clean Battery
Check Fasteners
Check All Belts
Grease Front Axle Castor Pivots
Engage parking brake. Push unit. If unit rolls, adjust parking
brake (see PARKING BRAKE ADJUSTMENT on page 22).
See Check Hydraufic Fluid Level on page 17.
See SPECIFICATIONS on page 28 for correct tire pressure.
Clean engine, battery, seat, mower deck, etc. of dirt and debris.
Do not use solvents, hard cleaners, or abrasives.
NOTE: Protect painted surfaces with automotive type wax.
Perform scheduled engine maintenance. Refer to Engine
Manual for detailed instructions.
Ensure mower blade hardware istightened to 115 - 125 Ibf-ft.
(156- 169 Nom). Check mower blades for wear. Sharpen or
replace mower blades as needed (see Sharpen the Mower
Blades on page 18).
Keep battery and battery terminals clean (see Clean Battery on
page 19).
Check mower blade mounting hardware and all other fasteners.
Replace missing or damaged fasteners. Tighten all nuts and
bolts to their correct torque value.
Replace worn or deteriorated belts.
• Check mower drive belt. See Replacing Mower Belts on
page 22 for belt location.
• Check PTO belt. See Replacing Mower Belts on page 22
for belt location.
Check transmission belt. See Replacing the Hydro Pump
Belt on page 23 for belt location.
Repack front axle castor pivots (see LUBRICATE UNIT on
page 20).
Every
500
Hours
Change Hydraulic Oil and Filter
See Change Hydraulic Fluid and Filter on page 17.
GB- 16
AriensDealerswillprovideanyservicewhichmayberequired
tokeepyourunitoperatingatpeakefficiency.Shouldengine
serviceberequired,itcanbeobtainedfromaAriensDealer
ortheenginemanufacturer'sauthorizedservicecenter.
_h ARNING: AVOID INJURY. Read and understand
entire Safety section before proceeding.
_ CAUTION: HOT SURFACES may result in injury.
DO NOT touch engine or drive parts which are hot
from operation. Allow parts to cool before servicing.
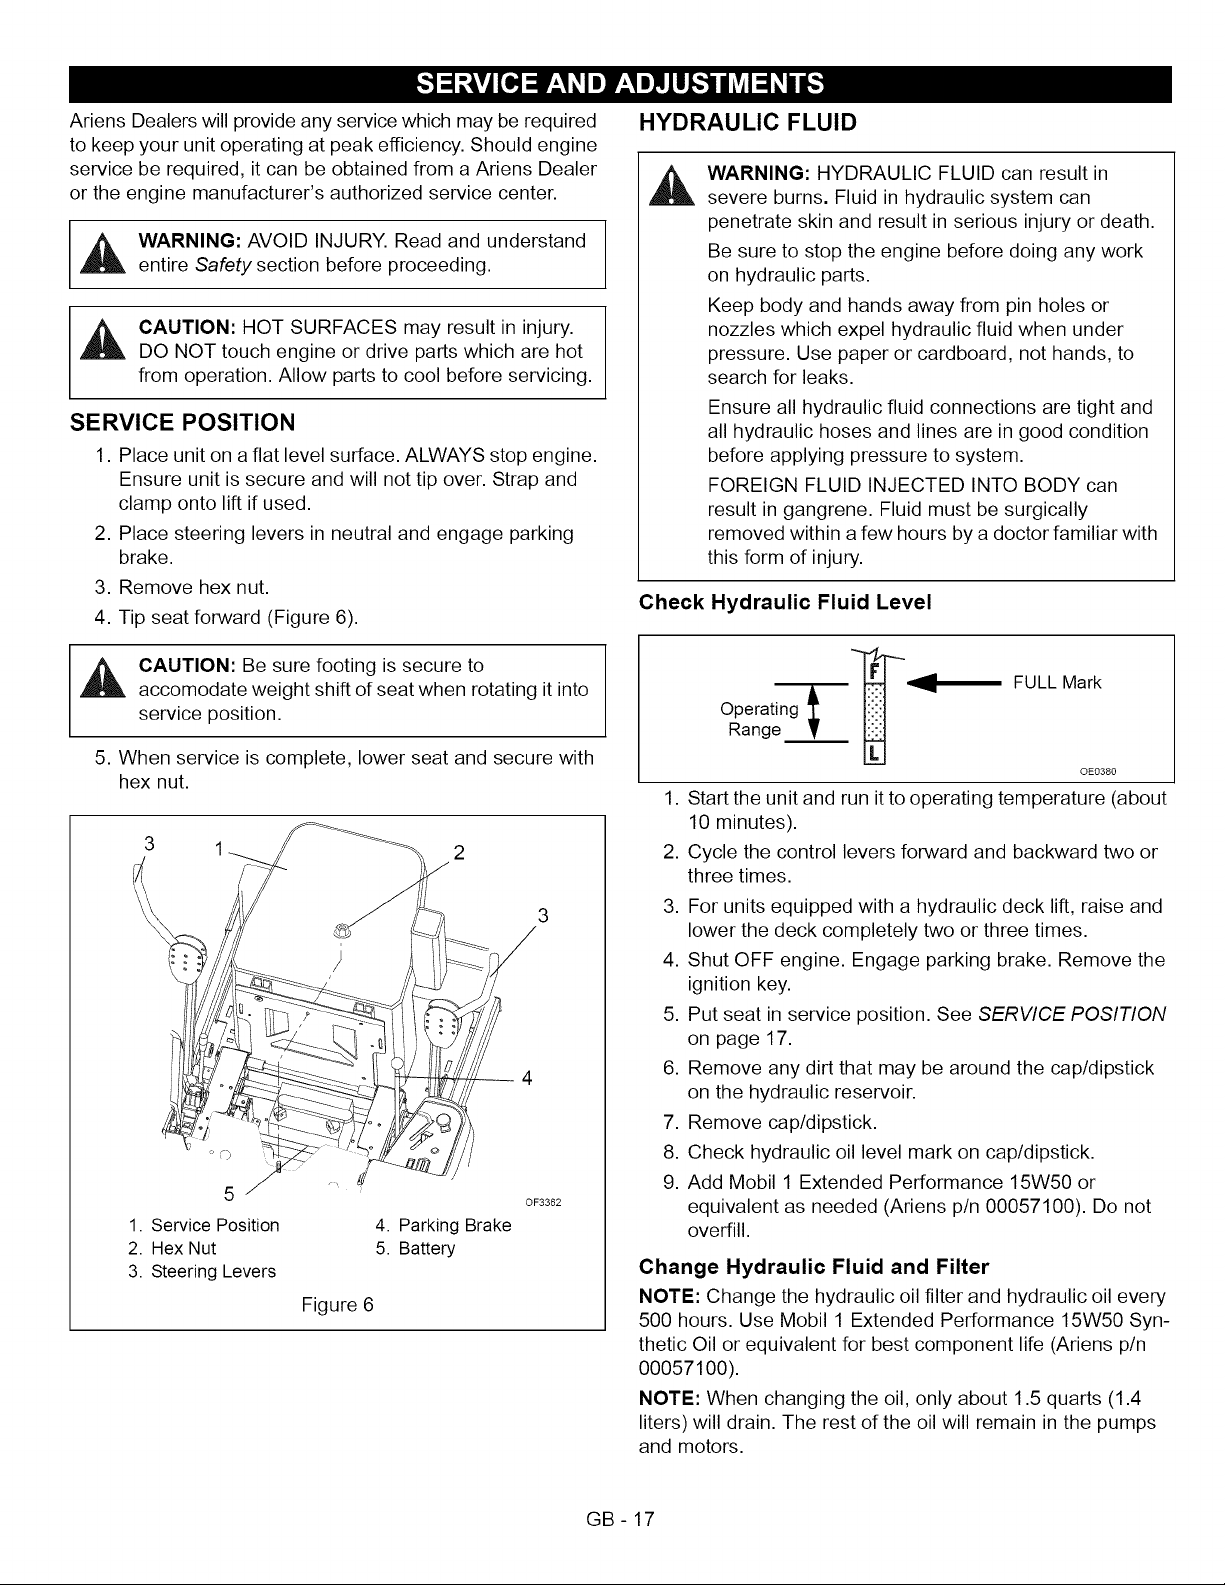
SERVICE POSITION
1. Place unit on a flat level surface. ALWAYS stop engine.
Ensure unit is secure and will not tip over. Strap and
clamp onto lift if used.
2. Place steering levers in neutral and engage parking
brake.
3. Remove hex nut.
4. Tip seat forward (Figure 6).
_i AUTION: Be sure footing is secure to
accomodate weight shift of seat when rotating it into
service position.
5. When service is complete, lower seat and secure with
hex nut.
4
5
1. Service Position 4. Parking Brake
2. Hex Nut 5. Battery
3. Steering Levers
Figure 6
OF3362
HYDRAULIC FLUID
WARNING: HYDRAULIC FLUID can result in
severe burns. Fluid in hydraulic system can
penetrate skin and result in serious injury or death.
Be sure to stop the engine before doing any work
on hydraulic parts.
Keep body and hands away from pin holes or
nozzles which expel hydraulic fluid when under
pressure. Use paper or cardboard, not hands, to
search for leaks.
Ensure all hydraulic fluid connections are tight and
all hydraulic hoses and lines are in good condition
before applying pressure to system.
FOREIGN FLUID INJECTED INTO BODY can
result in gangrene. Fluid must be surgically
removed within a few hours by a doctor familiar with
this form of injury.
Check Hydraulic Fluid Level
Operat_Range_ --__ FULL Mark
OE0380
1. Start the unit and run it to operating temperature (about
10 minutes).
2. Cycle the control levers forward and backward two or
three times.
3. For units equipped with a hydraulic deck lift, raise and
lower the deck completely two or three times.
4. Shut OFF engine. Engage parking brake. Remove the
ignition key.
5. Put seat in service position. See SERVICE POSITION
on page 17.
6. Remove any dirt that may be around the cap/dipstick
on the hydraulic reservoir.
7. Remove cap/dipstick.
8. Check hydraulic oil level mark on cap/dipstick.
9. Add Mobil 1 Extended Performance 15W50 or
equivalent as needed (Ariens pin 00057100). Do not
overfill.
Change Hydraulic Fluid and Filter
NOTE: Change the hydraulic oil filter and hydraulic oil every
500 hours. Use Mobil 1 Extended Performance 15W50 Syn-
thetic Oil or equivalent for best component life (Ariens p/n
00057100).
NOTE: When changing the oil, only about 1.5 quarts (1.4
liters) will drain. The rest of the oil will remain in the pumps
and motors.
GB- 17

Clean around dipstick cap and dipstick. Remove
1. Sharpen the Mower Blades
dipstick.
,
Place container under oil filter to catch oil.
3.
Remove oil filter.
CAUTION: DO NOT sharpen mower blades while
on unit. An unbalanced mower blade will cause
excessive vibration and eventual damage to unit.
4.
Allow tank to drain.
5.
Lubricate rubber gasket on new oil filter with clean
hydraulic oil.
Check mower blade balance before reinstalling
blades.
NEVER weld or straighten bent blades.
6. Spin new oil filter onto filter housing until it makes
contact. Tighten oil filter another 1/2 turn.
7. Add new oil to the oil tank. It will take about 1.5 quarts
(1.4 liters). Use Mobil 1 Extended Performance 15W50
Synthetic Oil or equivalent for best component life
(Ariens pin 00057100).
8. Check hydraulic oil level mark on cap/dipstick.
9. Properly dispose of waste oil.
MOWER BLADES
Remove
1. Remove mower blade from unit.
Discard mower blade if:
• More than 1/2 in. (1.27 cm) of metal is removed.
• Air lifts become eroded.
• Blade is bent or broken.
2. Sharpen mower blade by removing an equal amount of
material from each end of mower blade. DO NOT
change angle of cutting edge or round the corner of the
mower blade.
3. Check mower blade balance.
Slide mower blade on an unthreaded bolt. A balanced
,_ CAUTION: Use sturdy gloves or padding to protect
hands when working with mower blades.
blade should remain in a horizontal position. If either
end of mower blade moves downward, sharpen the
heavy end until blade is balanced.
1. Turn the engine off. Remove the ignition key. Remove
the ignition wire from the spark plugs.
2. Block mower blades to prevent rotation.
4. Install mower blade(s) on unit.
5. Tighten the bolts to a torque of 115-125 Ibf-ft
(156-169 N•m).
3. Remove the bolts, washers, and blades from the
spindle shafts.
DO NOT Sharpen to This Pattern
Figure 7
Replace
1. Replace the blades, washers and bolts on the spindle
shafts.
2. Tighten the bolts to a torque of 115-125 Ibf-ft
(156-169 N-m).
3. Replace the ignition wire on the spark plugs.
GB- 18
DISCARD if More
Than 1/2 in. (1.27 cm)
Sharpen to This Pattern
1. Cutting Edge
2. Square Corner
OT0792
3. Air Lift Erosion
4. Air Lift
Figure 8

BATTERY Charging the Battery
_ ARNING: AVOID INJURY. Read and understand
entire Safety section before proceeding.
WARNING: Battery posts, terminals and related
accessories contain lead and lead compounds,
chemicals known to the State of California to cause
cancer and reproductive harm. Wash hands after
handling.
Unit comes equipped with a maintenance-free battery that
requires no regular maintenance except cleaning the
terminals.
Remove Battery
1. Place seat in the service position (See
MAINTENANCE SCHEDULE on page 16).
2. Disconnect negative (-) cable first, then positive (+)
cable (Figure 9).
3. Remove holddown and remove battery.
Replace Battery
1. Replace battery and secure with battery holddown.
2. Connect positive (+) cable first, then negative (-)
cable.
3. Coat terminals with dielectric grease or petroleum jelly.
4. Return seat to operating position.
Clean Battery
Keep battery and its terminals clean. Inspect every 100
operating hours or monthly for best performance.
WARNING: FROZEN BATTERIES CAN
EXPLODE and result in death or serious injury. DO
NOT charge a frozen battery. Let battery thaw
before charging.
Battery Electrolyte First Aid
Follow First Aid directions for contact with battery fluid.
• External Contact: Flush with water.
• Eyes: Flush with water for at least 15 minutes and get
medical attention immediately!
• Internal Contact: Drink large quantities of water. Follow
with Milk of Magnesia, beaten egg or vegetable oil. Get
medical attention immediately!
In case of internal contact, DO NOT induce vomiting!
IMPORTANT: DO NOT fast charge. Charging at a higher
rate will damage or destroy battery. ONLY use an automatic
charger designed for use with your battery.
ALWAYS follow information provided on battery by battery
manufacturer. Contact battery manufacturer for extensive
instructions to charge battery.
1. Remove battery from unit. See Remove Battery on
page 19.
2. Place battery on bench or other well-ventilated place.
3. Connect positive (+) lead of charger to positive (+)
terminal, and negative (-) lead to negative (-) terminal.
4. Charge battery according to the instructions from
battery charger manufacturer and battery
manufacturer.
5. Replace battery. See Replace Battery on page 19.
2
1. Negative terminal
2. Positive terminal
Figure 9
3. Battery
OF1671
1. Remove battery from unit. See Remove Battery on
page 19.
2. Clean terminals and battery cable ends with wire
brush.
3. Coat terminals with dielectric grease or petroleum jelly.
4. Replace battery. See Replace Battery on page 19.
Jump-Starting
Ariens does not recommend jump-starting your unit.
Jump-starting can damage engine and electrical system
components. See your engine manual for more detailed
information.
GB- 19

LUBRICATE UNIT
NOTE: Use Ariens Hi-Temp Grease or equivalent
(part number 00036700).
Apply oil at all pivot points and pin connections.
3
4
OF1793
REF LUBRICATION QTY
1 REPACK 2
OIL
Figure 10
LOCATION
CASTER PIVOT
ALL PIVOT
POINTS, PIN
CONNECTIONS
INTERVAL
400 Hrs
50 Hrs
STEERING CONTROL NEUTRAL
ADJUSTMENT
If the steering levers do not line up (match) or the unit has
excessive creeping when the steering levers are in neutral,
adjust as follows.
Adjusting the Steering Levers to Line Up (Match)
(Figure 11)
1. Shut OFF engine. Engage parking brake. Remove the
ignition key.
2. Place seat in the service position (See SERVICE
POSITION on page 17).
3. Loosen damper Iocknut on the same side as the
steering lever to be adjusted.
4. Loosen brake interlock on the same side as steering
lever to be adjusted.
5. Loosen tie rod jam nut and turn tie rod until steering
levers are aligned.
6. Tighten jam nut on tie rod, tighten brake interlock and
tighten damper Iocknut.
7
1. Damper Locknut
2. Damper
3. Tie-Rod Jam Nut
4. Tie-Rod
5. Steering Lever
6. Brake Interlock
7. Hydrostatic
Transmission
Figure 11 0F3381
Eliminating Excessive Creeping of the Unit
(Figure 11)
WARNING: This adjustment requires operating the
engine. Use extreme care to avoid contact with
moving parts and hot surfaces. Be sure rear of unit
is well-supported and secure before starting
engine.
1. If hydraulic system is cold, run unit for a minimum of
five minutes, then shut OFF engine.
2. With the unit up to and facing a wall, jack the unit up so
that both drive wheels are off the ground.
3. Start the engine and release the parking brake.
4. Move the steering levers from Forward to Reverse
several times to make sure controls are free. Then
return steering levers to neutral position.
5. Check wheel(s) for movement.
6. Shut OFF engine.
NOTE: The right and left steering levers are adjusted the
same way. To access the tie-rod, place seat in service posi-
tion. See SERVICE POSITION on page 17.
GB - 20

7.Adjusttie-rod(s):
Ifthewheelismovinginaforwarddirection:
a.Loosenthejamnutoneachendofthetie-rod.
b.Turntie-rodcounterclockwise(lengtheningthe
distancebetweenthesteeringleverandhydrostatic
transmission)severaltimes.
Ifthewheelismovinginareversedirection:
a.Loosenthejamnutoneachendofthetie-rod.
b.Turntie-rodclockwise(decreasingthedistance
betweenthesteeringleverandhydrostatic
transmission)severaltimes.
8.Returnseattooperatingposition.
9.Startengine.
10.MovesteeringleversfromForwardtoReverseseveral
times.Thenreturnsteeringleversto neutralposition.
11.ShutOFFengine.
12.Ifwheelisnotmoving,tightenjamnutsontie-rod.The
adjustmentiscomplete.
13.Ifwheelisstillmoving,repeatsteps7through12.
ADJUSTING THE UNIT TO TRACK STRAIGHT
2
1. Limiter Bolt
2. Jam Nut
3
3. Steering Lever
4. Stop Bracket
Figure 12
_ ARNING: Prior to adjusting the tracking of the
unit, shut off engine, engage parking brake, and
remove the ignition key.
Check and adjust tire pressure. Increase pressure on side
unit tracks to. DO NOT exceed maximum recommended tire
pressure (See SPECIFICATIONSon page 28).
If tire pressure adjustment does not solve tracking problem,
adjust the limiter bolts on the stop bracket (Figure 12). Front
bolts adjust forward and rear bolts adjust reverse. Lengthen
the limiter bolt (move closer to lever) on side which is too
fast.
ADJUSTING THE HEIGHT OF THE STEERING
LEVER HANDLES
The handles have three height positions (Figure 13).
Position # 1
#2
1
Position # 3
1. Eccentric Spacer
2. Handle
3. Steering Lever
Figure 13 OF357O
1. Remove the spacer, handle, and eccentric spacer from
the steering lever.
NOTE: Position the right and left handles at the same height
position.
2. Install the spacer, handle, and eccentric spacer in the
appropriate height position. Do not tighten the nut
holding the eccentric spacer.
3. Turn the eccentric spacer until the right and left
handles are the same height. Tighten nut.
GB-21

PARKING BRAKE ADJUSTMENT
The parking brake might need adjustment over time and
after new brake pads have been installed.
NOTE: After installing new brake pads in the calipers, they
must be burnished by driving for a short distance (about 100
feet) with the brake on. To do this, bring the parking brake
lever part-way up while driving in a straight line. This quickly
breaks-in the pads for maximum effectiveness
BELTS
_b WARNING: MOVING PARTS can cut or amputate
body parts. ALWAYS wait for moving parts to stop
before performing maintenance or service.
_ CAUTION: DAMAGED OR WORN BELTS may
result in injury and/or damage to unit. Check belts
for excessive wear or cracks often.
NOTE: The Ogura clutch can be adjusted if the clutch starts
to slip. Contact your Ariens dealer for this adjustment.
Belt1.Access
Properly stop and park unit (See OPERATION on
page 12).
2. Lower the mower deck.
3. Place seat in most rearward position.
4. Remove belt covers.
5. Place foot board in open position (Figure 15).
6. Secure raised footboard with latch.
1. Parking Brake Lever 4. Trunnion
2. Brake Rod 5. Spring
3. Return Nuts 6. Jam Nuts
Figure 14
OF3303
Check Adjustment
NOTE: Be sure to check the parking brake on both sides of
the unit (Figure 14).
With the parking brake engaged, the spring length should
measure 1 1/2 in. (3.81 cm) between the jam nuts and the
trunnion and the clearance between the return nuts and
trunnion should measure 1/16 to 1/8 in. (1.59 to 3.18 mm). If
either of these measurements is off, adjust the parking brake
appropriately.
Adjust the Parking Brake
1. Engage the parking brake.
2. Turn the jam nuts clockwise to compress the spring or
counterclockwise to extend the spring until there is
1-1/2 in. (3.81 cm) clearance between the jam nuts
and trunnion.
,
Tighten jam nuts together.
4.
Turn the return nuts clockwise to decrease the
distance or counterclockwise to increase the distance
until there is 1/16 to 1/8 in. (1.59 to 3.18 mm) between
the return nuts and trunnion.
5. Tighten return nuts together.
1. Footboard in
open position
2. Frame
3. Latch
Figure 15 OF3_80
Replacing Mower Belts
NOTE: Long PTO mower belt must be removed from blade
spindle pulleys prior to removing short mower drive belt.
_hk AUTION: Use care when releasing idler spring
tension. Keep body parts well away from idlers
when performing this operation.
,
Slowly release the tension on the PTO mower belt idler
until all the tension is removed from the springs.
2.
Remove PTO mower belt from left blade spindle and
remove from deck.
3.
Slowly release the tension on the mower drive belt
idler until all the tension is removed from the springs.
4.
Remove mower drive belt from right blade spindle and
from deck. Idler pivot bolt must be loosened slightly to
gain clearance to remove belt from under idler pulley
(Figure 16).
GB - 22

5.Arrangenewmowerbelt(s)ondeck(mowerdrivebelt
first).Retightenshortmowerbeltidlerpivotbolt.Install
beltsonsheaves.Putbeltsontocentersheavelast.
IMPORTANT: Prior to starting the unit, ensure that there are
no twists in the mower drive belt as any twist in the PTO
mower belt will drastically reduce the belt life.
6. Replace belt covers and return foot board to closed
position.
6
2
4 7
1
6
1. PTO Mower Belt
2. Mower Drive Belt
3. Springs
4. Mower Drive Belt Idler
5. PTO Belt Idler
6. PTO Clutch Sheave
7. Center Sheave
Figure 16
Replacing the Hydro Pump Belt
1. Properly stop and park unit (See OPERATION on
page 12).
2. Remove the PTO mower belt from the PTO clutch
sheave (See Replacing Mower Belts on page 22).
_i AUTION: Use care when releasing idler spring
tension. Keep body parts well away from idlers
when performing this operation.
1. Hydro Belt
2. Spring
3. Idler
4. Engine Sheave
Figure 17
5. Left Hand Hydrostat
6. Right Hand Hydrostat
7. Clutch
8. Clutch Anchor
OF163I
MOWER DECKS
Anti-scalp Roller Adjustment
The anti-scalp rollers are set at the factory for typical
mowing height, but can be adjusted for high or low cutting
conditions (Figure 18).
Anti-Scalp rollers are intended to prevent lawn scalping, not
to control cutting height.
For a very high cutting height, set the anti-scalp rollers in the
lowest position on the bracket.
For a very low cutting height, set the anti-scalp rollers in the
highest position on the bracket.
NOTE: There are four anti-scalp rollers on the outside of the
mower deck and four anti-scalp rollers on the inside of the
mower deck. Make sure all anti-scalp rollers are set at the
same height.
Remove clutch anchor.,
4. Slowly release the tension on the hydro pump belt idler
until all the tension is removed from the springs.
5. Remove old hydro pump belt from right hand hydrostat
sheave first (Figure 17).
6. Install new hydro pump belt by positioning belt on
sheaves. Put belt onto right hand hydrostat sheave
last.
7. Replace clutch anchor.
8. Replace PTO mower belt on PTO clutch sheave. See
Replacing Mower Belts on page 22.
GB - 23
Lowest
Cutting
Height
Highest
Cutting
Height
Figure 18
OF3590

Removing the Mower Deck
NOTE: Only remove PTO belt from electric clutch.
1. Remove PTO belt from electric clutch (see Replacing
Mower Belts on page 22).
2. Lower mower deck all the way down.
3. Remove link chains from mower lift arms (Figure 19).
4. Remove mower mounting arms from frame.
5. Slide mower deck out from under unit.
1
1. Link Chain 3.
Mower lift Arm
2
2. Mower Mounting Arm
Figure 19
Installing the Mower Deck 0
1. Slide mower deck under unit.
2.
Install mower mounting arms on frame.
3.
Install link chains on the mower lift arms.
4.
Install PTO belt on electric clutch (see Replacing
Mower Belts on page 22).
,
Level mower deck (see Leveling the Mower Deck on
page 24).
Leveling the Mower Deck
These adjustments should be made on a level surface with
the tires inflated to the correct air pressure.
Check Blade Level and Pitch
1. Raise mower deck to a 3 in. (7.62 cm) cutting height.
2. Shut off engine. Engage parking brake. Remove the
ignition key.
NOTE: Place blocks under the bottom edge of the deck, not
under the reinforcement bar welded along deck face.
3. Place blocks at each corner of the deck to support the
weight of the deck.
4. Turn the blades so the blade ends point left to right
across the width of the deck.
5. Measure the distance between the ground and cutting
edge of the blade on the left blade (Left position in
Figure 20) and on the right blade (Right position in
Figure 20). Distances should be within 3/16 in.
(4.7 mm). If they are not, raise the low side of the deck
using the height adjusters on the deck lift brackets (see
Figure 21).
6. After deck is level side to side, check the deck front to
back pitch.
7. Turn the blades so the blade ends point front to back
as shown in Figure 20.
8. Measure the distance between the ground and the
cutting edge of the middle blade at the front of the deck
(Front position in Figure 20) and between the ground
the cutting edge of the left and right blades at the rear
of the deck (Rear position in Figure 20).
9. The cutting edge at the front of the deck (Front position
in Figure 20) should be 1/8 in. (3.18 mm) lower than
the cutting edges at the rear of the deck (Rear position
in Figure 20).
10. If measurements are out of range, raise the low side of
the deck using the height adjusters on the deck lift
brackets (see Figure 21). Be sure to raise the deck
evenly to keep the deck level side to side.
NOTE: Pitching the front of the blades lower than the rear
provides a balance between cut quality and the power
needed to cut grass. Certain cutting conditions require the
deck to be pitched with the rear of the blades lower than the
front. Heeling the deck this way requires more engine power
but can provide better cut quality.
11. Remove the blocks from under the deck.
GB - 24

Left
Blade Side-to-Side Level
Blade Front-to-Back Pitch
_ ARNING: AVOID INJURY. Read and understand
entire Safety section before proceeding.
SHORT TERM
NEVER spray unit with high pressure water or store unit
outdoors.
Inspect unit for visible signs of wear, breakage or damage.
Keep all nuts, bolts and screws properly tightened and know
unit is in safe working condition.
Store unit in a cool, dry protected area.
Front
Rear Rear
Figure 20
Adjust Blade Height
Level and pitch the mower with the height adjusters on each
deck lift bracket (Figure 21).
Loosen the jam nut on the deck lift bracket bolt about
1/4 turn to reduce clamp load on the height adjusters.
Loosen the jam nut on the deck adjuster bolt and then
turn the bolt clockwise to raise the deck or
counterclockwise to lower the deck. Tighten both jam
nuts.
LONG TERM
Clean unit thoroughly with mild soap and low pressure water
and lubricate (See LUBRICATE UNITon page 20 in
Maintenance). Touch up all scratched painted surfaces.
Remove weight from wheels by putting blocks under frame
or axle.
When storing unit for extended periods of time, remove all
fuel from tank and carburetor (run dry). Refer to Engine
Manual.
Clean and charge the battery. Charge battery every three to
four weeks when storing unit.
To Take the Unit Out of Storage
1. Refer to the engine service manual to prepare the
engine for service.
2. Put fresh, clean fuel in the fuel tank.
3. Begin the maintenance schedule.
4. Charge and install the battery.
Height Adjusters
DO NOT place blocks under reinforcement bar.
Figure 21
1
GB - 25

PROBLEM
PROBABLE CAUSE
CORRECTION
Engine does not
crank.
1. PTO engaged. 1.
2. Parking brake disengaged. 2.
3. Loose or corroded battery cables. 3.
Disengage PTO.
Engage parking brake.
Clean and tighten battery cables (see
Clean Battery on page 19).
4. Discharged battery. 4.
Charge battery (see Charging the
Battery on page 19).
See your Ariens Dealer.
Fill fuel tank (see FILLING FUEL TANK
on page 14).
Replace spark plug. Refer to Engine
Engine cranks but
does not start.
5. Faulty starter. 5.
1. Fuel tank empty. 1.
2. Faulty spark plug. 2.
Manual.
3. Air cleaner is plugged or dirty. 3.
Clean or replace air cleaner. Refer to
Engine Manual.
4. Fuel filter is dirty. 4.
Clean or replace fuel filter. Refer to
Engine Manual.
5. Faulty engine. 5.
Refer to Engine Manual or see your
Ariens Dealer.
Battery light does not
light up when starting
1. Discharged battery. 1.
Charge battery (see Charging the
Battery on page 19).
engine.
Oil pressure light is Refer to Engine Manual.
on.
1. Oil pressure is low. 1.
Engine continues to
run when ignition key
is in the off position.
PTO or mower blades
do not engage or shut
off.
Unit does not drive.
1. Ignition ground wire disconnected. 1.
2. Ignition switch failure. 2.
1. Operator presence switch not 1.
depressed.
2. Faulty PTO switch. 2.
1. Parking brake engaged. 1.
2. Transmission bypass levers open. 2.
3. Hydraulic oil level low.
4. Faulty hydraulic drive system.
Connect ground wire to clean metal
surface.
Replace ignition switch (see your Ariens
Dealer).
Depress operator presence switch by
sitting on seat.
Check the electrical system to the
clutch for damage or wear. See your
Ariens Dealer.
Disengage parking brake.
Close transmission bypass levers (see
MOVING THE UNIT WITH THE
ENGINE OFF on page 15).
,
Add hydraulic oil (see Check Hydraulic
Fluid Level on page 17).
4.
See your Ariens dealer.
GB - 26

Pa_ No.
79205800
79202200
79202300
79202700
79202900
89202700
Description
44 in. Mulching Kit
Liftmaster Kit
Hitch Kit
Headlight Kit
Counterweight Kit
Foldable Rollover Protection System
Pa_ No.
01554800
21537000
21536900
21535800
09246900
21536100
21410800
07241100
07202900
07218000
00273000
Description
1
Battery
1
Air Filter Outer Element
1
Air Filter Inner Element
1
Engine Oil Filter- Kawasaki
1
Hydraulic Oil Filter
1
Spark Plug - Kawasaki
1
Fuel Filter- Kawasaki
1
PTO (Engine to Deck) Belt (44 in.)
1
Mower Drive Belt (44 in. )
1
Traction (Hydro Pump) Belt
1
Mulch Blade (44 in.)
GB - 27

Model Number
Model
Eye-Q
Engine
Engine
Engine Model Number
Engine Power- hp (kW) at Maximum RPM
Governed RPM (May be different from maximum RPM)
Cooling Capacity
Speed
Forward Maximum - mph (km/h)
Reverse Maximum - mph (km/h)
Turning Radius
Brakes
Electrical
Starter
Battery
Power Take-Off
Fuel
Fuel Type
Fuel Tank Capacity - gal. (L)
Transmission
Type
Transmission Oil
Hydraulic System Capacity - qt (L) 4.8 (4.5)
Hydraulic Oil Filter Yes
Size and Weight
Length - in. (cm) 72.5 (184.2)
Width -in. (cm) 47.50 (120.6)
Height- in. (cm) 42 (106)
Height with ROPS - in. (cm) 75 (190)
Weight - lbs (kg) 946 (430)
Tires
Front Tire Size - in. (cm) 15 x 6 -6 (38 x 15 -15)
Rear Tire Size - in. (cm) 23 x 9.5 -12 (58.4 x 24-30.5)
Front Tire Pressure - psi (kPa) 20 -25 (138 - 172)
Rear Tire Pressure - psi (kPa) 12 -15 (83 -103)
Mower Deck
Mower Deck Lift Hydraulic
Cutting Width -in. (cm) 44 (112)
Cutting Height -in. (cm) 1 - 5 (2.5 - 12.7)
Cutting Height Increments -in. (cm) 1 to 5 (2.5 to 12.7)
Maximum Towing Capacity - Ibs (kg) 500 (227)
Maximum Tongue Weight - Ibs (kg) 50 (23)
Mobil 1 Extended Performance 15W50 Synthetic Oil or
Hydro/Dynamic Disk - Parking
12-Volt Maintenance Free
Electric PTO Clutch/Brake
Refer to Engine Manual
992312
PM144Z
Standard
Kawasaki
FH641V
21 (15.6)
2600 + 100
Air Cooled
10(16)
4.5 (7.2)
0
Electric
10 (37.8)
Hydrostatic Drive
equivalent
GB - 28

Ariens Company
655 West Ryan Street
RO. Box 157
Brittion, Wl 54110-0157
920-756-2141
Fax 920-756-2407
www.ariens.com
,_, WARNING ,_
The engine exhaust from this product
contains chemicals known to the State
of California to cause cancer, birth
defects or other reproductive harm.

Promaster 144Z
Owner/Operator Manual-- Manuel du proprietaire/utilisateur- Betriebsanlei-
tung -- Eigenaars/gebruikshandleiding -Instruktionsbog -- Manuale d'uso/
del proprietario -- Manual del propietario/operador- Brukerh&ndboken -
Instruktionsboken -- Omistajan/kuljettajan k_ytt6ohjekirja -- Instrukcj¢
obsfugi/operatora -- PyKOBOACTBO BJqaAeJqbL_a/noJqb3OBaTeJq£ -- Navod k
obsluze/pro obsluhu -- Manual do Operador / Proprietario
992312 21 HP 144Z
ENGLISH
(_ FRAN(_AIS
@ DEUTSCH
(_ NEDERLANDS
DANSK
ITALIANO
(_ ESPANOL
NORSK
(_ SVENSKA
SUOMI
(_ POLSKI
(_ PYCCKVIH R3BIK
(_ CESKY
_) PORTUGUESE
00678500 10/06
Printed in USA

AriensCompany
655WestRyanStreet
RO.Box157
Brillion,Wisconsin54110-0157
USA
Telephone(920)756-2141
Facsimile(920)756-2407
ECDECLARATIONOFCONFORMITYISSUEDBYTHEMANUFACTURER-
Dt_CLARATIONDECONFORMITI_ CE I_MISE PAR LE FABRICANT-
EU-0BEREINSTIMMUNGSERKL_,RUNG DES HERSTELLERS - VERKLARING VAN
OVEREENSTEMMING VOOR DE EU, AFGEGEVEN DOOR DE FABRIKANT- EF
OVERENSSTEMMELSESERKL,ZERING UDSTEDT AF FABRIKANTEN - DICHIARAZlONE
DI CONFORMITA CE RILASCIATA DAL PRODUTTORE - DECLARACION DE
CONFORMIDAD CE EMITIDA POR EL FABRICANTE - EF-SAMSVARSERKL/ERING FRA
PRODUSENTEN - EG-DEKLARATIONEN OM OVERENSST_,MMELSE UTF_,RDAD AV
TILLVERKAREN -VALMISTAJAN ANTAMA EY-VAATIMUSTENMUKAISUUSVAKUUTUS -
DEKLARACJA ZGODNOCECI Z PRZEPISAMI EC WYDANA PRZEZ PRODUCENTA -
DECLARA(_,O DE CONFORMIDADE CE EMITIDA PELO FABRICANTE - PROHL/_,SENi
O SHODi CE, VYDANI _ V"/ROBCEM
We the undersigned, ARIENS COMPANY, certify that: -- Nous, soussign6s ARIENS COMPANY, certifions que :-- Der
Unterzeichnete, ARIENS COMPANY, bescheinigt, dass -- Wij, de ondergetekenden, ARIENS COMPANY, verklaren dat: --
Undertegnede, ARIENS COMPANY, attesterer, at:-- La sottoscritta societ_ ARIENS COMPANY certifica che: -- Nosotros, los
abajo firmantes, ARIENS COMPANY, certificamos que: -- Undertegnede, ARIENS COMPANY, bekrefter at: -- Undertecknad,
ARIENS COMPANY, intygar att: -- Allekirjoittanut, ARIENS COMPANY, vakuuttaa, ett_: -- My, ni_'ej podpisani, ARIENS
COMPANY, ogwiadczamy, _'e: -- My, nLepodepsani, ARIENS COMPANY, prohla_ujeme, _e: -- N6s, abaixo assinados,
certificamos em nome da ARIENS COMPANY, que
Type: Type : Typ:
Type: Type: Tipo:
Tipo: Type: Typ:
Tyyppi: Typ: Typ:
Tipo: trawnikowa - SamojHzdn5 travnH seka_4kas rotujHcHmi no_i-- Tractor cortador de relva -
Trade Name: Appellation commerciale : Handelsbezeichnung: Handelsnaam: Firmanavn: Nome Ariens
commerciale: Nombre comercial: Handelsnavn: Handelsbeteckning: Kauppanimi: Nazwa
handlowa: Nome da Marca: Obchodni nazev:
Model: Modele: Modell: Model: Model: Modello: Modelo: Modell: Modell: Malli: Model: Modelo: 992312
Model:
Cutting Width: Largeur de coupe : Schnittbreite: Maaibreedte: Ktippebredde: Larghezza di tagtio: 112
Ancho de corte: Klippebredde: Klippbredd: Leikkuuleveys: Szerokocia: Largura de corte: Sieka
zabiru:
Conforms to: Est conforme & : Mit den Anforderungen der folgenden Richtlinien 0bereinstimmt: Voldoet aan: Er i overensstemmelse
med: €: conforme a: Cumpte con: Er i samsvar med: Overensst&mmer med: T&ytt&& seuraavat vaatimukset: Jest zgodny z: De acordo
com: Odpovida normi:
98/37/EC, 89/336/EEC;
2000/14/EC Conformity Assessment Annex VI. AnnexeVI de I'evaluationde conformit& Konformit_tsbewertung, Anhang Vl. Bijlage VI voor
beoordeling vanovereenstemming.Vurdering afoverensstemmelse Anneks VI. AnnessoVI dellavalutazione di conformit& Anexo VI de laevaluaci6n de la
conformidad. Samsvarsvurdering ettervedlegg Vl. Bed6mning av 6verensst_mmelse Bilaga Vl. Vaatimustenmukaisuudenarviointi, liite Vl. DodatekVl,
Ocena zgodnooeci.Anexo VI da Avalia9_ode Conformidade. Posouzeni shody p_iloha VI.
Representative Measured Sound Power Level (Lwa) - Niveau de
puissance acoustique representatif mesure (Lwa) - Repr_sentativer
gemessener Ger_uschpegel (Lwa) - Representatief gemeten geluidsniveau
(Lwa) - Repraesentativt, malt st_jeffektniveau (Lwa) - Livello di potenza
sonora rappresentativo rilevato (Lwa) - Nivel de potencia acQstica
representativo medido (Lwa) - Representativt malt lydeffektniva (Lwa) -
Representativ uppm_tt Ijudniva (Lwa) - Tyypillinen mitattu _nitehotaso
(Lwa) - Zmierzony reprezentatywny poziom mocy akustycznej (Lwa) -
Representativni hodnota zmerene hladiny hlucnosti (Lwa) - Nivel de
Pot6ncia de Som Medido Representativo (Lwa)
Riding Rotary Lawn Mower -- Tondeuse a gazon autoportee rotative -- Aufsitz-Sichelm_her -- Rijdende roterende
grasmaaier -- Havetraktor med roterende knive -- Trattorino con unita di taglio rotativa -- Tractor cortacesped
giratorio -- Plentraktor med rotorklipper - Sittrotorgr_sklippare - Ajoleikkuri -- Samobie_:na rotacyjna kosiarka
Guaranteed Sound Power Level (Lwa) - Niveau de puissance
acoustique garanti (Lwa) - Garantierter Ger_uschpegel (Lwa) - Garantierter
Ger_uschpegel (Lwa) - Garanteret st_jeffektniveau (Lwa) - Livello di
potenza sonora garantito (Lwa) - Nivel de potencia acQstica garantizado
(Lwa) - Garantert lydeffektniva (Lwa) - Garanterad uppm_tt Ijudniva (Lwa) -
Taattu _nitehotaso (Lwa) - Gwarantowany reprezentatywny poziom mocy
akustycznej (Lwa) - Zarucovana hodnota hladiny hlucnosti (Lwa) - Nivel
de Pot_ncia de Som Medido Garantido (Lwa)
992312:99 dBA
992312: 100dB A
2
J

jJ
Notified Body - Organisme notifie - Zertifizierungsstelle -
Aangemelde instantie - Bemyndiget organ - Organismo notificato -
Organismo notificado - Teknisk kontrollorgan - AnmNt organ -
Ilmoitettu laitos - Organ za_wiadczajatcy - Organismo Certificador
- Pov_fena osoba
Fred J. Moreaux:
Quality and Conformance Manager (Keeper of Technical File)
Responsable de ta qualite et de ta conformite des produits
(Depositaire de la fiche technique) Manager Qualit&tssicherung und
Konformit&t (Archivar der technischen Akte) Kwaliteits- en
normalisatiemanager (Beheerder van technische bestand) Chef for
kvalitet og overensstemmelse (Indehaver af tekniske data)
Responsabite della qualit& e della conformit& del prodotto
(Depositario del file tecnico) Gerente de calidad y conformidad
(Depositario del archivo tecnico) Kvalitet- og samsvarsansvarlig
(innehaver av teknisk ill) Chef for kvalitet och
produktOverensst&mmelse (Innehavare av tekniska data) Laadusta
ja vaatimustenmukaisuudesta vastaava johtaja (Teknisen tiedoston
haltija) Kierownik do spraw jako_ci i zgodno_ci
(Przechowuja_cy Dokumentacj_ Techniczna) Gestor de Qualidade e
Conformidade (Zelador de Arquivos Tecnicos) Manager jakosti a
shody (spravce technicke dokumentace)
SNCH
11, Route de Luxembourg
L-5230 Sandweiler
Ariens Company
Brillion, WI 54110-0157 USA
Signature Signature Unterschrift
Handtekening Underskrift Firma Firma
Signatur Namnteckning Altekirjoitus
Podpis Assinatura Podpis
09/12/2006
Date Date Datum
Datum Dato Data
Fecha Dato Datum
PNv_ys Data Data
Datum
CE Sound and Vibration - Bruits et vibrations CE - CE Ger_iusch- und Vibrationswerte - CE Geluid en trilling - CE
stoj og vibration - Livello sonoro e vibrazioni CE - Sonido y vibracion CE - CE-lyd og -vibrasjon - CE Ijudniv& och
vibrationer - CE, melu ja t_irin_i- CE D:_wi_pkui Wibracji - Som e Vibrag_o CE - CE zvuk a vibrace - (Ref. EN836-2001)
992312
Oper. Ear Sound Pressure (Lpa) in dBA - Pression acoustique aux oreittes de t'operateur
(Lpa) en dBA - Ger&uschpegel am Ohr des Bedieners (Lpa) in dBA - Geluidsdruk bij het oor van
de gebruiker (Lpa) in dBA - Strejtryk ved brugerens ere (Lpa) m&It i dBA - Pressione sonora
alt'orecchio delt'operatore (Lpa) in dBA - Presi6n de sonido en el oido (Lpa) in dBA - Lydtrykk ved
fererens ere (Lpa) inn dBA - Ljudeffekt vid f5rarens Oron (Lpa) i dBA - Kuljettajan korvaan
kohdistuva &&nenpaine (Lpa), dBA-Robocze cicenienie akustyczne na uchu (Lpa)w decybelachA
- Oper. Press_o do Som no Ouvido (Lpa) em dBA - Provozni hladina akustickeho tlaku (Lpa) v
dBA
Vibration Measure (m/sec2) at Operator: Mesure des vibrations (m/s2) au niveau de
l'operateur: Vibration (m/s2) an des Bedieners: Gemeten trilling bij (m/sec2): Vibrationsm&linger
(m/s2) ved brugerens: Vibrazioni percepite dalt'operatore (m/sec2): Medida de vibraci6n (m/seg2)
en el operador: Vibrasjonsm&ling (m/s2) ved f_rerens: Vibrationsm&tt (m/s2) vid f_rarens: T_rin_
(m/s2) kuljettajan: Pomiar wibracji (m/sec2) u operatora: Medida de Vibrag_o (m/seg.2) no
Operador: Hodnota vibraci (m/s2) u obsluhy:
Hands - Mains - H_nde - De handen van de gebruiker - Haender- Mani- Manos - Hender-
H_nder- K_siss_ - R6ce - Ruce - M_os
Seat - Siege - Sitz - Stoel - De bestuurdersplaats - Saede - Sedile - Asiento - Sete - S_te -
Istuimella - Fotel - Siedzenie - Assento - Sedadlo 0.82
88
1.6

Seguridad .................................... 5
Montaje ...................................... 11
Controles y caracteristicas ...................... 12
Funcionarniento ............................... 13
Prograrna de rnantenirniento .................... 17
Reparaciones y ajustes ......................... 18
Almacenarniento .............................. 27
Localizacion de averias ........................ 28
Accesorios ................................... 29
Piezas de repuesto ............................ 29
Especificaciones .............................. 30
EL MANUAL
Antes de hacer funcionar la unidad, lea con atenci6n yen
su totalidad los manuales. El contenido de los manuales
le ayudar8 a entender las instrucciones y los controles
durante el funcionamiento normal y el mantenimiento.
Las referencias a los lados izquierdo, derecho, delantero y
trasero se dan desde el asiento del operador en la posici6n
de funcionamiento y orientado en la direcci6n de desplaza-
miento hacia adelante.
MANTENIMIENTO Y PIEZAS DE REPUESTO
r- "1
Transferir
la etiqueta
del modelo
y nQmero
de serie
del registro
del producto
aqui.
/ /
AI pedir cat_logos, piezas de repuesto o
al hacer preguntas sobre mantenimiento,
tenga a mano los nQmeros de modelo
y de serie de la unidad y del motor.
Los nQmeros est_n situados en el
formulario de registro del producto del
paquete de documentaci6n. Se hallan
impresos en una etiqueta de nQmero
de serie Iocalizada en la estructura de
la unidad (Figura 1).
Etiqueta del nQmero de serie
REGISTRO DEL PRODUCTO
El concesionario de Ariens deber8 registrar el producto en el
momento de la compra. El registro del producto ayudar8 a la
compa_ia a procesar las reclamaciones de garantia, asi como
a ponerse en contacto con usted con la informaci6n de servicio
m_s reciente. Todas las reclamaciones que cumplan los
requisitos durante el periodo de garantia limitada serSn
aceptadas, independientemente de si se devuelve o no la
tarjeta de registro de producto. Guarde una prueba de su
compra si no registra su unidad.
Nota para el cliente: Si el concesionario no registra
el producto, rellene, firme y devuelva la tarjeta de registro
del producto a Ariens o vaya a www.ariens.com en Internet.
PIEZAS DE REPUESTO NO AUTORIZADAS
Use Qnicamente piezas de repuesto de Ariens.
La sustituci6n de cualquier pieza de este equipo por otra
que no sea una pieza de repuesto autorizada por Ariens
puede afectar negativamente al rendimiento, durabilidad y
seguridad de la unidad y puede invalidar la garantia. Ariens
declina toda responsabilidad por da_os o reclamaciones, ya
sea a la garantia, da_os materiales, lesiones o incluso la
muerte, provocados por el uso de piezas de repuesto no
autorizadas.
NOTA: Para encontrar el concesionario Ariens m_s
cercano, acuda a www.ariens.com en Internet.
OF3510
Figura 1
• Anote aqui los nQmeros de modelo y de serie de la unidad.
• Anote aqui el modelo del motor y los nQmeros de serie.
CLAUSULA DE EXENCION
DE RESPONSABILIDAD
Ariens se reserva el derecho de abandonar la fabricaci6n,
realizar cambios y mejoras a sus productos en cualquier
momento, sin previo aviso u obligaci6n hacia el comprador.
Las descripciones y especificaciones contenidas en este
manual eran las vigentes en el momento de su publicaci6n.
Algunos equipamientos descritos en este manual pueden
ser opcionales. Algunas ilustraciones pueden no aplicarse a
su unidad.
ENTREGA DEL CONCESIONARIO
El concesionario debe:
1. Probar los frenos despu6s de montar la unidad para
asegurarse de que el envio no ha afectado a su ajuste
(V6ase Ajuste del freno de estacionamiento en la
E - 4 © Copyright 2006 Ariens Company

pSgina24).Losfrenosdelasruedasseajustan
correctamenteenf_brica.
2.Comprobarqueelsistemadeinterbloqueodeseguridad
funcionecorrectamente.Cuandoeloperadorest6
sentado,launidads61odebearrancarsilaspalancas
dedirecci6nest_nenpuntomuerto(N),elfrenode
estacionamientoaccionadoy latomadefuerza(TDF)
desactivada(Off).Elmotordebedetenersesiel
operadorselevantadelasientocuandolaspalancas
dedirecci6nest_nenlaposici6ndeconducci6n
olaTDFest_activada(On).V6aseSistema de
interbloqueo de seguridad en la p_gina 13.
3. Rellene la tarjeta de registro del comprador original
y enviela de vuelta a Ariens.
iADVERTEN¢IA! Esta m_quina de corte puede
amputar manos y pies y lanzar objetos. Si no observa
las instrucciones de seguridad de los manuales y las
calcomanias podrian producirse lesiones graves
o incluso la muerte.
Las pendientes son uno de los factores principales
relacionados con la p6rdida de control y los
accidentes por vuelco. Preste especial atenci6n
cuando haga funcionar la unidad en pendientes.
Se pueden producir accidentes trSgicos si el operador
no observa la presencia de menores. No asuma
nunca que los menores permanecerSn en el L_ltimo
sitio en el que los vio.
La gasolina es altamente inflamable y sus vapores
son explosivos; man6jela con cuidado.
Desactive el accesorio, detenga la unidad y el motor,
saque la Ilave, active el freno de estacionamiento
y deje que todas las partes m6viles se detengan
antes de abandonar la posici6n del operador.
SiMBOLO DE ALERTA
DE SEGURIDAD
Estos son simbolos de alerta de seguridad.
OLI253 1
Su significado es:
.iATENCION!
•iSU SEGURIDAD EST.&.EN PELIGRO!
Cuando vea este simbolo:
•iESTI_ ALERTA!
OL3900
•iOBEDEZCA EL MENSAJE!
4. Explicar la politica de garantia limitada de Ariens.
5. Explique los procedimiento de lubricaci6n y manteni-
miento recomendados. Asesore al cliente sobre los
ajustes. Mu6strele los controles y el funcionamiento
de la unidad. Comente y enfatice las precauciones
de seguridad. Proporcione los Manuales del propietario/
operador, piezas de repuesto y del motor. Acons6jele
que los lea atentamente y los entienda.
Nota para el ¢liente: El concesionario le ha suministrado
instrucciones completas para la configuraci6n y preparaci6n
que deben completarse antes de recibir esta unidad.
El concesionario debe revisar informaci6n importante de
este manual antes de entregarle la unidad o el accesorio
o durante la entrega.
PALABRAS DE SEfiALIZACIC)N
Los simbolos de alerta de seguridad anteriores y las siguientes
palabras se usan en calcomanias yen este manual.
Lea y entienda todos los mensajes de seguridad.
,_ PELIGRO iSITUACION DE PELIGRO INMINENTE!
Si no se evita, RESULTARA en lesiones graves o la
muerte.
,i_ iADVERTENCIA! iSITUACION
POTENCIALMENTE PELIGROSA! Si no se evita,
PUEDE RESULTAR en lesiones graves o la muerte.
PRECAUCION iSITUACION POTENCIALMENTE
PELIGROSA! Si no se evita, PUEDE RESULTAR
en lesiones leves o moderadas. Tambi6n puede
usarse para alertar contra prScticas no seguras.
NOTACIONES
NOTA: Informaci6n de referencia general para el funciona-
miento y prScticas de mantenimiento correctos.
IMPORTANTE: Procedimientos o informaci6n especificos
requeridos para evitar da_os a la unidad o al accesorio.
PRACTICAS Y LEYES
Lleve a cabo con frecuencia y de manera habitual
precauciones de seguridad, por su propio bien y el de otros.
Comprenda y obedezca todos los mensajes de seguridad.
Est6 alerta ante condiciones inseguras y ante la posibilidad
de lesiones leves, moderadas o serias, o incluso la muerte.
Conozca las normas y leyes de aplicaci6n en su regi6n,
incluidas las que limiten la edad del operador.
E-5

FORMACION REQUERIDA AL OPERADOR
El comprador original de esta unidad ha sido instruido por
el vendedor acerca de su funcionamiento adecuado y
seguro. Si la unidad va a ser utilizada por otra persona que
no sea el comprador original (o si va a prestarse, alquilarse
o venderse), proporcione SIEMPRE este manual y la formaci6n
necesaria referente a la seguridad antes de ponerla en
funcionamiento.
CALCOMANiAS DE SEGURIDAD Y
EMPLAZAMIENTO DE LAS MISMAS
Sustituya SIEMPRE las calcomanias de seguridad da_adas
o que se hayan perdido. Consulte Figura 2 para las
ubicaciones de las calcomanias de seguridad.
1. iPELIGRO! PARA EVITAR LESIONES
GRAVES O INCLUSO LA MUERTE
Lea el Manual del propietario/operador.
OL1801
Mantenga a ni_os y terceras personas alejadas
de la unidad durante su funcionamiento.
0L4370
No dirija nunca la descarga hacia otras personas,
ya que los objetos lanzados podrian causar da_os
personales. Retire los objetos que la cuchilla
pudiera arrojar.
OL0910
Mire hacia abajo y hacia atrSs antes y durante
el retroceso.
OL4460
Figura 2
OF1627
Mantenga a los niSos fuera del _rea de trabajo
y bajo la supervisi6n de un adulto responsable.
OL4470
NUNCA LLEVE NINOS.
OL4480
En las pendientes, opere hacia arriba y hacia
abajo, pero no transversalmente.
NO ponga la m_quina en funcionamiento en
OL4450
pendientes de m_s de 17°.
• Si la m_quina se para cuesta arriba, detenga la cuchilla
y retroceda lentamente.
• Evite los giros bruscos.
• Mantenga los dispositivos de seguridad (guardas,
protectores, interruptores, etc.) en su lugar y en
buen estado de funcionamiento.
Antes del uso, revise el sistema de interbloqueo
de acuerdo al manual•
Comprenda y conozca la ubicaci6n y funcionamiento
de todos los controles.
E-6

• Nopermitanuncaquepersonassinformaci6noperen
lam_quina.
2. iPELIGRO!
Mire hacia abajo y hacia atrSs antes y durante
el retroceso.
Mantenga a los ni_os fuera del _rea de trabajo
0L4470
y bajo la supervisi6n de un adulto responsable.
de la unidad durante su funcionamiento.
__] antenga a ni_os y terceras personas alejadas
OL4370
antes de ajustar o reparar la unidad.
[_ Apague el motor, quite la Ilave, lea el manual
3. PUNTO DE PINZAMIENTO
Evite los puntos de pinzamiento.
OF3330
4. iPELIGRO! PIEZAS GIRATORIAS
Mantenga siempre los pies y las manos alejados
_]de las piezas giratorias.
OL3030
Mant6ngase siempre alejado del 8rea de descarga.
No dirija la descarga hacia otras personas.
0L0910
Mantenga a la gente alejada de la unidad cuando
6sta est6 en funcionamiento
OL3292
iPIES FUERA! Mantenga siempre los pies
y las manos alejados de las piezas giratorias.
0L4420
EVITE LESIONES.
Mant6ngase alejado de las piezas giratorias.
5. iSUPERFICIES CALIENTES!
a causa del funcionamiento. Deje SIEMPRE
i _] NO toque las piezas que est6n calientes
_ que las piezas se enfrien.
OS073I
6. PIEZAS GIRATORIAS
EVITE LESIONES.
Mant6ngase alejado de las piezas giratorias.
7. iPELIGRO!
EVITE LESIONES.
Mant6ngase alejado de las piezas giratorias.
OL4730
NORMAS DE SEGURIDAD
Lea, comprenda y obedezca todas las prScticas de seguridad
que aparecen en el Manual del propietario/operador antes de
proceder al montaje o funcionamiento. No tener en cuenta
estas instrucciones podria implicar lesiones personales y/o
da_os a la unidad.
Retire SIEMPRE la Ilave y/o el cable de la bujia de encendido
antes de realizar labores de montaje. Un arranque no
intencionado del motor podria provocar lesiones graves
o incluso la muerte.
Realice una inspecci6n general del 8rea de trabajo y de
la unidad para entender:
• El _rea de trabajo • Su unidad
• Todas las calcomanias de seguridad
Determine qu6 accesorios son necesarios y pueden usarse
de manera segura.
Revise la unidad antes de cada utilizaci6n y compruebe que
no faltan calcomanias y protectores y que no est_n da_ados,
que el sistema de interbloqueo de seguridad funciona
correctamente y que los recolectores de c6sped no est_n
deteriorados. Realice las sustituciones o reparaciones
necesarias.
Compruebe SIEMPRE los espacios libres por encima
y a los lados antes de poner la unidad en funcionamiento.
Est6 SIEMPRE al tanto del trSfico al hacerla funcionar
por calles o bordillos.
Mantenga alejados a ni_os y personas adultas.
Mantenga a los ni_os fuera del 8rea de trabajo y bajo
la supervisi6n de un adulto responsable.
Mantenga el _rea de trabajo libre de juguetes, mascotas
y basura. Los objetos arrojados pueden provocar lesiones.
Compruebe que no haya puntos d6biles en plataformas,
rampas o en el firme. Evite las _reas de trabajo desiguales
y el terreno accidentado. Est6 siempre alerta ante los
peligros ocultos y el trSfico.
NO haga funcionar la unidad cerca de desniveles, cunetas
o terraplenes. La unidad podria volcar sQbitamente si una
de sus ruedas se encuentra m_s all_ del borde de un
terrapl6n o cuneta, o si uno de los bordes se hunde.
Las estadisticas indican que los operadores mayores de
60 a_os se hallan implicados en un porcentaje mayor de
lesiones relacionadas con cortac6spedes. Estos operadores
deberian evaluar su capacidad de hacer funcionar el
cortac6sped con seguridad para protegerse y proteger
a los demos de lesiones graves.
OF3450
E-7

LealatotalidaddelManualdelpropietario/operadory
elrestodematerialesdeformaci6n.Sieloperadoroel
mec_niconopuedeleerelmanual,esresponsabilidad
delusuarioexplic_rselo.ElusuarioeselQnicoquepuede
evitarlosaccidentesolesionesasimismo,alosdemoso
losda_osalapropiedad,yesresponsabledelosmismos.
$61oadultosformadospuedenoperaromantenerlaunidad.
Laformaci6nincluyeelfuncionamiento.
Lasnormaslocalespuedenrestringirlaedaddeloperador.
NUNCApermitaalosni_oshacerfuncionarojugarsobrela
m_quinaocercadeella.Est6alertay desconectelaunidad
silosni_osentranenel_readetrabajo.
NUNCAhagafuncionarlaunidadduranteodespu6s
delconsumodemedicaci6n,alcoholodrogas.
Elfuncionamientosegurorequieresuatenci6ntotalyen
perfectoestadodesaludentodomomento.
NUNCAutiliceropasueltaojoyasquepuedanquedar
atrapadasenlaspiezasgiratorias.
Vistaropasadecuadas.
NoIleveNUNCAsandaliasabiertaso zapatosdeIona
duranteelfuncionamiento.Lleveequipodeseguridad
adecuado,calzadoyguantesprotectores.
Utiliceelequipoadecuadoparamejorarsuagarreen
superficiesresbaladizas.
Utilicesiempregalasprotectorasogalasconprotectores
lateralesalponerenfuncionamientoelcortac6sped.
Laspiezasm6vilespuedencortaro amputardedoso una
mano.Envuelvalascuchillaso Ileveguantespararealizar
elmantenimiento.Enloscortac6spedesconvarias
cuchillas,larotaci6ndeunacuchillahar_quetodas
lascuchillasgiren.
NUNCAcoloquelasmanosoningunapartedelcuerpoo
lasropasenelinteriorocercadelaspiezasenmovimiento
duranteelfuncionamientodelaunidad.
MantengalasmanosylospiesSIEMPREalejadosde
laspiezasgiratoriasduranteelfuncionamiento.Laspiezas
giratoriaspuedenamputarmiembros.
SIEMPREsedebemantenerelcuerpoylasmanosalejados
delosorificiosdelospasadoresoboquillasquearrojan
liquidohidr_ulicoapresi6n.
NOtoquelaspiezascalientes.Permitaqueseenfrien.
MantengaSIEMPRElasmanosylospiesalejadosde
lospuntosconriesgodeaprisionamiento.
Elhumodeltubodeescapepuedecausarlesionesgraves
oinclusolamuerte.NOhagafuncionarelmotorenun8rea
cerrada.Proporcionesiempreunabuenaventilaci6n.
Leer,entenderyseguirtodaslasinstruccionesenelmanual
yen lam_quinaantesdearrancar.
Entender:
• C6moutilizartodosloscontroles
• Lasfuncionesdetodosloscontroles
• C6moPARARencasodeemergencia
• Caracteristicasdeladirecci6ny losfrenos.
• Elradiodegiroylasholguras
Mantengalosdispositivosolasguardasdeseguridadensu
sitioyfuncionandocorrectamente.NOmodifiqueniretire
NUNCAlosdispositivosdeseguridad.
No haga funcionar la maquina sin que todo el recolector
de cesped o el protector de descarga esten en su sitio.
Detenga el motor antes de quitar el recolector de c6sped
o de desobstruir la tolva.
Compruebe que el sistema de interbloqueo de seguridad
funciona correctamente. NO haga funcionar la unidad si
el sistema de interbloqueo de seguridad est_ da_ado
o desactivado.
Ponga en marcha y haga funcionar la unidad s61ocuando
est6 sentado en la posici6n del operador. Las palancas de
control de la direcci6n deben estar en punto muerto, la TDF
desactivada y el freno de mano activado al arrancar el motor.
Tenga cuidado al aproximarse a esquinas ciegas, arbustos,
_rboles y otros objetos que puedan impedir la visi6n.
El polvo, humo, niebla, etc. pueden reducir la visi6n y causar
un accidente. Corte el c6sped s61o durante el dia o con luz
artificial adecuada.
Evite las superficies resbaladizas. AsegQrese de tener
un buen agarre al firme.
NO corte el c6sped si 6ste se encuentra hQmedo.
La tracci6n reducida podria provocar derrapes y afectar
a la estabilidad de la m_quina.
Permanezca pendiente del trSfico al cruzar o poner en
funcionamiento la m_quina cerca de una carretera.
Nunca Ileve pasajeros.
NO intente estabilizar la m_quina poniendo el pie a tierra.
No dirija nunca la descarga hacia otras personas o hacia
articulos que pudieran sufrir da_os por causa de los objetos
lanzados. Sea extremadamente cuidadoso en las superficies
con grava.
Mant6ngase siempre alejado del 8rea de descarga.
Desactive SIEMPRE la TDF, detenga la unidad y el motor,
saque la Ilave, active el freno de estacionamiento y permita
que todas las piezas se detengan antes de abandonar la
posici6n del operador.
Nunca active la TDF al mismo tiempo que se eleva el
accesorio ni cuando el accesorio est6 en la posici6n elevada.
NO haga funcionar la unidad a demasiada velocidad.
No cambie la configuraci6n que rige el motor ni Io utilice
a demasiada velocidad. Aminore la velocidad antes de girar.
NO haga funcionar la m_quina en marcha atrSs a menos
que sea absolutamente necesario. Mire SIEMPRE hacia
abajo y hacia atrSs antes de retroceder.
Detenga y revise el equipo si golpea un objeto o si se
produjeran vibraciones inusuales. Antes de volver a poner
en marcha la unidad, realice las reparaciones necesarias.
No realice nunca ajustes ni reparaciones con el motor en
funcionamiento.
Las cuchillas del cortac6sped est_n afiladas y podrian
cortarle. Envuelva las cuchillas o Ileve guantes y tenga
cuidado cuando las repare. No suelde ni enderece NUNCA
las cuchillas del cortac6sped.
E-8

Larotaci6ndeunadelascuchillaspuedecausarlarotaci6n
delasotras.
Tometodaslasprecaucionesposiblescuandodejelaunidad
desatendida.Apagueelmotor.Retireelcabledelabujia
ysepSrelodelabujia.
QuiteSIEMPRElaIlaveparaimpedirsuusonoautorizado.
Compruebeelpesodelascargas.Limitelascargas
aaquellasquesepuedancontrolarconseguridad
yquelaunidadpuedemanejarconseguridad.
DesconectelaTDFcuandonoutiliceelaccesorio.
Laalimentaci6nalaccesoriosedebecancelarSIEMPRE
alrealizarunviaje,cruzarcaminosdeentrada,etc.
Enlaspendientes,corteelc6spedhaciaarribayhacia
abajo,notransversalmente.
NOlahagafuncionarenpendientesdem_sde17grados.
Serecomiendalautilizaci6ndeunROPS(RollOver
ProtectionSystem- Sistemadeprotecci6ncontravuelcos)
paratrabajoenpendientes.ConsulteelapartadoAccesorios.
LleveSiempreelcintur6ndeseguridadcuandosehaga
funcionarlaunidadconunsistemadeprotecci6nantivuelco
(ROPS).
Hagaquetodoslosmovimientosenlaspendientessean
lentos y graduales. NO realice cambios bruscos en la
velocidad o la direcci6n.
Evite arrancar o parar en pendientes. Si los neum_ticos
pierden tracci6n, desactive las cuchillas y avance
lentamente en linea recta hacia abajo.
Si no puede retroceder en una pendiente o no se siente
c6modo en ella, no corte el c6sped en ella.
NO aparque en pendientes a no ser que sea necesario.
Cuando aparque en pendientes, bloquee las ruedas.
Accione siempre el freno de estacionamiento.
Utilice una velocidad reducida. Los neum_ticos pueden
perder tracci6n en las pendientes incluso si los frenos
funcionan adecuadamente.
No anule la transmisi6n cuando se est6 en una pendiente.
Rem61quela s61o con una m_quina que tenga un dispositivo
de enganche para remolcar. Fije el quipo remolcado s61oen
el punto de enganche.
Siga las recomendaciones del fabricante acerca de los limites
de peso para el equipo remolcado y para el remolque en
pendientes.
NUNCA permita que haya ni_os ni terceros dentro o sobre
el equipo que se est_ remolcando.
En las colinas, el peso del equipo remolcado puede causar
la p@dida de control.
DesplScese lentamente y deje un distancia libre extra para
detenerse.
Tenga especial cuidado al cargar o descargar la unidad
desde o hacia un remolque o cami6n.
Asegure la unidad por el chasis para transportarla. NUNCA
la asegure por vSstagos o conexiones que podrian verse
da_ados.
La m_quina NO debe transportarse con el motor en marcha.
Desconecte SIEMPRE la alimentaci6n al accesorio y corte
el paso de combustible cuando se transporte la unidad.
Mantenga la unidad libre de residuos. Limpie las salpicaduras
de aceite o combustible.
Este producto viene equipado con un motor de combusti6n
interna. NO use la unidad en terreno baldio, forestal o de
monte bajo a menos que el sistema de escape venga
equipado con un amortiguador de chispas que cumpla
las leyes locales, estatales o federales. Si se usa, el
amortiguador de chispas deber8 mantenerse en un estado
de funcionamiento efectivo por parte del operador.
El combustible es altamente inflamable y los vapores
que emite son explosivos. Man6jelo con cuidado.
Use un recipiente aprobado para el combustible.
NO fume, NO provoque chispas, NO acerque llamas.
Deje SIEMPRE que el motor se enfrie antes de efectuar
reparaciones.
NUNCA Ilene el dep6sito de combustible con el motor en
marcha o cuando est6 caliente.
NUNCA Ilene o purgue el dep6sito en un recinto cerrado.
Vuelva a colocar el tap6n del combustible con mucho
cuidado y limpie el combustible derramado.
No Ilene nunca los recipientes para combustible dentro de
un vehiculo o en un cami6n o remolque con un revestimiento
de pl_stico. Coloque siempre los recipientes en el suelo
lejos de su vehiculo antes de Ilenarlos.
Cuando sea posible y prSctico, saque los equipos impulsados
por gasolina del cami6n o remolque y rep6stelos en el suelo.
Si esto no fuera posible, reposte dicho equipamiento en un
remolque con un contenedor port_til, antes que directamente
desde un surtidor de gasolina.
En todo momento, la boquilla del surtidor debe mantenerse
en contacto con el borde del dep6sito de gasolina o de la
abertura del recipiente hasta que el repostado se complete.
No use un dispositivo de bloqueo-apertura de la boquilla.
Si se derrama combustible en la ropa, 6sta debe cambiarse
inmediatamente.
Evite las descargas el6ctricas. Los objetos en contacto con
ambos terminales de la bateria al mismo tiempo pueden
sufrir da_os y al mismo tiempo da_ar la unidad. NO invierta
las conexiones de la bateria.
Las conexiones inversas pueden resultar en chispas que
pueden causar lesiones graves. Siempre conecte el cable
positivo (+) del cargador al terminal positivo (+) y el cable
negativo (-) al terminal negativo (-).
SIEMPRE desconecte PRIMERO el cable negativo (-),
y DESPUt_S el cable positivo (+). SIEMPRE conecte
el cable positivo (+) PRIMERO y DESPUt_S el cable
negativo (-).
Los gases explosivos de la bateria pueden causar lesiones
graves o incluso la muerte. El liquido venenoso de la bateria
contiene _cido sulfQrico y su contacto con la piel, los ojos
o la ropa puede ocasionar quemaduras quimicas graves.
No provoque chispas, no acerque llamas ni fume cerca de
la bateria.
E-9
LleveSIEMPREpuestaslasgafasdeseguridady ropa
protectoracercadelabateria.Utiliceherramientasaisladas.
NOINCLINElabateriaaun8ngulodem_sde45°en
ningunadirecci6n.
MantengaSIEMPRElasbateriasfueradelalcancede
losnifios.
Losbornesdelabateria,terminalesyaccesoriosrelacionados
contienenplomoycompuestosdeplomo,sustanciasqueen
elestadodeCaliforniasesabequecausanc_ncerydafios
alsistemareproductor.L_veselasmanosdespu6sde
manejarlos.
BloqueeSIEMPRElasruedasyasegQresedequetodoslos
soportesdeelevaci6nsonresistentesyest_nfijos,adem_s
dequesoportanelpesodelaunidadduranteelmantenimiento.
Liberelentamentelapresi6ndeloscomponentesconenergia
almacenada.
NointenteNUNCArealizarajustesenlaunidadconelmotor
enfuncionamiento(salvoqueserecomiendeIocontrario).
Apagueelmotor,quitelaIlaveoelcabledelabujiayespere
aquetodaslaspiezasm6vilessedetenganantesderealizar
elmantenimientoolalimpieza.
Compruebeconfrecuenciaelfuncionamientodelfrenode
estacionamiento.Realiceajustesy reparacionessegQnse
requiera.
MantengaSIEMPRElaunidadencondicionessegurasde
funcionamiento.Unsilenciadordafiadoodesgastadopuede
provocarunincendioounaexplosi6n.
Mantengao reemplacelasetiquetasdeseguridade
instruccionessegQnseanecesario.
NoalmaceneNUNCAlaunidadconcombustibleenel
dep6sitoenelinteriordeunedificiodondeexistanfuentesde
ignlclon.
Cierreelpasodecombustibleydejequeelmotorseenfrie
completamenteantesdecubriroalmacenarlaunidadenun
recintocerrado.
Limpielahierbay losresiduosdelaunidad,especialmente
alrededordelsilenciadorydelmotor,paraevitarquese
produzcanincendios.
Paraunalmacenamientoduranteunlargoperiododetiempo,
cierreelcombustibleylimpielaunidadcompletamente.
VeaelManualdelmotorparalasinstruccionescorrectas
dealmacenaje.
Bajelaunidaddecorteamenosqueseutiliceunatraba
mec_nicasegura.
UsarQnicamenteaditamentoso accesoriosdisefiadospara
launidad.
Compruebetodalatornilleriaaintervalosregulares,especial-
mentelospernosdesujeci6ndelacuchilla.Mantengatodos
lostornillosbienapretados.
Compruebeloscomponentesdelaccesorioconfrecuencia.
Siestuvierandesgastadosodeteriorados,reemplSceloscon
piezasrecomendadasporelfabricante.
E-10

iADVERTENCIA!EVITELASLESIONES.
Antesdeproceder,leaycomprendatoda
lasecci6ndeSeguridad.
MONTAJE DE LA UNIDAD
El paquete contiene:
la unidad, la plataforma de corte y un paquete con manuales
Desembalaje de la unidad
Retire la unidad y el resto de componentes del contenedor
de envio. Abra las vSIvulas de desviaci6n (v6ase
TRASLADO DE LA UNIDAD CON EL MOTOR DETENIDO
en la pSgina 16). Saque la unidad del contenedor en una
superficie nivelada. Cierre las vSIvulas de desviaci6n.
Comprobar la presibn de los neum&ticos
V6ase ESPECIFICACIONES en la p_gina 30.
Conexibn de la bateria
Conecte el cable negativo (-) de la bateda a la bateda
(consulte Cambie la bateria en la p_gina 20 y realice
los pasos del 2 al 3 de la secci6n de instalaci6n).
Revisar el aceite del motor
Consultar el manual del motor.
Revisar el aceite hidr&ulico
V6ase L/QUIDO HIDRAULICO en la p_gina 19.
Llenado del depbsito de combustible
V6ase LLENADO DEL DEPOSITO DE COMBUSTIBLE en
la pSgina 15.
Tornilleria
Comprobar que la tornilleria no est6 suelta.
Revisibn del sistema de intertraba de seguridad
Posicionamiento de las palancas de direccibn
Retirelos espaciadores y pernos de las palancas de direcci6n.
Ponga las palancas de direcci6n en la posici6n de
funcionamiento. Vuelva a instalar los espaciadores, pernos
y las tuercas. Apriete bien la tornilleria. Vea Figura 3.
3
2
1. Palanca de direcci6n en 3. Palanca de direcci6n
posici6n de envio en posici6n de
2. Espaciadores y tornilleria funcionamiento
Figura 3
OF3520
iADVERTENCIA! Los fallos en el sistema de
interbloqueo de seguridad y efuncionamiento
incorrecto de la unidad pueden resultar en la muerte
o lesiones graves. Compruebe este sistema cada
vez que haga funcionar la unidad. Si el sistema no
funciona correctamente, no Io haga funcionar hasta
que se hayan realizado reparaciones.
V6ase Sistema de interbloqueo de seguridad en la pSgina 13.
Comprobacibn del nivel y la inclinacibn de
la cuchilla
V6ase Nivelaci6n de la plataforma del cortac6sped en la
pSgina 26.
Revisar el funcionamiento de todos los controles
Asegurarse de que la unidad funciona correctamente.
iADVERTENCIA! EL FALLO DE LOS
CONTROLES podria causar la muerte o lesiones
graves.
E-11
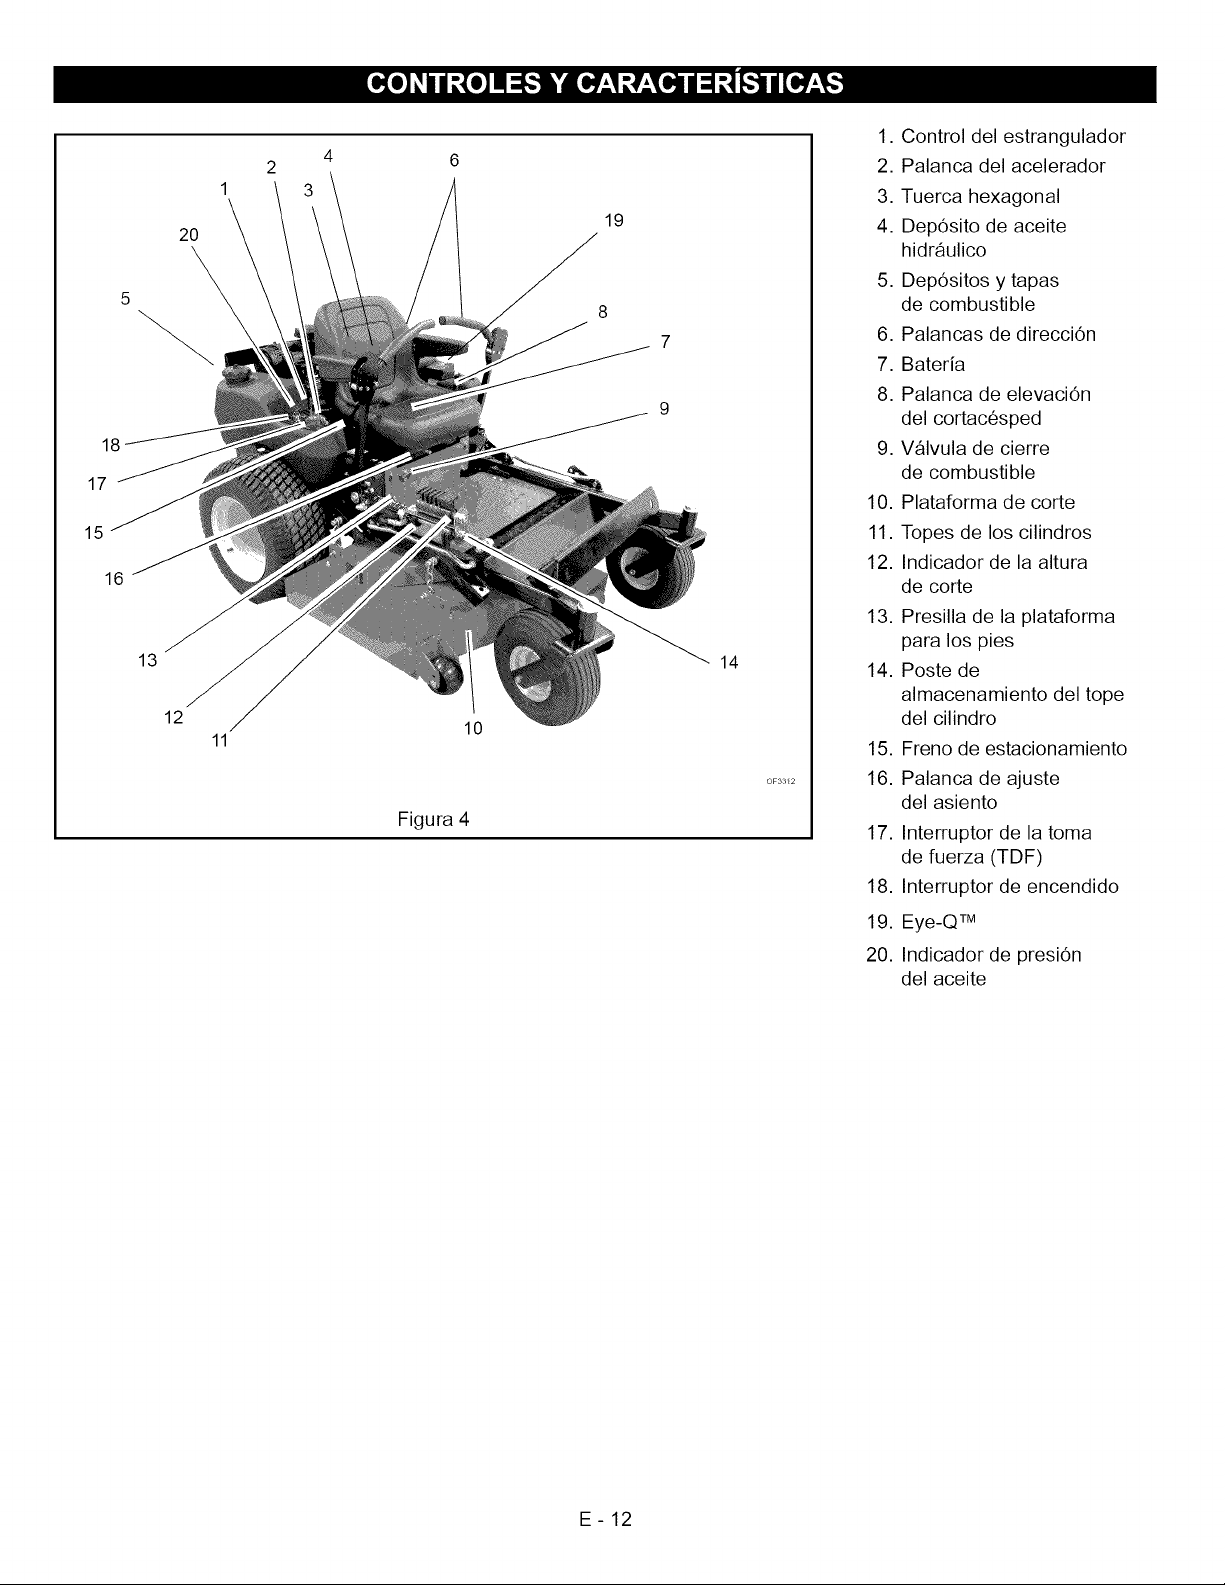
15
17
18
16
13
12
20
11
Figura 4
10
1. Control del estrangulador
2. Palanca del acelerador
3. Tuerca hexagonal
19
4. Dep6sito de aceite
hidrSulico
5. Dep6sitos y tapas
8
7
de combustible
6. Palancas de direcci6n
7. Bateria
8. Palanca de elevaci6n
del cortac6sped
9. V_lvula de cierre
de combustible
10. Plataforma de corte
11. Topes de los cilindros
12. Indicador de la altura
de corte
13. Presilla de la plataforma
para los pies
14
14. Poste de
almacenamiento del tope
del cilindro
15. Freno de estacionamiento
16. Palanca de ajuste
del asiento
17. Interruptor de la toma
de fuerza (TDF)
18. Interruptor de encendido
19. Eye-Q TM
20. Indicador de presi6n
del aceite
E-12
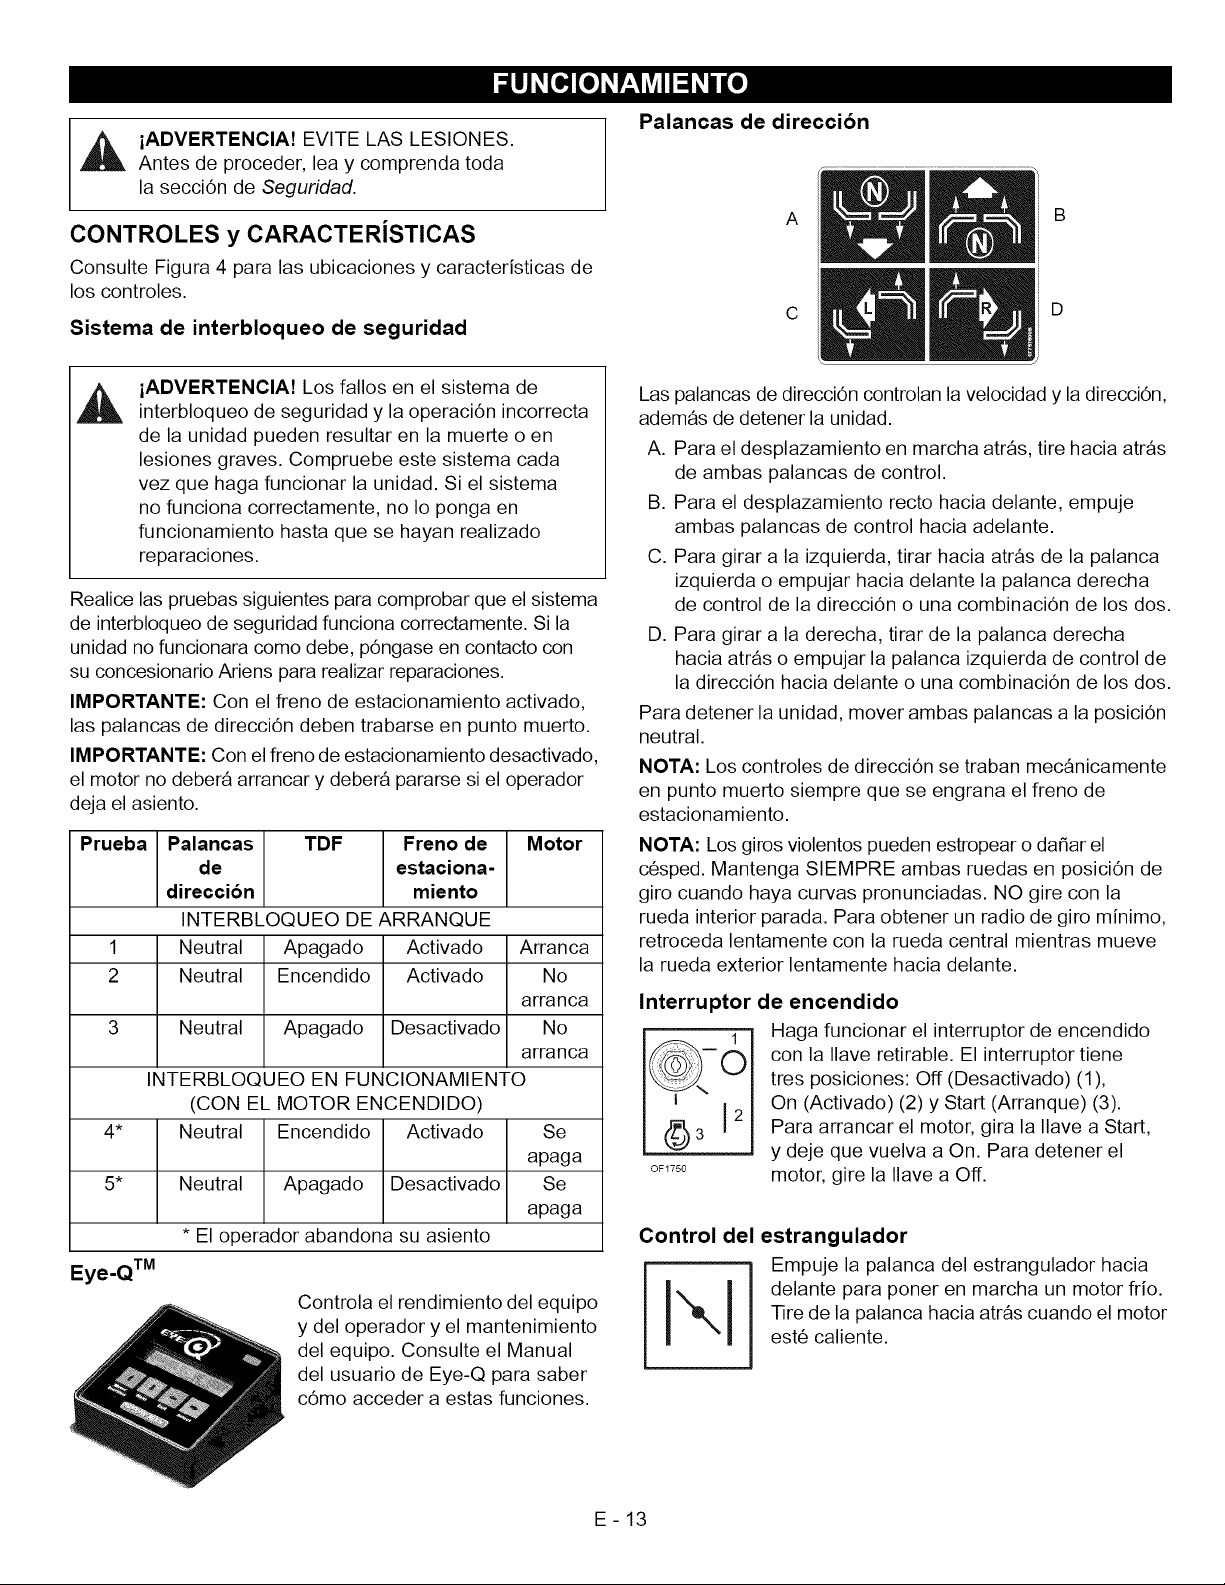
,_ iADVERTENCIA! EVITE LAS LESIONES.
Antes de proceder, lea y comprenda toda
la secci6n de Seguridad.
CONTROLES y CARACTERiSTICAS
Consulte Figura 4 para las ubicaciones y caracteristicas de
los controles.
Sistema de interbloqueo de seguridad
Palancas de direcci6n
A
C
D
iADVERTENCIA! Los fallos en el sistema de
interbloqueo de seguridad y la operaci6n incorrecta
de la unidad pueden resultar en la muerte o en
lesiones graves. Compruebe este sistema cada
vez que haga funcionar la unidad. Si el sistema
no funciona correctamente, no Io ponga en
funcionamiento hasta que se hayan realizado
reparaciones.
Realice las pruebas siguientes para comprobar que el sistema
de interbloqueo de seguridad funciona correctamente. Si la
unidad no funcionara como debe, p6ngase en contacto con
su concesionario Ariens para realizar reparaciones.
IMPORTANTE: Con el freno de estacionamiento activado,
las palancas de direcci6n deben trabarse en punto muerto.
IMPORTANTE: Con el freno de estacionamiento desactivado,
el motor no deber8 arrancar y deber8 pararse si el operador
deja el asiento.
Prueba Palancas TDF Freno de Motor
de estaciona-
direccion rniento
INTERBLOQUEO DE ARRANQUE
1 Neutral Apagado Activado
2 Neutral Encendido Activado
3 Neutral Apagado Desactivado
INTERBLOC UEO EN FUNCIONAMIENTO
(CON EL MOTOR ENCENDIDO)
4* Neutral Encendido Activado Se
5* Neutral Apagado Desactivado Se
* El operador abandona su asiento
Eye-QTM
Controla el rendimiento del equipo
y del operador y el mantenimiento
del equipo. Consulte el Manual
del usuario de Eye-Q para saber
c6mo acceder a estas funciones.
Arranca
No
arranca
No
arranca
apaga
apaga
Las palancas de direcci6n controlan la velocidad y ladirecci6n,
adem_s de detener la unidad.
A. Para el desplazamiento en marcha atrSs, tire hacia atrSs
de ambas palancas de control.
B. Para el desplazamiento recto hacia delante, empuje
ambas palancas de control hacia adelante.
C. Para girar a la izquierda, tirar hacia atrSs de la palanca
izquierda o empujar hacia delante la palanca derecha
de control de la direcci6n o una combinaci6n de los dos.
D. Para girar a la derecha, tirar de la palanca derecha
hacia atrSs o empujar la palanca izquierda de control de
la direcci6n hacia delante o una combinaci6n de los dos.
Para detener la unidad, mover ambas palancas a la posici6n
neutral.
NOTA: Los controles de direcci6n se traban mec_nicamente
en punto muerto siempre que se engrana el freno de
estacionamiento.
NOTA: Los giros violentos pueden estropear o dafiar el
c6sped. Mantenga SIEMPRE ambas ruedas en posici6n de
giro cuando haya curvas pronunciadas. NO gire con la
rueda interior parada. Para obtener un radio de giro minimo,
retroceda lentamente con la rueda central mientras mueve
la rueda exterior lentamente hacia delante.
Interruptor de encendido
Haga funcionar el interruptorde encendido
con la Ilave retirable. El interruptor tiene
tres posiciones: Off (Desactivado) (1),
On (Activado) (2) y Start (Arranque) (3).
Para arrancar el motor, gira la Ilave a Start,
y deje que vuelva a On. Para detener el
OF1750 motor, gire la Ilave a Off.
Control del estrangulador
Empuje la palanca del estrangulador hacia
] X,iX. ] delante para poner en marcha un motor frio.
Tire de la palanca hacia atrSs cuando el motor
!
est6 caliente.
E-13
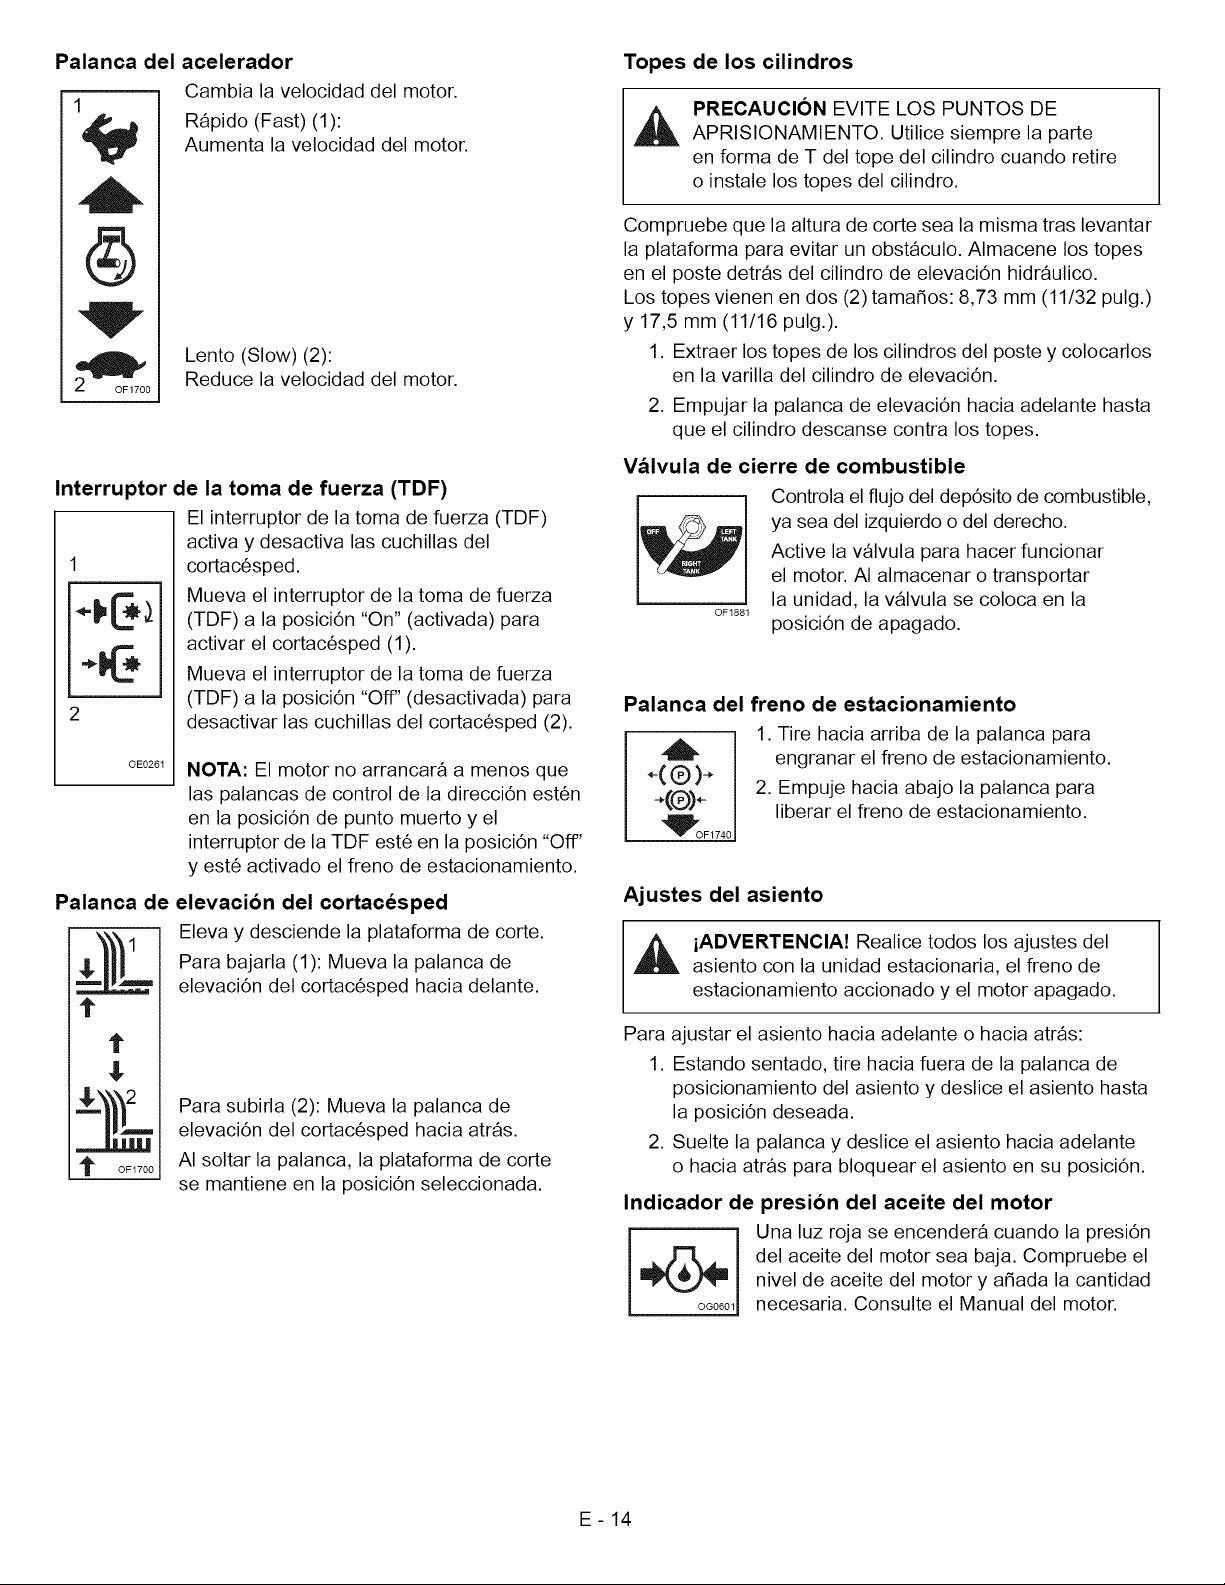
Palanca del acelerador
1
21_ ° Lento (Slow) (2):
Interruptor de la toma de fuerza (TDF)
r_ Mueva el interruptor de la toma de fuerza
_"_ _,= _ (TDF) a la posici6n "On" (activada) para
it"&
"_lJL_ Mueva el interruptor de la toma de fuerza
2 desactivar las cuchillas del cortac6sped (2).
Palanca de elevacibn del cortac6sped
&
Cambia la velocidad del motor.
R_pido (Fast) (1):
Aumenta la velocidad del motor.
Reduce la velocidad del motor.
El interruptor de la toma de fuerza (TDF)
activa y desactiva las cuchillas del
cortac6sped.
activar el cortac6sped (1).
(TDF) a la posici6n "Off" (desactivada) para
OE026I
NOTA: El motor no arrancar_ a menos que
las palancas de control de la direcci6n est6n
en la posici6n de punto muerto y el
interruptor de la TDF est6 en la posici6n "Off'
y est6 activado el freno de estacionamiento.
Eleva y desciende la plataforma de corte.
Para bajarla (1): Mueva la palanca de
elevaci6n del cortac6sped hacia delante.
t
t
$
Para subirla (2): Mueva la palanca de
elevaci6n del cortac6sped hacia atr_s.
t OF1700
AI soltar la palanca, la plataforma de corte
se mantiene en la posici6n seleccionada.
Topes de los cilindros
PRECAUCION EVlTE LOS PUNTOS DE
APRISIONAMIENTO. Utilice siempre la parte
en forma de T del tope del cilindro cuando retire
o instale los topes del cilindro.
Compruebe que la altura de corte sea la misma tras levantar
la plataforma para evitar un obst_culo. Almacene los topes
en el poste detr_s del cilindro de elevaci6n hidr_ulico.
Los topes vienen en dos (2)tama_os: 8,73 mm (11/32 pulg.)
y 17,5 mm (11/16 pulg.).
1. Extraer los topes de los cilindros del poste y colocarlos
en la varilla del cilindro de elevaci6n.
2. Empujar la palanca de elevaci6n hacia adelante hasta
que el cilindro descanse contra los topes.
V&lvula de cierre de combustible
Controla el flujo del dep6sito de combustible,
ya sea del izquierdo o del derecho.
Active la vSIvula para hacer funcionar
el motor. AI almacenar o transportar
la unidad, la vSIvula se coloca en la
OF1881
posici6n de apagado.
Palanca del freno de estacionamiento
.i
,-(®)-,
÷(®)÷
_'OF 1740
Ajustes del asiento
iADVERTENCIA! Realice todos los ajustes del
asiento con la unidad estacionaria, el freno de
estacionamiento accionado y el motor apagado.
Para ajustar el asiento hacia adelante o hacia atr_s:
1. Estando sentado, tire hacia fuera de la palanca de
posicionamiento del asiento y deslice el asiento hasta
la posici6n deseada.
2. Suelte la palanca y deslice el asiento hacia adelante
o hacia atr_s para bloquear el asiento en su posici6n.
Indicador de presibn del aceite del motor
1. Tire hacia arriba de la palanca para
engranar el freno de estacionamiento.
2. Empuje hacia abajo la palanca para
liberar el freno de estacionamiento.
E-14
nivel de aceite del motor y a_ada la cantidad
i Una luz roja se encender_ cuando la presi6n
del aceite del motor sea baja. Compruebe el
1 necesaria. Consulte el Manual del motor.

Horbmetro
Registra el nOmero total de horas que
el motor ha estado en funcionamiento.
IMPORTANTE: Mantenga un registro de
las lecturas del cuentahoras como referencia
para los intervalos recomendados de lubri-
caci6n y mantenimiento.
NOTA: Para obtener lecturas exactas,
asegQrese de que el interruptor de encendido
est6 APAGADO cuando la unidad no est6
funcionando.
LLENADO DEL DEPOSITO DE COMBUSTIBLE
iADVERTENCIA! EVlTE LAS LESIONES.
Ante de proceder, lea y comprenda toda
la secci6n de Seguridad.
Agregue la cantidad de combustible necesaria al dep6sito
de combustible. Consulte el Manual del motor para el tipo
y grado correcto del combustible.
Para agregar combustible al depbsito
de combustible:
1. Coloque la unidad en un _rea abierta o bien ventilada.
2. Apagar el motor.
3. Limpie la tapa del combustible y el _rea circundante a
la misma para evitar que entre suciedad en el dep6sito
de combustible. Retire la tapa del dep6sito de
combustible.
4. Llene el dep6sito de combustible hasta 25 mm (1 pulg.)
por debajo de la parte inferior de la boca de Ilenado.
5. Vuelva a colocar la tapa del combustible y apri6tela.
6. Limpie el combustible que se haya derramado.
PREARRANQUE
PRECAUCION Asegurarse de que toda la tornilleria
est_ apretada, todos los dispositivos de seguridad
est6n en su lugar y que se hayan realizado correcta-
mente todos los ajustes.
1. Compruebe el sistema de interbloqueo
de seguridad
Si dicho sistema no funciona como se ha descrito, no haga
funcionar la unidad hasta que se repare.
2. Compruebe el depurador de aire
Compruebe que no haya suciedad en el filtro de aire y
limpielo si es necesario. Siga el programa de mantenimiento
del Manual del motor.
3. Compruebe el combustible del motor y el aceite
del c&rter
Compruebe el combustible y agregue la cantidad necesaria.
Compruebe que el c_rter del motor est6 Ileno de aceite.
Siga el programa de mantenimiento del Manual del motor.
4. Compruebe la presibn de los neum&ticos
5. Revise el nivel del fluido hidr&ulico
6. Ajuste el asiento
AsegL_rese de que puedan alcanzarse f_cilmente todos
los controles desde la posici6n del operador.
7. Ajuste la altura de corte
Aseg@ese de que la plataforma est6 a la altura de corte
correcta.
PARADA EN CASO DE EMERGENCIA
La unidad puede detenerse inmediatamente en cualquier
momento girando la Ilave de contacto a la posici6n de
apagado.
ARRANQUEYPARADA
CAUTION: Lea primero todo el Manual del
propietario/operador, el Manual del embrague
y el Manual del motor. NO intente arrancar el motor
en este momento.
NOTA: NO haga funcionar el motor de arranque durante
m_s de 15 segundos por cada minuto, ya que de otro modo
se podria recalentar o da_ar. Si el motor no arranca, vea
LOCALIZACION DE AVER/AS en la pSgina 28 o consulte
el Manual del motor.
NOTA: El motor no arrancar8 a menos que las palancas de
control de la direcci6n est6n en punto muerto, el interruptor
de la TDF est6 en posici6n apagada y el freno de estaciona-
miento est6 activado.
Para
arrancar:
1.
Si el motor est_ frio, mueva el control del estrangulador
a la posici6n 'On' (activado). Si el motor est_ templado
o caliente, no utilice el estrangulador.
,
Mueva el acelerador a la posici6n 3/4 rSpido.
Encontrar8 instrucciones detalladas en el Manual
del motor.
3. Poner la Ilave de contacto en el interruptor y girar
a la posici6n de arranque.
4. Tan pronto como el motor arranque,soltar la Ilave.
5. Mueva el control del estrangulador a la posici6n
desactivada (Off). Espere a que el motor funcione
con suavidad antes de iniciar la operaci6n.
Para apagar la unidad:
1. Ponga las palancas de direcci6n en punto muerto.
Desactive la TDF y accione el freno de estaciona-
miento.
2. Mover la palanca del acelerador a la posici6n
de despacio.
3. Girar la Ilave de contacto a la posici6n apagado.
E-15
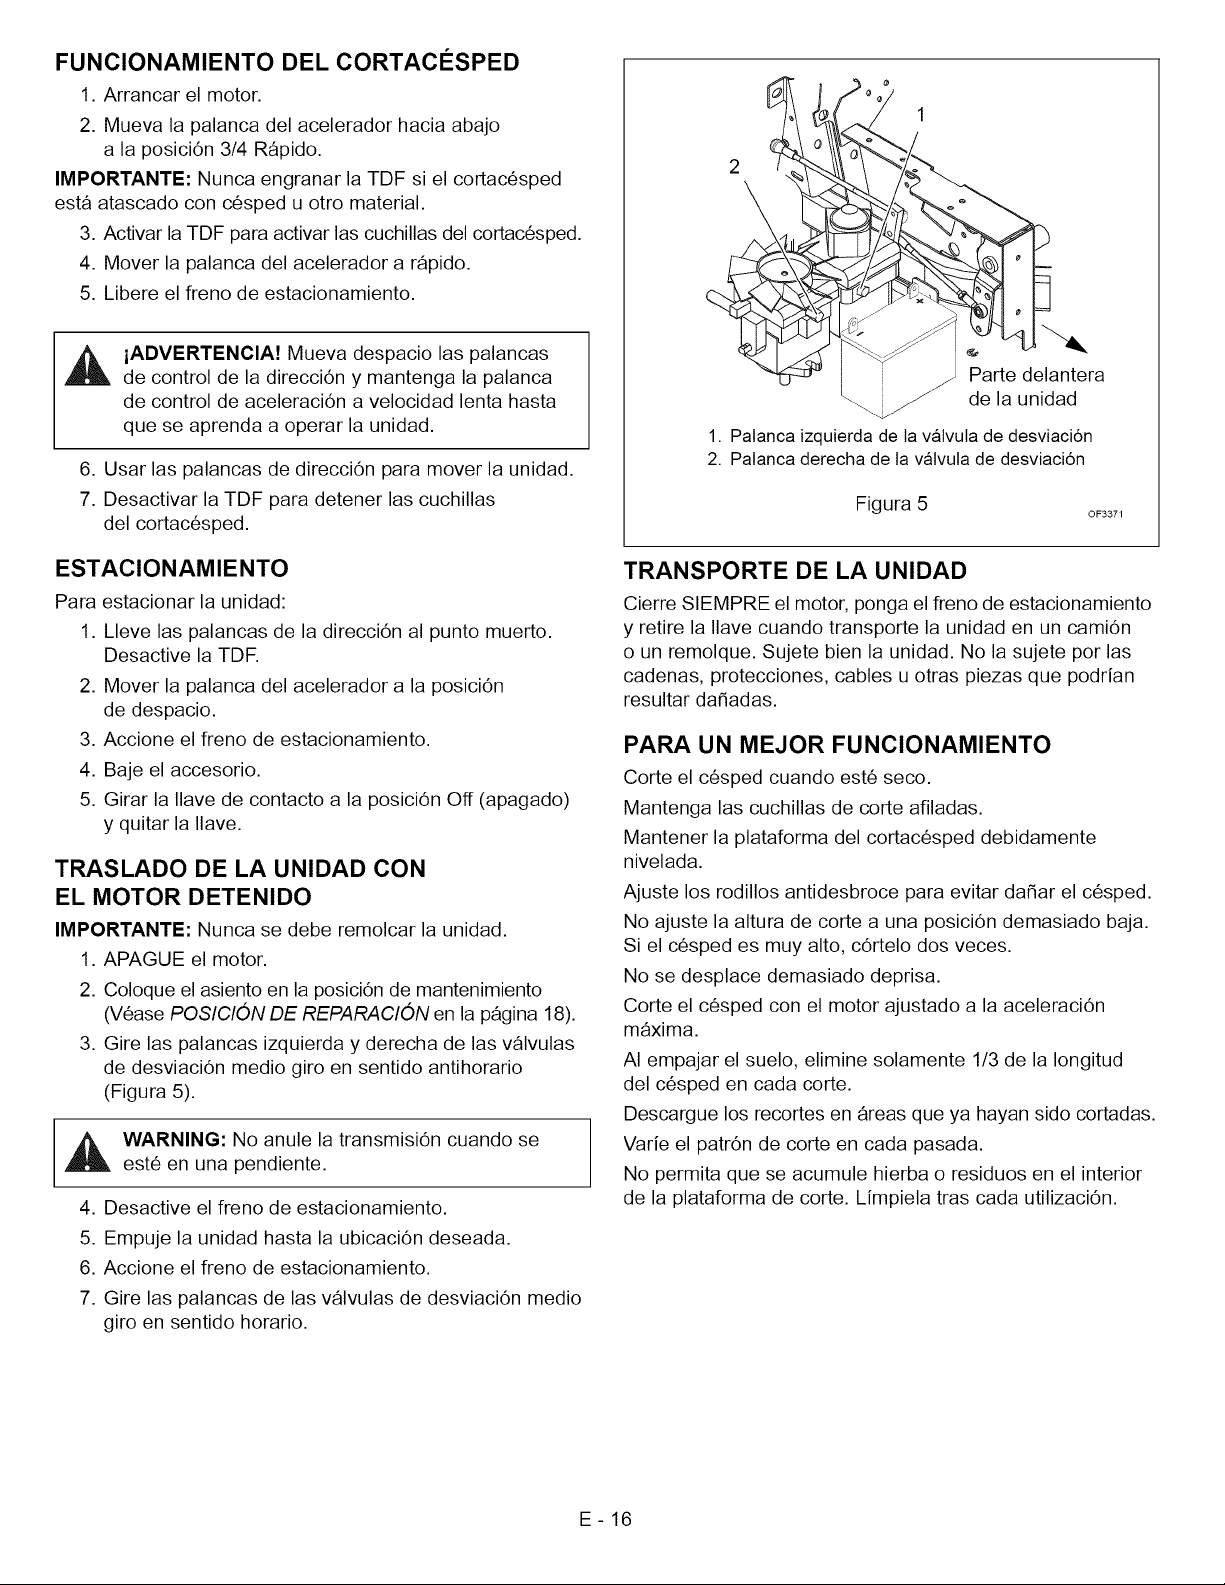
FUNCIONAMIENTO DEL CORTAC¢:SPED
1. Arrancar el motor.
2. Mueva la palanca del acelerador hacia abajo
a la posici6n 3/4 R_pido.
IMPORTANTE: Nunca engranar la TDF si el cortac6sped
est_ atascado con c6sped u otro material.
3. Activar la TDF para activar las cuchillas del cortac6sped.
4. Mover la palanca del acelerador a rSpido.
5. Libere el freno de estacionamiento.
2
,_ iADVERTENCIA! Mueva despacio las palancas
de control de la direcci6n y mantenga la palanca
de control de aceleraci6n a velocidad lenta hasta
que se aprenda a operar la unidad.
6. Usar las palancas de direcci6n para mover la unidad.
7. Desactivar la TDF para detener las cuchillas
del cortac6sped.
ESTAClONAMIENTO
Para estacionar la unidad:
1. Lleve las palancas de la direcci6n al punto muerto.
Desactive la TDF.
2. Mover la palanca del acelerador a la posici6n
de despacio.
3. Accione el freno de estacionamiento.
4. Baje el accesorio.
5. Girar la Ilave de contacto a la posici6n Off (apagado)
y quitar la Ilave.
TRASLADO DE LA UNIDAD CON
EL MOTOR DETENIDO
IMPORTANTE: Nunca se debe remolcar la unidad.
1. APAGUE el motor.
2. Coloque el asiento en la posici6n de mantenimiento
(V6ase POSICION DE REPARACION en la p_gina 18).
3. Gire las palancas izquierda y derecha de las v_lvulas
de desviaci6n medio giro en sentido antihorario
(Figura 5).
_IL ARNING: No anule la transmisi6n cuando se
est6 en una pendiente.
4. Desactive el freno de estacionamiento.
5. Empuje la unidad hasta la ubicaci6n deseada.
6. Accione el freno de estacionamiento.
7. Gire las palancas de las vSIvulas de desviaci6n medio
giro en sentido horario.
Parte delantera
de la unidad
1. Palanca izquierdade ta vatvula de desviaci6n
2. Palancaderecha de lavalvula de desviaci6n
Figura 5
OF3371
TRANSPORTE DE LA UNIDAD
Cierre SIEMPRE el motor, ponga el freno de estacionamiento
y retire la Ilave cuando transporte la unidad en un cami6n
o un remolque. Sujete bien la unidad. No la sujete por las
cadenas, protecciones, cables u otras piezas que podrian
resultar da_adas.
PARA UN MEJOR FUNCIONAMIENTO
Corte el c6sped cuando est6 seco.
Mantenga las cuchillas de corte afiladas.
Mantener la plataforma del cortac6sped debidamente
nivelada.
Ajuste los rodillos antidesbroce para evitar da_ar el c6sped.
No ajuste la altura de corte a una posici6n demasiado baja.
Si el c6sped es muy alto, c6rtelo dos veces.
No se desplace demasiado deprisa.
Corte el c6sped con el motor ajustado a la aceleraci6n
m_xima.
AI empajar el suelo, elimine solamente 1/3 de la Iongitud
del c6sped en cada corte.
Descargue los recortes en 8reas que ya hayan sido cortadas.
Varie el patr6n de corte en cada pasada.
No permita que se acumule hierba o residuos en el interior
de la plataforma de corte. Limpiela tras cada utilizaci6n.
E-16
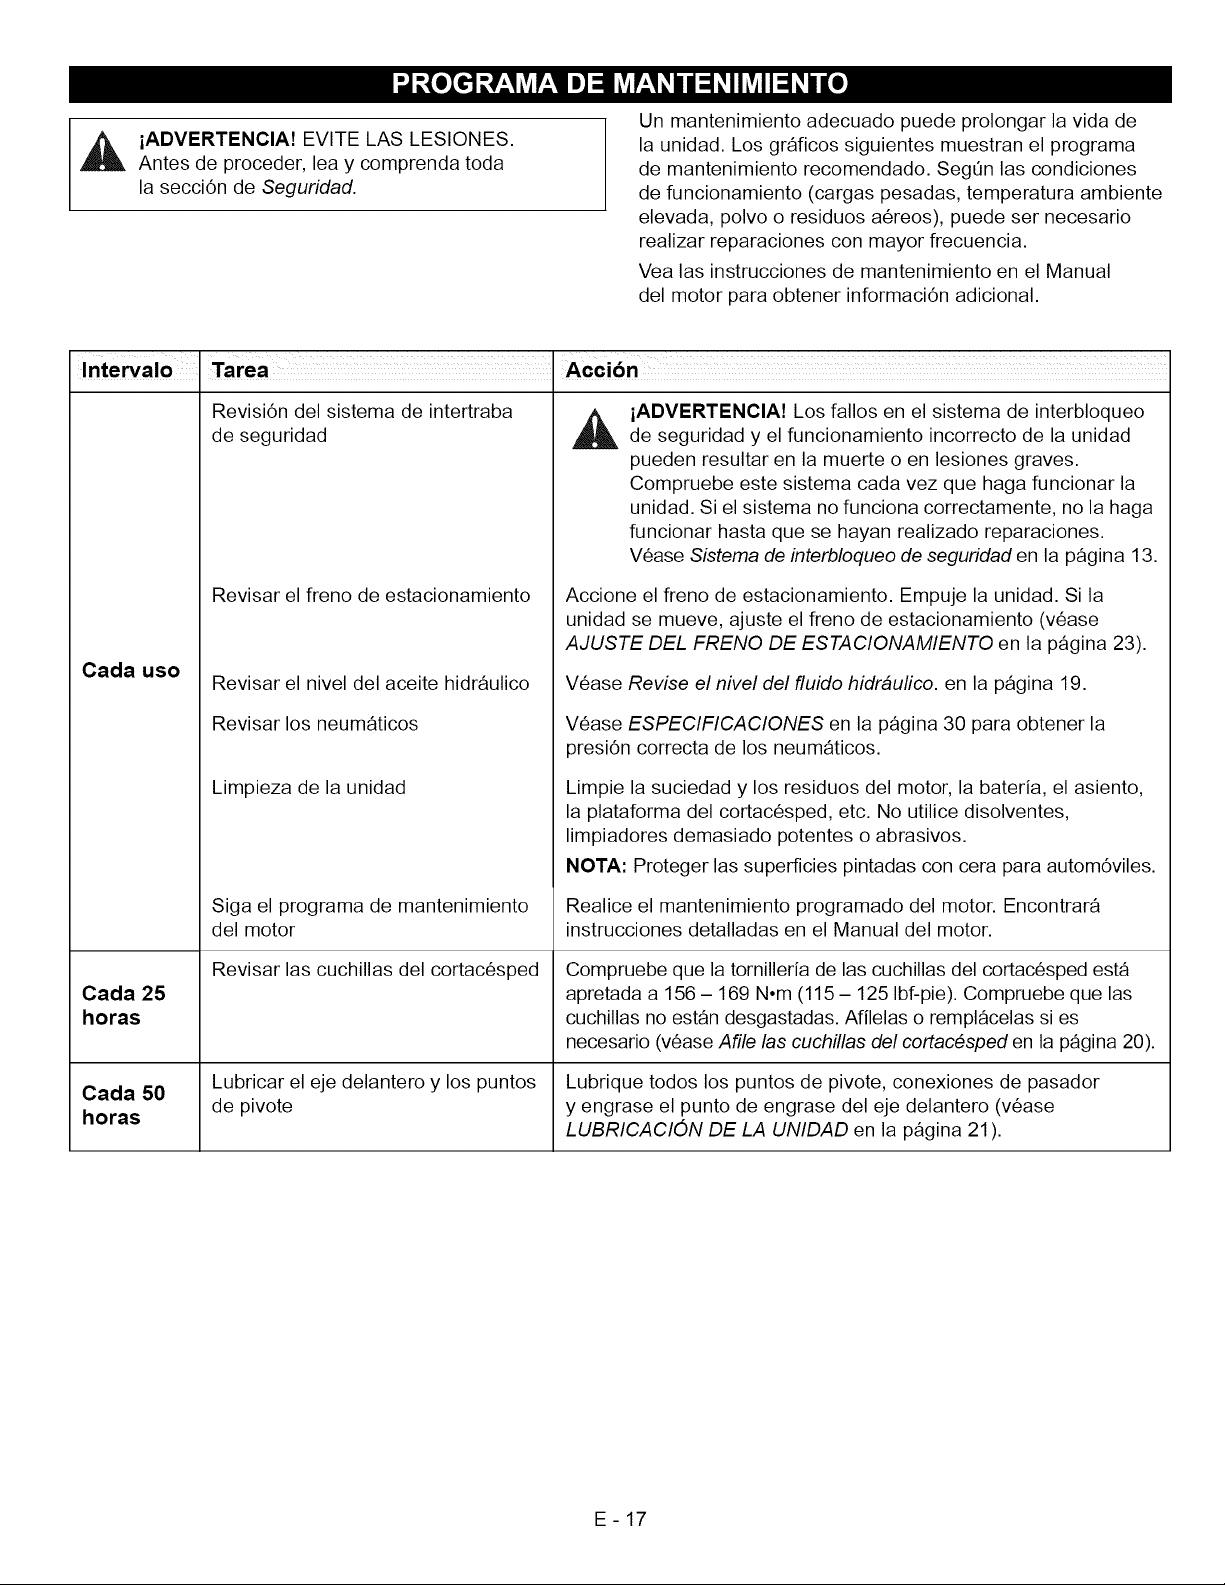
iADVERTENCIA!EVITELASLESIONES.
Antesdeproceder,leaycomprendatoda
lasecci6ndeSeguridad.
Intervalo . Tarea .Accibn
Revisi6n del sistema de intertraba
de seguridad
_L ADVERTENCIA! Los fallos en el sistema de interbloqueo
Un mantenimiento adecuado puede prolongar la vida de
la unidad. Los grSficos siguientes muestran el programa
de mantenimiento recomendado. SegOn las condiciones
de funcionamiento (cargas pesadas, temperatura ambiente
elevada, polvo o residuos a6reos), puede ser necesario
realizar reparaciones con mayor frecuencia.
Vea las instrucciones de mantenimiento en el Manual
del motor para obtener informaci6n adicional.
de seguridad y el funcionamiento incorrecto de la unidad
pueden resultar en la muerte o en lesiones graves.
Compruebe este sistema cada vez que haga funcionar la
unidad. Si el sistema no funciona correctamente, no la haga
funcionar hasta que se hayan realizado reparaciones.
V6ase Sistema de interbloqueo de seguridad en la pSgina 13.
Cada uso
Cada 25
horas
Cada 50
horas
Revisar el freno de estacionamiento
Revisar el nivel del aceite hidrSulico
Revisar los neum_ticos
Limpieza de la unidad
Siga el programa de mantenimiento
del motor
Revisar las cuchillas del cortac6sped
Lubricar el eje delantero y los puntos
de pivote
Accione el freno de estacionamiento. Empuje la unidad. Si la
unidad se mueve, ajuste el freno de estacionamiento (v6ase
AJUSTE DEL FRENO DE ESTACIONAMIENTO en la pSgina 23).
V6ase Revise el nivel del fluido hidr4ufico, en la p_gina 19.
V6ase ESPECIFICACIONES en la pSgina 30 para obtener la
presi6n correcta de los neum_ticos.
Limpie la suciedad y los residuos del motor, la bateria, el asiento,
la plataforma del cortac6sped, etc. No utilice disolventes,
limpiadores demasiado potentes o abrasivos.
NOTA: Proteger las superficies pintadas con cera para autom6viles.
Realice el mantenimiento programado del motor. Encontrar8
instrucciones detalladas en el Manual del motor.
Compruebe que la tornilleria de las cuchillas del cortac6sped est_
apretada a 156 - 169 N-m (115 - 125 Ibf-pie). Compruebe que las
cuchillas no est_n desgastadas. Afilelas o rempl_celas si es
necesario (v6ase Afile las cuchillas del cortac6sped en la pSgina 20).
Lubrique todos los puntos de pivote, conexiones de pasador
y engrase el punto de engrase del eje delantero (v6ase
LUBRICACI(DN DE LA UNIDAD en la pSgina 21 ).
E-17
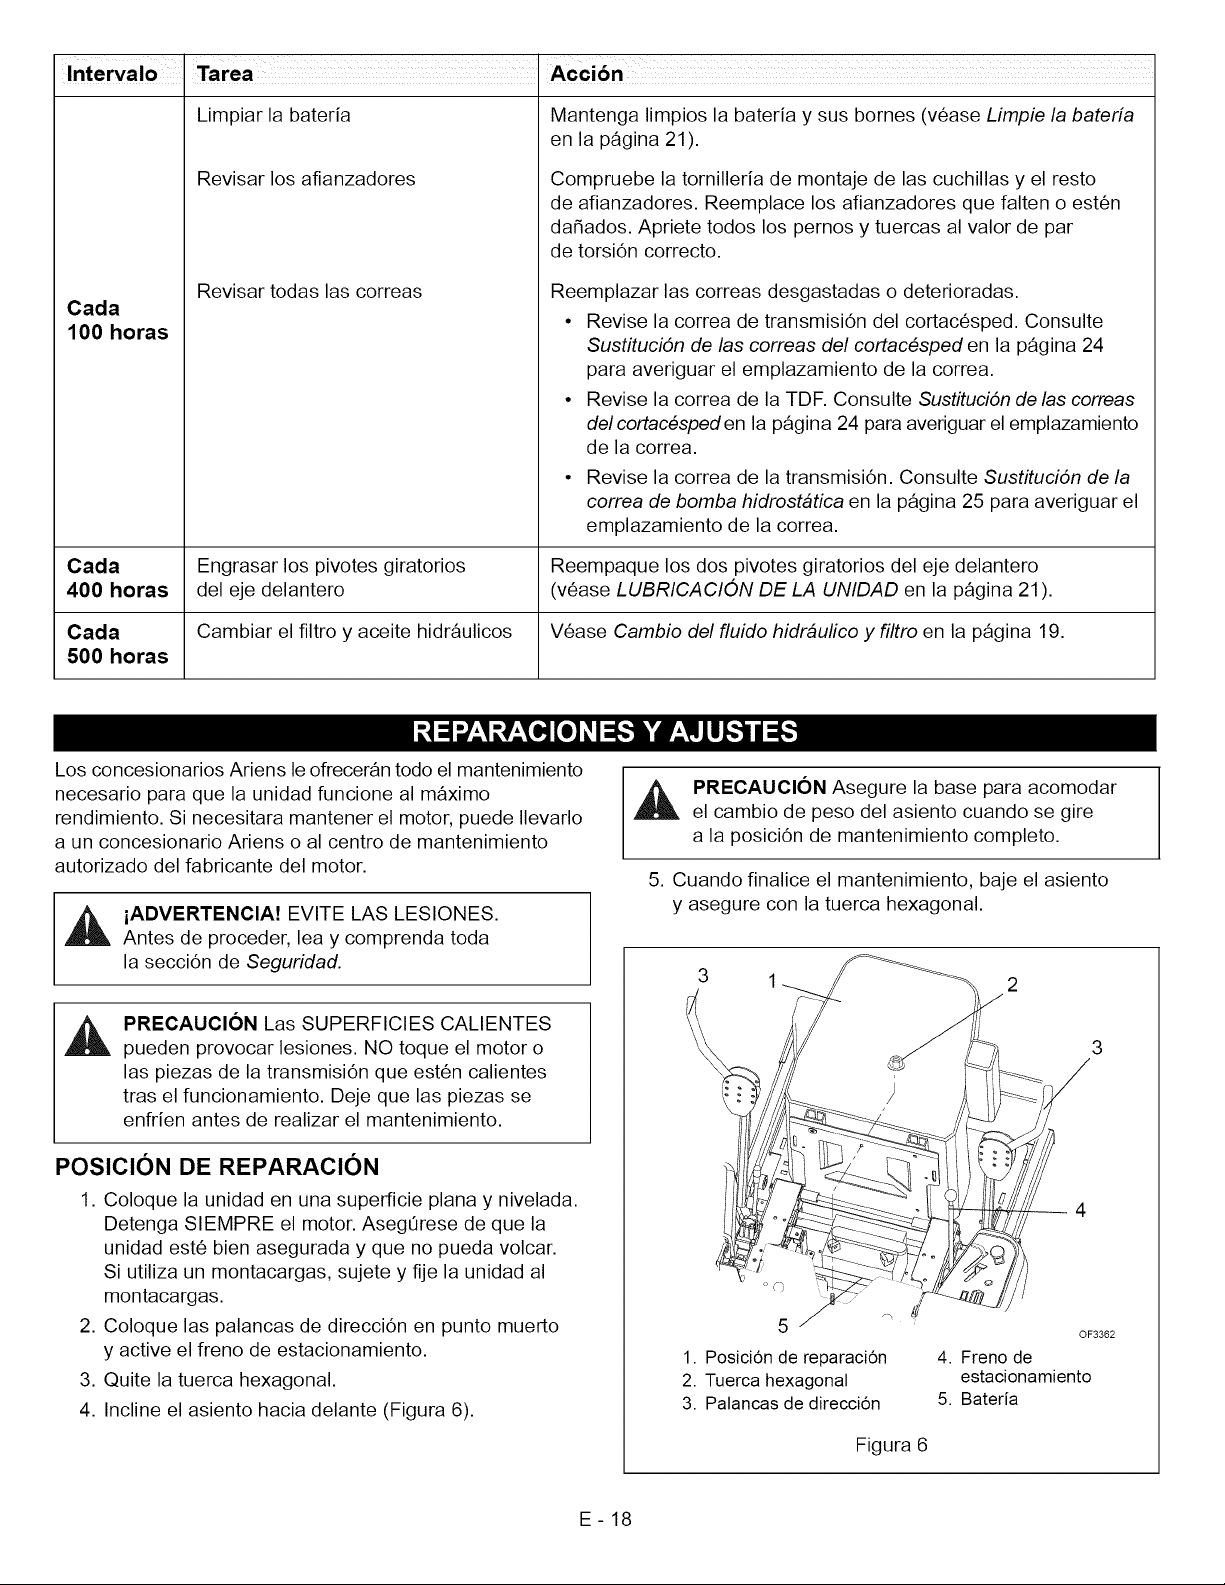
Intervalo , Tarea ,'Acc,on" ................................................
Limpiar la bateria
Mantenga limpios la bateria y sus bornes (v6ase Limpie la bateria
en la pSgina 21).
Revisar los afianzadores
Compruebe la tornilleria de montaje de las cuchillas y el resto
de afianzadores. Reemplace los afianzadores que falten o est6n
da_ados. Apriete todos los pernos y tuercas al valor de par
de torsi6n correcto.
Cada
Revisar todas las correas
100 horas
Reemplazar las correas desgastadas o deterioradas.
• Revise la correa de transmisi6n del cortac6sped. Consulte
SustituciOn de las correas del cortac6sped en la p_gina 24
para averiguar el emplazamiento de la correa.
• Revise la correa de la TDF. Consulte SustituciOn de las correas
del cortac6sped en la pSgina 24 para averiguar el emplazamiento
de la correa.
• Revise la correa de la transmisi6n. Consulte SustituciOn de la
correa de bomba hidrost4tica en la pSgina 25 para averiguar el
emplazamiento de la correa.
Cada Engrasar los pivotes giratorios Reempaque los dos pivotes giratorios del eje delantero
400 horas del eje delantero (v6ase LUBRICACION DE LA UNIDAD en la pSgina 21).
Cada Cambiar el filtro y aceite hidrSulicos V6ase Cambio del fluido hidr4ulico y filtro en la pSgina 19.
500 horas
Los concesionarios Ariens le ofrecer_n todo el mantenimiento
necesario para que la unidad funcione al m_ximo
rendimiento. Si necesitara mantener el motor, puede Ilevarlo
a un concesionario Ariens o al centro de mantenimiento
autorizado del fabricante del motor.
,t_ iADVERTENCIA! EVITE LAS LESIONES.
Antes de proceder, lea y comprenda toda
la secci6n de Seguridad.
PRECAUCION Las SUPERFICIES CALIENTES
pueden provocar lesiones. NO toque el motor o
las piezas de la transmisi6n que est6n calientes
tras el funcionamiento. Deje que las piezas se
enfrien antes de realizar el mantenimiento.
POSICI[)N DE REPARACI[)N
1. Coloque la unidad en una superficie plana y nivelada.
Detenga SIEMPRE el motor. AsegQrese de que la
unidad est6 bien asegurada y que no pueda volcar.
Si utiliza un montacargas, sujete y fije la unidad al
montacargas.
2. Coloque las palancas de direcci6n en punto muerto
y active el freno de estacionamiento.
3. Quite la tuerca hexagonal.
4. Incline el asiento hacia delante (Figura 6).
,_ PRECAUCION Asegure la base para acomodar
el cambio de peso del asiento cuando se gire
a la posici6n de mantenimiento completo.
5. Cuando finalice el mantenimiento, baje el asiento
y asegure con la tuerca hexagonal.
3 1
4
OF3362
1. Posici6n de reparaci6n
2. Tuerca hexagonal
3. Palancas de direcci6n
4. Freno de
estacionamiento
5. Bateria
E-18
Figura 6

LiQUIDO H IDRAU LICO
iADVERTENCIA! El LJQUIDO HIDRAULICO
puede provocar quemaduras graves. El liquido
del sistema hidr_ulico puede penetrar en la piel
y ocasionar lesiones graves o la muerte.
AsegOrese de apagar el motor antes de realizar
ningQn tipo de trabajo en las piezas hidrSulicas.
Mantenga el cuerpo y las manos alejadas de los
peque_os orificios o boquillas que arrojan liquido
hidrSulico cuando est_n bajo presi6n. Utilice papel
o cart6n y no las manos para buscar fugas.
AsegQrese de que todas las conexiones de liquido
hidrSulico est6n apretadas yen buen estado antes
de aplicar presi6n al sistema.
UN LJQUIDO EXTRANO INYECTADO EN EL
CUERPO puede producir gangrena. Debe ser
extraido quirOrgicamente en un periodo de pocas
horas por un m6dico que est6 familiarizado con
tipo de lesi6n.
Revise el nivel del fluido hidr&ulico.
de funcionamiento _
Intervalo Ti_,__ Marca FULL (lleno)
OE0380
1. Ponga en marcha la unidad y haga funcionar hasta
que Ilegue a la temperatura de funcionamiento (unos
10 minutos).
2. Mueva las palancas de control hacia delante y hacia
atrSs dos o tres veces.
3. En las unidades equipadas con un elevador de
plataforma hidrSulico, eleve y baje la plataforma
completamente dos o tres veces.
4. Apague el motor. Accione el freno de estacionamiento.
Saque la Ilave de contacto.
5. Coloque el asiento en la posici6n de mantenimiento.
V6ase POSICION DE REPARACION en la p_gina 18.
6. Quite la suciedad que pueda haber alrededor de
la tapa/varilla de medici6n en el dep6sito hidrSulico.
7. Extraiga la tapa/varilla de medici6n.
8. Revise la marca del nivel de aceite hidrSulico en
la tapa/varilla de medici6n.
9. A_ada aceite sint6tico Mobil 1 Extended Performance
15W50 o equivalente para conservar los componentes
(Ariens p/n 00057100) segQn se precise. No Io Ilene en
exceso.
Cambio del fluido hidr&ulico y filtro
NOTA: Cambie el filtro de aceite hidr_ulico y el aceite
hidrSulico cada 500 horas. Utilice aceite sint6tico Mobil 1
Extended Performance 15W50 o equivalente para
conservar los componentes (Ariens pin 00057100).
NOTA: Cuando cambie el aceite, s61ose drenar_ alrededor
de 1,4 litros (1,5 cuartos de gal6n). El resto del aceite
quedar8 en las bombas y motores.
1. Limpie el _rea de alrededor de la tapa de la varilla
de medici6n y de la varilla de medici6n.
Retire la varilla de medici6n.
2. Coloque un contenedor debajo del filtro del aceite para
recogerlo.
3. Extraiga el filtro de aceite.
4. Dejar drenar el dep6sito.
5. Lubrique la junta de goma en el nuevo filtro de aceite
con aceite hidr_ulico limpio.
6. Haga girar el nuevo flltro de aceite en la carcasa
del filtro hasta que ambos entren en contacto.
Apriete el filtro de aceite media vuelta m_s.
7. Agregue aceite al dep6sito de aceite. Necesitar8 unos
1,5 cuartos (1,4 litros). Utilice aceite sint6tico Mobil 1
Extended Performance 15W50 para conservar la
bombay el motor de la rueda.
8. Revisar el nivel del aceite hidrSulico.
9. Deseche de manera adecuada el aceite usado.
CUCHILLAS DEL CORTACI_SPED
Extraccibn
,_ PRECAUCION Utilice guantes gruesos o un material
acolchado para protegerse las manos cuando trabaje
con las cuchillas del cortac6sped.
1. Apague el motor. Retire la Ilave del contacto.
Retire el cable de ignici6n de las bujias.
2. Bloquear las cuchillas del cortac6sped para impedir
la rotaci6n.
3. Quite los pernos, las arandelas y las cuchillas
de los vSstagos de los ejes.
Figura 7
E-19

Recolocaci6n
1. Reemplace las cuchillas, la arandelas y los pernos en
los v_stagos de los ejes.
2. Apriete los pernos a un par de 156-169 Nom
(115-125 Ibf-pie).
3. Vuelva a colocar el cable de ignici6n de las bujias.
Afile las cuchillas del cortac_sped
PRECAUCION NO afile las cuchillas si est_n
montadas en la unidad. Si una de las cuchillas
est_ desequilibrada, se producir_n vibraciones
excesivas y la unidad resultar8 da_ada.
Compruebe que las cuchillas est6n equilibradas
antes de volverlas a instalar.
NUNCA suelde ni enderece las cuchillas dobladas.
1. Retire la cuchilla del cortac6sped de la unidad.
Deseche la cuchilla del cortac6sped si:
• Se quita m_s de 1,27 cm (1/2 in.) de metal.
• Se erosionan los extractores de aire.
• La cuchilla est_ doblada o rota.
2. Afile la cuchilla del cortac6sped quitando una cantidad
de material igual de cada extremo de la misma.
NO cambie el _ngulo del filo ni redondee la esquina
de la cuchilla del cortac6sped.
3. Revise el equilibrio de la cuchilla del cortac6sped.
Deslice la cuchilla en un perno sin rosca. Si la cuchilla
est_ equilibrada, deberia mantenerse en posici6n
horizontal. Si uno de los extremos de la cuchilla
desciende, afile el extremo m_s pesado hasta que
la cuchilla est6 equilibrada.
4. Instalar la(s) cuchilla(s) del cortac6sped en la unidad.
5. Apriete los pernos a un par de 156-169 Nom
(115-125 Ibf-pie).
NO afilar de acuerdo a este esquema
D2E_SECHEsi mide m_s_4
de 1,27 cm (1/2 pulg.)
Afilar de acuerdo
a este esquema
1. Filo cortante
2. Esquina cuadrada
BATERJA
iADVERTENCIA! EVITE LAS LESIONES.
Antes de proceder, lea y comprenda toda
la secci6n de Seguridad.
iADVERTENCIA! Los bornes de la bateria,
terminales y accesorios relacionados contienen
plomo y compuestos de plomo, sustancias queen
el estado de California se sabe que causan c_ncer
y da_os al sistema reproductor. L_vese las manos
despu6s de manejarlos.
...------1
OT0792
3. Erosi6n del
extractor de aire
4. Extractor de aire
Figura 8
La unidad viene equipada con una bateria que no requiere
mantenimiento, excepto la limpieza de los bornes.
Retire la bateria
1. Coloque el asiento en la posici6n de mantenimiento
(V6ase PROGRAMA DE MANTENIMIENTO en la
pSgina 17).
2. Desconecte primero el cable negativo (-) y luego
el cable positivo (+) (Figura 9).
3. Quite el sujetador y saque la bateria.
Cambie la bateria
1. Vuelva a colocar la bateria y aseg@ela con su
sujeci6n.
2. Conecte primero el cable positivo (+), y despu6s
el negativo (-).
3. Recubra los bornes con grasa diel6ctrica o vaselina.
E - 20

4. Vuelva a colocar el asiento en la posici6n de funciona-
miento.
Limpie la bateria
Mantenga limpia la bateria y los bornes de la misma.
Para garantizar un buen rendimiento, revisela cada
100 horas de funcionamiento o una vez al mes.
2
1. Borne negativo 3. Bateria
2. Borne positivo
Figura 9
1. Extraiga la bateria de la unidad.
V6ase Retire la bateria en la pSgina 20.
2. Limpie los bornes y los extremos del cable de
la bateria con un cepillo de alambre.
3. Recubra los bornes con grasa diel6ctrica o vaselina.
4. Cambie la bateria. V6ase Cambie la bateria en la
pSgina 20.
OF1671
Siga SIEMPRE la informaci6n suministrada por el fabricante
que acompa_a a la bateria. P6ngase en contacto con
el fabricante de la bateria para obtener instrucciones
detalladas sobre c6mo cargar la bateria.
1. Extraiga la bateria de la unidad. V6ase Retire la
bateria en la p_gina 20.
2. Coloque la bateria en el banco o cualquier otro lugar
bien ventilado.
3.
Conecte el terminal positivo (+) del cargador al
borne positivo (+), y el terminal negativo (-) al borne
negativo (-).
,
Cargar la bateria de acuerdo con las instrucciones
del fabricante del cargador de baterias y del fabricante
de la bateria.
,
Cambie la bateria. V6ase Cambie la bateria en la
pSgina 20.
Arranque pot puente
Ariens no recomienda el arranque por puente de la unidad
ya que se pueden da_ar los componentes del motor y del
sistema el6ctrico. Consulte el Manual del motor para obtener
informaci6n m_s detallada.
LUBRICACION DE LA UNIDAD
NOTA: Utilice grasa Ariens Hi-Temp o un equivalente
(nQmero de pieza 00036700).
Aplique aceite a todos los puntos de pivotaje y alas conexiones
de los pasadores.
Carga de la bateria
iADVERTENCIA! LA8 BATERJA8
CONGELADA8 PUEDEN EXPLOTAR y provocar
la muerte o lesiones graves. NO cambie baterias
congeladas. Deje que se descongelen antes de
cambiarlas.
Primeros auxilios en caso de contacto con
el electrolito de la bateria
Siga las instrucciones de primeros auxilios despu6s
del contacto con el liquido de la bateria.
• Contacto externo: Enju_guese con agua.
• Ojos: iEnju_guese con agua durante por Io menos
15 minutos y Ilame a un m6dico inmediatamente!
• Contacto interno: Beba grandes cantidades de agua.
Siga con leche de Magnesia, huevos batidos o aceite
vegetal, iLlame a un m6dico inmediatamente!
iEn caso de contacto interno, NO induzca el v6mito!
IMPORTANTE: NO realice una carga r_pida. Si la carga
es demasiado r_pida, la bateria puede resultar da_ada
o destruida. Utilice SOLO un cargador autom_tico dise_ado
para su bateria.
REF LUBRICACION CANT
1 REGUARNECER 2
ACEITE
Figura 10
o
UBICACION
PIVOTE DE
ROLDANAS
TODOS LOS
PUNTOS DE
PIVOTAJ E,
CONEXIONES
DE PASADORES
OF1793
INTERVALC
400 horas
50 horas
E-21

AJUSTE DEL PUNTO MUERTO DEL CONTROL
DE LA DIRECClC)N
Eliminacibn del arrastre excesivo de la unidad
(Figura 11)
Si las palancas de direcci6n no se alinean (coinciden)
o la unidad tiene un excesivo arrastre cuando las palancas
de direcci6n est_n en punto muerto, ajustar como sigue
a continuaci6n.
Ajuste de las palancas de direccibn para alinearlas
(que coincidan) (Figura 11)
1. Apague el motor. Accione el freno de estacionamiento.
Saque la Ilave de contacto.
2. Coloque el asiento en la posici6n de mantenimiento
(V6ase POSICION DE REPARACION en la p_gina 18).
3. Afloje la tuerca del amortiguador en el mismo lado que
la palanca de direcci6n que se va a ajustar.
4. Afloje el interbloqueo del freno del mismo lado que
la palanca de direcci6n que se va a ajustar.
5. Afloje la contratuerca de la barra de sujeci6n y gire
la barra hasta que las palancas de direcci6n est6n
alineadas.
,
Apriete la contratuerca en la barra de sujeci6n,
apriete el interbloqueo del freno y la contratuerca
del amortiguador.
3
4 3
7
1. Contratuerca
del amortiguador
2. Amortiguador
3. Contratuerca de
la varilla tensora
Figura 11 0F3381
4. Varitta tensora
5. Palanca de direcci6n
6. Interbloqueo del freno
7. Transmisi6n
hidrostatica
iADVERTENCIA! Este ajuste debe hacerse con
el motor en marcha. Tenga cuidado de evitar el
contacto con piezas en movimiento y superficies
calientes. AsegQrese de que la parte trasera de la
unidad est6 bien sujeta y segura antes de arrancar
el motor.
1. Si el sistema hidrSulico est_ frio, deje en marcha
la unidad durante un minimo de cinco minutos,
y a continuaci6n APAGUE el motor.
2. Con la unidad arriba y orientada hacia una pared,
levantar la unidad con un gato hasta que ambas
ruedas de transmisi6n queden levantadas del suelo.
3. Arrancar el motor y soltar el freno de estacionamiento.
4. Mueva las palancas de direcci6n desde marcha
adelante a marcha atrSs varias veces para asegurarse
de que los controles est6n libres. A continuaci6n,
devuelva las palancas de direcci6n al punto muerto.
5. Revisar el movimiento de las ruedas.
6. APAGUE el motor.
NOTA: Las palancas de direcci6n derecha e izquierda se
ajustan de la misma forma. Para acceder a lavarilla tensora,
coloque el asiento en la posici6n de mantenimiento.
V6ase POSICION DE REPARACION en la pSgina 18.
7. Ajustar la(s) varilla(s) tensora(s):
Si la rueda se mueve en direcci6n de avance:
a. Aflojar la contratuerca en cada extremo
de la varilla tensora.
b. Girar la varilla tensora en sentido antihorario
(alargando la distancia entre la palanca de direcci6n
y la transmisi6n hidrost_tica) varias veces.
Si la rueda se mueve en direcci6n de retroceso:
a. Aflojar la contratuerca en cada extremo de
la varilla tensora.
b. Girar la varilla tensora en sentido horario
(disminuyendo la distancia entre la palanca de
direcci6n y la transmisi6n hidrost_tica) varias veces.
,
Vuelva a colocar el asiento en la posici6n de
funcionamiento.
9. Arrancar el motor.
10.
Mueva las palancas de direcci6n varias veces desde
la posici6n Avance a Retroceso. A continuaci6n,
vuelva a colocar las palancas de direcci6n en punto
muerto.
11. APAGUE el motor.
12. Si la rueda no se mueve, apriete las contratuercas de
la varilla tensora. Esto finaliza el ajuste.
13. Si la rueda aQn se mueve, repetir los pasos 7 a 12.
E - 22

AJUSTE DE LA UNIDAD PARA UN TRAZADO
EN LJNEA RECTA
_, ADVERTENCIA! Antes de ajustar el trazado
de la unidad, apague el motor, active el freno de
estacionamiento y saque la Ilave de contacto.
Compruebe y ajuste la presi6n de los neum_ticos.
Aumente la presi6n en el lado hacia el que se desvia
la unidad. NO exceda la presi6n m_xima recomendada
del neum_tico (Vease ESPEClFICAClONES en la p_gina 30).
Si el ajuste de la presi6n del neum_tico no resuelve el
problema, ajuste los pernos limitadores del soporte de tope
(Figura 12). Los pernos frontales se ajustan hacia delante y
los posteriores hacia atrSs. Alargue el perno limitador
(mu6valo m_s cerca de la palanca) en el lateral que vaya
demasiado rSpido.
3
,i! ,.
AJUSTE DE LA ALTURA DE LAS MANILLAS
DE LA PALANCA DE DIRECCION
Las manillas tienen tres posiciones de altura (Figura 13).
Posici6n n° 1
n° 2
Posici6n n° 3
1. Espaciador
excentrico
2. Manitlar
3. Palanca
de direcci6n
Figura 13 0F3570
1. Quite el espaciador, la manilla y el espaciador
exc6ntrico de la palanca de direcci6n.
NOTA: Coloque las manillas derecha e izquierda en
la misma posici6n de altura.
2. Instale el espaciador, la manilla y elespaciador exc6ntrico
en la posici6n de altura apropiada. No apriete la tuerca
que sujeta el espaciador exc6ntrico.
3. Gire el espaciador exc6ntrico hasta que las manillas
derecha e izquierda est6n a la misma altura. Apriete
la tuerca.
2
1. Pernotimitador
2. Contratuerca
Figura 12
3. Palanca de
direcci6n
4. Soporte de tope
AJUSTE DEL FRENO DE ESTACIONAMIENTO
El freno de estacionamiento podria necesitar ajustes con
el paso del tiempo y despu6s de instalar nuevas pastillas
de frenos.
NOTA: Tras instalar las nuevas pastillas de freno en los
calibradores, debe conducir durante una cierta distancia
(unos 30 metros - 100 pies) con el freno activado para
condicionarlos. Para ello, levante el freno de mano en parte
y conduzca en linea recta. De esta manera, las pastillas
de freno funcionarSn al m_ximo.
E - 23

1. Palanca del freno
de estacionamiento
2. Varitta de freno
3. Tuercas de retorno
Figura 14
4. Mu56n
5. Resorte
6. Contratuercas
OF3303
Comprobacibn del ajuste
NOTA: AsegQrese de comprobar el freno de estacionamiento
en ambos lados de la unidad (Figura 14).
Con el freno de estacionamiento activado, la Iongitud
del resorte deber8 medir 3,81 cm (1 1/2 pulg.) entre las
contratuercas y el mu_6n y la holgura entre las tuercas
de retorno y el mu_6n deber8 medir de 1,59 a 3,18 mm
(1/16 a 1/8 pulg.). Si cualquiera de estas medidas no
coincide, ajuste el freno de estacionamiento correctamente.
Ajuste del freno de estacionamiento
1. Accione el freno de estacionamiento.
2. Gire las contratuercas en sentido horario para
comprimir el resorte o en sentido antihorario para
extenderlo hasta que haya una holgura de 3,81 cm
(1-1/2 pulg.) entre las contratuercas y el mu_6n.
3. Apriete las contratuercas entre si.
4. Gire las tuercas de retorno en sentido horario para
disminuir la distancia o en sentido antihorario para
aumentarla hasta que haya de 1,59 a 3,18 mm
(1/16 a 1/8 pulg.) entre las tuercas de retorno
y el mu_6n.
5. Apriete las tuercas de retorno entre si.
CORREAS
iADVERTENCIA! Las PIEZAS MOVILES pueden
cortar o amputar partes del cuerpo. Apague
SIEMPRE el motor, quite la Ilave y espere a que
todas las piezas en movimiento se detengan antes
de realizar el mantenimiento o la reparaci6n.
PRECAUCION LAS CORREAS DANADAS
O DESGASTADAS pueden provocar lesiones
o da_os a la unidad. Compruebe con frecuencia
que las correas no est6n demasiado desgastadas
ni agrietadas.
NOTA: El embrague Ogura puede ser ajustado si el embrague
comienza a deslizarse. P6ngase en contacto con su
concesionario Ariens para realizar este ajuste.
Acceso a las correas
,
Detenga y estacione la unidad apropiadamente
(V6ase FUNCIONAMIENTO en la pSgina 13).
2.
Bajar la plataforma de corte.
3.
Coloque el asiento en posici6n completamente
hacia arras.
4.
Retire las cubiertas de las correas.
5.
Coloque la plataforma para los pies en la posici6n
abierta (Figura 15).
6.
Con el seguro, sujetar la plataforma para los pies en
la posici6n subida.
1. Plataforma
para los pies
en posici6n
abierta
2. Chasis
3. Seguro
Figura 15 OF3580
Sustitucibn de las correas del cortac_sped
NOTA: Debe extraer la correa larga de la TDF de las poleas
del v_stago de la cuchilla antes de retirar la correa corta de
transmisi6n del cortac6sped.
E - 24
PRECAUCION Tenga cuidado cuando libere la
tensi6n del muelle de la polea tensora. Mantenga
las partes del cuerpo bien alejadas de las poleas
cuando realice esta operaci6n.
1. Libere lentamente la tensi6n de la polea tensora de
la TDF del cortac6sped hasta que se libere toda la
tensi6n de los resortes.

2.SaquelacorreadelaTDFdelcortac6speddelvSstago
delacuchillaizquierdayextrSigaladelaplataforma.
3.Liberelentamentelatensi6ndelapoleatensorade
lacorreadetransmisi6ndelcortac6spedhastaque
seliberetodalatensi6ndelosresortes.
4.Retirelacorreadetransmisi6ndelcortac6speddeleje
delacuchilladerechaydelaplataforma.Elperno
pivotantedelapoleatensoradebeestarligeramente
sueltoafindetenersuficienteespaciolibreparaquitar
lacorreadedebajodelapoleatensora(Figura16).
5.Coloquelasnuevascorreasdelcortac6speden
laplataforma(primerolacorreadetransmisi6ndel
cortac6sped).Vuelvaaapretaralpernopivotantede
lapoleatensoradelacorreacortadelcortac6sped.
Instalelascorreasenlaspoleas.Pongalascorreas
enlapoleacentralenUltimolugar.
IMPORTANTE: Antes de arrancar la unidad, asegQrese de
que no hay torsiones en la correa del cortac6sped, ya que
cualquier torsi6n en dicha correa de la TDF del cortac6sped
reducir8 dr_sticamente la vida de la correa.
6. Vuelva a colocar las cubiertas de las correas
y devuelva el estribo a la posici6n cerrada.
PRECAUCION Tenga cuidado cuando libere la
tensi6n del muelle de la polea tensora. Mantenga
las partes del cuerpo bien alejadas de las poleas
cuando realice esta operaci6n.
,
Quitar el ancla del embrague.
4.
Liberar lentamente la tensi6n de la polea tensora de
la correa de la bomba hidrost_tica hasta que se libere
toda la tensi6n de los resortes.
5. En primer lugar, retire la correa vieja de la polea
hidrost_tica del lado derecho de la bomba hidrost_tica
(Figura 17).
6. Para instalar la nueva correa de la polea hidrost_tica,
col6quela sobre la polea. Ponga la correa en la polea
de la bomba hidrost_tica de la parte derecha en Ultimo
lugar.
7. Cambiar el ancla del embrague.
8. Vuelva a colocar la correa de la TDF del cortac6sped
en la polea del embrague del mismo. V6ase
SustituciOn de las correas del cortac6sped en la
pSgina 24.
1
6
1. Correa de ta TDF a la plataforma de corte
2. Correa de ta transmisi6n del cortacesped
3. Resortes
4. Polea de la correa de la transmisi6n
del cortacesped
5. Polea tensora de ta correa de la TDF
6. Polea del embrague de la TDF
7. Polea central
Figura 16
Sustituci6n de la correa de bomba hidrost&tica
1. Detenga y estacione la unidad apropiadamente
(V6ase FUNCIONAMIENTO en la pSgina 13).
2. Saque la correa de la TDF del cortac6sped de la polea
del embrague de la TDF (V6ase SustituciOn de las
correas del cortac6sped en la pSgina 24).
6
2
1. Correa hidrostatica
2. Resorte
3. Polea tensora
4. Polea del motor
Figura 17
5. Hidrostato izquierdo
6. Hidrostato derecho
7. Embrague
8. Anclaje del embrague
OF163I
PLATAFORMAS DE CORTE
Ajuste del rodillo antidesbroce
Los rodillos antidesbroce se ajustan en fSbrica para la altura
de corte tipica pero pueden ajustarse para condiciones de
corte alto o bajo (Figura 18).
El prop6sito de los rodillos antidesbroce es evitar raspar
o erosionar el c6sped, no controlar la altura de corte.
Para una altura de corte muy alta, ajuste los rodillos
antidesbroce a la posici6n m_s baja en el soporte.
E - 25
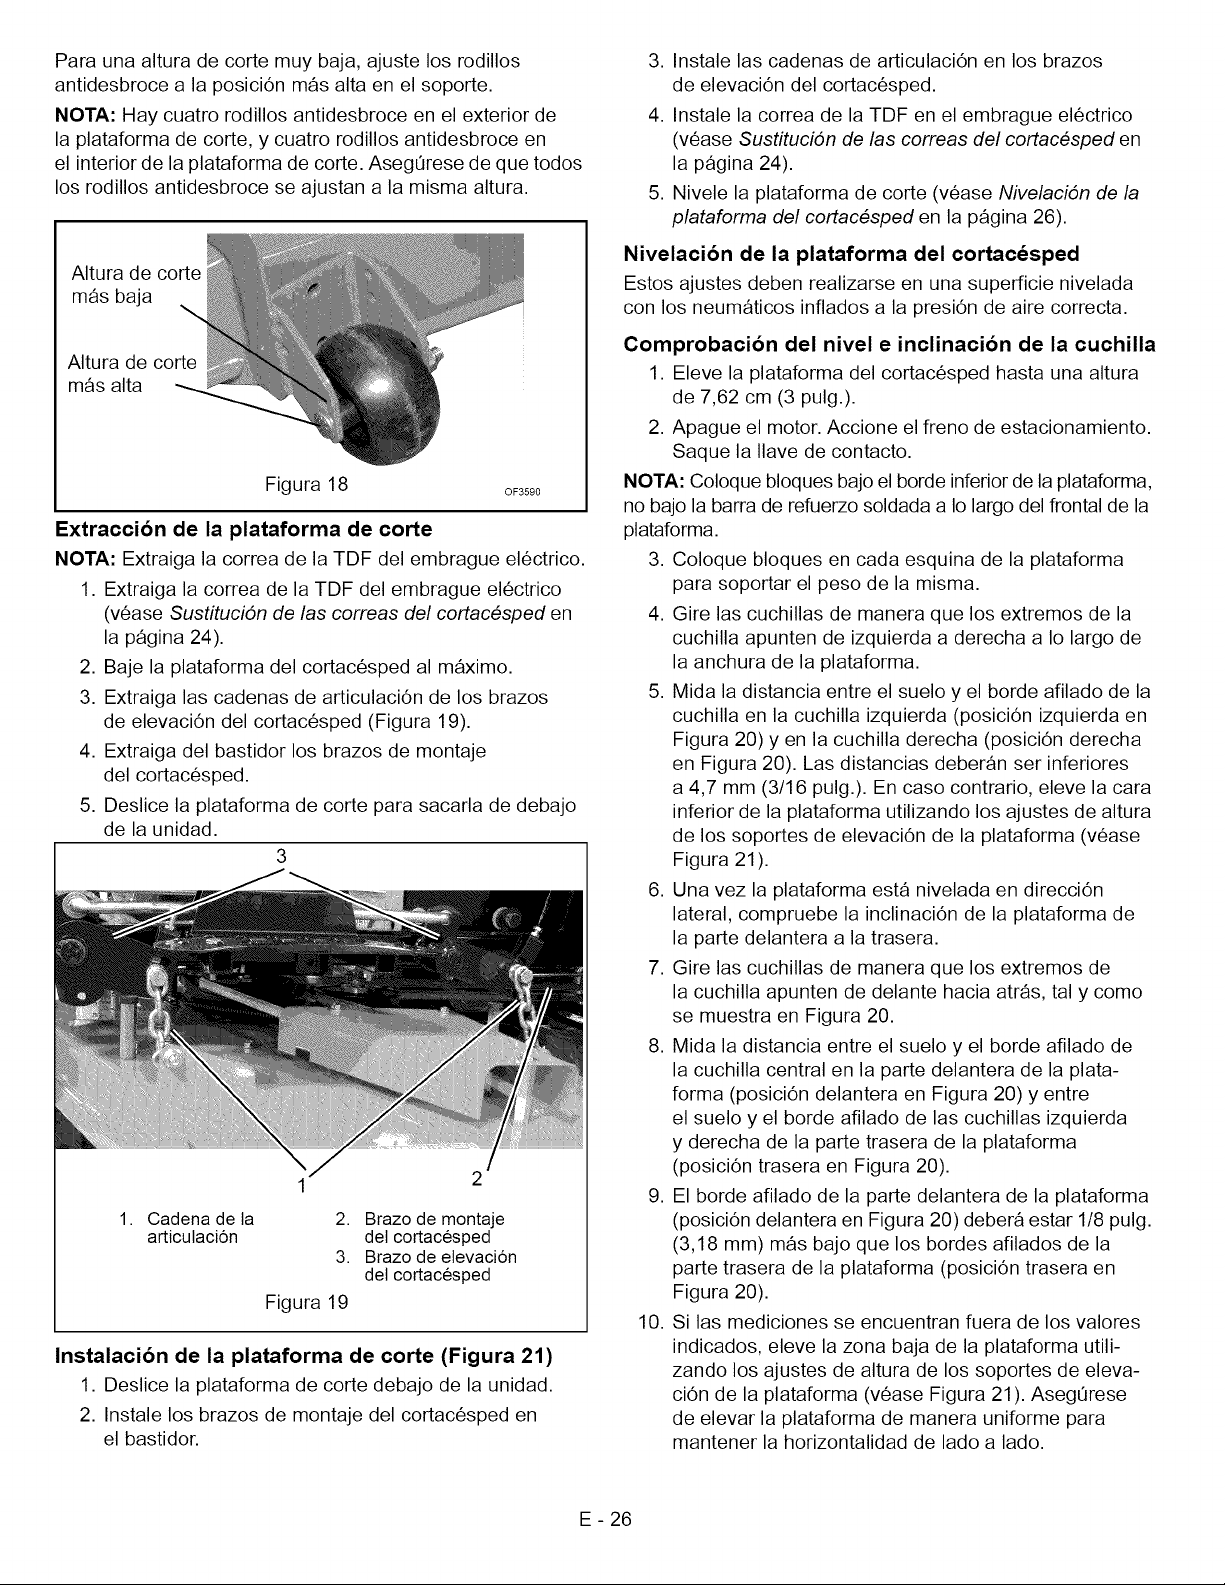
Paraunaalturadecortemuybaja,ajustelosrodillos
antidesbrocealaposici6nm_saltaenelsoporte.
NOTA:Haycuatrorodillosantidesbroceenelexteriorde
laplataformadecorte,ycuatrorodillosantidesbroceen
elinteriordelaplataformadecorte.AsegQresedequetodos
losrodillosantidesbroceseajustanalamismaaltura.
3. Instale las cadenas de articulaci6n en los brazos
de elevaci6n del cortac6sped.
4. Instale la correa de la TDF en el embrague el6ctrico
(v6ase Sustituci4n de las correas del cortac6sped en
la pSgina 24).
5. Nivele la plataforma de corte (v6ase Nivelaci4n de la
plataforma del cortac6sped en la pSgina 26).
Alturadecorte
m_sbaja
Alturadecorte
m_salta
Figura18 OF3_90
Extraccibn de la plataforma de corte
NOTA: Extraiga la correa de la TDF del embrague el6ctrico.
1. Extraiga la correa de la TDF del embrague el6ctrico
(v6ase Sustituci4n de las correas del cortac6sped en
la pSgina 24).
2. Baje la plataforma del cortac6sped al m_ximo.
3. Extraiga las cadenas de articulaci6n de los brazos
de elevaci6n del cortac6sped (Figura 19).
4. Extraiga del bastidor los brazos de montaje
del cortac6sped.
5. Deslice la plataforma de corte para sacarla de debajo
de la unidad.
3
1 2
1. Cadena de la 2. Brazo de montaje
articulaci6n del cortacesped
3. Brazo de elevaci6n
del cortacesped
Figura 19
Instalacibn de la plataforma de corte (Figura 21)
1. Deslice la plataforma de corte debajo de la unidad.
2. Instale los brazos de montaje del cortac6sped en
el bastidor.
Nivelacibn de la plataforma del cortac_sped
Estos ajustes deben realizarse en una superficie nivelada
con los neum_ticos inflados a la presi6n de aire correcta.
Comprobaci6n del nivel e inclinaci6n de la cuchilla
1. Eleve la plataforma del cortac6sped hasta una altura
de 7,62 cm (3 pulg.).
2. Apague el motor. Accione el freno de estacionamiento.
Saque la Ilave de contacto.
NOTA" Coloque bloques bajo el borde inferior de la plataforma,
no bajo la barra de refuerzo soldada a Io largo del frontal de la
plataforma.
3. Coloque bloques en cada esquina de la plataforma
para soportar el peso de la misma.
4. Gire las cuchillas de manera que los extremos de la
cuchilla apunten de izquierda a derecha a Io largo de
la anchura de la plataforma.
5. Mida la distancia entre el suelo y el borde afilado de la
cuchilla en la cuchilla izquierda (posici6n izquierda en
Figura 20) yen la cuchilla derecha (posici6n derecha
en Figura 20). Las distancias deberSn ser inferiores
a 4,7 mm (3/16 pulg.). En caso contrario, eleve la cara
inferior de la plataforma utilizando los ajustes de altura
de los soportes de elevaci6n de la plataforma (v6ase
Figura 21).
6. Una vez la plataforma est_ nivelada en direcci6n
lateral, compruebe la inclinaci6n de la plataforma de
la parte delantera a la trasera.
7. Gire las cuchillas de manera que los extremos de
la cuchilla apunten de delante hacia atrSs, tal y como
se muestra en Figura 20.
8. Mida la distancia entre el suelo y el borde afilado de
la cuchilla central en la parte delantera de la plata-
forma (posici6n delantera en Figura 20) y entre
el suelo y el borde afilado de las cuchillas izquierda
y derecha de la parte trasera de la plataforma
(posici6n trasera en Figura 20).
9. El borde afilado de la parte delantera de la plataforma
(posici6n delantera en Figura 20) deber8 estar 1/8 pulg.
(3,18 mm) m_s bajo que los bordes afilados de la
parte trasera de la plataforma (posici6n trasera en
Figura 20).
10. Si las mediciones se encuentran fuera de los valores
indicados, eleve la zona baja de la plataforma utili-
zando los ajustes de altura de los soportes de eleva-
ci6n de la plataforma (v6ase Figura 21). AsegL_rese
de elevar la plataforma de manera uniforme para
mantener la horizontalidad de lado a lado.
E - 26

NOTA:Lainclinaci6ndelascuchillasdelanterasenunnivel
m_sbajoconrespectoalastraserasproporcionaunequilibrio
entrelacalidaddelcorteylapotencianecesariaparacortarel
c6sped.Determinadascondicionesdecorterequierenquela
plataformaest6inclinadaconlapartetraseradelascuchillas
m_sbajaqueladelantera.Laregulaci6ndelaplataformade
estamaneraexigem_spotenciaalmotor,peropuede
proporcionarmejorcalidaddecorte.
11.Extraigalosbloquessituadosbajolaplataforma.
Nivelado de las cuchillas de lado a lado
Izquierda Derecha
Inclinacion de las cuchillas de atras adelante
Ajustes de la altura
NO coloque bloques bajo la barra de refuerzo.
Figura 21
,t_ iADVERTENCIA! EVITE LAS LESIONES.
Antes de proceder, lea y comprenda toda
la secci6n de Seguridad.
1
Delantero
La rueda La rueda
Figura 20
Ajuste de la altura de la cuchilla
Ajuste el nivel y la inclinaci6n de la cortadora con los ajustes
de altura de cada soporte de elevaci6n de la plataforma
(Figura 21).
Afloje la contratuerca del perno del soporte de ele-
vaci6n de la plataforma aproximadamente 1/4 de giro
para reducir la carga de agarre de los ajustes de
altura.
Afloje la contratuerca del perno del ajuste de la
plataforma y a continuaci6n gire el perno en sentido
horario para elevar la plataforma, o en sentido
antihorario para hacer descender la plataforma.
Apriete ambas contratuercas.
A CORTO PLAZO
No limpie NUNCA unidad con agua a alta presi6n, y no la
almacene a la intemperie.
Revise la unidad en busca de cualquier signo de desgaste,
ruptura o da_o.
Mantenga todas las tuercas, pernos y tornillos apretados
adecuadamente y asegOrese de que la unidad est_ en
buenas condiciones de funcionamiento.
Almacene la unidad en un 8rea fresca, seca y protegida.
A LARGO PLAZO
Limpie la unidad a fondo con un jab6n suave y agua a baja
presi6n y realice la lubricaci6n (V6ase LUBRICACION DE
LA UNIDAD en la pSgina 21 en Mantenimiento). Retoque
todas las superficies que presenten muescas en la pintura.
Quite peso de las ruedas colocando bloques por debajo de
la estructura o el eje.
AI almacenar la unidad durante periodos de tiempo
prolongados, extraiga todo el combustible del dep6sito
y el carburador (en seco). Consulte el Manual del motor.
Limpie y cargue la bateria. Cargue la bateria cada tres
o cuatro semanas cuando se almacene la unidad.
Para sacar la unidad del almacenamiento
1. Consulte el manual de mantenimiento del motor
y prepare el motor para su mantenimiento.
2. Ponga combustible nuevo y limpio en el dep6sito
de combustible.
3. Comenzar el programa de mantenimiento.
4. Cargar e instalar la bateria.
E - 27

PROBLEMA
POSIBLE CAUSA
CORRECCION
El motor no vira.
El motor vira pero
no arranca.
La luz de la bateria
no se enciende al
arrancar el motor.
1. TDF activada.
2. Freno de estacionamiento desactivado.
3. Cables de la bateria flojos o corroidos.
4. La bateria est_ descargada.
5. Motor de arranque defectuoso.
1. El dep6sito del combustible est_ vacio.
2. Bujia defectuosa.
3. El depurador de aire est_ sucio
o bloqueado.
4. El filtro de combustible est_ sucio.
5. Motor defectuoso.
1. La bateria est_ descargada.
,
Desactivar la TDF.
2.
Accione el freno de estacionamiento.
3.
Limpie y apriete los cables de la bateria
(v6ase Limpie la bateria en la pSgina 21).
,
Cargue la bateria (v6ase Carga de la
bateria en la pSgina 21).
,
POngase en contacto con el
concesionario Ariens.
,
Llene el dep6sito de combustible
(v6ase LLENADO DEL DEPOSITO DE
COMBUSTIBLE en la pSgina 15).
,
Reemplace la bujia. Consulte el Manual
del motor.
3.
Limpie o reemplace el depurador de
aire. Consulte el Manual del motor.
4.
Limpie o reemplace el filtro de
combustible. Consulte el Manual
del motor.
,
Consulte el Manual del motor o visite
el concesionario Ariens.
1. Cargue la bateria (v6ase Carga de la
bateria en la pSgina 21).
La luz de la presibn
del aceite est&
encendida.
El motor continua
funcionando cuando
la Ilave de contacto
est& en la posicibn
de desactivado.
La TDF o las cuchillas
del cortacdsped no se
activan o se paran.
La unidad no se
puede conducir.
1. Presi6n del aceite baja.
1. Cable de toma de tierra de la ignici6n
desconectado.
2. Fallos en el interruptor del encendido.
1. El interruptor de presencia del operador
no est_ oprimido.
2. El interruptor de la TDF est_ defectuoso.
1. El freno de estacionamiento est8 activado.
2. Las palancas de desviaci6n de
la transmisi6n est_n abiertas.
3. El nivel de aceite hidrSulico est_ bajo.
4. El sistema de transmisi6n hidrSulica es
defectuoso.
1. Consultar el manual del motor.
1. Conectar el cable de conxi6n a tierra a
una superficie met_lica limpia.
2. Reemplace el interruptor de encendido
(acuda al concesionario Ariens).
,
Oprimir el interruptor de presencia
del operador sent_ndose en el asiento.
2.
Compruebe que el sistema el6ctrico
del embrague no est6 da_ado ni
gastado. Consulte al concesionario
Ariens
,
Desactive el freno de estacionamiento.
2.
Cierre las palancas de desviaci6n de la
transmisi6n (v6ase TRASLADO DE LA
UNIDAD CON EL MOTOR DETENIDO
en la pSgina 16).
,
ASada aceite hidr_ulico (v6ase Revise el
nivel del fluido hidr4ulico, en la pSgina 19).
4.
POngase en contacto con el
concesionario Ariens.
E - 28

Pieza n°.
79205800
79202200
79202300
79202700
79202900
89202700
Descripci6n
Juego para pajote para ptataformas de 44 pulg.
Juego Liftmaster
Juego de enganche
Juego de faros
Juego de contrapesos
Sistema de protecci6n contravuelcos
Pieza n°. Cantidad Descripci6n
01554800 1 Bateria
21537000 1 Elemento exterior del filtro de aire
21536900 1 Elemento interior del flltro de aire
21535800 1 Filtro de aceite del motor: Kawasaki
09246900 1 Filtro de aceite hidraulico
21536100 1 Bujia: Kawasaki
21410800 1 Filtro de combustible: Kawasaki
07241100 1 Correa (motor a plataforma) de
la TDF (44 pulg.)
07202900 1 Correa de transmisi6n de la unidad
de corte (44 pulg.)
07218000 1 Correa de tracci6n (bomba hidraulica)
00273000 1 Cuchilla para pajote (44 pulg.)
E - 29
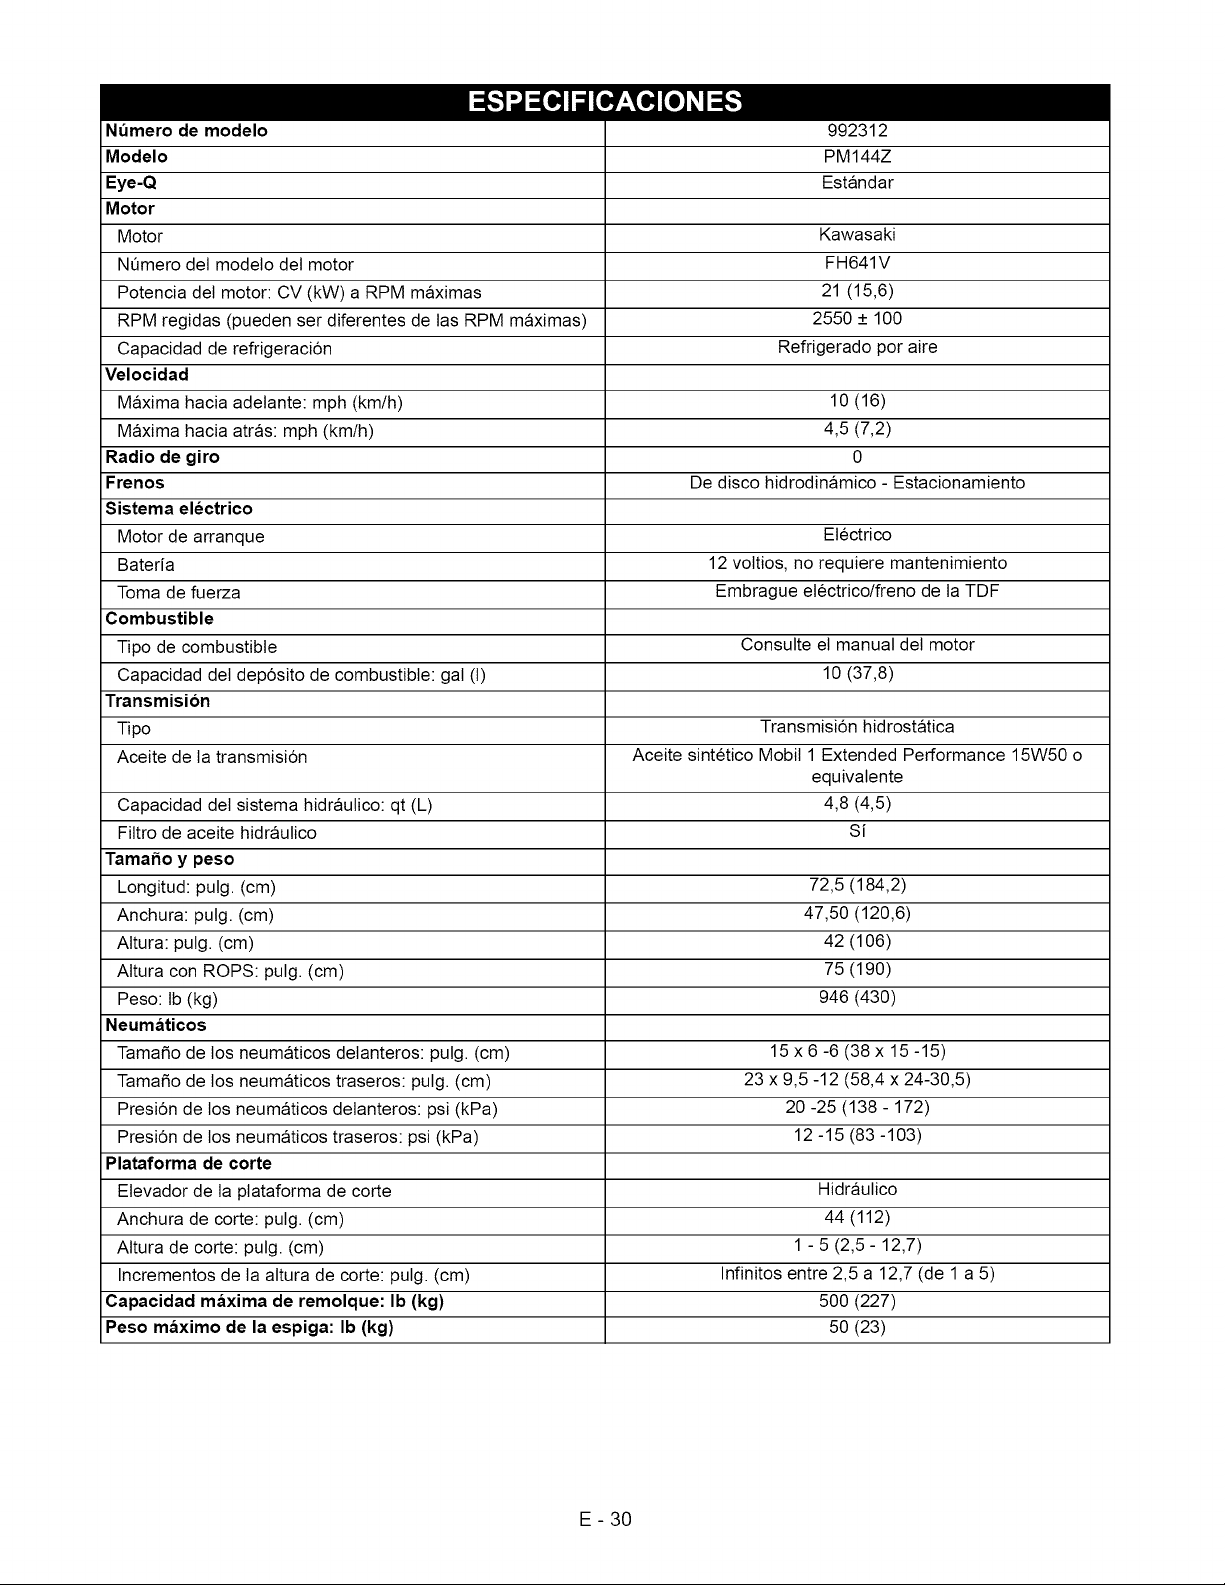
Numero de modelo
Modelo
Eye-Q
Motor
Motor
Nemero del modelo del motor
Potencia del motor: CV (kW) a RPM maximas
RPM regidas (pueden ser diferentes de las RPM maximas)
Capacidad de refrigeraci6n
Velocidad
Maxima hacia adelante: mph (km/h)
Maxima hacia atras: mph (km/h)
Radio de giro
Frenos
Sistema electrico
Motor de arranque
Bateria
Toma de fuerza
Combustible
Tipo de combustible
Capacidad del dep6sito de combustible: gal (t)
Transmision
Tipo
Aceite de la transmisi6n
Capacidad del sistema hidraulico: qt (L) 4,8 (4,5)
Filtro de aceite hidraulico Si
Tama_o y peso
Longitud: pulg. (cm) 72,5 (184,2)
Anchura: pulg. (cm) 47,50 (120,6)
Altura: pulg. (cm) 42 (106)
Altura con ROPS: pulg. (cm) 75 (190)
Peso: lb (kg) 946 (430)
Neumaticos
Tamafio de los neumaticos delanteros: pulg. (cm) 15 x 6 -6 (38 x 15 -15)
Tamafio de los neumaticos traseros: pulg. (cm) 23 x 9,5 -12 (58,4 x 24-30,5)
Presi6n de los neumaticos delanteros: psi (kPa) 20 -25 (138 - 172)
Presi6n de los neumaticos traseros: psi (kPa) 12 -15 (83 -103)
Plataforma de corte
Elevador de la ptataforma de corte Hidraulico
Anchura de corte: pulg. (cm) 44 (112)
Altura de corte: pulg. (cm) 1 - 5 (2,5 - 12,7)
Incrementos de la altura de corte: pulg. (cm) Infinitos entre 2,5 a 12,7 (de 1 a 5)
Capacidad maxima de remolque: Ib (kg) 500 (227)
Peso maximo de la espiga: Ib (kg) 50 (23)
De disco hidrodinamico - Estacionamiento
12 voltios, no requiere mantenimiento
Embrague electrico/freno de la TDF
Consulte el manual del motor
Transmisi6n hidrostatica
Aceite sintetico Mobil 1 Extended Performance 15W50 o
992312
PM144Z
Estandar
Kawasaki
FH641V
21 (15,6)
2550 + 100
Refrigerado por aire
10(16)
4,5 (7,2)
0
Electrico
10 (37,8)
equivalente
E - 30

Ariens Company
655 West Ryan Street
RO. Box 157
Brittion, Wl 54110-0157
920-756-2141
Fax 920-756-2407
www.ariens.com
,_, WARNING ,_
The engine exhaust from this product
contains chemicals known to the State
of California to cause cancer, birth
defects or other reproductive harm.
 Loading...