

Ariakon Sim 15 User Manual
Page 20
Thank You for choosing ARIAKON™
ARIAKON™
2794 LOKER AVE WEST
SUITE 107
CARLSBAD CA 92008
TOLL FREE:: 1-877-4-ARIAKON
PHONE: 760-268-0735
FAX: 760-268-0736
Email: sales@ariakon.com
Page 1
On the web
www.ariakon.com
ARIAKON, SIM, SIM-4, SIM-5, SIM-5N,SIM-15 and TORO are trademarks of
Any use or reproduction of materials, images, names, or logos found in this manual is
ARIAKON™ All Rights Reserved.
ARIAKON™
strictly prohibited.

Page 2
WARNING
THIS IS NOT A TOY. MISUSE MAY CAUSE SERIOUS INJURY OR
DEATH. PROPER EYE AND FACE PROTECTION DESIGNED
FOR PAINTBALL MUST BE WORN AT ALL TIMES BY THE USER
AND ANY OTHER PERSON WITHIN RANGE. THIS PRODUCT IS
NOT INTENDED FOR UNSUPERVISED USE BY PERSONS
UNDER THE AGE OF 18. READ THE OWNERS MANUAL
BEFORE USING THIS PRODUCT.
Page 19
REQUEST AUTHORIZATION FORM
This form must be included with your return. You must contact
ARIAKON™ @ 1-877-427-4256 and obtain a Return Merchandise
Authorization Number before sending your marker back. IF YOU DO
NOT HAVE THE RETURN NUMBER WRITTEN ON THE
PACKAGE IT WILL BE REFUSED!!!
CO#__________________________________________________________________
Name_________________________________________________________________
Address_______________________________________________________________
______________________________________________________________________
Phone ( )___________________________________________
Product: ______________________________________________
Description of Prob-
lem:______________________________________________________________________
______________________________________________________________________
______________________________________________________________________
______________________________________________________________________
______________________________________________________________________
Most repairs are completed within 3 to 5 business days. Any costs
associated with parts and/or labor that is not covered by the warranty is the
sole responsibility of the customer. Customers will be contacted prior to out
of warranty repairs. Out of warranty repairs will be charged at a rate of $15
hour + the cost of parts. Return shipping is not covered for out of warranty
items and will be the responsibility of the customer. Items must be picked
up or shipped out within 30 days of completion of repairs. If the customer
does not pickup merchandise or cover shipping and handling charges for
return of such products, the customer agrees to relinquish all rights and
titles to and waives all claims against ARIAKON™ for credit related to such
products. This form must be filled out and signed by an Adult over the age
of 18.
Signature____________________________________________________________
Date_____/_____/_____

Page 18
3: Removing the velocity screw, velocity lug,
Page 3
WARRANTY TERMS AND AGREEMENTS
LIMITED 90 DAY WARRANTY
ARIAKON™ products are warranted for 90 Days from the original date of retail purchase. During
the warranty period, any part, because of manufacturing defects or workmanship, that fails to
function properly under normal use shall be repaired or replaced, at ARIAKON‘S™ sole
discretion, free of charge. This product must be operated in accordance with the instructions
included with the unit.
WHAT IS COVERED
Any parts which are determined to be defective. Labor associated with the warranty repairs.
Transportation charges to consumer for repaired product.
WHAT IS NOT COVERED
Malfunctions or damage resulting from misuse, failure to perform normal maintenance (see page 8),
tampering, unauthorized repairs, modifications, alterations, abuse, neglect, accident, aftermarket
parts and add-ons. Wearable part such as, but not limited to, anodizing, o-rings, cup seal, ball
detent, sights, springs, screws, plastic parts, and plastic finishes. Transportation charges to
ARIAKON™ for defective product. Use of Locktite® or non-approved lubricant on any
ARIAKON™ product will void warranty.
WARRANTY CLAIMS
USA customers: You must contact ARIAKON™ at 1-877-4-ARIAKON and obtain a
Return Merchandise Authorization Number. The Repair Authorization Form (see page 19), filled
out, and a copy of original purchase receipt must be included with the return.
Package the unit carefully using ample padding material to prevent damage in transit and ship it
prepaid and insured. We recommend that you ship your return product using a method of shipment
that supplies proof of delivery to establish liability. ARIAKON™ is not responsible for items that do
not reach us or are lost / damaged in transit.
International Customers: Please return product to your nearest distributor. If you do not know your
distributor, please call 760-268-0735 and ask for our International Department for
assistance.
IMPLIED WARRANTIES
WE MAKE NO EXPRESS WARRANTIES EXCEPT THOSE STATED IN THIS SECTION.
ARIAKON™ MAKES NO REPRESENTATIONS OR WARRANTIES, EITHER EXPRESSED OR
IMPLIED, OF ANY KIND WITH RESPECT TO PRODUCTS SOLD, INCLUDING BUT NOT LIMITED
TO QUALITY, MERCHANTABILITY AND FITNESS FOR A PARTICULAR PURPOSE. YOU AGREE
THAT THE SOLE AND EXCLUSIVE MAXIMUM LIABILITY, TO ARIAKON™ ARISING FROM ANY
PRODUCT SOLD, SHALL BE THE PRICE OF THE PRODUCT ORDERED. WE RESERVE THE
RIGHT TO MODIFY THIS WARRANTY AT ANY TIME AT OUR SOLE DISCRETION. SOME
STATES DO NOT ALLOW LIMITATIONS ON HOW LONG AN IMPLIED WARRANTY LASTS, SO
THE ABOVE LIMITATIONS MAY NOT APPLY TO YOU. TO THE EXTENT ANY PROVISONS OF
WARRANTY IS PROHIBITED BY FEDERAL, STATE, OR MUNICIPAL LAW WHICH CANNOT BE
PREEMPTED, SHALL NOT BE APPLICABLE. THIS WARRANTY GIVES YOU SPECIFIC LEGAL
RIGHTS, AND YOU MAY ALSO HAVE OTHER RIGHTS WHICH VARY FROM STATE TO STATE
AND COUNTRY TO COUNTRY.
LIABILITY STATEMENT
ARIAKON™ SHALL NOT BE LIABLE, UNDER ANY CIRCUMSTANCE, FOR CONSEQUENTIAL
DAMAGES, INCIDENTAL DAMAGES, OR INCIDENTAL EXPENSES, INCLUDING BUT NOT
LIMITED TO, DAMAGE AND LOSS OF PROPERTY, LOSS OF LIFE, PERSONAL INJURY OR ANY
OTHER EXPENSE RESULTING FROM THE USE OF THIS WEAPON, INCLUDING THE
INTENTIONAL, RECKLESS, NEGLIGENT OR ACCIDENTAL DISCHARGES. SOME STATES DO
NOT ALLOW THE EXCLUSION OR LIMITATION OF INCIDENTAL OR CONSEQUENTIAL
DAMAGES, SO THE ABOVE LIMITATION OR EXCLUSION MAY NOT APPLY TO YOU.
GOVERNING LAW
THE SALE(S) WILL BE GOVERNED BY THE LAWS OF THE STATE OF CALIFORNIA. VENUE
AND JURISDICTION FOR ALL DISPUTES WILL LIE IN SAN DIEGO COUNTY,CALIFORNIA
Please return to:
ARIAKON™
2794 Loker Ave West, Suite #107
Carlsbad CA USA 92008.
RMA#
TABLE OF CONTENTS
Congratulations on your purchase of an ARIAKON™ paintball
marker! As the leader in scenario paintball products we strive to
provide you with one of the best paintball markers available. With
proper maintenance your marker will provide you with reliable
service for many paintball adventures. Please take time to read
through the manual thoroughly and become familiar with the parts,
operation, and safety precautions before you attempt to load or fire
your ARIAKON™ marker.
Warning and Liability Statement…………………………………………… 4
Be Responsible! Be Safe! …………………………………………………. 4-5
Specifications and Performance………………………. …………………. 5
Getting Started………………………………………………………………. 6
Unloading Your Marker……………………………………………………... 7
Storing Your Marker…………………………………………………………. 7
Transporting Your Marker………………………………………………….. 7
Basic Cleaning and Maintenance………………………………………….. 8
Accessories and Upgrades…………………………………………………. 9
Schematic……………………………………………………………………. 10-11
Disassembly Methods – Diagrams…………………………………………. 12-15
• Diagram 1-1 Removing your stock……………………………………. 12
• Diagram 1-2: Separating the two body halves………………………. 12
• Diagram 1-
guide pin, and velocity spring………………………………………... 12-13
• Diagram 1-4: Removing the volume chamber lug, cup seal
• return spring, and cup seal.…………………………………………….. 13
• Diagram 1-5: Loosening the connector pin retaining screw.
• Removing the connector pin and bolt.………………………………… 14
• Diagram 1-6: Removing the Ball Detent………………………………. 14
• Diagram 1-7: Removing the Feed……………………………………... 15
• Diagram 1-8: removing the Barrel……………………………………... 15
Troubleshooting………………………………………………………………. 16-17
Warranty Terms and Agreements………………………………………….. 18
Repair Authorization Form………………………………………………….. 19
Page 4
Page 17
WARNING AND LIABILITY STATEMENT
This marker is classified as a dangerous weapon and is surrendered by
ARIAKON™ with the express understanding that the purchaser assumes
all liability resulting from unsafe handling, misuse, or any action that
constitutes a violation of any applicable laws or regulations. ARIAKON™
Assumes no liability for, and shall not be liable for personal injury, loss of
property or life resulting from use of this weapon under any circumstances,
including but not limited to those resulting from intentional, reckless,
negligent, or any other possible accidental discharges.
All information contained in this manual is subject to change without
notice. ARIAKON™ Reserves the right to make changes and
improvements to products without incurring any obligation to incorporate
such improvements in products previously sold.
BE RESPONSIBLE! BE SAFE!
The ownership and use of this marker places the total responsibility
of its safe and lawful use upon you. You must observe the same
safety precautions as you would any firearm to assure the safety not
only yourself, but everyone around you. The user, at all times, must
use caution when using this marker.
• Do not pressurize, load, or fire this marker until you have completely
read and understood this manual and are familiar with its operation
and safety procedures.
• Handle this marker as if it were loaded at all times.
• Wear paintball approved goggles and full face mask when you are
firing your marker, or are within range of anyone else firing their
marker. NEVER shoot at someone who is not protected with gear as
described.
• Always leave the marker in ‘SAFE’ mode when not actually in
game play.
• Do not carry this paintball marker in public unless it is stored in a
paintball case or bag.
• Always make sure your barrel is properly covered with a barrel plug or
cover whenever you are not actually in game play.
• Only pressurize and load the marker when you intend to immediately
use it. Always unload and remove CO2 cylinder immediately after use
Firing
TROUBLESHOOTING
Loosen the rear screw on the carry
handle (part #2) approximately
½ turn at a time until you are able to
The marker will
not cock
Marker does not fire
Marker sputters or
doesn’t re-cock
Paintballs Curve
More than one paintball
comes out at a time
Breaking paint
Clean barrel and breech area of broken
installed properly, not worn out, and that
Make sure the paintballs being used are
freely out of the barrel when it is pointed
cock the marker freely.
Make sure the connector pin (part #17)
is properly installed in the bolt and
striker. See diagram 2-2 on
Make sure air source is inserted
Make sure marker has been
re-assembled properly
Make sure paintballs are being
allowed into the marker
Check to make sure the
air tank is full
Clean bolt and striker making sure they
are free of debris or
Inspect the bolt (part #15) and striker
(part #32) o-rings and make sure that
they are well oiled and fit snuggly.
Replace if necessary
Make sure you are using high quality
paintballs that are not old or dirty
paint and debris
Make sure the ball detent (part #9) is
the screws (part #11) are not
over-tightened. Replace if
the proper size. They should not roll
Make sure you are using high quality
paintballs that are not old, dirty or are
Clean barrel and breech area of
broken paint and debris
Make sure ball detent (part #9) is not
worn. Replace if necessary. Note:
Screws holding ball detent should
not be over-tightened
page 13.
properly.
broken paint
necessary
downward
misshaped.
Page 16
Page 5
Air Leak
Alignment of Parts
Velocity
TROUBLESHOOTING
Inspect the valve on your tank to
Air leaks from where I
screw in the tank
Air leaks out from the
barrel
Air leaks from
between the
vertical ASA (part #40)
and the body
Stock
Front Sight
Hand guard is loose
Velocity is too high
Velocity is too low
Check for debris in the ASA (part #40)
Replace the o-rings on the valve (part
properly, and re-tighten the screw. If
the stock is loose after that tighten the
Loosen sight adjustment screw (part #
Tighten connecting screw (part #48),
(part #27) out, counter-clockwise, until
Turn the velocity adjustment screw in/
Internal parts may be dirty or o-rings
Check bolt (part #15) to make sure it
is not installed upside down. The hole
ensure that it is not
Replace the o-ring on your tank
Make sure your marker has been
reassembled properly. Refer to
Cleaning and Maintenance”
Replace the cup seal
Replace the valve
Loosen the set screw holding the
stock (part #19), align the stock
screw on the underside of the stock
50), and align sight properly, then
re-tighten the screw . See diagram
Follow diagram 3-2 on page 14.
then reassemble hand guard
Turn the velocity adjustment screw
desired velocity is reached
If the velocity spring (part #30) is
new it may need to be broken in;
until you are able to achieve the
desired velocity*
clockwise until desired velocity is
may be damaged. Refer to “Basic
Cleaning and Maintenance” on
in the center of the bolt should face
Make sure you have not lost the
copper air passage (part #12).
damaged
“Basic
on page 7.
#34)
(part #36)
(part #34)*
Replace o-ring
(part #38)
(part #22).
3-3 on page 14
reached
page 8
downward
BE RESPONSIBLE! BE SAFE! CONTINUED
• Never point the marker at anything you do not intend to shoot.
• Only use paintball markers where it is legal and/or approved.
• Always keep the muzzle pointed down or in a safe direction.
• Use only .68 caliber paintballs. Never load or attempt to fire any other
objects.
• Wear proper attire and avoid exposing any skin when playing the
game of paintball.
• Keep exposed skin away from escaping CO2 gas when
installing or removing the cylinder.
• Never look directly into the barrel while it is attached to the marker.
accidental discharge into the eyes may cause
permanent injury or death.
• Avoid shooting an opponent at point blank (6 feet or less).
• Never disassemble or perform maintenance to the marker while it is
pressurized with gas.
• Never shoot at wildlife or any other animals.
• Never shoot your marker at personal property of others.
SPECIFICATIONS
Model……………………………… ARIAKON™ SIM-15
Caliber…………………………….. .68 caliber
Action……………………………… Semi-automatic (open bolt blow-back)
Power……………………………… CO2, Compressed Air or Nitrogen
Barrel length……………………… 13.5”
Overall Length……………………. 30”
Weight (without tank or hopper)… 4.2 lbs
PERFORMANCE
Operating a paintball marker below 70°F (21°C) will decrease the number of
effective shots. The same is true for operating above 70°F (21°C). Many
factors affect velocity and accuracy, including brand of paintball, type of
paintball, amount of CO2 in source, lubrication, barrel condition and
temperature.
Page 6
Page 15
GETTING STARTED
IMPORTANT: Paintball approved eye and face protection must be worn at all times
when handling this or any other marker. Always make sure that when not actively
firing the marker in a paintball game, the marker is in ’SAFE’ mode and the barrel
plug or barrel cover is properly installed.
1) Ammo Box (Hopper)
Make sure that the feed port is clean to keep the paintballs feeding properly
and to help avoid breaking any paint. Also, make sure there are no sharp
edges or debris in your hopper. Install the hopper into the feed elbow (included
with your marker). Then attach the hopper assembly onto the feed port on the
side of the marker. Now open the lid on the hopper and fill with paintballs.
NOTE: Do not over tighten or the elbow may break.
2) Air Source Installation
First make sure the marker is in ’SAFE’ mode. Next you need to cock the
marker by sliding the cocking handle all the way back until it clicks, then
release the handle so it slides back to the forward position. Note: you may
need to manually push the cocking handle forward once you fully cock the
marker.
To install the air source, insert the tank valve end into the tank adapter in front
of the trigger frame. Twist the tank clockwise into the marker until you hear and
feel the tank ’ENGAGE’, then give the tank about 1/3 turn more so it does not
become loose. Your marker is ready to fire once you switch it from ’SAFE’
mode to fire mode.
3) Adjusting the Velocity
To adjust the velocity use a 3MM hex wrench on the velocity adjustment
screw, (part #27), on the rear of the marker directly under the stock. Turning
the adjuster screw in or clockwise will increase the velocity, and adjusting it out
or counter-clockwise will lower the velocity.
NOTE: Always check the velocity of you marker using a chronograph at your
local paintball field or store.
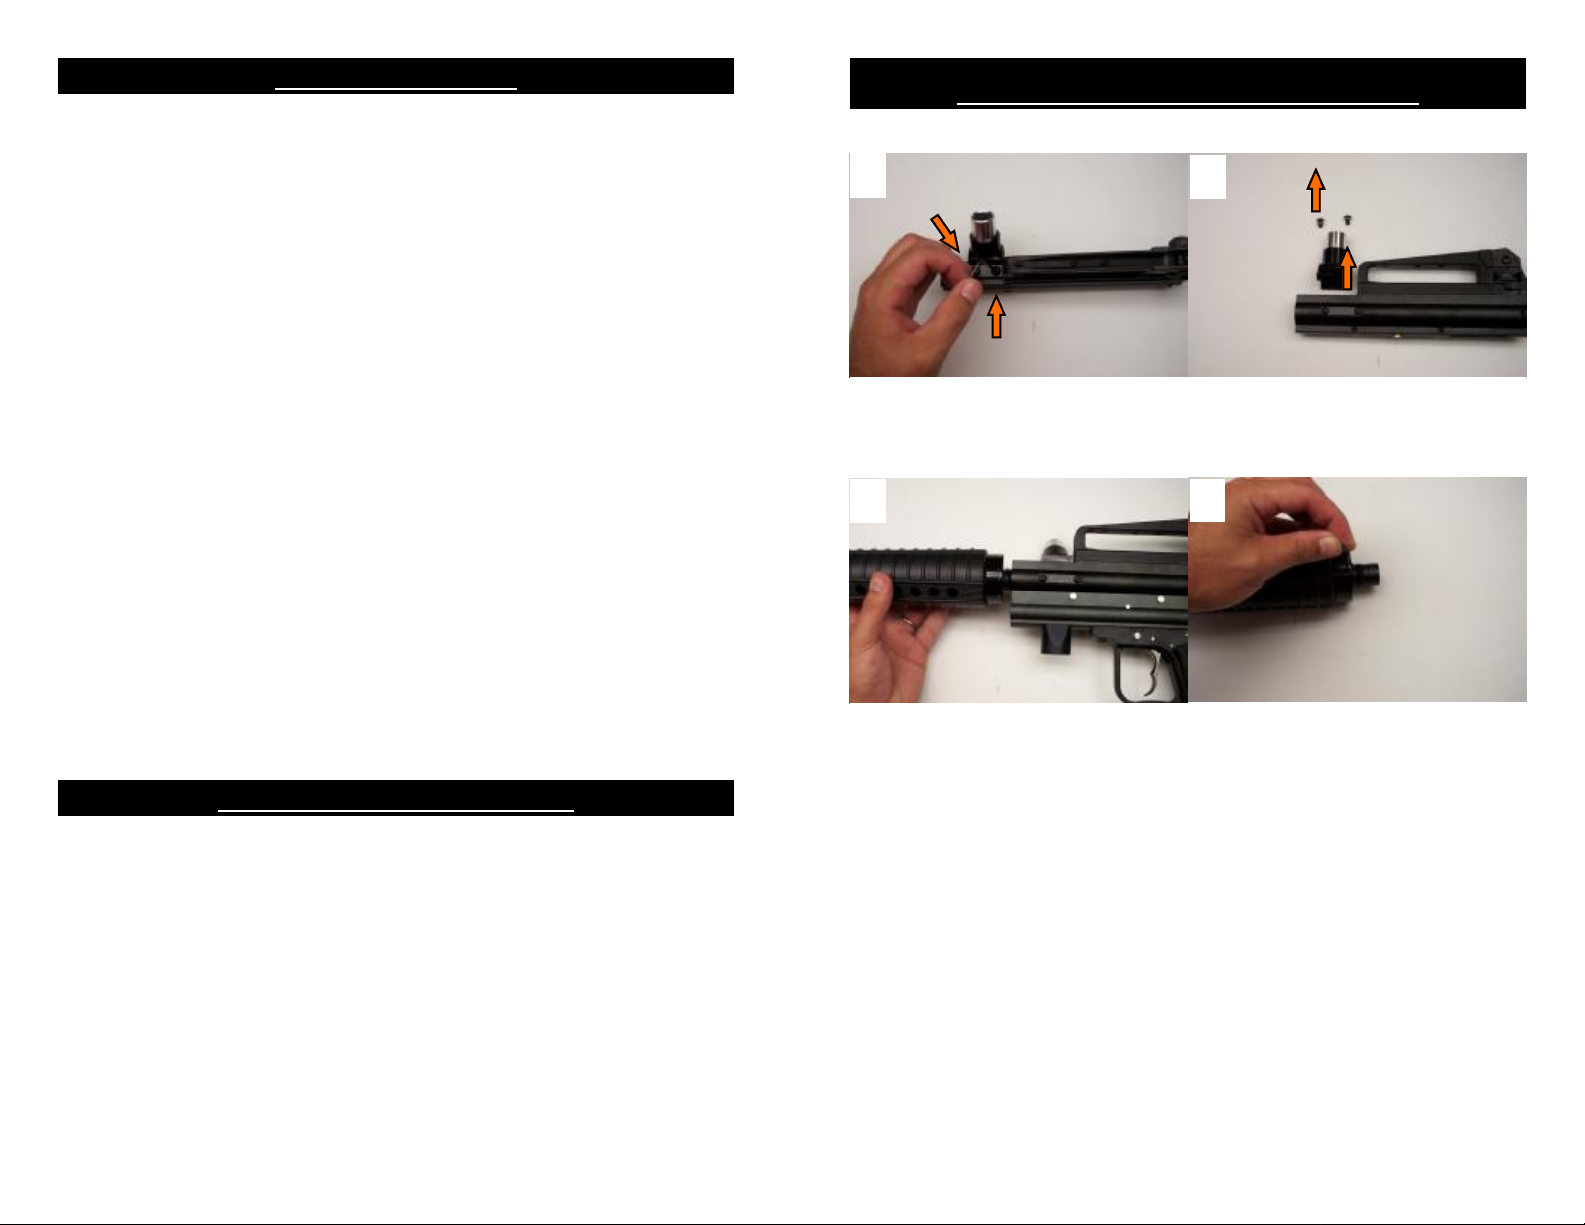
SIM-15 DISASSEMBLY METHODS
Diagram 1-7: Removing the Feed.
A
A— Begin by removing the Feed Screws (part #7) with a 3 mm Allen Key.
B— Pull up to remove as shown in Picture ’B’.
Diagram 1-8: Barrel Removal
A B
A— Begin by unscrewing the barrel from the top body half in a counter clockwise
motion as shown.
B— After the two have been unscrewed pull them apart as shown in Picture ‘B’
B
UNLOADING YOUR MARKER
IMPORTANT: Paintball approved eye and face protection should be worn when
operating any paintball product. Make sure your barrel plug, or cover, is installed
properly and always keep your marker pointed in a safe direction away from others.
1) First make sure your marker is set in ’SAFE’ mode and your barrel cover,
or plug, is properly installed.
2) To unload your marker remove the ammo box completely or empty it so it
is free of paintballs. Then point the marker in a safe direction, remove the
barrel cover, take the marker out of ’SAFE’ mode and fire several times to
be sure there are no paintballs lodged in the chamber, then immediately
return the marker to ’SAFE’ mode and replace the barrel cover.
 Loading...