

Page 1

DC3200
DC3200
DC3200
DC3200
DC3200
DC3200
DC3200
DC3200
DC3200
DC3200
DC3200
DC3200
DC3200
DC3200
DC3200
USER'S MANUAL
DC3200
DC3200
DC3200
Page 2

TABLE OF CONTENTS
Electromagnetic Compatibility Notice..................................................................2
Trademarks acknowledgement..........................................................................2
Precautions.........................................................................................................3
Contents of package...........................................................................................4
Batteries used for DC3200 Digital Camera.........................................................5
Input Compact Flash card.................................................................................6
Nomenclature....................................................................................................7
Buttons Desc.....................................................................................................9
LCD monitor menu.......................................................................................9-12
Status LCD Display..........................................................................................13
Icon Descriptions.............................................................................................13
Front LED indication.........................................................................................14
Default settings................................................................................................14
How to view the images
Playback on LCD monitor...........................................................................14
Download to computer...............................................................................14
View photos on TV....................................................................................15
Digital Zoom / Shot to Shot time......................................................................16
Install Camera Drivers and Software.........................................................17-26
Download photos by using PhotoStudio....................................................26-29
Use PhotoPrinter ......................................................................................30-31
Use PhotoFantasy.....................................................................................32-33
Use your digital camera as a PC camera...........................................................34
Open User’s Manual........................................................................................35
Uninstall Arcsoft programs..............................................................................35
Troubleshooting.......................................................................................................36
Product Specification........................................................................................37
Software and System Requirements...............................................................38
1
Page 3

Electromagnetic Compatibility Notice
This device complies with Part 15 of the FCC rules. Operation is subject to the
following two conditions :
(1) This device may not cause harmful interference, and (2) This device must
accept any interference received, including interf erence that may cause undesired
operation.
Warning : Changes or modifications to this unit not expressly approved by the
party responsible for compliance could void the user's authority to
operate the equipment. This equipment has been tested and found
to comply with the limits for a Class B digital device, pursuant to Part
15 of the FCC rules. These limits are designed to provide reasonable
protection against harmful interference in a residential installation.
This equipment generates,uses, and can radiate radio frequency
energy , and if not installed and used in accordance with the instructions,
may cause harmful interference to radio communications. However,
there is no guarantee that interference will not occur in a particular
installation.
If the unit does cause harmful interference to radio or television
reception, which can be determined by turning the equipment off and
on, the user is encouraged to try correcting the interference by one
or more of the following measures:
• Re-orient or relocate the receiving antenna.
• Increase the separation between the equipment and receiver.
• Connect the equipment into an outlet on a circuit different from that to which
the receiver is connected.
• Consult the dealer or any experienced TV/radio technician for help.
• Shielded cables are used with this unit to ensure compliance with the Class
B FCC limits.
• A high electrostatic discharge environment may cause the camera to
malfunction, Reset the camera by taking out the batteries and reinserting
them.
Trademark acknowledgements
Argus is a trademark of Argus Industries,Inc.
TWAIN driver is developed by Conexant Systems, Inc., USA.
Microsoft, Windows 98/Me/2000/XP are the registered trademarks of Microsoft
Corporation.
Pentium is a registered trademark of Intel Corporation.
The PhotoFantasy, PhotoPrinter and PhotoStudio is licensed to Arcsoft, USA.
All other product names mentioned herein are trademarks or registered trademarks
of their respective owners.
2
Page 4

Precautions :
Thank you for purchasing a DC3200 digital camera. Please read the instructions
carefully for a thorough understanding of the product before taking pictures.
• This camera is not resistant to water and should not be used outdoors in
snow or rain. If accidentally dropped in water, please quickly pour out the
water. Dry it with sunlight or an air-blower.
• Protect it from excessive humidity. It will wet the lens and the pictures taken
will be blurred.
• Do not expose the camera to sand.
• Do not attempt to disassemble the camera yourself. Always take it to an
authorized service facility for repair.
• Remove the batteries if you do not expect to use the camera for 1 month
or longer.
• To store the camera, wrap it in a piece of clean, soft cloth and place it in a
cool, dry, dust-free place. Also it should not be placed in very hot temperature
conditions or under direct sun-light.
• The batteries may explode or cause burns if disassembled, recharged,
shorted, exposed to high temperature, or disposed of in fire.
• AA-size alkaline or Ni-MH batteries can be used with this camera. The
camera will be damaged if you use poor quality batteries.
• Make sure all four batteries are fresh, unused or fully charged.
• Ensure that battery polarities are correct when placing the batteries in the
camera.
• Batteries may feel warm after being used for some time.
• Take care of the lens. Use special cloth to clean it.
• Do not scratch hard objects against the lens, LCD monitor screen or
viewfinder.
• Condensation is a problem when bringing cold equipment into a warm room.
Try to put the camera in a plastic bag so condensation forms on the outside
of the bag.
• If the status LCD display or the LCD monitor screen is damaged, do not
touch it.
• Battery low detection:
When you see the battery icon blinking, replace the batteries with new
alkaline batteries or fully charged NiMH batteries.
If you do not replace batteries, you cannot use the flash and you have to
turn off the LCD monitor in order to take additional pictures.
• Battery life is shorter for poor quality alkaline batteries. If you always turn
on the LCD monitor and the flash , you should use good quality batteries(eg.
Energizer alkaline batteries). High power NiMH rechargeable batteries
(1300mAH or higher) are also recommended.
3
Page 5
Contents of Package:
DC3200 digital camera
Installation CD-ROM containing: User's Manual and Digital Camera software
Quick Start Guide
USB cable
Video cable
Hand Strap for camera
Warranty Card
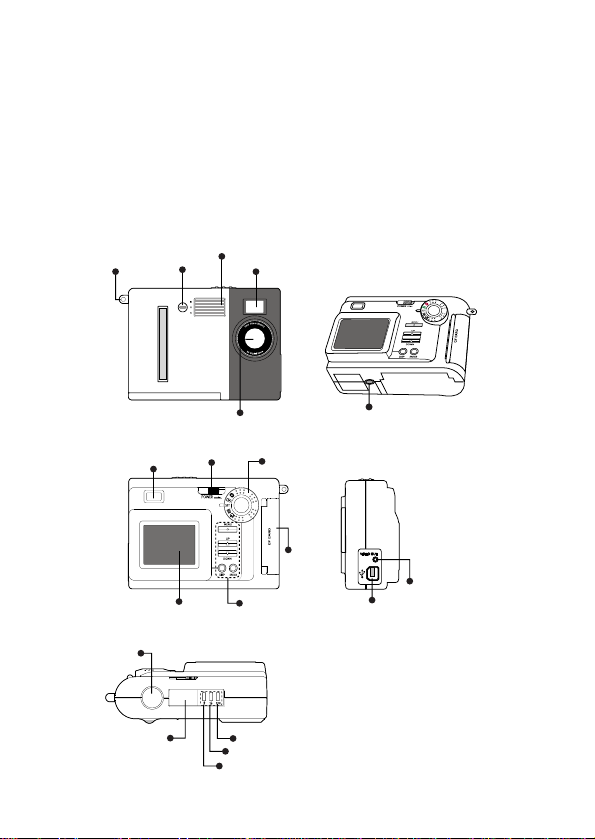
Nomenclature:
Hand Strap
Mount
View Finder
1.8'' TFT LCD Monitor
Shutter
Status LCD Display
LED
Power Switch
Flash
View Finder
Lens
LCD monitor
control buttons
Resolution
Self Timer
Flash
Mode Dial
CF card
cover
4
Tripod port
Video out
USB port
Page 6
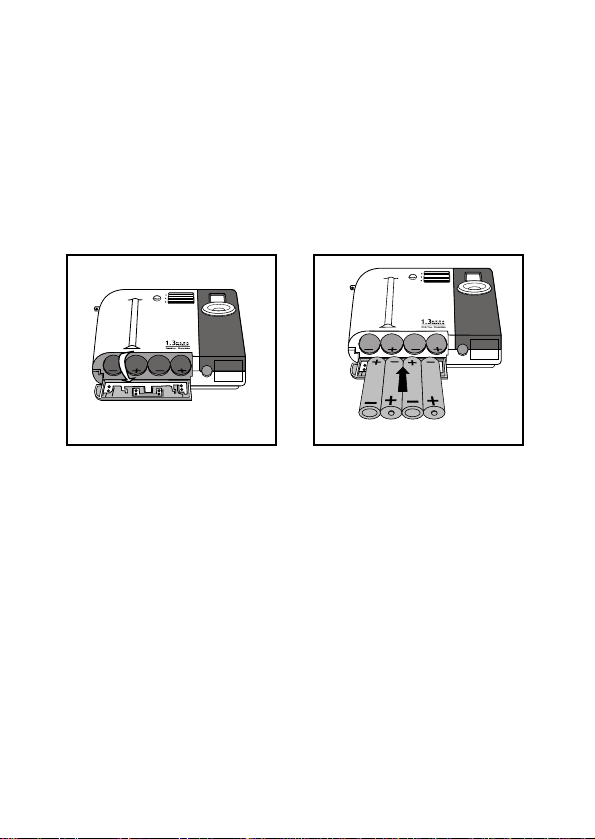
Batteries Installation
1. Insert 4 AA alkaline batteries into the battery compartment
2. Slide the Power switch to the right for 1 second; the camera will be turned
on.
3. The camera cannot be powered up without batteries.
4. If the battery power is cut off, the settings will be reset. For example, the
date and time will be set to 01/01/00 12:00
5. If the battery is too low, a battery icon on the status LCD screen will blink.
Note: Although the camera is ON, the LCD monitor remains OFF to sav e battery
power. Press the DISP button to turn the LCD monitor on. This displays
the live image.
• Lift open battery compartment.
• Insert 4 AA alkaline batteries using the correct polarity and close battery
compartment cover.
5
Page 7
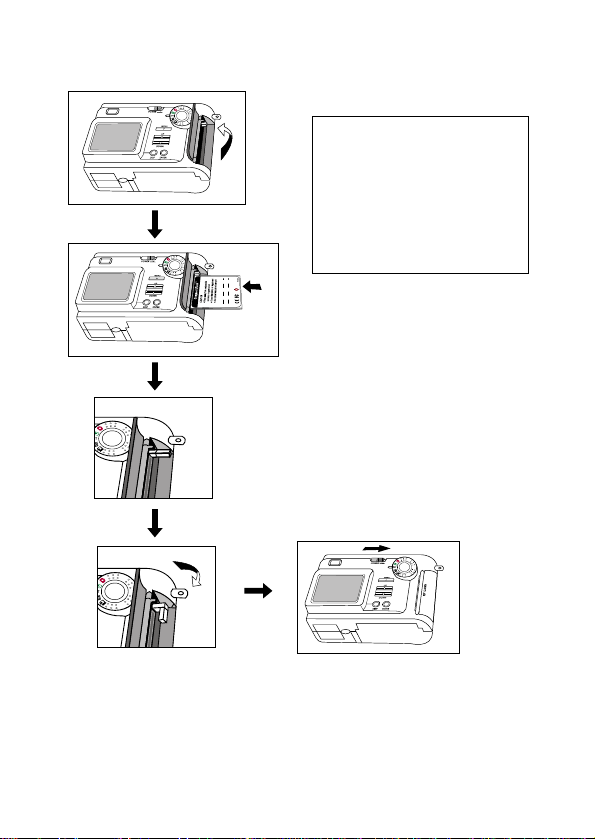
Input the CF (Compact Flash) Card :
CF
ce
1. Open the CF card cover,located
on the left hand side of the camera.
2. Insert the CF card as shown.
3. Lock the ejector.
4. Close the CF card cover.
5. T urn the Mode Dial to Record mode.
Power on the camera.
6. The remaining number of photos
that can be taken appears on the
status LCD.
6
Page 8
ce
CF
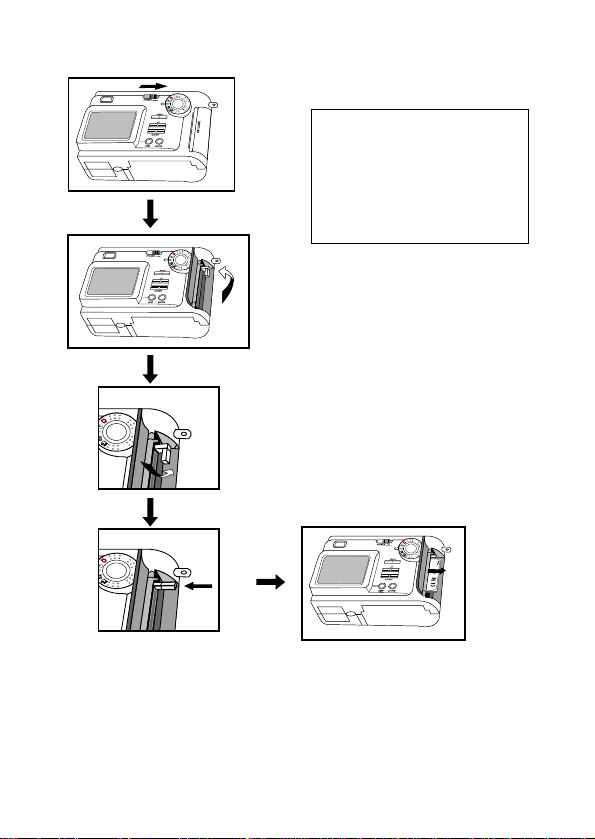
Take out the CF (Compact Flash) card :
1. Power off the unit.
2. Open the CF Card cover
3. Unlock the ejector.
4. Push down on the ejector to
release the CF card.
5. Pull up on the CF card to remove
6. Close the CF card cover.
7
Page 9

NOTE: The internal memory only holds six photos when set on the low-resolution
setting (HALF*). Use the CF (Compact Flash) card capability for
maximum number of photos.
The number of photos can be taken by using CF card
Resolution CF card size
16MB 32MB 64MB
Full *** 15 30 60
Full ** 30 60 120
Full * or Half *** 60 120 240
Half ** 120 240 480
Half * 240 480 960
NOTE:
• This is an estimation. The actual figures may vary according to environments
and subjects.
• With the CF card installed, each picture you take is stored on the CF card.
Without the CF card installed, your pictures are stored in the camera’s
500KB of internal memory.
• Only CF card type 1 is suitable for this camera.
• We recommend using quality CF Memory cards, e.g. SanDisk or Kodak. W e
do NOT guarantee compatibility with poor quality CF Memory cards.
• If you insert the CF card after the camera is powered on, you need to pow er
off and on again to get the frame number matching the CF card memory
size.
• Do not change the directory (folder) names or file names from your PC. If
you do so, the files cannot be opened by the camera.
• The files are stored in the folder Dcim\100Cnxnt of the CF card. You can
save the images to PC directly by using a CF card reader.
• If you copy some image files from other sources, they cannot be used for
this camera.
8
Page 10
Buttons Description :
1. RES : Select image resolution from FULL*, FULL* , HALF***,
HALF**, HALF*, HALF* , FULL***, FULL**.
Resolution: Full = SXGA 1280x1024, Half = VGA 640x480
Image Quality: *** = High, ** = Normal, * = Economy
2. : Timer (10 second delay). Press to select on/off
3. Flash : Toggle between Off ,Auto (no icon), Red Eye , On
4. Shutter : Measure and take exposure. Press to take photos.
5. POWER : Slide to right for 1 second to turn camera ON or OFF.
6. MENU : Display or hide the LCD monitor menu.
7. UP : Move up to next item on menu.
8. DOWN : Move down to next item on menu.
9. DISP :
• In Record mode : Turn LCD monitor ON or OFF.
• In Play mode : Toggle between full screen, full screen with image
information, display photos as 3 x 3 thumbnails.
10. ENTER :
• Confirm the item selected on LCD monitor
• In Record mode : Activate Digital Zoom
Mode Dial:
1. Record mode: Take pictures.
2. Play mode: Review stored images
3. Setup mode: Display Setup menu.
4. Erase mode: Display Erase menu
5. PC mode: Download images, or PC camera mode.
9
Page 11

LCD Monitor Menu in each Mode:
1. Record Mode Menu
Turn Mode Dial to Record mode. Press the Menu button. Use UP and DOWN
buttons to select. Use ENTER button to confirm.
• LCD Brightness: -5 to +5, step 1
Adjust the LCD monitor brightness to suit the environment's light condition.
It is not easy to see the image on LCD monitor, if you use it outdoors in
bright sunlight. For indoors, you can use the default value (0).
• Quick View: ON or OFF
If it is set to On and the LCD monitor is set to Off, it will display the last
image for 3seconds (the image is converted to a JPEG file but is not saved
to the memory). If you do not like the image, just press the ENTER button
to delete it before the LCD monitor is turned off.
• White Balance: Auto, Daylight, Incandescent, Fluorescent1, Fluroescent2
The digital camera is a device different from the human eyes that can see
a white subject regardless of the lighting condition of the environment. So
the firmware is designed to automatically update the color processing in
order to reproduce a true color image.
However, this may fail in some cases. You can change from Auto White
Balance to Daylight, Incandescent, Fluorescent1 (Daylight fluorescent lamps)
or Fluroescent2 (warm white fluorescent lamps).
Note: Once use this function, the flash is set to OFF automatically.
• EV Compensate: -1.5 to +1.5 EV, step 0.3 EV
If the background is too bright (e.g. Sunny da y, sno w mountain), the e xposure
will be too low for the main subject. You need to increase the exposure by
increasing the EV (from+0.3 to +1.5). If the background is too dark (e.g.
black wall), you need to decrease the EV (from -0.3 to - 1.5)
Note : +1 EV = the exposure is double. –1EV = the exposure is half
• Light Frequency: 50Hz or 60Hz
If you use the camera as a PC camera, you need to select the light frequency
equal to your country's AC mains frequency. E.g. USA is 60Hz. Europe is
50Hz.
2. Play Mode Menu
Turn Mode Dial to Play mode. Press the Menu button. Use UP and DOWN
buttons to select.
Use ENTER button to confirm.
• LCD Brightness: -5 to +5, step 1
same as Rec mode
• Video Mode: NTSC or PAL
Select either NTSC or PAL to match your TV system
10
Page 12

NTSC is mostly for USA and Japan.
PAL is mostly for Europe.
• Slideshow: 1 to 10 seconds
Change the display time from 1 second to 10 seconds. The time is preset
as 3 seconds.
Press ENTER button to stop the Slideshow.
• Folder : Select another folder
Initially, a folder named "100cnxnt" is created in the folder ‘Dcim’ of the
Compact Flash (CF) card. You can also create other folders in the CF card
to better organize the photos you have taken.
• To create a folder in the CF card:
1. Install camera drivers (please see P17-P25 for drivers installation).Connect
the camera to your computer
2. Turn the Mode dial to PC mode
3. Power on the camera
4. Double-click "My Computer" icon on your computer
5. Look for "Removable Disk" icon and double-click on it
6. Double-click "Dcim" folder and y ou should see the folder named "100cnxnt"
7. Click File > New > Folder from the pull-down menu
8. Rename the folder in the format "xxxyyyyy" where ‘xxx’ can be any
number from 101 to 999 and ‘yyyyy’ can be a combination of alphabets
(A to Z)and numbers (0 to9). F or e xample, y ou ma y create a f older named
"105home1" (Note: The folder name must contain a total of 8 digits)
After you have created the folders, you can rearrange your photos into
different folders. Then close the "My Computer" screen.
• To review the rearranged photos on your camera:
1. Turn the Mode dial to Play mode
2. Power off the camera and power it on again
3. Press MENU button
4. Press DOWN button to select Folder and press ENTER button
5. Press UP or DOWN button to select the folder you want to review
and press ENTER button
6. Press UP or DOWN button to review the photos
Note: Any new photos taken will be stored in the last created folder.
• Protect Files: Protect Current / Unprotect Current, Protect All / Unprotect
All, Cancel.
To protect the image from being erased you can select to protect the current
image or all the images. The protected image has a lock icon on the
upper left corner of the LCD monitor. However, the protected files will still
be erased, if you select Format Media in Setup mode. You will hear a beep
sound if you attempt to erase a protected file.
11
Page 13

3. SET Setup Mode Menu
Turn Mode Dial to Setup mode. Press the Menu button. Use UP and DOWN
buttons to select. Use ENTER button to confirm.
• Date/Time Set date and time
To store the date (month/day/year) and time (hour/minute) on the image,
use the UP and DOWN buttons to set the value(s). Press ENTER button
to confirm and go to the next entry. Once the minute value is set you will
return to the Setup Menu.
• Language: English, French, Deutsch, Spanish, J apanese , Portuguese, Italian
7 languages available on LCD monitor menu
• Sound: Beeper On or Off
With the Beeper ON, you can hear beep sound if press button
• Format Media: Format the CF card or erase the internal memory.
It takes about 2 second to format the CF card (~1 second to erase the
internal memory).
Make sure you download the important images to the PC before formatting.
Note: If you select "Yes" to format media you will then be prompted to "Reset
Image No.?"
If you select "Yes", the next photo will be numbered 1. If you select
"No", the next photo taken after formatting will follow the numbering
sequence before formatting. E.g, if 3 photos were taken before
formatting, after choosing "No" to "Reset Image No.?", the next photo
will be numbered 4.
• Auto Power Off: 1, 2 or 3 minute selection
To save battery when camera is not in use.
4. Erase Mode Menu
Turn Mode Dial to Erase mode. Press the Menu button. Use UP and DOWN
buttons to select. Use ENTER button to confirm.
• Erase Current
• Erase All
5. PC Mode Menu
Connect the camera to the PC with the USB cable. Turn Mode Dial to PC
mode. Slide the Power switch to power on the camera. 'PC' icon will display
on the status LCD, Press the Menu button. Use UP and DOWN buttons to
select. Use ENTER button to confirm.
• Mass Storage: Download images
See download to the computer
• Silent Video: PC camera
You can use the camera for web video conferencing.
12
Page 14

Status LCD display
Icon Descriptions
1. Battery icon: Indicates 3 levels of battery power, Full Half
Low .
Once Low is blinking, replace new batteries or camera
will be turned off soon.
2. 4-digit 7-segment display :
• Number:
In Record mode , Show the total number of images remaining.
In Play mode , Show the number of the last image (e.g. 0008, it
shows 8).
• Busy: Image data is being processed and saved as a JPG file
• PC: Mode dial is turned to PC mode
3. Flash icon
• (no icon) Auto Flash : Flashes according to light condition
• Flash ON : Flash is forced to fire regardless of lighting.
This is useful for bac klight conditions. (e.g. A shadow
of a tree)
• Flash OFF : Flash is suppressed
This is used for indoor lighting or for taking objects
at a distance when the flash will not be effective.
The white balance will operate to get natural colors.
• Anti-Red Eye : Pre-flash is set to avoid red eye
This ensures the object's eyes to appear natur al (not
red) when photographing in low light conditions. The
flash will fire a 'pre-flash' just before the picture is
taken and then fire again to take the actual picture.
Note: Flash is preset to Auto Flash upon installing the batteries.
4. Self-Timer:10-second delay after press the Shutter button
• To activate the Self-Timer, turn Mode Dial to Record Mode
• Press the Self-Timer button, the icon will appear on the status LCD
display
• Press the shutter down to trigger the self-timer
• You will hear a beep sound on the 7th second
• It will take the photo on the 10th second
13
Page 15

Note: The front LED light will blink red during the 10 second period
5. HALF / FULL: Indicate image resolution. See Buttons Description RES.
6. Rapid Fire: Take 3 continuous photos
• To activate Rapid Fire, turn Mode Dial to Record Mode
• Press the RES button until Rapid Fire icon appear on the status
LCD display.
• Press the Shutter button, you can take 3 continuous photos
Note: This function is available in resolution FULL* and HALF* only.
We recommend to de-activated the flash while using Rapid Fire
function due to the time required to re-charge the flash between photos.
Front LED indication :
Blinking : Self-timer is started
Off : Self-timer is not in use.
Default settings
Note: These are set upon installing batteries to power on the camera
Flash : Off
Resolution : FULL*
LCD monitor : Off
LCD Brightness : 0
Quick View : Off
White Balance : Auto
EV Compensate : 0
Light Frequency : 60Hz
Video : NTSC
Slide show : 3-second delay
Folder : 100 01.01.00
Date/Time : 01/01/00 12:00
Language : English
Sound : Off
Auto Power Off : 1 minute
(For detailed settings please refer to the User’s Manual)
How to view the images
1. Playback on LCD Monitor
• Turn Mode Dial to Play mode, the last photo taken will be
displayed.
• See LCD Monitor Menu in Play Mode
2. Download to the Computer
• Don't connect camera to PC before drivers are installed. See Page17 to
25 Install camera drivers and software
• Be sure to save photos in the camera or CF card
14
Page 16

• Connect the USB cable from the camera to the PC.
• Turn Mode Dial to PC mode
• Slide Power switch button to power on the camera
• Click 'My Computer' folder you will see an additional removable disk folder.
All the images stored in the CF card (or the 500KB internal memory) can
be downloaded to the PC hard drive by copying files from this removable
disk folder.
• Click 'Removable disk' folder
• Click ‘Dcim” folder
• Open '100cnxnt' folder
• The images are stored in the '100cnxnt' folder
• You may copy them to your hard driver
• Use PhotoStudio, Arcsoft or the software of your choice to edit, create and
erase files
3. View the images on TV
• Connect the camera to the TV using the video cable included in the pac kage
• Turn the TV to 'line' display
• Turn the Camera on .
• Turn Mode Dial to Play mode
• The last image file is shown on
TV screen
• Use the UP and DOWN buttons to
view other images
Note: Viewing images from a TV works well to show a group of people.
15
Page 17

Digital Zoom
In Record Mode, press the “DISP” button to turn on the LCD monitor and press
“ENTER” button to activate the 2X Zoom function . “2 x D Zoom” will be displayed
on lower left corner of the LCD monitor. The central portion of the image is
enlarged by 2 times. Press Shutter to take photos. Press “ENTER” button again
or switch off the power to cancel 2X Zoom function.
Note : Once 2X Zoom is activated, the image resolution will automatically be
set to VGA, i.e. HALF.
This simulates the effect of using a 2X zoom lens. It is better to review the images
on TV / TFT .
Image on TV/TFT Digital Zoom Image on TV/TFT
Shot-to-Shot time
Following table is the approximately processing time for the camera before it
is ready for next shot.
Resolution Processing time
FULL *** ~6s
FULL ** ~4s
FULL * / HALF *** ~3s
HALF ** / HALF * ~2s
16
Page 18

Install Camera Drivers and Software
Install Arcsoft programs and camera drivers for Windows 98/98SE/Me OS
Note: The graphics shown are based on the user interface in Windows 98SE
Install Arcsoft Programs
1. Put the program CD-R OM into the CD ROM drive, it will perform an Auto run.
2. Select your desired language and clic k
OK button
3. Click Next button
4. Click Yes button if you accept the
license agreement
5. Change the Destination Folder by
clicking the Browse button if necessary
and click Next button
17
Page 19

6. Select components of Arcsoft programs
to install and click Next button
7. Change the name of the program f older
if necessary and click Next button
8. Files are being copied to your computer
9. Click Finish button to install camera
drivers
18
Page 20

Install camera drivers for Windows 98 / 98SE / Me OS
10. Click Next button to start camera driver installation
11. When installation is complete, click Finish button to restart your computer
12. After the computer is restarted, power up your camera
13. Switch the Mode dial to PC mode
14. Connect the camera and computer with the USB cord
15. Removable disk drive will automatically be installed in your computer.
Several screens will appear momentarily.
16. When Removable disk installation is complete, press MENU, DOWN,
ENTER buttons on the camera to select Silent Video mode
17. Video driver will be installed in your computer
18. Drivers installation is complete.
Note: The installed camera driv er may conflict other USB devices in your computer system.
19
Page 21

Check the image files
1. Turn Mode Dial to PC Mode( ) .
2. Press MENU.
3. Select Mass Storage Mode.
4. Press ENTER.
5. Open Windows Explorer.
6. Search through Removable Disk>Dcim>100cnxnt
and double-click on the 100cnxnt folder
7. The image files are shown in the right pane
Check the video driver
1. Turn Mode Dial to PC Mode ( ).
2. Press Menu.
3. Select 'Silent Video' Mode.
4. Press ENTER.
5. Search through Start>Settings>Control Panel>System
>Device Manager>Imaging
Devices>DC3200 Video Camera
20
Page 22

Install Arcsoft programs and camera drivers in Windows 2000/XP OS
Note: The graphics shown are based on the user interface in Windows XP
1. Put the program CD-R OM into the CD-R OM driv e , it will perform an Autorun.
2. Select your desired language and click OK button
Install Arcsoft Programs
3. Click Next button
4. Click Yes button if you accept the license agreement
5. Change the Destination Folder by clicking Browse button if necessary and
click Next button
21
Page 23

6. Select components of Arcsoft programs to install and click Next button
7. Change the name of the program folder if necessary and click Next button
8. Files are being copied to your computer
9. Click Finish b utton to install camera drivers
22
Page 24

Install camera drivers in Windows 2000 / XP OS
10. Click Next button to start camera driver installation
11. Click Continue An ywa y b utton (for Win XP) or Yes button (for Win 2000) when
you see the warning message.
12. When Setup is complete, click Finish button to restart your computer
13. After your computer is restarted, power up your camera
14. Switch the Mode dial to PC mode
15. Connect the camera and computer with the USB cord
16. The f ollowing screen will appear to signal the Remo v able Disk has been installed
in your computer. Click Cancel button to move on to video driver installation.
23
Page 25

17. Turn Mode Dial to PC Mode ( ) .
18. Press Menu.
19. Select 'Silent Video' Mode.
20. Press enter and wait till the following screen to appear.
21. Install the software automatically .
Select and click Next button to start the video driver installation.
22. Click Continue Anyway button (for Win XP) or Yes button (Win 2000) when
you see the warning message
24
Page 26

23. Click Finish button to end
24. Drivers installation is complete.
Note: The installed camera drivers ma y conflict other USB de vices in your computer
system.
Check the image files
1. Turn Mode Dial to PC Mode ( ).
2. Press MENU.
3. Select 'Mass Storage' Mode.
4. Press ENTER.
5. Open Windows Explorer.
6. Search through Remov able disk>Dcim>100cnxnt and double-clic k on 100cnxnt
folder
7. The image files are shown on the right pane
25
Page 27

Check the video driver
1. Turn Mode Dial to PC Mode ( ).
2. Press Menu.
3. Select 'Silent Video' Mode.
4. Search through Start>Control Panel>System>Hardware>Device Manager
>Imaging devices>DC3200 Video Camera
Download photos by using Photo Studio
NOTE: The graphics shown are based on the user interface in Windows 98SE
1. Search through Start>Programs (“All Programs” for Windows XP) > DC
3200 Digital Camera Suite and click PhotoStudio 2.0 SE icon
2. Click on the following screen to start using the program
26
Page 28

3. Search through File and click Acquire > Select Source icon from the pull-
down menu
4. Highlight DC3200 Digital Camera and click Select button. Make sure your
camera is in Mass Storage mode and connected to your computer.
5. Search through File and click Acquire > Acquire icon
6. Highlight the photo(s) you want to save and click Save button.(Or click Save
All button to highlight and save all pictures).
27
Page 29

NOTE: If there is only one picture taken in the camera, you will receive the
following screen. Click the OK button.
The following screen will display with the image file name only. Preview of the
picture is not available.
7. Select the folder in which you want to save the picture(s) from the Save in
field. Change the filename in the File name field if necessary. Clic k Save b utton.
OR
When Save All button has been pressed:
Select the folder to save all images and click OK button.
28
Page 30

8. To retrieve the sav ed photos , clic k File>Open from the pull-down men u. From
the Open dialog box, look in the folder in which the pictures are saved,
highlight the image file and click Open button.
9. You may now edit the opened picture with the tools provided .
29
Page 31

Using PhotoPrinter
NOTE: The graphics shown are based on the user interface in Windows 98SE.
1. Search through Start>Programs (“All Programs” for Windows XP) > DC
3200 Digital Camera Suite and click PhotoPrinter 2000 icon
2. Click Get Photos icon
3. Click Add icon.
NOTE: You can also download photos from your digital camera by clicking the
Acquire icon. Please go to “Download Photos by using PhotoStudio”
section for similar procedures.
30
Page 32

4. Look in the folder where the picture you want is saved. Highlight the image
file and click Open button.
5. The thumbnail of the opened picture will be added.
6. Click and highlight the thumbnail and click OK button
7. You may now set your print options by using the buttons or icons shown on
the right and bottom of this screen.
31
Page 33

Using PhotoFantasy
NOTE: The graphics shown are based on the user interface in Windows 98SE.
1. Search through Start>Programs (“All Programs” for Windows XP) >DC3200
Digital Camera Suite and click Photo Printer 2000 icon.
2. Click Get Fantasy icon. You need to put the program CD-ROM to the CDROM drive to view the sample photos.
3. Select the template you want and click Okay icon
32
Page 34

4. Click get photo icon and then click Add icon at the bottom
NOTE: You can also download photos from your digital camera by clicking on
the acquire photo icon. Please go to “Download Photos by using
PhotoStudio” section.
5. From Open dialog box, look in your preset folder, highlight the image file
and click Open button.
6. Click Okay icon
7. You can modify the image as you want.
33
Page 35

Using your digital camera as a PC camera
1. Start Windows Netmeeting (or other similar programs) and set up an account.
2. Power up your camera and connect it to the computer . Press MENU, DO WN,
ENTER buttons to select Silent Video mode.
3. Click Start Video icon and you should see a live picture.
4. Click Stop Video icon (same as the Start Video icon) to end.
34
Page 36

Open User’s Manual
Search through Start>Programs (“All Programs” for Windows XP) >DC3200
Digital Camera Suite > User Manual
Uninstall Arcsoft programs
Search through Start>Programs (“All Programs” for Windows XP) > DC3200
Digital Camera Suite > Uninstall
35
Page 37

Troubleshooting :
Before you decide the camera is faulty, check the following hints or instructions.
1. No Power The battery is exhausted, inverted polarities
2. No Photo is taken The internal memory or CF card is full
3. Can't use flash 1. It is set to suppress flash mode
4. Image too dark with flash 1. The subject is too far away
5. Image is blurred The lens is soiled
6. Can't erase the photo It is
protected. Unprotect it.
7. LCD monitor is off The Mode Dial is set incorrectly
8. No display on the status LCD The camera is auto power off
9. Card Full is seen No CF card
is inserted. The card is full
10. The object is too dark 1. Change the position to avoid backlit
11. The object is unclear
Environment too dark. Use flash or tripod.
12. The object color is too yellow Change the White Balance to other settings.
13. I cannot use the CF card 1. Power off and then turn on the unit.
14. I cannot use the video camera Make sure you have selected 'silent video'
mode mode
15. I am using “Easy-CD Creator 1.DC3200 Digital Camera’s installation CD
(version 4.X or below) and I includes an “auto-check” prog ram to detect
have problem installing the if your PC has any software conflicts
camera driver, what should between PC’s own devices and the camera.
I do? If the “auto-checker” detects existence of
2. Battery power is low.
2. Your fingers covered the flash.
problem.
2. Use eV compensate. Add 1eV or 1.5eV.
2. Check if the CF card is fully inserted.
software conflicts, it will recommend and
guide the user to download the updated
driver/file from appropriate website to solve
the conflict problem.
2.If you cannot download the driver from
website for some reasons, try following the
following procedures:
a. Insert the DC3200 Digital Camera
installation CD into the CD-ROM drive
b. Look for the file “recover.bat” stored in
the CD
c. Double-click the file to initiate the
recovering process
d. Restart your computer
36
Page 38

PRODUCT SPECIFICATIONS
1. Resolution FULL : 1280 x 1024 (SXGA),
HALF : 640 x 480 (VGA)
2. Image Quality *** High, ** Normal, * Economy
3. Lens Glass, 5 elements, F/2.8, 35mm(Equiv)
4. Number of Photos FULL * : 1
(Built-in memory) HALF* : about 6
5. 1.8-inch LCD monitor 280x220 dots, True color TFT display.
6. LCD monitor Menu 7 types of languages (European and Japanese)
7. Special Features Quick View, Slideshow, Folder selection, Protect
Files,Date/Time insert, Auto power off, Erase
Current/All
8. Others View Finder, Status LCD , Buzz er , LED, T ripod mount
9. Buttons and Switch 10 buttons and 1 rotary Mode Dial.
10. Flash 4 modes : Auto, On, Off, Red Eye.
11. Battery Power Alkaline AA battery x 4 ( 6V)
12. Auto-Off 1, 2 or 3 minutes
13. Self timer Yes. Delay time = 10s.
14. TV video out NTSC or PAL
15. White Balance Auto,Daylight,Incandescent, Fluorescent1 or
Fluroescent2.
16. Digital Zoom 2X digital zoom. (HALF)
17. File format JPEG (DCF compatible)
18. Focusing range 1m to infinity (fixed-focus lens)
19. EV Compensate From -1.5 to +1.5 EV , step 0.3 EV
20. Low Battery Detect Three levels.
21. Battery Life(Alkaline) Approx. 1 hour with LCD monitor on.
22. Operating conditions 0 ~ 40 degree Celcius.
23. Dimension 80 x 110 x 35 mm (HWD)
24. Net Weight 190g w/o battery
Software :
1. Camera Driver USB Type, Removable Disk
2. PhotoPrinter Photo printing program
3. Photo Fantasy Role play program
4. Photo Studio Photo editing program
Specifications are subject to change without notice.
37
Page 39

System Requirements :
1. Pentium 300MHz or above.
2. Operating Systems: PC Win98/ 98SE/ 2000/Me/XP
3. 32MB SDRAM minimum for Win98/98SE.
64MB SDRAM for WinMe/Win2000,
128MB for WinXP.
4. Minimum 300MB hard disk free capacity, 1GB for WinXP.
5. With USB port and CD-ROM drive.
Responsible Party in USA
Legal Company Name: Argus Industries, Inc.
Address: 1100 Howard street
Elk Grove Village, IL 60007
www.arguscamera.com
E-Mail : argus@arguscamera.com
38
 Loading...