

Page 1

User Manual
Package Contents:
Bean - Carabiner Camera
Li-Ion Rechargeable Battery
AC Adapter
User Guide
ArcSoft PhotoImpression
and Driver Installation CD
Page 2

CONTENTS
I Getting to Know Your Camera .................................................. 3
1. Configuration & Installation .................................................... 3
2. LCD Display ........................................................................... 4
3. Setup ..................................................................................... 7
4: Turning on/off the Camera ..................................................... 8
5. Taking Pictures ...................................................................... 8
6. Video Recording: ................................................................. 10
7. Still Image Review ............................................................... 10
8. Digital Zoom ......................................................................... 13
9. Play Video Files on a Television .......................................... 14
Ⅱ. Setting up Your Camera ......................................................... 16
1. Setup in Capture Mode ........................................................ 16
2. Setup in Video Mode............................................................ 21
3. Setup in Playback Mode: ..................................................... 22
4. Other Setup ......................................................................... 24
Ⅲ. Software & download ............................................................. 31
1. Web-Cam Driver Installation ................................................ 31
2. Using as a Web-Cam ........................................................... 37
1
Page 3

3. Downloading Images ......................................................... 38
Ⅳ. Maintenance .......................................................................... 38
1. Camera ................................................................................ 38
2. Battery ................................................................................. 39
3. Memory Card ................................ ....................................... 39
4. Caution ................................................................................ 41
Ⅴ. Specifications & System Requirements:................................. 41
1 . Camera Specifications ........................................................ 41
2. System Requirements: ...................................................... 43
2
Page 4
I Getting to know your camera
1. Configuration & Installation
3
Page 5
00:00:24
T
W
White b ala nc e ind ic at or
Auto
Day Light
Tung sten
Fluoresc en t
Clou dy
Batte ry leve l indi ca to r
Empt y
Half
Full
Digita l zoo m b ar
Resolutio n ind icato r
640x4 80
Mem or y ca rd insid e
Video mo de
320x2 40
00:00:24
The time o f rec ord ing
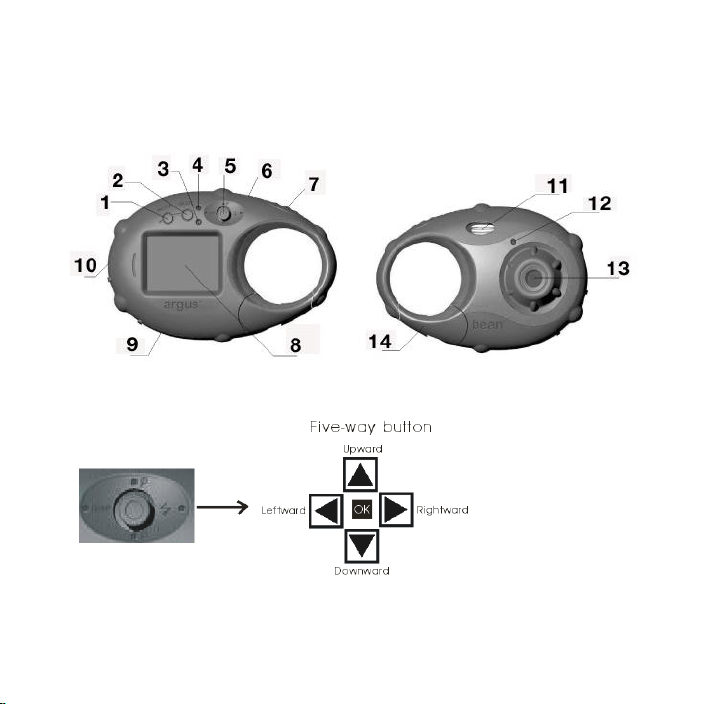
1. Menu Button 2.Mode button
3. Activity Light 4. Charge LED
5. Joystick 6.Power button
7. Shutter Button 8.LCD screen
9. SD card Slot 10. USB jack
11. Flash 12.Self-timer indicator
13. Lens 14. Clip
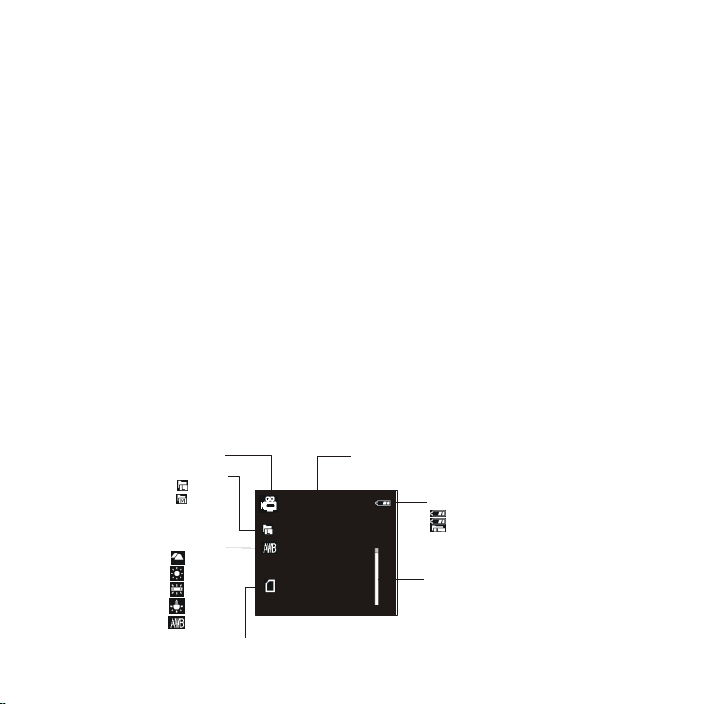
2. LCD Display
Video Capture
4
Page 6
T
W
12/1511
EV+0 .0
White b ala nc e ind ic ato r
Qua lity ind ica tor
Auto
Day Light
Tung sten
Fluoresc en t
Clou dy
Super
Fine
Norm al
Self-tim er ind ica to r
10 Seco nd
20 Seco nd
Batte ry leve l indic a tor
Empt y
Half
Full
Digita l zoo m b ar
Resolutio n indic at or
2592 x1944
2048 x1536
1600 x1200
1280 x960
640x4 80
Mem ory ca rd insid e
Ca ptu re mo de
EV Valule
Photo ta ken / pho to c a pa cit y
Date stam p
Flash co ntro l indic a tor
Force o n
Force o ff
Autom a tic ally fo rce on
Image Capture
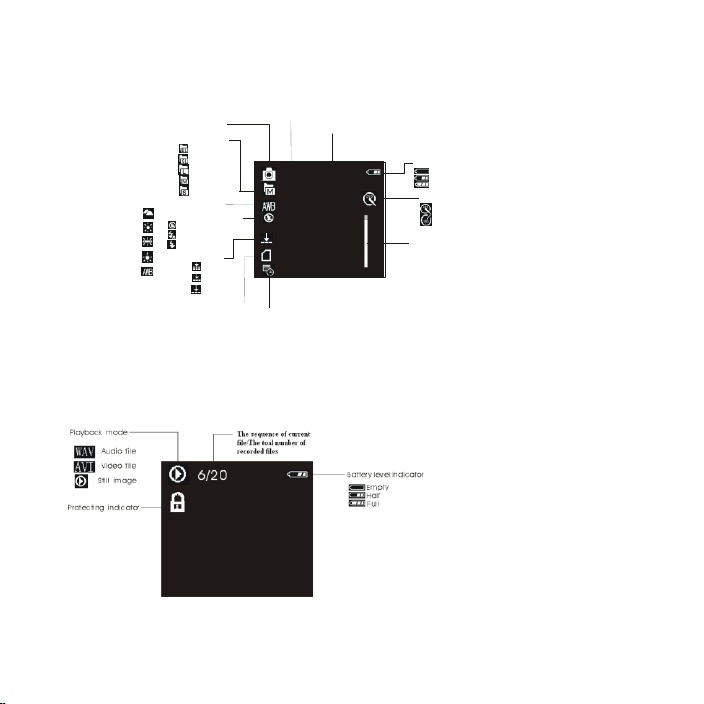
During Playback
5
Page 7
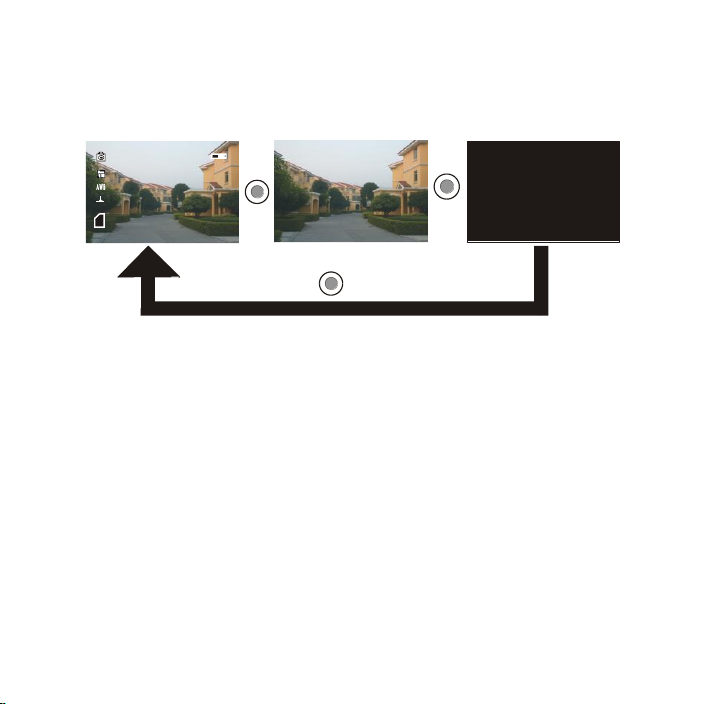
2.1 LCD status
00:00:24
12/1 511
EV+0.0
DISP
DISP
DISP
Push the joystick left to change the LCD status as shown below:
Attention:
You can not change the LCD status in the following
situations:
While in Setup;
While previewing files in the thumbnail mode;
While in slide show mode.
6
Page 8

3. Camera Setup
3.1 Battery
This digital camera uses a rechargeable li-ion battery. Before
using this camera please charge the battery for at least 4 hours.
The battery can be charged by connecting the camera
to computer via the USB cable.
Note: When the camera is charging, the Charge LED is Red
and this light turns off when charging is complete. If charging
the camera via USB, turn the camera off before connecting it to
the computer.
3.2 Insert a memory card
Insert the memory card to the card slot carefully with the label
facing the LCD screen.
Attention:
If the SD card does not go completely into the slot, do not
force it; remove and insert again.
To remove the card press the edge of the card gently and
then release it.
7
Page 9

4: Turning on/off the camera
1) To turn on the camera, press the power button. The LCD
screen and the busy light will turn on.
2) Press the power button again to turn off the camera.
5. Taking Pictures
1): Press the power button to enter default capture mode; If the
camera is in playback or video capture mode, press the
mode button until the icon flashes briefly on the screen
and remains in the upper left corner of the screen to enter
the capture mode.
2): Press the shutter button to take pictures.
Attention:
Do not take the memory card or battery out when camera is
saving the image, otherwise, the image won't be saved.
The screen will power off automatically if the camera is
inactive for 30 seconds. Press any key other than the power
button to restart the screen.
8
Page 10
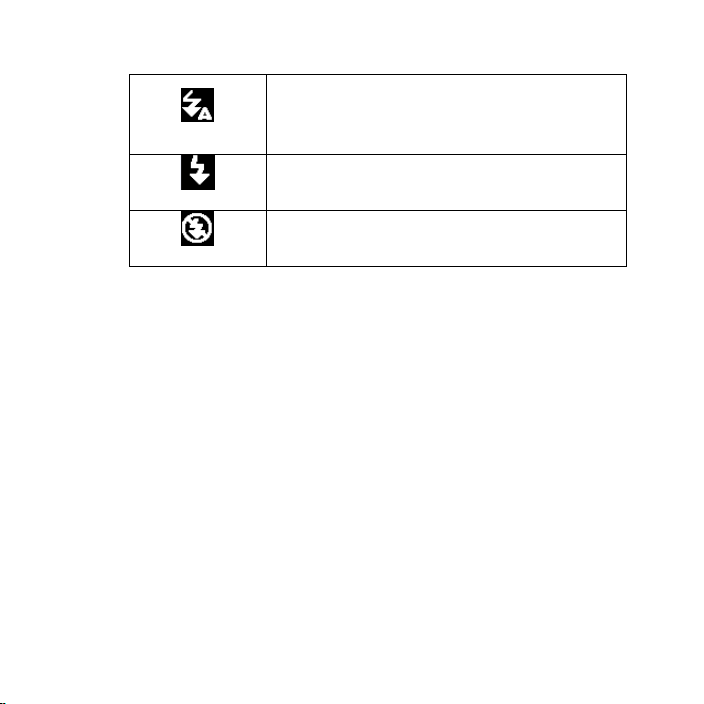
5.1 Flash
Auto: The camera determines if
flash is required.
Flash on: The flash will always fire.
Flash off: The flash will not fire.
When in capture mode, push the joystick to the right to adjust the
flash setting.
● When the flash is charging, the screen will remain blank. This
process takes between 3 and 5 seconds.
● Do not use the flash in a well lit environment as it will cause a
poor exposure.
● The flash function will not be usable in “Burst snapshot” mode
and video mode.
9
Page 11

6. Video Recording:
1): Press the mode button until the icon” “ flashes briefly on
the screen and appears on the upper left of screen;
2): Press the shutter button to start recording;
3): Press the shutter button again to stop recording the video.
Attention:
● The total amount of recording time depends on the capacity of
the internal memory or the SD card.
7. Playback
7.1 Still Image Review
a): Press the Mode button until the icon flashes on the screen
to enter playback mode.
b): Push the joystick left/right to show the previous or
next image or video file.
c): When previewing images, push down on the joystick to
display the index screen. (See the details on page 11 )
10
Page 12

7.2 Playing video files
Please note that when reviewing video files on the camera,
sound is not available. To hear the audio, download the files to
a computer.
a): Press the mode button to enter playback mode.
b): Push the joystick left/right to select video file (AVI).
c): Press the shutter button to play video file and press shutter
again to end playing.
d): Push the joystick left/right button to show previous file
or next file.
e): Push down on the joystick to pause and press it again to
continue.
7.3. Thumbnail Images
a) Press the menu button in image playback mode when the
images are showed in single full screen mode , then push the
joystick up/down to select “thumbnail”, push the joystick
right to display the index screen.
11
Page 13

b) Push the joystick left/right/up/down to select
image and press the shutter button to return to the single
image screen.
Attention: You can also push the joystick down to enter the
thumbnail mode while a still image is displayed.
7.4. Delete files
a) In playback mode press the menu button to enter the menu
interface, push the joystick up/down to select “delete
current” or “delete all”.
b) Selecting “Delete Current” will delete the current image. Push
the joystick right to confirm and exit.
c) Select “Delete All” to delete all the files. Push the joystick
right to confirm and exit.
You can also push down on the joystick when files are shown in
thumbnail mode. In playback mode, a dialogue box “Confirm
delete? Yes, No” will appear, select “Yes” with pushing the
joystick left and push down on the joystick to delete the selected
file.
12
Page 14

7.5: Lock image
This function can protect the files which from being deleted
accidentally.
a) In playback mode press the menu button to enter the menu
interface. Push the joystick up/down to select “lock”,
push the joystick right to show: “lock current”, “lock all”,
“unlock current”, “unlock all”;
b) Push the joystick up/down to select the necessary
operation;
c) Push down on the joystick to confirm the setting.
d) Press the menu button to return to playback mode.
8. Digital Zoom
To change the zoom:
In the camera/video/playback mode, push the joystick up/down
to zoom in or zoom out.
Attention:
● Digital zoom may affect the quality of the image. The higher
13
Page 15

digital zoom multiples, the lower of the image quality,
maximum 4X digital zoom is available.
● In playback mode the AVI files cannot be enlarged. These are
video files that can only be viewed and displayed unless
downloaded to a computer.
9. Playing video files on a Television
a): Connect the camera to a TV with the AV cable;
b): Power on the TV and switch it to AV mode;
c): Power on the camera and set it to playback mode;
d): Push the joystick left/right to select file to play, press
the shutter button to play video file.
Attention:
The camera screen will automatically power off when the AV
cable is connected to it but the battery will still be used;
The TV system (NTSC/PAL) will affect the image quality,
please select the proper TV system to match the
requirement in your region. (see P.15 for TV output setting).
14
Page 16

Adjust the television if the image does not display at the
center of TV screen.
Only use the cable that accompanies this camera to connect
the camera to the TV.
15
Page 17

II Setting up your camera
1. Setup in Capture Mode
In capture mode, press the menu button to enter the main menu
for 2 options:”Image” mode and “Setup” mode: Select “Image” to
adjust the following settings: Resolution, Quality, White Balance,
Color Effect, Exposure, DateStamp, Selftimer, and Burst
Snapshot
A. Resolution:
This function allows you to select the still image size.
a) Push the joystick down to select “resolution” , then push
the joystick right for 5 options : 2592*1944,2048*1536,
1600*1200,1280*960,640*480. The default resolution is
2592*1944 or 5 MegaPixel.
b) Push the joystick up/down to select the desired size.
c) Press down on the joystick to confirm the setting.
16
Page 18

d) Press the menu button to return to capture mode.
B. Quality:
Note that the higher the quality setting, the larger the image
file.
a) Push the joystick down to select “Quality” and then push
it right for 3 options: “Super”, “Fine”, “Normal”.
b) Push the joystick up/down to select the desired
image quality.
c) Press down on the joystick to confirm the setting.
d) Press the menu button to return to capture mode.
C. White Balance:
Normally, the “Auto” setting will set the optimum white
balance automatically. If natural colors can’t be obtained
with auto white balance, you can set the white balance
manually to suit the respective light source.
a) Push the joystick down to select “White Balance”, and
17
Page 19

push it to the right for 5 options: Auto, Day Light,
Tungsten, Fluorescent, and Cloudy.
b) Push the joystick up/down to select the proper mode.
c) Press down on the joystick to confirm the setting.
d) Press the menu button to return to capture mode.
D. Color Effect:
This function can color tune an image.
a) Push the joystick down to select “Color Effect”, followed
by right for 3 options: “Color”, “Sepia”, “Monochrome”;
b) Push the joystick up/down to select the desired color
setting.
c) Press down on the joystick to confirm.
d) Press the menu button to return to capture mode.
E. Exposure:
The EV value can be adjust from -2.0 to 2.0; you can lighten
18
Page 20

or darken your photos by adjusting the EV value.
a) Push the joystick down to select “Exposure”, then push it
right ;
b) Push the joystick left/right to adjust the exposure from
-2.0 to +2.0; then Press down on the joystick to confirm the
setting.
c) Press the menu button to return to capture mode.
F: Date Stamp:
The date will be shown at the lower right corner of the image
when viewing the image.
a) Push the joystick up/down to select “Date Stamp”, then
push it right ;
b) Push the joystick up/down to select “Enable” or
“Disable”;
c) Press down on the joystick to confirm the setting.
d) Press the menu button to return to capture mode.
19
Page 21

G: Self-timer:
Use the Self-timer to set a delay from the time the shutter
button is pressed to the time the image is shot.
a) Push the joystick up/down to select “Self-timer”, then
push it right to show: “Disable”, “10SEC”, “20SEC”;
b) Push the joystick up/down to select the time you
desired;
c) Press the joystick vertically to confirm the setting.
d) Press the menu button to return to capture mode.
Note: set “Disable” if you want to cancel the self-timer.
H: Burst Snapshot:
Use this function to take 3 pictures continuously.
a) Push the joystick up/down to select “Burst Snapshot”,
then push it right to show: “Single”; “Burst”;
b) Push the joystick up/down to select “Single” or
“Burst”;
c) Press down on the joystick to confirm the setting.
20
Page 22

d) Press the menu button to return to capture mode.
2. Setup in Video Mode
There are 3 options available by pressing the menu button in
video mode: “Resolution”, “Frame rate”, and “White balance”.
A: Video Resolution:
a) Push the joystick up/down to select “Resolution” then
push it right for 2 options: 640*480 or 320*240.
b) Push the joystick up/down to select resolution.
c) Press down on the joystick to confirm the setting.
d) Press the menu button to return to video mode.
B: Frame rate:
a) Push the joystick up/down to select “Frame rate”, then
push it right for 2 options: 30FPS or 15FPS. The higher the
setting for “Frames Per Second”, the smoother the video on
playback but the larger the file size.
b) Push the joystick up/down to select the frame rate you
21
Page 23

desired;
c) Press down on the joystick to confirm the setting.
d) Press the menu button to return to video mode.
C: White balance
This is the same as the setting under the capture mode (See
page 4).
3. Setup in playback mode:
Under image playback mode, press the menu button to enter the
main menu for 2 options: “Play” and “Setup”.
There are 7 Options in “Play” mode: Delete Current, Delete All,
Lock, Thumbnail, Set logo, Rotate, and Slideshow.
A. Delete image
See details on page 12.
B. Lock image
22
Page 24

See details on page 13.
C. Thumbnail
See details on page 11.
D. Rotate
Press “menu” button in image playback mode and push the
joystick up/down to select “Rotate”. Push the joystick right
to enter rotate mode: 90º, 180º and 270º. Push the joystick
up/down button to select the desired degree of rotation
and Press down on the joystick to confirm the setting. Press the
menu button to return to playback mode.
Note: The rotation function is disabled if the size of the
picture is 5M (2592x1944).
E. Slide show:
a) Push the joystick up/down to select “slide show” and
then push it right to start;
23
Page 25

b) Press down on the joystick to pause and press it again to
continue .
c) Press the shutter button to stop slideshow.
4. Other setup
When in capture mode, video mode, image playback mode,
press the menu button to enter the main menu. Push the joystick
right to select “Setup”.
There are 11 Options in “Setup” mode: Language(Abc), Auto
Power Off, TV Output, Play Logo, Light Frequency, Date/Time,
Buzzer, Format, Default Settings, USB Mode, Firmware Version.
A: Language (Abc):
Use this function to select a language for display menus and
other information.
a) Press the menu button to enter the setup interface;
b) Push the joystick right to select “Setup”;
c) Push the joystick up/down to select “Language(Abc)”,
24
Page 26

then push it right to launch the submenu, push it up/down
again to select the desired language; and press down on
the joystick to confirm the setting;
d) Press the menu button to return.
B: Auto Power Off :
For power save, the camera is turned off automatically after
a period of inactivity time.
b) Push the joystick up/down to select “Auto Power Off”.
c) Push the joystick right for 3 options: “Disable”, “60Sec”,
“120Sec”.
d) Push the joystick up/down to select the power off time,
and press down on the joystick to confirm the setting;
e) Press the menu button to return.
C: TV Output
TV Output should be set to either NTSC or PAL depending
on your region.
25
Page 27

a) Push the joystick up/down to select “TV Output”.
b) Push the joystick right to launch the submenu: “NTSC;
“PAL”.
c) Push the joystick up/down to select the proper TV mode;
then press down on the joystick to confirm the setting.
d) Press the menu button to return.
D: Play Logo
Use this function to turn on or off the startup image.
a) Push the joystick up/down to select “Play Logo” then
push it right for 2 options: “Enable” or “Disable”.
b) Push the joystick up/down to select the operation you
need and press down on the joystick to confirm.
c) Press the menu button to return.
Attention: No startup image will be displayed when you select
“Disable”.
E: Light Frequency
26
Page 28

Light Frequency should be set to either 60Hz or 50Hz
depending on your region.
a) Push the joystick up/down to select “Light Frequency”.
b) Push the joystick right for 2 options: 50HZ or 60HZ.
d) Push the joystick up/down to select the frequency then
press down on the joystick to confirm.
e) Press the menu button to return.
F: Date/Time
This camera can record the shooting date and time basing
on the Date/Time function.
a) Push the joystick up/down to select “Date/Time”; then
push it right to launch the submenu.
b) Push the joystick up/down to change the value of year,
month, date, hour and minute.
c) Push the joystick right to select the items : year, month, date
and time.
d) Press down on the joystick to confirm.
27
Page 29

e) Press the menu button to return.
G: Buzzer:
This function sets the sound indicator on or off.
a) Push the joystick up/down to select “Buzzer”.
b) Push the joystick right for 2 options: Enable, Disable.
d) Push the joystick up/down to select what you want and then
press down on the joystick to confirm.
e) Press the menu button to return.
H. Format
This function will ERASE all data stored on the memory card
if you are using one, or all data stored in the internal
memory if there is no card inserted. Be sure to backup the
important files before formatting.
a) Push the joystick up/down to select “Format”.
c) Push the joystick right for 2 options, select” Yes” with
pushing the joystick up to format the camera memory or SD
card.
28
Page 30

e) Press down on the joystick to confirm and start formatting.
I. Default setting
Use this function to reset all camera settings to default.
a) Push the joystick up/down to select “Default setting”.
b) Push the joystick right for 2 options: “load” or “NO”; select
“load” with pushing the joystick up to get the default setting.
c) Press down on the joystick to confirm.
d) Press the menu button to return.
J. USB Mode
Select “PC Camera” mode when you use this camera as a Web
camera.
Select “Mass Storage” when you download, delete or upload file,
it can also be used as the removable disk.
Mode switch:
a) Press menu button to enter “Setup”.
29
Page 31

b) Push the joystick up/down to select “USB Mode”.
c) Push the joystick right for 2 options: “Mass storage”; “PC
camera”.
f) Push the joystick up/down to select “mass storage” or
“PC camera” and then press down on the joystick to confirm.
g) You can also press the mode button to switch the USB mode
between “Mass storage” and “PC camera” quickly when the
camera is connected to the PC with an USB cable.
K. Firmware version
a) Power on and press the menu button to enter “Setup”;
b) Push the joystick up/down to select “Firmware version”;
c) Push the joystick right to display the firmware version and
update date.
d) Press down on the joystick to exit.
30
Page 32

III Software & download
1. Web-Cam Driver Installation
Before connecting the camera to the computer, insert the CD into
the CD-ROM drive of your PC, An interface appears as follows,
Click the “Install Driver” to install the camera driver. This
process is only necessary to use the Web Camera function.
31
Page 33

Select the installation language
Connect the camera with PC by USB cable, power on the
camera then press the mode button to select “PC CAMERA”
32
Page 34

An interface “Found New Hardware Wizard” appears. Select
“Yes, this time only” and then click “next”
Select “Install the software automatically (Recommended)”, click
“next”;
If “hardware installation” interface appears, click “Continue
33
Page 35

Anyway”
If the following interface appears, click “cancel”;
34
Page 36

An interface “Found new hardware Wizard” appears, select “Yes,
this time only”, then click “next”;
Select “install the software automatically (Recommended)”, click
“next”;
35
Page 37

If “hardware installation” interface appears, click “Continue
Anyway”;
36
Page 38

The installation is finished and now you can use the Web camera
function;
2. Using as a Web-Cam
1. Power on the camera. Press “mode” button to Select “PC
camera” .
2. Double click the icon “my computer” on the desktop of PC.
3. Double click the icon “ ” Then you can start to use the
pc-cam function
37
Page 39

3. Downloading Images
Set the USB mode to “mass storage”, and then the camera
becomes a removable storage device:
a): Connect the camera and PC with the USB cable ;
b): Double click the icon “my computer” on the desktop of PC;
c): Double click “ ”icon;
d): Double click “DCIM” file folder;
e): Copy all the files to your PC.
Note: Do not take out the SD card or the batteries when you are
copying the files to PC, otherwise the files might be destroyed or
lost.
IV. Maintenance
Always keep your camera and accessories in proper condition.
1. Camera
Only use dry, soft and clean cloth to clean the lens and LCD.
Do not use rough cloths or cleaner on the camera.
38
Page 40

Do not store the camera in the sun or in a high-temperature
Full
Half
Empty
environment.
Wait few minutes before using when bring the camera from a low
temperature environment to a warm environment.
2. Battery
The status of the internal battery can be seen on the LCD
display:
In addition to the regular use of the camera, the following factors
can influence battery life:
LCD use.
Use of the flash.
Temperature (it will shorten the lifetime of the battery when
the camera is used in low temperature environment).
3. Memory card
Before using, format an SD card in the following situations:
39
Page 41

a): If the SD card has not been formatted previously.
b): Repeat formatting if the camera does not recognize the card
although it has been formatted before;
c): Format the card before using it with another camera.
Attention: Make sure that the card is unlocked before inserting
the card into camera. All data will be deleted when the card is
formatted, please backup the data before formatting.
Memory card format
a. Confirm the card is unlocked.
b. Insert the card before turning the camera on.
c. Press “MENU” button then select “Setup”.
d. Push the joystick UP/DOWN to select “format”.
e. Push the joystick right to launch the submenu.
f. Select “yes” by pushing the joystick up then press down on
the joystick to start formatting.
g. Press the menu button to exit.
Attention: do not pull out the card during image capture.
40
Page 42

Types of cards that can be used in this camera:
sensor
5 Mega pixel CMOS
Image resolution
2592 x 1944, 2048 x 1536,
1600 x 1200,
1280 x 960, 640x 480
storage
Internal 32MB Flash, External SD
card(8MB to 2GB)
File format
JPEG, EXIF 2.2, DCF1.1,
MJPEG(AVI)
Standard SD card(8 MB – 2GB)
The camera may be unable to recognize non-standard
cards or a card formatted by another device (such as
another camera) so format the card in this camera
before using.
4. Caution
To avoid risk of electric shock, do not open the camera or attempt
to fix the camera by yourself.
Do not use the camera if it has been submersed in water.
V Specifications & system requirements:
1 . Specifications
41
Page 43

Capture
Single/Burst
Video Quality
VGA 640x480 ,
snapshot speed
Electronic shutter:1/3 ~ 1/4096 sec
Self timer
10 sec/20 sec
zoom
4 x digital zoom
White balance
Auto、Daylight、Tungsten、
Fluorescent 、Cloudy
exposure control
-2.0~+2.0(in 0.5 step)
illumination
Auto
PC-Camera mode
640x480
interface
USB1.1
TV output
NTSC/PAL
TFT monitor screen
1.5” TFT LCD monitor screen
power
Rechargeable Li-ion battery
OSD language
English/French/German/Spanish/Ch
inese/Italian/Portuguese
focal range
f=6.4mm
aperture
F=2.8
Auto power off
60sec/120sec
System required
WIN98SE /2000/ME/XP/Vista
Weight
Dimensions
Approx: 97.5x65x39 mm
QVGA 320X240
Approx. 75g
(without SD card)
42
Page 44

Note: The product design and the specifications are subject to
change without prior notice.
2. System Requirements:
Windows 98SE/2000/ME/XP/Vista
CPU: Pentium III 800MHz and upper
Memory:64 MB and upper memory
Disk space:At least 128 MB
43
 Loading...