

Page 1

p
Em
ower the Bar Code
User’s Manual
PT-90 Series Mobile Computer
PT-9130-1-1,PT-9230-1-1 (Contains WiFi/Bluetooth/GPRS/ GPS)
PT-9132-0-0,PT-9232-0-0 (Contains WiFi/Bluetooth/RFID)
(WinCE 6.0 version)
DOC NO. UM-P9005-01
Dec. 2012
Version 2.0
Page 2

NOTICE: This user’s manual may be revised or withdrawn at any time without prior notice.
Copyright 2009, Argox Informati on C o., L td.
All rights reserved.
This manual may not, in whole or in part, be copied, photocopied, reproduced, translated or
converted to any electronic or machine readable form without the prior written consent of
Argox.
Limited warranty and disclaimers
By opening the package of this product you agree to become bound by the liability and
warranty conditions as described below.
Under all circumstances this manual should be read attentively before installing and or using
the product. In no event, will Argox be liable for any direct, indirect, consequential or
incidental damages arising out of use or inability to use both the hardware and software, even
if Argox has been informed about the possibility of such damages.
A serial number appears on all Argox products. This official registration number is strictly
related to the device purchased. Make sure that the serial number app earing on your Argox
device has not been removed. Servicing by our service department can only be carried out
under warranty.
All Argox products are warranted for the legal warranty period after purchase, covering
defects in material and workmanship. Argox will repair or, at its opinion, replace products that
prove to be defective in material or workmanship under proper use during the w arranty period.
Argox will not be liable in case modifications are made by the customer. In such case the
standard repair charge will be applicable. The standard charge for repair will also be
applicable in case no defect is found at all. These rules also apply for products that are still
under warranty. Therefore, you are advised to have the product specifications always at hand.
Trademarks used are property of their respective owners.
User’s Manual II
Page 3

FEDERAL COMMUNICATIONS COMMISSION INTERFERENCE STATEMENT
This equipment has been tested and found to comply with the limits for a Class B
digital device, pursuant to Part 15 of the FCC Rules. These limits are designed to
provide reasonable protection against harmful interference in a residential installation.
This equipment generates, uses and can radiate radio frequency energy and, if not
installed and used in accordance with the instructions, may cause harmful
interference to radio communications. However, there is no guarantee that
interference will not occur in a particular installation. If this equipment does cause
harmful interference to radio or television reception, which can be determined by
turning the equipment off and on, the user is encouraged to try to correct the
interference by one or more of the following measures:
--Reorient or relocate the receiving antenna.
--Increase the separation between the equipment and receiver.
--Connect the equipment into an outlet on a circuit different from that to which the receiver
is connected.
--Consult the dealer or an experienced radio/TV technician for help.
CAUTION:
Any changes or modifications not expressly approved by the grantee of this device could void
the user's authority to operate the equipment.
Labeling requirements
This device complies with Part 15 of the FCC Rules. Operation is subject to the following two conditions:
(1) this device may not cause harmful interference, and (2) this device must accept any interference
received, including interference that may cause undesired operation.
RF exposure warning
This equipment must be installed and operated in accordance with provided instructions and must not be
co-located or operating in conjunction with any other antenna or transmitter. End-users and installers
must be providing with antenna installation instructions and transmitter operating conditions for
satisfying RF exposure compliance.
Maximum SAR value: 0.617 W/kg (For M/N: PT-9130-1-1, PT-9230-1-1)
0.561 W/kg (For M/N: PT-9132-0-0, PT-9232-0-0)
User’s Manual III
Page 4

Table of Contents
1. INTRODUCTION............................................................................................................. 1
1.1 ABOUT THIS MANUAL ................................................................................................ 1
1.2 USER AND PRODUCT SAFETY..................................................................................... 2
1.3 SPECIFICATIONS......................................................................................................... 4
2. GETTING STARTED...................................................................................................... 6
2.1 CHECK THE PACKAGE................................................................................................ 6
2.1.1 Compact Package ........................................................................................... 6
2.1.2 Cadle & Pistol grip Package (Optional)......................................................... 7
2.2 DETAILED VIEW......................................................................................................... 8
2.2.1 PT-90 Mobile Computer ................................................................................. 8
2.2.2 Cradle ............................................................................................................. 9
2.3 INSTALLING, REPLACING AND CHARGING BATTERIES .......................................... 10
2.3.1 Installing / Replacing the Battery Pack......................................................... 12
2.3.2 Charging the Battery Pack with a Power Adapter........................................ 12
2.3.3 Charging the Battery Pack with Cradle........................................................ 13
2.4 INSTALLING IN A SYSTEM ........................................................................................ 14
2.4.1 Via USB /RS-232 Cable ................................................................................ 14
2.4.2 Via CRD-90 Cradle....................................................................................... 14
3. OPERATION OF THE MOBILE COMPUTER......................................................... 15
3.1 KEYPAD DESCRIPTION............................................................................................. 15
3.2 FUNCTION KEY DESCRIPTION ................................................................................. 16
3.3 INSTALL MICRO SD CARD INTO PT-90.................................................................... 17
3.4 CONFIGURING PT-90 SETTINGS.............................................................................. 18
3.4.1 Calibrating Touch Screen Alignment............................................................ 18
3.4.2 Adjusting Brightness..................................................................................... 19
3.4.3 Muting Sound................................................................................................ 19
3.4.4 Using the Stylus............................................................................................. 19
3.5 ENTERING INFORMATION ........................................................................................ 20
3.5.1 Entering Information Using a Keypad.......................................................... 20
3.5.2 Entering Information Using the Keyboard Input Panel................................ 20
3.5.3 Entering Data via the Bar Code Scanner...................................................... 20
3.6 POWER MANAGEMENT ............................................................................................ 21
3.6.1 Power Status Indication................................................................................ 21
3.6.2 Saving Battery Power.................................................................................... 23
3.6.3 Suspend Mode............................................................................................... 24
3.6.4 Resume.......................................................................................................... 25
3.7 RESETTING THE PT-90............................................................................................. 25
3.7.1 Performing a Warm Boot.............................................................................. 26
3.7.2 Performing a Cold Boot................................................................................ 26
3.7.3 Performing a Clean Boot.............................................................................. 26
3.8 FLASH STORAGE....................................................................................................... 27
3.8.1 Flash Disk Location...................................................................................... 27
3.8.2 Flash Disk Size.............................................................................................. 27
3.9 BLUETOOTH SETTING .............................................................................................. 28
3.10WLAN SETTING ...................................................................................................... 34
3.10.1 SDIO86861..................................................................................................... 34
3.10.2 SDCSD40N1................................................................................................... 35
3.11GPRS UTILITY......................................................................................................... 37
User’s Manual I
Page 5

3.11.1 GPRS Connection ......................................................................................... 37
3.11.2 GPRS SMS..................................................................................................... 38
3.12GPS CONNECTION ................................................................................................... 40
3.13RFID......................................................................................................................... 41
3.14CAMERA.................................................................................................................... 43
4. SCANNING..................................................................................................................... 45
4.1 SCAN CONFIGURATION ............................................................................................ 45
4.2 SCAN DRIVER............................................................................................................ 47
4.3 SCAN TEST ................................................................................................................ 48
4.4 READING BARCODE .................................................................................................. 48
4.5 BARCODE READING PROBLEMS................................................................................ 49
5. UTILITIES...................................................................................................................... 50
5.1 FUNCTION KEY SETTING ......................................................................................... 50
5.2 TIMEOUT & BRIGHTNESS ........................................................................................ 51
6. SOFTWARE APPLICATIONS..................................................................................... 52
6.1 INTERNET EXPLORER............................................................................................... 52
6.2 MEDIA PLAYER ........................................................................................................ 52
6.3 MICROSOFT WORDPAD ........................................................................................... 53
6.4 REMOTE DESKTOP CONNECTION............................................................................ 53
6.5 TRANSCRIBER........................................................................................................... 53
6.6 WINDOWS EXPLORER .............................................................................................. 54
7. COMMUNICATION...................................................................................................... 55
7.1 MICROSOFT ACTIVESYNC ....................................................................................... 55
7.2 MICROSOFT MOBILE DEVICE CENTER ................................................................... 55
8. OVERVIEW OF MICROSOFT WINDOWS CE 6.0.................................................. 56
8.1 MAIN WINDOWS....................................................................................................... 56
8.2 TASKBAR .................................................................................................................. 58
8.3 SETTING UP THE PT-90............................................................................................ 60
8.3.1 Certificates.................................................................................................... 61
8.3.2 Date/Time...................................................................................................... 62
8.3.3 Dialing .......................................................................................................... 63
8.3.4 Display.......................................................................................................... 64
8.3.5 Hot Function Key.......................................................................................... 65
8.3.6 Input Panel.................................................................................................... 65
8.3.7 Internet Options ............................................................................................ 66
8.3.8 Keyboard....................................................................................................... 67
8.3.9 Mouse............................................................................................................ 68
8.3.10 Network and Dial-up Connection ................................................................. 68
8.3.11 Owner............................................................................................................ 69
8.3.12 Password....................................................................................................... 70
8.3.13 PC Connection .............................................................................................. 71
8.3.14 Power ............................................................................................................ 72
8.3.15 Regional Settings ........................................................................................... 72
8.3.16 Remove Programs......................................................................................... 73
8.3.17 Scan Configuration ....................................................................................... 74
8.3.18 Storage Manager........................................................................................... 74
8.3.19 Stylus............................................................................................................. 75
8.3.20 System ........................................................................................................... 76
8.3.21 System Information ....................................................................................... 77
8.3.22 Timeout and Brightness................................................................................. 77
User’s Manual II
Page 6

8.3.23 Volume and Sounds....................................................................................... 77
9. TROUBLE SHOOTING................................................................................................ 79
9.1 GENERAL CHECKS ................................................................................................... 79
9.2 READ OPERATION PROBLEMS................................................................................. 79
9.3 MOBILE COMPUTER PROBLEMS.............................................................................. 79
10. APPENDIX: UPDATING THE OS VIA MICRO SD CAR D..................................... 81
User’s Manual III
Page 7

1. Introduction
Congratulations on purchasing the PT-90, a Microsoft Windows
special combination of features makes it perfect for use in a wide range of applications. These
features as:
Microsoft Windows CE. Net operat ing sy stem
Robust expansion capability
Wireless mobility via 802.11b
Long battery life
Low Power Transflective type color LCD display
Backlight keypad
1.1 About this Manual
The chapters contained in this manual are:
Chapter 1: Introduction – Presents general information about the PT-90
Chapter 2: Getting started – Describes basic use of the PT-90
Chapter 3: Operating the Mobile computer – Describes customizing the PT-90
Chapter 4: Scanning
Chapter 5: Useful Utilities
Chapter 6: Software Applications
Chapter 7: Communication – Describes using the PT-90 for different types of communication
Chapter 8: Overview of Microsoft Wi n d ow s C E 6. 0
Chapter 9: Troubleshooting
Chapter 10: Appendix
®CE Mobile Computer. Its
User’s Manual 1
Page 8

1.2 User and Product Safety
Never use strong pressure on the screen or subject it to severe impact, as the LCD
panel can crack and possibly cause personal injury. If the LCD panel is broken,
never touch the liquid inside, for such contact can irritate the skin.
Although the PT-90 mobile computer meets IP65 standards for water and dust
resistance, avoid prolonged exposure to rain or other concentrated moisture.
Conditions exceeding IP65 standards could result in water or other contaminants
entering the PT-90.
Use only the approved AC Adapter with the PT-90. Use of an unapproved AC
Adapter could result in electrical problems, or even cause a fire or an electrical
shock to the user.
Be sure that only authori zed suppl i e rs are allowed to disassemble and reassemble the
device. If the device or parts are damaged due to wrong handling, the product and
parts warranty is void.
Always make back-up copies of all important data. This is easily done using a cable
or single cradle (optional) to transfer data to the computer. The manufacturer is not
liable for any data damage or data loss caused by deletion or corruption while using
this device, or due to a drained battery.
Lithium-ion battery packs may get hot, explode, ignite and/or cause serious injury if
abused. Please follow the safety warnings listed below.
Warnings:
Do not place the battery pack in fire or heat the battery.
Do not install the battery pack backwards so the polarity is reversed.
Do not carry or store battery pack together with metal objects.
Do not pierce the battery pack with nails, strike the battery pack with a
hammer, step on the battery pack or otherwise subject it to strong impacts or
shocks.
Do not solder directly onto the battery pack.
Do not expose battery pack to liquid, or allow the battery contacts to get
wet.
Do not disassemble or modify the battery pack. The battery pack contains
safety and protection devices, which, if damaged, may cause the battery
pack to generate heat, explode or ignite.
Do not discharge the battery pack using any device except for the specified
device. When it is used in devices other than the specified devices, the
battery pack can be damaged or its life expectancy reduced. If the device
causes any abnormal current to flow, it may cause the battery pack to
become hot, explode or ignite and cause serious injury.
In the event the battery pack leaks and fluid gets into the eyes, do not rub the
eyes. Rinse well with water and immediately seek medical care. If left
untreated, the battery fluid could cause eye damage.
User’s Manual 2
Page 9
To avoid malfunctions and to ensure years of trouble-free operation, pay attention to the
following:
General Use
Cleaning Instructions
Cleaning the Mobile Computer
Clean the scan window periodically for better reading performance, but pay
Cleaning the Cradle
Avoid touching the contacts in the cradle. The contacts must stay as clean as
Using the Mobile Computer
Do not place any object on top of the mobile computer. Do not lay the mobile
Using the Cradle
Do not place any product other than the PT-90 mobile computer in the cradle.
Maintenance
Do not expose the mobile computer to areas subject to extreme heat such as direct
sunlight, near a heater, or in a car – or in areas that are very cold, humid, moist, or
dusty.
Do not expose the product to rain or water
Do not subject the product to strong impact, or throw or drop the mobile computer
from large heights. Do not allow other mechanical shocks to the product.
Clean the exterior by wiping it with a soft, dry cloth. Do not use much water.
Do not use thinner, white spirit or other solvents. These can discolor the case and
the keys and it has a negative effect on the lifetime of the keys.
attention to not scratching the window
possible to maintain optimal charging capacity. Do not use water when cleaning
the cradle. This can cause malfunction of the chargers.
Avoid temperature changes. Sudden temperature changes can cause condensation
to form on the mobile computer. Using the mobile computer while condensation is
present can cause malfunction. Always wait until the condensation clears naturally
before attempting operation.
Do not leave the mobile computer in an area where static charge is accumulated or
near devices where electromagnetic emission is generated.
computer face down. Doing so can cause accidental operation of the power key or
[ENT] key, which can discharge your batteries or change settings you do not want
changed.
There are no user-serviceable parts inside the mobile computer or the cradle. So do
not try to take it apart. The manufacturer will not be liable for any damage caused
by customers. In case of a malfunction that can not be solved by the troubleshooting instructions in this manual, please consult our service department.
User’s Manual 3
Page 10

1.3 Specifications
Performance
OS Windows Embedded CE 6.0
CPU MARVELL PXA310 (806 MHz)
RAM 256MB RAM
ROM 256MB
Display
LCD 3.5” Color TFT LCD with touch panel
Resolution 240 x 320
Scanner
Scanner system Laser scan engine / 2D scan engine
Readable barcode
Laser scan engine
2D scan engine
Keypad
29 keys /29 keys plus / 44 keys with backlight
RFID
RFID HF support ISO 15693, ISO 14443A/B (optional)
Camera
5 megapixel (optional)
Communication Interface
Standard Interface USB 2.0 and RS-232
Wireless radio Options WPAN :Bluetooth Class 2, version 2.0
Power supply
Main power Terminal : Rechargeable Li-ion Battery 3900mAH, 3.7Vdc
User’s Manual 4
Code 11, Code 39, Code 93, Code 128, Codabar, EAN-8, EAN13, Industrial 2/5, Interleaved 2/5, MSI plessey, UK plessey,
Telepen, UPC-A, UPC-E, Matrix 2/5, UPC/EAN General, IATA
2/5, TRI-OPTIC and RSS
Code 11, Code 39, Code 93, Code 128, Codabar, EAN-8, EAN13, Industrial 2/5, Interleaved 2/5, MSI plessey, UK plessey,
Telepen, UPCA, UPCE, Matrix 2/5, PDF-417, Code-16K, China
Post, RSS 14, RSS Limited, RSS Expanded, Italian
Pharmacode39, MicroPDF, EAN.UCC composite, IATA 2/5,
TRI-OPTIC, PosiCode, CodablockF, Code 49, TLC 39, Planet
Code, Postnet, Australian Post, British Post, Canadian Post,
Japanese Post, KIX Post, Korea Post, USPS, UPU, Aztec Code,
Data Matrix, MaxiCode, QR/MicroQR Code and Chinese
Sensible Code
WLAN: 802.11b/g/n
WWAN: EDGE /GPRS (optional)
GPS: SiRF star IV (optional)
Gun type : Rechargeable Li-ion Battery 4400mAH, 3.7Vdc
Page 11

Power input Via cradle or direct charging
* Batteries must be charged at a temperature ranging from 0~+40°C (+32°F to +104°F). At
temperatures below 0°C and above +40°C display or battery performance degradation may
occur.
Expansion slot
Micro SD card
Physical and Environmental
Operation Temperature
Storage Temperature
Battery Charging
Temperature
Humidity
Weight Approx. 380 g(battery included )
Drop test 1.8 meters to concrete (Handset)
ESD +/-15kVDC air discharge
Sealed standard IP65
Agency Listing
Win-CE AP
MS Web Browser(Internet Explorer), Media Player, Microsoft
Developing Tools
Argox SDK Microsoft Visual Studio for smart device programming
-10~50°C
-20~70°C
0~40°C
Max 80% RH <= 30°C
0.9 meters to concrete (Cradle)
+/- 8kVDC direct discharge (contact)
+/- 8kVDC indirect discharge (H & V)
CE, FCC, BSMI, NCC, CCC, SRRC
WordPad, Remote Desktop Connection, Transcriber, Windows
Explorer
User’s Manual 5
Page 12

2. Getting Started
This chapter describes the PT-90 physical characteristics, how to install and charge the
batteries, how to remove and replace the strap assembly and how to start the PT-90 for the first
time.
2.1 Check the package
Carefully remove all protective material from around the PT-90 and save the shipping
container for later storage and shipping.
Depending on the configuration ordered, the PT-90 shipping container may include:
2.1.1 Compact Package
PT-90 Quick Reference Guide
Battery pack CD -ROM
USB Sync cable Thread
Power supply Stylus
Hand strap
CD -ROM
Quick Reference
Guide
Hand strap
Figure 2-1 Compact Package
PT-90
Stylus
Power supply
Battery pack
Thread
USB Sync cable
User’s Manual 6
Page 13

2.1.2 Cadle & Pistol grip Package (Optional)
Cradle Package
Power supply Cradle
Figure 2-2 Cradle Package
Inspect the package contents for damage. If any item is missing or damaged, please contact the
Argox Technical Support Center immediately.
USB cable Cradle
User’s Manual 7
Page 14
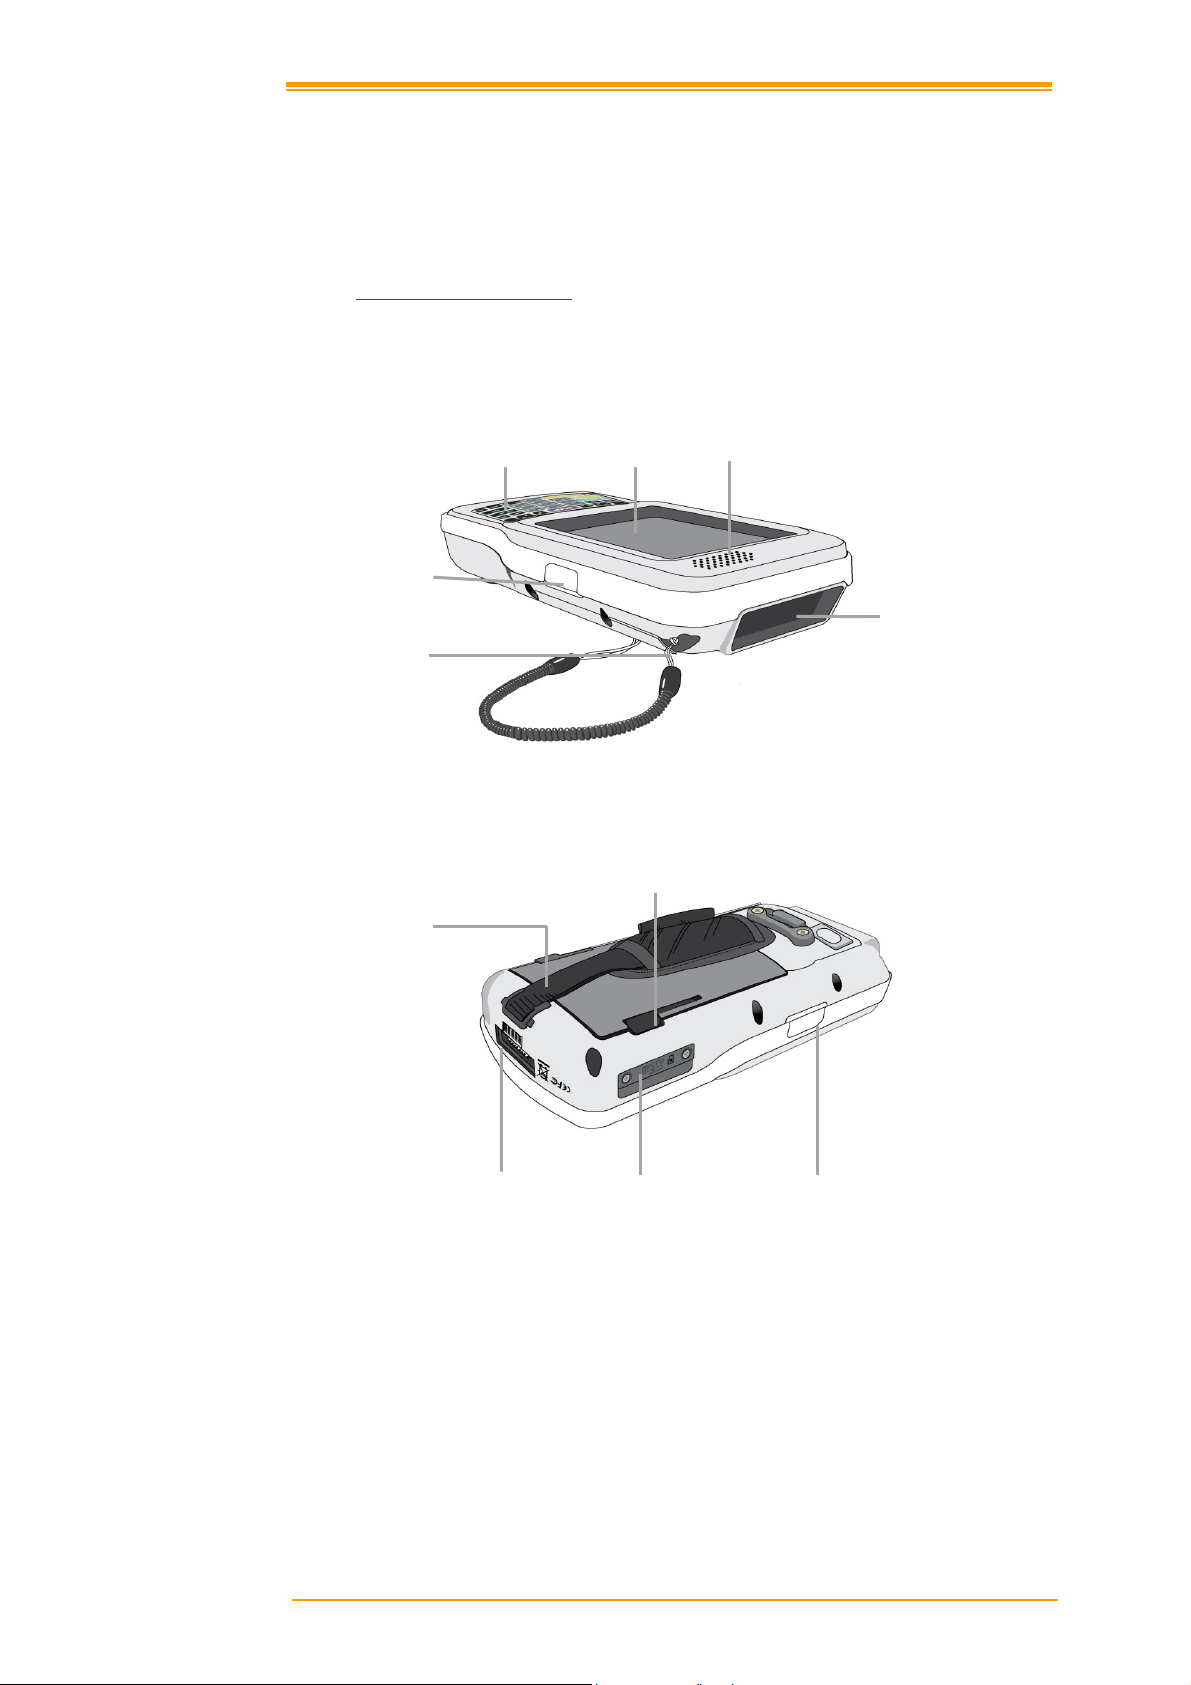
2.2 Detailed View
The pictures below provide informati on on the PT-9 0 ’s various buttons, ports and other
functions.
2.2.1 PT-90 Mobile Computer
Dimensions of the PT-90
159 mm (L) * 80.8mm (W) * 36mm (H)
Key pad
Scan Button
Stylus
Figure 2-3 The Front of the PT-90
Hand strap
Docking Connector Micro SD Card slot
Figure 2-4 The Back of PT-90
Touch Screen Speaker
Scan Window
Battery Cover Latch
Scan Button
User’s Manual 8
Page 15
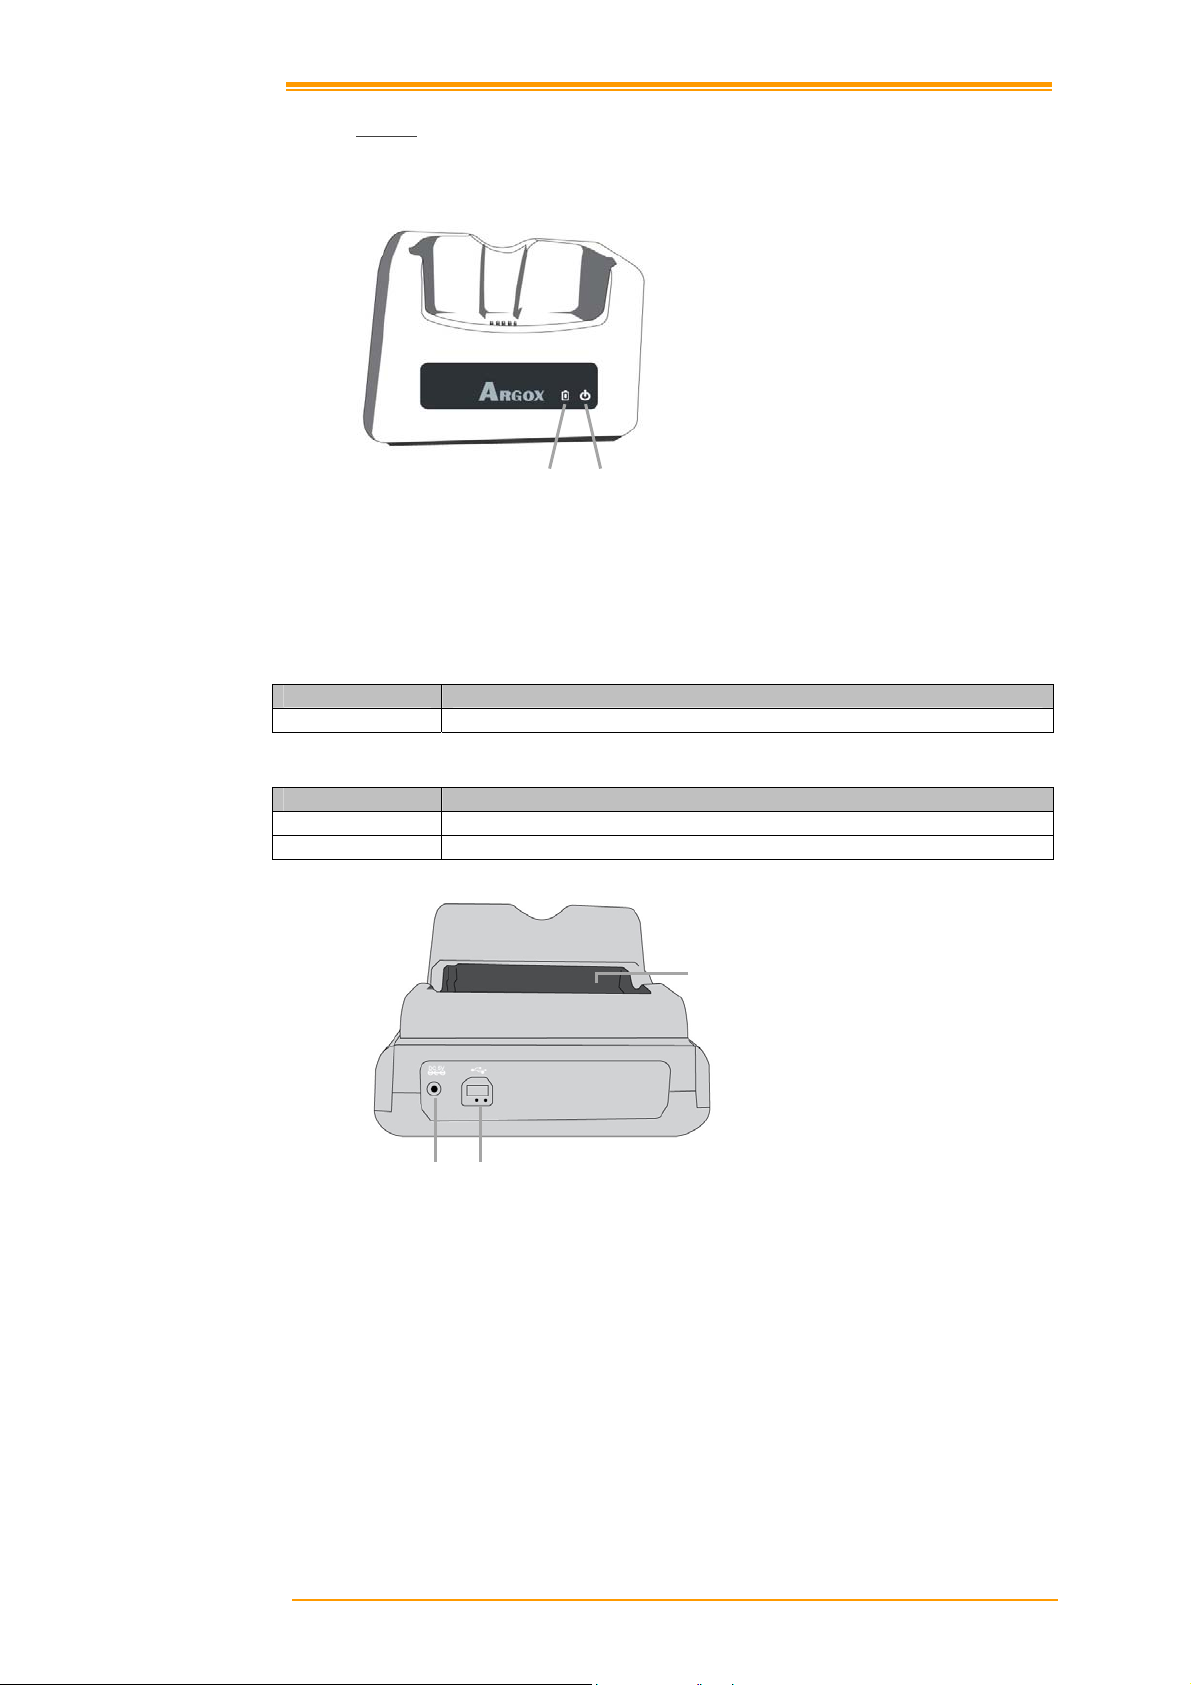
2.2.2 Cradle
Dimensions of the CRD-90 Cradle
147mm (L) x 112mm (W) x 83mm (H)
Charging
Figure 2-5 The Front of the CRD-90
1. Mobile Computer Slot
Put the mobile computer in the cradle slot for data transmission or charging
2. Power LED Indicator
LED status Description
Green Power on (mobile computer not in cradle)
3. Charging LED Indicator
LED status Description
Red Charging
Green Charging complete
Power Jack
Figure 2-6 The Back of the CRD-90
4. Charging Slot
For charging a spare rechargeable battery pack
5. USB and Ch a r gi ng Con nect or
Connects the multiple function socket on the mobile computer for data transmission and
charging
6. Power Jack
Input for AC adapter
Communication
Power
Charging slot
User’s Manual 9
Page 16

2.3 Installing, Replacing and Charging Batteries
Wrong use of batteries may cause serious damage to the mobile computer or to the cradle. To
avoid damage, it is important to follow the instructions.
Caution:
Required batteries:
The mobile computer needs both main battery and backup battery for operation.
Main Battery
The rechargeable battery pack is for normal operations and data storage. When the battery
pack power goes low, immediately charge it or replace it with a charged battery pack.
Insert a fully-charged battery pack before use of the mobile
computer.
Never remove the main batteries while the mobile computer is turned
on.
Doing so may lose data that is not saved in the mobile computer.
Use only recommended batteries.
When other batteries are used, defects or other problems can occur.
Before installing (new) batteries, please make sure you are using the
recommended batteries.
Use the right charger for batteries.
The rechargeable Li-polymer
the cradle when either it is in the mobile computer or alone in the
charging slot in the back of the cradle.
The life of a battery pack is limited, and charging a battery pack
causes it to gradually lose its ability to maintain a charge. If your
battery pack requires frequent charging, it probably means it is time
to purchase a new one.
A fully charged backup battery can maintain memory (RAM)
contents for about 15 minutes, even when the battery pack is
removed.
Strictly follow the instructions for installing, charging, and removing
the batteries.
The products are not warranted for damage, defects, malfunction, or loss of
data, resulting from incorrect use of batteries.
battery pack from Argox can be charged in
User’s Manual 10
Page 17

Backup Battery
The built-in battery is for memory backup.
How to charge the Argox rechargeable battery pack in the cradle
1. Make sure that the Argox rechargeable battery pack is inserted in the mobile
computer. When the mobile computer is placed in the cradle, the rechargeable
battery pack charges automatically.
2. If you have a spare Argox battery pack, you can replace the empty battery pack with
a full battery pack for continuous mobile computer operation. Put the empty battery
pack in the charging slot of the cradle. The LED (CHG) on the cradle flashes Red
and turns Green when the battery is fully charged.
When to replace or recharge the main battery
There are two conditions that you need to replace the main battery.
1. As soon as possible after the battery indicator
2. Before using the mobile computer when it has not been used for an extended period.
Notes:
Charging the Main and Backup Batteries for the First Time
It may take up to 8 hours to fully charge the empty backup battery. The
first time charge should be for at least 8 hours to insure a proper charge.
When charging the battery pack, the Power LED on the Mobile
computer turns Red. After the battery pack is fully charged, the Power
LED turns green.
appears on the display.
User’s Manual 11
Page 18
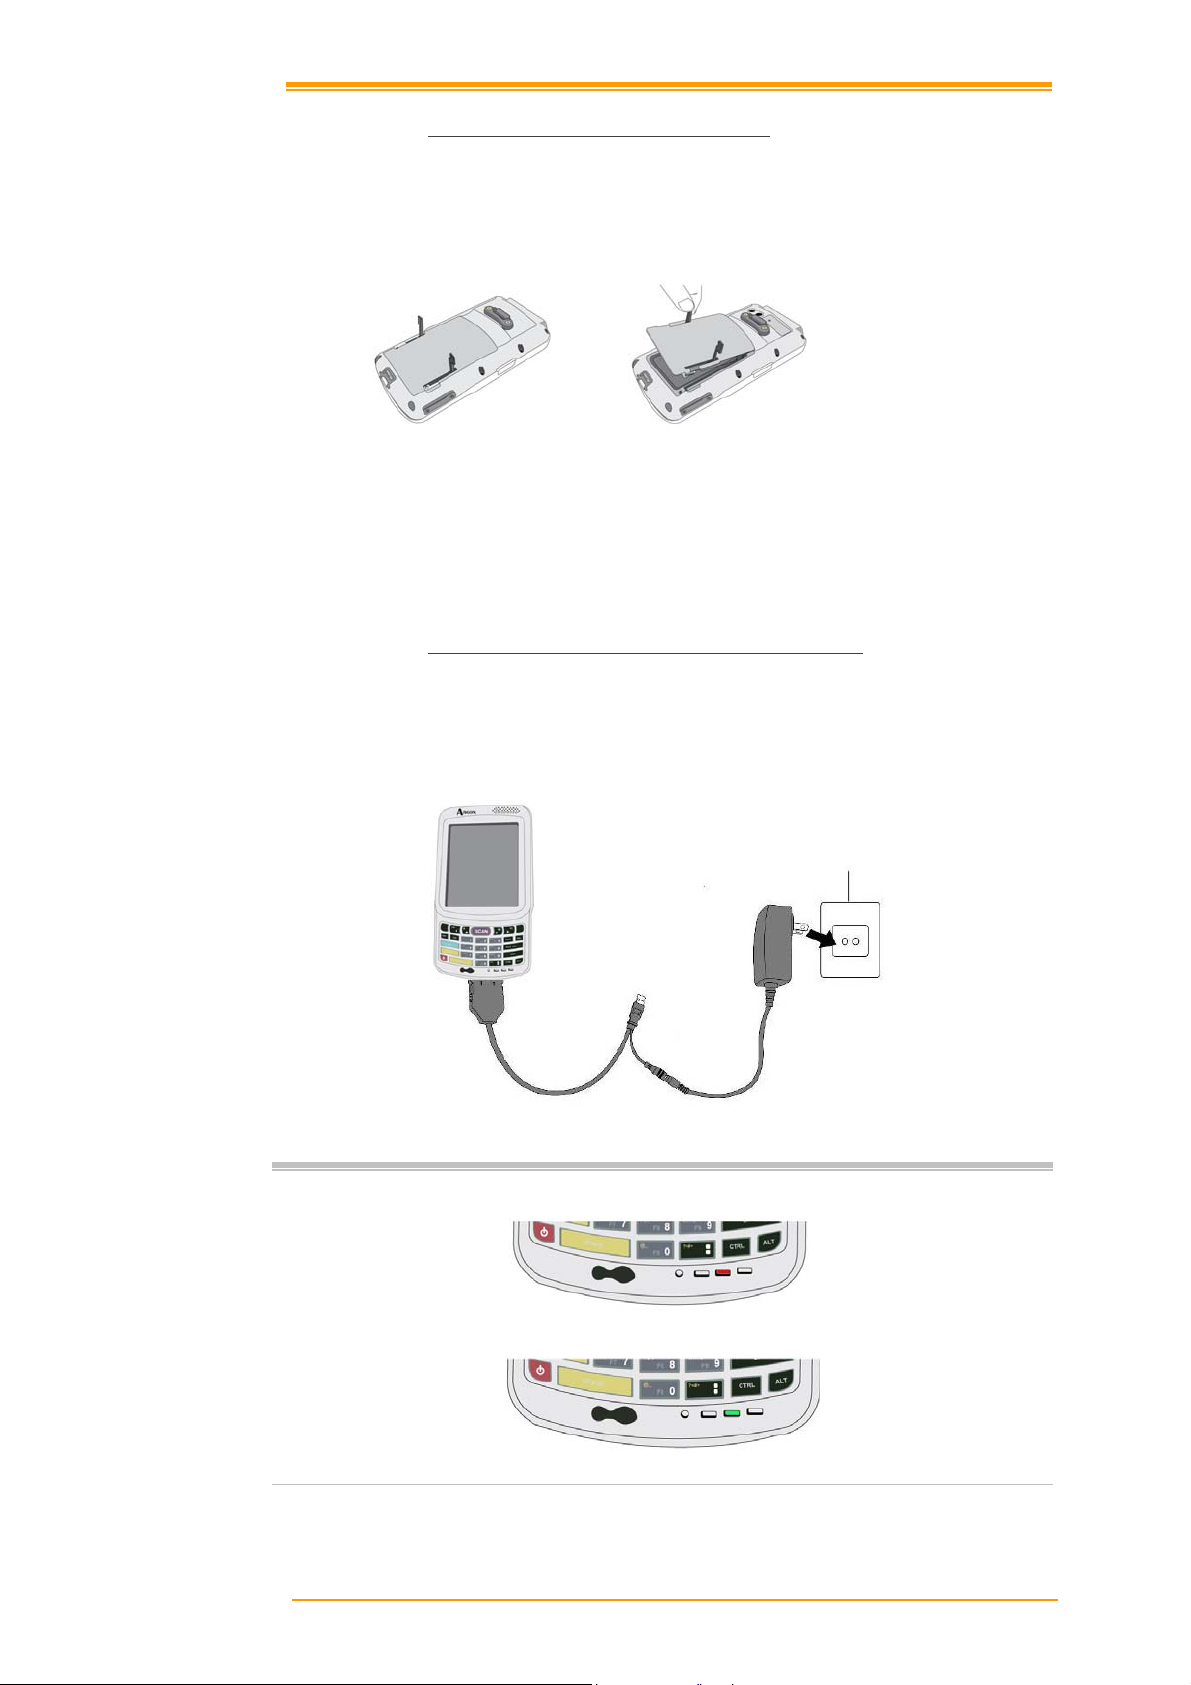
2.3.1 Installing / Replacing the Battery Pack
To remove and install the battery
1. Press and release the POWER button to suspend the mobile computer
2. If the Mobile Computer has a hand-strap, detach and loosen the hand-strap
3. Rotate the latches to the open position and remove the battery cover
Figure 2-7 Installing / Replacing the Main Battery
4. Align the battery contacts and insert the battery
5. Reassemble the battery cover and Rotate the latches to the closed position
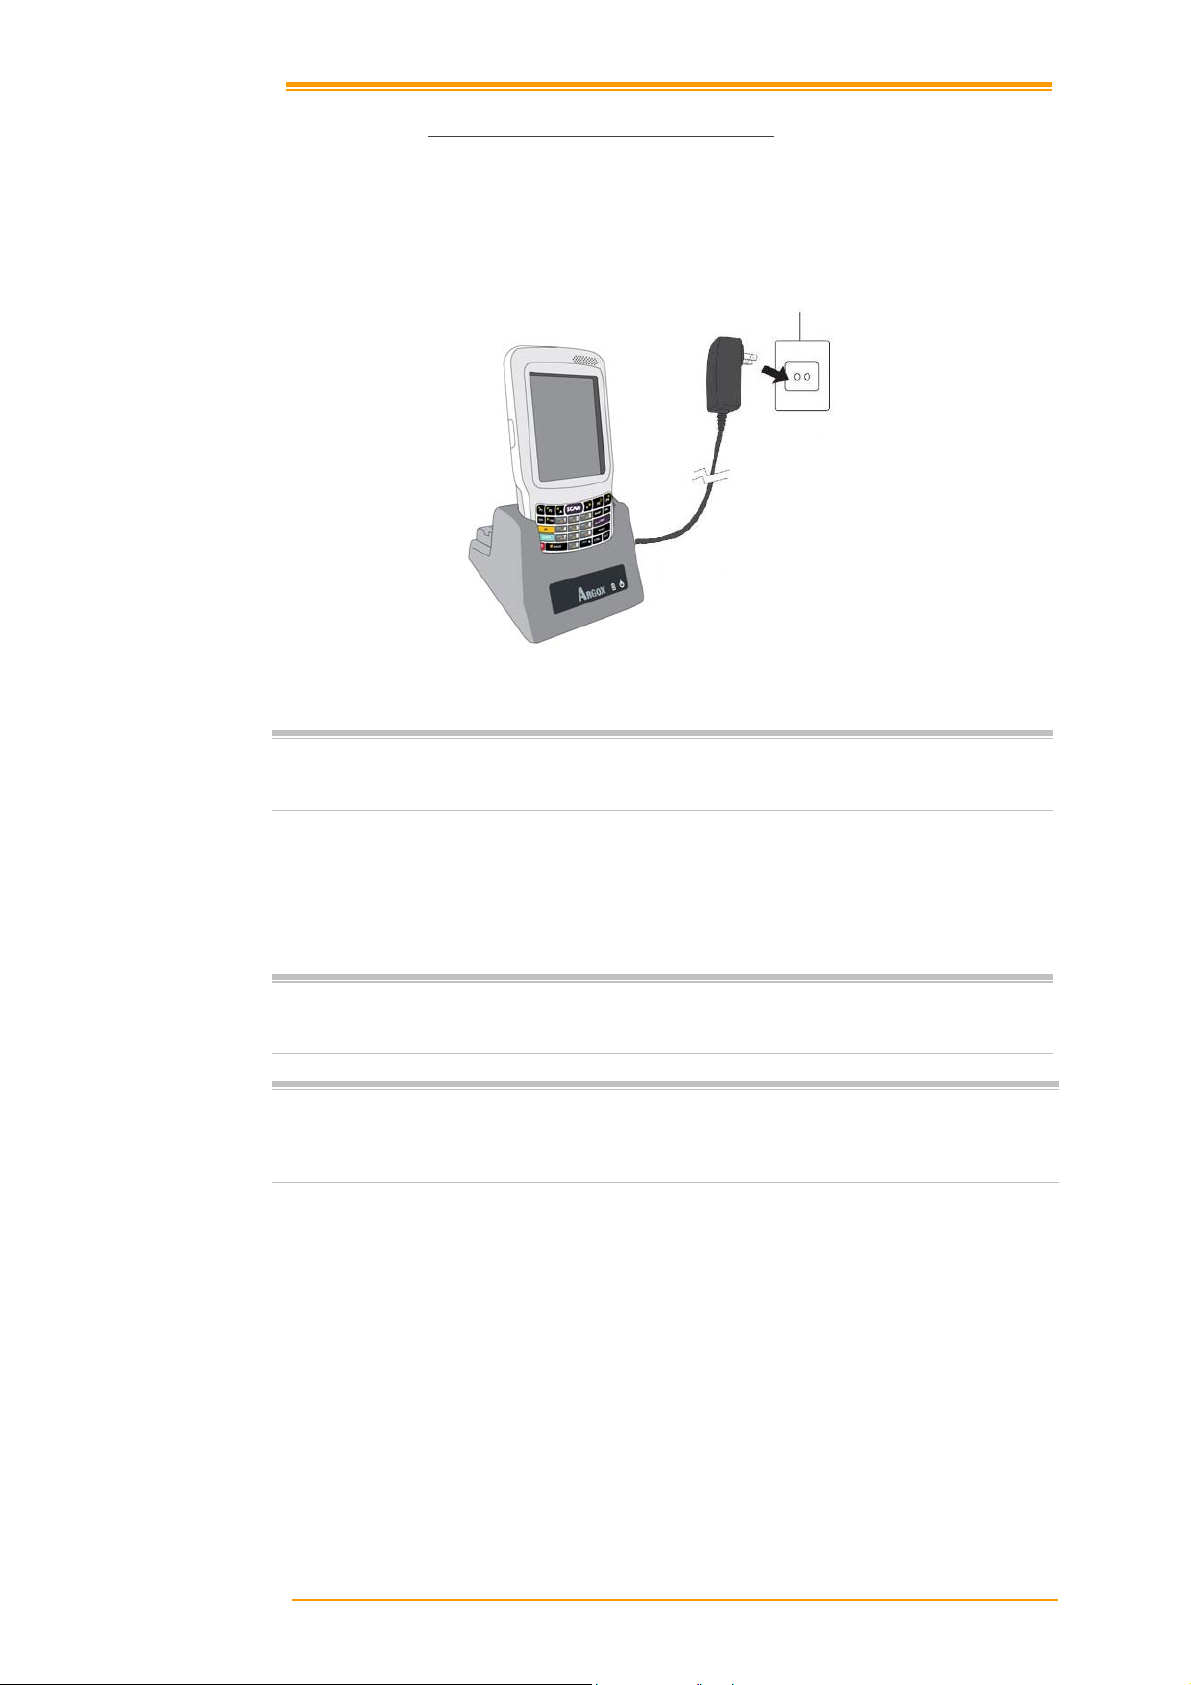
2.3.2 Charging the Battery Pack with a Power Adapter
Using a RS232/Charging Cable or USB/Chargi ng Cable
1. Plug in the RS232/Charging cable or the USB/Charging cable to the PT-90
2. Connect the AC adapter to the cable’s power jack and an electrical outlet.
Figure 2-8 Supplying Power
Notes:
When charging the battery pack, the Power LED on the Mobile computer is
Red.
When the battery pack is fully charged, the Power LED tu rns to green.
User’s Manual 12
Page 19
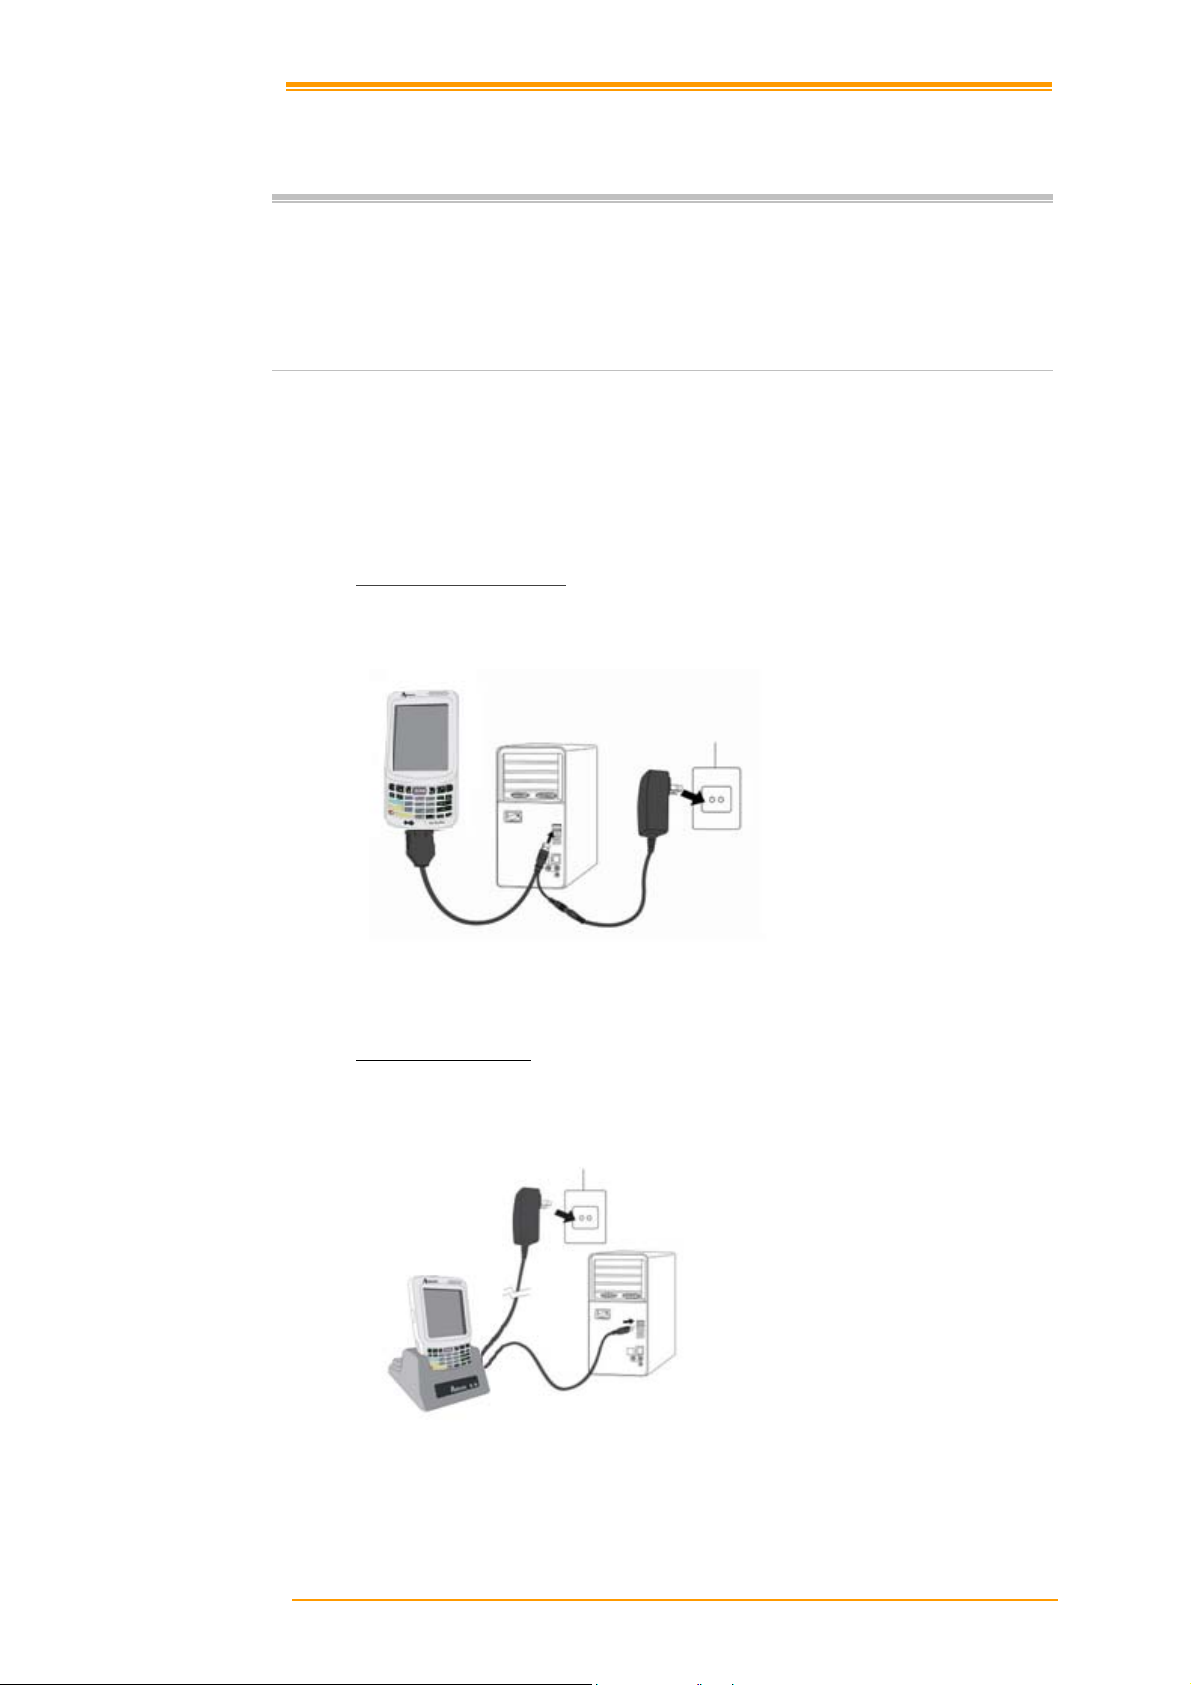
2.3.3 Charging the Battery Pack with Cradle
a) Leaving the battery pack inside the Mobile computer
1. Connect the power adaptor to a power source
2. Plug in the co nnector of the power ad apter to the Cradle
3. Insert the Mobile computer into the Cradle
Figure 2-9 Charging with Cradle
Note:
b) Placing the spare battery pack into the Cradle’s spare battery charging slot
1. Connect the power adapter to a power source
2. Plug in the connector of the power adapter with Cradle
3. Insert the battery pack into the Cradle’s spare battery slot
Note:
Caution:
When charging the battery pack, the Power LED on the Mobile computer
turns Red. After the battery pack is fully charged, the Mobile Computer
Power LED turns green.
When charging the battery pack in the Crad le’s spare battery slot, the Cradle
charging LED is Red. After the battery pack is fully charged, the LED turns
green.
Do not remove the Battery pack for too long from PT-90 once you have already
fully-charged the Battery pack and the backup battery pack and have started to use
the PT-90. Otherwise data that is not saved will be lost. Please keep in mind to
turn off the power on Mobile computer when changing the main Battery pack.
User’s Manual 13
Page 20
2.4 Installing in a System
Notes:
Exercise caution at all times when working with AC-powered equipment.
Turn off your devices before installation.
Because of the special pin-out of the connectors, use the cables supplied by
the manufacturer.
Do not modify the cable provided by the manufacturer. If you need a special
cable for some cases, contact your supplier to purchase the right cables or
technical support.
System Connection (Data Communication)
The mobile computers let you link to a host computer through USB and RS-232 cable or the
CRD-90 cradle for data communication.
2.4.1 Via USB /RS-232 Cable
The mobile computer connects directly to a host computer via the USB /RS-232 cable.
Figure 2-10 Communication through Cable
2.4.2 Via CRD-90 Cradle
Connected with CRD-90 cradle via USB cable for data transmission
Figure 2-11 Communication through Cradle
User’s Manual 14
Page 21
3. Operation of the Mobile Computer
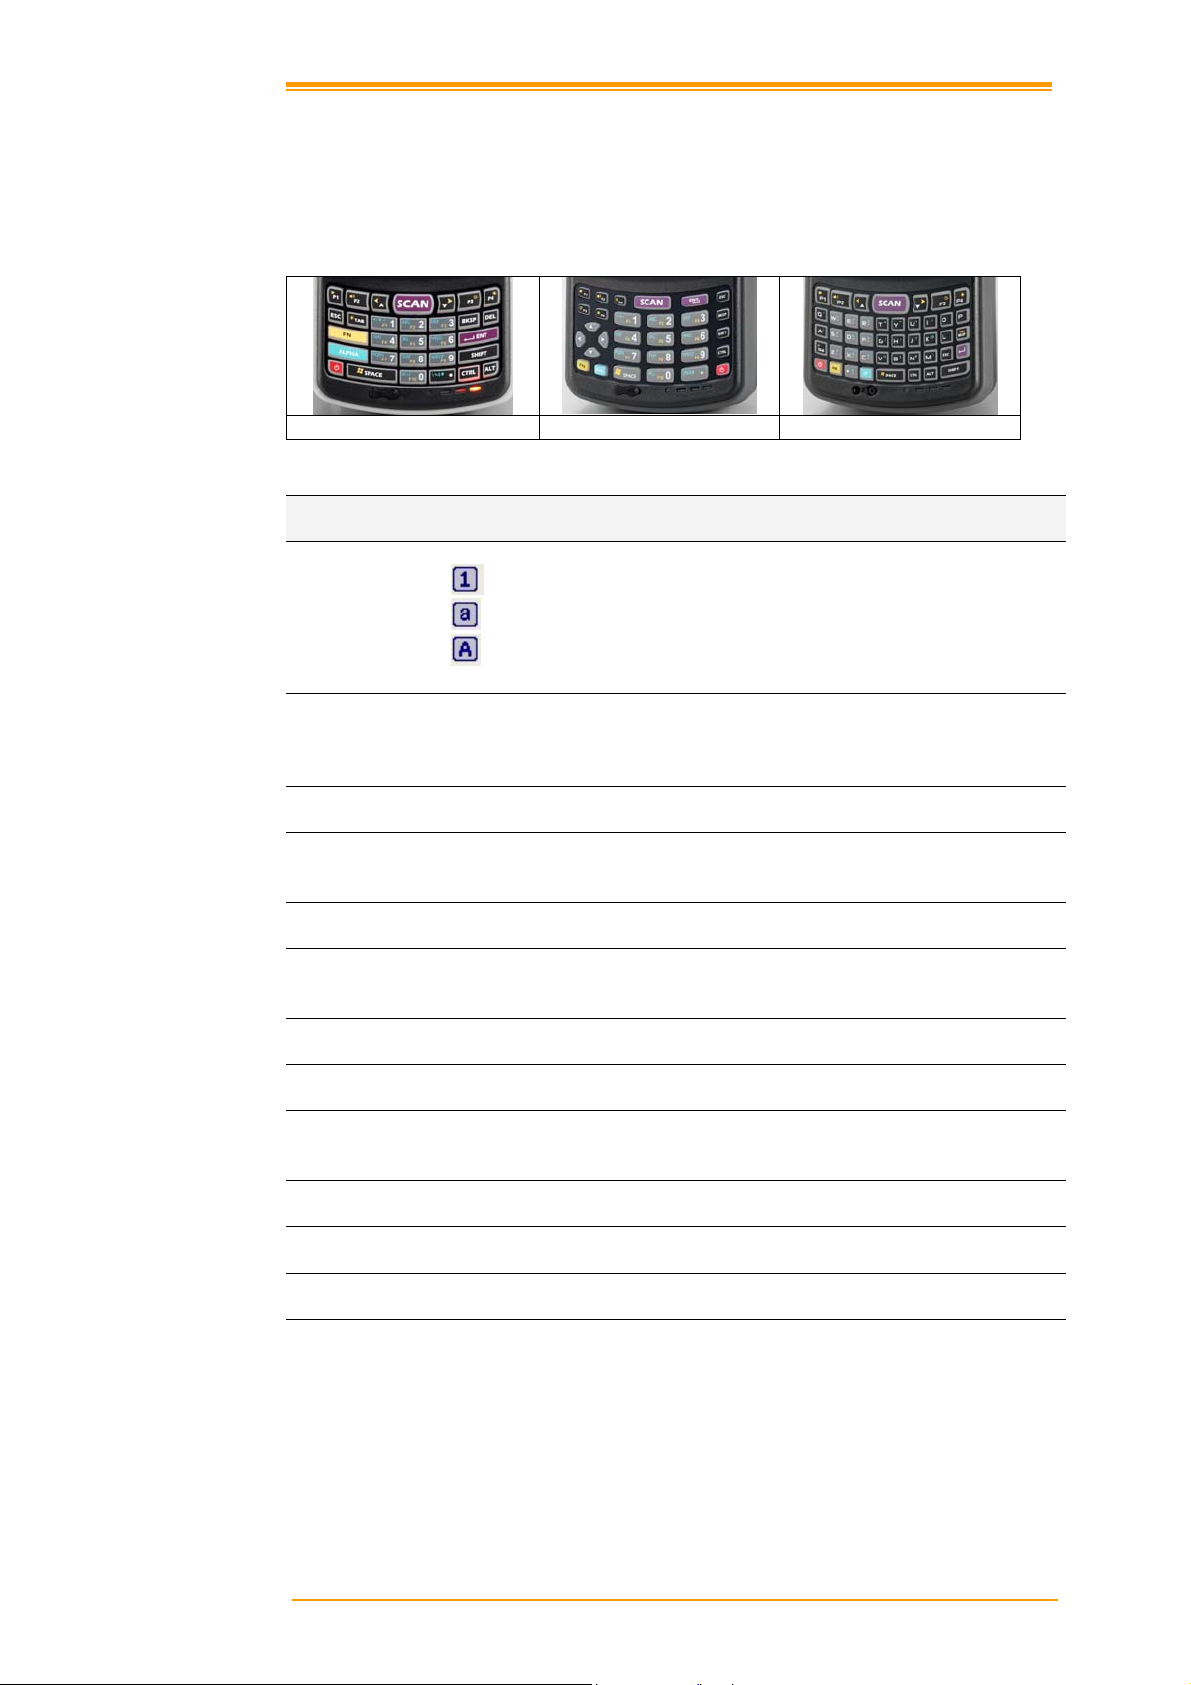
3.1 Keypad Description
PT-90 keypad consists of 29 /44 rubber keys including one SCAN key. Please refer to the
picture below.
Key Define
ALPHA
On/ Off
ESC
TAB
BKSP
DEL
ENT
SHIFT
ALT
SCAN
CTRL
SPACE
P1~P4
29-key 29-key plus 44-key
Figure 3-1 Keypad Layout
Switches between the number input mode or the character input mode.
Number input mode (default input mode)
English lowercase letter (a~z)
English capitalization (A~Z)
When the unit is off, pressing the Power key turns the unit on.
Alternatively, when the unit is on, this key must be pressed and held down
for about two seconds in order to turn the unit off.
Exit and back to the last layer.
The Tab key is used to toggle between data fields or to place the cursor at
pre-determined places in a programming or word processing application.
The Backspace key is used to erase previously input characters.
Delete Key
(DEL key is not available in 29key plus.)
Enter Key
Shift Key
Alt Key
(ALT key is not available in 29key plus.)
Trigger scanner, if the scanner enables.
Control Key
Space Key
User define key or application
Function
User’s Manual 15
Page 22
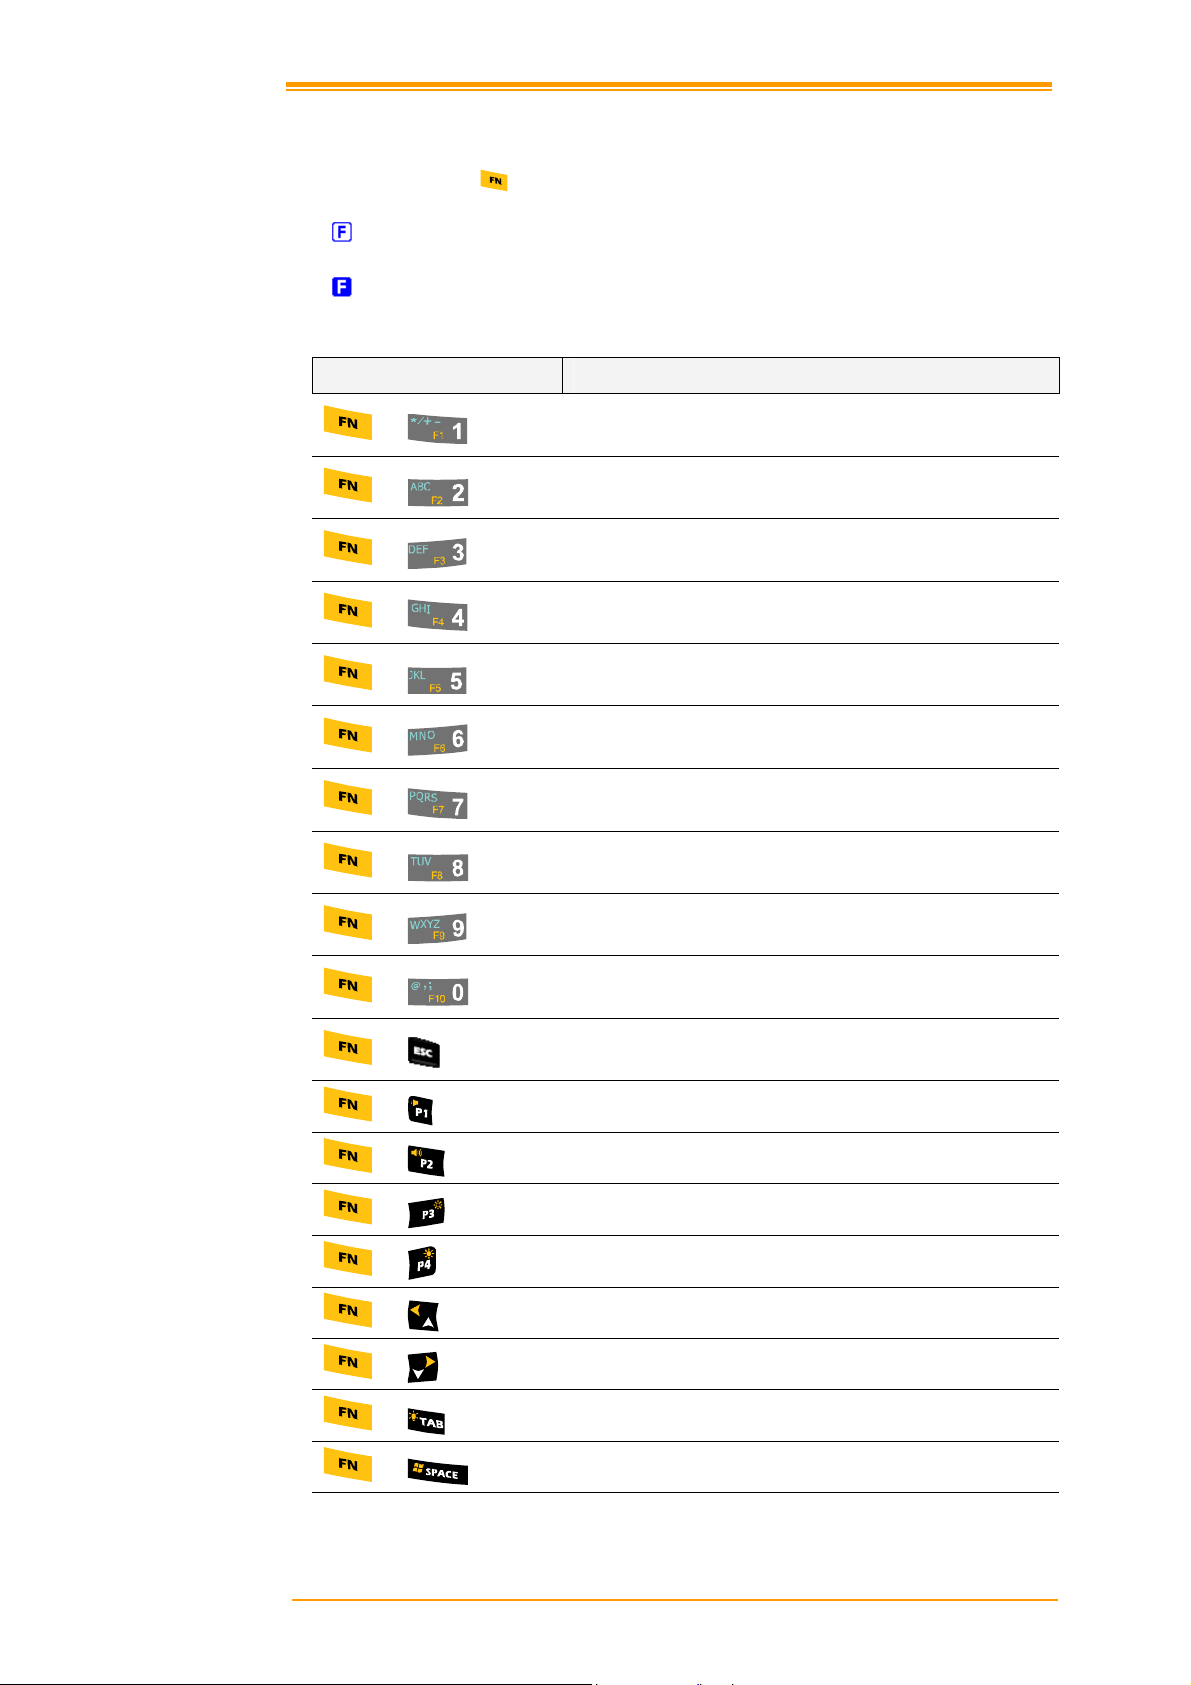
3.2 Function Key Description
The function key is specially designed for quick access (Hot-key) to some
functions. The function key combi nes with ot her keys.
Availabl e f unction key combinations
Press function key once (function single mode). After press function key combination,
function single mode switches to normal mode.
Press function key twice (function continue m ode). Aft er press function key again,
function continue mode switches to normal.
Key Define Function
Reserve (user define)
+
Reserve (user define)
+
Reserve (user define)
+
Reserve (user define)
+
Reserve (user define)
+
Reserve (user define)
+
Reserve (user define)
+
Reserve (user define)
+
Reserve (user define)
+
Reserve (user define)
+
Touch screen calibration
+
Volume Down
+
Volume Up
+
LCD Backlight down
+
LCD Backlight up
+
Move Left
+
Move Right
+
Keypad Backlight ON/OFF
+
Windows Start Menu
+
User’s Manual 16
Page 23

3.3 Install micro SD card into PT-90
1. Open the Micro SD slot cover with a screw driver.
2. Insert a correctly oriented Micro SD card.
3. Close the slot cover and fix two screws.
Insert Micro SD card face side down
Note:
a. If the micro SD card is inserted incorrectly, the micro SD card unit and its internal data
maybe damaged.
b. When removing the micro SD card, please press “push” first.
Figure 3-2 Inserting a micro SD Card
User’s Manual 17
Page 24

3.4 Configuring PT-90 Settings
3.4.1 Calibrating Touch Screen Alignment
Pressing the Power key
The PT-90 welcome screen appears. The
Windows CE® screen appears shortly after.
Calibrating the PT-90
This screen can be accessed at any time by
pressing the hot key FN and ESC key. Or by
accessing the menus and tab in order of Start
→ Settings → Control Panel → Stylus →
Calibration.
Figure 3-3 Logo
Figure 3-4 Calibration-1
Whenever the response of the touch screen is poor, or the operations executed do not match
your tapping on the touch screen, please recalibrate the alignment of the touch screen using the
following method.
1. Press the stylus against the center of the
target mark “ + “ as indicated on the
screen. The screen shown to the right
appears after you press the stylus against
the target at five different locations.
2. Press the Execute key or tap anywhere on
the touch screen
Figure 3-5 Calibration-2
User’s Manual 18
Page 25

3.4.2 Adjusting Brightness
You can use the following procedures to adjust display brightness to make it easier to read
under different lighting conditions.
Press the
display. Press the
darker display.
To continue making adjustments, press the
continue mode. Press the
press the
Brightness settings are also made by accessing the menu and tab in order of Start
→ Settings → Control Panel → Timeout&Brightness.
key and then press the key to adjust brightness for a lighter
key and then press the key to adjust brightness for a
key twice to enter function
or key to adjust brightness. After finish setting,
key to exit function continue mode.
3.4.3 Muting Sound
You can use the following procedures to adjust sound to make it easier to hear under different
working conditions.
Press the
the
key and then press the key to adjust for a louder sound. Press
key and then press the key to adjust for a softer sound.
To continue making adjustments, press the
continue mode. Press the
the
key to exit function continue mode.
Sound settings are also be made by accessing the menu and tab in order of Start
→Settings → Control Panel→Volume & Sounds
or key to ad just sound. After finish setting, press
key twice to enter function
3.4.4 Using the Stylus
The stylus is located next to hand-strap on the rear of the PT-90 as illustrated in
The Front of the PT-90 (
stylus to:
Navigate the display, select menu items and open optional applications.
Tap the characters on the soft keyboard panel
Hold the stylus on the screen and drag across the screen to select a list of multiple
items.
Caution:
Never use a pen, pencil, or other sharp object on the display to avoid
damaging the touch screen.
page 8). The stylus functions the same as a mouse on a PC. Use the
Figure 2-4
User’s Manual 19
Page 26

3.5 Entering Information
To enter information:
Use the keypad
Use the keyboard input panel (soft keyboard) to enter text.
Scan bar code data into data fields.
Use left /right side key
Use Microsoft ActiveSync to synchronize or copy information from the host
computer to the PT-90. For more information on ActiveSync, refer to Chapter 7.
3.5.1 Entering Information Using a Keypad
The alphanumeric keypads produce the 26-character alphabet (A-Z), number s (0-9), function
keys and assorted characters. The keypads default characters/functions are printed white.
3.5.2 Entering Information Using the Keyboard Input Panel
Use the keyboard input panel (soft keyboard) to enter information in any program. To launch
the keyboard input panel, press the button on the taskbar. Tap a key to enter a value. Tap a
key board input panel button to display or hide the keyboard input panel.
Figure 3-6 Soft Keyboard
3.5.3 Entering Data via the Bar Code Scanner
The sample bar code scanner application scans data into data fields in the same way data is
entered via the keypad.
User’s Manual 20
Page 27
3.6 Power Management
3.6.1 Power Status Indication
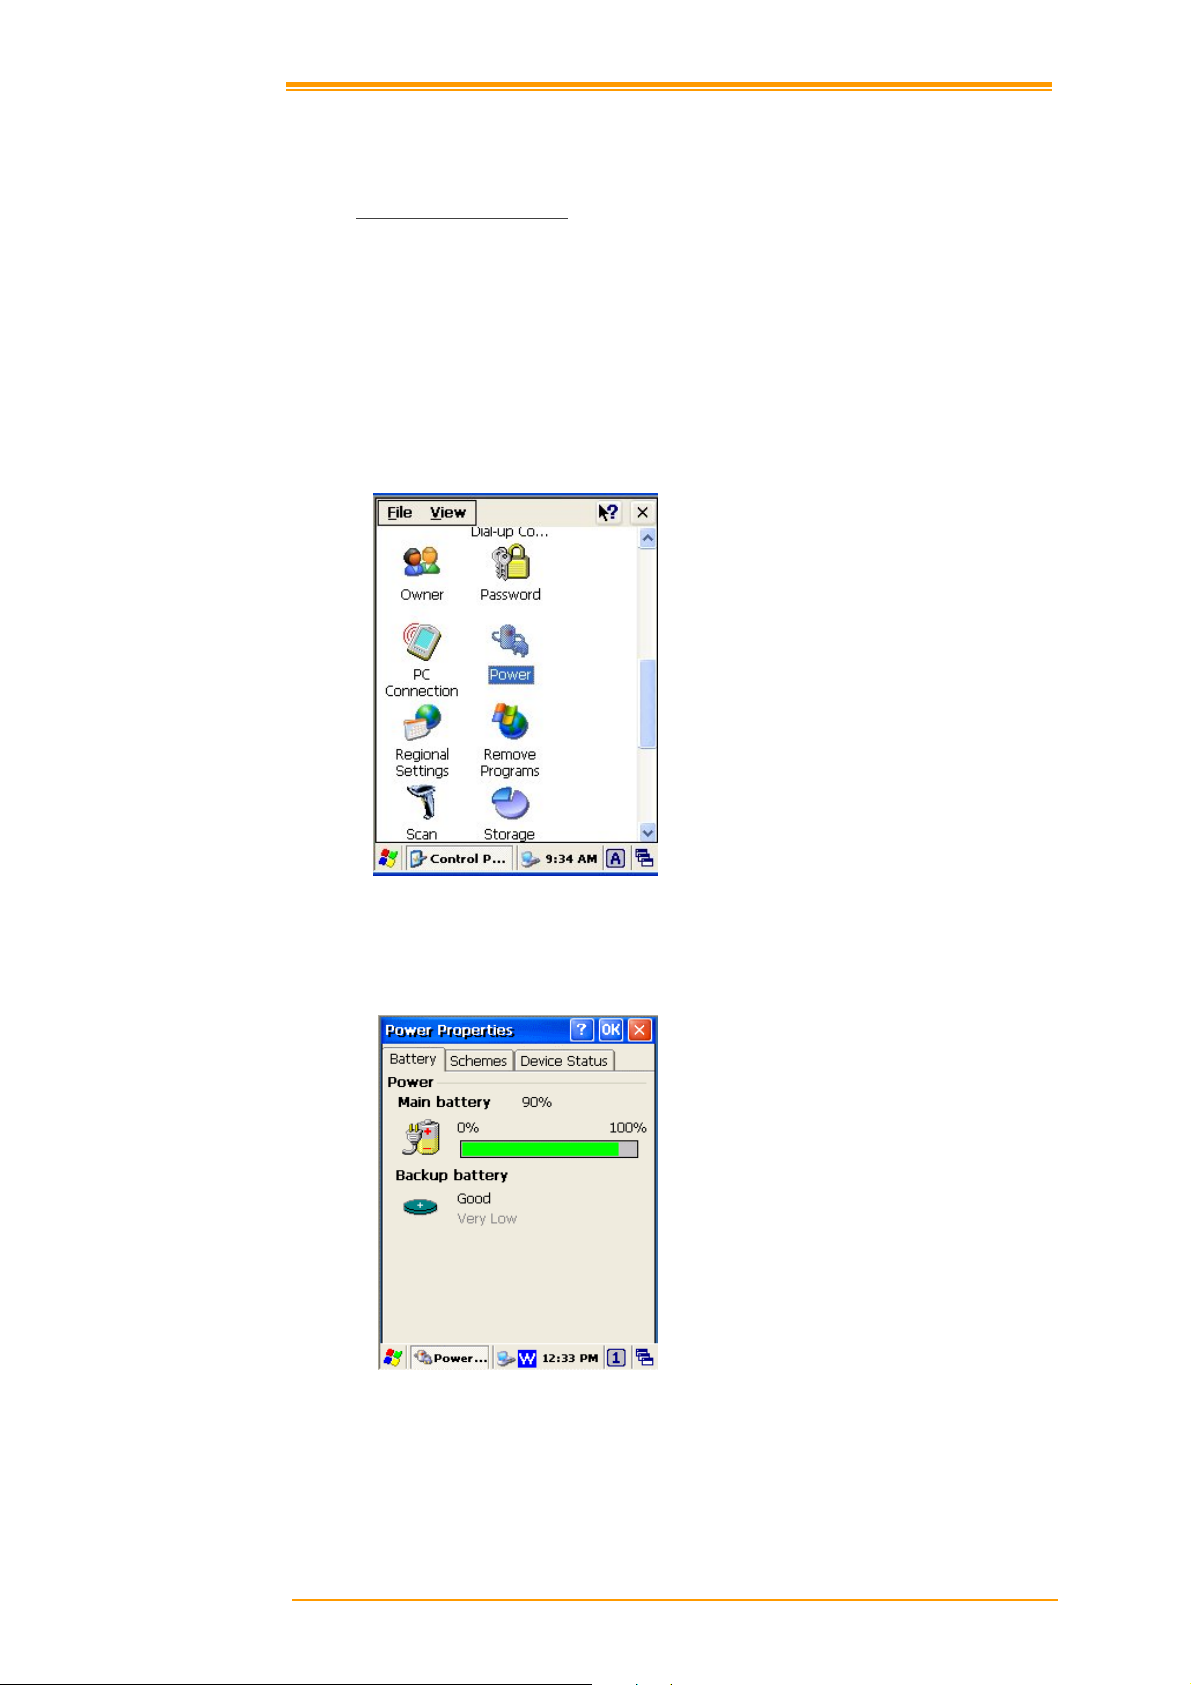
Checking main and Backup Battery Status
Enter “Power Properties”
If the above mentioned Plug or Battery icon is displayed, double tap this icon to bring up the
Power Properties screen.
Or, select Settings → Control Panel from the Start menu and then double tap the Power
icon to display Power Properties.
Figure 3-7 Control Panel
To Check Battery Status:
The battery menu item shows the status of the main and backup batteries.
Figure 3-8 Power Properties
User’s Manual 21
Page 28

Five different icons are displayed on the status bar to indicate the on-board power status.
Icon Description
No icon:
“Plug”
“Charging” :
“Battery Low”
“Battery Very low” :
You must charge the battery when the Battery Very Low icon is displayed.
If the Battery Very Low icons still show after charging, please contact Argox Technical
Support.
:
:
Indicates there is no external power supply to the PT-90 but
the battery power status is good.
Shows external power is in use. The PT-90 is either
plugged-in via the DC 5V/3A power adapter or in the
cradle.
Indicates that the battery is charging.
Shows there is no external power supply, the battery charge
is low.
Indicates the battery is very low. Stop operation and charge
the PT-90 immediately.
User’s Manual 22
Page 29

3.6.2 Saving Battery Power
Automatic shut-down of the PT-90
The PT-90 enters idle mode when there is no task or if all tasks are waiting for input. In
default setting, the PT-90 automatically turns itself off if idle for 9 (1+3+5) minutes and when
there is no external charging power. Press the Power button to return the PT-90 to the same
point at the time of automatic shutdown.
In Power Properties, select Schemes. Customize automatic shut off time by tapping the arrow
to select from a list of time periods. The available time periods for battery power are 1, 2, 3, 4,
5, 10, 30 minutes and never.
Activate this function when the PT-90 is plugged into the power adapter or placed in its cradle
by tapping the check box and then tapping the arrow to select from a list of time periods. The
available time periods for AC power are 1, 2, 5, 10, 15, 30 minutes and never.
Figure 3-9 Power Properties-2
Backlight Setting
Because the power consumption of the LCD backlight is high, turn off the backlight function
when it is not necessary. If a backlight is required, set “automatically turn off the back-light.”
To change the backlight setting, select Start → Settings → Control Panel, and then double
tap the Timeout&Brightness icon.
Figure 3-10 Backlight Setting
User’s Manual 23
Page 30

Timeout setting:
Tap the check box off to always turn on
backlight. Tap the check box on to toggle
automatically turning off backlight.
Available timeout for battery power are 15
seconds, 30 seconds, 1 minute, 2 minutes
and 5 minutes. Available timeout for AC
power are 15 seconds, 30 seconds, 1 minute,
2 minutes, 5 minutes, 10 minutes, 15 minutes
and 30 minutes.
Brightness setting:
Adjust the brightness setting for backlight.
Available brightness for battery and AC
power are Off, Micro, Fine, Normal and
Super.
Figure 3-11 Timeout Setting
Figure 3-12 Brightness Setting
3.6.3 Suspend Mode
The PT-90 will go into suspend mode when it is idle for a period of time. Customize the idle
duration using the Power control panel (refer to Figure Schemes Tab). Suspend mode appears
just like you have turned the unit off. Press the
key again for the PT-90 to resume its previous state.
Use the Battery Power control panel to set the duration to switch to Suspend mode when the
system uses battery power. This saves battery power when the PT-90 is not in use.
key to suspend the PT-90. Press the
User’s Manual 24
Page 31

Entering Suspend Mode:
The following puts the PT-90 in suspend mode:
Press
The duration timer for Switch state to Suspend expires, which indicates that there
has been no use for a specified of time.
The battery pack di scharges completely.
Tap Start → Suspend
key while the unit is on.
Figure 3-13 Suspend Mode
Tap here to set the PT-90 into suspend mode
3.6.4 Resume
Press
Waking the PT-90
The default wakeup conditions define what actions wakeup the PT-90. These setting are
configurable and the factory default settings are subject to change / update.
key to suspend or resume (wake up)
Status Description Condition for Wakeup
Power Off When the PT-90 is set to suspend mode by
pressing
, this action wakes the PT-90.
Auto Off When the PT-90 enters suspend mode by
Press
Press
button
button
automatic power-off, this action wakes the PT-90.
3.7 Resetting the PT-90
If the PT-90 stops responding to the system, you may need to rest it. There are three ways to
reset - warm boot
A warm boot and cold boot restart the PT-90, but all data that have not saved will get lost. All
data in flash will be preserved.
A clean boot will erase all data except User application folder. In addition it returns formats,
preferences and other settings to the factory default setting.
User’s Manual 25
, cold boot and clean boot.
Page 32

3.7.1 Performing a Warm Boot
To perform a warm boot to correct the computer when an application stop responding to the
system.
Caution:
To perform a warm boot:
1. Press Reset button. Do not hold down any other keys or buttons.
2. PT-90 initializes the logo screen appears for about a minute.
3.7.2 Performing a Cold Boot
A cold boot restarts the PT-90 and all un-saved data will get lost. Only perform a cold boot if a
warm boot does not solve the problem.
Caution:
To perform a cold boot:
1. Press the Reset and
2. PT-90 initializes the logo screen appears for about a minute
3.7.3 Performing a Clean Boot
Perform a warm boot first. If the PT-90 still does not respond, perform a cold boot.
Perform a clean boot only if you want to reset PT-90 to fac t ory default setting.
The RAM will be reinitialized.
The RAM will be reinitialized.
keys together. Do not hold down any other keys or buttons.
Registry
Flash Disk
User application
RAM data
RTC
Caution:
To perform a clean boot in OS:
1. To perform a clean boot, select Start →
Settings → Control Panel, and then
double tap the System Information
icon.
2. Tap the Format partition check box in
Clean boot page and press Setting to
start clean boot.
3. The PT-90 logo window appears.
4. Reset to factory default setting.
To perform a clean boot using hotkey:
1. Cold boot and press hot key
(UP+ DOWN+SHIFT).
2. PT-90 initializes the logo screen appears
for about a minute.
All data will be lost except User application folder. The User application folder
will lost when FW upgrading.
Warm boot Cold boot Clean boot
Preserved Preserved Factory default
Preserved Preserved Clean disk
Preserved Preserved Preserved
Reinitialized Reinitialized Reinitialized
Preserved Clean Clean
Figure 3-14 Clean Boot
User’s Manual 26
Page 33

3.8 Flash Storage
Flash memory is a re-writable location in which to store up to 256MB of programs and data
files. The benefit of this feature is that files and programs saved in Flash Memory are
unaffected by the PT-90’s power status.
Note:
3.8.1 Flash Disk Location
All storage disks are stored in Flash Disk in PT-90
The Flash storage memory persists for warm/cold reset conditions. We strongly
recommend that perform a clean reset only if you want to reset factory default
setting.
Figure 3-15 My Device
3.8.2 Flash Disk Size
The size of the Flash Disk varies depending
on the size of the system firmware.
Select Start → Settings → Control
Panel, and then double tap the Storage
Manager icon.
The capacity is the total Flash Disk size.
Figure 3-16 Flash Size
User’s Manual 27
Page 34

3.9 Bluetooth Setting
1. Run program from Desktop→Utility→Bluetooth.exe to enable Bluetooth like Figure 3-17.
Figure 3-17 Enable Bluetooth
2. After enable Bluetooth, please select Show BT like
figure 3-18
Figure 3-18 Show BT
3. On Bluetooth manager screen, select File New Connection like
Figure 3-19 Bluetooth Connection
User’s Manual 28
Figure 3-19.
Page 35

4. Bluetooth has four functions to choose like
Figure 3-20 Bluetooth Explorer
5. First function is Pair with remote device, after press next button.
It will start to search devices. Select a device and press Pair button; it needs to enter
Bluetooth PIN code like
Figure 3-21.
Figure 3-20.
Figure 3-21 Bluetooth Pairing
After PT-90 check pin code with device. PT-90 will appear a pop window and show
6.
Success message like
Figure 3-22.
Figure 3-22 Bluetooth Pairing-1
User’s Manual 29
Page 36

7. Second function is Serial Port which communication with device via com port like
Figure 3-23.
Figure 3-23 Bluetooth Explorer
8. After press Next button, it will start to search device like Figure3-24.
Figure 3-24 Bluetooth Serial Port
9. After press Connect button, it will appear a connection with SPP mode like
Figure 3-25 Bluetooth Serial Port
User’s Manual 30
Figure 3-25.
Page 37

10. Third function is File Transfer like
Figure 3-26 Bluetooth Explorer
11. After press Next button, it will start to search device and it needs to enter PIN code
Figure 3-27
like
Figure 3-26
Figure 3-27 Bluetooth File Transfer-1
12. After checking pin code with the connect device. PT90 will enter FTP mode like
Figure 3-28.
Figure 3-28 Bluetooth File Transfer-2
User’s Manual 31
Page 38

13. On Bluetooth manager screen, it will add a FTP connection like
Figure 3-29 Bluetooth File Transfer-3
14. The latest function is ActiveSync connection. The function can connect with
computer via ActiveSync like
Figure 3-30.
Figure 3-29.
Figure 3-30 Bluetooth Explorer
15. After press Next button, it will start to search device like
Figure 3-31 Bluetooth ActiveSync
User’s Manual 32
Figure 3-31.
Page 39

16. PT-90 will add a ActiveSync connection on Bluetooth manager screen. It will
synchronize with computer like
Figure 3-32 Bluetooth ActiveSync
Figure 3-32.
User’s Manual 33
Page 40

3.10 WLAN Setting
SDIO86861 only available in PT-9X30-0-0.
SDCSD40N1 only available in PT-9X30-1-1 and PT-9X32-0-0.
3.10.1 SDIO86861
1. After enable WLAN setting, a POP window appears as below. Figure 3-33
Figure 3-33 WLAN setting
2. If the above window doesn’t show, try to doub le click the Wireless icon on the screen
bottom.
3. Select new connection and press Connect button or double click the new connection,
BU01-WPA for instance; it will appear the configuration window (
Figure 3-34). Then user
can set wireless Encryption on this window.
Figure 3-34 Wireless Properties
4. After setting, press OK to connect to AP server (wireless AP server must setup
completely before connection). WiFi connection can work now.
5. Wireless icon for SDIO86861
Icon Description
User’s Manual 34
Not Connected
Signal Strength
Page 41

3.10.2 SDCSD40N1
1. Double click on Wireless icon or tap Start→Program→Summitscu to open Summit
Client Utility like
FIGURE 3-35 OPEN SCU
2. Click Admin Login and input password “SUMMIT” to login like
Figure 3-35.
Figure 3-36.
FIGURE 3-36 ADMIN LOGIN
3. In Profile Tab, press Scan to find access point. Select a access point and press
Configure.
FIGURE 3-37 SCAN
User’s Manual 35
Page 42

4. Create a new profile and input key if necessary.
FIGURE 3-38 CREATE A NEW PROFILE
5. Press Commit to save the profile setting.
FIGURE 3-39 COMMIT
6. In Main tab, set Active Profile to RD02test. WiFi will start connection with RD02test.
FIGURE 3-40 ACTIVE PROFILE
7. Wireless icon for SDCSD40N1
Icon Description
Not Connected
Signal Strength
User’s Manual 36
Page 43

3.11 GPRS Utility
GPRS utility only available in PT-9X30-1-1. Before using GPRS, insert the SIM card in PT90
first. Utility will ask PIN code if SIM card is lock.
3.11.1 GPRS Connection
1. Tap Desktop→Utility→GPRS_RAS to enable GPRS_RAS like Figure 3-41.
FIGURE 3-41 ENABLE GPRS_RAS
2. Tap Power On.
FIGURE 3-42 POWER ON GPRS
3. Select connection and tap Connect.
FIGURE 3-43 CONNECT
User’s Manual 37
Page 44

4. The signal strength will display in Status and the GPRS icon on the taskbar.
FIGURE 3-44 GPRS SIGNAL STRENGTH
3.11.2 GPRS SMS
1. Tap Desktop→Utility→GPRS_Demo. The GPRS_Demo screen appears. In the
GPRS_Demo screen, you can send or receive SMS, setting phonebook, security, and SMS
center. The signal strength display on the taskbar.
FIGURE 3-45 GPRS_DEMO
2. In SMS tab, you can o
FIGURE 3-46 SMS
perate SMS function.
User’s Manual 38
Page 45

3. In Phonebook tab, you can add, modify, and delete phonebook.
FIGURE 3-47 PHONEBOOK
4. In Security tab, you can lock or unlock SIM card and change PIN code.
FIGURE 3-48 SECURITY
5. In Center tab, you should setting SMS center before sending SMS.
FIGURE 3-49 CENTER
User’s Manual 39
Page 46

3.12 GPS Connection
GPS utility only available in PT-9X30-1-1.
1. Tap Desktop→Utility→GPS SYSTEM.exe to enable GPS like
FIGURE 3-50 ENABLE GPS
2. Tap SetupConnect to start GPS positioning. PT90 will get position in a few minutes.
Figure 3-50.
FIGURE 3-51 GPS POSITIONING
3. Tap SetupGPS Info or GPS Data to switch different information.
Figure 3-52 GPS Info and GPS Data
User’s Manual 40
Page 47

3.13 RFID
RFID utility only available in PT-9X32-0-0.
1. Tap Desktop→Utility→RFID_Demo.exe to enable RFID like
FIGURE 3-53 ENABLE RFID
2. In Inventory tab, tap 15693, 14443A or 14443B to select tag type. Press trigger key to
read tag ID.
Figure 3-53.
FIGURE 3-54 INVENTORY
3. In 15693 tab, you can get UID, read block and write block from ISO15693 tags .
Figure 3-55 15693
User’s Manual 41
Page 48

4. In 14443A tab, you can get UID from ISO14443A tags. You can also read and write
block from Mifare S50/S70 and Mifare Ultralight.
Figure 3-56 14443A
5. In 14443B tab, you can get chip ID from ISO14443B tags. You can also read and write
block from SRIX4K.
Figure 3-57 14443B
User’s Manual 42
Page 49

3.14 Camera
Camera utility only available in PT-9X30-1-1.
1. Tap Desktop→Utility→CameraDemo.exe to en able Camera like
FIGURE 3-58 ENABLE CAMERA
2. Tap PreviewStart to start preview.
Figure 3-58.
FIGURE 3-59 START CAMERA
3. Tap CaptureJPEG Image to take picture. The capture pictures place in default folder
\My Documents.
Figure 3-60 Take picture
User’s Manual 43
Page 50

4. Tap PreviewStop to stop preview. You can tap DisplayShow image to display
picture.
Figure 3-61 Display picture
User’s Manual 44
Page 51

4. Scanning
The PT-90 has an integrated laser/2D scanner that reads all major bar code labels with
excellent performance. The trigger key is located in the middle of the unit. There are also two
side-keys to trigger scanner. Press trigger key to activate the laser/2D scanner.
The PT-90 has laser/2D scanner engine. Each scanner engine has different barcode settings.
The configurations and scan SDK settings are also different between Laser and 2D scanner.
4.1 Scan Configuration
When it is necessary to change the default barcode symbology for a different application, use
Scan Configuration to change default symbology, place delimiter characters behind scanned
data, and save the settings.
Run this program from Desktop→Utility→Scan Configuration. exe which is also accessible
via Start→Settings→Control Panel→Scan Configuration.
Laser Scanner Engine:
Figure 4-1 Laser Scan Configuration -1
Figure 4-2 Laser Scan Configuration -2
User’s Manual 45
Page 52

Figure 4-3 Laser Scan Configuration-3
2D Scanner Engine:
Figure 4-4 2D Scan Configuration -1
Figure 4-5 2D Scan Configuration -2
User’s Manual 46
Page 53

Figure 4-6 2D Scan Configuration -3
After you change settings, press the OK button to configure, or press Restore Default to
return to the scan default settings.
4.2 Scan driver
Scan driver lets you put data into Microsoft WordPad. Open scan driver and the scan module
powers on the scanner. You can then scan barcode. To turn off the power, press Exit on the
task bar.
Figure 4-7 Scan Driver
User’s Manual 47
Page 54

4.3 Scan test
The PT-90 has a Scan Test.exe program that allows you to test the barcode scan function.
Scan Test.exe is located in directory Desktop→Utility→Scan Test.exe.
This program shows barcode type and barcode data when pressing the Scan key.
Figure 4-8 Scan Test
4.4 Reading barcode
Note:
Position the LED light beam over the bar code from margin to margin and pass the scanner
downward over the bar code, as shown in the scan position illustration
Observe handling precautions.
Make sure the mobile computer is installed according to instructions.
Never remove the main batteries or battery pack while the mobile
computer is turned on. Doing so can cause loss of data in the mobile
computer.
Avoid looking directly into the LED light beam emitter, or pointing the
LED light beam directly into someone’s eyes.
Good read scan position
Incorrect read scan positions
User’s Manual 48
Page 55

The scanning sequence is defined by the user’s application. A typical sequence is:
Point the mobile computer at the barcode and press the Trigger key
Point the LED lightbeam at barcode as shown in the scan position illustration above.
The scanner reads the barcode and the results are indicated.
A “Good Read” means that the scanner has effectively recognized and decoded the bar code.
In most cases, the application program provides an indicator signal to indicate a good read.
If the read is incorrect, try again paying close attention to the instructions.
When reading a small bar code, decrease the distance between the mobile computer and the
bar code. For larger bar codes, position the mobile computer so th at the bar code fits into the
LED light beam. When reading a very high density bar code, decrease the distance between
the mobile computer and the bar code. For a low density bar code, increase the distance
between the mobile computer and the bar code.
.
4.5 Barcode reading problems
When the barcode can NOT be read, try the following:
Change the angle between the bar code and the mobile computer.
Change the distance between the bar code and the mobile computer.
If the bar code is larger than the LED light beam, try moving the mobile computer a bit
further away from the bar code.
User’s Manual 49
Page 56

5. Utilities
5.1 Function Key Setting
To assign your favorite application program or virtual key from F1 ~ F10 and P1~P4 hot
keys. Function Key.exe is located in directory Desktop→Utility→Function_Key.exe.
1. Choose F1~F10 or P1~P4 from list.
2. Tap Define to define application or virtual key.
3. Tap Apply or OK to set function key setting.
4. Tap the Default to return to default setting.
Figure 5-1 Function Key Setting
Figure 5-2 Function Key Define
User’s Manual 50
Page 57

5.2 Timeout & Brightness
Timeout & Brightness setting is a tool for changing the LCD backlight and keypad LED. If
you wish to save power use this program to change LCD backlight and keypad LED settings.
This application supports battery power and external power settings.
Figure 5-3 Timeout & Brightness
User’s Manual 51
Page 58

6. Software Applications
The PT-90 includes software applications
such as Internet Explorer, Media player,
Microsoft WordPad, Remote Desktop
Connection, Transcriber, and Windows
Explorer.
6.1 Internet Explorer
Figure 6-1 Software Applications
With Internet Explorer, you can view Web or
intranet Web pages on your device. You will
need to use WLAN to connect to an Internet
server provider (ISP) or network.
6.2 Media Player
The PT-90 comes with Media Player for
Windows CE installed.
Open Media Player by selecting Start
→ Programs →Media Player from the
desktop.
Select File → Open to open a new
media file.
Please refer to www.microsoft.com
additional information and help with
your Microsoft Windows Media Player.
for
Figure 6-2 Internet Explorer
User’s Manual 52
Figure 6-3 Media Player
Page 59

6.3 Microsoft WordPad
You can create and edit documents and
templates in WordPad, using buttons and
menu commands that are similar to those
used in the desktop version of Microsoft
Word. You can work with files Normal or
Outline view.
WordPad documents are usually saved
as .pwd files, but you can also save
documents in other file formats, such as .rtf
or .doc.
Figure 6-4 Microsoft WordPad
6.4 Remote Desktop Connection
Using Remote Desktop Connection, you can
log on to Windows Mobile computer Server
and use all programs installed on this server.
For example, instead of running Microsoft
Pocket Word, you can run the desktop
version of Microsoft Word.
6.5 Transcriber
Features:
Microsoft Transcriber is the natural
handwriting recognition solution for
your Windows CE device. It recognizes
words from its integrated dictionary,
and allows you to write in cursive, print
or mixed handwriting.
The letter Shapes Selector (note 1) is
for optimizing recognition to your own
handwriting style
Transcriber works transparently in the
background of all Windows CE
applications providing handwriting
input, while taking away no precious
screen space.
Figure 6-5 Remote Desktop Connection
Figure 6-6 Transcriber
User’s Manual 53
Page 60

6.6 Windows Explorer
Windows Explorer works almost the same
on your PDA as it does on your PC. See the
topics below for information about the
difference in Windows Explorer on your
device.
Figure 6-7 Windows Explorer
User’s Manual 54
Page 61

7. Communication
The Argox PT-90 lets you link to a host computer via RS-232 or USB port for data
communication with cable or cradle. This chapter gives an overview of the PT-90’s
communication capabilities.
7.1 Microsoft ActiveSync
Download and install Microsoft ActiveSync if you run Windows XP or Windows 2000 on
your computer and you want to sync content between PT90 and your computer. You can use
ActiveSync with the following versions of the Windows operating system:
Windows 2000 Service Pack 4(SP4)
Windows XP SP1
Windows XP SP2
Windows XP SP3
ActiveSync provides a user-friendly interface and it can be downloaded free of charge from
Microsoft’s Website.
With Microsoft ActiveSync you can:
Transf er data between PT90 and your computer.
Limited backup/restore functionality.
Install /uninstall programs on PT-90.
Note:
ActiveSync is only compatible with Windows XP or earlier. The detail
description of ActiveSync can be found in Microsoft’s Websi t e.
7.2 Microsoft Mobile Device Center
Download and install Microsoft Mobile Device Center if you run Windows Vista or Windows
7 on your computer and you want to sync content between PT90 and your computer. You can
use Mobile Device Center with the following versions of the Windows operating system:
Windows Vista
Windows 7
Microsoft Mobile Device Center can be downloaded free of charge from Microsoft’s Website.
With Microsoft Mobile Device Center you can:
Transf er data between PT90 and your computer.
Install /uninstall programs on PT-90.
Note:
Windows Mobile Device Center s only compatible with Windows Vista and
Windows 7. The detail description of Mobile Device Center can be found in
Microsoft’s Website.
User’s Manual 55
Page 62

8. Overview of Microsoft Windows CE 6.0
This chapter describes Microsoft Windows CE 6.0, the operating system for the PT- 90
This introduction to Microsoft Windows CE 6.0 includes:
How to use the main Windows
How to use a taskbar
How to use settings
8.1 Main Windows
When you turn on PT-90, you will see the
main Windows of Window CE 6.0, which
is similar in appearance to Windows XP.
The main window consists of a background
screen and taskbar.
Figure 8-1 Main Window
The screen shows short cut icons for the main programs of Microsoft Windows CE 6.0. A
description of the icons follows:
My Device:
Shows the internal configuration of PT-90
and the folders and files it contains.
Figure 8-2 My Device
User’s Manual 56
Page 63

Recycle bin:
Completely delete or restore files and data. This folder saves deleted files from Windows
Explorer or the background screen. You can completely empty or restore files in the recycle
bin.
Caution:
Taskbar
Windows CE 6.0’s taskbar is designed to be simple and user-friendly. The picture below
shows the configuration of the taskbar.
Once you have emptied the recycle bin, you cannot restore the files and data
previously in the recycle bin.
Figure 8-3 Taskbar
Start Icon
Start icon is the starting point for the PT-90 program. If you point at the start menu with the
stylus pen, you can see various menus including program, bookmark, document, setting, help,
and operation. If you choose each menu, detailed executable programs appear as in the picture
below. If you choose and press, you can run the program of you r choice. Windows CE 6.0’s
start menu is similar to that of Windows on a desktop PC.
Figure 8-4 Start Icon
User’s Manual 57
Page 64

8.2 Taskbar
Taskbar shows a variety of information including keying in characters, battery, network
connection, status of running programs, etc.
Open Taskbar and Start Menu setting by selecting Start → Settings → Taskbar and Start
Menu from the desktop. There are Always on top, Auto hide and Show Clock setting in
General tab. You can choose the check box of desired setting.
The following explains the function of icons appearing on the task bar.
Input Method:
To activate Keyboard or Transcriber, press
can also activate Transcriber in following order: Start → Programs → Transcriber. To
deactivate input method, press
To change the features of the input method, select input method in Start → Settings →
Control Panel → Input Panel and click the option you wish to setup.
Figure 8-5 Input method
icon and select Hide input Panel.
icon and select input method. You
Transcriber:
When you want to key in characters when making a document or setting, start Transcriber.
Using the stylus to draw characters you want on the input panel, this program recognizes the
characters and transform them into typeface characters. To start the Transcriber, run the
program as the following order: Start → Programs →Transcriber.
The picture below shows how the Transcriber works in keying in characters on Microsoft
Word Pad. When Microsoft Transcriber is running, you will see the
taskbar. When Microsoft Transcriber is active the
User’s Manual 58
icon shows a dark background.
icon located in the
Page 65

Figure 8-6 Transcriber
Keyboard:
When Keyboard input panel is running, you will see the
icon located in the taskbar.
Figure 8-7 Keyboard Input Panel
Upper / lower case Selection:
Press this icon to select upper and lower case letters. If you select upper case, capital letters
and characters appear on the number key pad. It serves the same function with the Shift key.
Figure 8-8 Keyboard Input Panel -1
Status Indicator Icon:
The following is a list of icons that appear in the taskbar’s status area.
Icon Description
Battery capacity is low
Battery is charging
Linked to desktop PC through USB
WLAN not connected
Signal strength for WLAN connection
Function key status
Alt , Ctrl and Shift status
User’s Manual 59
Page 66

8.3 Setting up the PT-90
You can set up various configurations of the PT-90 such as Date/Time, Network, Display,
Volume and Sounds, Power, System, etc. at the control panel.
Figure 8-9 Setting up
To Tap Start → Settings → Control Panel, the control panel window appears. In the View
option in the menu, you can change the view mode into large icons, small icons, details or to
arrange icons. The control panel appears as below:
Figure 8-10 Control Panel
User’s Manual 60
Page 67

8.3.1 Certificates
Application programs use certificates to ensure reliability and safe communication.
Figure 8-11 Certificates
Authorized certificate providers issue certificates that are valid for a specified period.
Windows CE manages several certificate storages.
1. Select Go to Start → Settings → Control Panel.
2. Double click a Certificates to run.
Select certificate storage for browsing or correcting through the storage tap list.
Trusted Authorities: Includes the top quality certificates.
My certificate: This saves the user’s personal certificate to identify the user.
Other Authorities: Middle certificate providers establish chains of reliability.
3. To add certificates or secret keys in the selected storage, press the Import button then
select the way to bring certificates or keys. You can select them from files or a mi cro SD
card.
4. To see details of selected certificates such as extension, expiration date, etc. press the
View button.
5. To delete the selected certificate from storage, press Remove button.
User’s Manual 61
Page 68

8.3.2 Date/Time
This screen sets date, time, standard time zone.
Figure 8-12 Date/Time
Date/Time
You can set standard time zone, year, day and time. Set as follows:
1. Press the down arrow in the standard time zone until it reaches your location. If the
previously set value is appropriate, move on to the following.
2. Select Year and Month in the calendar. If the current year is not correct, press Year and
adjust. You can select the month using left and right arrows or the monthly tab that pops
up when pressed.
3. Press the correct date on the calendar.
4. Set time by keying in correct time in the current time box. The box shows AM/PM:
Hour: Minutes: Seconds. Press each and adjust time with arrows on the right.
5. Press Apply to save the changes. Confirm if the time is correct.
User’s Manual 62
Page 69

8.3.3 Dialing
Dialing Properties
1. In the When dialing from list, select the Location where you want to change settings.
2. To create a new location, select New. Enter the name of the location, and then select OK
3. Enter or Edit the area code and local country code as needed.
Figure 8-13 Dialing Properties -1
Figure 8-14 Dialing Properties -2
4. In Dial using, select Tone dialing or Pulse dialing. Most phone lines are tone.
5. To automatically disable call waiting, select Disable call waiting by dialing, select the
appropriate number sequence in the list, or enter a new sequence.
Editing dialing patterns
1. Using the codes listed, revise the dialing patterns as needed.
Notes:
If you need to use characters other than the ones listed here, use manual dialing.
Hyphens and spaces in dialing strings are ignored.
Some modems may not respond to the some characters, even though your dev ice
lets you add them to the dial string.
User’s Manual 63
Page 70

8.3.4 Display
This screen lets you set the wallpaper image of the PT-90, or change the color of the
background screen. Call up the right button menu from desktop and select Properties and you
can check the Display Properties window.
Figure 8-15 Display Properties
Display
Change the desktop image of the background screen as follows:
1. Select the Background tab.
2. Click Browse to select an image file.
3. Press OK to apply the setting.
User’s Manual 64
Page 71

8.3.5 Hot Function Key
Please refer to Function Key Setting above.
8.3.6 Input Panel
You can set up the Input method and Options.
Figure 8-16 Input Panel Properties
1. Select keyboard and press Options. The Soft Keyboard Options window appears.
2. Select the Size of the keys.
3. To Use gestures for Space, Backspace, Shift and Enter, click the gestures check box.
4. Click OK to save the changes of Soft Keyboard Options.
5. Click OK to save the setting of Input Panel Properties.
User’s Manual 65
Page 72

8.3.7 Internet Options
To use the Internet Options, make the following settings.
General
Click the General tab.
1. Define your own start page and search page on the tab.
2. It also can set the cache size.
3. Click Delete Browsing History button, it can clear temporary internet files, cookies or
history.
Figure 8-17 Internet Options -1
Connection
Click the Connection tab and set Internet connection methods.
1. To use a proxy server, click Internet Connection by Proxy Server check box and enter
the proxy address and port.
2. To ignore the proxy server when making access to local address, click No proxy server
for local address check box. This option is availab le only for the proxy server use. If you
use a wireless LAN card, click the LAN User manual dial check box.
Figure 8-18 Internet Options -2
User’s Manual 66
Page 73

Security
Under Security page, specify the security option for your browser.
Figure 8-19 Internet Options-3
Privacy
Under Privacy page, specify the cookies setting include of privacy level.
Figure 8-20 Internet Options-4
8.3.8 Keyboard
Repeat Tab
1. To change the amount of time between taps before repetition starts, adjust the Repeat
delay slider
2. To change the repeat rate, adjust the Repeat rate slider.
3. Test your new setting.
4. Tap OK to exit the Keyboard properties.
Figure 8-21 Keyboard Properties
User’s Manual 67
Page 74

8.3.9 Mouse
1. Double-click the checkerboard grid at a comfortable speed.
2. Double-click the Test icon to test your setting.
3. Tap OK to exit the Mouse properties.
Figure 8-22 Mouse Properties
8.3.10 Network and Dial-up Connection
You can directly link to the network via network (Ethernet, LAN) or phone (modern)
connection. You can send or receive emails or access available files on the network server
or search the Internet or Intranet.
Figure 8-23 Network and Dial-UP Connection
User’s Manual 68
Page 75

8.3.11 Owner
This function lets you set the PT-90 to display user information at start up, add information on
the user, and set up a Network ID.
Figure 8-24 Owner Properties
Identification
Enter information such as Name, Company, Address, company phone number, home
phone number in the user information tab. To display the owner information on the start
screen for system start, click the Display Owner Identification check box.
Notes
Enter additional user information or other information in the Notes box. To show notes on the
initial screen when the system starts, click Display Owner Notes check box.
Network ID
Windows CE 6.0 gains access to Network resources using the owner information. Enter the
information provided by Network manager such as User Name, Password, and Domain.
User’s Manual 69
Page 76

8.3.12 Password
You can set a password to keep unauthorized users from using the PT-90.
Figure 8-25 Password Properties
To set up a password:
1. Select the Password Setting tab.
2. Enter the password in the password box.
3. Re-enter the password in the password confirmation box.
4. To enable the password protection when the power on, click on the Enable password
protection at power-on.
You may encounter a request to enter the password if resume or warm/cold boot PT-90. If you
forget the password and enter the system you may have to do a clean boot. A clean boot erases
all files, data, as well as programs. Please consider using a password that is easy to remember
and leave a record easy to access. To deactivate a Password, delete the Password in the
password feature window.
User’s Manual 70
Page 77

8.3.13 PC Connection
You can set up a PC Connection to synchronize the device with a desktop PC. You can set
desktop USB and serial port connections. The following is the procedure required for changes
in PC Connection.
Begin with Windows CE 6.0. The PT-90 basicall y supports the Internet functions via USB. If
you set up a partnership with PC during ActiveSync, it provides `USB CONNECT link items
that enable an Internet connection through the USB connection:
Figure 8-26 PC Connection
1. Create a new connection in Go to Start → Settings → Network and Dial-up
Connections. Choose the direct connection as connection type. For detailed information,
refer to the < Network and Dial-up Connections > section. (
Page 57)
2. Select Go to Start → Settings → Control Panel → PC connection.
3. Select Change Connection icon.
4. Select the connection mode.
5. Click OK to save the setting.
To connect the PT-90 to a desktop PC, you must have Microsoft ActiveSync 4.5 for Windows
2000/XP or Microsoft Mobile Device Center 6.1 for Windows Vista/7 on your desktop PC.
User’s Manual 71
Page 78

8.3.14 Power
Please refer to the previous section on Power Management. (Page 21 )
8.3.15 Regional Settings
Figure 8-27 Regional Setting Properties
You can set up region, numbers, currency, time, and date.
1. Select Go to Start → Settings → Control Panel.
2. Open Regional Settings icon.
3. Select the tab for information to change.
4. Select the < Preferred> option. Available features are dependent on which region you
have chosen in the region tab.(REMOVE)
User’s Manual 72
Page 79

8.3.16 Remove Programs
Figure 8-28 Remove Programs
To remove installed programs:
1. Select Go to Start → Settings → Control Panel.
2. Open the Remove Programs icon.
3. Select the program and click Remove to uninstall program.
4. Click Remove.
User’s Manual 73
Page 80

8.3.17 Scan Configuration
Please refer to the previous section on Scan Configuration.
8.3.18 Storage Manager
The storage manager lets you manage storage device. DSK1: NAND FLASH only allows the
users to check the store information. DSK2 shall be SD memory card. The storage manager
allow SD memory card to format, dismount or make new partition.
Figure 8-29 Storage Properties
1. Select the SD memory card from the storage information dropdown list.
2. To format the partitions of the selected disk, click Dismount button and then click
Format button.
3. After clicking the Create New button, key in the new partition names. The system
automatically creates new partitions to set up.
4. To delete a partition, select a partition and press the Delete button.
5. To see the features of the selected partitions, click the Properties icon.
Caution:
Formatting a disk erases all data, files, and programs.
If you insert extension Micro SD memory cards, Micro SD memory shows
as “SD Memory Card”.
User’s Manual 74
Page 81

8.3.19 Stylus
This screen sets Double-Tap sensitivity and calibration.
Figure 8-30 Stylus Properties
Double Tap
To set and test Double-Tap sensitivity:
1. Select Go to Start → Settings → Control Panel.
2. Activate the Stylus and select Double-Tap. Tap the grid and the color of the grid changes.
3. It automatically records the speed of the Double-Tap.
4. Double tap the bottom icon to test the double-tap sensitivity.
5. If the bottom icon does not change, adjust the setting using the grid icon above.
Calibration
If the PT-90 screen does not respond properly, adjust the screen with the calibration function.
To start Calibration:
1. Select Go to Start → Settings → Control Panel.
2. Activate the Stylus and select Calibration tap.
3. Press Recalibrate button and the adjustment process begins.
Caution:
Sometimes touching the screen with the stylus triggers the right mouse function.
You can solve this problem by adjusting the double touch sensitivity.
User’s Manual 75
Page 82

8.3.20 System
The System Properties window displays device information such as General, Memory,
Device Name and Copyrights.
General information contained in the window includes operating system data such as software
version, processor and memory etc.
Figure 8-31 System Properties
The memory of the PT-90 is used for storage and programs. Basic memory capacity is 256MB.
You can see the size of the memory cache used for running programs or storing data.
To check the Memory:
1. Select Go to Start → Settings → Control Panel.
2. Run the System and select the Memory tab.
3. The blue bar of the slider indicates the available memory capacity.
4. Left side is storage memory and the right is program memory.
The device name indicates the PT-90’s partnership relation when linked to the desktop
through ActiveSync.
To set up Device Name:
1. Select Go to Start → Settings → Control Panel.
2. Run the System and select the name of the device.
3. Enter the name of the device and its details.
User’s Manual 76
Page 83

8.3.21 System Information
The System Information properties window displays system information such as Info,
Memory and Clean boot.
Info page contained in the window includes operating system data such as CPU, ROM, RAM,
serial number (SN), hardware number (HW) and versi o n details.
Memory page display memory size such as RAM Program, ROM Storage, User application
and Storage Card.
Clean boot page allow users to clean registry and format user partition.
Figure 8-32 System Information
8.3.22 Timeout and Brightness
Please refer to the previous section on Timeout and Brightness.
8.3.23 Volume and Sounds
Adjust volume and select sound.
Volume
To adjust the Volume of the system:
1. Select Go to Start → Settings → Control Panel.
2. Open Volume & Sounds icon and select the Volume tab.
3. Press the left / right arrow icon or move the slide bar to adjust a volume.
4. Click all items to activate the sound such as Events (warning, system events),
Applications, Notifications (alarms,reminders) , Key clicks and Screen taps.
User’s Manual 77
Page 84

Sounds
To set the Sounds:
1. Select go to Start → Settings → Control Panel.
2. Open Volume & Sounds icon and select Sounds tab.
3. Select an Event from the event list.
4. Select a sound from the event sound list.
5. To remove the sound from the selected event, choose (None).
6. To save the changes in another scheme, select Save As in another name and name the
sound scheme.
7. To remove the sound scheme, select the scheme and then Delete.
Figure 8-33 Volume & Sounds
User’s Manual 78
Page 85

9. Trouble Shooting
This chapter contains information on solving problems you may encounter when using the
mobile computer and/or cradle. If problems occur, first carry out general checks before
comparing the problem with the descriptions in this chapter.
9.1 General Checks
Make sure everything is installed properly
Check the power supply (including the main battery or battery pack in the mobile
computer) of all devices
Is the reading window of the mobile computer clean?
Is the interface connector properly connected with the cable?
Are the bar code labels readable, e.g. not damaged or poorly printed?
If the problem persists after these checks are performed, please check the problem descriptions
below. If the suggested solutions below do not r esolve the problem, please contact your local
supplier or Argox for technical support: http://www.argox.com
If the PT-90 mobile computer needs repair, please ensure that the label with the serial number
is present. If sending the mobile computer or cradle back to your local supplier or Argox,
please use the original package to minimize the chances of damage during shipping.
9.2 Read Operation Problems
If the mobile computer has a problem reading barcode labels
Barcode reading problems
Make sure the scanning application is loaded and operational.
Run Scan Configuration program to modify barcode read setting.
Barcode may be distorted and should be replaced.
Battery needs recharging or replacing
9.3 Mobile Computer Problems
Mobile computer does not power on.
Battery needs recharging or replacement.
Insure that battery is installed correctly.
Mobile computer shuts itself down
Adjust Power Properties
Battery needs recharging.
User’s Manual 79
Page 86

Mobile computer will not shut off
If the mobile computer is processing data, attach a charging cable to insure the battery
isn’t depleted.
If the mobile computer is connected to AC power, disconnect.
Perform a warm boot – WARNING – Unsaved data will be lost.
Perform a cold boot – WARNING – Unsaved data will be lost.
Perform a clean boot – WARNING – The mobile computer is reset to default settings
and data will be lost.
Screen is blank
Make sure mobile computer is powered on.
Adjust screen brightness.
Mobile computer either doesn’t respond, or responds inaccurately to touch screen input
Calibrate touch screen.
Perform a warm boot – WARNING – Unsaved data will be lost.
Perform a cold boot – WARNING –Unsaved data will be lost.
Perform a clean boot – WARNING – The mobile computer is reset to default settings
and data will be lost.
Battery life is short
Adjust Power Properties especially if peripherals are used.
Adjust backlight of LCD or keypad.
Replace battery pack if old (battery can be recharged approximately 500 cycles.)
“Low Backup Battery” message
Charge mobile computer for 8 hours
User’s Manual 80
Page 87

10. Appendix: Updating the OS via Micro SD Card
To upgrade or reinstall the PT-90 OS via Micro SD card, you need the P9XCE60R.bin,
P9XUtility.cab and P9X2DUtility.cab file (available from Argox Technical Support):
Note:
1. Micro SD must be FAT32 format.
2. The file name must be “P9XCE60R.bin”, “P9XUtility.cab” and “P9X2DUtility.
cab” – do not rename it.
Caution: Users files will be erased!
1. Co py file “P9XCE60R.bin”, “P9XUtility.cab” and “P9X2DUtility.cab ” from the PC
to the root directory of the Micro SD card.
2. Insert the Micro SD Card into the PT-90.
3. Plug the power adapter into the PT-90.
4. Cold boot and press hot key function to update (FN+Dot.)
5. Press ENT to start upgrading.
6. Upgrading will cost 5~10 minutes.
After the image successfully update, the PT-90 automatically cold-starts with the new OS.
User’s Manual 81
 Loading...