

Page 1
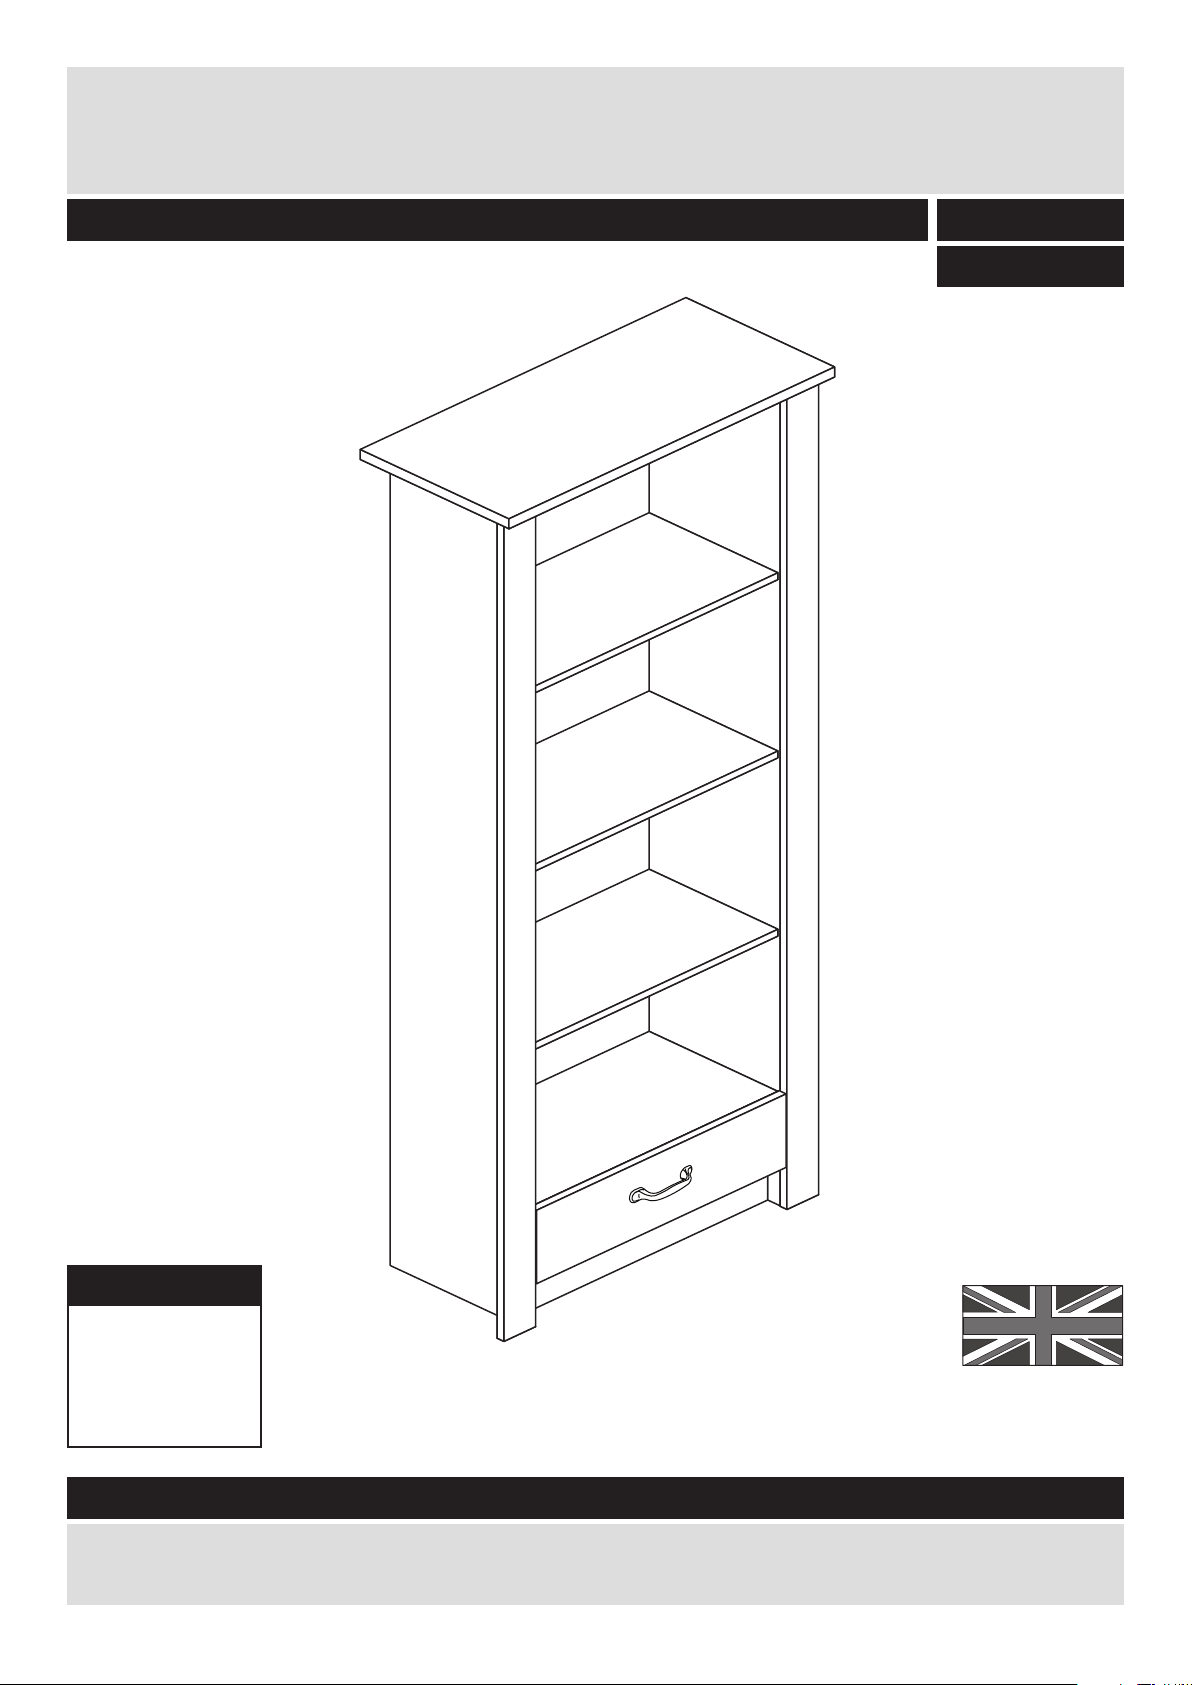
MADE IN
BRITAIN
Dimensions
Width - 72cm
Depth - 33cm
Height - 183cm
Ohio - Bookcase
Assembly Instructions - Please keep for future reference
If you need help or have damaged or missing parts, call the Customer Helpline: 03456 400800
Issue 2 - 28/04/15
Important - Please read these instructions fully before starting assembly
343/2235
413/9544
Page 2
Safety and Care Advice
Important - Please read these instructions fully before starting assembly
• Warning: This unit weighs
approximately 30kgs.
Please lift with care.
• Check you have all the
components and tools listed on
pages 2 and 3.
• Remove all fittings from the
plastic bags and separate them
into their groups.
• Keep children and animals
away from the work area, small
parts could choke if swallowed.
• Parts of the assembly will be
easier with 2 people.
• Make sure you have enough
space to layout the parts before
starting.
• Do not stand or put weight on
the product, this could cause
damage.
• Assemble the item as close to
its final position (in the same
room) as possible.
• Assemble on a soft level
surface to avoid damaging the
unit or your floor (use opened
out unit carton).
1
Care and maintenance
• Only clean using a damp cloth
and mild detergent, do no use
bleach or abrasive cleaners.
• From time to time check that
there are no loose screws on
this unit.
• This product should not be
discarded with household
waste. Take to your local
authority waste disposal centre.
Note: If required the next page
can be cut out and used as
reference throughout the
assembly. Keep this page with
these instructions for future
reference.
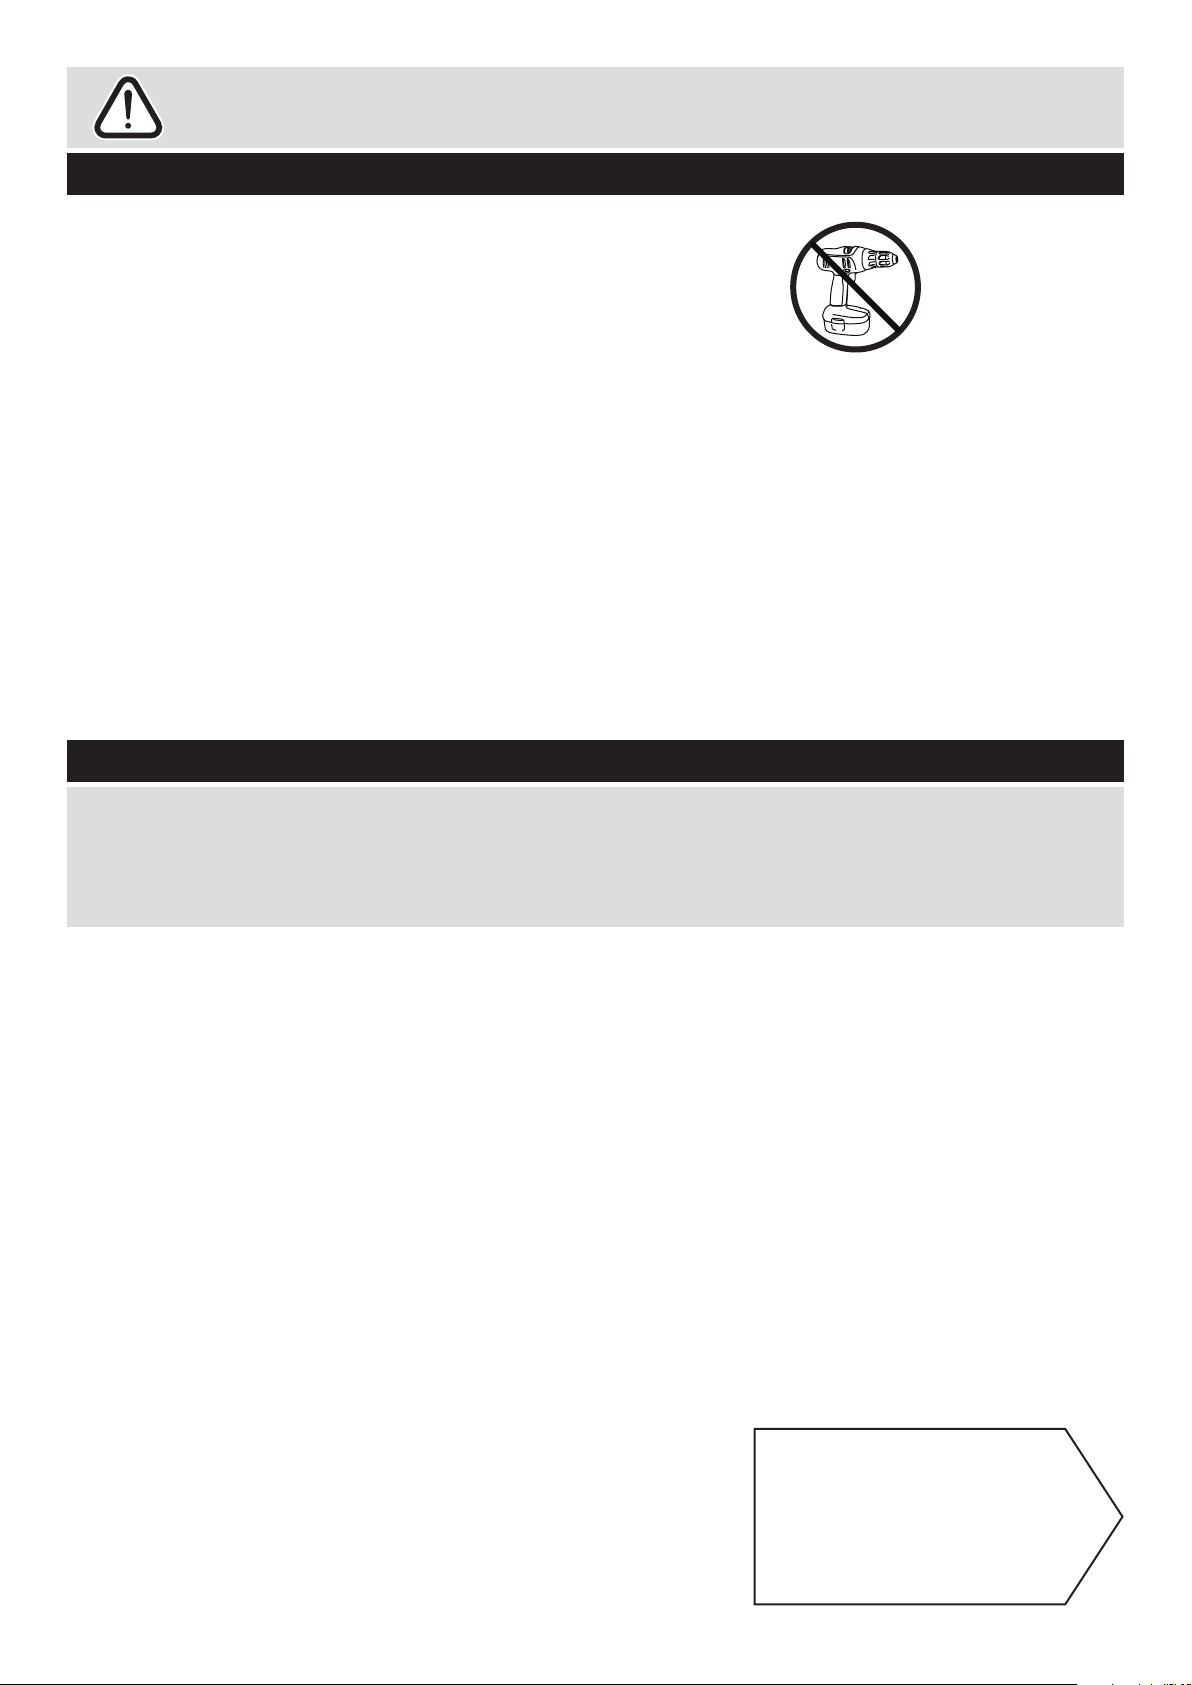
• We do not
recommend the
use of power
drill/drivers for
inserting screws,
as this could damage the unit.
Only use hand screwdrivers.
• Safety note: It is
recommended that this unit is
secured to a wall using the
bracket supplied.
• Dispose of all packaging
carefully and responsibly.
Page 3
Components - Panels
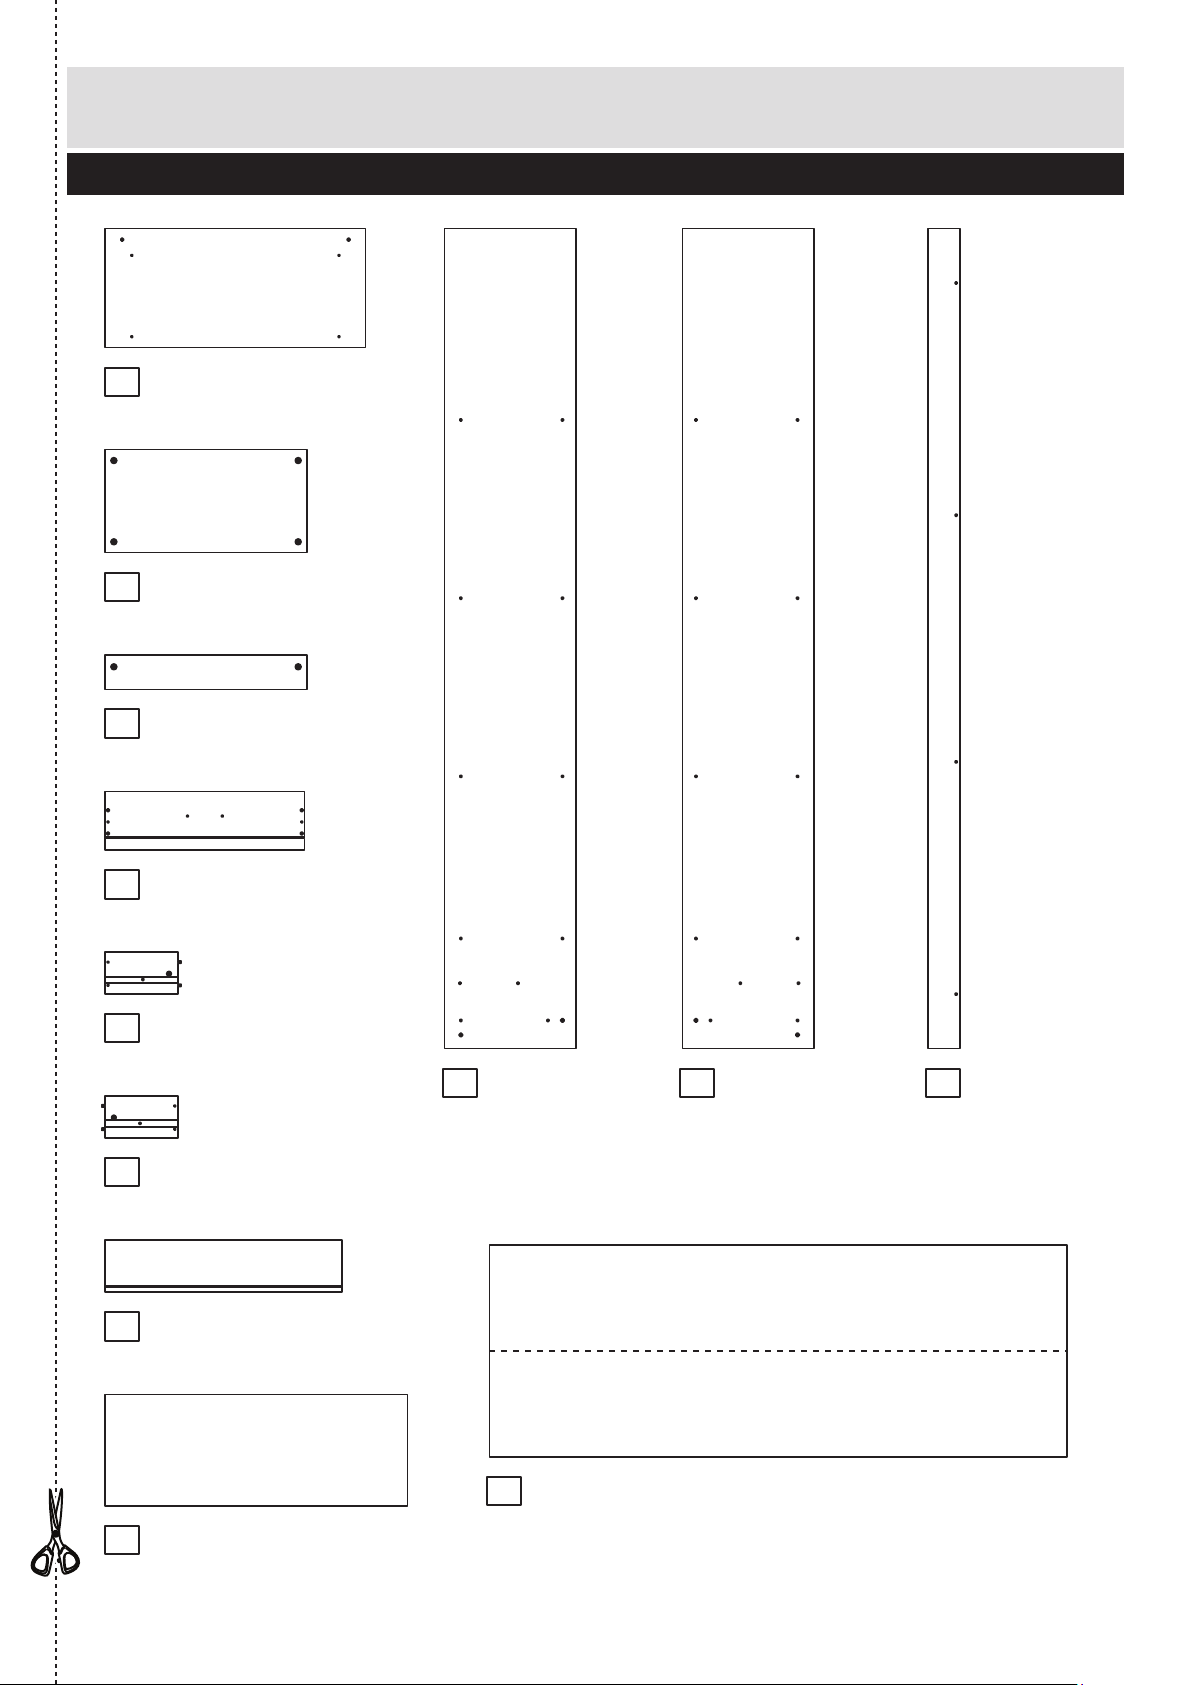
Please check you have all the panels listed below
2
1
9
If you have damaged or missing components, call the
Customer Helpline: 03456 400800 quoting the reference
numbers below
Top (D1792A)
(718 x 328mm)
Shelf (D1795A)
(556 x 284mm) x 4
Plinth (D1797A)
(556 x 95mm) x 2
Left Side (D1793A)
(1808 x 290mm)
2
12
10
Right Side (D1794A)
(1808 x 290mm)
11
8
Fascia (D1799A)
(1808 x 70mm) x 2
Drawer Front (D1798A)
(550 x 162mm)
Drawer Base (T564)
(533 x 197mm)
Back (X919)
(1592 x 584mm)
Drawer Back (W564)
(522 x 115mm)
Left Drawer Side (W454LH)
(200 x 115mm)
Right Drawer Side (W454RH)
(200 x 115mm)
3
4
5
6
7
Page 4
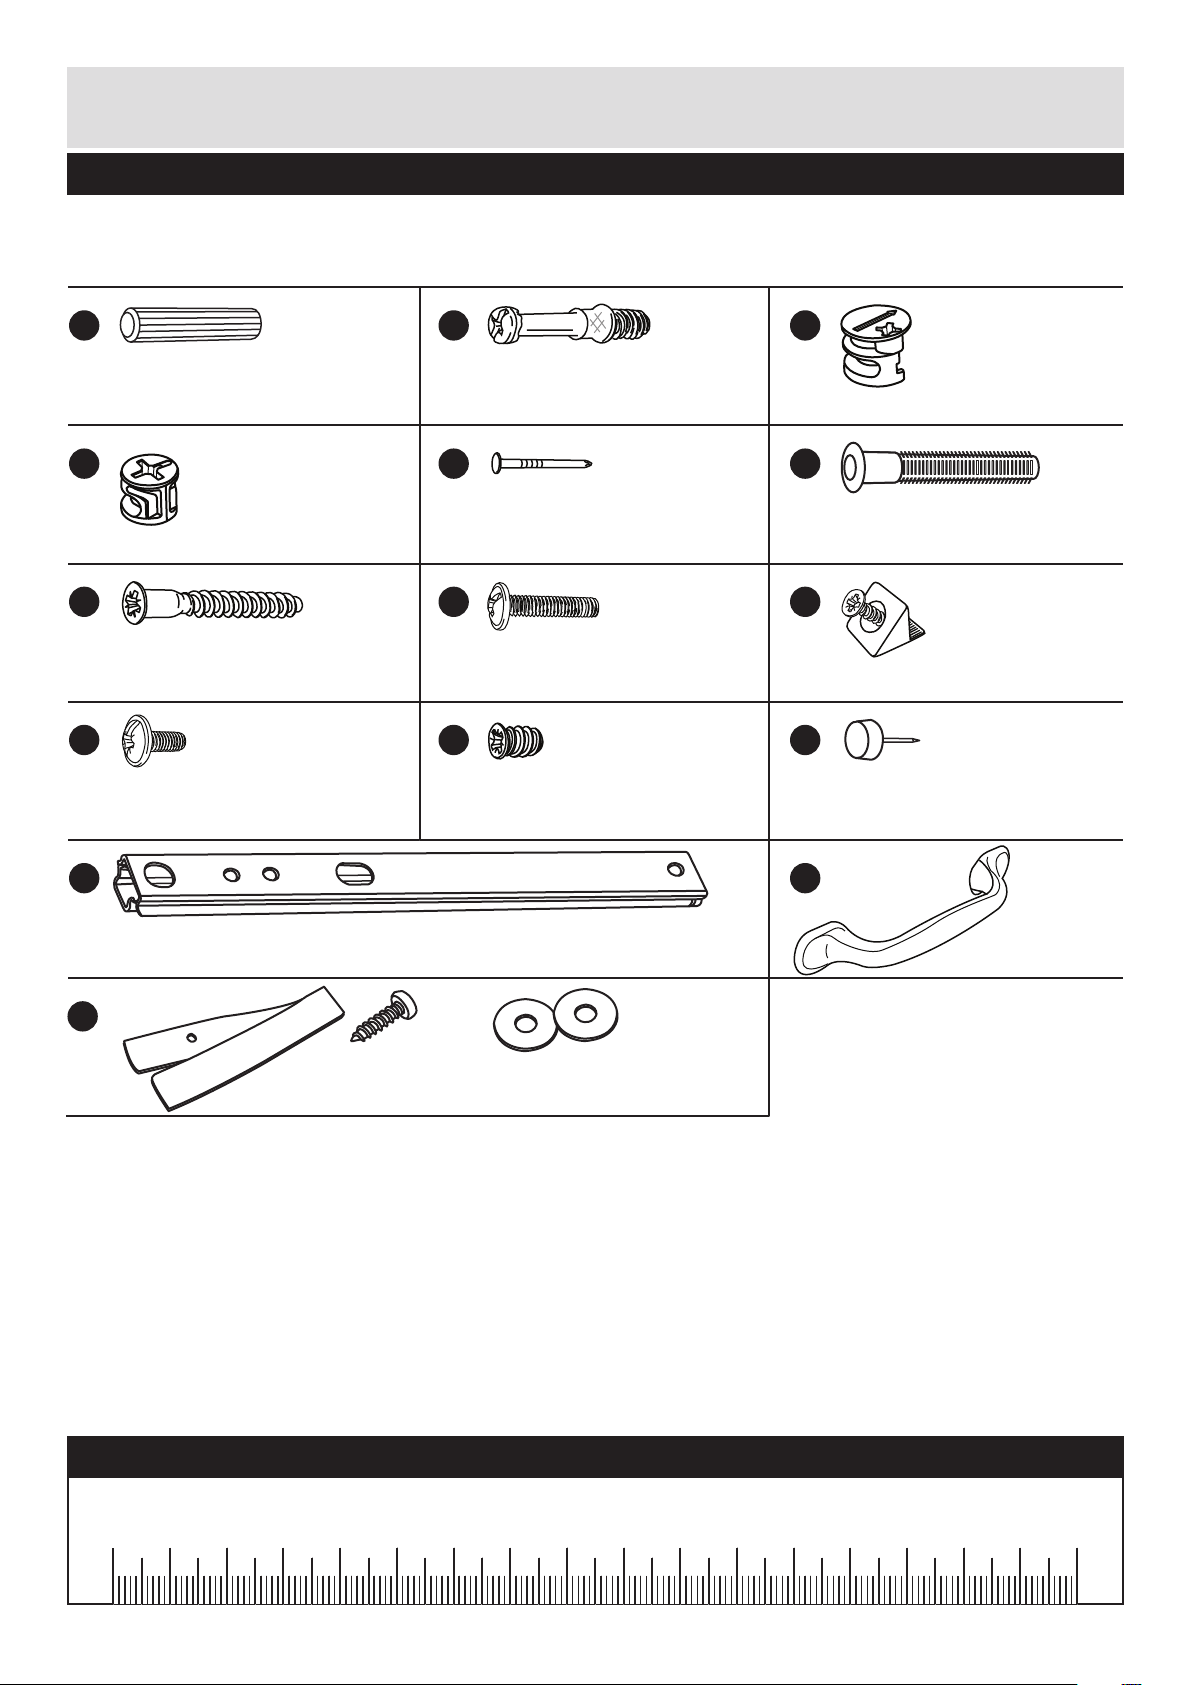
Please check you have all the fittings listed below
3
Components - Fittings
If you have damaged or missing components, call the
Customer Helpline: 03456 400800 quoting the reference
numbers below
Note: The quantities below are the correct amount to complete the assembly. In some cases
more fittings may be supplied than are required.
A
Wooden dowel (F22) x 6
B
Metal dowel (F901) x 30
C
D
Large locking
nut (F900) x 28
H
19mm Screw (F461) x 2
I
Small locking
nut (F3) x 2
Ruler - Use this ruler to help correctly identify the screws
mm 10 20 30 40 50 60 70 80 90 100 110 120 130 140 150 160 170
G
N
E
Nail (F51) x 30
M
Drawer runner (F307) x 2
J K
9mm Screw (F74) x 2
9mm Screw (F73) x 4
40mm Screw (F910) x 4
L
Handle (F287) x 1
F
Knock-in Peg (F171GY) x 4
O
Strap Screw Washer x 2
Overbalance protector kit (F269) x 1
Plastic Nail (F91) x 4
Wedgefix (F639) x 2
Page 5
Assembly Instructions
4
If you have damaged or missing components, call the
Customer Helpline: 03456 400800 quoting the reference
numbers below
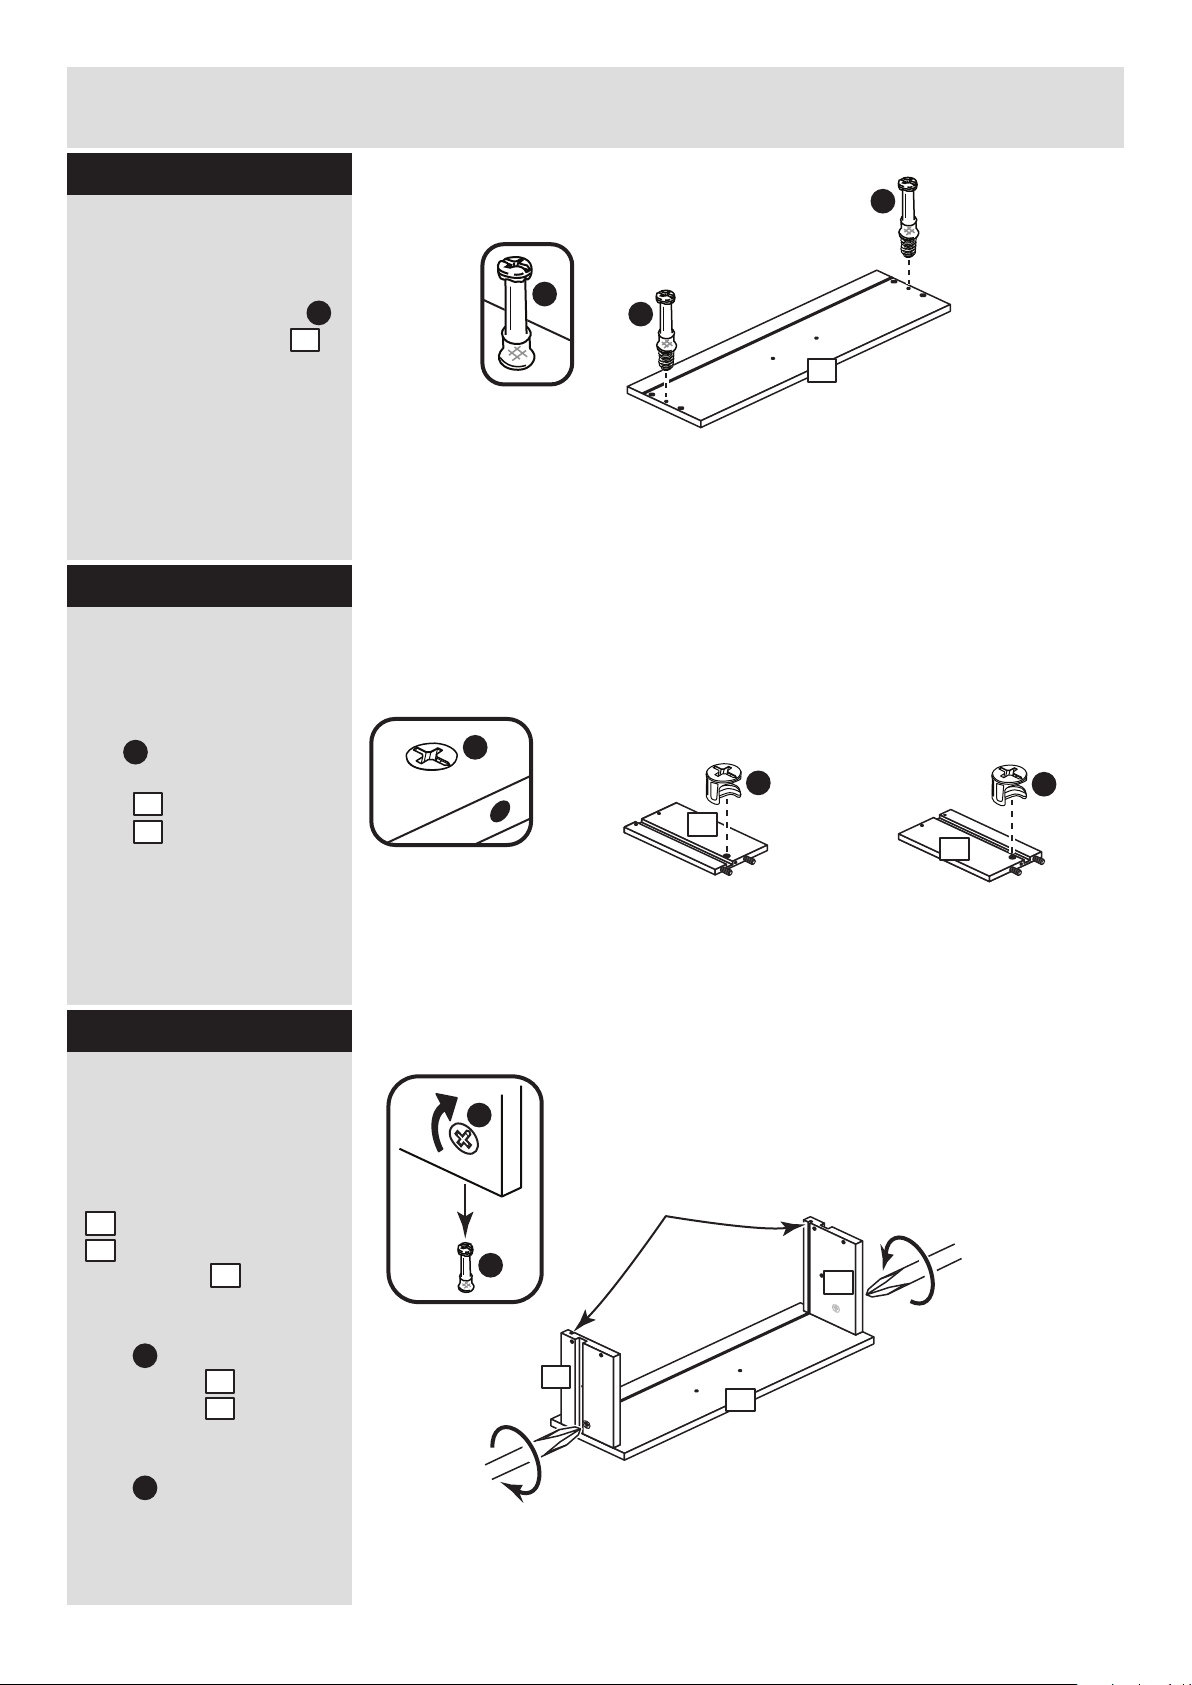
Step 1
B
Step 2
Prepare the drawer
front
Screw 2 metal dowels
into the drawer front .
Note: Tighten the metal
dowels up fully against
the panels.
B
4
Prepare the drawer
sides
Insert a small locking
nut into the hole
shown on the left drawer
side and right drawer
side .
Note: Arrow on locking
nut must point towards
hole in edge of panel.
Step 3
D
5
6
Attach the drawer
sides to the drawer
front
Push the left drawer side
. and right drawer side
. onto the back of the
drawer front .
Turn the small locking
nuts on the left
drawer side and right
drawer side .
Note: Turn the locking
nuts clockwise to
secure panels - more
than 1/2 a turn.
5
6
4
D
D
5
6
D
B
B
D
D
5
6
B
B
D
4
5
6
Small groove
4
Page 6
Assembly Instructions
5
Step 4
F
F
4
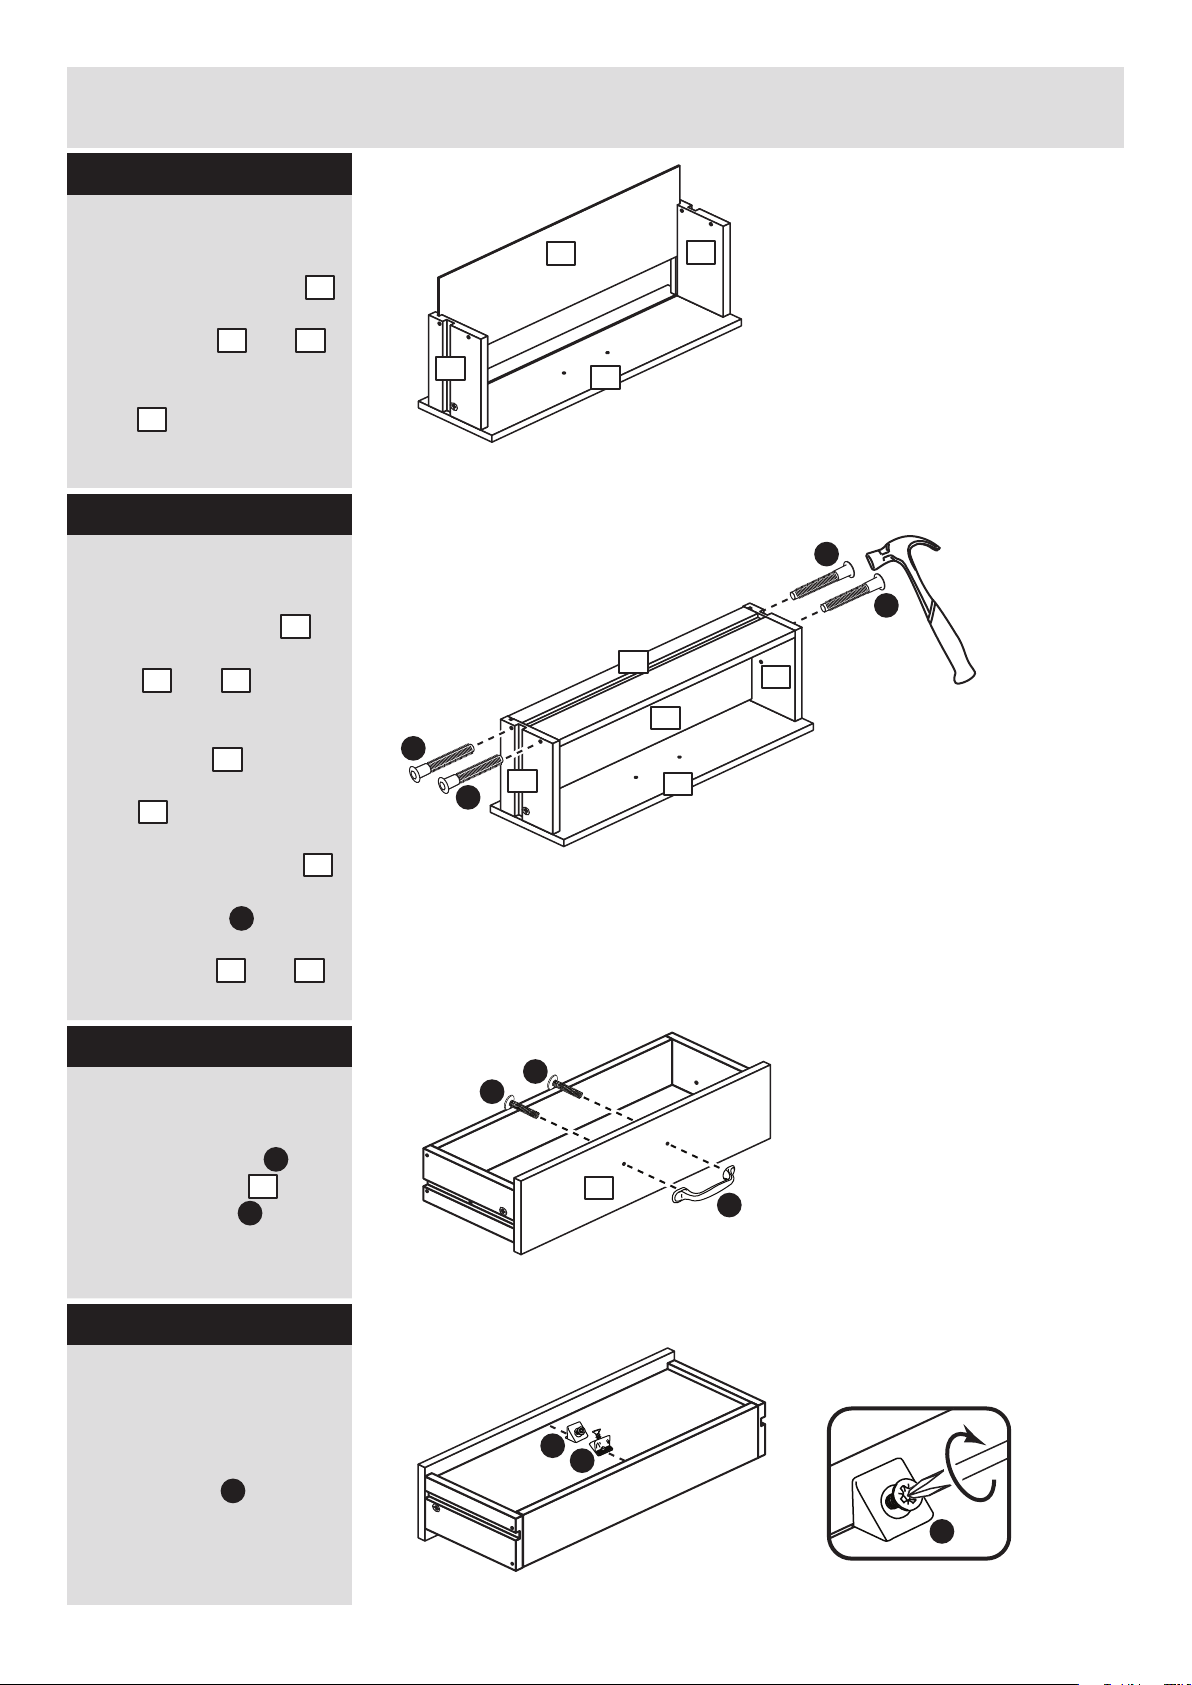
Attach the handle
Attach the handle to
the drawer front
using 2 screws .
N
H
Step 6
4
Fit the drawer base
Slide the drawer base
down the grooves in the
drawer sides and
and down into the
groove in the drawer
front .
Step 5
Fit the drawer back
Fit the drawer back
between the drawer
sides and .
Make sure that the
drawer base fits into
the groove in the drawer
back .
Hold the drawer back
in position and tap the
knock-in pegs
through the holes in the
drawer sides and .
8
5 6
4
7
5 6
8
7
7
F
5 6
6
4
5
6
F
F
8
7
5
8
H
H
4
N
I
Step 7
Fit the wedgefixes
Turn the drawer
assembly over and slide
2 wedgefixes into the
front and back grooves,
as shown, and tighten up
the screws.
I
I
I
Page 7
Assembly Instructions
6
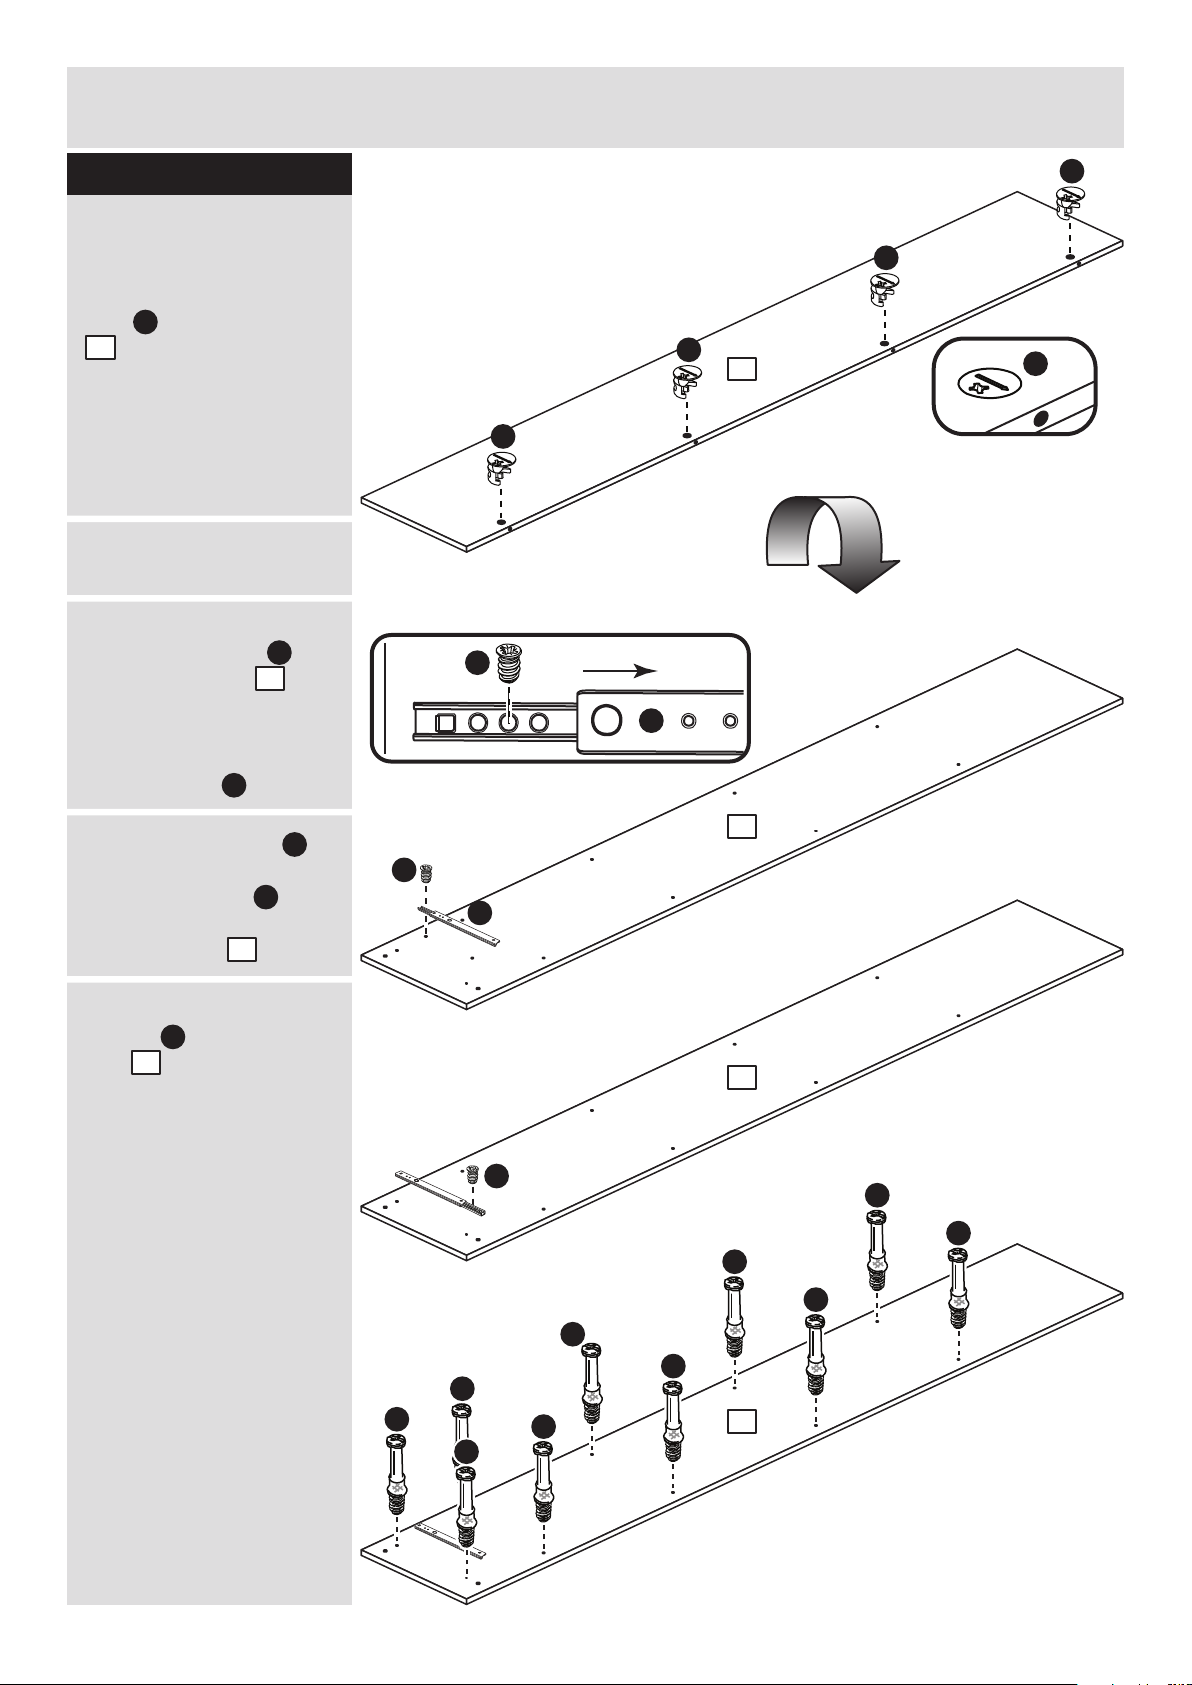
Step 8
Prepare the left side
a: Insert 4 large locking
nuts into the left side
. .
Note: The arrow on the
locking nuts must point
towards the holes in the
edge of the panel.
Turn the left side over
b: Place a runner
onto the left side .
Slide back the top of
runner and use the 2nd
hole from the front to fit
the 1st screw .
c: Slide the runner
back the other way and
fit the 2nd screw into
the corresponding hole
in the left side .
d: Screw 10 metal
dowels into the left
side .
K
M
M
9
K
M
K
K
M
B
9
9
K
B
B
B
B
B
B
B
B
B
B
C
9
9
9
9
b:
a:
c:
d:
C
9
Turn the left
side over
C
C
C
C
Page 8
Assembly Instructions
7
Step 9
a:
b:
c:
K
M
K
K
B
B
B
B
B
B
B
B
B
B
10
10
10
C
C
C
10
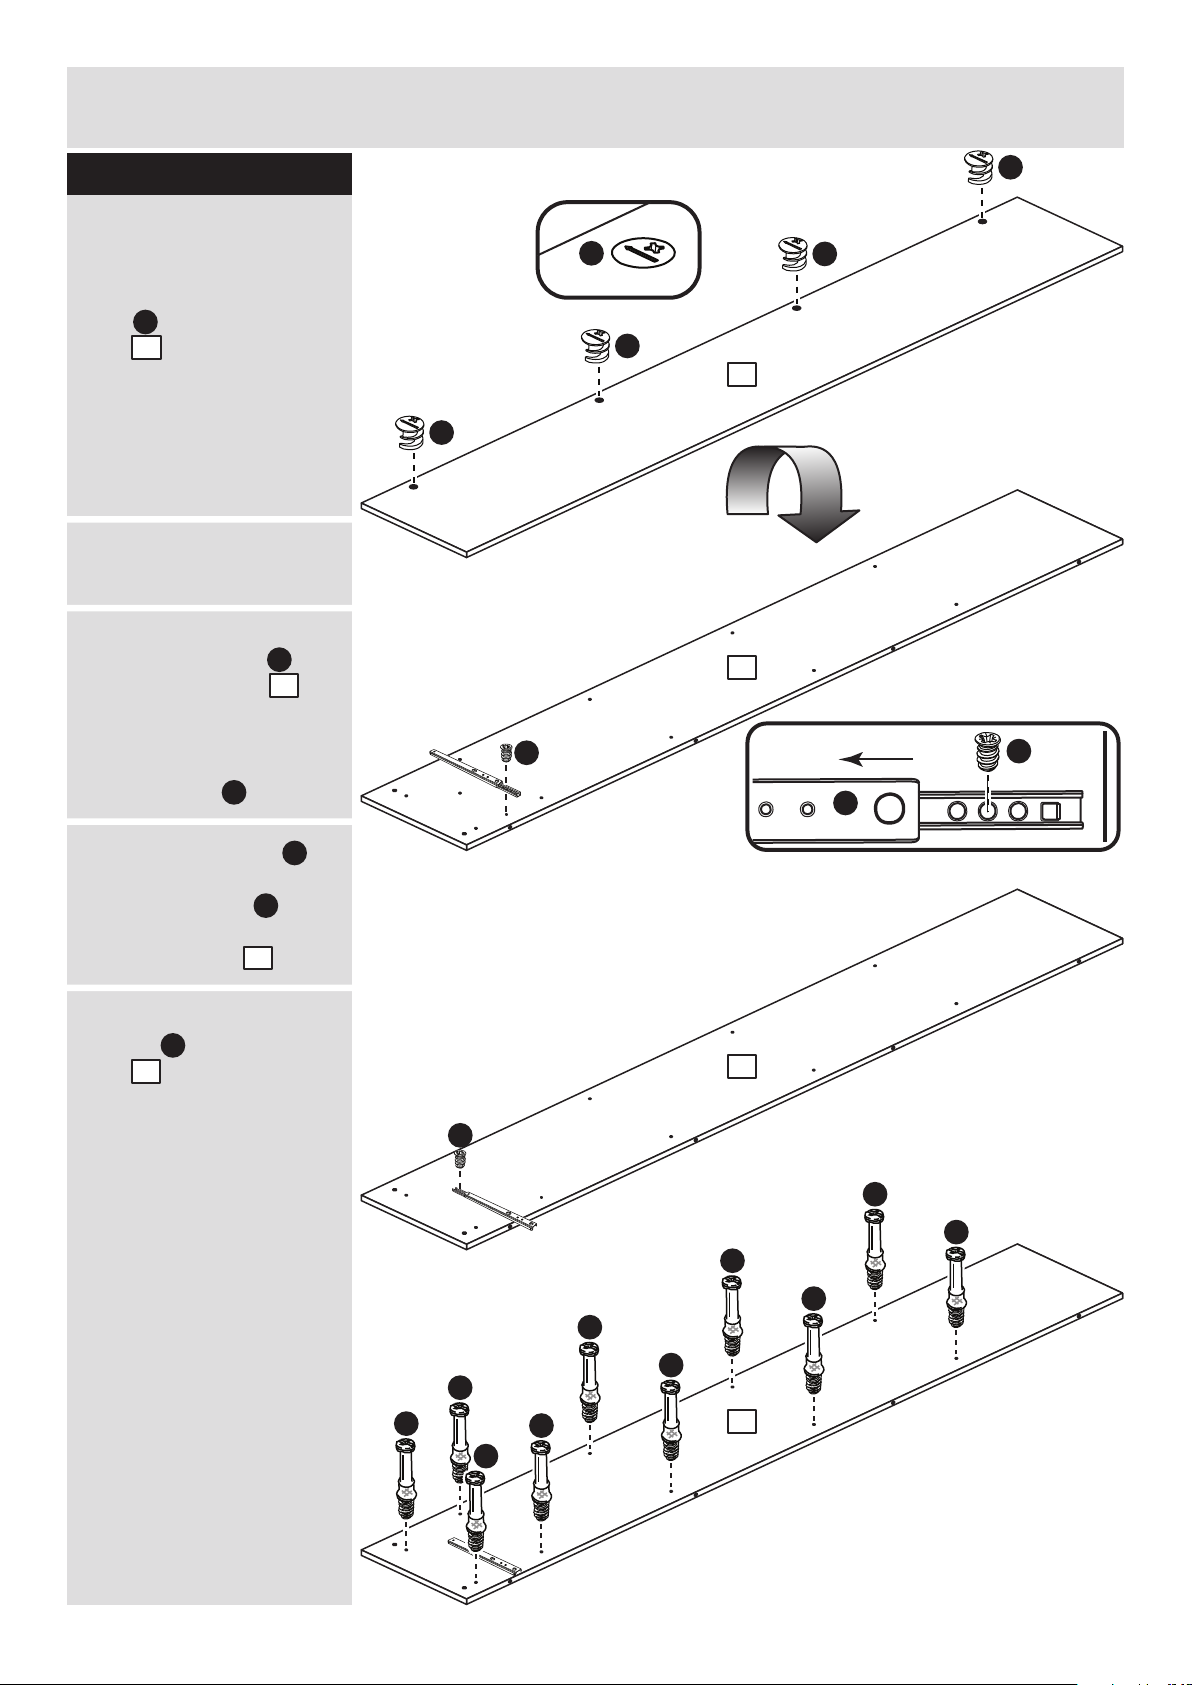
Prepare the right side
a: Insert 4 large locking
nuts into the right
side .
Note: The arrow on the
locking nuts must point
towards the holes in the
edge of the panel.
Turn the right side over
b: Place a runner
onto the right side .
Slide back the top of
runner and use the 2nd
hole from the front to fit
the 1st screw .
c: Slide the runner
back the other way and
fit the 2nd screw into
the corresponding hole
in the right side .
d: Screw 10 metal
dowels into the right
side .
M
10
K
M
K
B
10
10
C
10
Turn the right
side over
C
C
Page 9
A
Assembly Instructions
8
Step 10
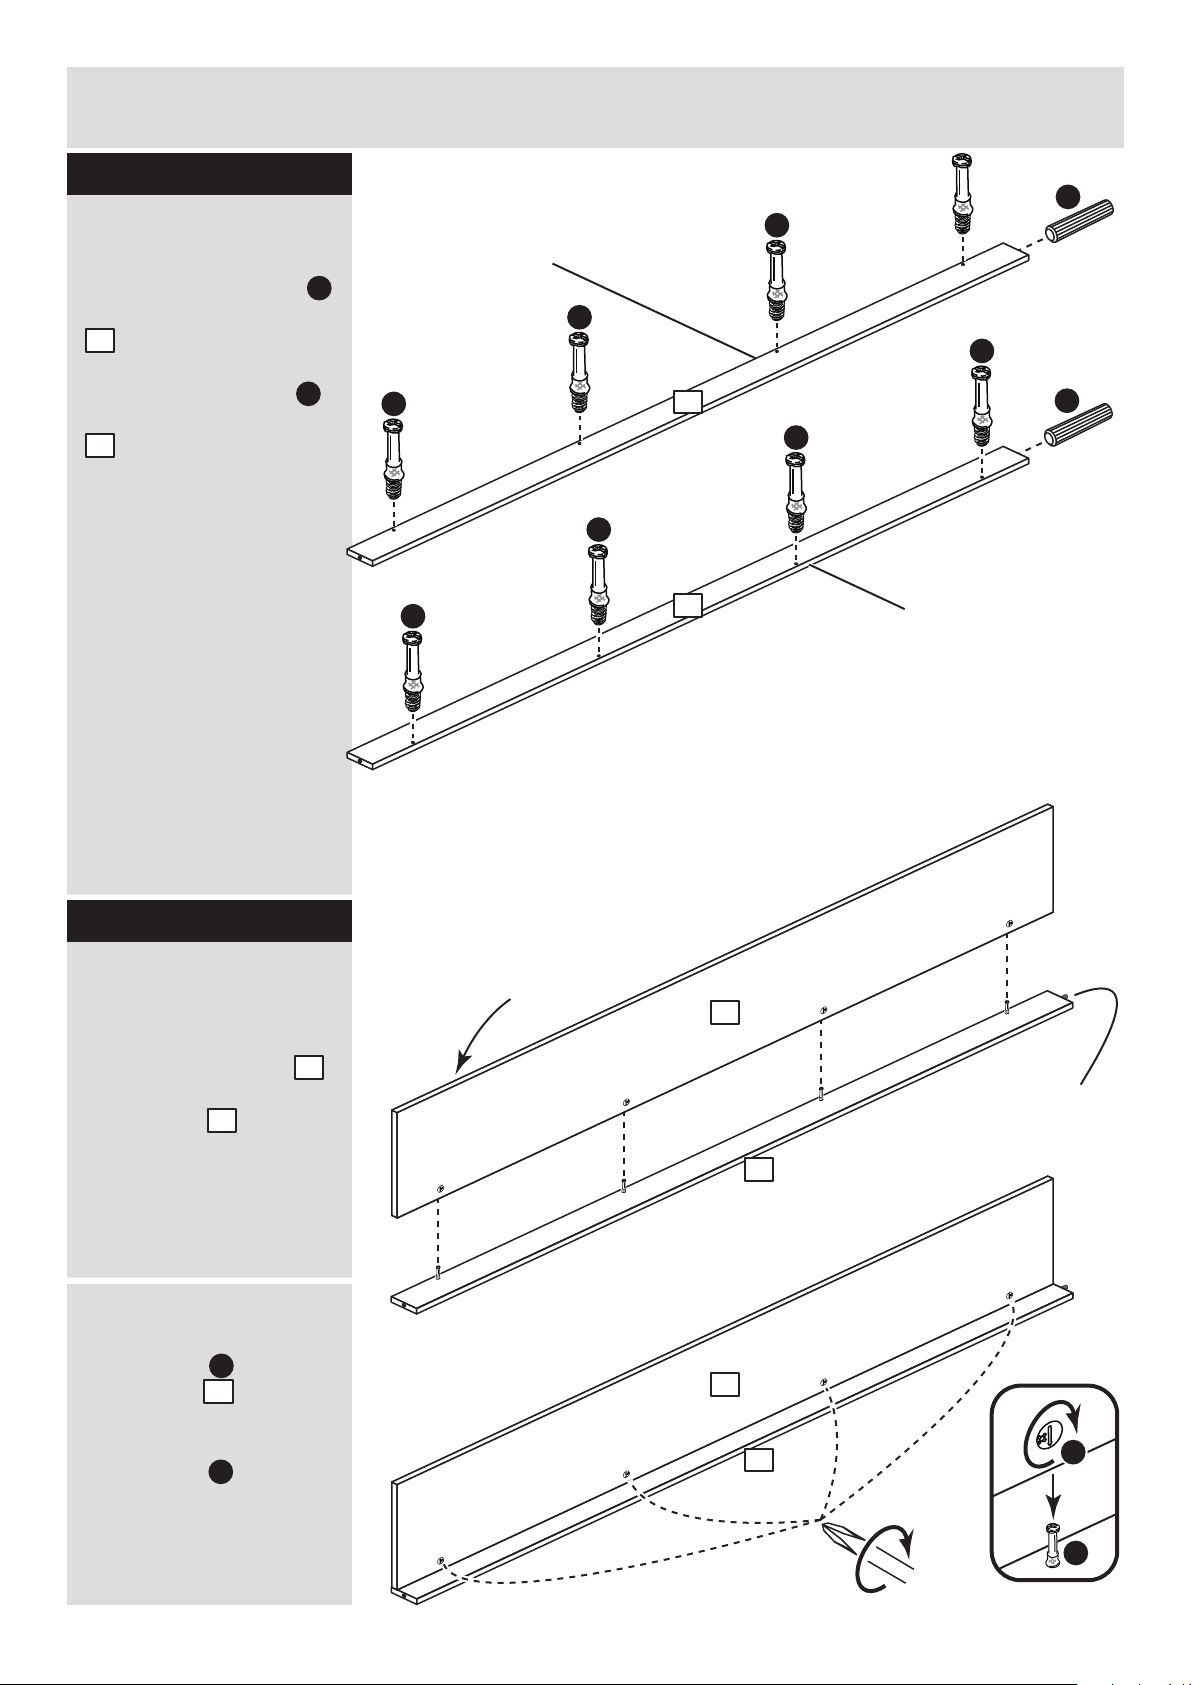
Prepare the 2 fascias
Screw 4 metal dowels
into each of the 2 fascias
. .
Tap a wooden dowel
into each of the 2 fascias
. .
Note: Wooden dowels
must not stick out from
the edge by more than
10mm or they may
damage other panels.
B
11
11
B
B
B
B
A
B
B
B
Left side fascia holes nearest this side.
Right side fascia holes nearest this side.
The runner is
at this end.
Join the left side to
the left side fascia
a: Push the left side
down onto the left side
fascia panel .
b: Use a screwdriver to
tighten the 4 large
locking nuts fitted to
the left side .
Note: Turn the large
locking nuts as far as
they will go - more than
1/2 a turn.
9
11
C
9
C
11
11
Step 11
a:
b:
A
10
10
Dowel
this end
11
11
9
9
B
C
Page 10
Assembly Instructions
9
Step 12
Step 13
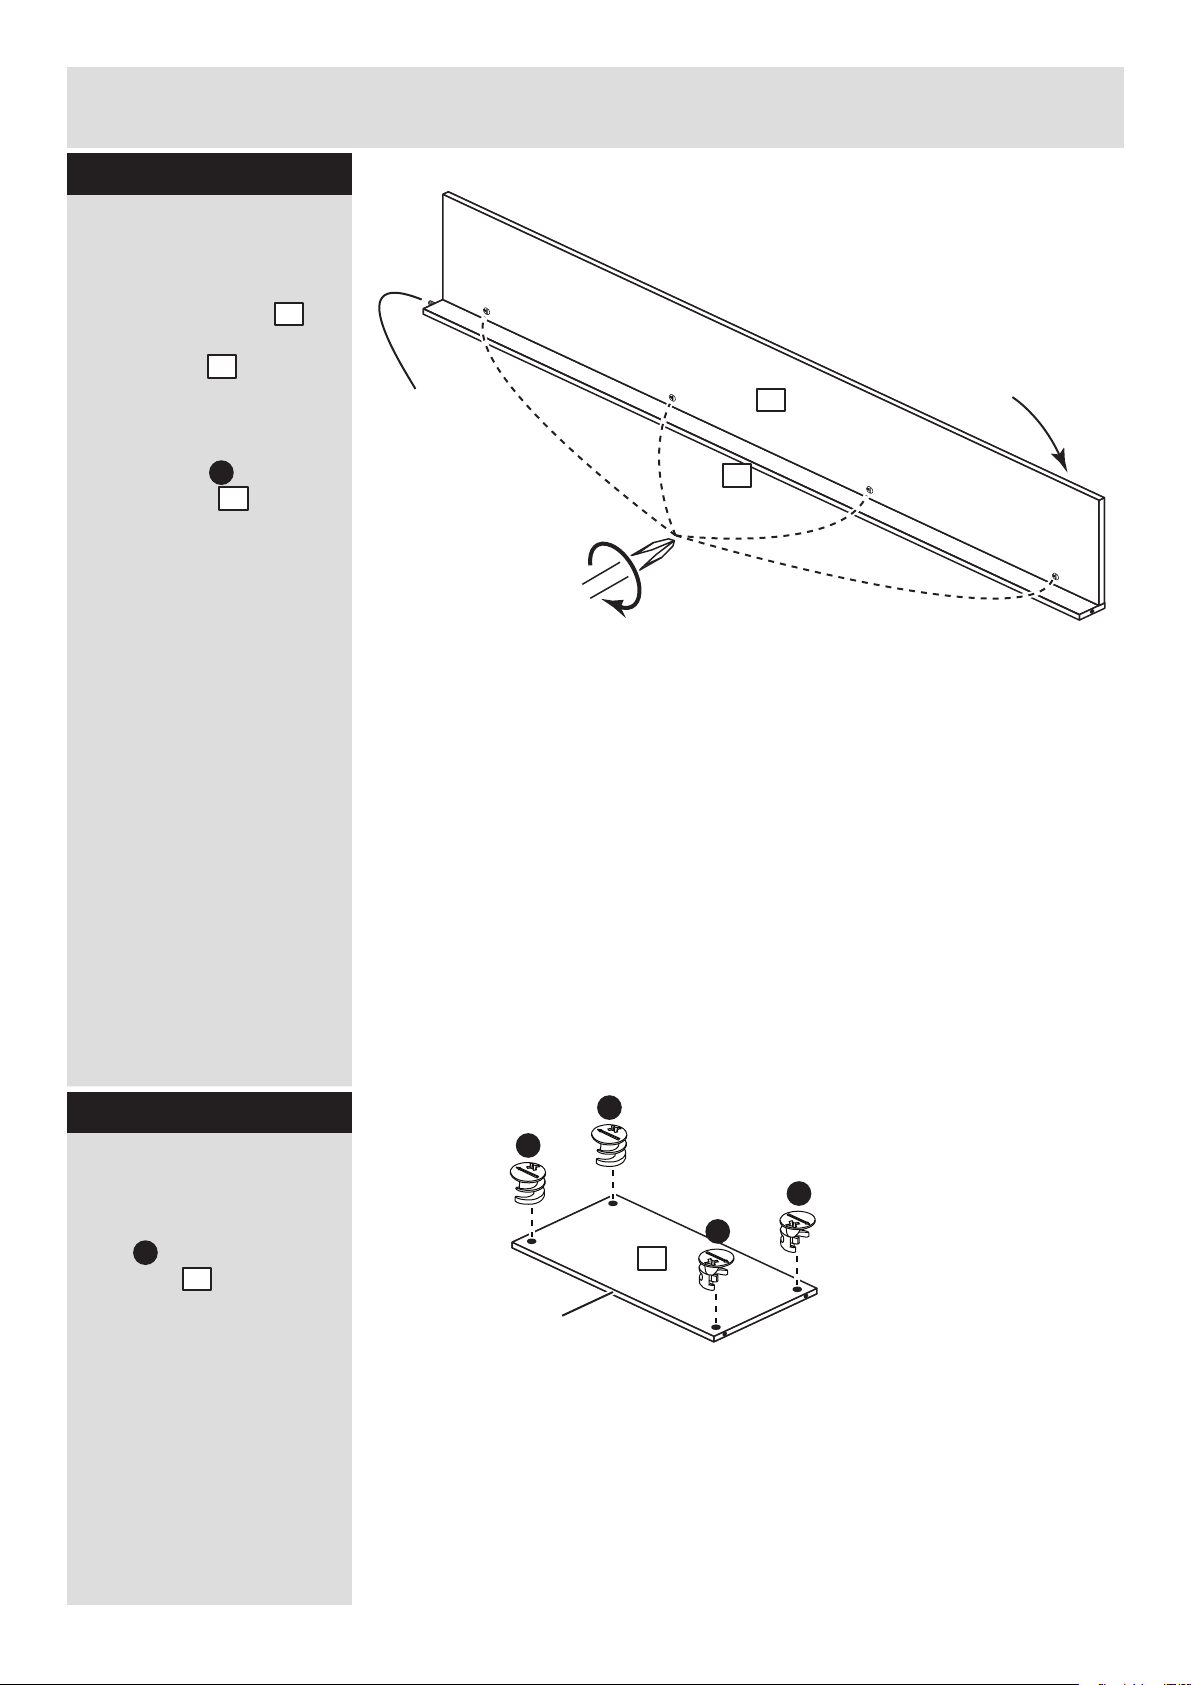
Prepare the 4 shelves
Insert 4 large locking
nuts into each of the
4 shelves .
C
2
C
C
C
C
Finished
front edge
x 4
2
Join the right side to
the right side fascia
Push the right side
down onto the right side
fascia panel .
Use a screwdriver to
tighten the 4 large
locking nuts fitted to
the right side .
10
11
C
10
The runner is
at this end.
10
Dowel
this end
11
10
Page 11
Assembly Instructions
10
Step 14
Step 16
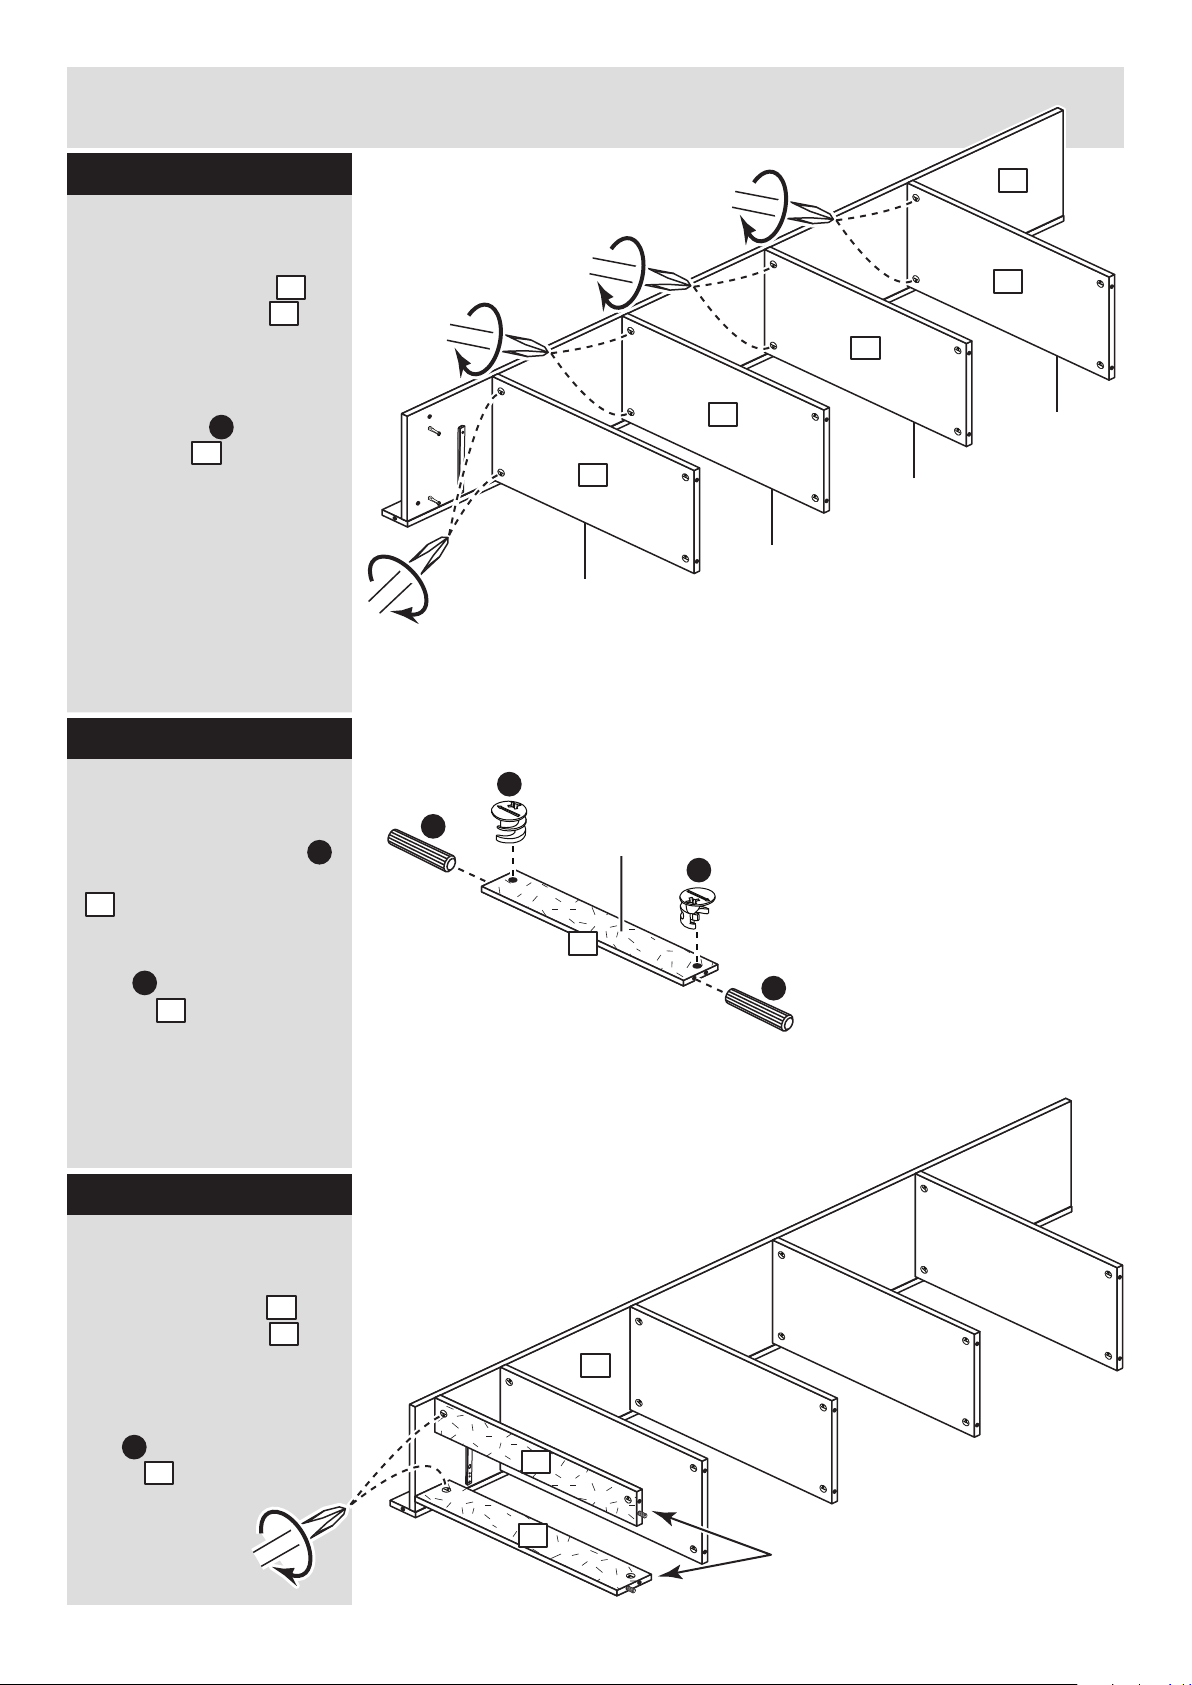
Fit the plinths
Push the 2 plinths
onto the right side .
Use a screwdriver to
tighten the large locking
nut fitted to each
plinth .
Step 15
C
3
10
3
3
10
3
A
C
C
A
Prepare the plinths
Tap 2 wooden dowels
into each of the plinths
. .
Insert 2 large locking
nuts into each of the
plinths .
3
3
A
C
Plain chipboard
surface
3
x 2
Finished
front edge
Finished
front edge
Finished
front edge
Fit the shelves
Push the 4 shelves
onto the right side .
Use a screwdriver to
tighten the 2 large
locking nuts fitted to
each shelf .
C
2
10
2
10
2
2
2
2
Finished
front edge
Note: Support the plinths
until the left side has been
fitted in the next step.
Page 12
G
G
G
G
Assembly Instructions
11
Step 17
Step 18
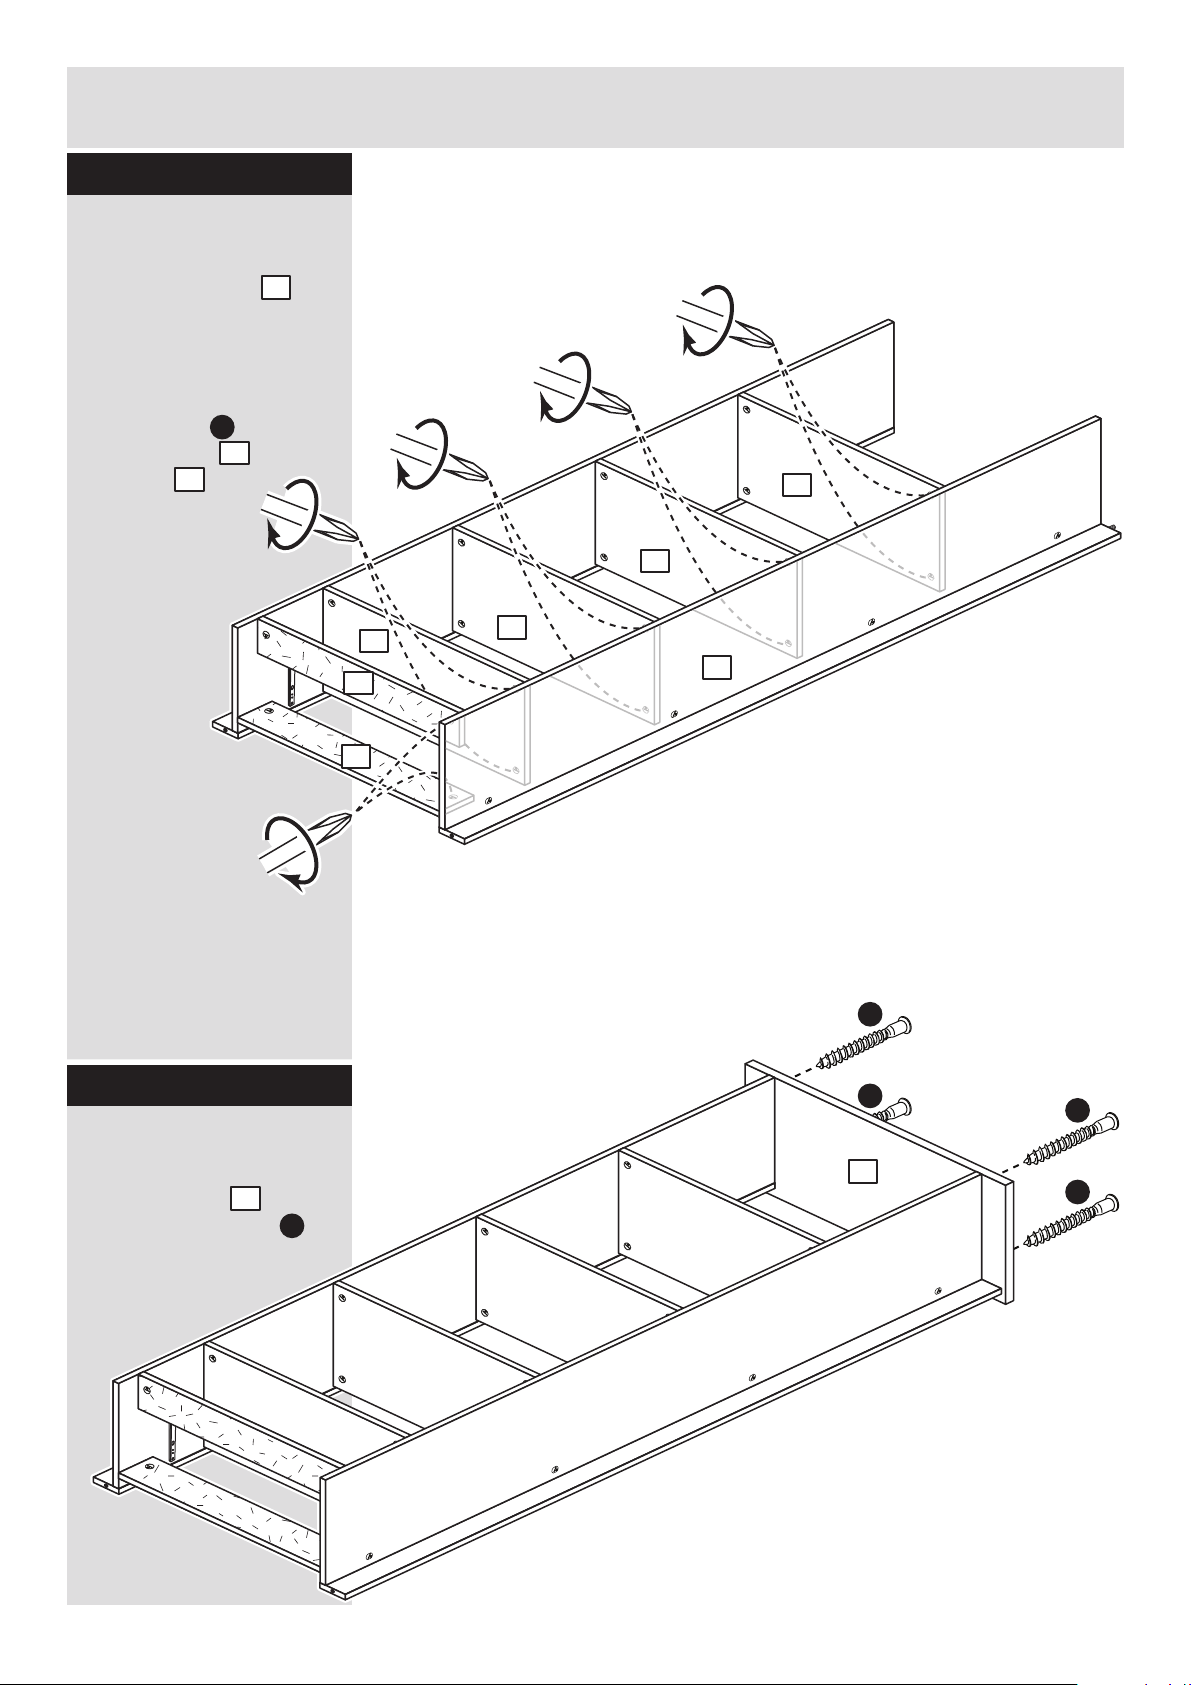
Fit the left side
Push the left side
onto the assembly.
Use a screwdriver to
tighten the 10 large
locking nuts fitted to
the 4 shelves and the
2 plinths .
C
9
2
3
3
3
2
2
2
2
9
Fit the top
Attach the top to the
unit using 4 screws .
1
G
1
Page 13
y
Assembly Instructions
12
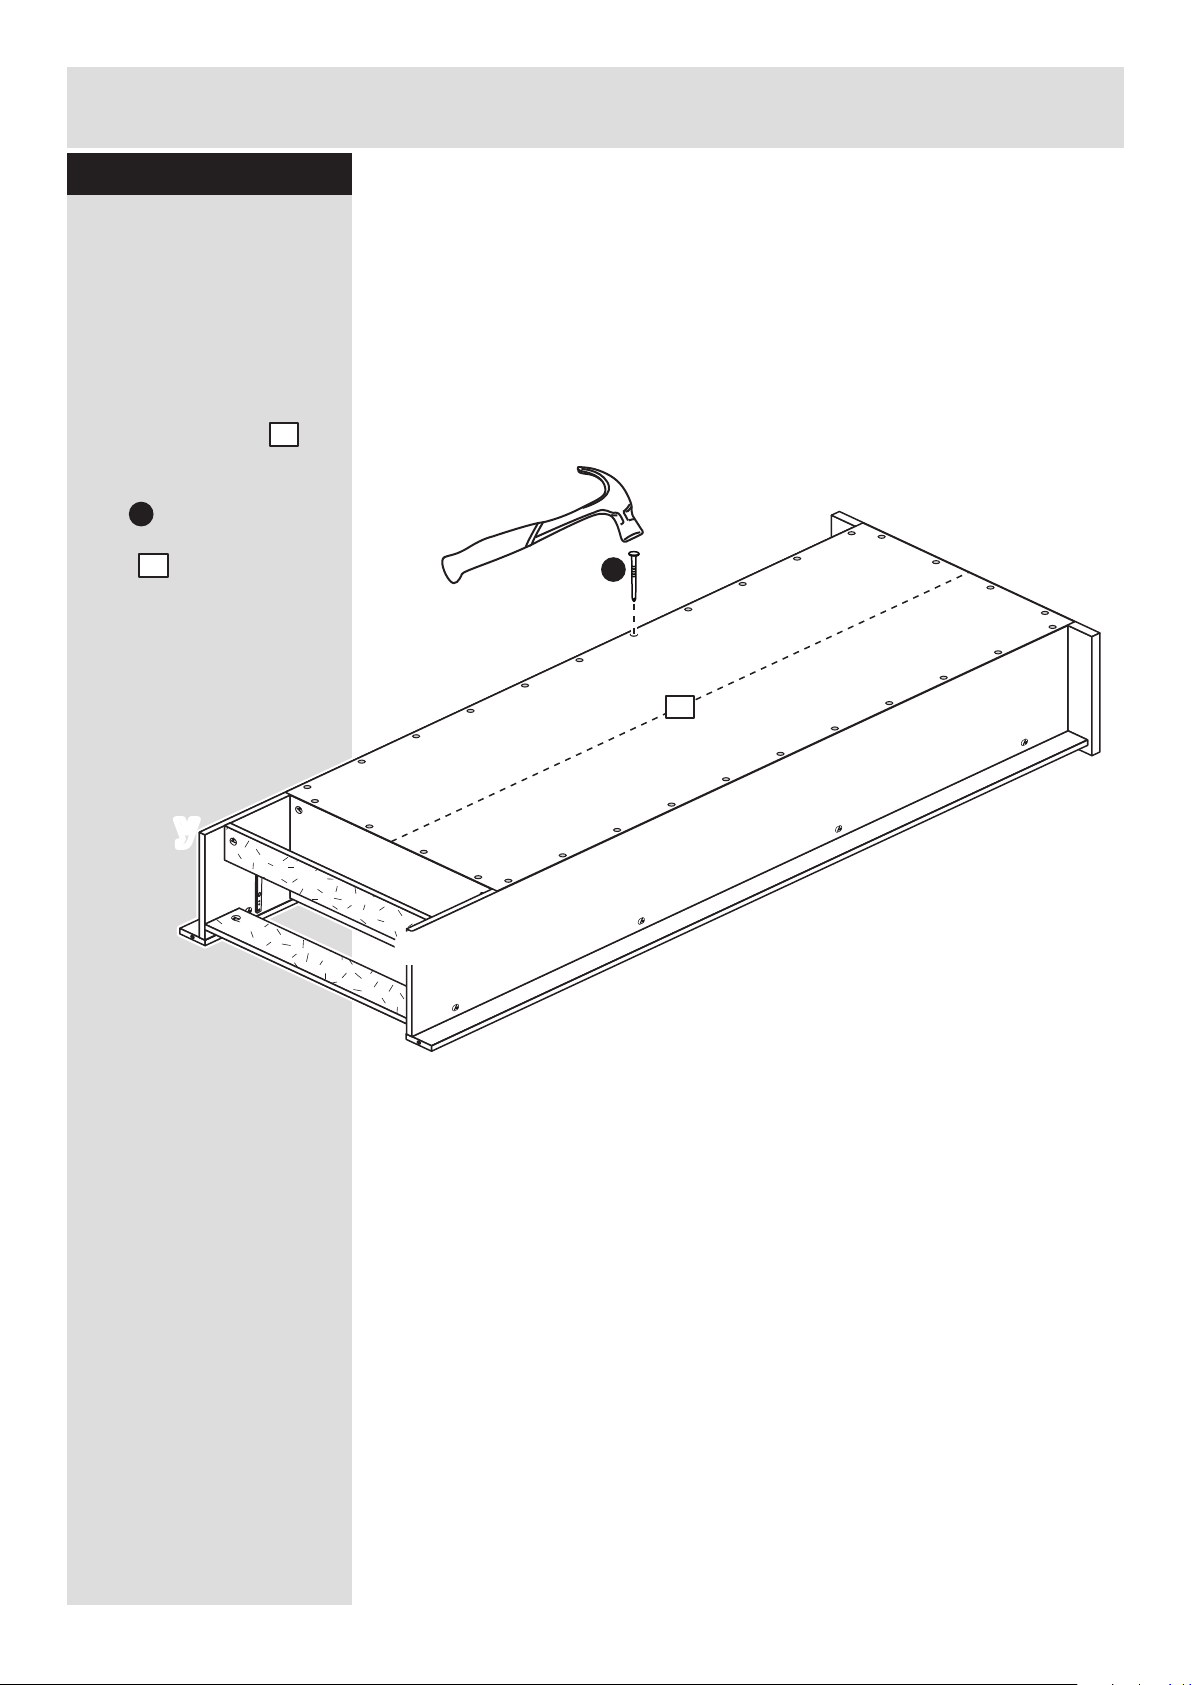
Step 19
Fit the back
a: Square up the unit by
making sure that
measurement x to x
equals y to y.
b: Place the back
onto the unit.
Nail around the
outside edges of the
back .
Note: Nails should
be spaced about 150mm
apart.
12
E
The measurement from top corner X to bottom corner X must be
equal to the measurement from top corner Y to bottom corner Y
a:
12
y
y
x
x
b:
E
12
Page 14
Assembly Instructions
13
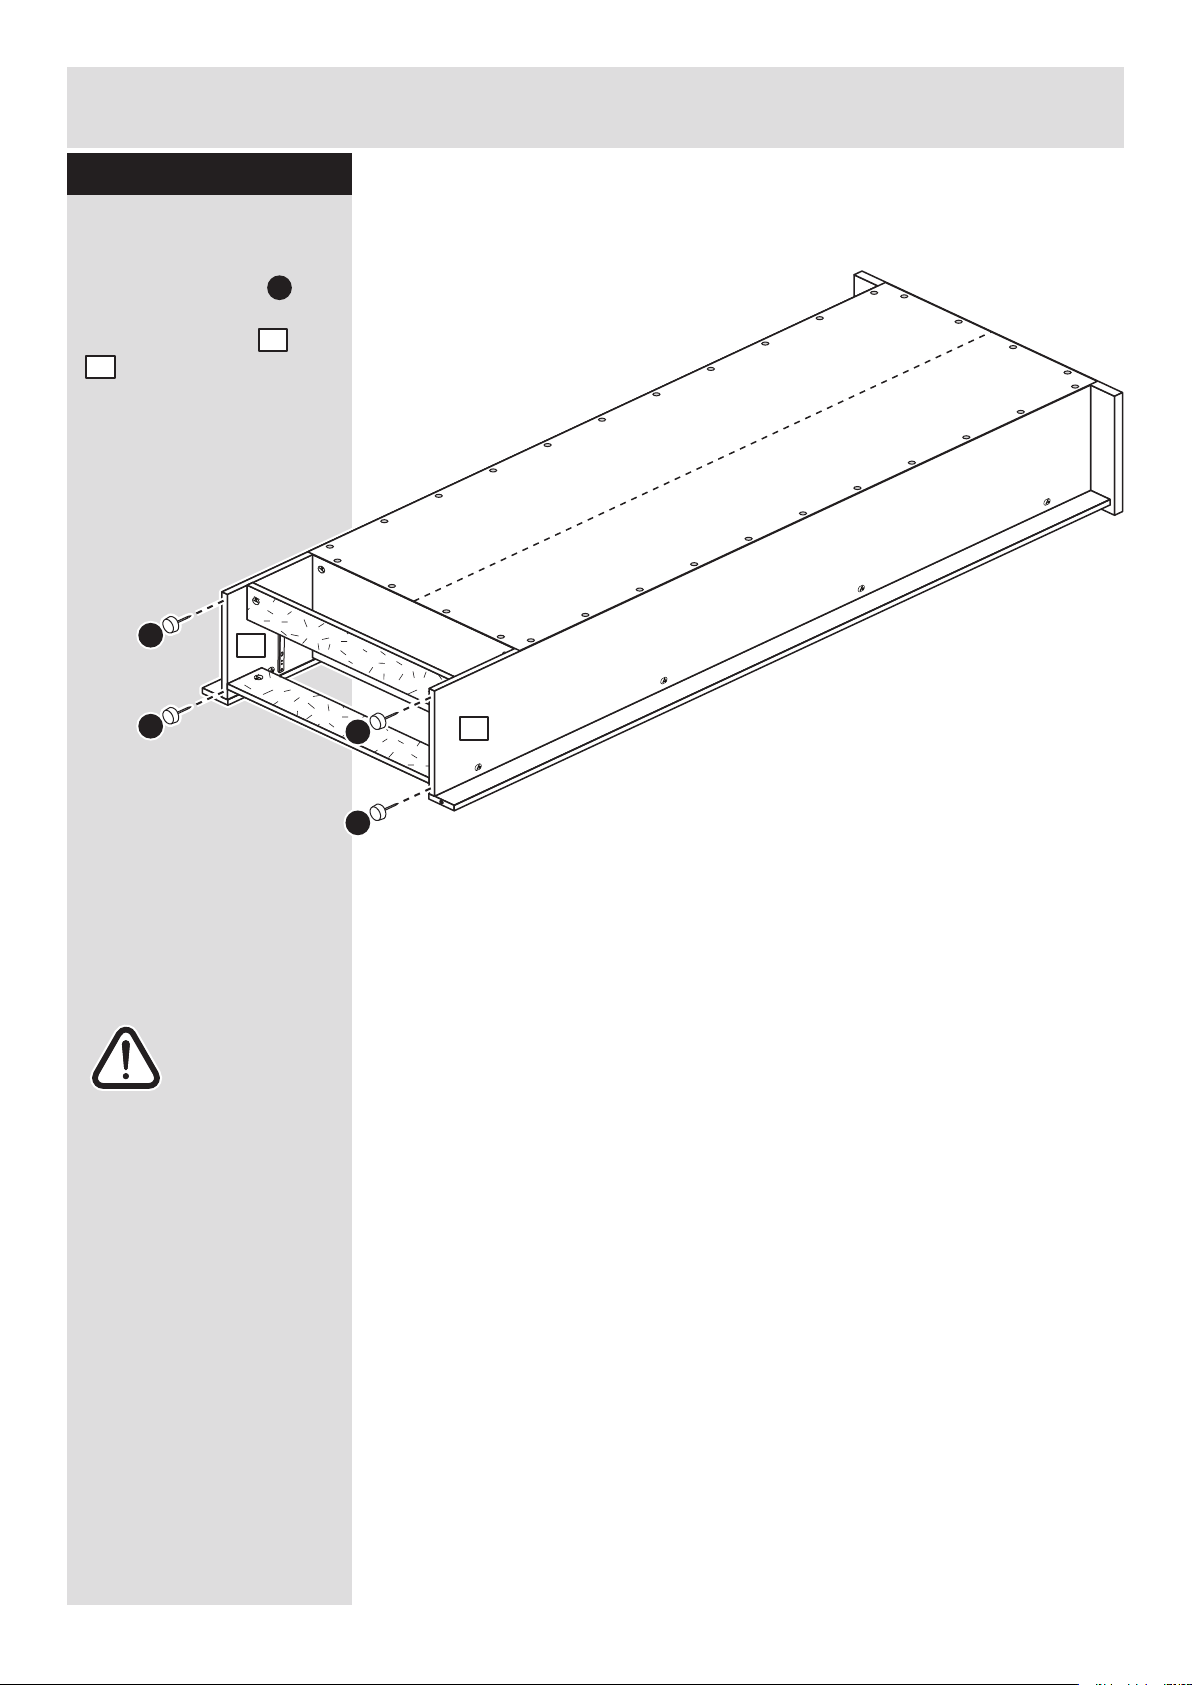
Step 20
Warning: The
unit is heavy.
Lift with care.
Fit the 4 plastic nails
Tap 2 plastic nails
into the bottom edge of
each of the sides and
. .
Stand the unit up for
the next step.
L
9
10
L
L
L
L
9
10
Page 15
Assembly Instructions
14
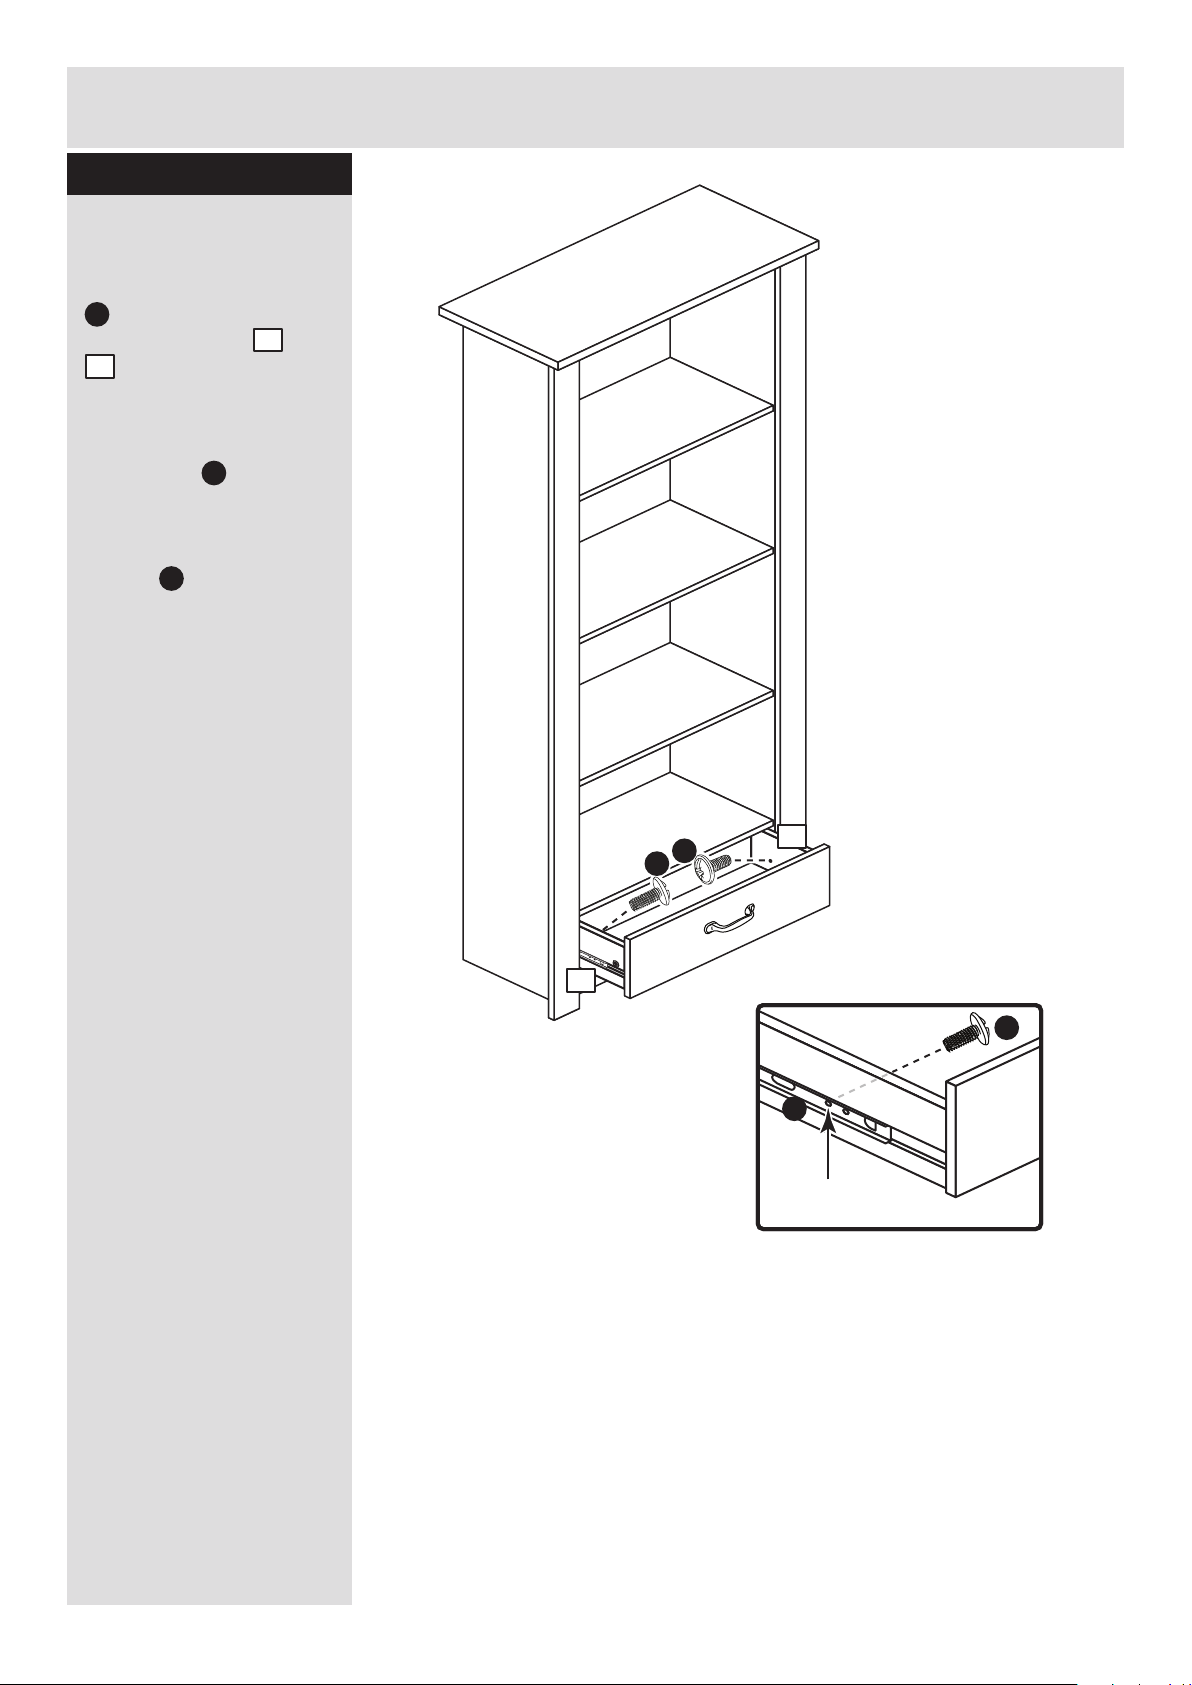
Step 21
2nd threaded
hole
M
J
Fit the drawer
Slide both of the runners
. forward and locate
the drawer sides and
. between them, lining
up the holes in the
drawer wrap with the
2nd 'threaded' holes in
the runners .
Working from the inside
of the drawer, insert 2
screws through the
drawer sides and out into
the hole in the runner.
Note: Do not overtighten
the screws.
If they catch on the
runner you may need to
loosen them slightly.
M
J
5
6
M
J
J
5
6
Page 16
Assembly Instructions
15
If you need help or have damaged or missing parts, call the Customer Helpline: 03456 400800
and quote the reference numbers on the component pages.
Argos Ltd, 489-499 Avebury Boulevard, Central Milton Keynes, MK9 2NW
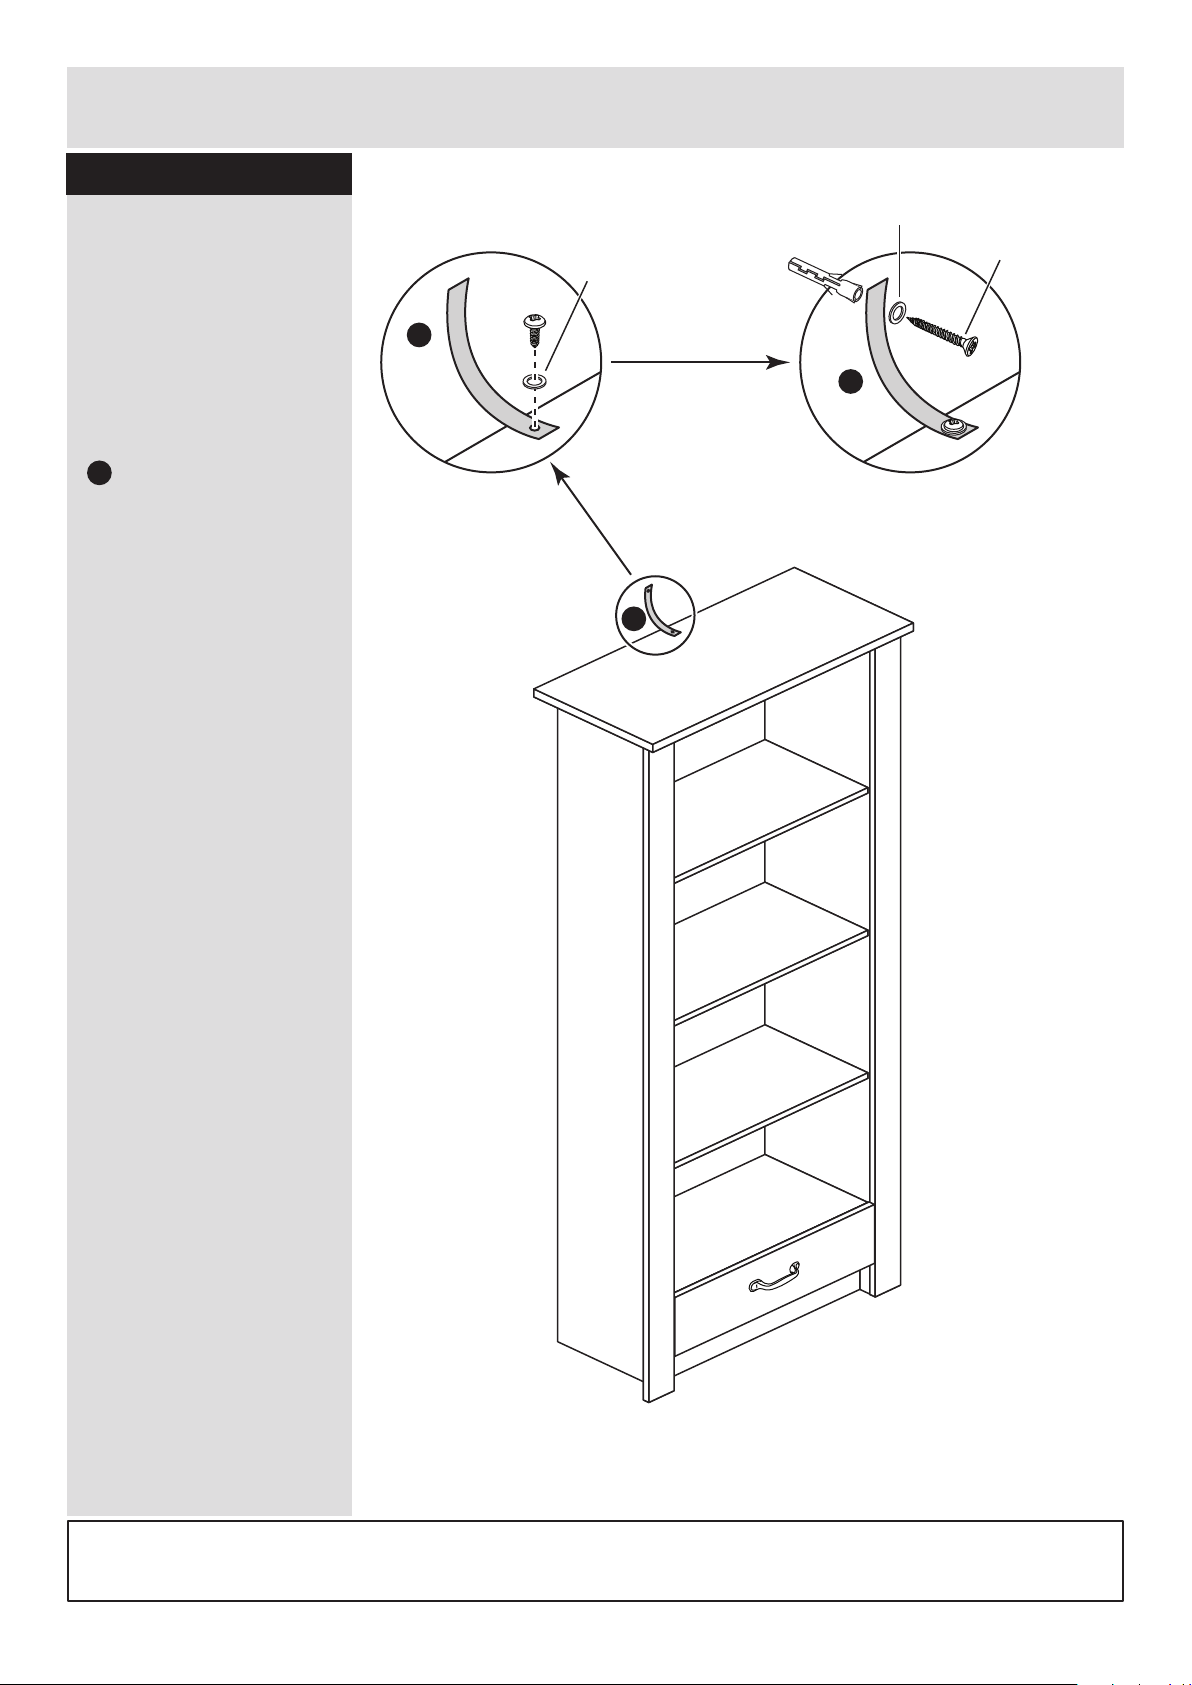
Step 22
ALR3082
Fit the overbalance
protector
To prevent possible
overbalancing we
recommend that this unit
is secured to a suitable
wall by use of the
overbalance protector kit
. fitted to the unit or, an
alternative fixing method
of your choice.
Wall fixings are not
supplied as they will
need to suit the wall
type.
Note: Take care when
drilling the wall that you
do not drill into any
pipes, wires etc.
If in doubt, consult an
expert.
Assembly is complete
O
N
Wall fixing
(not supplied)
Washer
Screw
(not supplied)
O
Strap
Washer
O
Screw
 Loading...