

Page 1
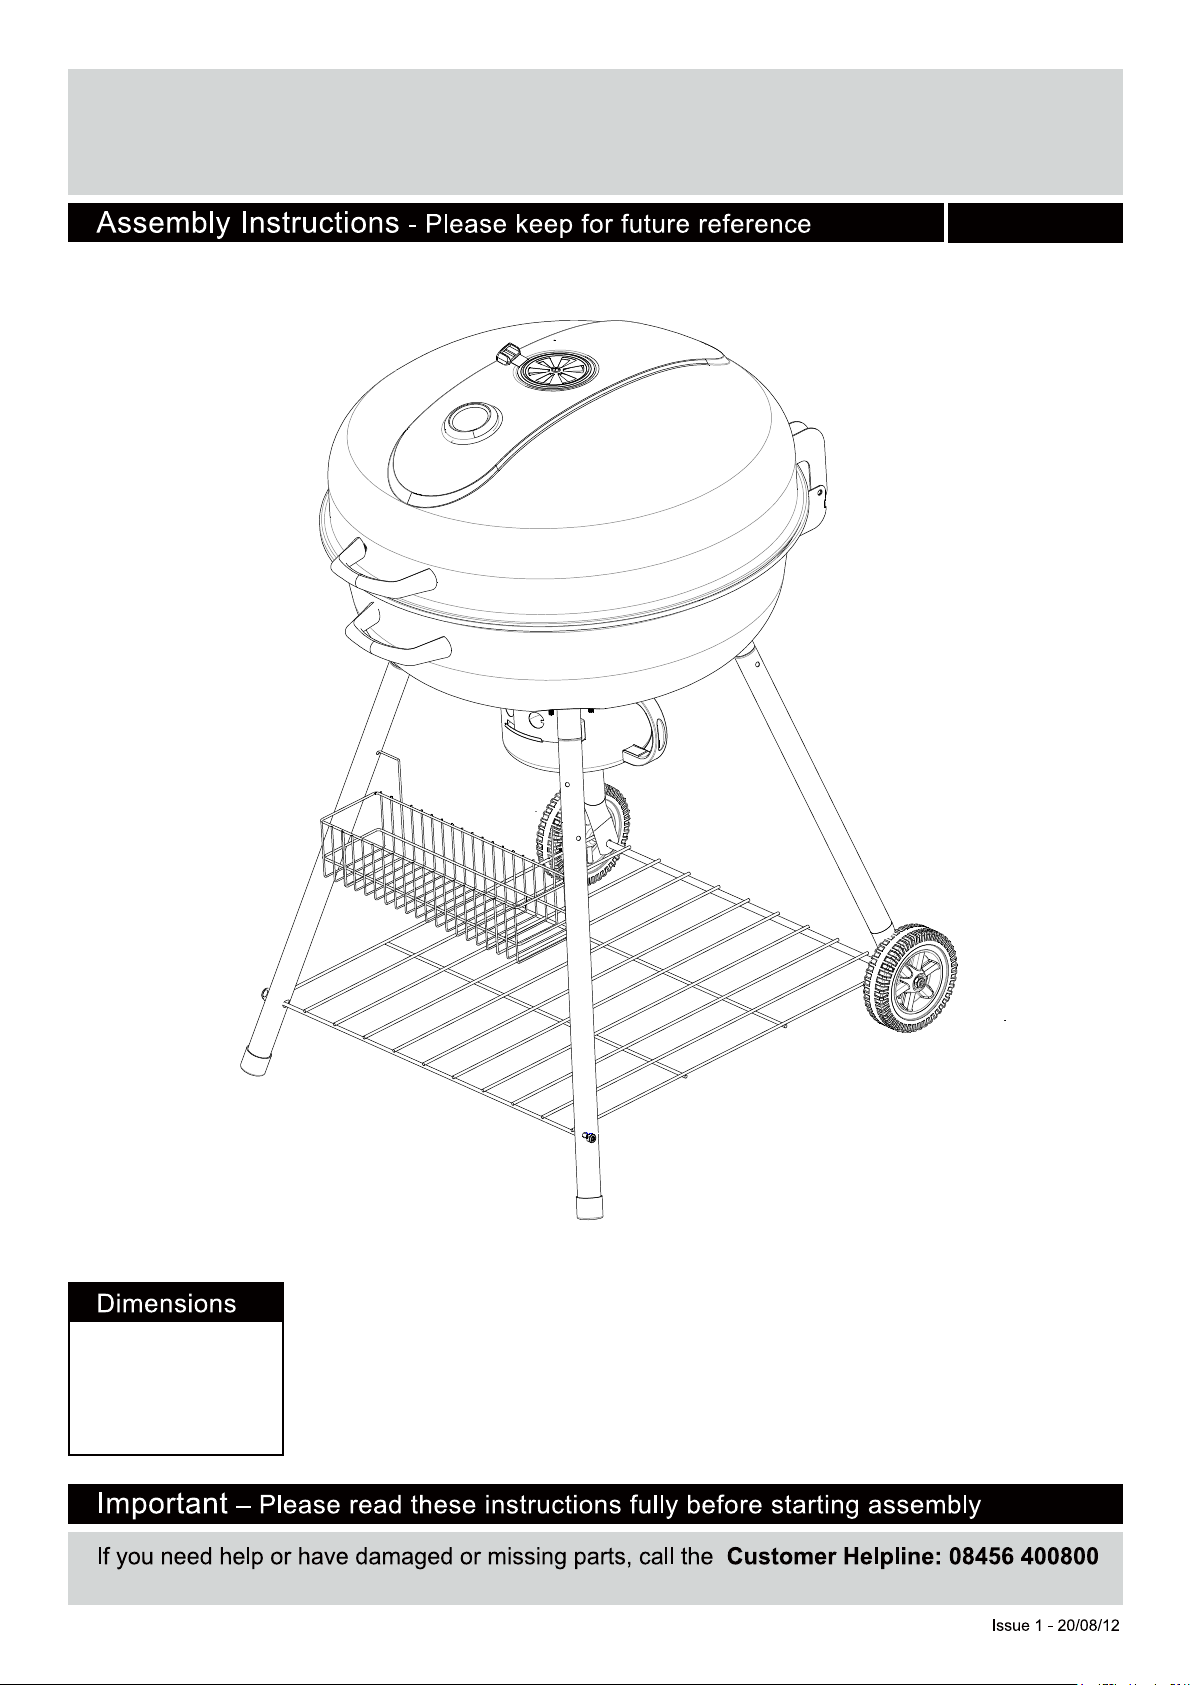
66 CM KETTLE BBQ
2901365
Width - 70cm
Depth - 77cm
Heitht - 110cm
Page 2

Page 3
Page 4
Page 5

x 1
x 1
x 2
x 1
x 1
x 1
x 1
x 1
x 1
x 1
x 4
x 1
x 1
x 1
x 1
x 2
x 2
x 1
x 2
Ash Catcher
Handle
x 1
Page 6

A
B
C
M6*13 Screw x 24
D
M6 Nut x 22
G
Flat washer-M10 x 2
J
Hinge Pin x 2
M
Screwdriver x 1
M5*10 Screw x 1
E
M5 Wing Nut x 1
H
M8 Lock nut x 2
K
Cotter Pin x 2
N
M6/M8/M10 Hex
Wrench x 1
M6*33 Screw x 4
F
Aluminum Washer
-M6(Small) x 14
I
M10 Lock nut x 2
L
Aluminum Washer
-M6(Big) x 16
Page 7

Step 1
Attach handle 4 to lid 1
with two M6x13 screw A,
two aluminum washers .
A
F
Tighten with screwdriver.
Step 2
Attach lid vent 2 to lid
with one M5x10 screw B
and one M5 wing nut E
as shown. Tighten screw
and nut with screwdriver.
2
B
E
A
F
B
E
Step 3
3-1: Unscrew the nut from
Temperature Gauge .
3
3-2: Attach the
Temperature Gauge 3 to
the front of lid 1 and
1
3
tighten with the nut again.
Step 4
4-1: Aligen upper hinges
7 8
7 & 8 with lid.
4-2: Attach upper hinges
to lid with four M6x13
screws A , four aluminum
washers F , and four M6
nuts D. Partially tighten
screws and nuts with
screwdriver and wrench.
NOTE: DO NOT tighten
fully until step 10.
A
F
D
F
D
A
Page 8

Step 5
Attach the leg connector
15 12
15 to bottom bowl 12 with
twelve M6x13 screws A ,
A
twelve Aluminum washer
L D
L and twelve nuts D ,
Tighten with screwdriver
and hex wrench
Step 6
Attach handle to bottom
12
bowl 12 with two M6x13
screws A , two aluminum
washer F . Tighten with
A
F
screwdriver.
4
A
L
D
A
F
Step 7
7-1: Align lower hinges (
10 and 11 ) with bottom
10 11
bowl 12 .
12
7-2: Attah lower hinges to
bowl with four M6x13
screws A , four aluminum
washers F , and four M6
nuts D . Tighten with
screwdriver and wrench.
NOTE: DO NOT tighten
completely until Step 10.
A
F
D
A
F
D
Page 9

Step 8
8-1: Align axle holes in wheel legs
17
17 during assembly. Wheel legs
attach to the rear of the bottom
bowl, at the end opposite the
handle.
8-2: Slide the top end of each
stationary leg 16 & wheel leg 17
through a leg connector 15 .
16
15
8-3: Align the top of each leg with a
corner hole in the bottom bowl.
8-4: Attach each leg to the bowl
with a M6x33 screw C , and
aluminum washer L . Partially
C
L
tighten each screw with a
screwdriver.
17
C
L
Step 9
9-1: Slide the long ends of the wire
shelf 18 through the wheel legs 17 ,
and the short ends through the
stastionary legs 16 .
9-2: Slide a wheel 19 and flat
washer G onto each long end.
G
Thread a M10 lock nut I onto each
16
19
I
long end and tighten with a wrench.
The wheel should spin, but not
wobble.
9-3: Thread a M8 lock nut H onto
each short end and tighten by
wrench.
17
H
G
I
G
I
H
H
8
Page 10

Step 10
10-1: Set lid 1 onto
bottom bowl 12 and align
hinge pins J .
10-2: Slide higne pins J
through holes in hinges.
10-3: Slide one cotter pin
K through hole at end of
K
each hinge pin.
10-4: Cotter pins should
be tunked into place.
NOTE: Tighten all the
screw for Step 4 and
Step 7 .
7
1
12
J
J
4
Step 11
11-1: Set charcoal grate
6
6 into bottom bowl.
11-2: Set cooking grate 5
onto top ledge of bottom
bowl.
5
K
J
K
J
J
K
J
K
Step 12
12-1: Attach warming
rack 9 to top lid 1 and
bottom bowl 12 by
inserting ends at back of
warming rack into side
holes of each of top lid 1
.
12-2: Insert wire legs on
both side of warming
rack 9 into holes of
9
bottom bowl 12 .
9
12
1
Page 11

13
Step 13
13-1: Attach ash catcher
handle 20 to ash catcher
13 with two M6 nuts D ,
two aluminum washer
F , tighten with wrench.
F
13-2: slide ash catcher
into bottom bowl from
right side of the grill.
20
D
D
F
20
Step 14
Set Condiment Rack 14
14
14
10
 Loading...