

Page 1
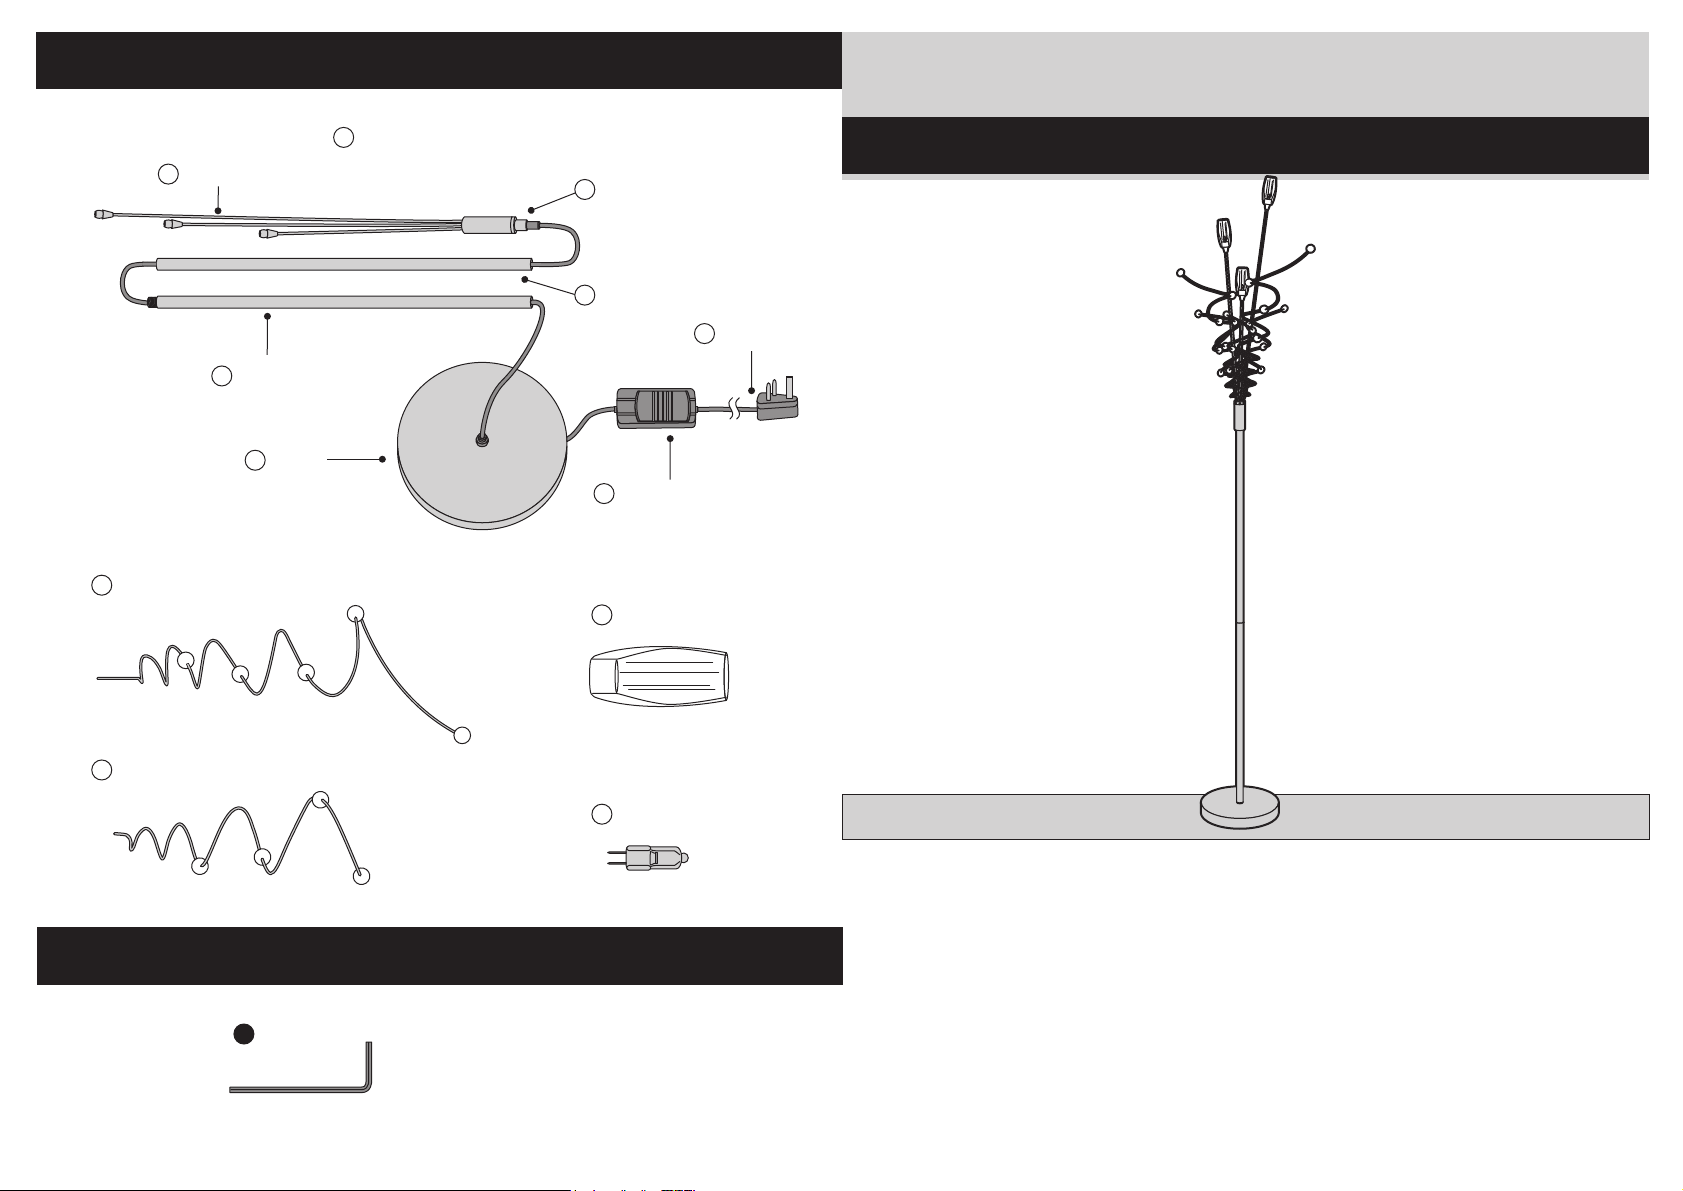
Components
Light Stalks
F
Bottom Tube
J
2 x Long Spiral Branch
B
K
Base
1 x Floor Lamp
A
Head
G
Top Tube
H
Dimmer Switch
L
3 x Shade
D
Power Cord
M
Belize Floor Lamp
Simple Assembly Instructions - Please keep for future reference
3 x Short Spiral Branch
C
Fittings
A
1 x Tool
E
3 x Bulb
IMPORTANT
1
. Read these instructions carefully and
familiarise yourself with the procedure
before assembling the unit.
2
. Check that you have all the component
parts following the list on the back
11-08
cover and familiarise yourself with
each part before proceeding.
3
. Take all the fittings out of the plastic bag
and separate them into their groups.
4
. Ensure you have enough space to lay out
all the parts before assembly.
5
. To avoid scratching it is recommended
that you assemble the unit on a soft
level surface.
Page 2
Assembly Instructions
Assembly Instructions
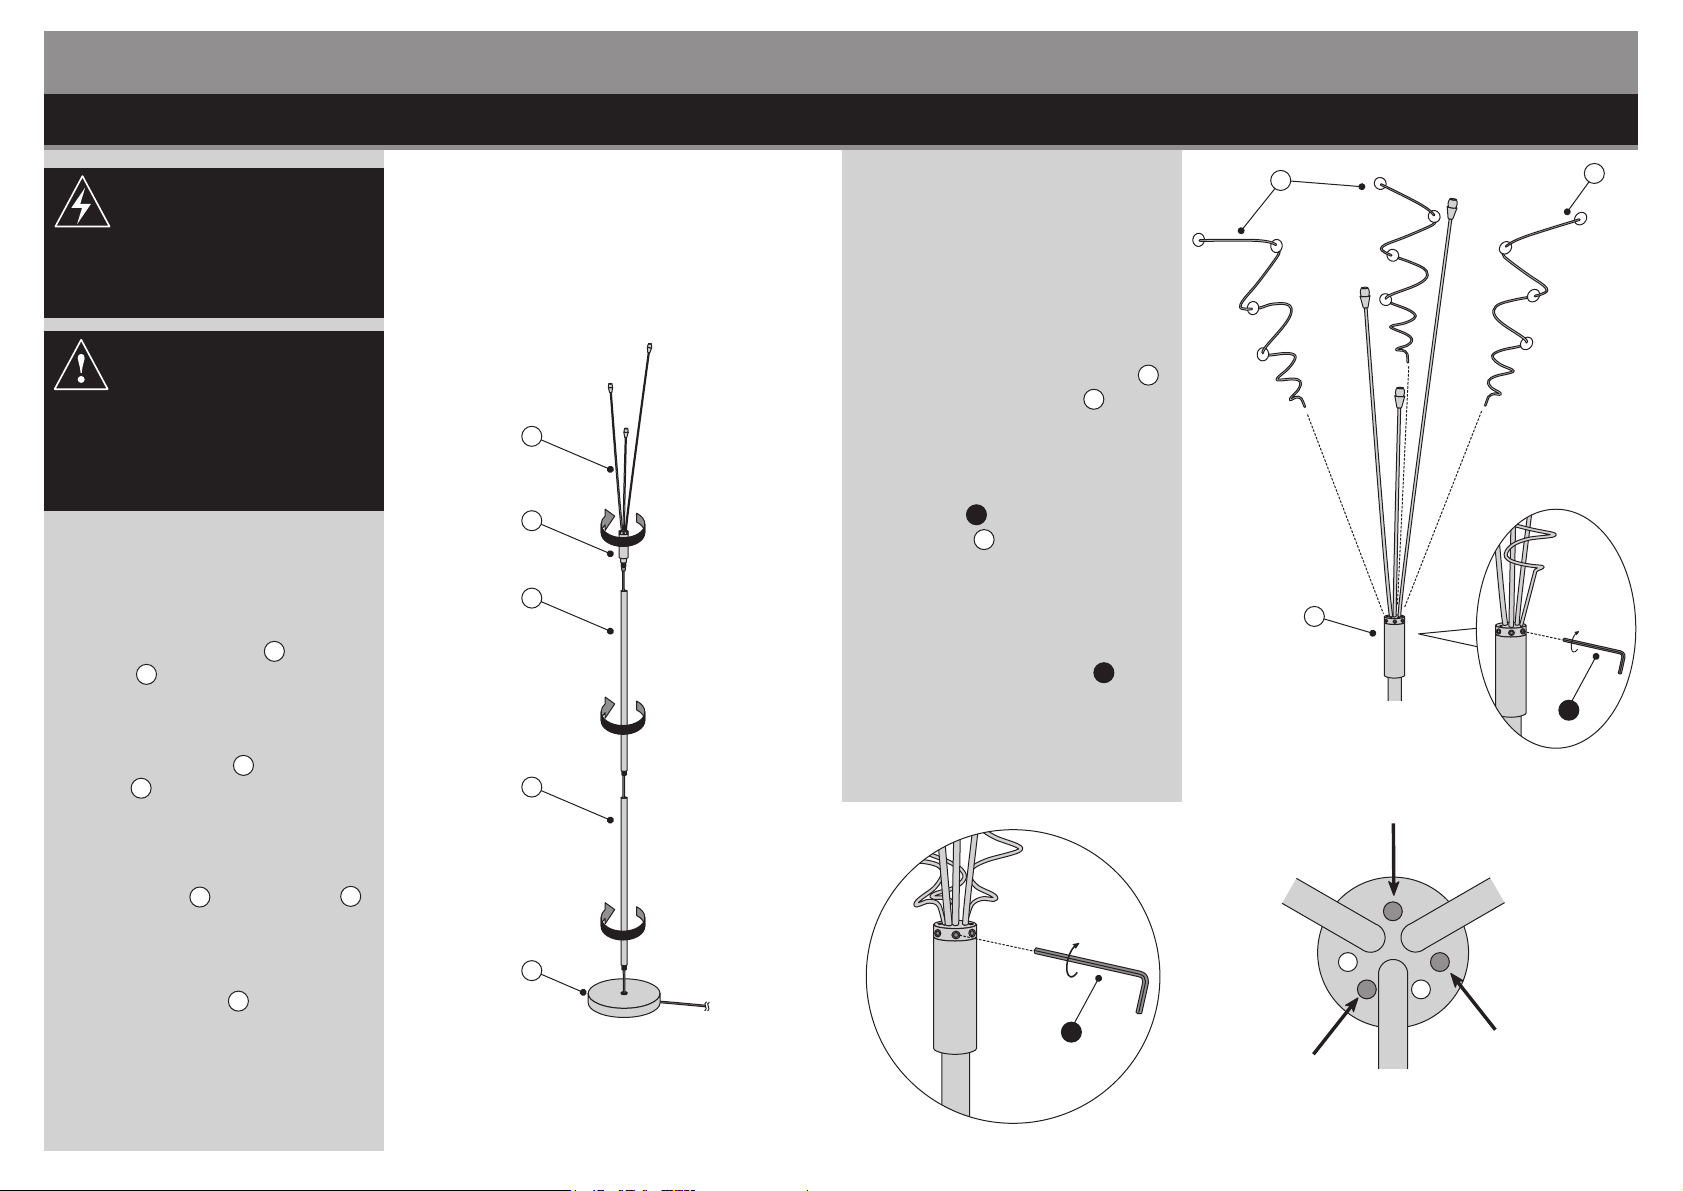
Stage 2 – Fitting the Short Spiral BranchesStage 1 – Fitting the Floor Lamp
IMPORTANT:
Ensure electricity is switched
off at the mains before installing
or maintaining any light fixture.
CAUTION:
Take care not to damage the
cable or light fittings. Feed the
cable through the tubes and base
during assembly.
NOTE: It would be useful to ask
someone to help you at this
stage.
Screw Bottom Tube J into
1.
Base K .
See fig. 1.
C
NOTE: It would be useful to ask
someone to help you at this
stage.
1. Insert Short Spiral Branches C
into the holes in Head G .
F
G
H
See fig. 2 and 4.
2. Use Tool A to fix Short Spiral
Branches C in position.
See fig. 3.
NOTE: The Light stalks can be
readjusted using Tool A .
See fig. 5.
fig.3
G
fig. 2
C
A
Screw Top Tube H into Bottom
2.
Tube J .
See fig. 1.
3.
Screw Head G into Top Tube H .
Bend Light Stalks F to a suitable
4.
angle.
J
fig. 1
Stalk
K
A
Short
Spiral
Branch
fig. 5
Short
Spiral
Branch
Stalk
Stalk
fig. 4
Short
Spiral
Branch
Page 3
Assembly Instructions
NOTE: It would be useful to ask
someone to help you at this
stage.
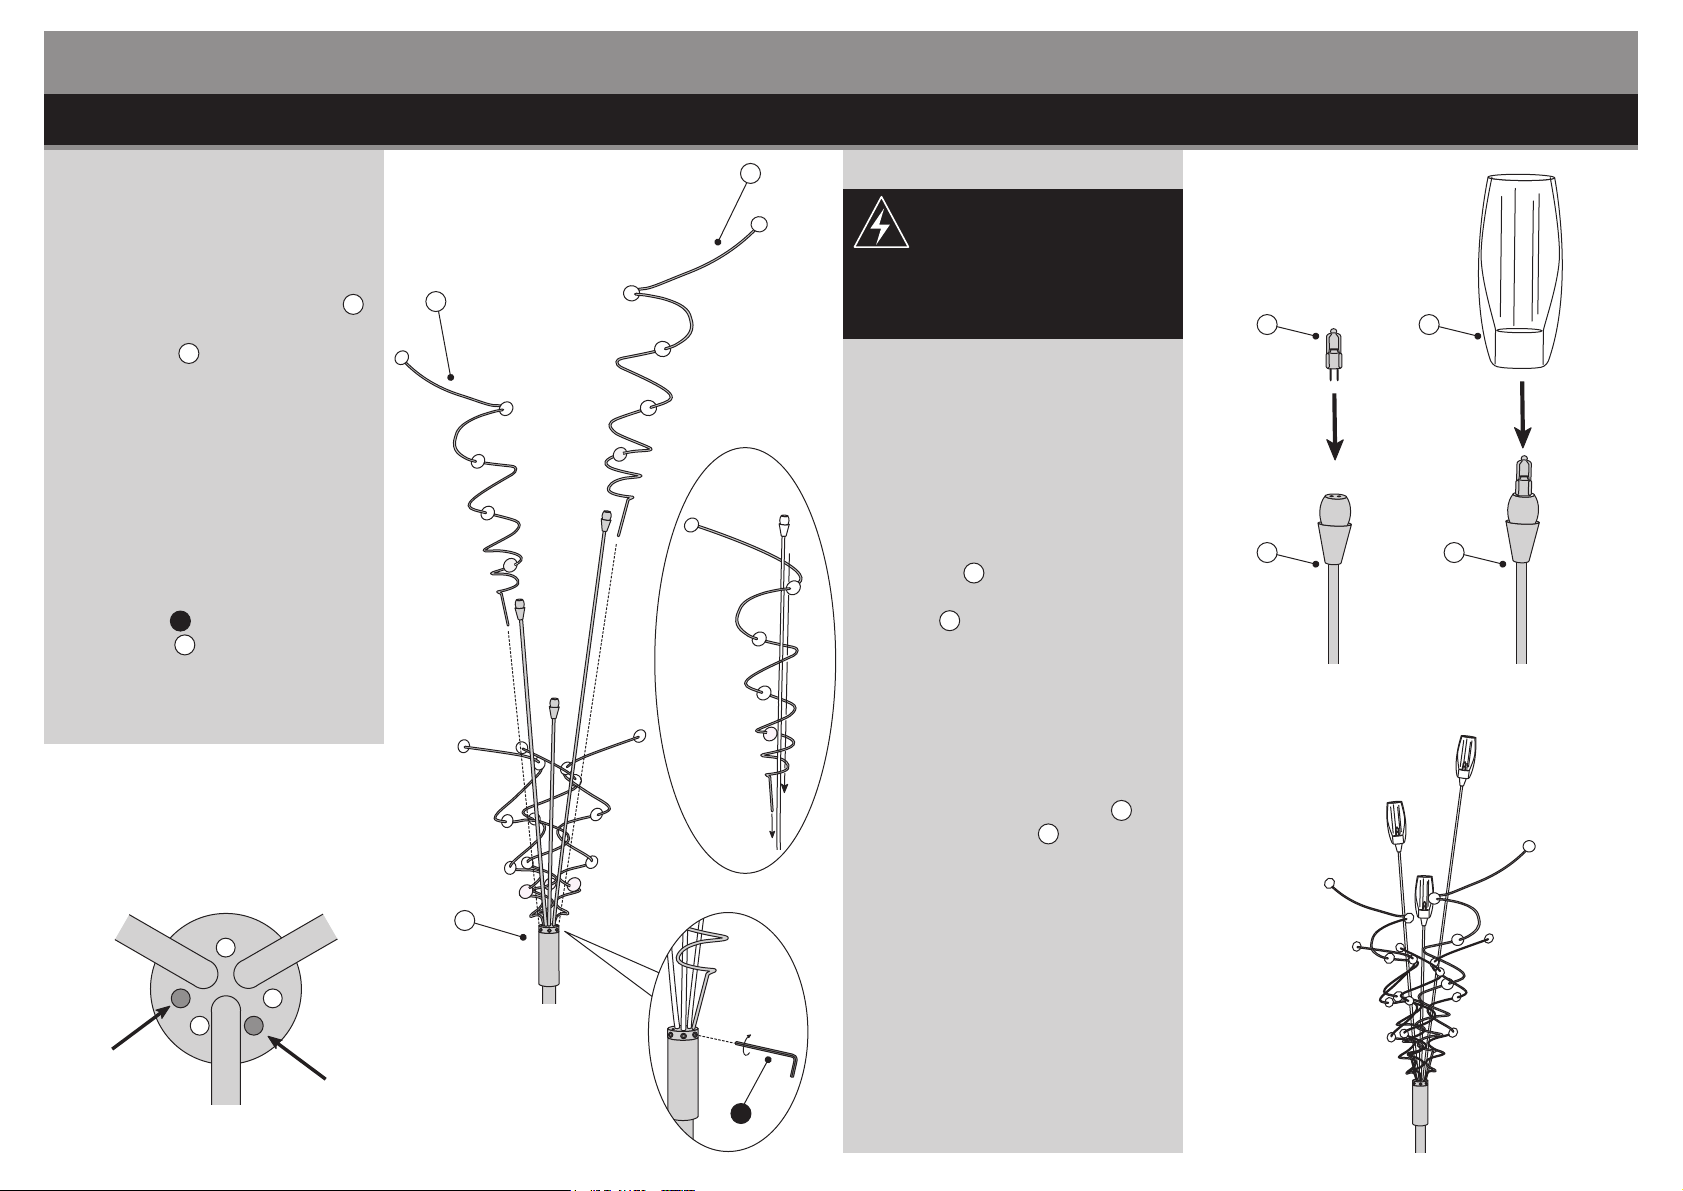
1. Fit the Long Spiral Branches B
over the Stalks, pluging the end
into Head G .
See fig. 6, 8 and 9.
B
Assembly Instructions
Stage 4 – Fitting the BulbsStage 3 – Fitting the Long Spiral Branches
B
IMPORTANT:
Ensure electricity is switched
off at the mains before installing
or maintaining any light fixture.
E
D
NOTE: The Short Spiral
Branches may need to be
adjusted to allow the Long
Spiral Branches to fit.
2. Use Tool A to fix Long Spiral
Branches B in position.
See fig. 7.
Stalk
Stalk
fig. 8
G
fig. 6
NOTE: Never touch the bulb with
your fingers directly, cover it
with a cloth.
1. Fit Bulbs E (20W 12V G4 BI Pin
Halogen Capsule Bulbs) into
Poles F .
See fig. 10 and 12.
2. Carefully fit Light Shades D
onto Light Stalks F .
See fig. 11 and 12.
F
fig. 10 fig. 11
F
Long
Spiral
Branch
fig. 9
Stalk
Long
Spiral
Branch
fig. 7
A
fig. 12
Page 4
Assembly Instructions
Assembly Instructions
Stage 6 – Bulb ReplacementStage 5 – To Operation
NOTE: It would be useful to ask
someone to help you at this
stage.
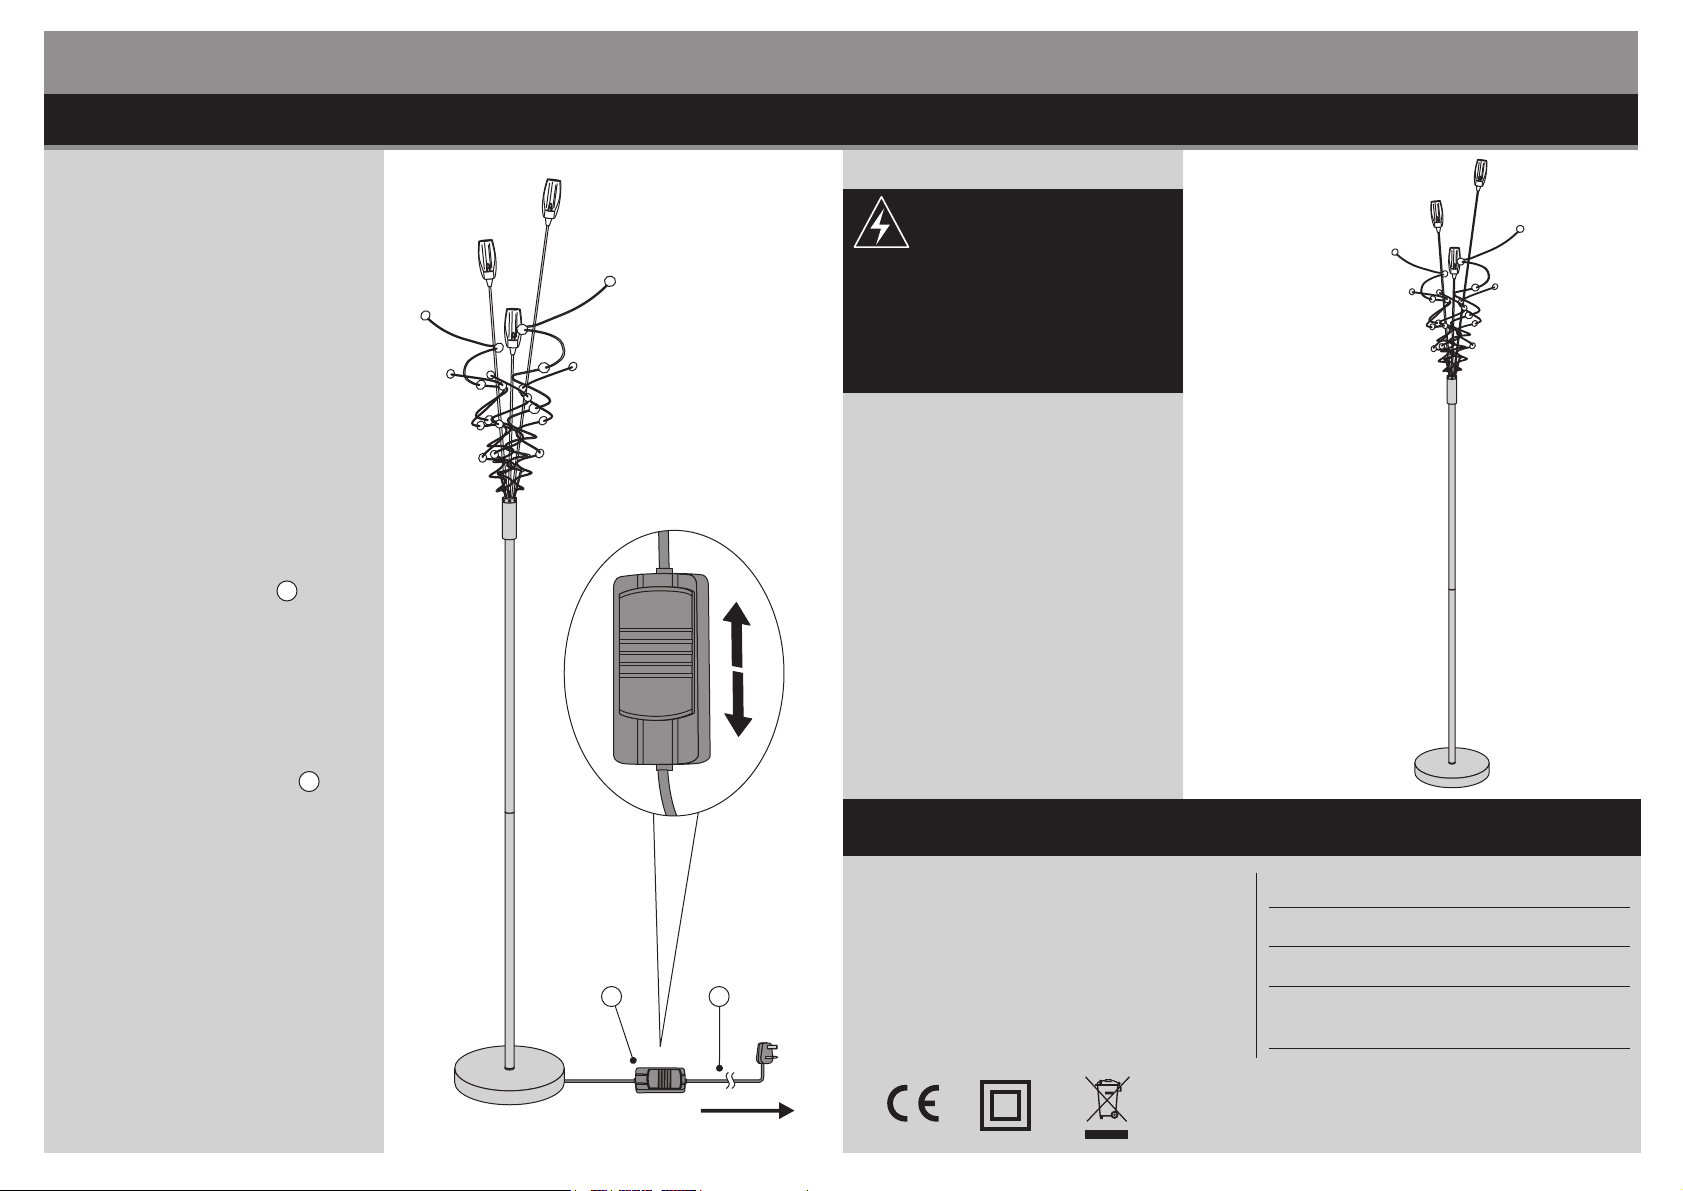
1. Carefully place the lamp in the
desired location.
NOTE: Make sure your local
voltage is 230V/240V~50Hz.
2. Plug the Power Cord M into the
mains socket.
See fig. 13.
3. Use the Dimmer Switch L to
adjust the brightness; and to turn
the unit on or off.
See fig. 13 and 14.
fig. 13
fig. 14
WARNING:
The correct Bulb wattage for
each bulb MUST be 20W MAX
when replacing the failed bulb,
the total load MUST be 60W MAX
as its rated power.
1. Switch off the mains power supply.
2. Allow bulb to cool for at least 10
minutes before replacing.
NOTE: Never touch the bulb with
your fingers directly, cover it
with a cloth.
3. Remove the bulb.
fig. 15
4. Replace with a new bulb of the
same voltage and wattage.
Technical DataCaution
1. Indoor use only.
2. Connect to 230V/240V~, 50Hz.
3. If in doubt about fitting this product. Please
consult a suitably qualified electrician.
4. The temperature of the spot lamp rises very
ML
quickly. Do not touch the metal parts or glass
of the spot lamp after the light is turned on.
5. Never allow the light beam to point directly onto
the ceiling.
Model No.
Input Voltage
Max. Wattage
Bulb
SHLT0017
230-240V~, 50Hz
60W
3 x Max. 20W G4 BI Pin Halogen
Capsule Bulbs
Mains Socket
WASTE ELECTRICAL PRODUCTS SHOULD NOT BE
DISPOSED OF WITH HOUSEHOLD WASTE. PLEASE
RECYCLE WHERE FACILITIES EXIST. CHECK WITH
YOUR LOCAL AUTHORITY FOR RECYCLING ADVICE.
 Loading...