

Page 1

QUICK ASSEMBLY GUIDE
Page 2
CONTENTS
WARNINGS
BOX CONTENTS
FITTING THE HANDLEBAR
FITTING THE SADDLE
....................................................page 2
.............................................page 3
.............................page 4
....................................page 5
FITING THE FRONT WHEEL
FITTING THE PEDALS
FITTING THE REFLECTORS & BELL
FINAL CHECKS
.............................................page 10
.....................................page 8
...........................page 6
.................page 9
WARNINGS
Always check that brakes work before each use - failure to set brakes correctly may result in serious injury or even death.
Ensure all nuts / bolts / screws are securely ghtened and checked before use. Recommended torques (ghtness levels) are
available in the owners manual.
Check bike regularly for signs of damage. Do not use again unl repaired.
Keep your bike in good condion by cleaning off dirt, keeping it well maintained and storing in a dry place.
Always wear a helmet that meets the latest safety standards and make sure you follow the manufaterer’s instrucons.
IF YOU NEED ASSISTANCE WITH ASSEMBLY PLEASE CALL
OUR CUSTOMER HELPLINE ON 0161 813 1745
2
Page 3
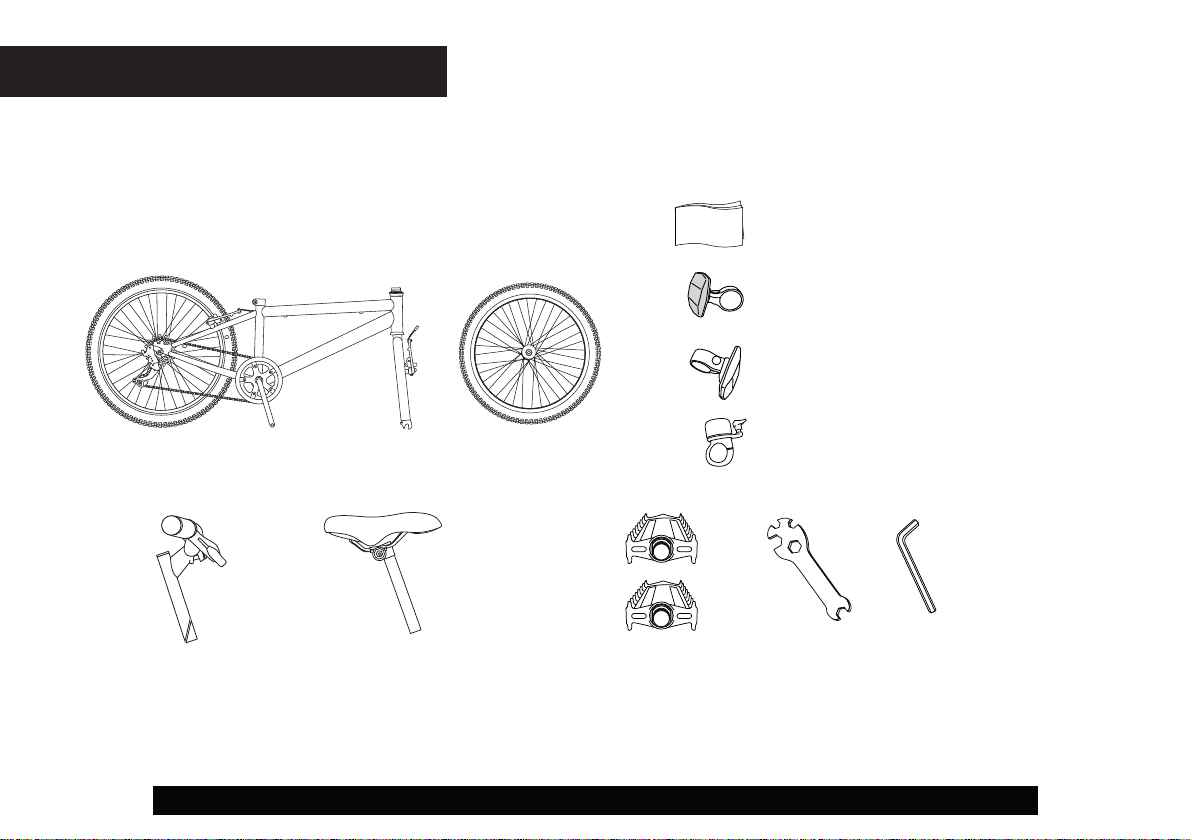
BOX CONTENTS
Please check contents of box carefully. If there are any parts missing please contact 03300 904 404 in the first instance
where they will be able to assist you with replacements.
Below is a list of parts you should have.
Instrucon Manual
Rear Reflector (Red)
Front Reflector (White)
Frame Assembly Front Wheel
Bar Assembly
(aached to frame assembly
via brake cable)
IF YOU ARE EXPERIENCING ANY PROBLEMS PLEASE CALL 0161 813 1745 BEFORE RETURNING BIKE TO STORE
R
L
Pedals x 2
(make sure you have an
‘L’ and an ‘R’ as shown)
Bell
Spanner Allen KeySaddle Assembly
3
Page 4
TOOLS NEEDED
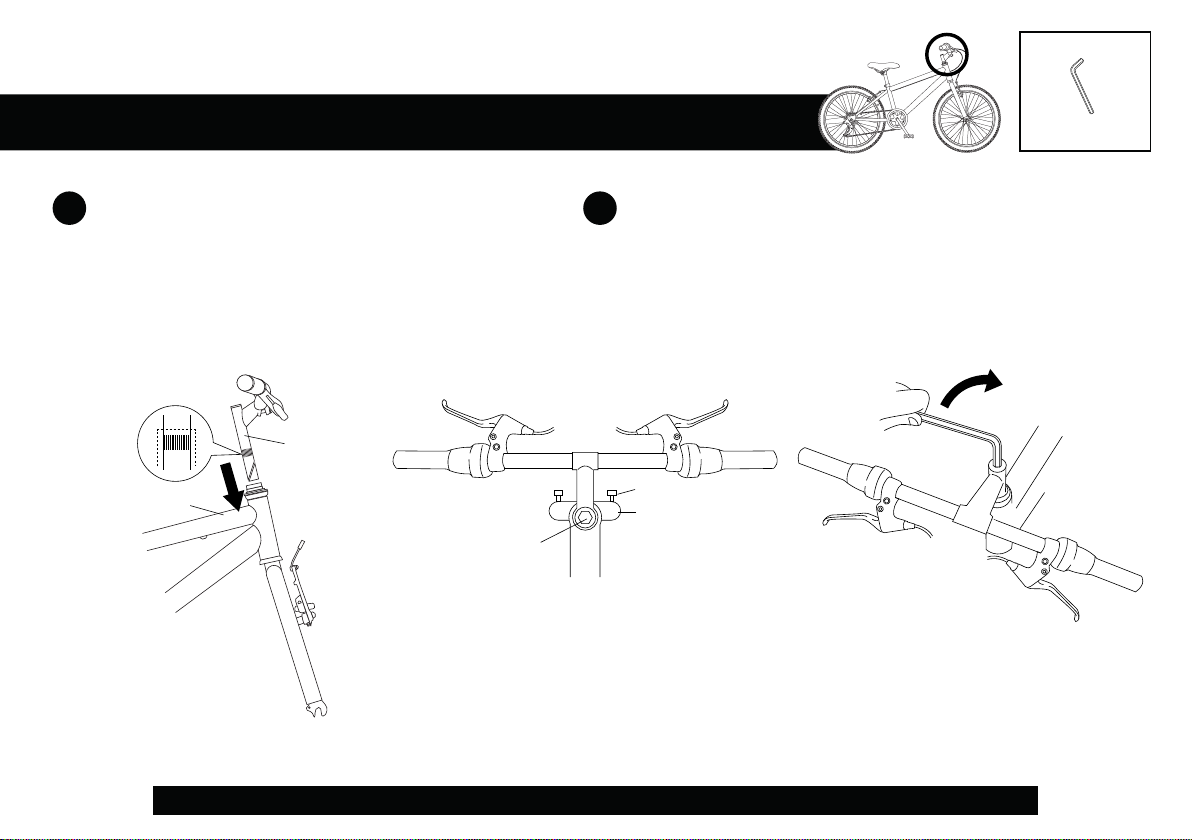
1.- FITTING THE HANDLEBAR
Insert the handlebar into the frame. If
A
necessary loosen the stem bolt at the top of
the handlebars and stem to allow the wedge
nut to move freely. Make sure the minimum
inseron mark is not visible once this is fied.
The handlebar must be inserted beyond this
point.
MINIMUM
INSERTION
MARK
BIKE FRAME
HANDLEBAR
TOP VIEW
Front of bike
ALLEN BOLT
Rear of bike
The handlebar must be straight. Align this with the fork by
B
looking downwards at it. The brakes must be facing the front
of the bike. Use the allen key to ghten the bolt on top of the
handlebar stem. Do not fully ghten unl the end as you may
need to adjust the height.
BRAKES
FORK
ALLEN KEY
Rear of bike
Front of bike
4
IF YOU ARE EXPERIENCING ANY PROBLEMS PLEASE CALL 0161 813 1745 BEFORE RETURNING BIKE TO STORE
Page 5

TOOLS NEEDED
2.- FITTING THE SADDLE
Insert saddle into frame. Make sure the minumum
A B
insertion mark is not visible once this is tted. The
saddle must be inserted beyond this point
SADDLE
FRAME
MINIMUM
INSERTION
MARK
SPANNER
Using the spanner provided, lock the seat in posion
by turning bolt in a clockwise direcon. Do not fully
ghten unl the end as you may need to adjust the
height.
IF YOU ARE EXPERIENCING ANY PROBLEMS PLEASE CALL 0161 813 1745 BEFORE RETURNING BIKE TO STORE
5
Page 6

TOOLS NEEDED
3.- FITTING THE FRONT WHEEL
Before fing the front wheel, you must open the
A
brake arms by releasing the brake cable:
Pull rubber cable protector to the right so you
can see the brake cable inside it. Squeeze
brake arms together.
Pull the noodle out by moving it le then up
and out of the metal housing
Turn the bike upside down. Loosen the nuts on the
B
front wheel axle by turning an-clockwise - you
need enough thread showing on the axle so the
wheel slots easily onto the fork. Make sure the
locking washers are on the outside of the fork as
shown.
i
SPANNER
ii
NUTS
LOCKING
WASHER
AXLE
FORK
6
IF YOU ARE EXPERIENCING ANY PROBLEMS PLEASE CALL 0161 813 1745 BEFORE RETURNING BIKE TO STORE
Page 7

Locking washers must be posioned correctly in this step:
C
Place the pointed side of the locking washer into the
hole on the fork. Make sure the gap between the
wheel and the fork is equal on both sides.
Tighten the nut with the spanner provided.
THE PIN ON THE LOCKING
WASHER MUST BE PLACED
IN THE HOLE.
Once the wheel is in place and ght, turn the bike the
D
right way up
Squeeze the brake arms together
Slot the brake cable noodle into the slot as
shown
CORRECT BRAKE & WHEEL FITTING IS VERY IMPORTANT FOR YOUR SAFETY
IF YOU HAVE ANY PROBLEMS THERE IS MORE INFORMATION IN THE USER MANUAL
FAILURE TO CORRECTLY SET THE BRAKES MAY RESULT IN SERIOUS INJURY
IF YOU ARE EXPERIENCING ANY PROBLEMS PLEASE CALL 0161 813 1745 BEFORE RETURNING BIKE TO STORE
i
ii
7
Page 8

TOOLS NEEDED
4.- FITTING THE PEDALS
To fit the pedals correctly, you must posion them the correct way around and screw them on in the right direcon:
Sckers indicate the le and right pedal. If these have dropped off, look at the end of the thread where it is imprinted.
i
ii
The correct pedal needs to be aached to the matching side of the bike i.e. le pedal to le side and right pedal to right side.
iii
IMPORTANT! Pedals need screwing in opposite direcons so they don’t fall off in use.
Le pedal is screwed in an-clockwise / Right pedal is screwed in clockwise. Tighten pedals with spanner provided.
i
THREADS
L R
PLEASE MAKE SURE YOU FIT THE CORRECT
PEDAL TO THE CORRECT SIDE. FAILURE TO
DO SO MAY RESULT IN CROSS-THREADING,
WHICH CAN CAUSE IRREPARABLE DAMAGE
NOT COVERED BY WARANTY
ii iii
L
R
LEFT RIGHT
SPANNER
SCREW CLOCKWISESCREW ANTI-CLOCKWISE
8
Page 9

TOOLS NEEDED
5.- FITTING THE REFLECTORS & BELL
First fully release the securing screws as shown
A
(an-clockwise)
BELL RED REFLECTOR WHITE REFLECTOR
Once these are in place, replace the screws and ghten by turning clockwise using a cross-head screwdriver
C
Wrap the bell around the handlebar as shown, remembering
B
to put it in a place where you can reach it easily whilst riding.
Then wrap the white reflector around the handlebar near the
centre, and wrap the red reflector in the same way around
the saddle post.
HANDLEBAR
(Bell and White Reflector)
CROSS HEAD
SCREWDRIVER
SADDLE
(Red Reflector)
IF YOU ARE EXPERIENCING ANY PROBLEMS PLEASE CALL 0161 813 1745 BEFORE RETURNING BIKE TO STORE
9
Page 10

TOOLS NEEDED
6.- FINAL CHECKS
You can now ensure your saddle and handlebars are at a comfortable riding position, and fully tighten. Always be
A
aware of the minimum insertion mark and make sure these are inserted beyond this point.
Check tyre pressures regularly. Recommended tyre pressures are clearly marked on the side of the tyre.
B
Check that all bolts and xings are tight and secure. You should do this before every ride.
C
D
Check functionality of brakes before every ride, you will nd out more about this in the user manual included.
IMPORTANT: ENSURE ALL NUTS / BOLTS / SCREWS ARE TIGHT
RECOMMENDED TORQUES IN OWNER’S MANUAL APPENDIX
PLEASE READ OWNER’S MANUAL BEFORE RIDING THIS BIKE
SPANNER ALLEN KEY
10
ALWAYS CHECK BRAKE FUNCTIONALITY BEFORE RIDING
This assembly guide is copyrighted to Avocet Sports Limited. Any reproducon, in whole or in part, is strictly forbidden without prior wrien consent.
Page 11

Page 12

IF YOU ARE EXPERIENCING ANY PROBLEMS PLEASE CALL 0161 813 1745 BEFORE RETURNING BIKE TO STORE
 Loading...