

Page 1
PDF 文件使用 "pdfFactory Pro" 试用版本创建 www.fineprint.cn
Page 2
PDF 文件使用 "pdfFactory Pro" 试用版本创建 www.fineprint.cn
Page 3
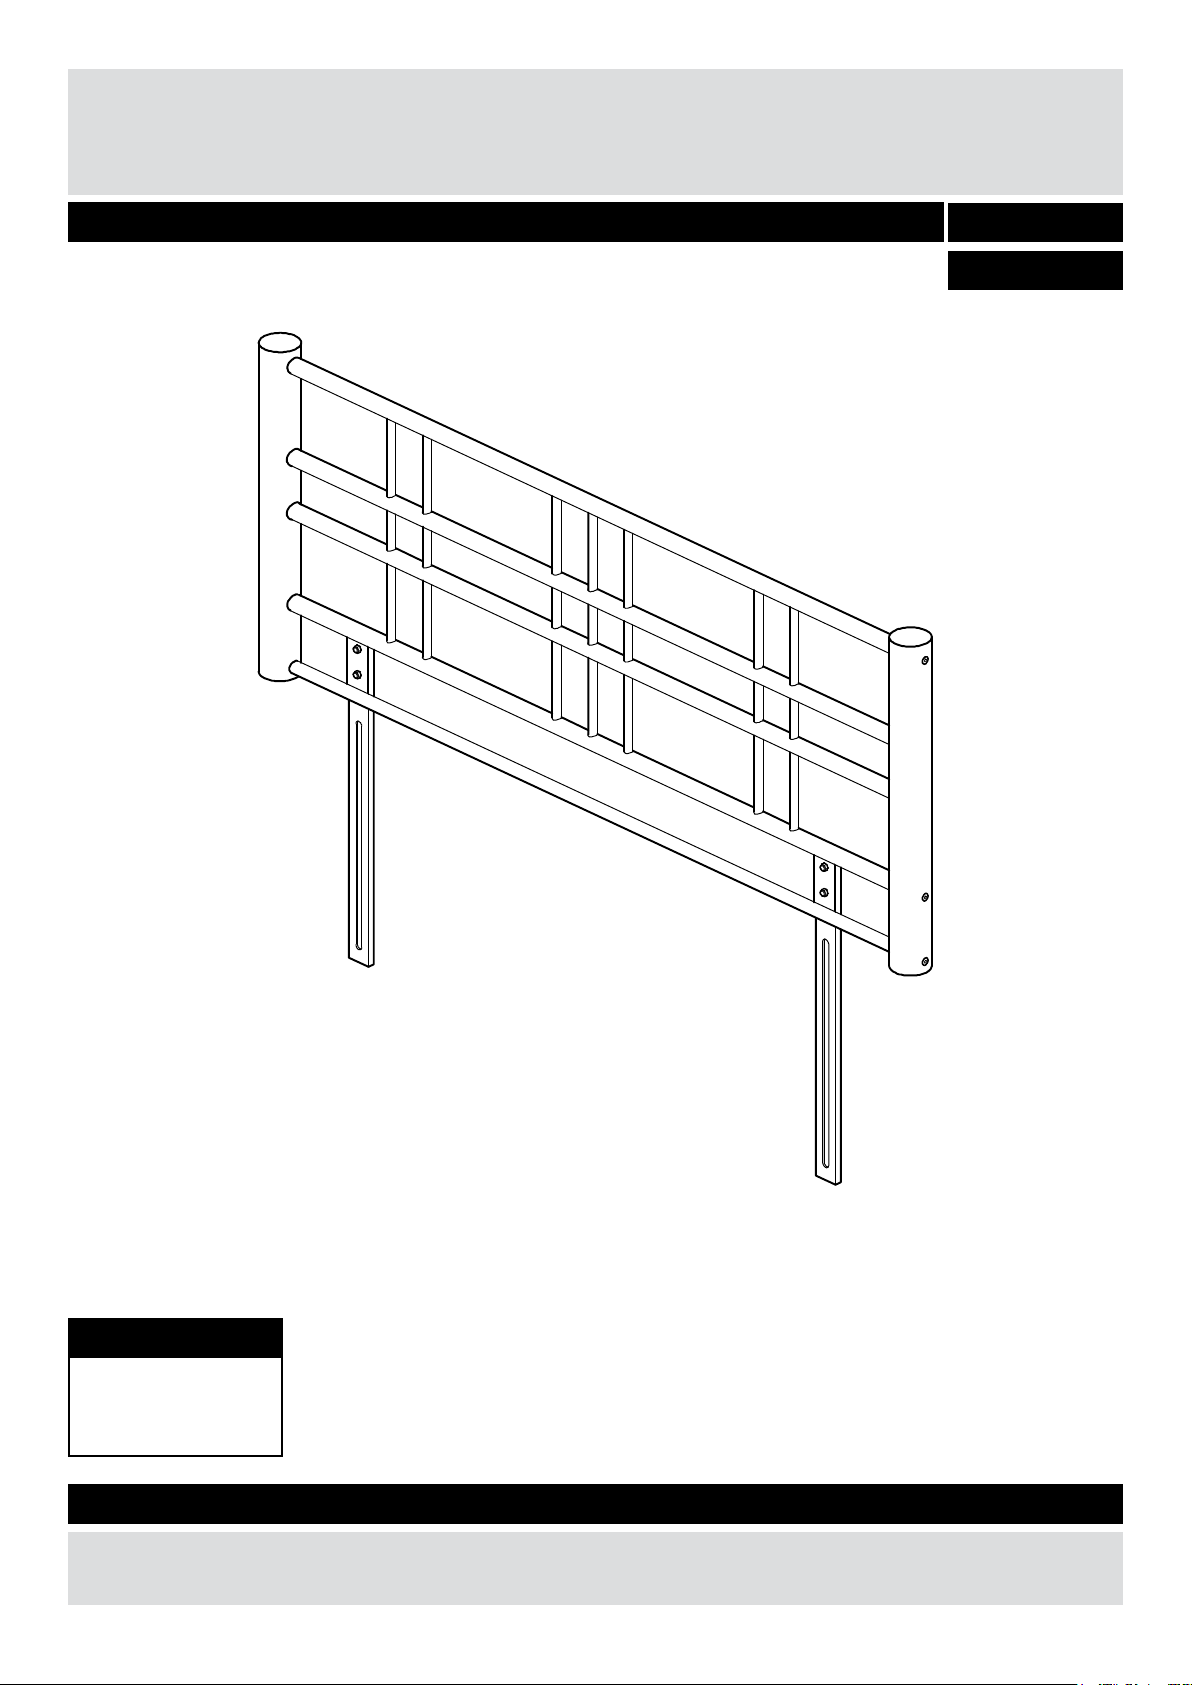
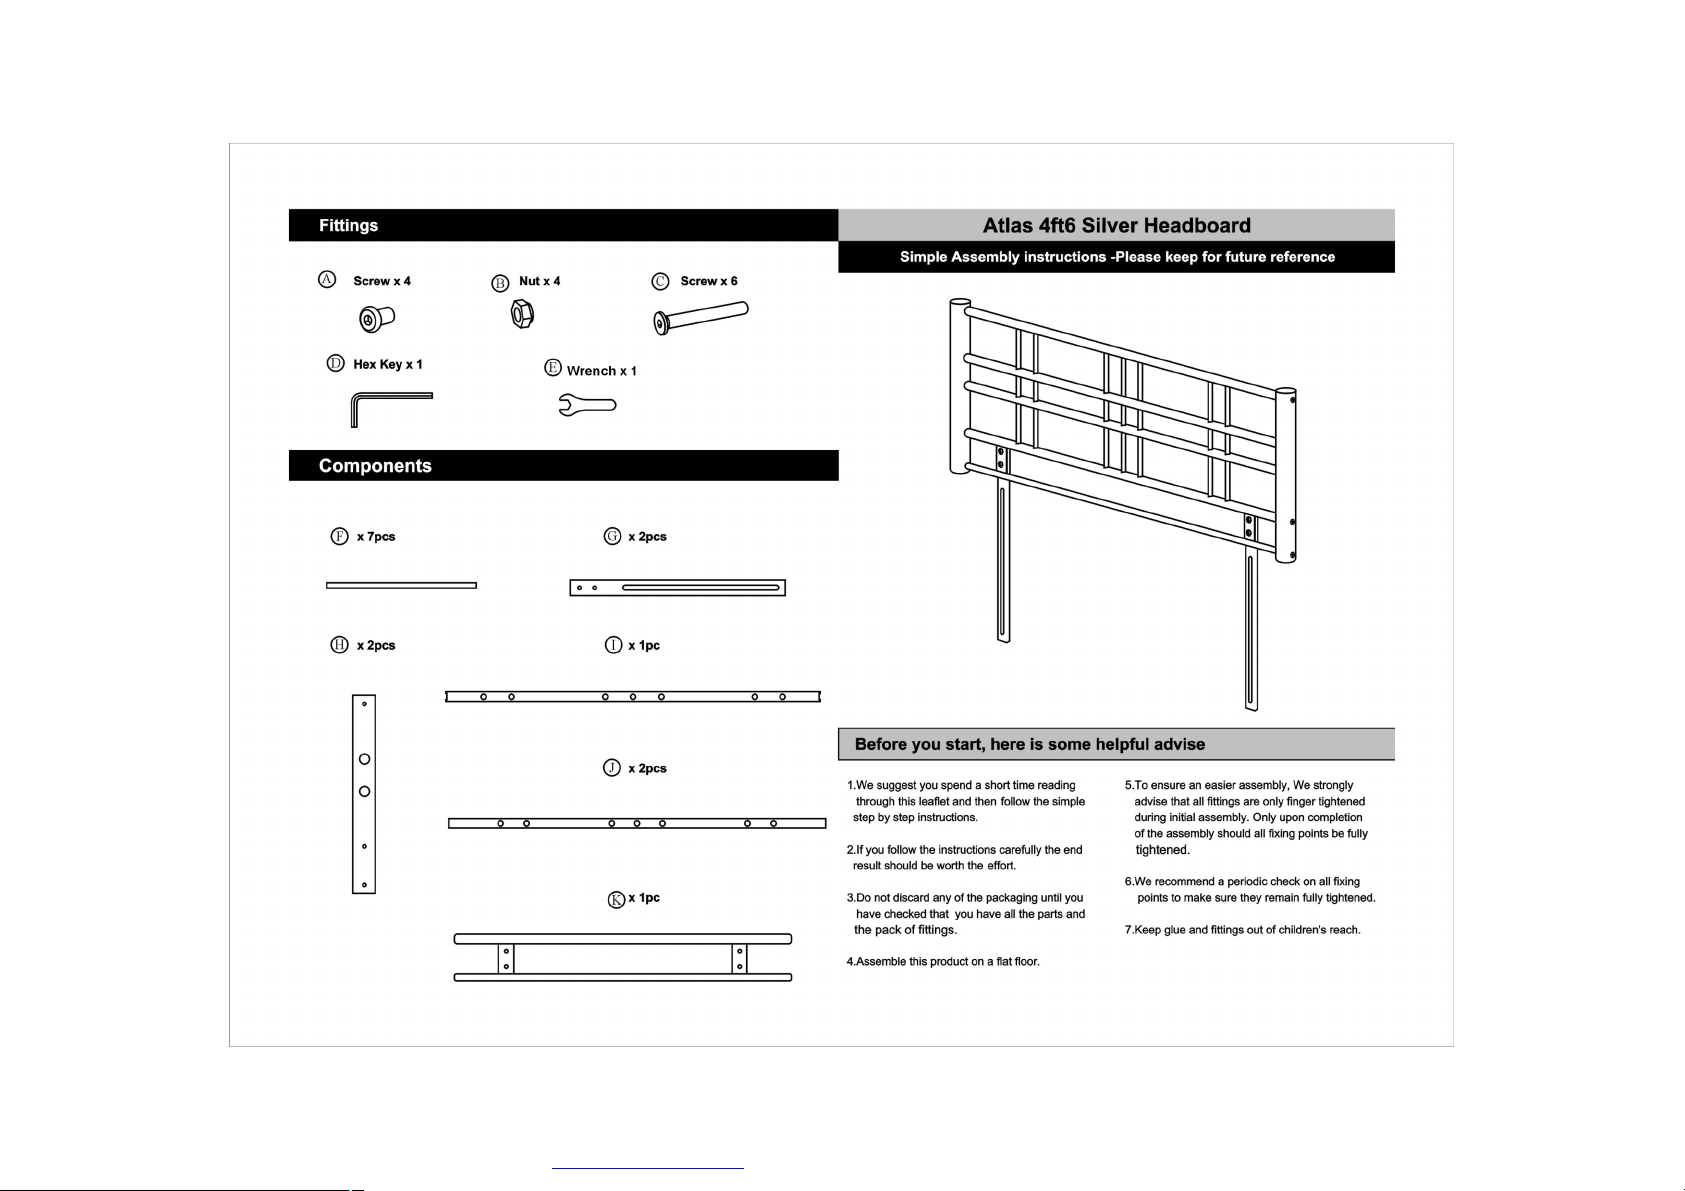
Atlas 4ft6 Headboard
Assembly Instructions - Please keep for future reference 634/0458
634/1952
Dimensions
Width - 145cm
Height - 101cm
Important – Please read these instructions fully before starting assembly
If you need help or have damaged or missing parts, call the Customer Helpline: 0845 6400800
Issue 1 - 09/07/10
Page 4

Safety and Care Advice
Important – Please read these instructions fully before starting assembly
• Check you have all the
components and tools listed on
page 2.
• Remove all ttings from the
plastic bags and separate them
into their groups.
• Keep children and animals
away from the work area, small
parts could choke if swallowed.
• Make sure you have enough
space to layout the parts before
starting.
• As you unpack and prepare
for assembly, clear an area for
assembly. The parts should be
placed on a carpeted or padded
area to protect them from
damage.
• Parts of the assembly will be
easier with 2 people.
• Do not discard any of the
packaging until you have
checked that you have all the
parts and pack of fittings.
• We do not recommend the
use of power drill/drivers for
inserting screws, as this could
damage the unit. Only use hand
screwdrivers.
• To ensure an easier assembly,
we strongly advise that all
fittings are only
finger tightened
druing initial
assembly. Only
upon completion of
the assembly should all fixing
points be fully tightened.
Care and maintenance
• Only clean using a damp cloth
and mild detergent, do not use
bleach or abrasive cleaners.
• From time to time check that
there are no loose screws on
this unit.
• This product should not be
discarded with household waste.
Take to your local authority
waste disposal centre.
1
Page 5

If you have damaged or missing components,
Components - Panels
call the Customer Helpline:
Please check you have all the panels listed below
0845 6400800
Headboard upright x 7
1
(dia1.27 x 39.4cm)
Connecting bar
4
(133.8 x 12.4cm)
End horizontal bar
2
(dia2.5 x 133.8cm)
Headboard post X 2
5
(dia6.0 x 52.1cm)
Middle horizontal bar x 2
3
(dia2.5 x 144cm)
6
Leg x 2
(61 x 4cm)
Components - Fittings
Please check you have all the ttings listed below
Note: The quantities below are the correct amount to complete the assembly. In some cases more ttings
may be supplied than are required.
A
17mm Bolt x 4
D
Hex key x 1
B
80mm Bolt x 6
E
Wrench x 1
Ruler - Use this ruler to help correctly identify the screws
0 5 10 15 20 25 30 35 40 45 50 55 60 65 70 75 80 85 90 95 100
105
C
Nut x 4
110 115 120 125 130 135 140 145 150 155 160 165 170
2
Page 6

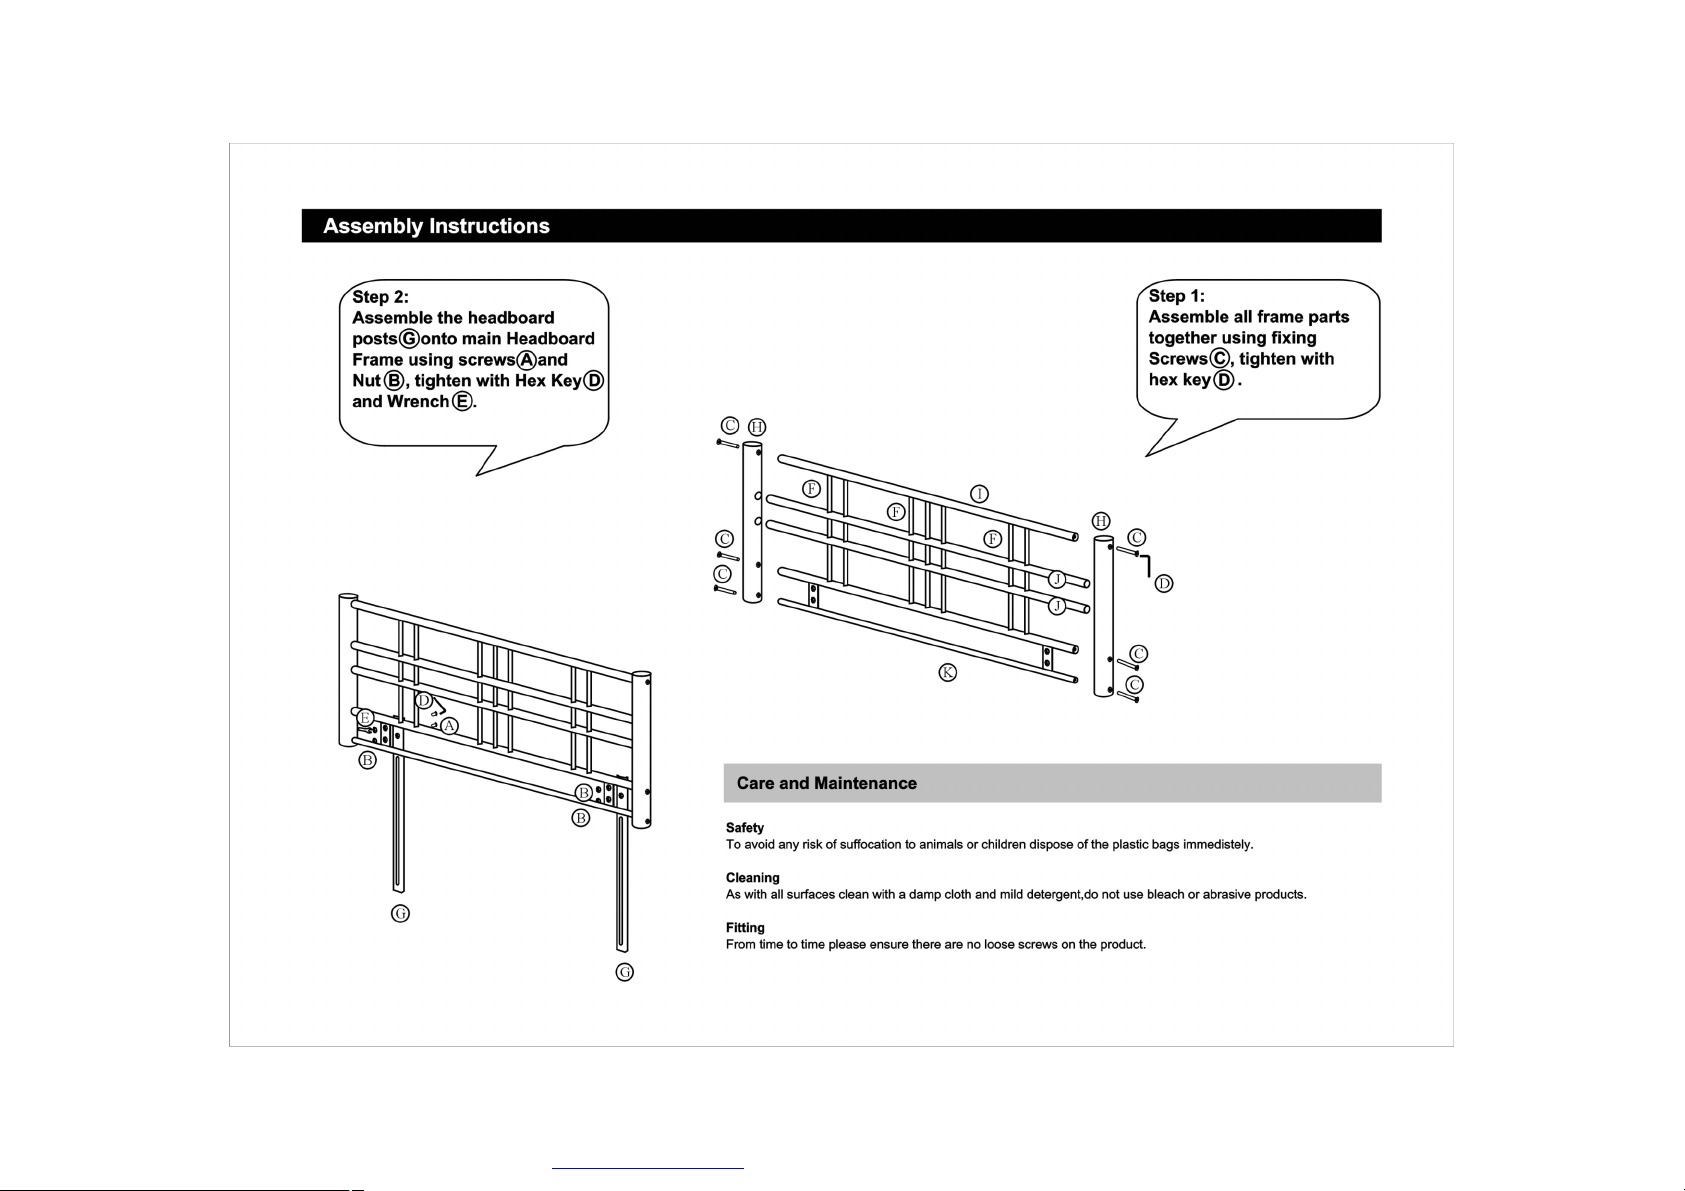
Assembly Instructions
Step 1
Assemble headboard
frame
a: Assemble end
horizontal bar
middle horizontal bars
3
to headboard posts
5
using bolts B as
shown in the gure.
Note: The chrome cap
on both posts should be
at the top.
Do not fully tighten
bolts.
2
and
b: Insert headboard
uprights
middle horizontal bars
to end horizontal bar
1
through
2
a:
B
2
5
3
B
5
b:
3
.
2
c: Attach connecting
4
bar
uprights and x to
headboard posts using
bolts
to the headboard
B
.
3
1
1
1
c:
B
B
4
B
B
3
Page 7

Assembly Instructions
Step 2
Assemble leg
6
Assemble legs
connecting bar
A
bolts
and nuts C.
to
4
using
Note: Re-tighten all the
bolts.
Assembly is complete.
A
A
A
A
C
C
4
C
C
6
6
If you need help or have damaged or missing parts, call the Customer Helpline: 0845 6400800
 Loading...