

Page 1
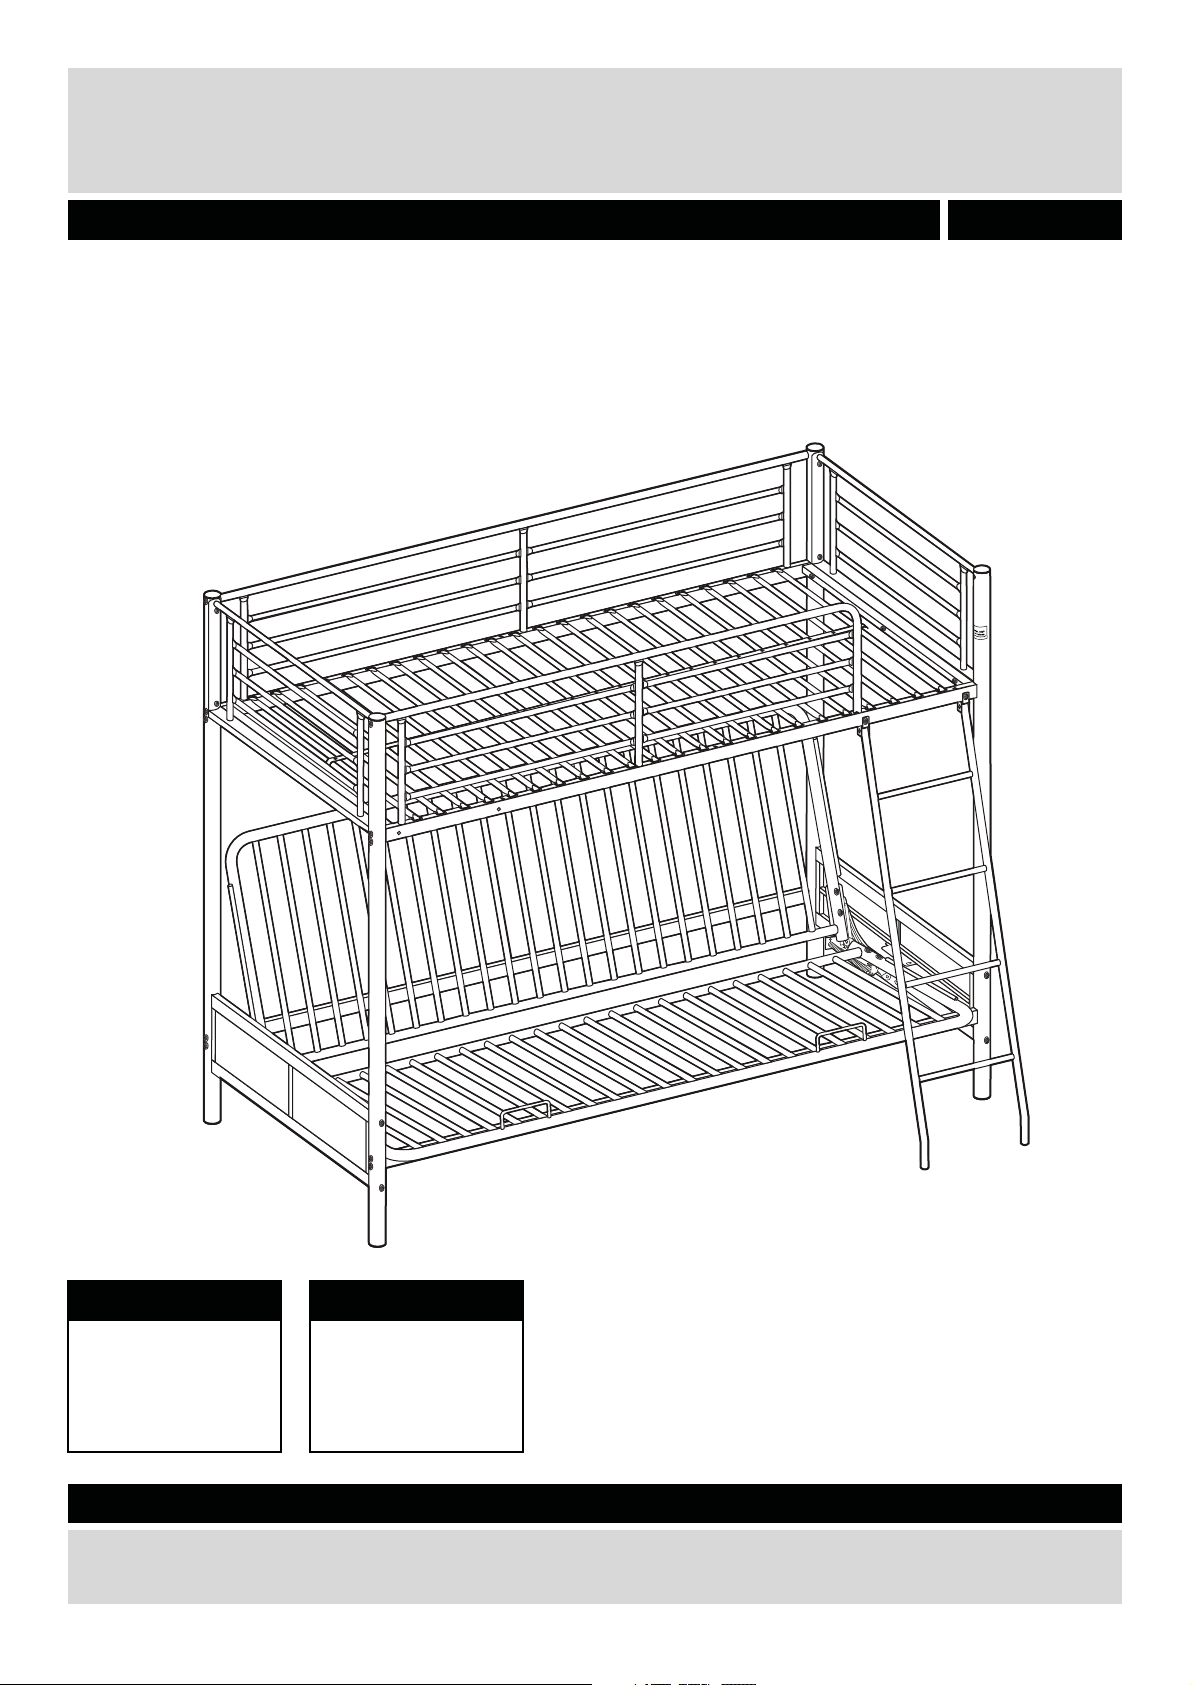
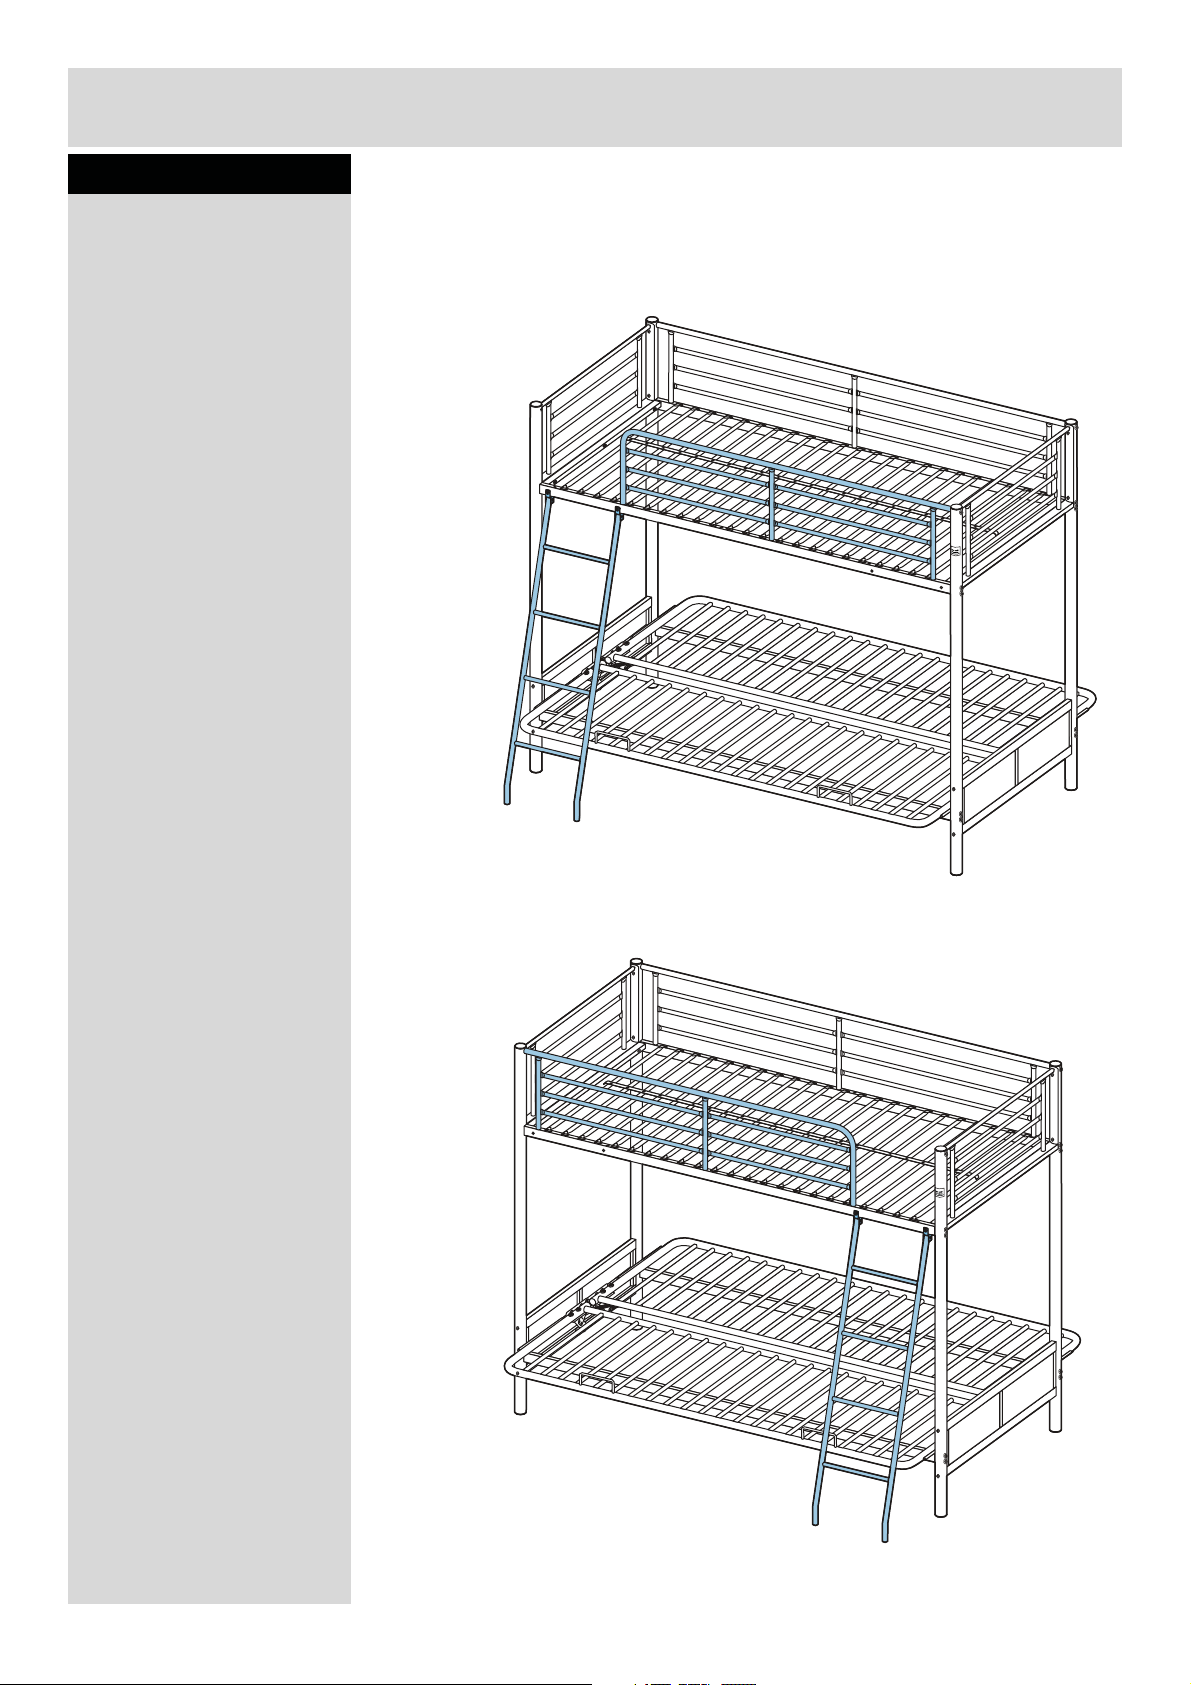
FUTON BUNK BED
Assembly Instructions - Please keep for future reference
656/0032
Open Dimensions
Width - 201cm
Depth - 177.5cm
Height - 165cm
Important -
If you need help or have damaged or missing parts, call the Customer Helpline: 08456 400800
Please read these instruction fully before starting assembly
Close Dimensions
Width - 201cm
Depth - 164cm
Height - 165cm
Issue 1 - 02/01/10
Page 2
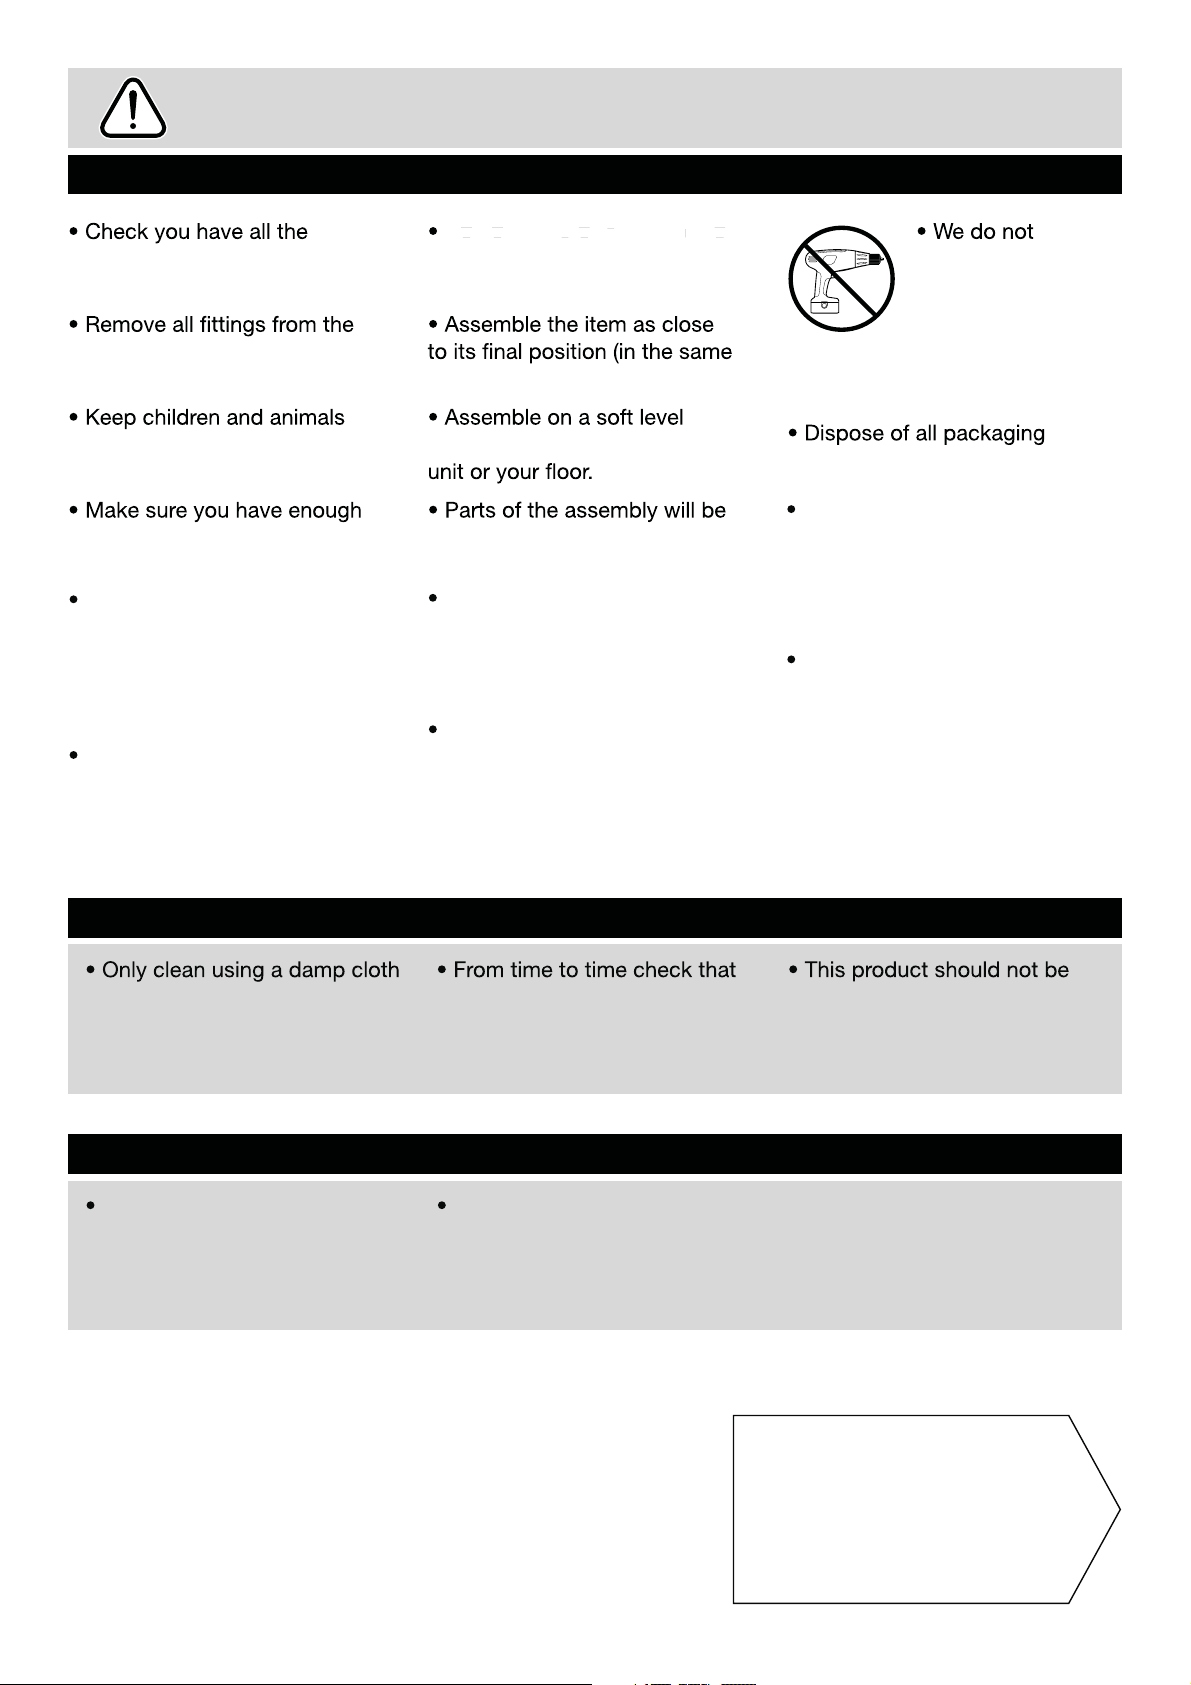
Safety and Care Advice
IMPORTANT – READ CAREFULLY – RETAIN FOR FUTURE REFERENCE
Do not stand on the product,
components and tools listed on
pages 2 and 3.
plastic bags and separate them
into their groups.
this could cause damage.
room) as possible.
as this could damage the unit.
Only use hand screwdrivers.
recommend the
use of power
drill/drivers for
inserting screws,
away from the work area, small
parts could choke if swallowed.
space to layout the parts before
starting.
All assembly fastenings
should always be tightened
properly and that care should
be taken that no fittings are
loose.
Recommended size of the
mattress(es):
W75 x L175 x D18cm.
Care and maintenance
and mild detergent, do not use
bleach or abrasive cleaners.
surface to avoid damaging the
easier with 2 people.
The bunk bed or high bed
should not be used if any
structural part is broken or
missing.
The high beds and the upper
bed of bunk beds are not
suitable for children under six
years due to the risk of injury
from falls.
there are no loose screws on
this unit.
carefully and responsibly.
Children can strangle in
items such as ropes, strings,
cords, harnesses and belts
attached to or hung on a bunk
bed/ high bed.
Warning: “Children can
become trapped between the
bed and the wall. To avoid risk
serious injury the distance
of
between the top safety barrier
and the wall shall not exceed
75 mm or shall be more than
230mm”.
discarded with household
waste. Take to your local
authority waste disposal centre.
Keep These Instructions For Future Reference
This product complies with
EN 747-1:2007
1
Argos plc
489-499 Avebury Boulevard
Central Milton Keynes
MK9 2NW
Note:
if required the next
page can be cut out and used
as reference throughout the
assembly. Keep this page with
these instructions for future
reference.
Page 3
Components - Panels
Please check you have all the pan els listed below
1
Metal leg x 4
( Ø4.8 x 165cm)
Lower footboard x 1
4
(88.7 x 20cm)
Bottom cross bar x 2
7
(190.7 x 4cm)
2
Headboard x 2
(89.9 x 39.3cm)
Filler bar x 2
5
(90.1 x 3cm)
Top cross bar x 1
8
(190.7 x 4cm)
3
Lower footboard x 1
(88.7 x 20cm)
ARGOS
Top cross bar x 1
6
(190.7 x 4cm)
9
Bed slats x 1
(190 x 93.4cm)
Back safety barrier x 1
10
(190.4 x 37cm)
Spring hinge X 1
13
(46 x 16cm)
16
Ladder X 1
(144 x 34.7cm)
Front safety barrier x 1
11
(154 x 37cm)
Futon frame X 1
14
(190 x 69.8cm)
Spring hinge X 1
12
(46 x 16cm)
Futon frame X 1
15
(190 x 69.8cm)
2
Page 4
If you have damaged or missing components,
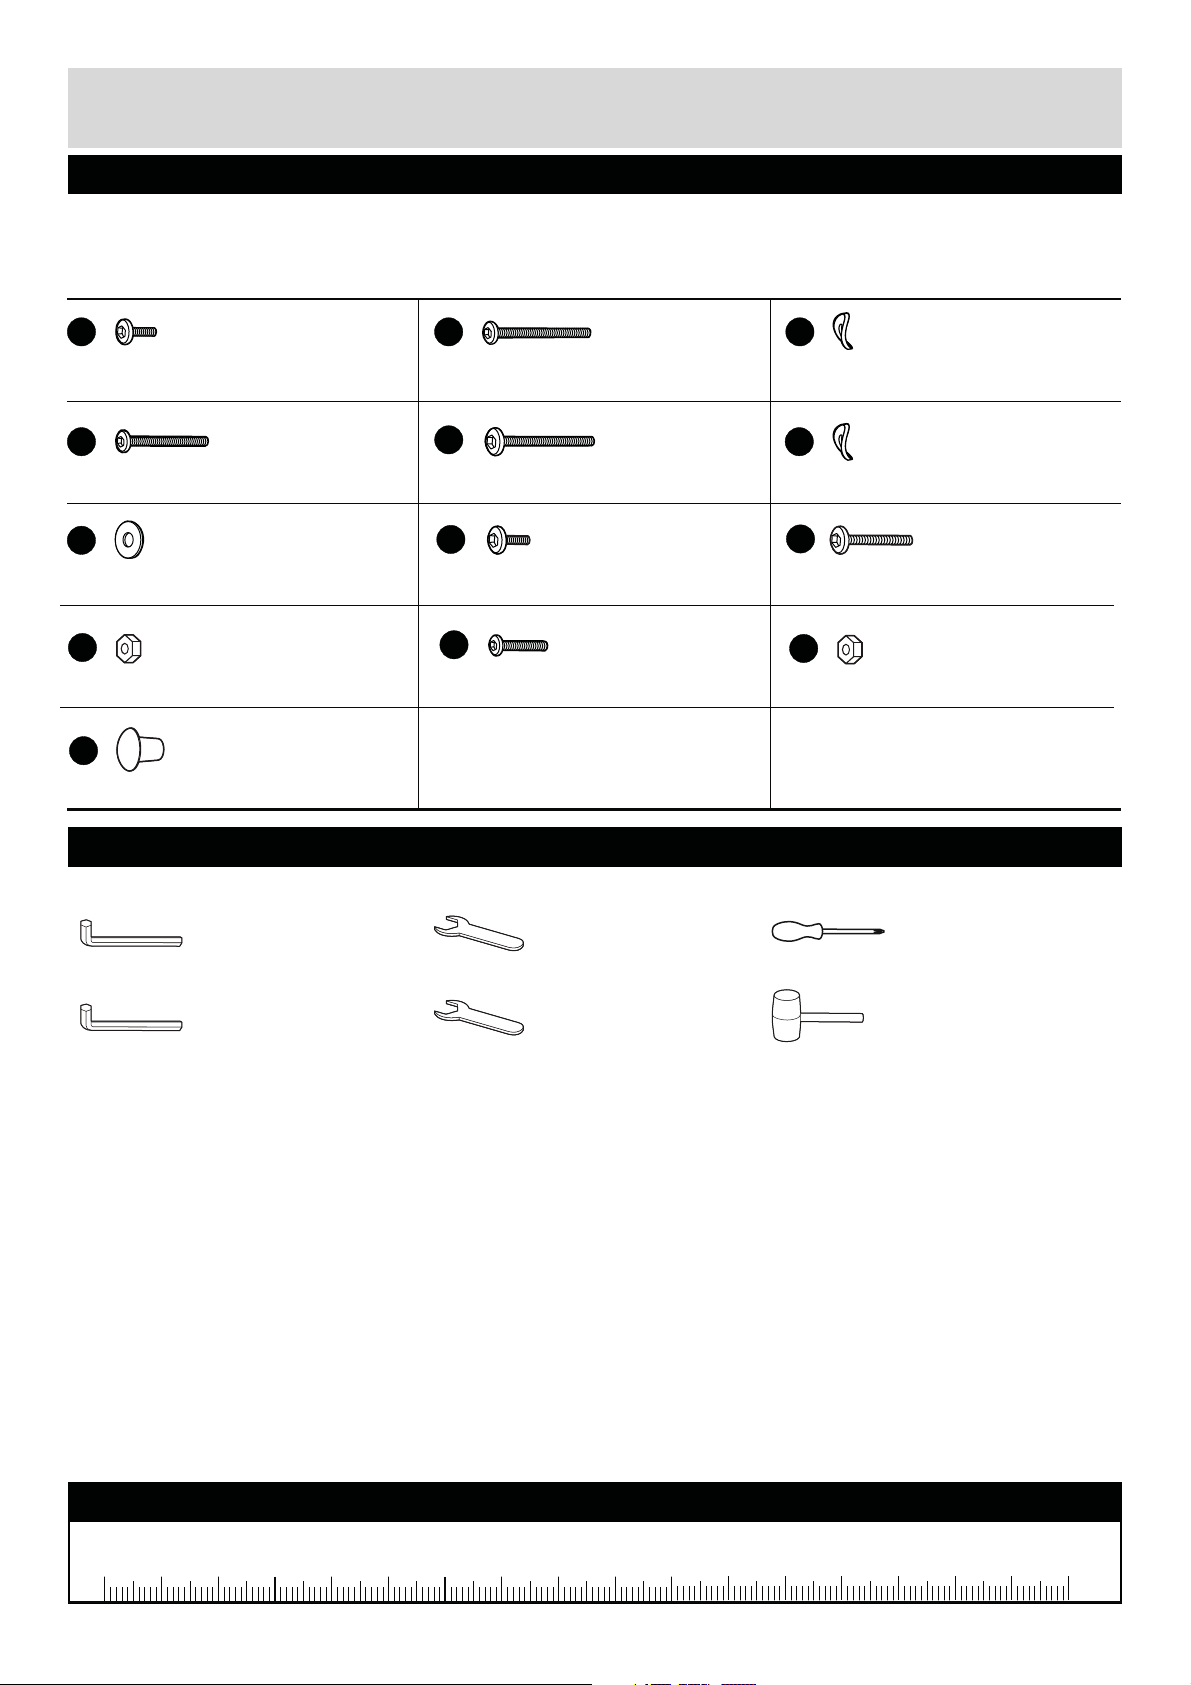
Components - Fittings
call the Customer Helpline: 08456 400800
Please check you have all the fittings listed below
Note: The quant it ies below are the correct amount to complete the assembly. In some cases more
fittings may be supplied than are required.
A
M6 x 20mm Bolt x 8
D
M6 x 55mm Bolt x 11
G
18mm Washer x 18
J
M8 Nuts x 8
M
Plastic cover x 14
Tools required
B
M6 x 65mm Bolt x 24
E
M8 x 65mm Bolt x 4
H
M8 x 20mm Bolt x 4
K
M6 x 35mm Bolt x 2
C
16mm Washer x 24
F
19mm Washer x 11
I
M8 x 50mm Bolt x 8
L
M6 Nuts x 2
Allen key M4
(included)
Allen key M5
(included)
Spanner M6
(included)
Spanner M8
(included)
Screwdriver
(not included)
Rubber Mallet
(not included)
Ruler - Use this ruler to help correctly identify the screws
0 5 10 15 20 25 30 35 40 45 50 55 60 65 70 75 80 85 90 95 100 110 120105 115 125 130 135 140 145 150 155 160 165 170
3
Page 5
Assembly Instructions
Step 1
Note: Please ensure
the WASHER is curving
in facing the hole
before assembling.
Step 2
Attaching headboard
Attach headboard Ⓑ to
metal leg Ⓐ by using 2
pcs of bolts .
Headboard should
1
A
2
2
be faced toward to other
side.
Step 3
Attaching lower
headboard
Attach lower headboard
to metal leg by
3
using 2 pcs of bolts
and 2 pcs of washers .
1
B
C
The washer curving in
facing the hole is correct.
1
A
A
2
The washer curving out
facing the hole is incorrect.
1
2
1
2
B
B
C
1
3
Headboard should
3
be faced toward to other
side.
Step 4
Attaching metal leg
Attaching the other
metal leg to the
headboard by using
2 pcs of bolts .
1
2
A
A
2
1
3
2
A
A
1
4
Page 6
Assembly Instructions
Step 5
Attaching metal leg
Attach metal leg to
the lower footboard
1
3
by using 2 pcs of screws
and 2 pcs washers .
B
C
Step 6
Attaching Filler bar
Attach filler bar to
headboard
3 pcs of bolts .
5
2
by using
D
3
2
1
D
D
D
5
2
C
C
B
B
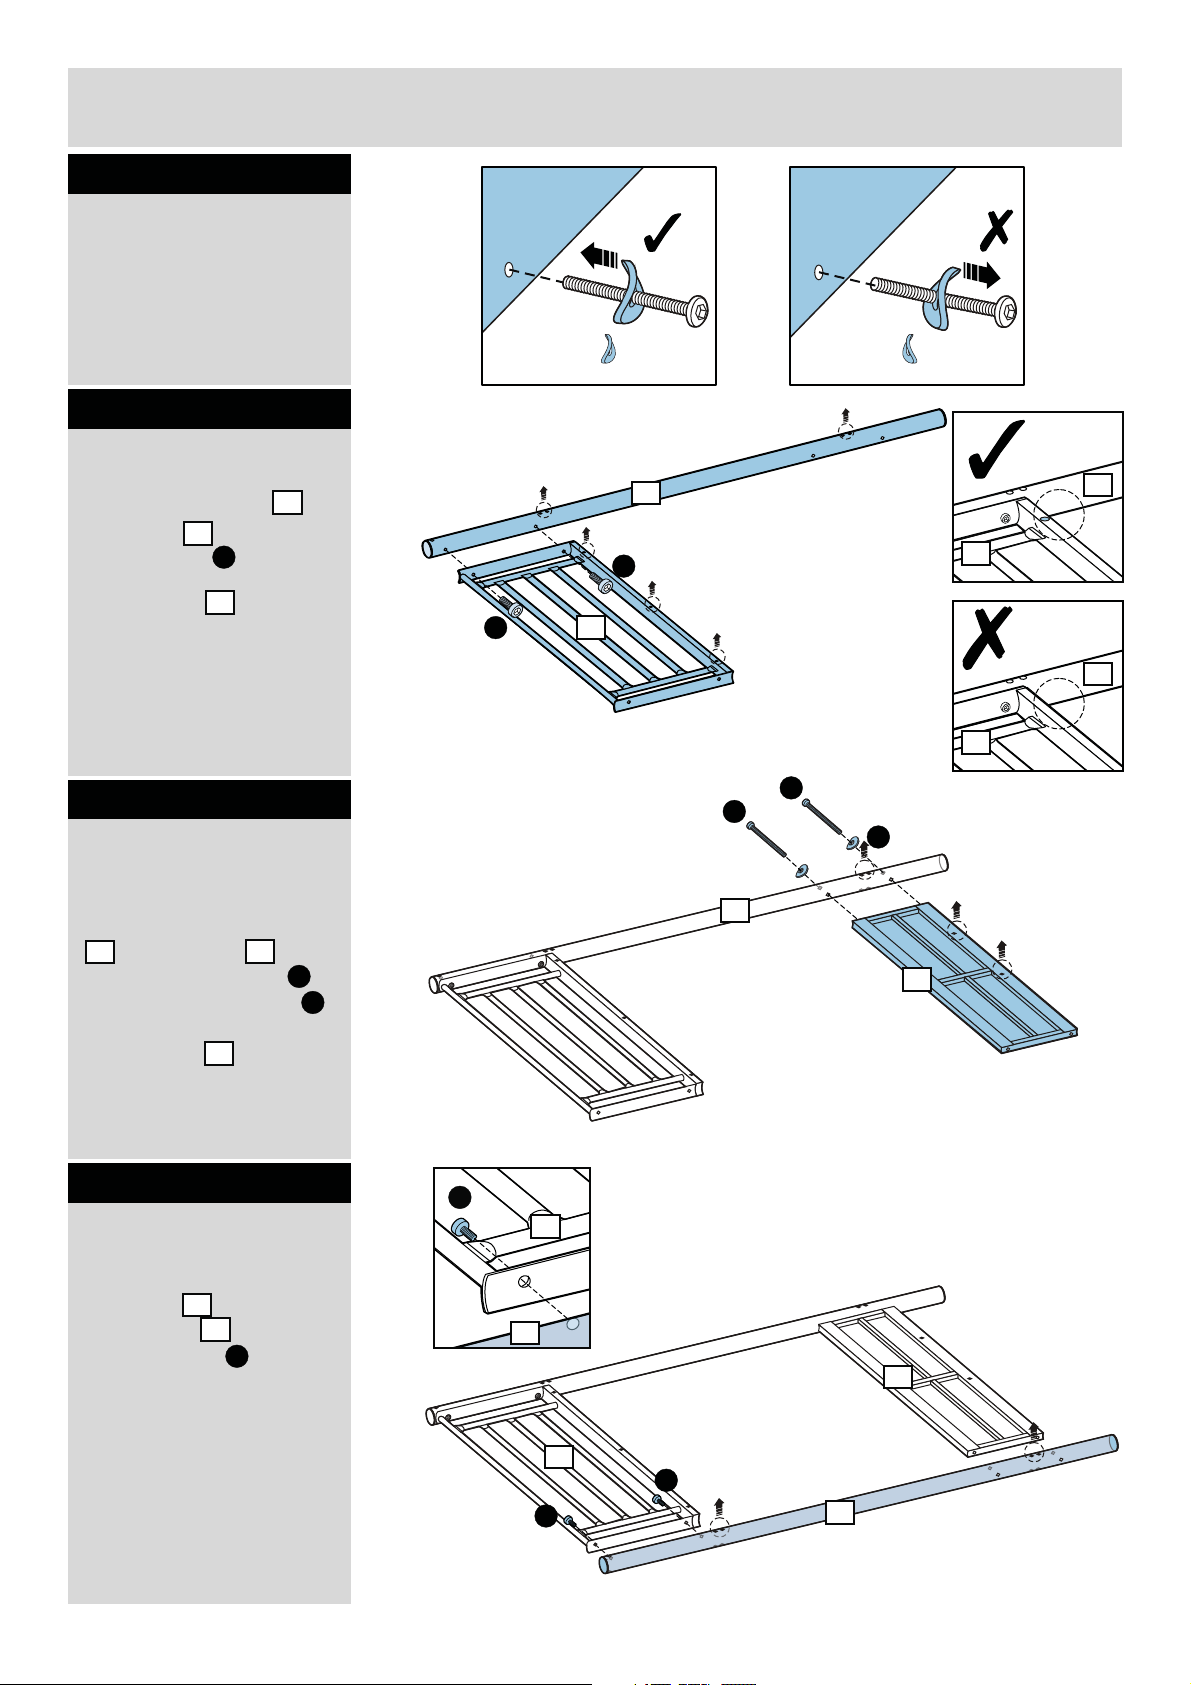
Step 7
Attaching headboard
Attach headboard to
metal leg by using 2
pcs of bolts .
5
1
A
2
1
A
A
2
2
2
1
1
Page 7

Assembly Instructions
Step 8
Attaching lower
footboard
Attach lower footboard
4
to metal leg by
using 2 pcs of bolts
and 2 pcs of washers .
Footboard should be
1
B
C
4
faced toward to other
side.
Step 9
Attaching metal leg
Attaching the other
metal leg to the
headboard by using
2 pcs of bolts .
1
2
A
B
B
C
C
1
4
A
2
1
4
Step 10
Attaching lower
footboard
Attach lower footboard
4
to metal leg by
using 2 pcs of bolts
and 2 pcs of washers .
1
B
C
2
A
A
2
1
4
C
1
C
B
B
6
Page 8

Assembly Instructions
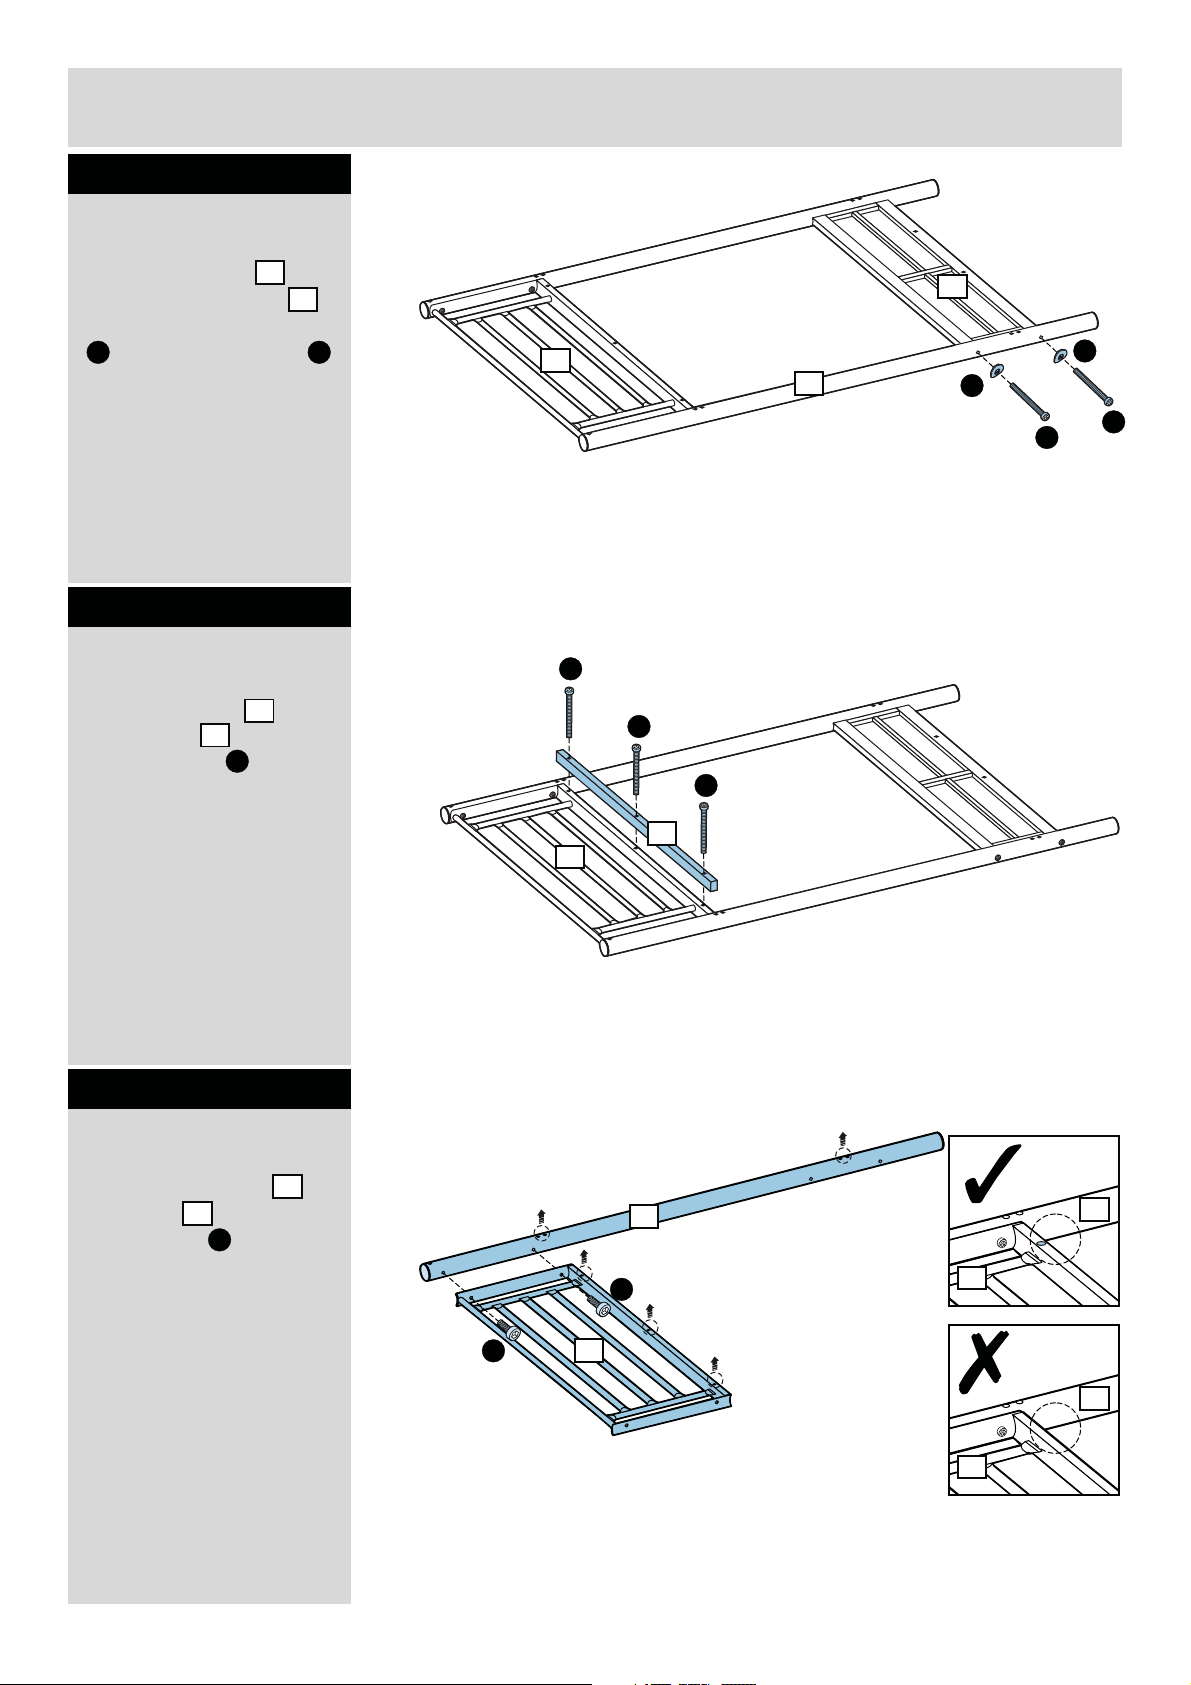
Step 11
Attaching filler bar
Attach filler bar to
headboard by using
3 pcs of bolts .
5
2
D
Step 12
Attaching top cross
bar
Two people are required
here.
D
D
D
5
2
4
4
Attach top cross bar
6
to the unit by using 2
pcs of bolts and 2 pcs
of washers .
B
C
Warning:
The unit is
heavy.
Lif t with care.
Step 13
Attaching bottom
cross bar
Two people are required
here.
Attach bottom cross
7
to the unit by using 2
pcs of bolts and 2
B
pcs of washers .
bar
C
6
1
C
C
B
B
7
4
6
C
Warning:
The unit is
heavy.
C
1
B
B
Lif t with care.
7
Page 9

Assembly Instructions
Step 14
Join both cross bars
Two people are required
here.
Join both cross bars
7
and to the
completed units by
using 4 pcs of bolts
and 4 pcs of washers .
6
B
C
B
C
3
B
C
1
7
Warning:
The unit is
heavy.
Lif t with care.
Step 15
Join another cross
bars
Two people are required
here.
Join another 2 pcs of
cross bar and to
the unit by using 4 pcs
of bolts and 4 pcs of
washers .
7 8
B
C
4
6
1
B
C
B
C
1
3
7
Warning:
The unit is
heavy.
Lif t with care.
C
8
1
4
C
B
B
8
Page 10

Assembly Instructions
Step 16
Attaching bed slats
Spread out the bed slats
,make sure each
9
hook of slat point
downwards as shown.
9
Step 17
Attaching bed slats
Two people are required
here.
Use a rubber mallet(not
supplied) gently tap
each slat lock onto
cross bars and .
Recommend 2 persons
for assembly.
68
8
9
6
3
4
9
Page 11

Assembly Instructions
Step 18
Attaching safety
barrier
Two people are required
here.
Attach safety barrier
to this unit through 2
pcs of bolts and 2 pcs
of washers .
E
F
Fix 3 pcs of bolts and
washers to this safety
barrier
cross bar .
G
10
through top
8
10
D
E
F
10
F
8
1
1
10
8
G
D
E
Step 19
Fixing safety barrier
Fix safety barrier to
the unit throush 3 pcs of
bolts with tool.
D
10
10
8
1
1
10
8
D
10
Page 12
Assembly Instructions
Step 20
Attaching ladders
Ladder can be fixed to
either left or right side.
OPTION 1
OPTION 2
11
Page 13

Assembly Instructions
Step 21
Attaching front safety
barrier
Two people are required
here.
Attach front safety
barrier to top bunk
by using one of bolt
and washer from side
and 1 pcs of bolt and
washer from bottom
with tool
11
E
F
E
G
as shown.
E
F
11
6
G
E
G
E
Step 22
Attaching front safety
barrier
Secure safety barrier Ⓚ
underside by using 2
pcs of bolts and 2
D
pcs of washers with
tool as shown.
11
G
11
G
6
D
G
D
G
D
12
Page 14

Assembly Instructions
Step 23
Attaching spring
hinge
Attach 1 pc of spring
hinge by using 2 pcs
of bolts and washer
with tool.
12
H
G
3
Step 24
Attaching spring
hinge
Attach 1 pc of spring
hinge by using 2 pcs
of bolts and washer
with tool.
13
H
3
12
G
G
H
4
13
4
3
13
G
H
4
Page 15

Assembly Instructions
Step 25
Attaching futon frame
Lay down futon frame
14
on spring hinge
by using 2 pcs of bolts
, washers , and
I
J
nuts with spanner and
F
tool.
13
G
I
14
F
Step 26
Attaching futon frame
Fix another side of the
futon frame through
spring hinge by
using 2 pcs of bolts ,
washers , and nuts
J
with spanner and
tool.
14
12
I
F
G
13
G
J
I
12
F
G
J
14
14
Page 16

Assembly Instructions
Step 27
Attaching futon frame
Lay down futon frame
15
on spring hinge
by using 2 pcs of bolts
, washers , and
I
J
nuts with spanner and
F
tool.
12
G
I
F
Step 28
Attaching futon frame
Fix another side of the
futon frame through
spring hinge by
using 2 pcs of bolts ,
washers , and nuts
J
with spanner and
tool.
15
12
I
F
G
G
J
15
I
15
15
F
G
J
Page 17

Assembly Instructions
Step 29
Fixing ladder ( for
right side )
a: Attach the ladder
onto this unit as shown.
b: Fix the ladder to
the unit by using 2 pcs
of bolts and nuts
with tool.
K
16
L
a:
b:
6
16
L
L
K
Step 30
Attaching plastic
covers
Attach 14 pcs of plastic
covers
as shown.
M
K
M
M
7
6
M
M
M
1
M
16
Page 18

Assembly Instructions
Step 31
Putting futon frame
in positon
a: Lift up the front futon
frame.
b: Push it inward.
a:
15
b:
c: Put down the futon
frame front to lock in
position.
15
c:
14
15
17
Page 19

Assembly Instructions
Step 32
Assembly is
complete.
For safety reason,please
ensure the top of the
mattress shall not come
above the line marked
on the top bunk.
WARNING:
TOP OF THE MATTRESS SHALL
NOT COME ABOVE THE LABEL
MARKED ON THE BED.
MAX:200mm
Step 33
Assembly is
complete.
If you need help or have damaged or missing parts, call the Customer Helpline: 08456 400800
18
 Loading...