

Page 1
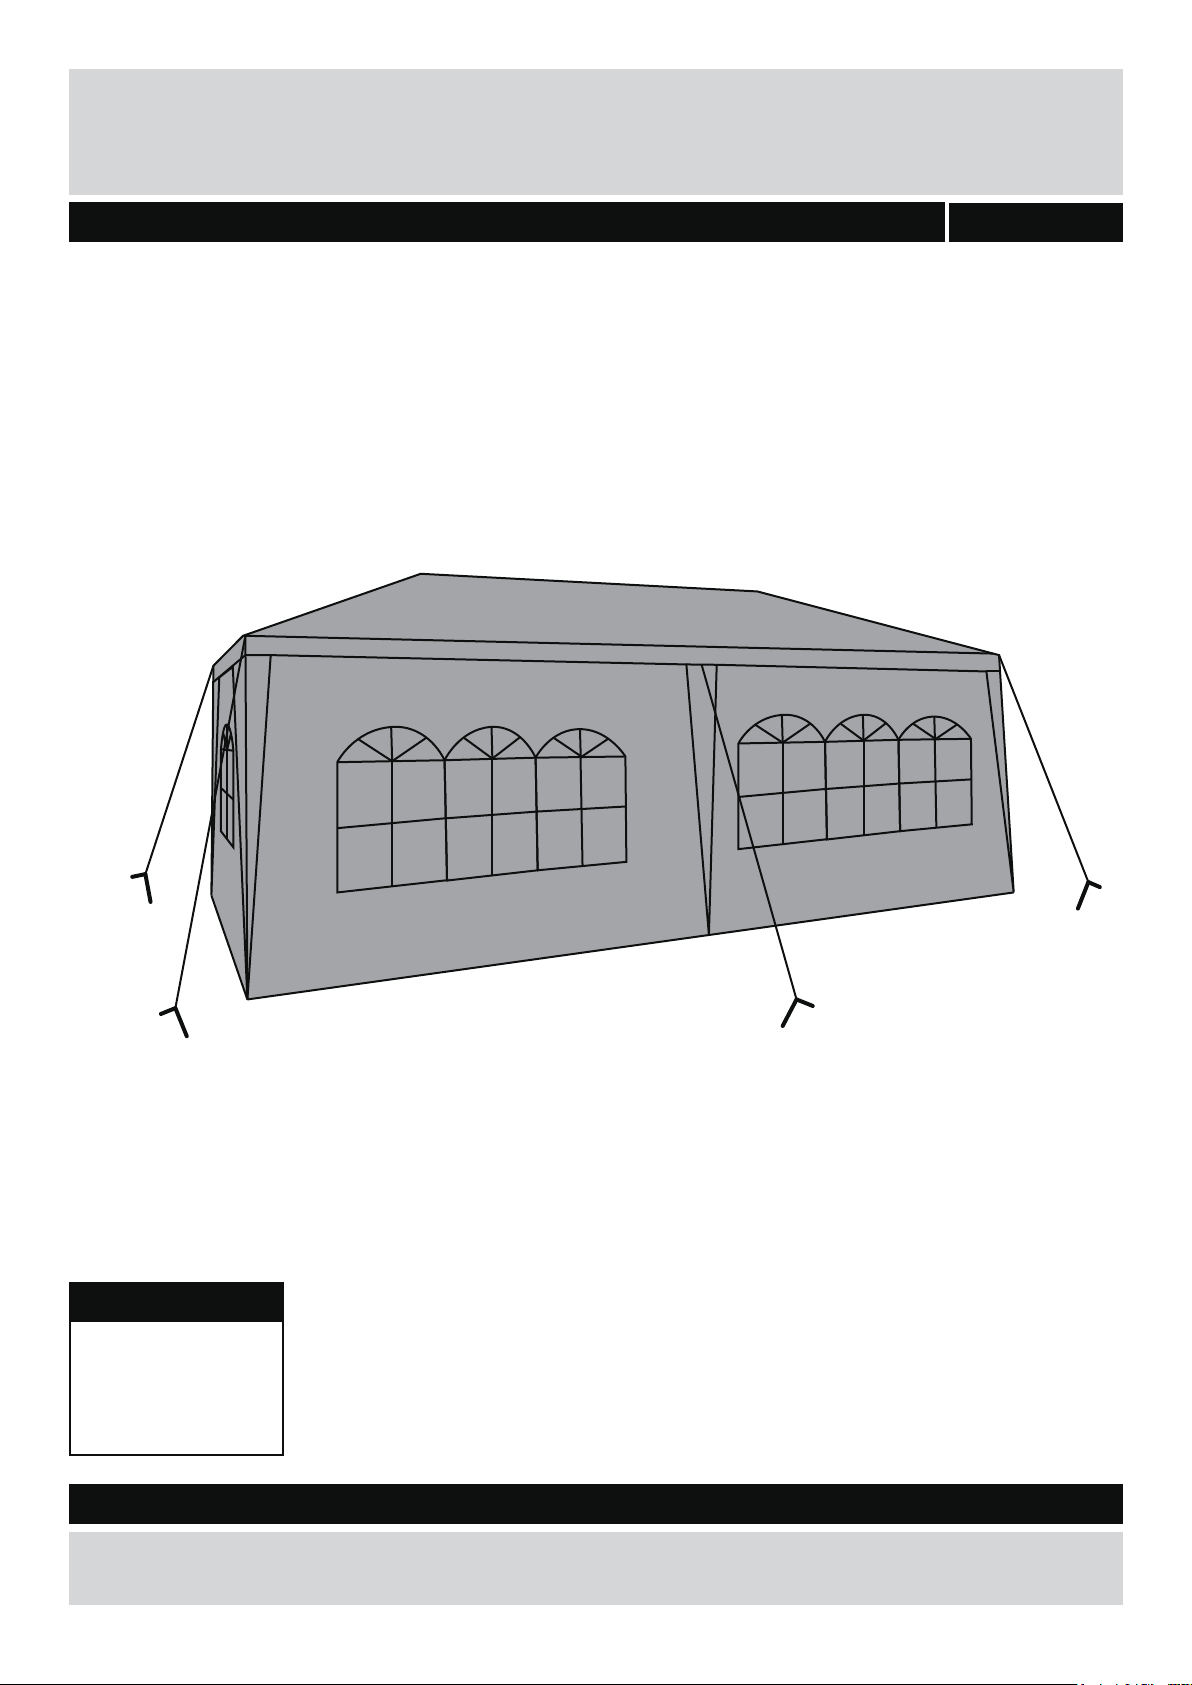
Dimensions
Width - 300cm
Height - 260cm
Important – Please read these instructions fully before starting assembly
651/0745
6x3M Gazebo With Side Panels
Simple Assembly Instructions - Please keep for future reference
Depth - 600cm
If you need help or have damaged or missing parts, call the Customer Helpline: 0845 640 0800
Retailer: Argos
Address: 489-499 Avebury Boulevard Saxon Gate West, Central Milton Keynes Bucks, MK9, 2NW
Page 2

IMPORTANT SAFETY INSTRUCTIONS
Read all instruction before using and keep for future reference
Read these instructions
carefully and familiarise
yourself with the procedure
before assembling the unit.
Check that you have all the
component parts following the
list on the page 3 and
familiarise yourself with each
part before proceeding.
Take all the fittings out of the
plastic bag and separate them
into their groups.
Ensure you have enough
space to lay out all the parts
before assembly.
To avoid scratching it is
recommended that you
assemble the unit on a soft
level surface.
• Please keep children away
when assembly. Please keep
children under direct supervision
of adult when using.
• Please do not use the gazebo
under windy condition.
• Always use guy rope and pegs to
secure the gazebo when using.
• This Gazebo is not a permanent
structure and should be
disassembled and stored away
after using.
• Do not repack your Gazebo
until completely dry.
• We recommend assembly by
four persons under light or no
wind conditions.
•This Gazebo must not be left
erect in windy conditions.
•Keep the Gazebo Fabric away
from screws, nails, staples,
hooks, etc to avoid damage to
the fabric and frame.
Warning:
The unit
weights approximately
kgs.
31
Please lift with care.
CAUTION
Fire precautions
• Do not place the Gazebo
near lights, fireplaces, gas or
electric heaters, candles,
radiators, or any other
sources of heat, fire or
flammable liquids.
• This Gazebo features a
Fabric cover that is not flame
retardant.
Safety
• To avoid any risks of suffocation to
animals or children dispose of the
plastic bags immediately.
Cleaning
• We recommend caution and
common sense when in use.
• This Gazebo can burning.
• Do not use naked flames in or
around the Gazebo. We recommend
you advise no smoking while inside.
• This Gazebo has no flame
retardant cooking area and should
not be use to house BBQs or other
cooking methods.
• As with all surfaces clean with a
damp cloth and mild detergent, do
not use bleach or abrasive products.
2
Page 3
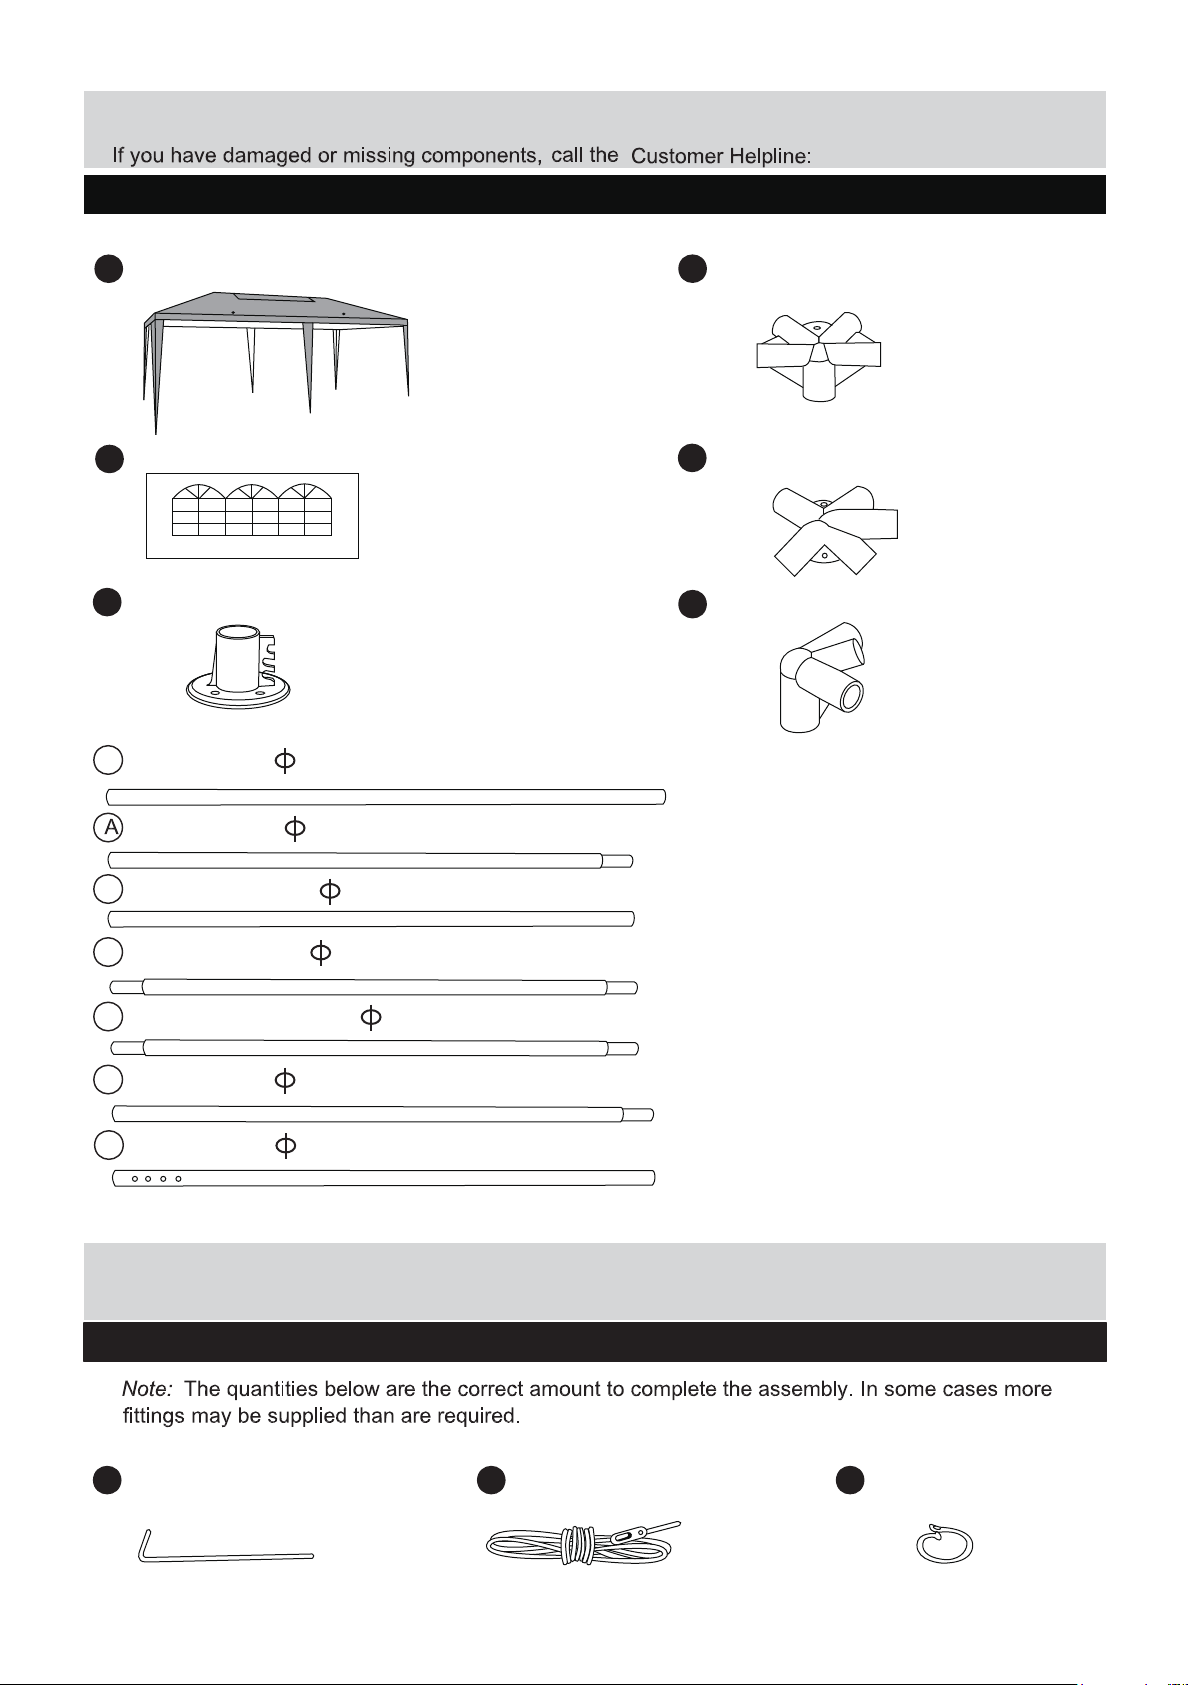
Components - Parts
Please check you have all the parts listed below
08456 400 800
1 x Gazebo Cover
A
6 x panel w/window
B
C
6 x Baseplate
4 x Top Pole ( 25 x 1080mm)
1
12 x Top Pole ( 25 x 1080mm)
1
2 x Centre Connector
D
2 x Middle Joint
E
2 x Corner Joint
F
14 x Support Pole ( 25 x 1000mm)
2
6 x Support Pole ( 25 x 1000mm)
2A
1 x Supplemental Pole ( 25 x 1018mm)
2B
6 x Leg Pole ( 32 x 1060mm)
3
6 x Leg Pole ( 32x 1000mm)
4
Components - Fittings
Please check you have all the fittings listed below
G
12 x Peg
6 x Guy Rope
H I
36 x Curtain Ring
3
Page 4

Assembly Instructions
Stage 1- Fitting the Support Poles
St
ep 1
Insert Support Poles⊙
into the Support Poles ⊙
2A
2
Ensure all the poles are
fully inserted and secure.
See fig.1.
IMPORTANT: Because
of the size of this unit
we recommend that it
is built in the place
intended for using
NOTE: Locate the unit
on the flat Ground free
from obstruction, in a
sheltered area away
from wind and heavy
rain as this will damage
the unit.
2
2A
2
Fig.1
Step 2
Use corner joints ⊙
together with Middle joint
to connect the Support
D
Poles .Ensure all the poles
are fully inserted
secure.
See fig 2.
NOTE: It would be useful
to ask someone to help
you at this step.
F
and
F
2
2
2
2A
2
F
F
2
F
D
2A
Fig.2
2
D
F
F
4
Page 5

Assembly Instructions
Stage 2- Fitting the Top Poles
Step 3
Insert Top Poles⊙
1A
into the Top Poles⊙
Meanwhile insert Top
Poles⊙ into the Top
Poles⊙ .Ensure all
1A
1A
the poles are fully
inserted and secure.
See fig 3A&3B.
Step 4
Insert Supplemental
2B
Pole ⊙ into the
Support Poles ⊙
Ensure the 3 poles
are fully connected
and secure.
See fig 4.
2
.
1
1
1A
1A
Fig.3A
1A
Fig.3B
2
Fig.4
Step 5
Connect the Centre
Connector⊙ to
Corner joint⊙ and
Middle Joint⊙ by
Top Poles of fig 3 .
See fig 5.
Link the two Centre
Connector⊙ together
by connected poles of
fig 4
See fig 5.
NOTE: It would be useful
to ask someone to help
you at this step.
E
F
D
E
E
2
1A
F
1
F
D
2
2B
2A
2
D
2
E
1A
1A
F
2
2A
F
2
Fig.5
F
5
Page 6

Assembly Instructions
Stage 3- Fitting the Gazebo
St
ep 6
Insert Leg Poles ⊙ into
the unit. Ensure all the
poles are fully inserted
and secure.
See fig 6.
NOTE: It would be useful
to ask someone to help
you at this step.
3
3
3
3
Fig.6
3
3
3
Step 7
Carefully place the
Gazebo Cover ⊙ over
the assembled roof.
Then pull the Gazebo
tightly over the
assembled roof frame.
See fig7.
NOTE: It would be useful
to ask someone to help
you at this step.
A
A
Fig.7
6
Page 7

Assembly Instructions
Stage 4- Fitting the Legs
St
ep 8
Insert the Base Plates⊙
into the Leg Poles ⊙
Then insert the Leg
Poles into the unit.
Ensure all the poles are
fully inserted and secure.
See fig 8.
NOTE: It would be useful
to ask someone to help
you at this step.
4
C
4
4
4
C
C
3
Fig.8
4
4
4
C
C
4
C
4
4
C
C
Step 9
Use the Velcro Tapes
inside the Gazebo Cover
to fix it onto the
assembled Frame.
See fig 9&10.
Attach the Gazebo
Cover’s Hooks into holes
on the Leg Poles ⊙ .
Tighten by moving the
Hook to a lower hole.
See fig .11.
4
Velcro Tape
Fig.10
Fig.9
4
Hook
C
Fig.11
7
Page 8

Assembly Instructions
Stage 5- Fitting the Guy Ropes
Step 10
Attached the D ring onto the Base
Plates ⊙ .Then use Pegs ⊙ to
C
fix the Base Plates ⊙ into the
ground.
See fig 12&14.
Attach the end of the Guy Rope⊙
to the corner of the top coverring
on the Gazebo. Then attach one
end to the peg⊙ and drive the
peg into the ground.
See fig 12, 13&15.
G
G
C
Fig.13
H
H
G
Use the Same method as in fig.12
to fix the other Guy Ropes.
The length of Guy Ropes can be
adjusted.
See fig 16.
NOTE: The pegs are for location
purposes only. They will not
support the unit in high winds, see
above instructions.
NOTE: It would be useful to ask
someone to help you at this step.
Stage 6- Fitting the Unit
Step 11
CAUTION: Do not assemble or
disassemble during strong winds.
Hang on all 6 pcs Panels ⊙ at the
top using the Curtain Ring ⊙ ,
Velcro tapes at side of panels can
be fastened to the Gazebo legs,
Side Panels can be taken off
separately.
See fig 18, 19 &20.
B
I
Fig.12
Fig.16
Fig.17
G
C
Fig.18
Fig.15
Fig.14
I
Drainage holes prevent rain water
collecting.
See fig 17.
Assemble is complete.
Fig.20
!
IMPORTANT:
Always use this product with
caution and read the important
safety instructions.
If you need help or have damaged or missing parts, call the Customer Helpline: 0845 640 0800
Retailer: Argos
Address: 489-499 Avebury Boulevard Saxon Gate West, Central Milton Keynes Bucks, MK9, 2NW
Fig.19
8
 Loading...