

Page 1

3x3 Pop Up Gazebo with Side Panels Waterproof
Assembly Instructions - Please keep for future reference
651/0037
Dimensions
Width - 300cm
Depth - 300cm
Height - 255cm
Important: This Gazebo Must be opened, erected
and dismantled by 2 people at least
Important: Make sure all the guy ropes and pegs
are used, otherwise the gazebo will be unstable!
Important – Please read these instructions fully before starting assembly
If you need help or have damaged or missing parts, call the Customer Helpline: 0845 640 0800
Retailer: Argos
Address: 489-499 Avebury Boulevard Saxon Gate West, Central Milton Keynes Bucks, MK9, 2NW
Issue 1 - 13/09/13
Page 2
Safety and Care Ad vice
Important – Pleas e re ad th es e i n s truct i ons f u ll y before st ar ting assem bly
Fire precautions and safety
Care and storage
The unit
:gninraW
approximately
Please lift with care.
15.5
weights
kgs.
1
Page 3
Components - Parts & Fittings
If you have damaged or missing components, call the Customer Helpine: 0845 640 0800
Please check you have all the parts & fittings listed below
21
Tent bag x 1 Gazebo x 1
4
Side panel x 2
C
A
Peg x 14
3
Back panel x 1
B
Guy rope x 4
Gurtain ring x 4
required
Rubbor mallct x 1
D
2
Page 4
Assembly Instructions
Step 1
Opening the Gazebo
Note: At least 2 people
are required for this
procedure.
a & b: Stand the
Gazebo upright.
With people at diagonally
opposite corners, carefully
pull the Gazebo partly
open.
Move to each side,
carefully pulling the frame
apart until it has expanded
as shown in diagram b.
c & d: Lift the canopy to
reveal the framework.
With people at opposite
sides,carefully push up
and down on the frames
where shown.
2
a:
c:
2
b:
Move to each side,
carefully pulling
(compressing) the frame
together until it has
expanded as shownin
diagram d.
d:
Caution: Do not compress frame sides more than shown.
3
Page 5
Assembly Instructions
Step 2
2
Locking and extending
the Gazebo frame
Note: At least 2 people
are required for this
procedure.
a: In one corner at a time,
lock the Gazebo frame
in position by sliding the
corner bracket up until
the spring clip engages
into the bracket.
Pull and extend each leg
until the spring clips
engage into the hole in
the outer tubes.
2
a:
Spring clip
Spring clip
Note: There are two
spring clip location holes
in each leg, using the
lower holes will increase
the canopy tension,
pulling it tighter.
b: Use the velcro tapes
top frame as shown
c: From inside, check
that of the frame
sides are as shown.
Note: each velcro tap
frame are as shown.
1
stretch the tap first
stick velcro tap second
2
Leg
b:
c:
Finished position of frame sides - Do not compress any more.
Corner
bracket
Warning: the velcro tap
must stretch tight as this
could cause rain water to
collect on the canopy and
a hazard.
Do not compress more
than shown or the frame
can be damaged.
A
1 2
4
Page 6

Assembly Instructions
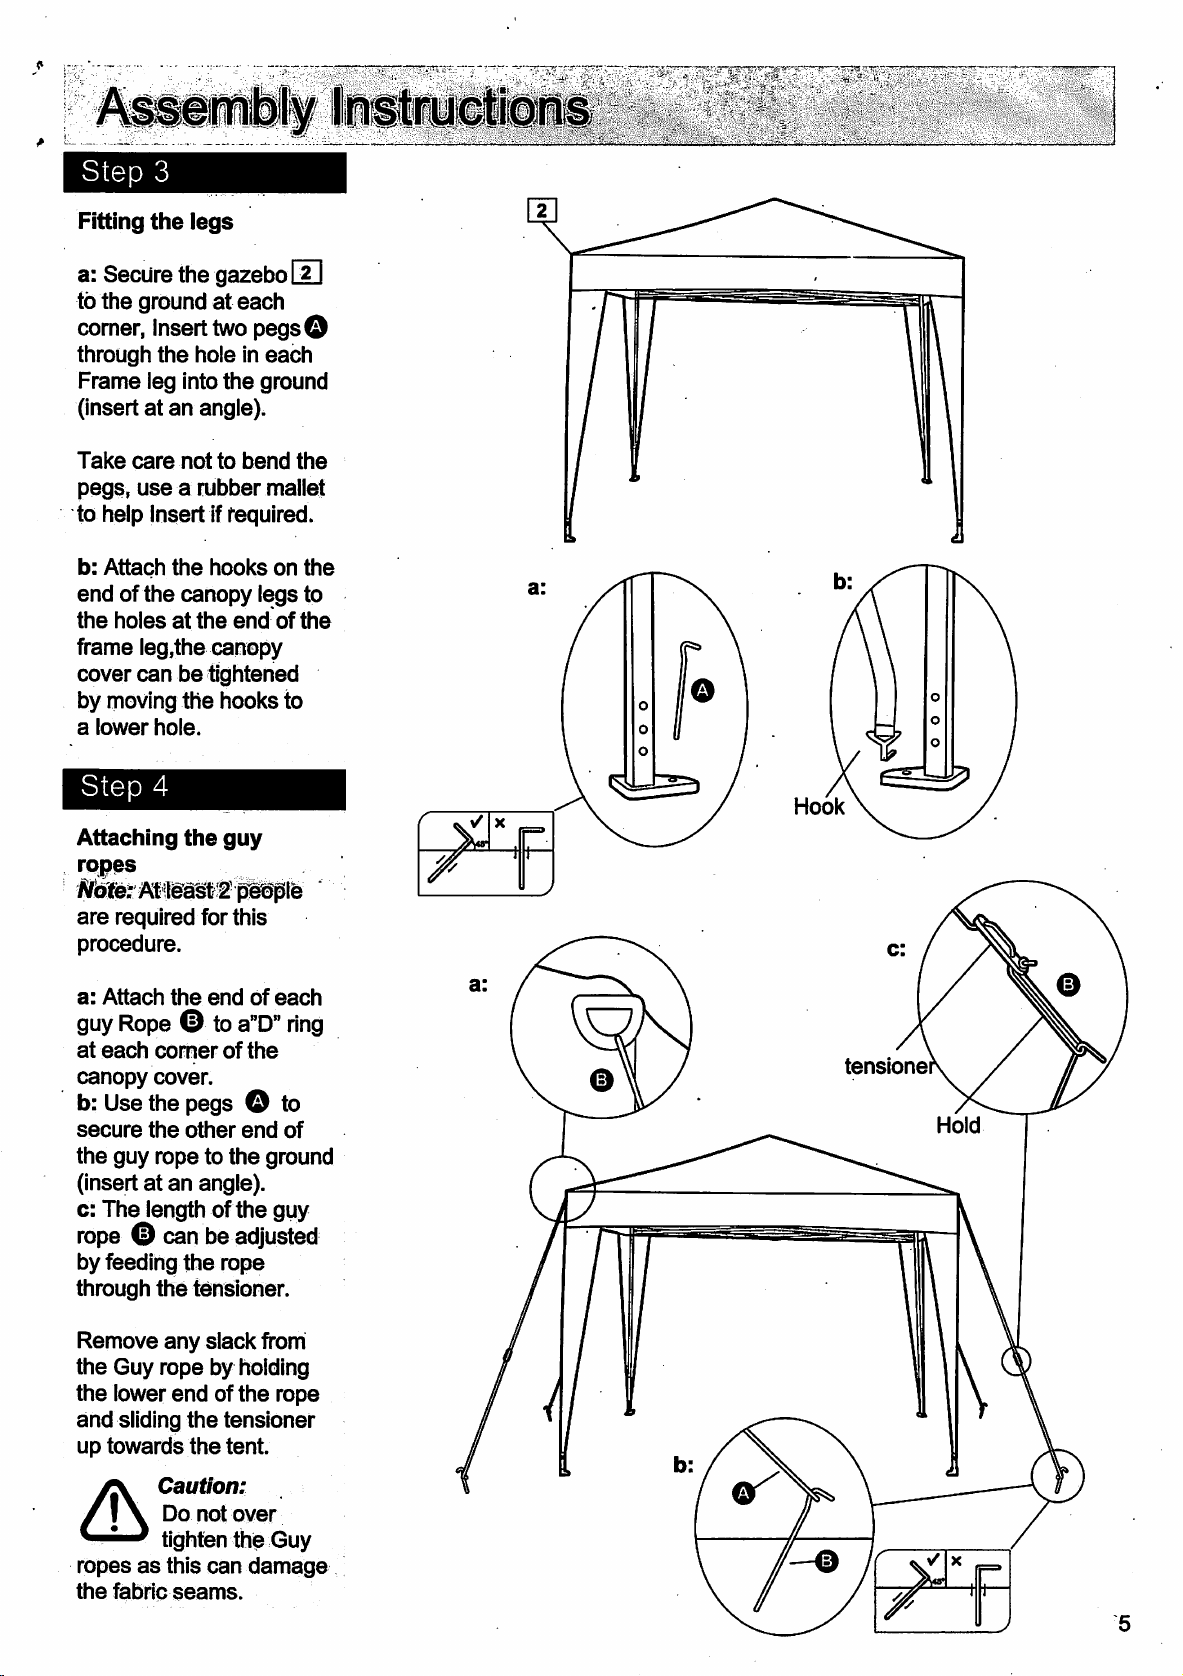
Step 3
Fitting the legs
a: Secure the gazebo
2
to the ground at each
corner, Insert two pegs
A
through the hole in each
Frame leg into the ground
(insert at an angle).
Take care not to bend the
pegs, use a rubber mallet
to help Insert if required.
b: Attach the hooks on the
end of the canopy legs to
the holes at the end of the
frame leg,the canopy
cover can be tightened
by moving the hooks to
a lower hole.
Step 4
Attaching the guy
ropes
Note: At least 2 people
are required for this
procedure.
a:
2
b:
A
Hook
c:
a: Attach the end of each
guy Rope to a”D” ring
B
at each corner of the
canopy cover.
b: Use the pegs to
A
secure the other end of
the guy rope to the ground
(insert at an angle).
c: The length of the guy
rope can be adjusted
B
by feeding the rope
through the tensioner.
Remove any slack from
the Guy rope by holding
the lower end of the rope
and sliding the tensioner
up towards the tent.
Caution:
Do not over
tighten the Guy
ropes as this can damage
the fabric seams.
a:
B
B
tensioner
Hold
b:
A
B
5
Page 7

Assembly Instructions
Step 5
Assembly Instrctions
Fitting the sides
Note:At least 2 people
are Required for this
procedure.
Use the Velcro tapes
a:
on the Back and side
panels &
To secure the panels
onto the frame work.
Note: each velcro tap
frame are as shown.
1
2
3 4
stretch the tap first
stick velcro tap second
a:
2
4
3
4
Warning: the velcro tap
must stretch tight as this
could cause rain water to
collect on the canopy and
a hazard.
Note: to avoid rain water
entering the gazebo,
ensure the curtain ring
is attaehed as shown.
C
Insert the pegs to
A
each side wall in the
bottom.
A
1 2
C
A
1 2
A
The assembly is now
complete
Velcro tape
6
Page 8

Folding Inst r u c t i ons
Step 6
Folding the Gazebo
Note: At least 2 people
are required for this
procedure.
Take care when
dismantling the Gazebo.
Follow the assembly
instructions in the
reverse order and do
not force the frame.
a: Remove the back and
side panels
b: Remove the guy ropes
and pegs
c: Unhook the canopy
from the frame legs and
remove the pegs.
d: Push in the spring
clips and slide up the
frame legs
e: Push in the spring
clips and (slightly) lower
the corner brackets.
f: With people at
diagonally opposite
corners, carefully lift and
push the gazebo
together.
a:
c:
b:
d:
Spring clip
e:
Spring clip
Do not force the frame.
Repeat at each corner
until the gazebo is fully
folded.
Store all of the
components and fittings
in the tent bag
provided.
WARNING: If use the
gazebo in outside,
please make sure to
take up the side wall.
If you need help or have damaged or missing parts, call the Customer Helpline: 0845 640 0800
Retailer: Argos
Address: 489-499 Avebury Boulevard Saxon Gate West, Central Milton Keynes Bucks, MK9, 2NW
1
Warning: in heavy wind , if you want to leave the
gazebo outside , please remove the side panels
f:
7
Page 9

!
3x3
Pop
Up
Gazebo
with
Side
Panels
Waterproof
Assembly Instructions - Please keep
z:S][^
for
future
reference
651/0037
Dimensions
Width-300cm
Depth-300cm
Height -
255cm
Important - Please
If
you
need
helporhave
Retailer: Argos
Address:
489-499
damagedormissing
Avebury
A
A
read
Boulevard
Important: This Gazebo Must be opened, erected
and
dismantled by 2 people
Important: Make sure
are
these
Saxon
used,
instructions
parts,
Gate
otherwise
fully
call
the
Customer
West,
Central
the
before
Milton
all
Helpline:
Keynes
at
least
the guy ropes and pegs
gazebo
starting
0845
Bucks.
will
be
assembly
840
0800
MK9,
2NW
unstable!
issue1-13/09/13
Page 10

/j\
Safety
and
Care
Advice
•
Check
components,
listedonpage
•
Remove
plastic
into
•
Keep
away
parts
•
Make
spacetolayout
'starting.
•
Do
Dismantle
winds.
• This unit is
fixture-Do
erectedInwindy
you
all fittings from
bags
their
groups.
children
from
could
sure
not
Assemble
have
fittings
and
the
chokeifswallowed.
you
during
notapermanent
not
all
2.
separate
and
work
have
the
parts
strong
use
conditions.
the
and
tools
the
animals
area,
small
enough
before
or
or
leave
them
•
Follow
precautions
Gazebo.
•
Please
is
Shower
Waterproof.
•
Practice
dismantling
usetofamiliarise
the
•
Take
components
ensure
when
•
Before
have
fittings,
are
all
safety
wheninor
note
proof
assembling
the
components
noteofall
and
you
don't
dismantling.
each
all
the
components
and
that
damaged.
that
use
and
fire
near
this
Gazebo
and
not
and
Gazebo
yourself
and
the
fittings
before
with
fittings.
and
forget anything
check
you
and
noneofthem
this
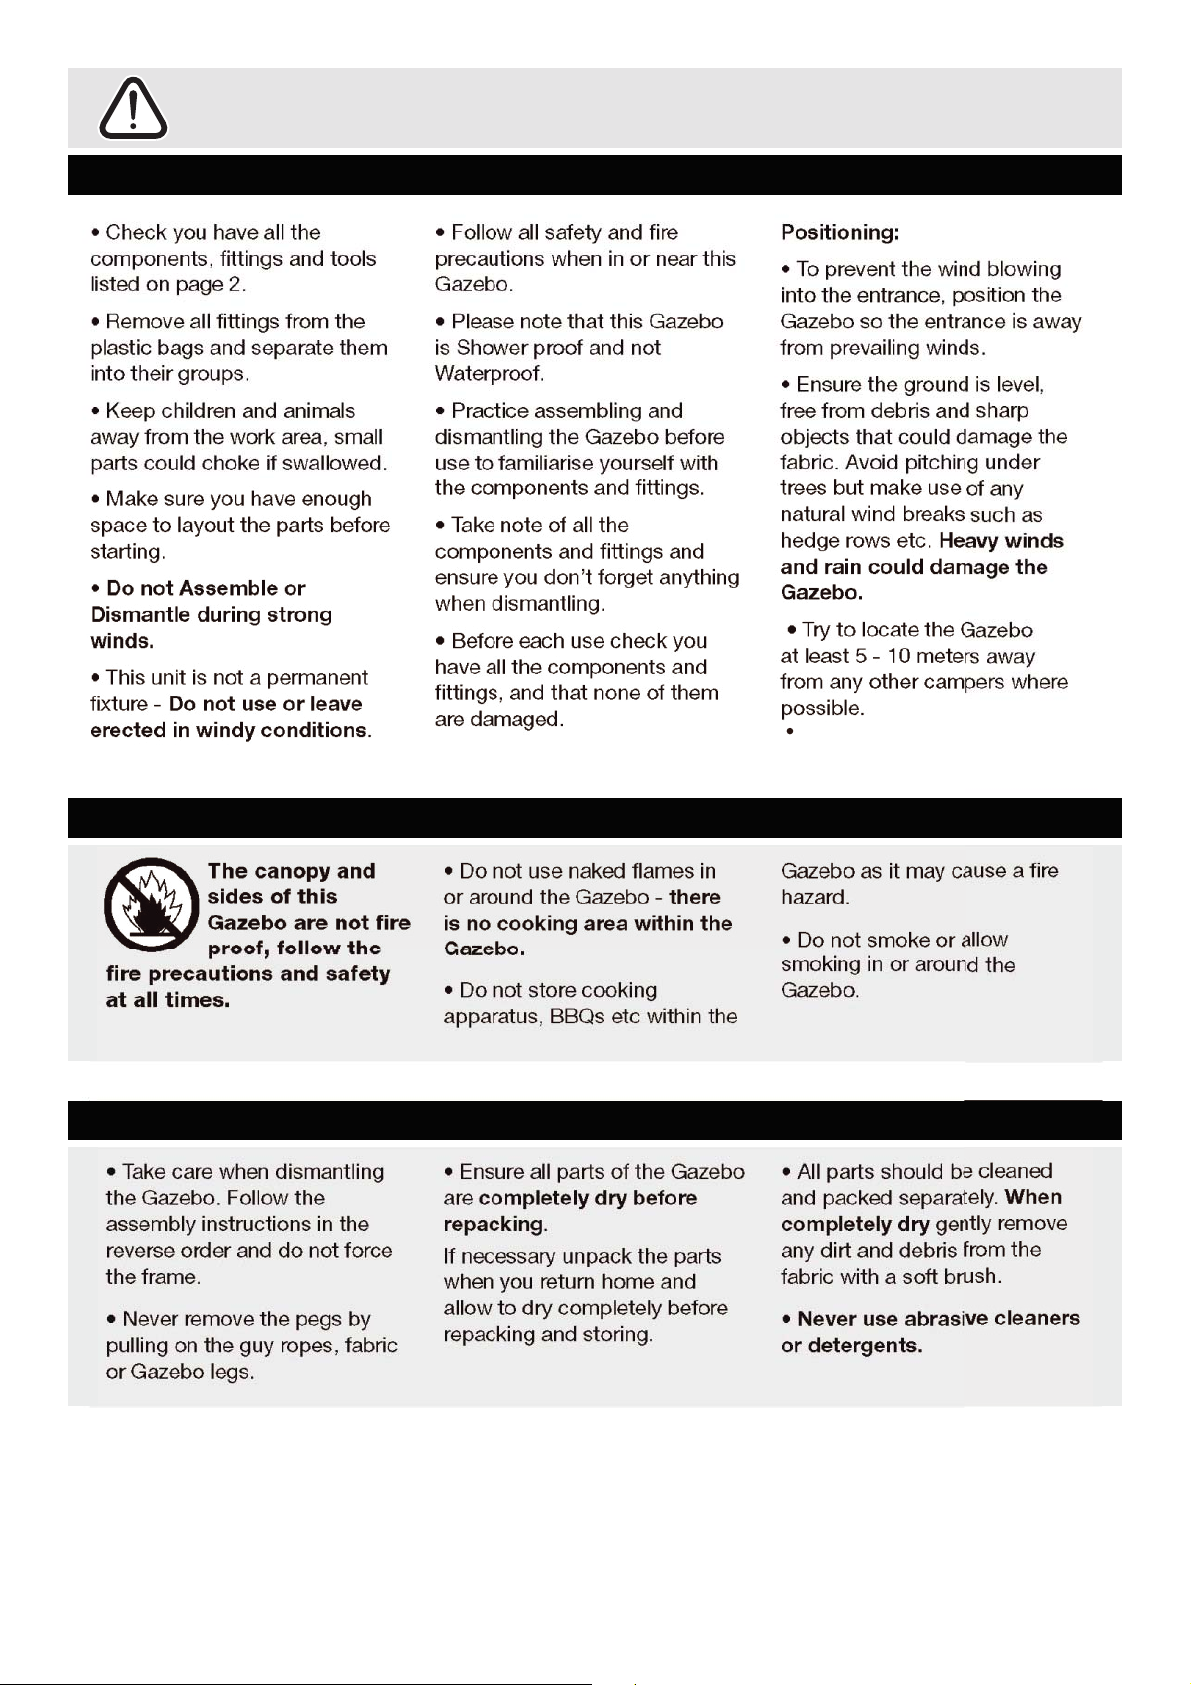
Positioning:
• To prevent
into
the
Gazebosothe
the
entrance,
entranceisaway
wind blowing
position
from prevailing winds.
the
debris
that
ground
and
could
damage
• Ensure
free
from
objects
fabric. Avoid pitching
trees
but
make
useofany
natural
hedge
and
Gazebo.
• Trytolocate
at
from
rain
least
any
wind
rows
could
5-10
other
breaks
etc.
damage
the
meters
campers
Heavy
Gazebo
possible.
•
IVarn/ng:
approximately
Please
lift
with
The
15.5
unit
care.
is level,
sharp
under
such
winds
the
away
where
weights
kgs.
the
the
as
fire
precautions
at
all
times.
•
Take
care
the
Gazebo.
assembly
reverse
the
frame.
•
Never
pulling on
or
Gazebo
The
canopy
I
sidesofthis
Gazebo
proof,
when
Follow
instructions in
order
and
remove
the
legs.
the
guy
and
are
not
follow
and
dismantling
the
safety
the
the
do
not
force
pegs
by
ropes,
fabric
fire
•
Do
not
use
or
around
isnocooking
Gazebo.
•
Do
apparatus,
•
Ensure
are
completely
repacking.
If
necessary
when
not
you
the
store
BBQs
all
retum
allowtodry
repacking
and
naked
flames
Gazebo-there
area
within
cooking
etc
within
partsofthe
dry
before
unpack
the
home
completely
storing.
in
the
Gazebo
parts
and
before
the
GazeboasIt
hazard.
•
Do
not
smoking
Gazebo.
•
All
parts should be cleaned
and
packed
completely
any
dirt
fabric
withasoft
•
Never
or
detergents.
smoke
in or
separately.
dry
and
debris from
use
may
or
around
gently remove
abrasive
cause
allow
brush.
a fire
the
When
the
cleaners
Page 11

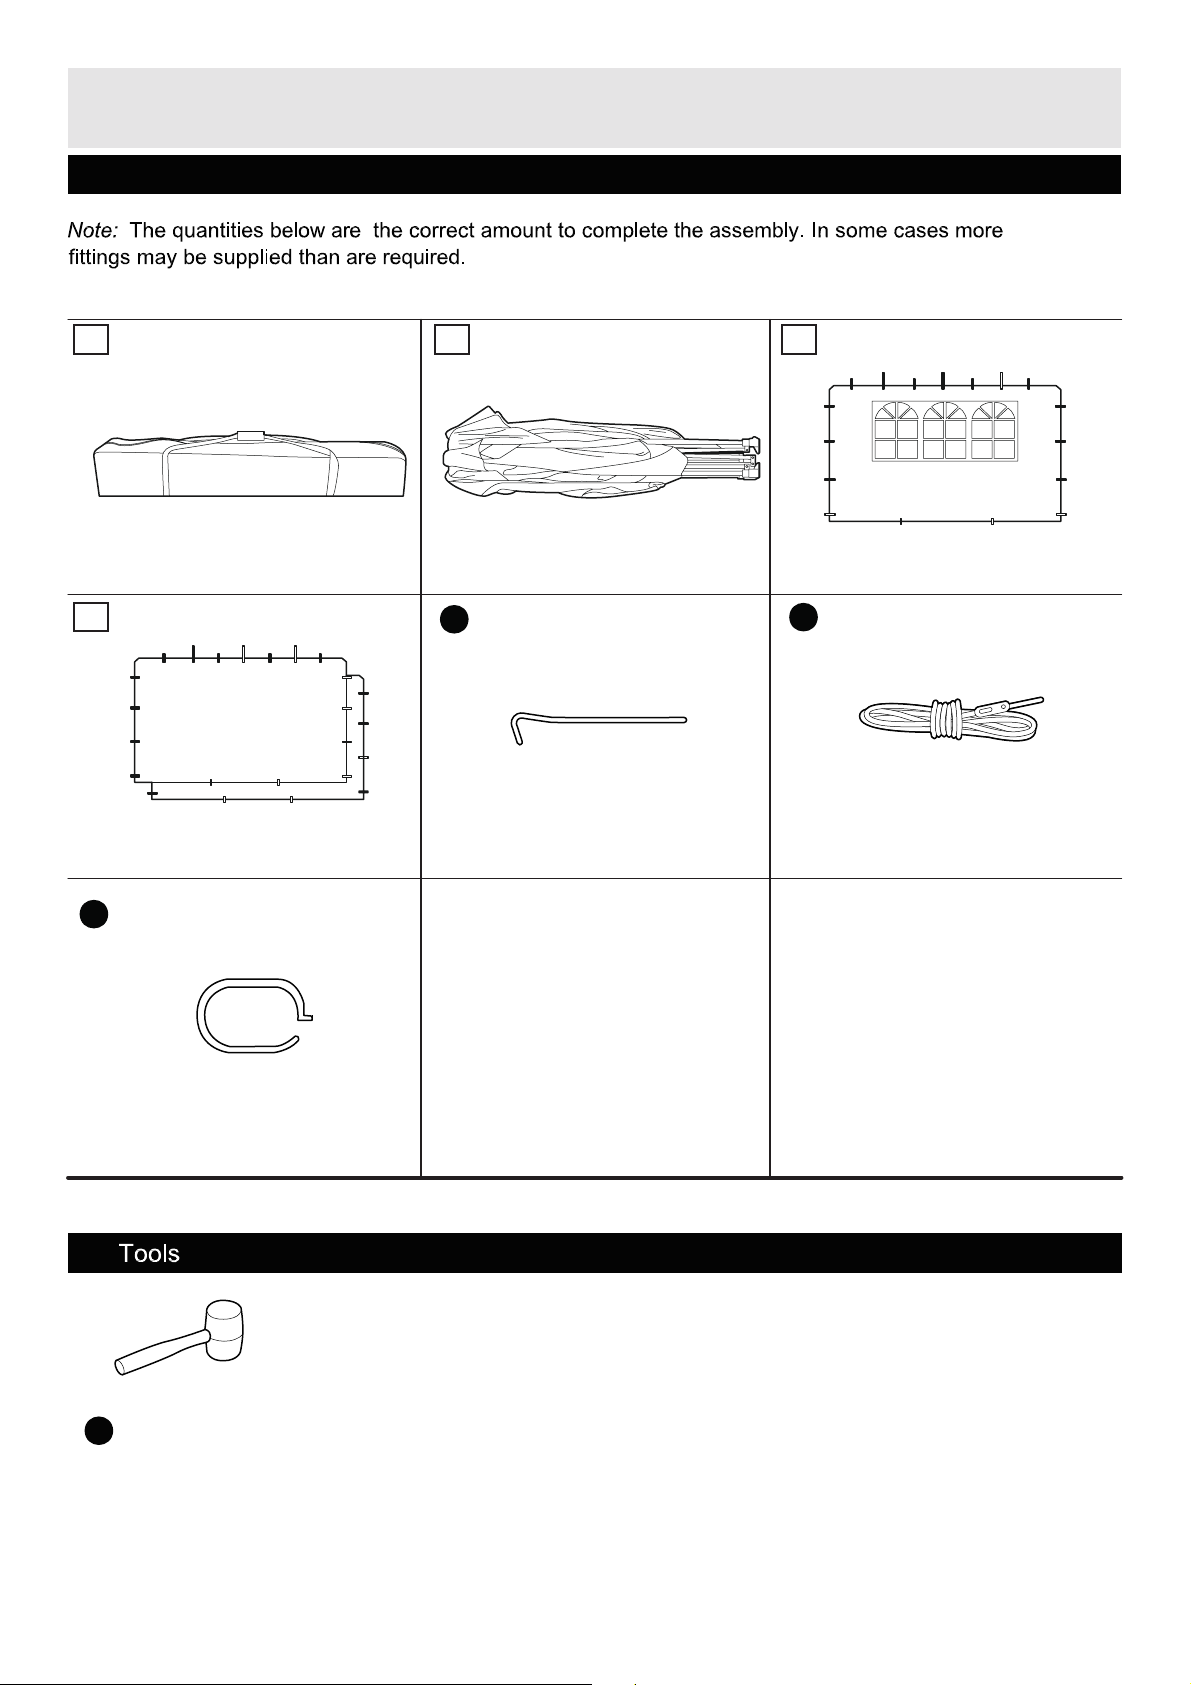
Components - Parts & Fittings
, Ifyou
have
damaged
or missing components, call
the
Customer
Helpine:
0845
640
0800
Please
Note:
fittings
check
The
quantities below
maybesupplied
Tent
bag
you
x 1
have
than
are
the
are
all
the
parts
correct amount to complete
required.
& fittings listed
Gazebo
x 1
below
the
assembly. In
some
cases
more
Tools
Gurtain
required
ring x 4
PegX14
Guy
rope
x 4
Q
Rubber
mallet
x1
Page 12

iMIiiiSliaris
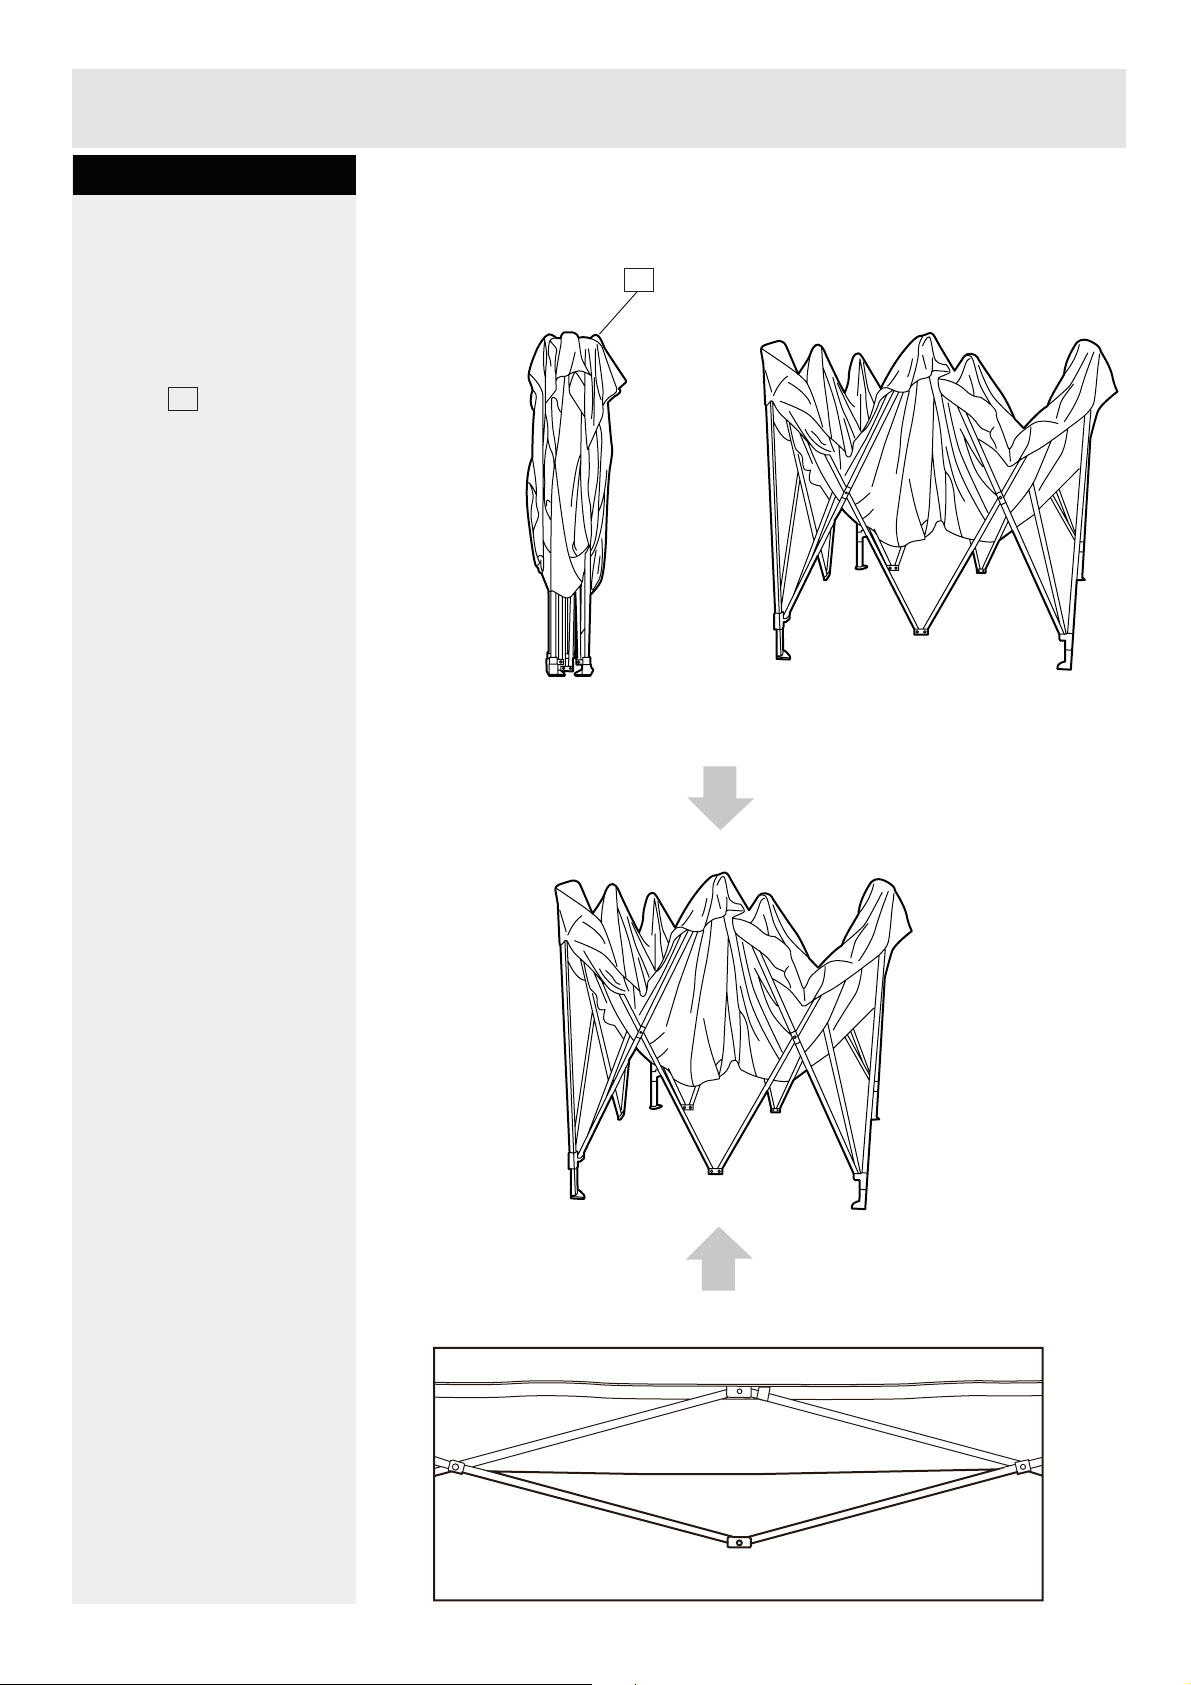
Step
Opening
1
the
Gazebo
Note:At least 2 people
are
required for this
procedure.
a &b:Stand
Gazebo0
the
upright.
With people at diagonally
opposite
pull
open.
Move to
carefully pulling
apart
as
c & d:
reveal
comers,
the Gazebo
each
until it
shown
in diagram b.
Lift
the
the
framework.
side,
the
has
canopy
carefully
partly
frame
expanded
to
With people at opposite
sides,carefully push up
and
down
on
the
frames
where
shown.
-
a:
c:
Move to
each
side,
carefully pulling
(compressing) the frame
together
expanded
until it
as
has
shownin
diagram d.
d:
Caution: Do
not
compress
frame
sides
more
than
shown
Page 13

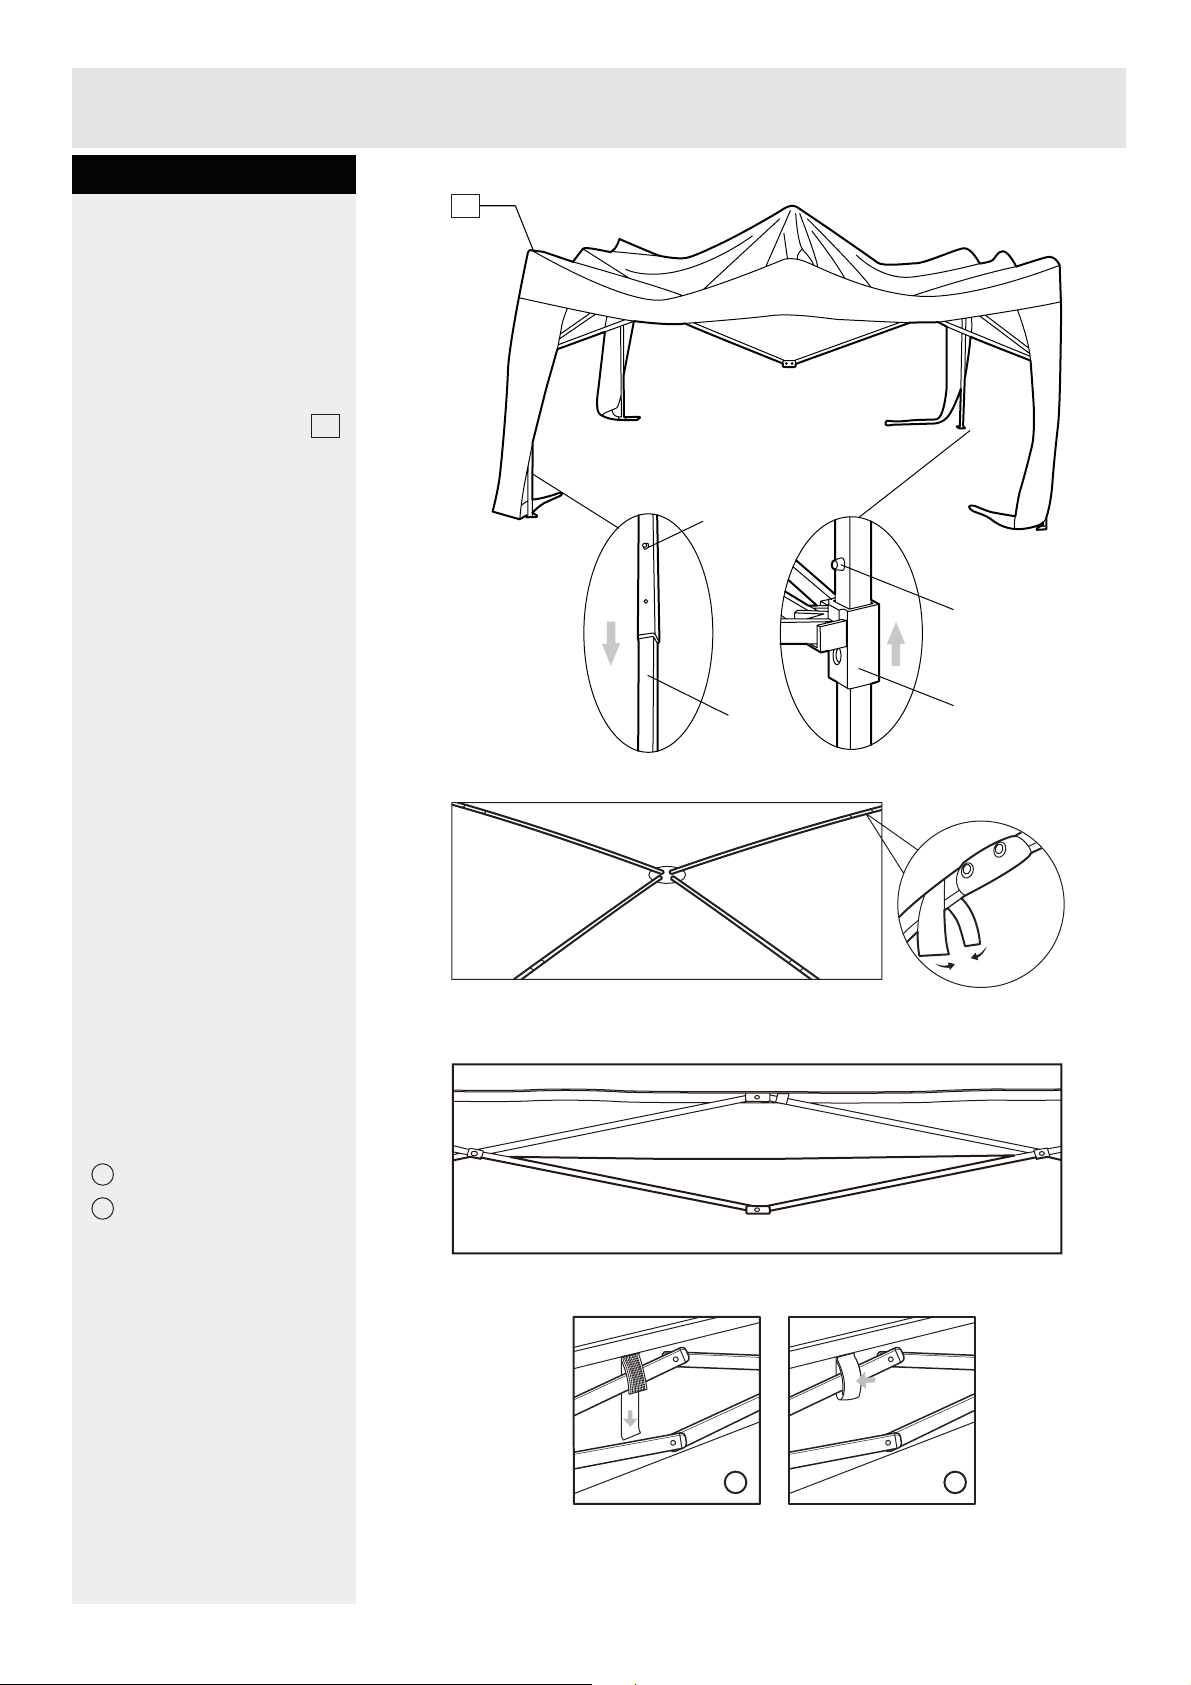
Step
2
Locking
the
Gazebo
and
frame
extending
Note:Atleast2people
are
required
procedure.
a:Inone
lock
the
in position by sliding
corner
the
spring clip
into
the
Pull
and
until
the
engage
the
outer
Note:
for
this
cornerata time,
Gazebo
bracket
framelTI
up until
engages
bracket.
extend
each
spring clips
into
the
hole
tubes.
There
are
two
the
leg
in
spring clip location holes
in
each
lower
the
leg, using
holes
canopy
tension,
will
the
increase
puliing it tighter.
a:
Spring clip
Corner
bracket
b:
b: Use
c:
Note:
frame
®
the
top
frameasshown
From
thatofthe
sides
each
are
stretch
©stick
Warning:
must
stretch
could
cause
collect on
a
hazard.
velcro
inside,
are
as
the
check
frame
as
shown.
velcro
shown.
tap
tapes
tap
first
velcro tap second
the
velcro
tightasthis
rain
the
canopy
water
tap
to
and
c:
Finished position of
frame
sides
- Do
not
compress
any
more,
Do not
than
compress
shown
or
the
can be damaged.
more
frame
Page 14
Step
3
Fitting
a:
to
corner,
through
Frame
(insertatan
Take
pegs,
to help Insert ifrequired.
b:
endofthe
the
frame leg,the
cover
by
a
Step
the
legs
Secure
the
the
groundateach
Insert
the
hole in
leg into
care
nottobend
usearubber
Attach
moving
lower
the
canopy
holesatthe
canbetightened
the hooks to
hole.
4
gazebo
two
the
angle).
hooks
endofthe
canopy
[I]
pegsO
each
ground
the
mallet
on
legs
the
to
Attaching
ropes
are
required for this
procedure.
a:
Attach
guy
Rope
at
each
corner
canopy
b:
secure
the
(insert
c:
rope
by feeding
through
Remove
the
the
and
up
cover,
Use
thepegs O to
the
guy rope to
atanangle),
The
length of
® canbe
the
any
Guy
rope
lower
sliding
towards
the
guy
the
endofeach
® to
a''D"
of
the
other
end
the
the
adjusted
the
rope
fensioner.
slack
by holding
endofthe
the
tensioner
the
tent.
ring
tensions
of
ground
guy
from
rope
\
Caution:
Xl\
^ '
ropesasthis
the
fabric
Do
tighten
seams.
not
can
over
the
Guy
damage
Page 15

iMMtoii'
step
Assembly
Fitting
/Vote.'At
are
procedure.
a:
on
5
instrctions
the
sides
least
2 people
Required for this
Use
the
Velcro
the
Back
and
tapes
side
panels [Tl & (Tl
To
secure
onto
Note:
frame
®
stretch
the
each
are
the
frame
as
the
panels
work.
velcro
shown.
tap
tap
first
@ stickvelcrotap second
••••••
Warning:
must
could
collect on the
a
hazard.
Note:
entering
ensure
the
stretch
cause
to
avoid
the
the
velcro tap
tightasthis
fain
water
canopy
rain
water
gazebo,
curtain ring
and
@ is attached as shown.
Insertthe pegs ® to
each
side
wallinthe
bottom.
to
The
assembly
compiete
is
now
Velcro
tape
Page 16

Foliira
liTstFuotiierii
Step
Folding
Note:Atleast2people
are
procedure.
Take
dismantiing
Follow
instructions
reverse
not
a:
side
b:
and
c:
from
remove
d:
dips
frame
e:
clips
the
f: With
diagonally opposite
comers,
push
together.
6
the
Gazebo
required for this
care
when
the
the
.assembly
in
the
order
and
force
the
frame.
Remove
paneis
Remove
pegs
Unhook
the
Pushinthe
and
Pushinthe
and
corner
the
the
the
frame
the
pegs,
siide up
legs
(slightly) lower
bradkets.
people
carefully lift
the
gazebo
back
canopy
legs
spring
spring
at
Gazebo.
do
guy
ropes
and
the
and
and
Spring
clip
Spring
clip
Do
not
force
Repeatateach
until
the
folded.
Store
allofthe
components
in
thetentbag
provided.
WARNING:
gazeboinoutside,
please
takeupthe
Ifyou
Retailer: Argos
Address:
make
need
the
gazebo
and
If
use
sure
side
help or
489-499
frame.
comer
is fully
fittings
E]
the
to
wali.
have
damaged
Avebury Boulevard
WiFfiliJgi
f azebo:
111
Heavy
outsideploaafj
or missing parts, cail the
Saxon
Gate
West, Central Milton
wind, jf
Customer
yoiii
wantto leave the
remove;
lie
§!ie
pansle
Helpline: 0845 640 0800
Keynes
Bucks, MK9, 2NW
 Loading...