

Page 1
Eton Range
Depth 64cm
Depth 191cm
Height 88cm
Depth 88cm
Dimensions
Depth 88cm
Height 40cm
Height 88cm
Height 88cm
Length 198cm
Length 99cm
Length 88cm
Length 273cm
Care and User Instructions - Please keep for future reference
241-6805 227-9853 248-3223
245-5897 227-1813 244-3737
258-1486 228-4202 280-0291
230-7536 223-3728 268-8619
2437
Large
Regular
Height 88cm
Length 155cm
Depth 88cm
Chair
Footstool
Corner
Important - Please read these instructions fully before using the product
If you need help or have damaged or missing parts, call the Customer Helpline: 0345 6400800
Issue 2 - 09.07.2014
Page 2
• Assemble on a soft level surface to
• Parts of the assembly will be easier with
• Remove the protective cellophane
wrapping the sofa. Do not use sharp tools
• Feet and accesories can be f ound by
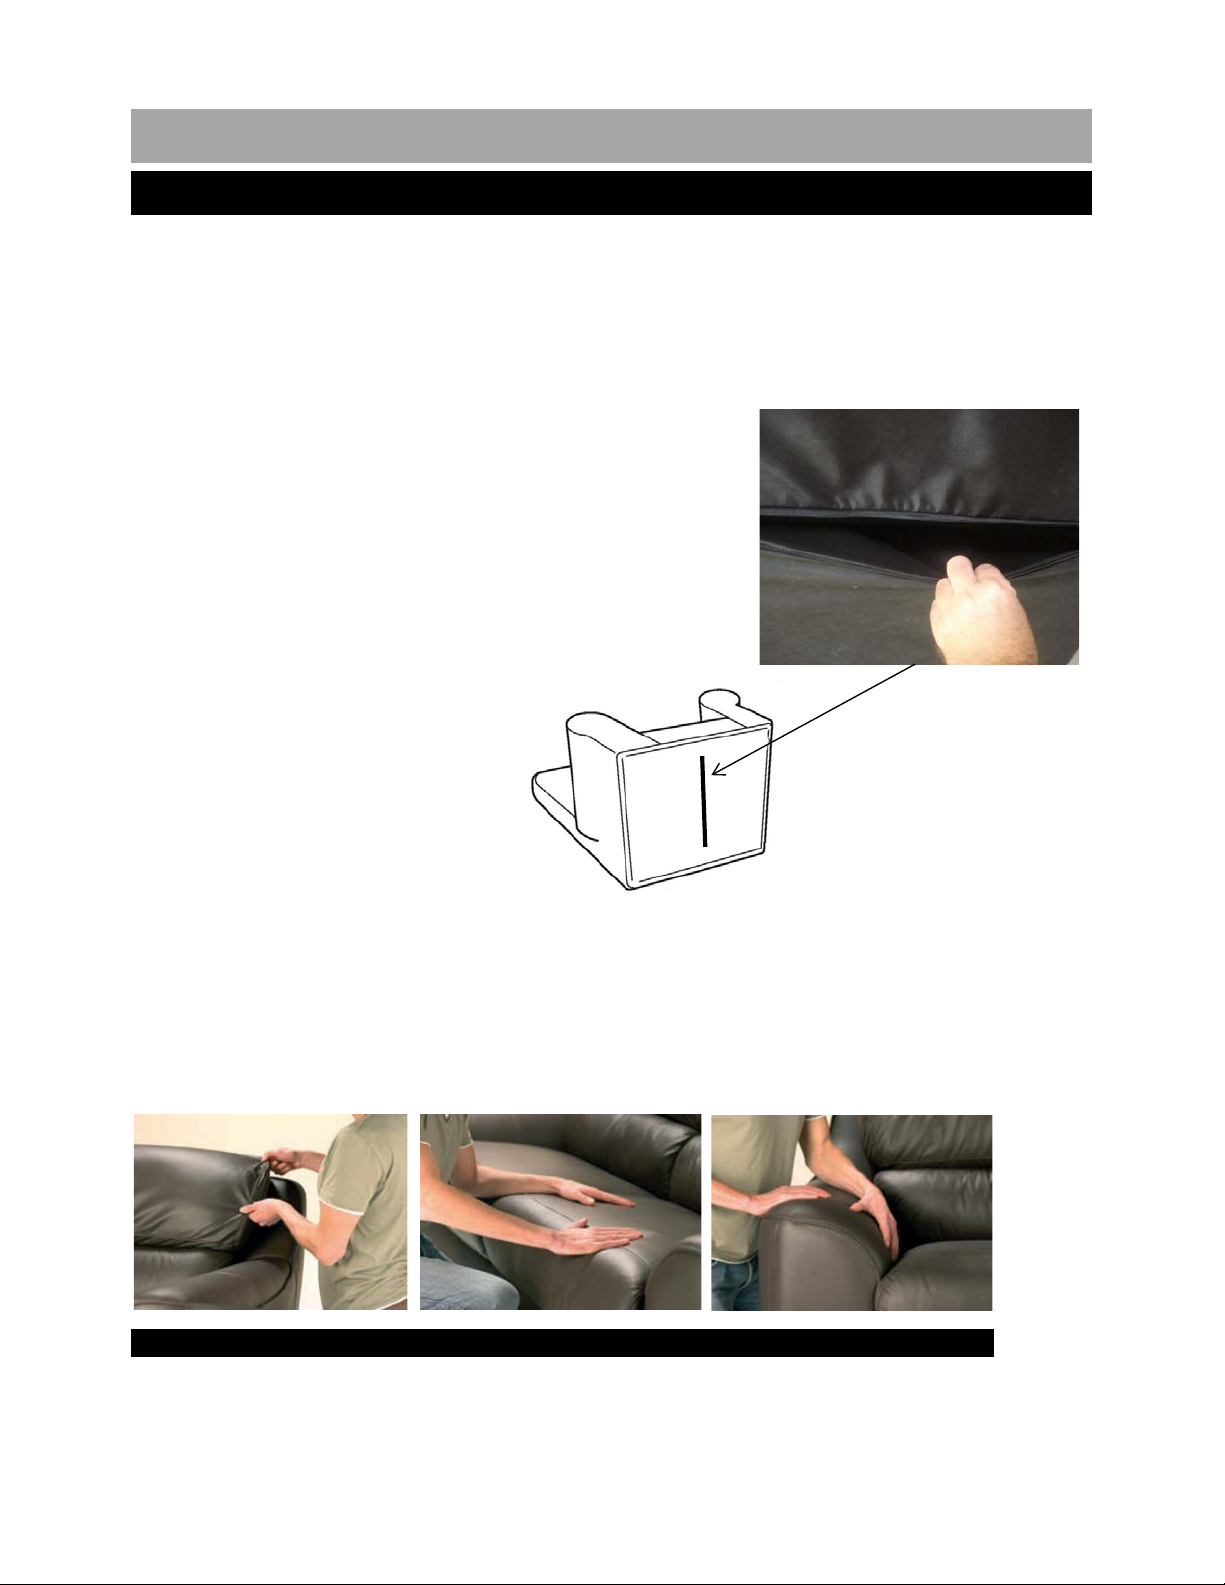
Before your furniture leaves the fact ory, it i s given a final inspection pri or t o secure wrapping for
Step 1
Step 2
Step 3
Safety and Care Advice
Important - Please read these instructions fully before starting assembly
• Make sure you have enough space to
• Once feet are securly attached return t he sofa to
an upright position. To do this the sofa must be lifted
• Assemble the s of a as close to its final
• Dispose of all packaging carefully and responsibly.
work and layout the sofa.
and turned. Avoid using the feet as a l ever as doing
this may lead to damage.
position (in the same room) as possible.
avoid damaging the sofa or your floor.
2 people.
that may damage the sofa covering.
opening the zip underneath the sofa. To
access this zip spread the c el l ophane
sheet on the floor, lower the sofa so that
the rear back panel rests agai ns t the
floor. Remove package containing the
feet and accesories, t hen i ns tall the feet.
distribution. Due to tight and s ecure wrapping to minimis e movement during transit, when unwrapped, the
chair may appear a little "distres sed". This is entirely normal, and t he i l l ustrations below show how to
rectify this in 3 easy steps:
1
With clean movements bring
the back cushions of t he chair
back to their original s hape.
Spread the leather evenly across
the seat cushions with the palms
of your hands
Give the arm pads a good plump
and then straighten them as
shown.
Issue 2 - 09.07.2014
Page 3
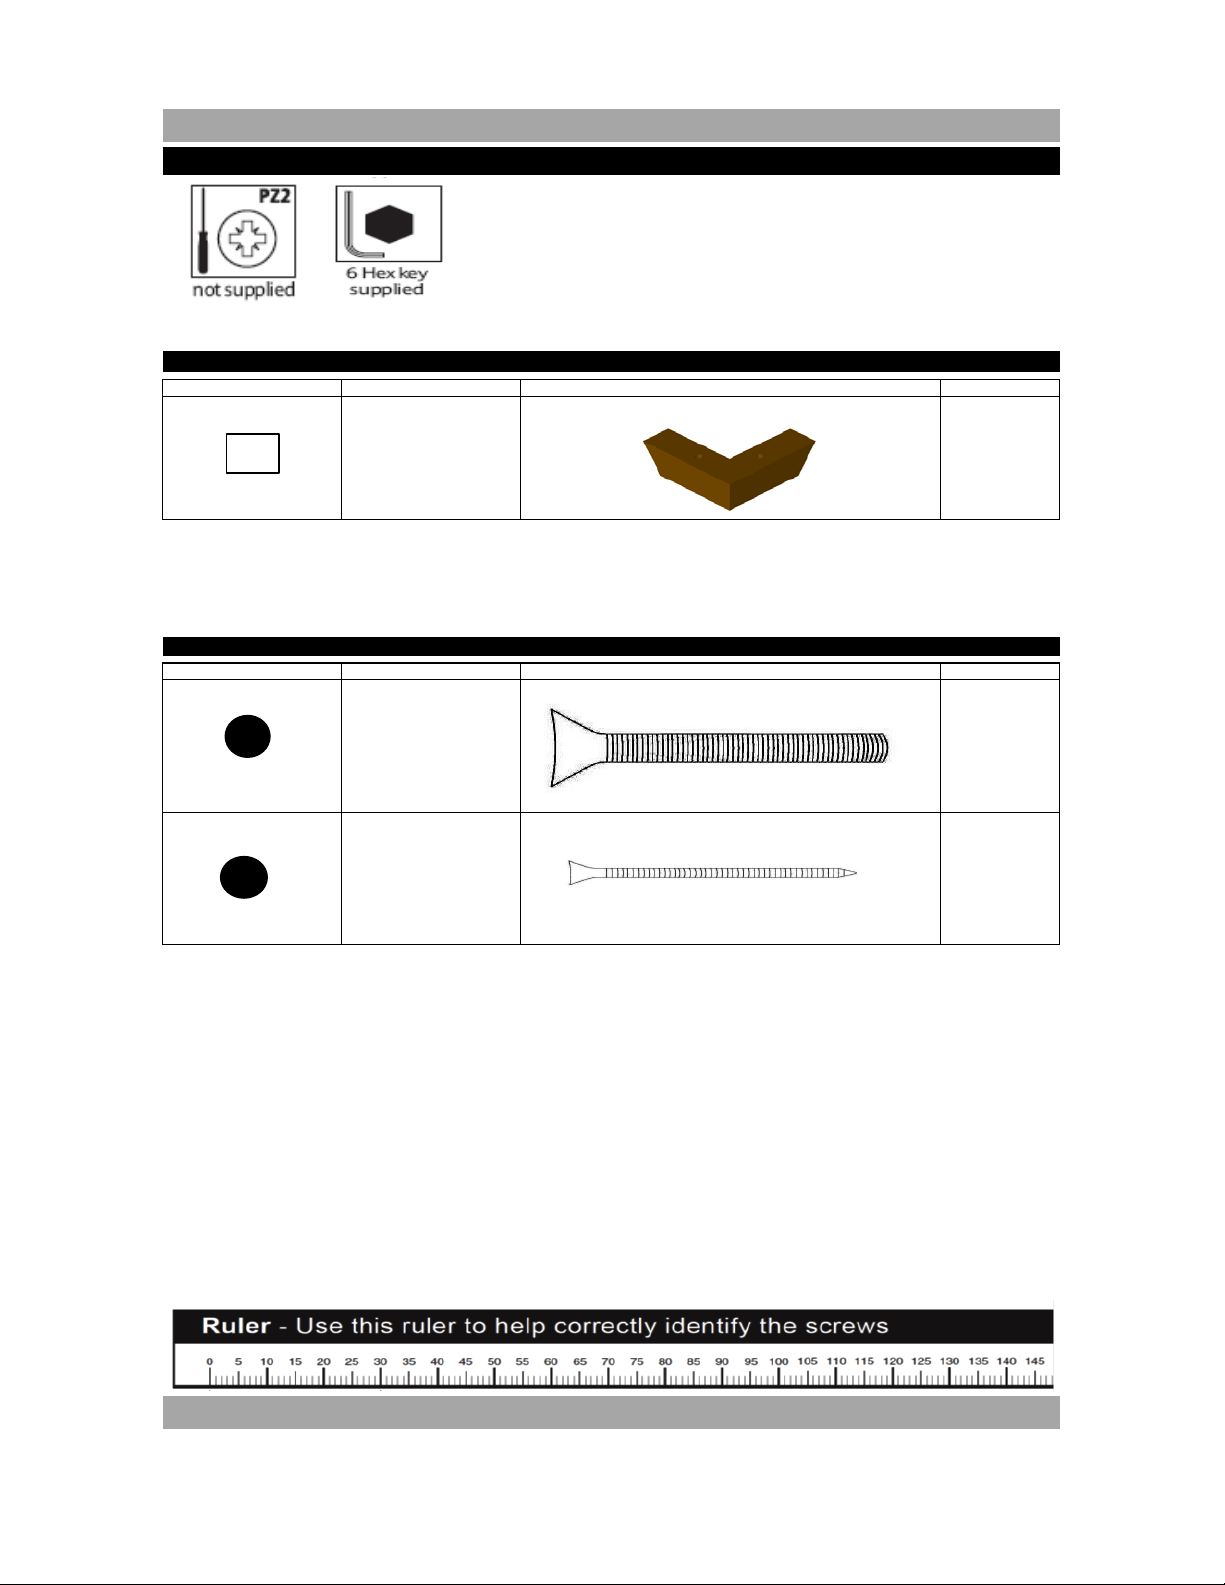
Components supplied (Not Actual Size)
Fixtures and Fittings supplied (Not Actual Size)
Quantity
Visual
Dimensions (mm)
Ref
Ref
Dimensions (mm)
Visual
Tools required
Quantity
Components, Fixtures and Fittings - Chair
1
A
B
H-825 x L-790 x D-820
M8 x 80
M5 x 70
4
4
4
If you need help or have damaged or missing parts, call the Customer Helpline: 0345 6400800
2
Issue 2 - 09.07.2014
Page 4

Using a screwdriver
Gently turn the product
Assembly is complete.
Assembly Instructions - Chair
Line the front feet
Using the Hex Key
Supplied gently screw the
1
*
A
A
1
B
Step 1
with the pre-drilled
holes.
Step 2
bolt clockwise to
engage thread and
tighten.
Step 3
screw the screw
in order to secure the
foot to the sofa.
Step 4
onto its feet.
B
3 Issue 2 - 09.07.2014
Page 5

•
Excessive Force :- Use your sofa respons ibly. Do not jump
Pets sleeping / lying on the furniture, as their natural body
•
Especially do not allow domestic pets to claw or climb on the
•
Avoid
Wearing dark clothing especially denim jeans
Leaving newspapers lying on the furniture
Both of the above can result in dye/print being ground into the
Restrain children from climbing or jumping on the furniture,
Safety and Care Advice
Care and maintenance
• Keep a minimum distance of 20-30 cm between your furniture
and any source of heat i.e. fires or radiators.
• Avoid exposing the sofa to direct sunlight or to powerful
• Vacuum or use a soft brush weekly as accumulated dust and
• Zips are fitted to assist in the ease of manufacture and do not
• Loose Threads should be cut carefully not pulled as this may
• Biro:- Remove any Biro marks immediately as the ink will eat
• Beware of sharp or hot objects :- Buckles, keys, toys and
lamps to as this may result in the leather fading. Protect it by
drawing curtains or blinds.
dirt will wear and dull the material.
necessarily mean the cover is removable for washing or
cleaning.
unravel the stitching.
into the leather.
jewellry can easiliy snag on the fabric and cause tears and
pulls. Hot objects, such as heat from mugs or cups can
permanently disfigure upholstery.
•
Do not move the sofa by pushing or pulling it by the arms on
smooth or rough surfaces. If the sofa has to be moved the
correct way to do so, is by lifting it from the base with two
persons. Inproper handling may lead to the feet or stitc hing to
be damaged.
on the sofa and avoid sitting on the edges of cushions and
arms as this may cause distortion and permanent damage.
especially in shoes.
sofa, they have sharp claws which can scratch the leather.
Their saliva is very harmful to leather as are their body fluids
and oils.
• The product is designed for interior use only. When the time
comes to discard it, do not dispose of the sofa improperly but
make use of public waste disposal systems.
fabric and can result in cream/pale finishes going grey in
colour.
oils/hair/saliva can cause damage to the leather finish.
4 Issue 2 - 09.07.2014
Page 6

• Use the mixture sparingly
• Dab gently from the outer edge, inward
• Dab out shampoo afterwards using warm water
DO NOT SOAK
Cleaners are available from most supermarkets and hardware stores
BEFORE USING ANY CLEANING AIDS, PLEASE READ THE INSTRUCTIONS CAREFULLY AND TEST ON A
HIDDEN AREA FIRST
• Use a specialist upholstery cleaner/shampoo. I f a specialist cleaner is not available a very weak (2%)
• Remember to damp a complete panel to avoid marking
• Always remove stains in the direction of the pile, if any. BE GENTLE - do not rub or scrub as this will only
General dirt and stains
• Use a clean damp cloth (not wet) and if necessary use a gentle cleaning aid
• Never use hot water as this can set the stain into the fabric
• Do not use detergents as these can cause colour loss and leave stic ky r esidues
Follow cleaning symbol guidleines as shown below
Grease or oil based stains
• Use a propriety spot cleaner working from the edge of the stain inward to avoid spreading
• If possible, treat the stain from the wrong side of the fabric and never use a hard scrubbing act ion
Water based stains
• If necessary, sponge the area but do not over wet as water can shrink fabrics or their backing fibres.
IF UNSURE SEEK THE ADVICE OF A PROFESSIONAL
DO NOT USE
• Harsh chemicals like acetone (nail polish remover), bleach, house-hold cleaners or stain removers
• Coloured shoe polish as it will run onto clothes
• Spray polishes, saddle soaps, waxes, "Hide foods"
These create a sticky surface attracting dirt and c aus ing irr eversible damage, which can over time, build up
Cleaning Information Fitted Covers
Accidental spillage
Where possible:
• Always tip liquid spillages from the surface of the fabric
• Blot excess liquid with tissues or toilet roll
• Allow to air dry
Safety and Care Advice
Cleaning Information Leather
Thorough Cleaning
Thorough Cleaning is recommended at least every 6 months to remove the gradual accumulation of body
oils, persporation, skin acids and general soiling (this includes the oils/hair from pets)
Use a specialist cleaning kit, taking into account any advice supplied by the manufacturer
AND TEST ON A HIDDEN AREA FIRST.
EMERGENCY CLEANING
If a major spill has occurred requiring immediate attention, do the following:
• Use a mild unscented soap with distilled water
• Dab the spot carefully with the solution
• Avoid soaking the leather
BEFORE USING ANY CLEANING AIDS, PLEASE READ THE INSTRUCTIONS CAREFULLY
layers which will eventually crack, damaging the leather underneath.
spreads the stain and can damage fabrics
solution of wshing powder can be used in hot or cold water
5 Issue 2 - 09.07.2014
Page 7

Safety and Care Advice
Attention :
• Natural leather is a noble and resistant material,
cool in the summer, and its flexibility allows it to mold
perfectly to the body's shape. Charac teristics such as
polyurethane foam padding used in the seats tends to
which becomes more valuable over time. Its
transpiration properties make it warm in winter and
healed scars, wrinkles, insect bites, breaks, veining
and variations in grain and colour are natural
features of hides of leather that give them their value
and natural character. These characteristics should
not be viewed as defects, but as confirmation that
you have purchased genuine leather and not an
imitation. These markings will depend on the grade
of leather you have selected.
• During the first three months of use the
become softer and then finally stabilizes itself. This
process is absolutely natural as when pressure is
applied on the seating the micro-cells that comprise
the polyurethane break down. This process is
perfectly normal for this kind of material and
produces a slight softening effect. As above, it is
abolutely normal that the softness of a seat / back
padding is found to be different from the one
adjacent, depending on its usage. Light creases may
form on the covering following the abovementioned
natural setting of the padding, which are to be
considered absolutely normal and depend on the
settling of the leather.
If you need help or have damaged or missing parts, call the Customer Helpline: 0345 6400800
6
Issue 2 - 09.07.2014
 Loading...