

Page 1
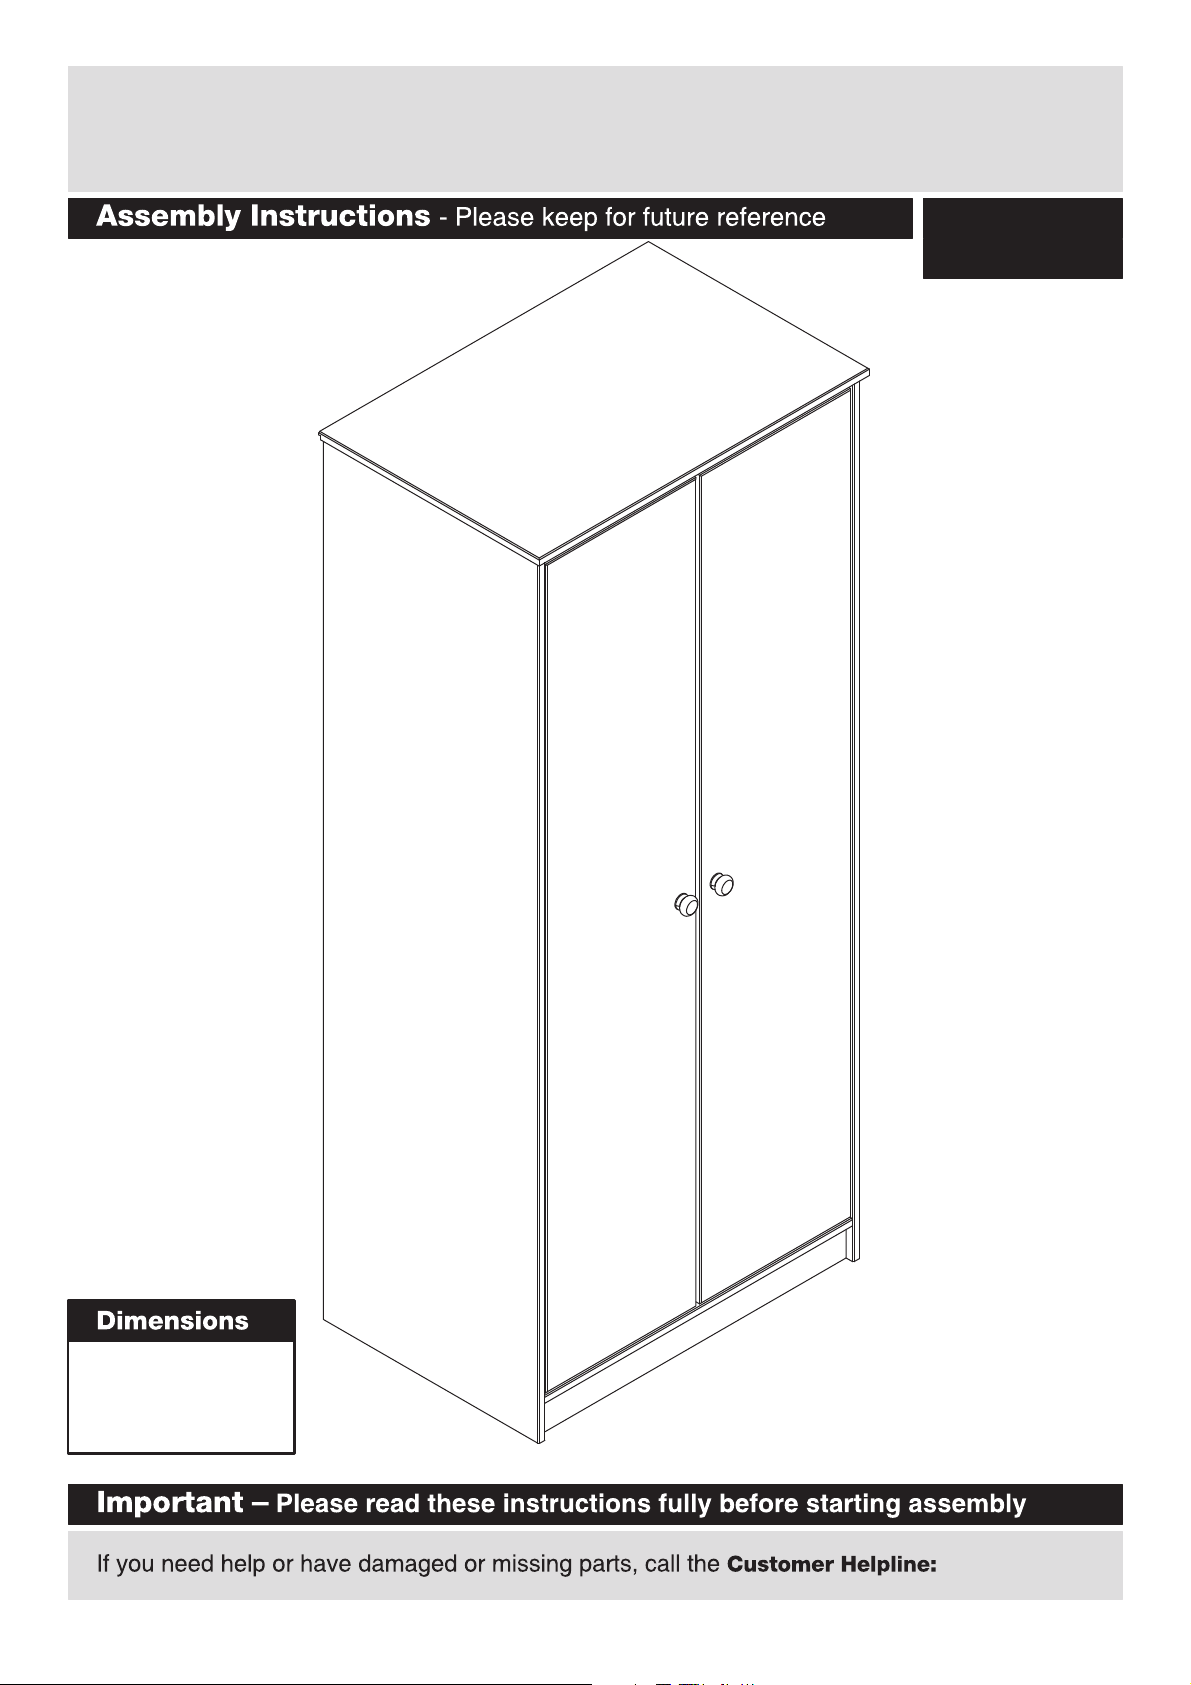
JAKOB - 2 Door Robe
549/6152
569/6426
Issue 1 - 12/09/12
Width - 73.4cm
Depth - 50.0cm
Height - 175.0cm
03456 400 800
Page 2
1
Page 3

1
Top panel
(73.4 x 50.0cm)
4
Bottom panel
(67.8 x 48.3cm)
5
Front plinth
(67.8 x 6.8cm)
6
Centre rail
(67.8 x 9.0cm)
7
Top rail x2
(67.8 x 4.5cm)
8
Door support x 4
(73.8 x 2.2cm)
9
Door small support x 6
(25.0 x 2.2cm)
12
Hanging rail
(66.8 x 2.5cm)
2
3
10
11
Left side panel
(173.4 x 48.9cm)
(173.4 x 48.9cm)
Right side panel
Doors x 2
(162.9 x 33.4cm)
Back Panel x 2
(167.5 x 34.8cm)
2
Page 4

3,5x30mm Screw x 44
4,0x16mm Screw x 27
Metal plate x 02
Ø8x30mm Wooden dowel x 28
Nail x 26
Knob x 02 Magnetic clip x 02
A B C
D E F
G H I
J
O
L M
N
3
4,0x40mm Screw x 10 Hanging Rail Support x 02
Hinge plate x 06
Hinge x 06
3,0x16mm Screw x 08
4,0x16mm Screw x 38
03456 400 800
Page 5
A
14
Step 1
2
4
3
5
A
Fitting wooden dowels
Insert dowels into the
indicated parts.
A
A
A
A
A
A
A
A
A
A
A
A
A
A
A
A
A
A
A
A
A
A
A
A
A
6
7
2x
Page 6

5
Step 2
3
2
C
J
J
F
J
F
J
C
C
C
C
C
C
F
F
Fix hanging rail supports
a: Fix Hanging rail support F in the
pre marked holes on Left side
panel 2 and Right side panel using
screws , as shown.
b: Attach Hinge plate C in the pre
marked holes on Left and Right side
panel 2 and using screws J,
as shown.
J
J
C
2 3
2
3
J
F
C
J
a:
b:
a:
b:
Page 7

6
Step 3
Step 4
Attention: Continue
assembly on a soft and
clean surface to avoid
damaging the product
B
B
B
B
B
B
B
3
6
4
5
7
7
Attaching panels
(Two people required for an
easier assembly).
Attach parts 4, 5, 6 and 7 to
Right side panel 3.
Fix parts 4, 5, 6 and 7 to Right
side panel 3 using screws B,
as shown.
Attaching panels
Attach Left side panel 2
to assembled unit.
Fix parts 4, 5, 6 and 7 to
Left side panel 2 using
screws B, as shown.
4 5 6 7
3
4 5 6 7
3
B
2
4 5 6 7
2
B
Back
This Hole Down
B
B
B
B
B
B
B
2
B
B
B
B
B
B
B
Page 8

7
Step 5
Step 6
Fixing back panels
Attention to the measure when
attaching nails to the Center rail.
Attach Back panels 11 using
Nail G , as shown.
Important. Cabinet MUST
be “square” when back panel
is attached.
11
G
BACK
BACK
1
E
E
E
E
E
E
3X
Fixing top panel
Attach Top panel to the cabinet.
Fix Top panel to Side panel and
Top rails using screws E, as shown.
E
1
1
G
G
G
G
11
G
11
11
G
G
G
G
G
G
G
G
G
G
G
G
G
G
G
G
G
G
G
G
G
G
G
G
G
G
G
G
G
G
G
G
G
G
G
840mm
Page 9

8
Step 7
B
B
B
B
B
B
B
B
B
B
B
B
B
B
B
J
J
D
D
D
D
10
9
9
9
8
8
a:
b:
B
Attaching door supports
a: Fix Door small support in the
pre marked holes on Door using
screws B, as shown.
Fix Door support in the pre
marked
roles on Door using screws
B, as shown.
b: Attach Hinge D in the holes
on Door using screws
, as shown.
B
B
D
J
9
8
10
10
10
Page 10

9
Step 8
Step 9
Inserting hanging rail
With help, carefully stand
the product upright.
Insert Hanging rail 12 into
supports, as shown.
Fixing magnetic clip
Fix the Magnetic clips M in the
pre marked holes on Bottom
panel using screws O, as shown.
12
O
O
M
M
M
12
4
M
O
Page 11

L
L
E
E
L
E
a: b:
c: d:
C
D
C
C
B
C
D
D
D
A
D
C
B
N
O
O
N
10
Step 10
e:
f:
Hanging doors
a: With help slot Hinge D
onto Hinge plates C.
Make sure hinges are
correctly positioned according
to the diagram prior to xing.
b: Tighten screw shown to
lock hinges in position
Ensure hinges are positioned
as shown in the diagram.
NOTE: Repeat a and b to
the other door.
e: Fix Metal plate N in the
pre marked roles on Doors
10 using screws O , as shown.
f: Fix Knobs L to the Doors
10 using screws E , as shown.
D
C
O
L
E
10
10
10
10
Page 12

D
E
F
D
E
F
D
E
11
Step 11
Hinge adjustment
a: To move doors left and
right: loosen
screw shown and move
doors to suit.
Re-tighten screws.
b: To move doors in and
out: loosen
screw shown and move
doors to suit.
Re-tighten screws.
c: To move doors up and
down: loosen
screw shown and move
doors to suit.
Re-tighten screws.
Page 13

12
Step 12
I
Strap
Washer
Screw
TOP
OF UNIT
I
WALL
Wall xing
(not supplied)
Screw
(not supplied)
Washer
Strap
I
H
J
H
Fixing to wall
It is recommended that the
wardrobe is xed to a wall.
Fix wall strap I to top
wardrobe using washer
H and screw J, as shown.
With help move the
wardrobe into position.
Warning: The wardrobe
is heavy. Lift with care.
03456 400 800
I
H J
Page 14

 Loading...