

Page 1

Components
2 x Support Tube
A
3 x Glass Shelf
B
3 x Metal Bar
C
4 x Plastic Plug
D
Wall Rack With Glass Shelves
Simple Assembly Instructions - Please keep for future reference
Fittings
4 x Screw
A
4 x Wall Plug
B
6 x Small Screw
C
1 x Fixing Template
B
IMPORTANT
1. Read these instructions carefully and
familiarise yourself with the procedure
before assembling the unit.
4-05
2. Check that you have all the component
parts following the list on the back
cover and familiarise yourself with
each part before proceeding.
3. Take all the fittings out of the plastic bag
and separate them into their groups.
4. Ensure you have enough space to lay out
all the parts before assembly.
5. To avoid scratching it is recommended
that you assemble the unit on a soft
level surface.
Page 2
Assembly Instructions
Assembly Instructions
Stage 2 – Fitting the Glass ShelvesStage 1 – Fitting the Support Tubes
IMPORTANT:
Keep these instruction for future
use.
WALL MOUNTING: Hold the Fixing
Temple D against the wall in
the desired location and check
if it is horizontal. Mark the wall
to indicate where to drill the
holes.
See fig. 1.
IMPORTANT: When drilling into
walls always check that there
are no hidden wires or pipes etc.
Make sure that the screws and
wall plugs supplied are suitable
for supporting the unit. Consult
a qualified tradesperson if you
are not sure.
NOTE: It would be useful to ask
someone to help you at this
stage.
BS 7449:1991
Model / Catalogue Number: 832/2292
Retailer: ARG
Retailer address:
489-499 Avebury Boulevard, Saxon
D
Gate West, Central Milton Keynes,
Bucks, MK9 2NW
C
NOTE: This unit contains
fig. 1
tempered glass of nominal
thickness of 5mm and complies with
Class C of BS 6206. If the glass is
chipped or broken, replace with glass
of the type described on this label.
Consult the furniture retailer or agent
with regard to obtaining a
manufacturing specification of the
shape for replacement glass quoting
the model number, and batch number
or date of manufacture of this item.
fig. 3
B
NOTE: It would be useful to ask
someone to help you at this
stage.
B
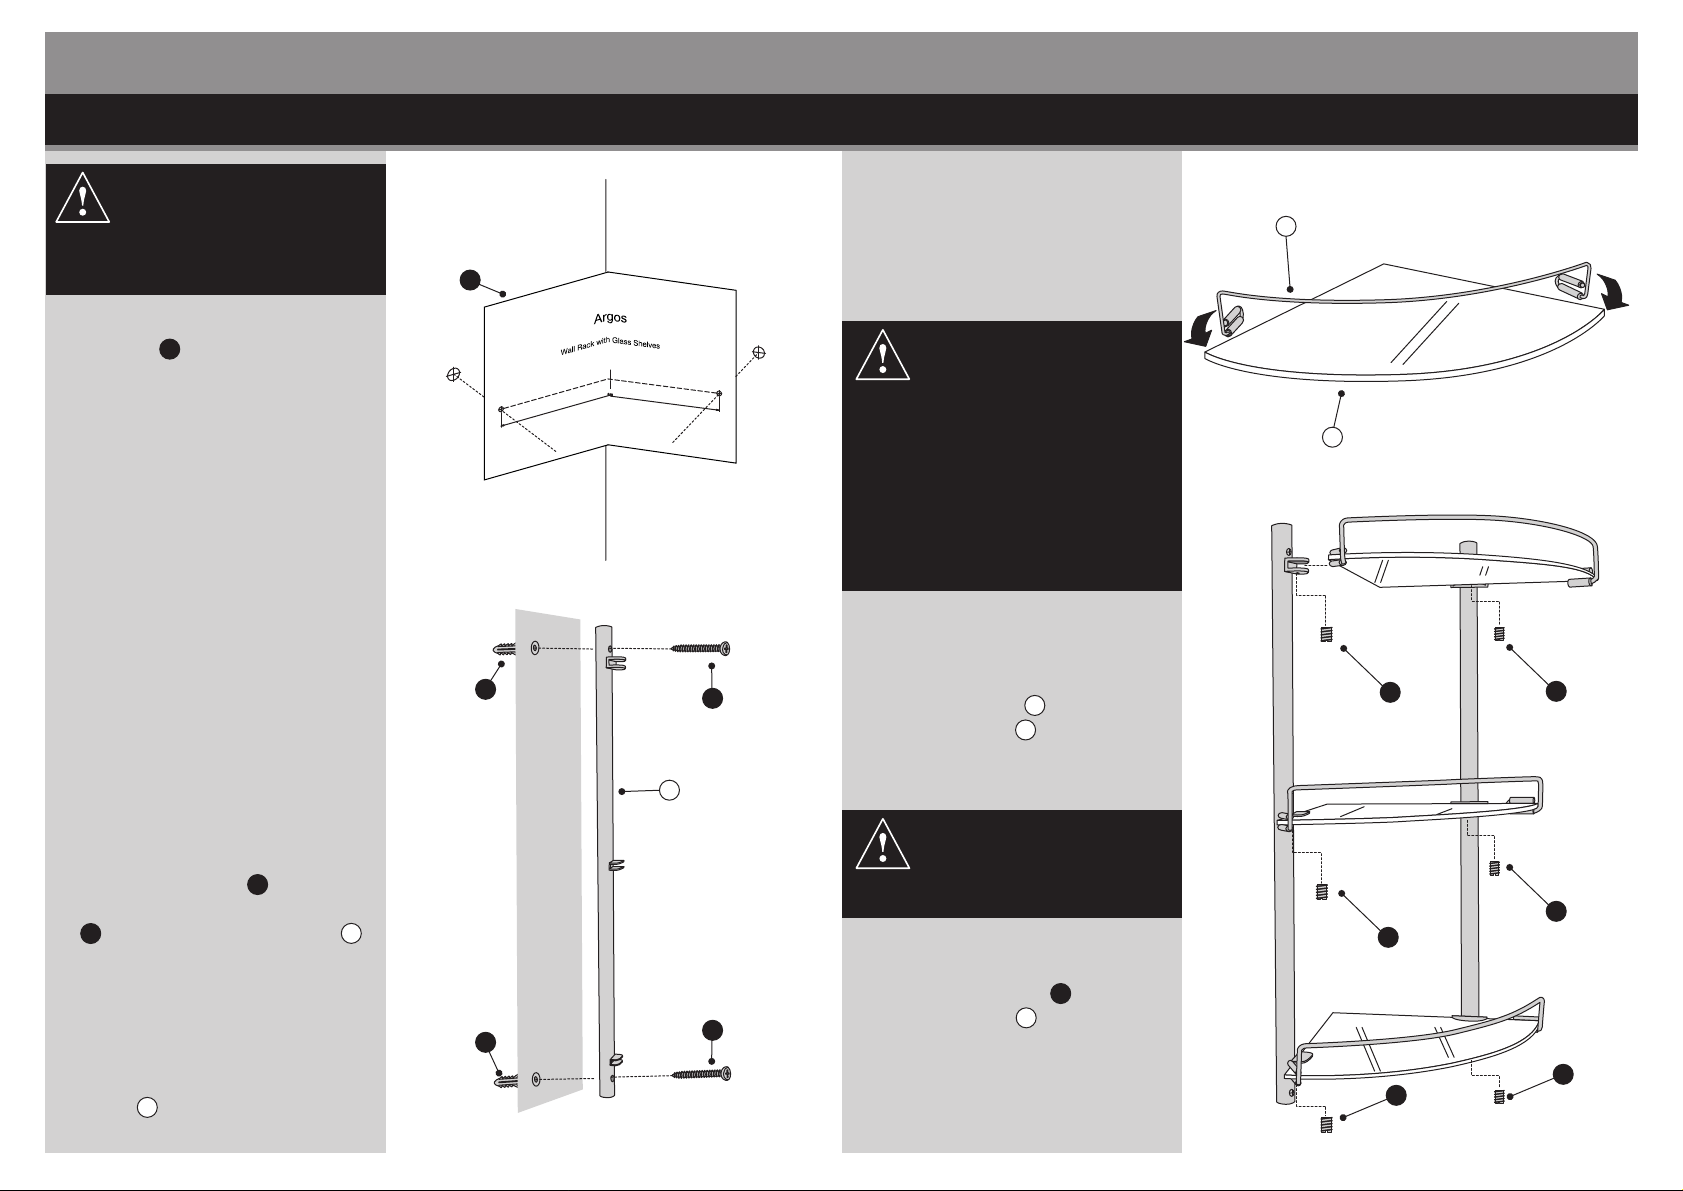
A
1. Use Metal Bars C to hold the
C
C
Glass Shelves B.
See fig. 4.
A
1. Use the Wall Plug B to fit to the
hole. Then screw in the Screws
A through the Support Tube A
into the Wall Plugs.
See fig. 3.
2. Use the same method as in fig 1
and 2 to fix the other Support
Tube A.
CAUTION: When handling
glass always take extra care.
Ensure no children are in the assembly
area.
fig. 2
2. Use Small Screws C to fix the
B
A
Glass Shelves B onto the unit.
See fig. 3.
fig. 4
C
C
C
C
Page 3

Assembly Instructions
1. Press the Plastic Plugs D firmly
into the ends of the Support Tubes
A .
See fig. 5.
NOTE: Before use always make
sure the unit is secure.
Assembly Instructions
Stage 4 – Finishing the UnitStage 3 – Fitting the Plastic Plugs
NOTE: The maximum safe load
D
D
for each shelf is 3kg evenly
distributed along the length
of the shelf.
WARNING:
• Do not place very hot or very cold items
on the glass surface(s) unless
adequately thick tablemats are used to
prevent such items from coming into
contact with the glass.
• Do not strike the glass with hard or
pointed items.
• When cleaning the glass panels use a
damp cloth or leather with washing up
liquid or soft soap if necessary; do not
use washing powders or any other
substances containing abrasives since
these substance scratch glass.
• Do not sit or stand upon the glass
surface.
• It is essential that this unit be fixed to
a wall with the fixing provided.
fig. 6
fig. 5
Care and Maintenance
D
D
Safety
To avoid any risk of suffocation to animals or children dispose of the plastic
bags immediately.
Cleaning
As with all surfaces clean with a damp cloth and mild detergent, do not use bleach
or abrasive products.
Fitting
From time to time please ensure there are no loose screws on the product.
 Loading...