

Page 1
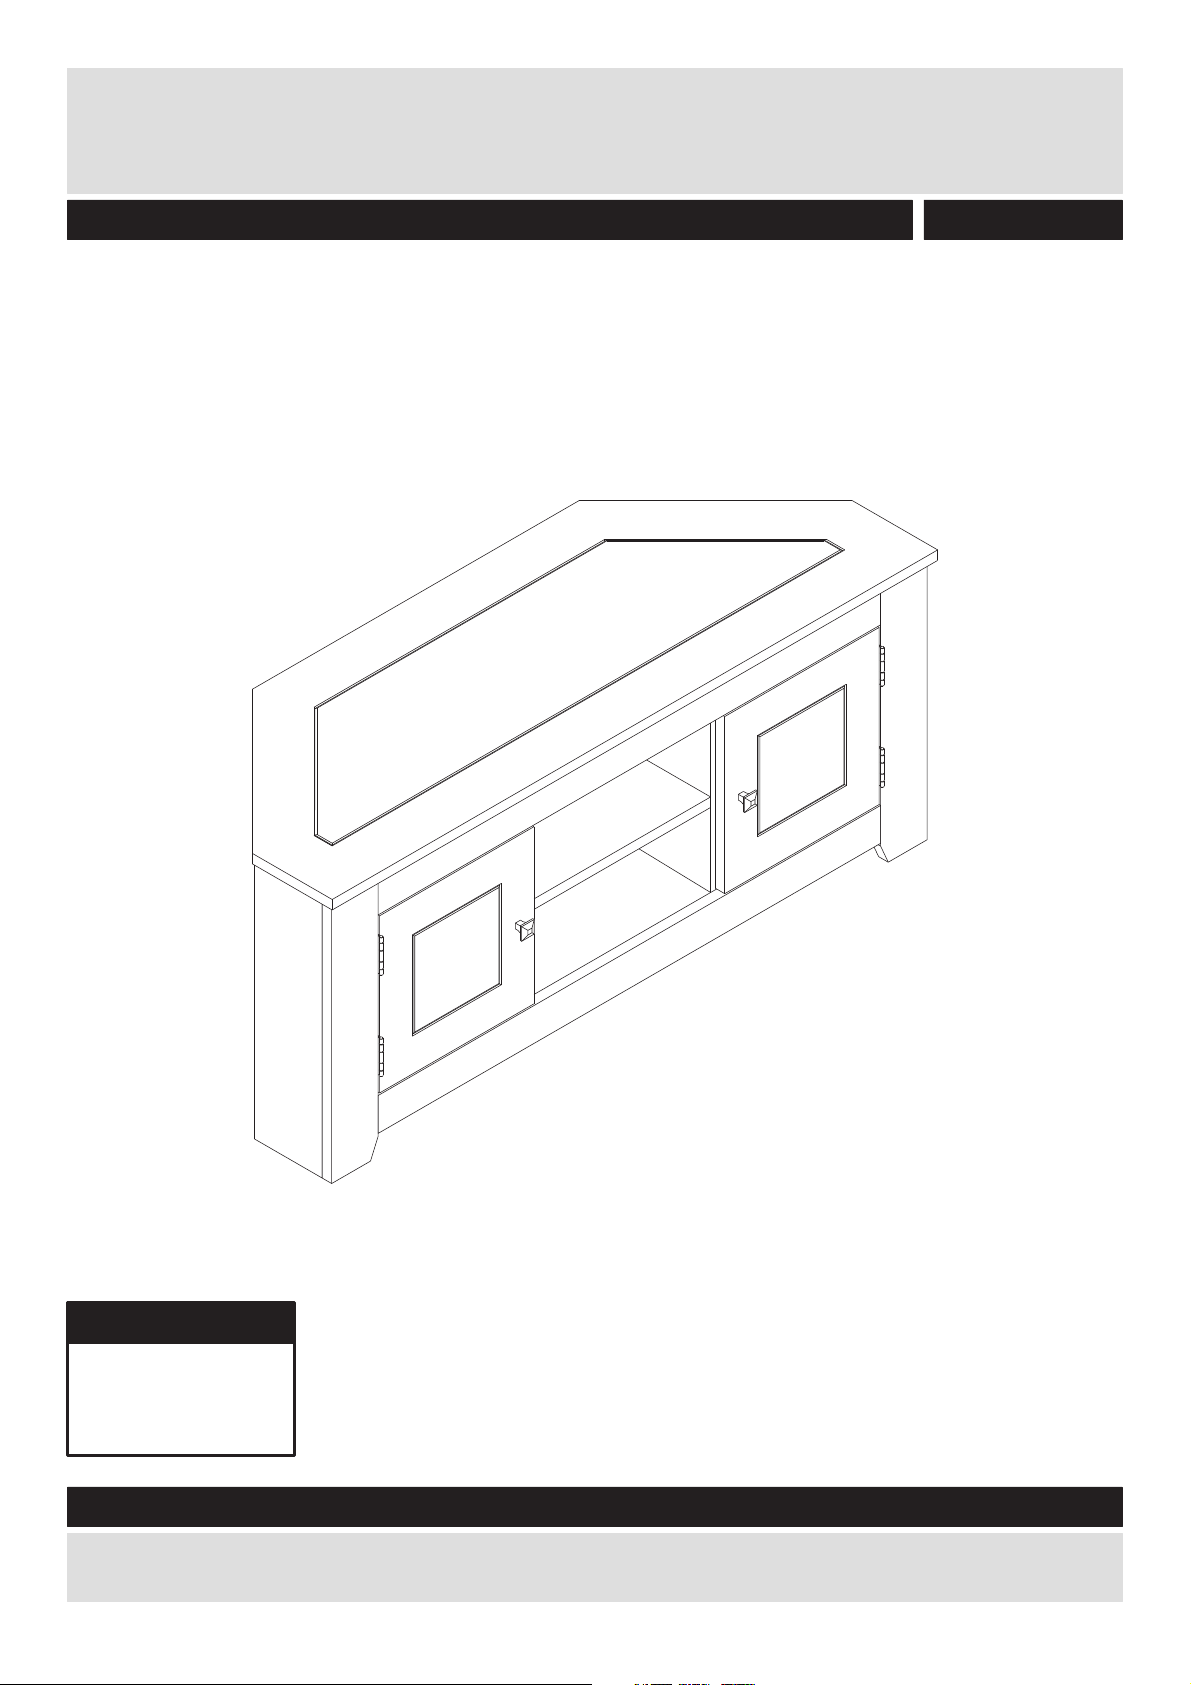
Amersham - Corner TV Unit
Assembly Instructions - Please keep for future reference
881/4968
Dimensions
Width - 120cm
Depth - 44cm
Height - 50cm
Important – Please read these instructions fully before starting assembly
If you need help or have damaged or missing parts, call the Customer Helpline: 03456 400 800
Issue 1 - 17/09/18
Page 2
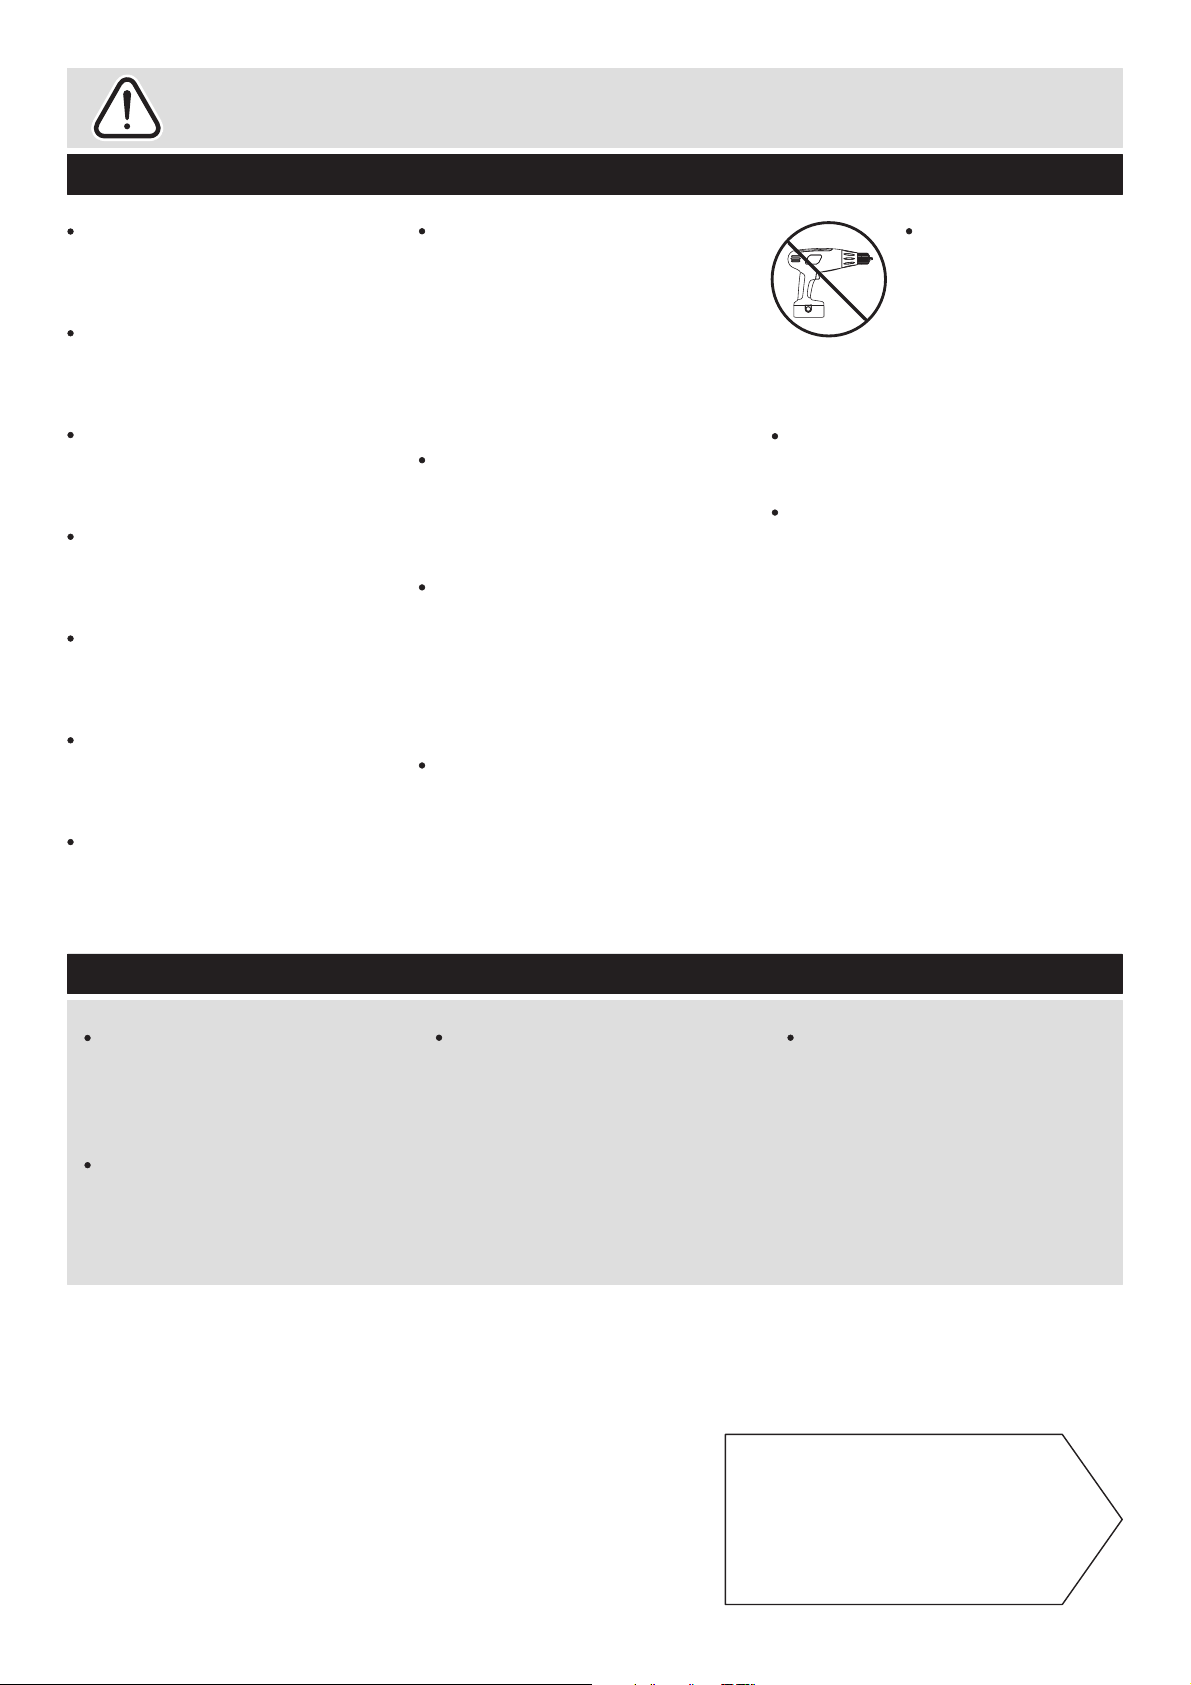
Safety and Care Advice
Important – Please read these instructions fully before starting assembly
Check you have all the
components and tools listed on
pages 2 and 3.
Remove all fittings from the
plastic bags and separate them
into their groups.
Keep children and animals
away from the work area, small
parts could choke if swallowed.
Make sure you have enough
space to layout the parts before
starting.
Do not stand or put weight on
the product, this could cause
damage.
Assemble the item as close
to its final position (in the same
room) as possible.
Assemble on a soft level
surface to avoid damaging the
unit or your floor.
This product has been produced
from natural timber; you may
notice some variation in the grain
and colour of different component
parts which is normal for furniture
produced using natural wood and
is not the result of any
manufacturing fault.
The product has been treated
with a wax and oil finish to
prevent dirt ingress and preserve
moisture.
On unpacking the
furniture you may notice an
odour due to this treatment;
this will disappear once the
furniture is unpacked and
assembled after a period of time.
This process may leave some
staining on the packaging
material; please take care to
ensure this does not transfer
to clothing or carpeted surfaces
during assembly.
We do not
recommend the
use of power
drill/drivers for
inserting screws,
as this could damage the unit.
Only use hand screwdrivers.
Parts of the assembly will be
easier with 2 people.
Dispose of all packaging
carefully and responsibly.
Care and maintenance
Use an appropriate furniture
polish for natural wood
furniture and a dry cloth to
clean the product.
Avoid placing the furniture in
direct sunlight as this will cause
the timber to prematurely age.
From time to time check
that there are no loose
screws on this unit.
This product should not be
discarded with household
waste. Take to your local
authority waste disposal
centre.
Note: If required the next page
can be cut out and used as
reference throughout the
assembly. Keep this page with
these instructions for future
reference.
1
Page 3
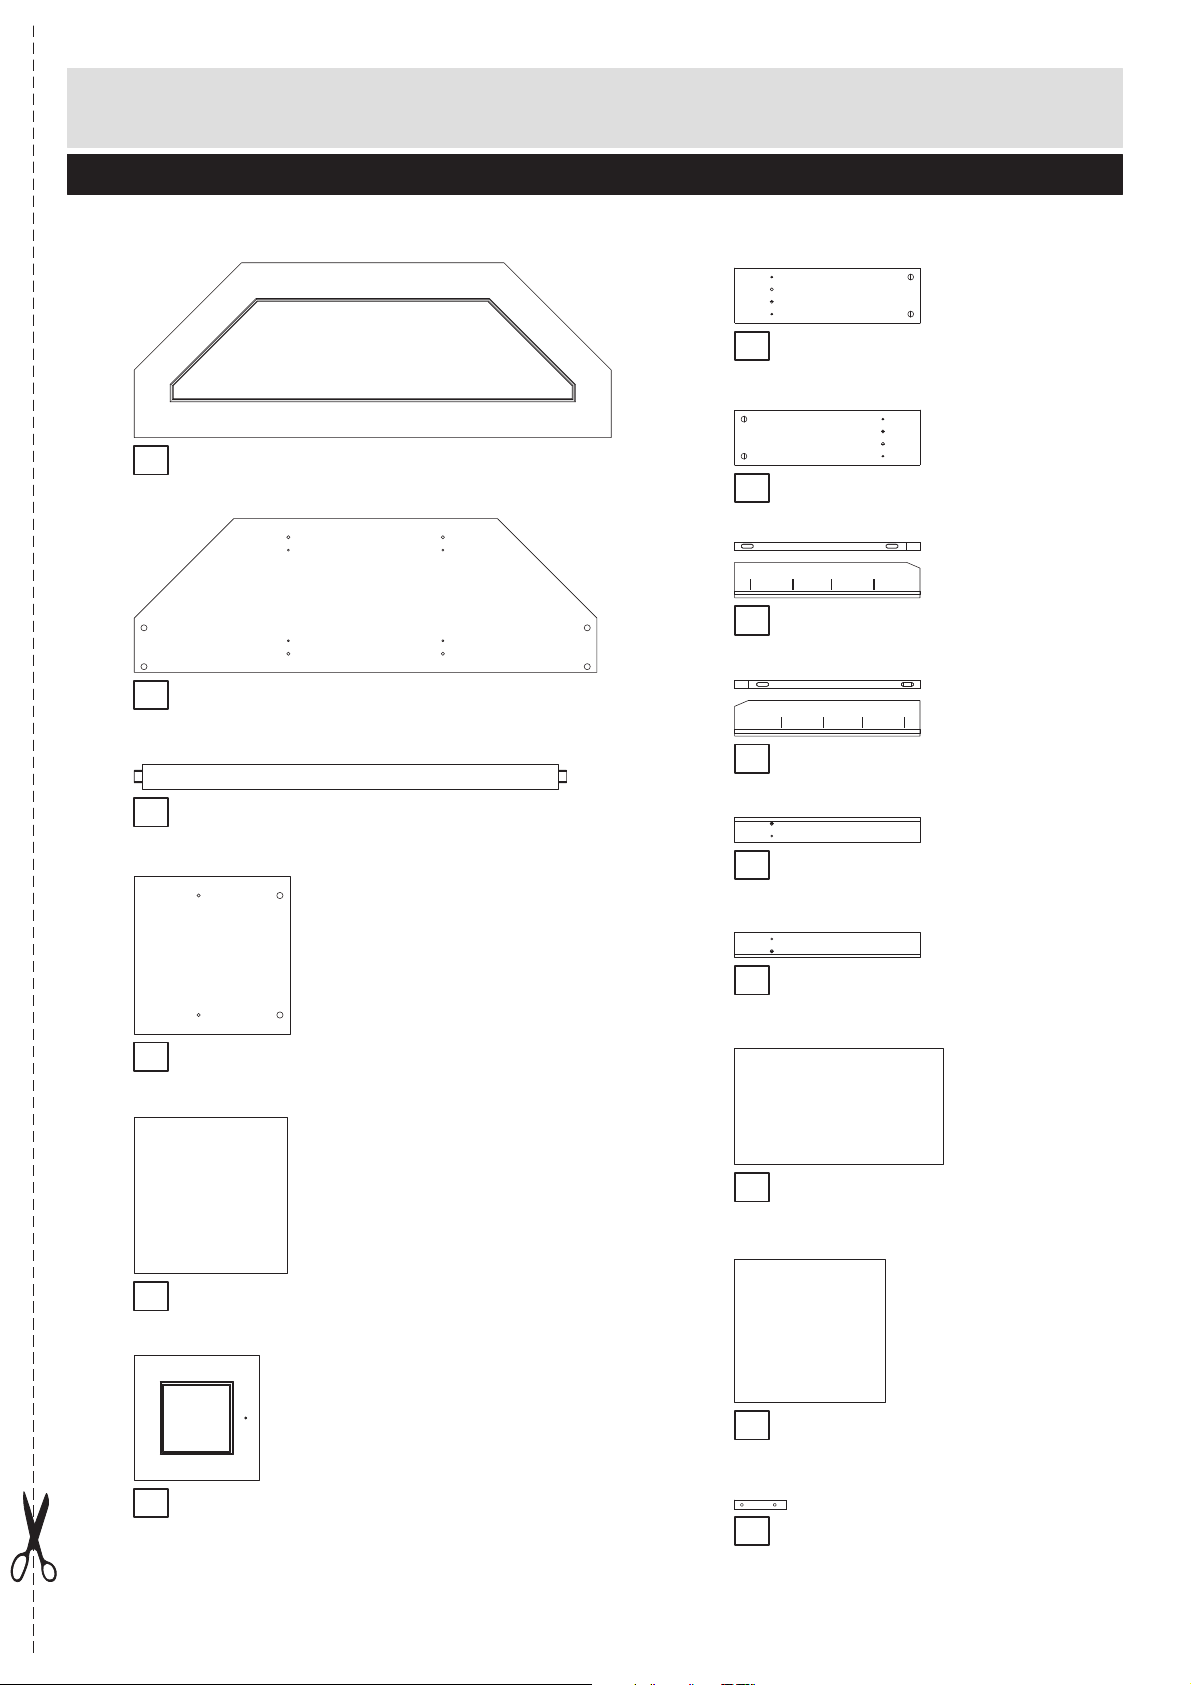
Components - Panels
Please check you have all the panels listed below
Top panel (120 x 44cm)
1
underside
Base panel (114.4 x 38cm)
2
Top
Right side panel (48 x 14.4cm)
7
Top
Left side panel (48 x 14.4cm)
8
Right front frame (48 x 9.2cm)
9
Front frame x 2 (103.6 x 6.5cm)
3
Top
Inside panel x 2
4
(37.5 x 38cm)
Shelf (36.4 x 37.4cm)
5
Left front frame (48 x 9.2cm)
10
Left back column
11
(48 x 6.5cm)
Right back column
12
(48 x 6.5cm)
Large back panel
13
(54 x 30cm)
Door x 2
6
(30.4 x 30.4cm)
Small back panel x 2
14
(39 x 37cm)
Block x 4
15
(10 x 2cm)
2
Page 4
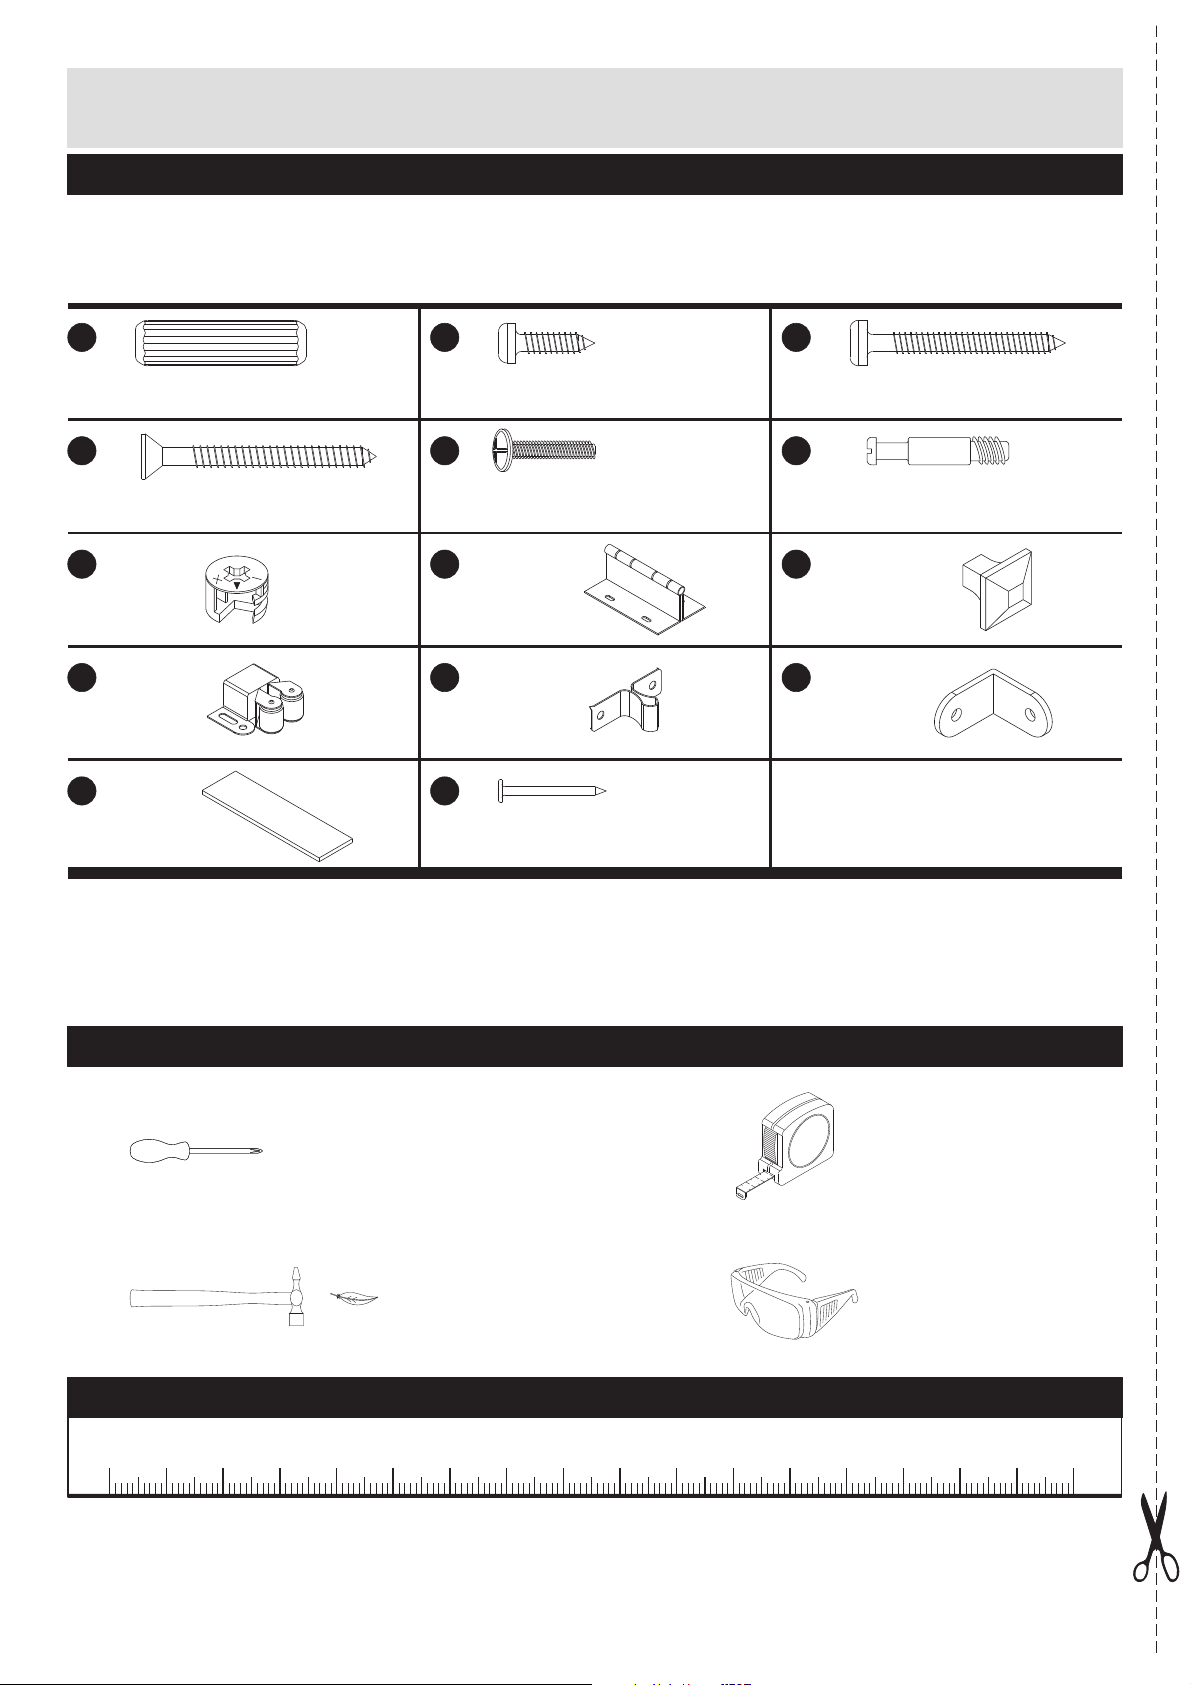
If you have damaged or missing components,
Components - Fittings
call the
Customer Helpline: 03456 400 800
Please check you have all the fittings listed below
Note: The quantities below are the correct amount to complete the assembly. In some cases more
fittings may be supplied than are required.
A
Wooden dowel x 24
D
40mm Screw x 6
G
Locking
nut x 14
J
B
14mm Screw x 26
E
22mm Bolt x 2
H
Door
hinge x 4
K
Clip x 2 Plug x 2
M N
Door
spacer x 1
Nail x 20
C
35mm Screw x 16
F
Metal dowel x 14
I
Door
handle x 2
L
Metal
bracket x 1
Tools required
Phillips screwdriver
(medium & large)
Small
hammer
Ruler - Use this ruler to help correctly identify the screws
5
0
10 15 20 25 30 35 40
3
55
45
50
60 65 70
75
80 85 90 95 100 105 110 115 120 125 130 135 140 145 150 155 160 165 170
m
2
Ruler/tape
measure
Eye protection
(when using a
hammer or glue)
Page 5
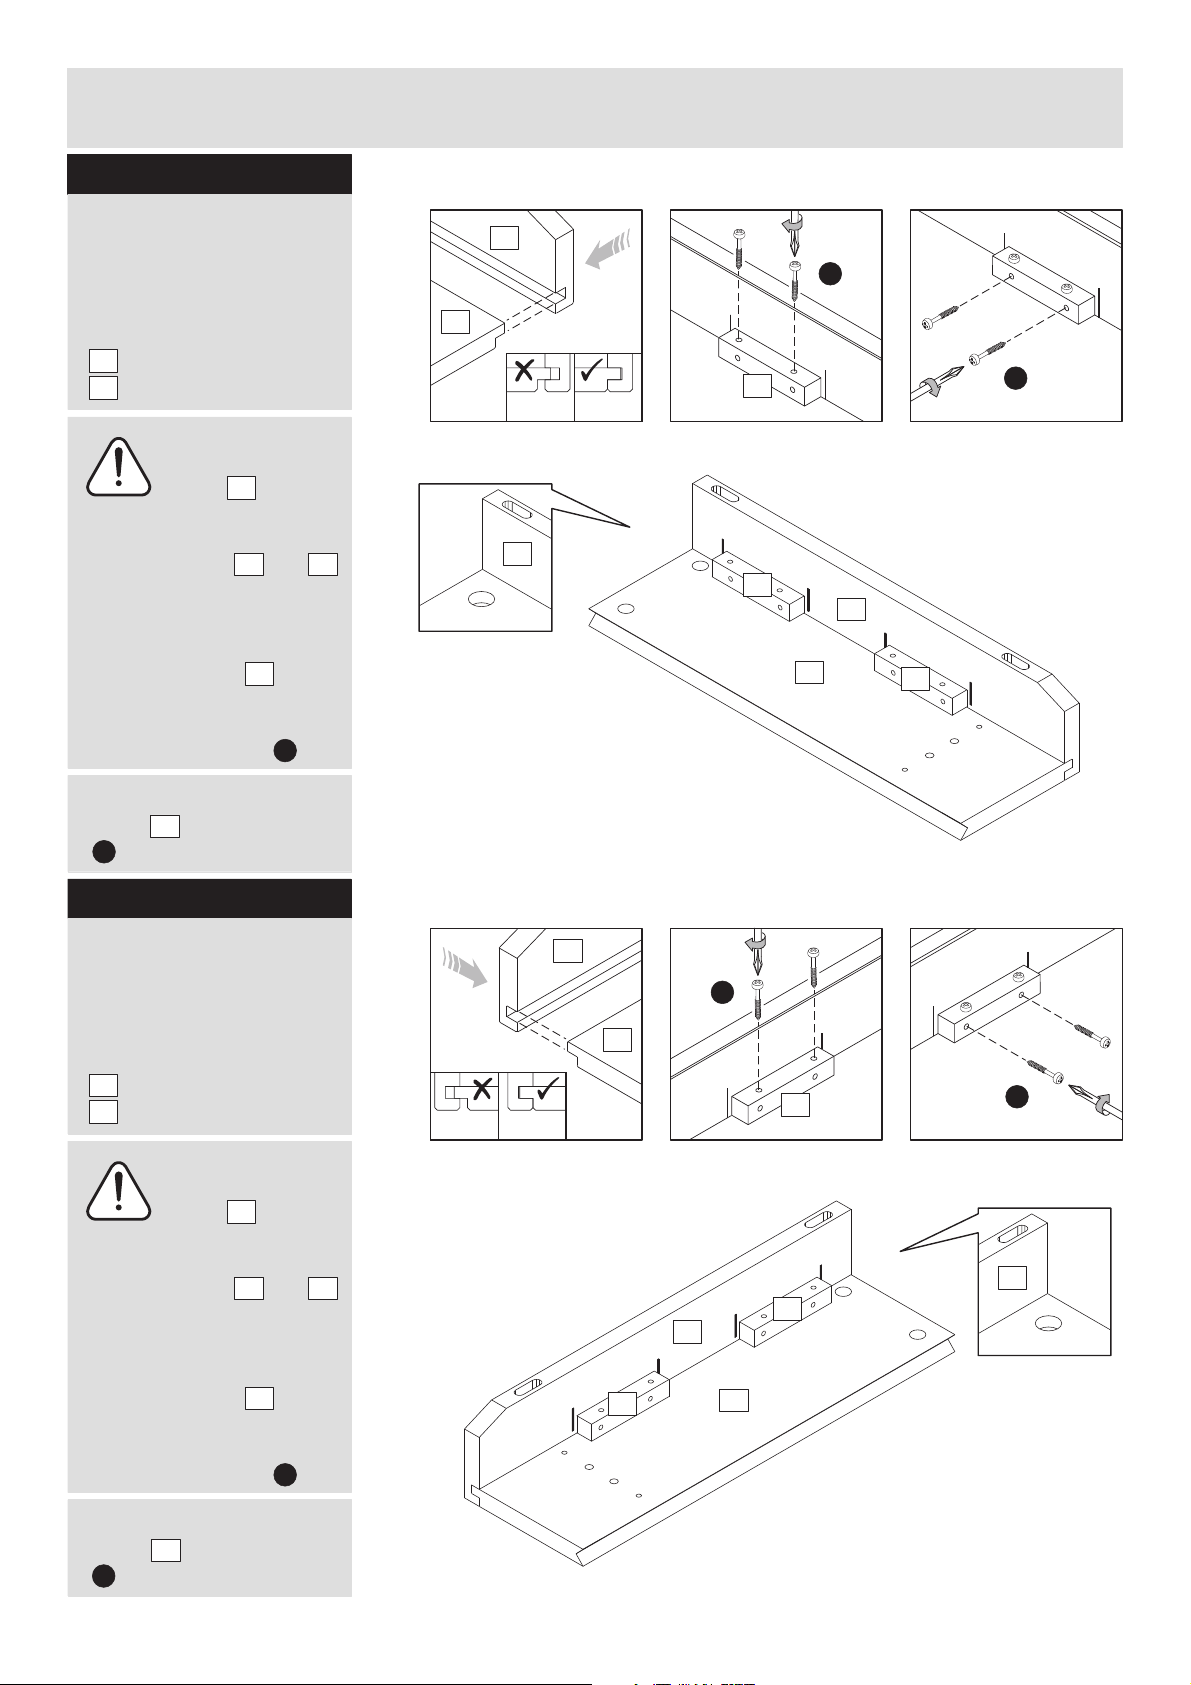
Assembly Instructions
Step 1
Fixing right front frame
to the right side panel
(Two people required for
an easier assembly).
a: Insert right side panel
7
into right front frame
9
through joints.
Note:
Before fixing
blocks into
place it is important to
ensure that the slot and
groove of parts and
are fully pushed together
and lined up correctly at
the top and bottom.
b: Place blocks
between the two marks as
shown. First fix to the side
panel using screws .
15
7
15
9
C
a: c:
9
C
7
15
Yes!No!
Attention:
correct position.
9
15
9
7
C
15
c: Fix front frame through
blocks using screws
15
C
.
Step 2
Fixing left front frame
to the left side panel
(Two people required for
an easier assembly).
a: Insert left side panel
8
into left front frame
10
through joints.
Note:
Before fixing
blocks into
place it is important to
ensure that the slot and
groove of parts and
are fully pushed together
and lined up correctly at
the top and bottom.
b: Place blocks
between the two marks as
shown. First fix to the side
panel using screws .
15
8
15
10
C
a: b: c:
10
C
8
15
Yes!No!
15
10
15
8
C
Attention:
correct position.
10
c: Fix front frame through
blocks using screws
15
C
.
4
Page 6
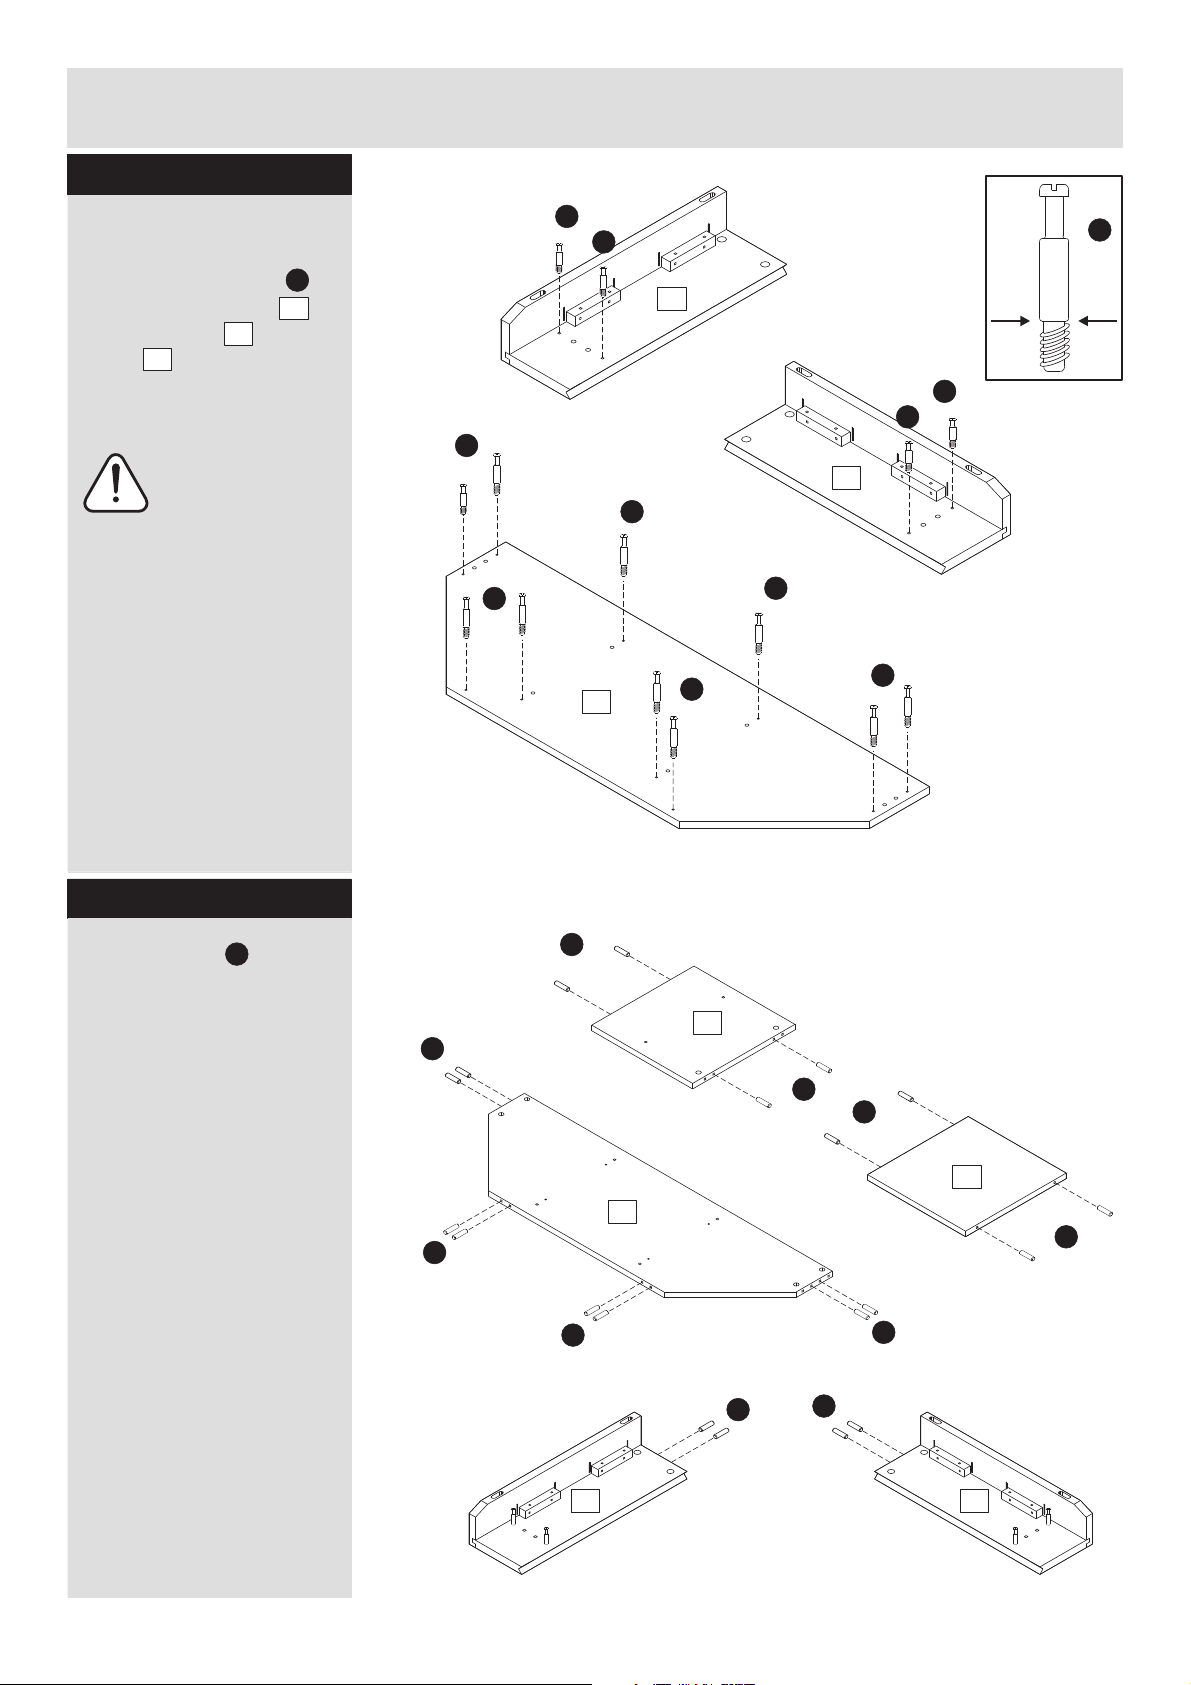
Assembly Instructions
Step 3
Fitting Metal dowels.
Screw metal dowels
into right side panel ,
left side panel and top
panel .
1
F
7
8
Insert metalNote:
dowels as far as
shown.
Do not over tighten.
F
F
8
F
F
F
7
F
F
1
F
F
F
F
Step 4
Insert dowels into the
indicated parts.
A
A
4
2x
A
A
A
5
2
A
A
A
A
A
A
78
5
Page 7
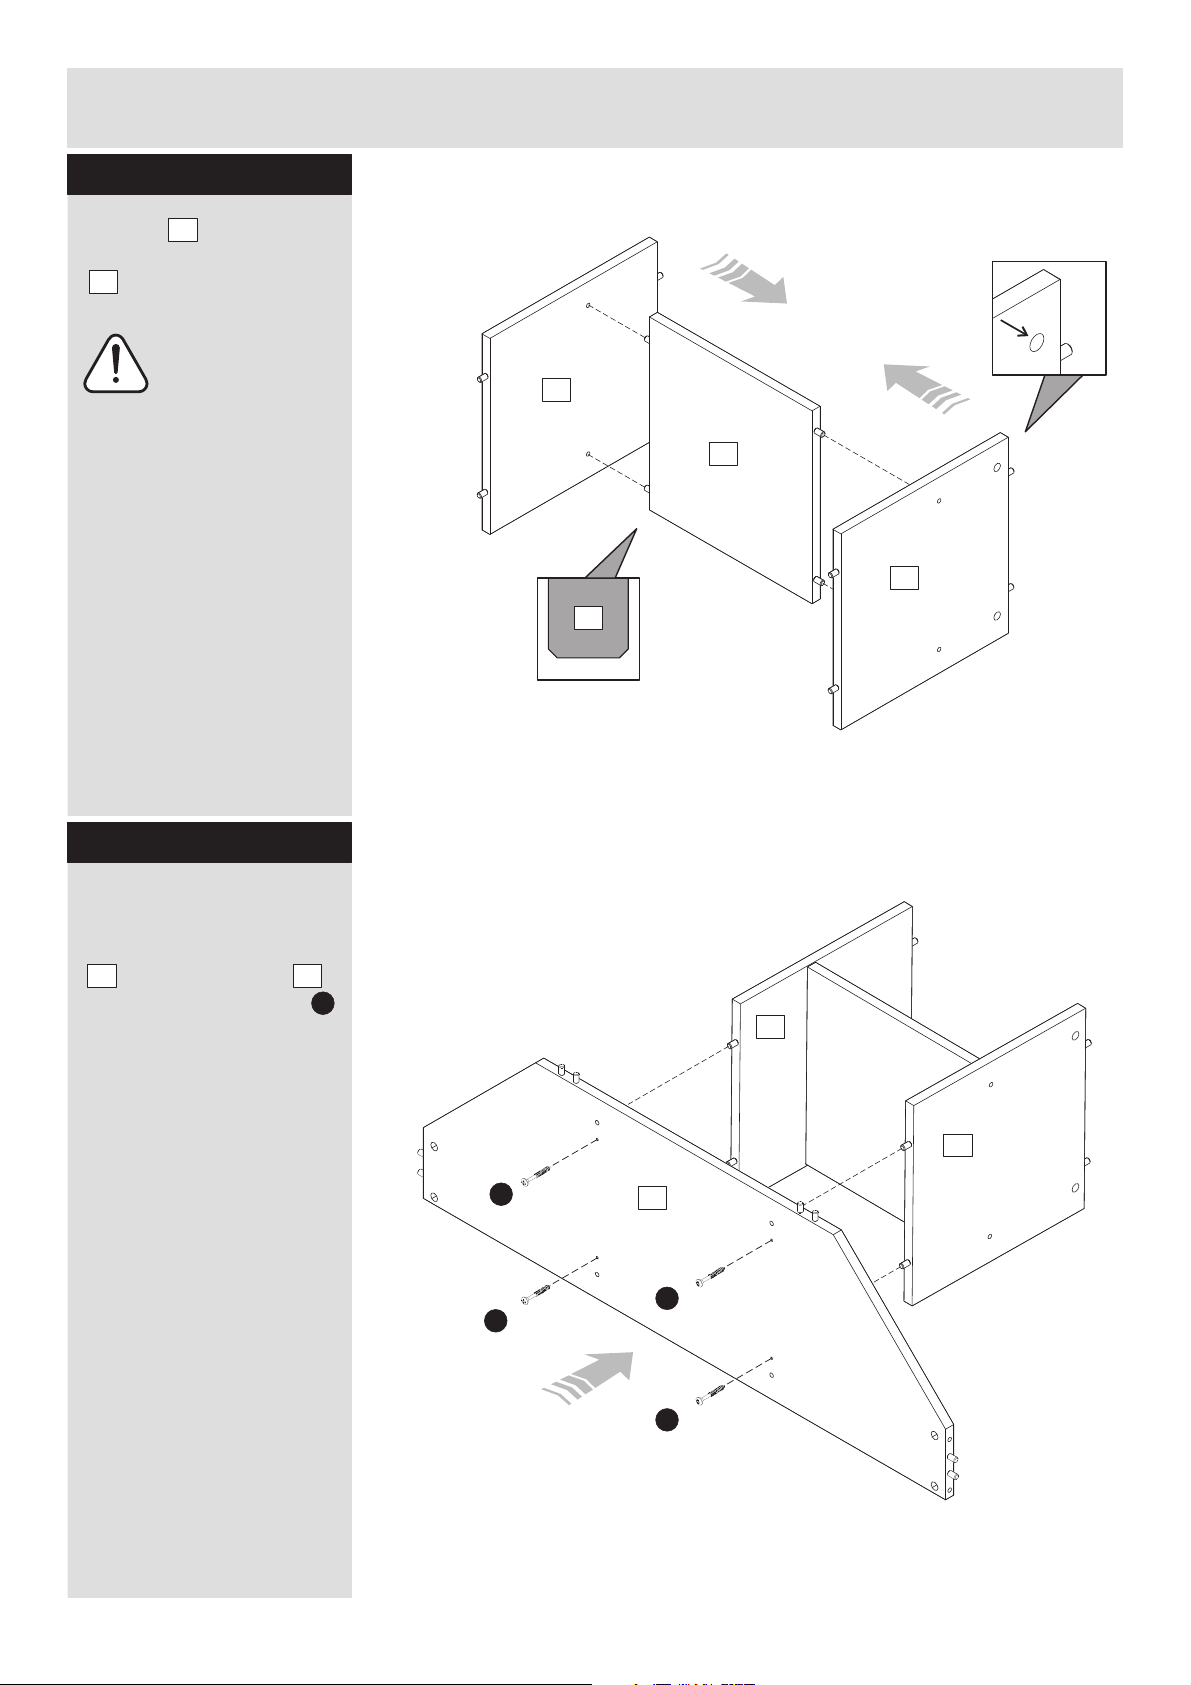
Assembly Instructions
Step 5
Fit shelf into the
5
holes on inside panels
4
.
Important!
Panels must be
positioned as shown in
the picture.
Note: The
hole position.
4
5
4
5
Step 6
Fixing base panel.
With help, fit inside panels
4
to the base panel
then fix it using screws .
Do not over tighten
screws.
2
D
4
4
D
D
2
D
D
6
Page 8
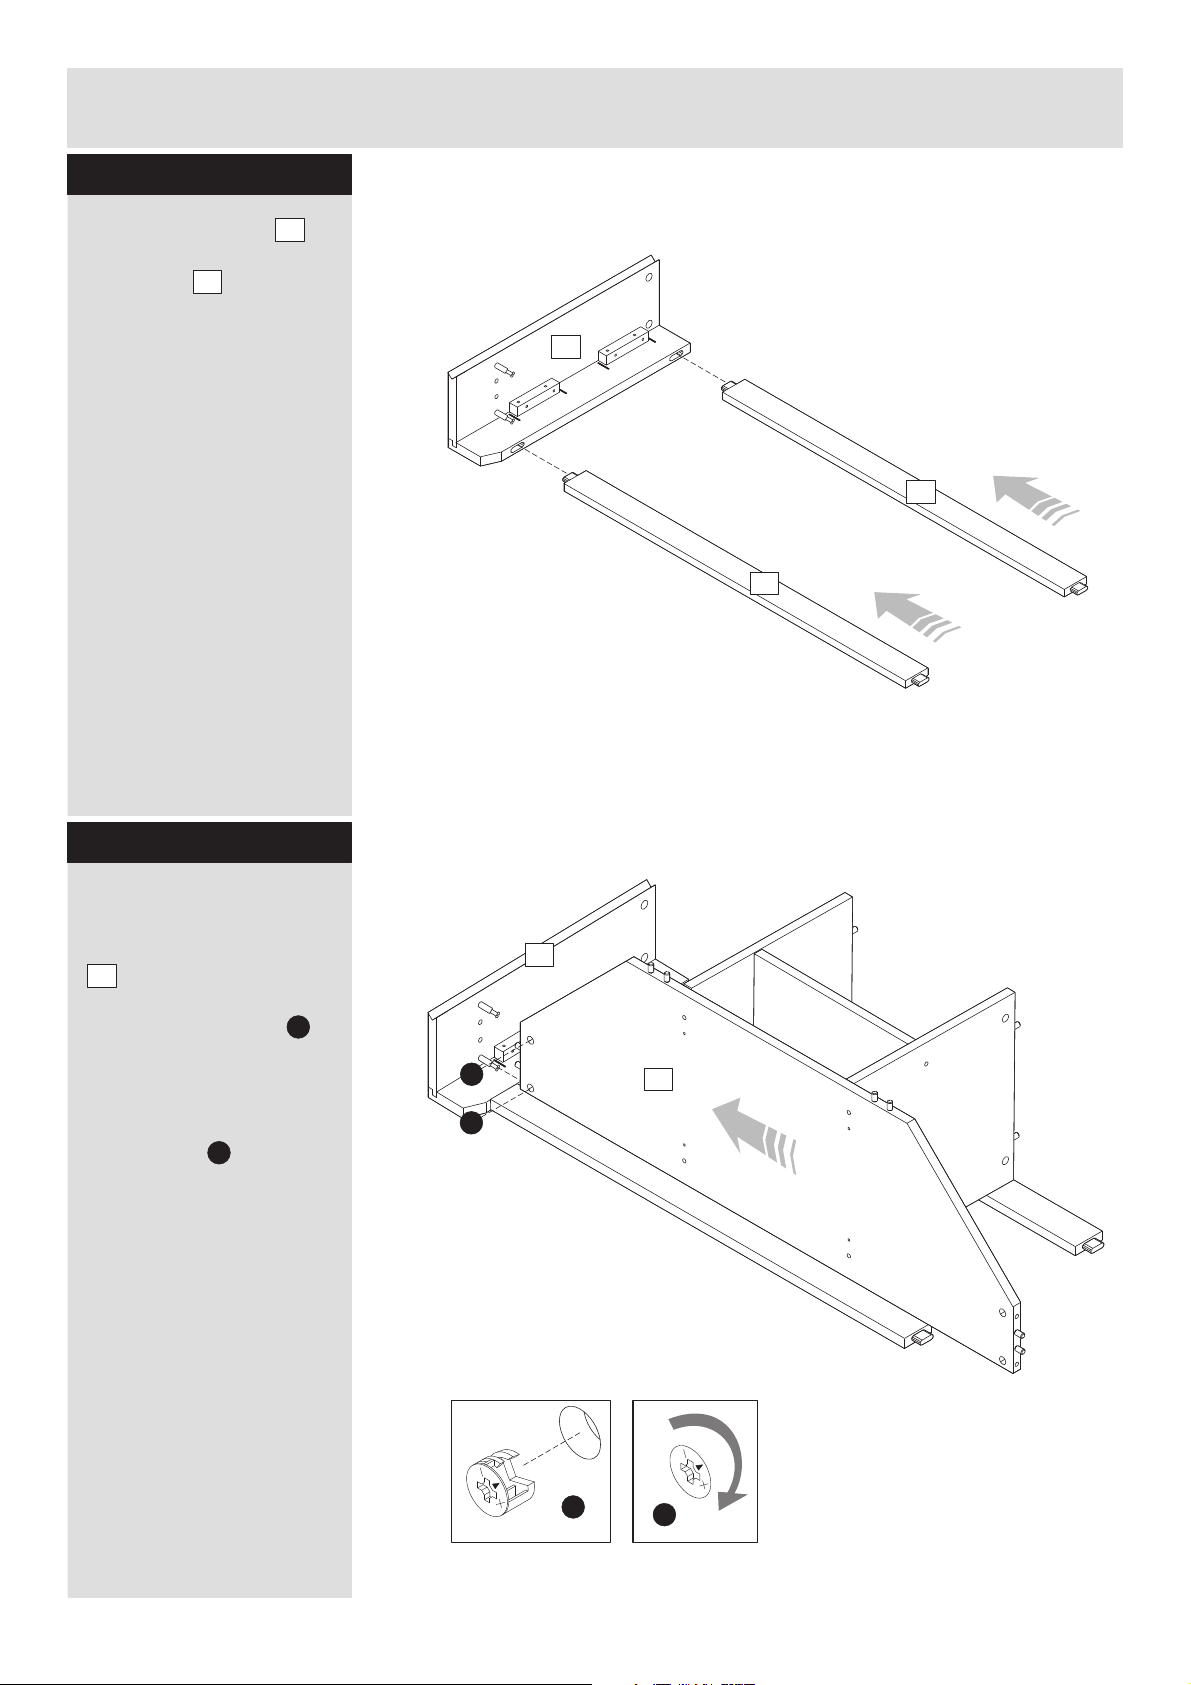
Assembly Instructions
Step 7
Insert front frames
into the holes on right
side panel .
7
3
7
3
3
Step 8
Fixing base panel.
With help, fit base panel
2
to the right side panel.
Insert 2 locking nuts
into base panel where
shown.
Use a screwdriver to turn
locking nuts clockwise
G
to lock.
Do not over tighten.
G
7
G
G
2
G
G
7
Page 9
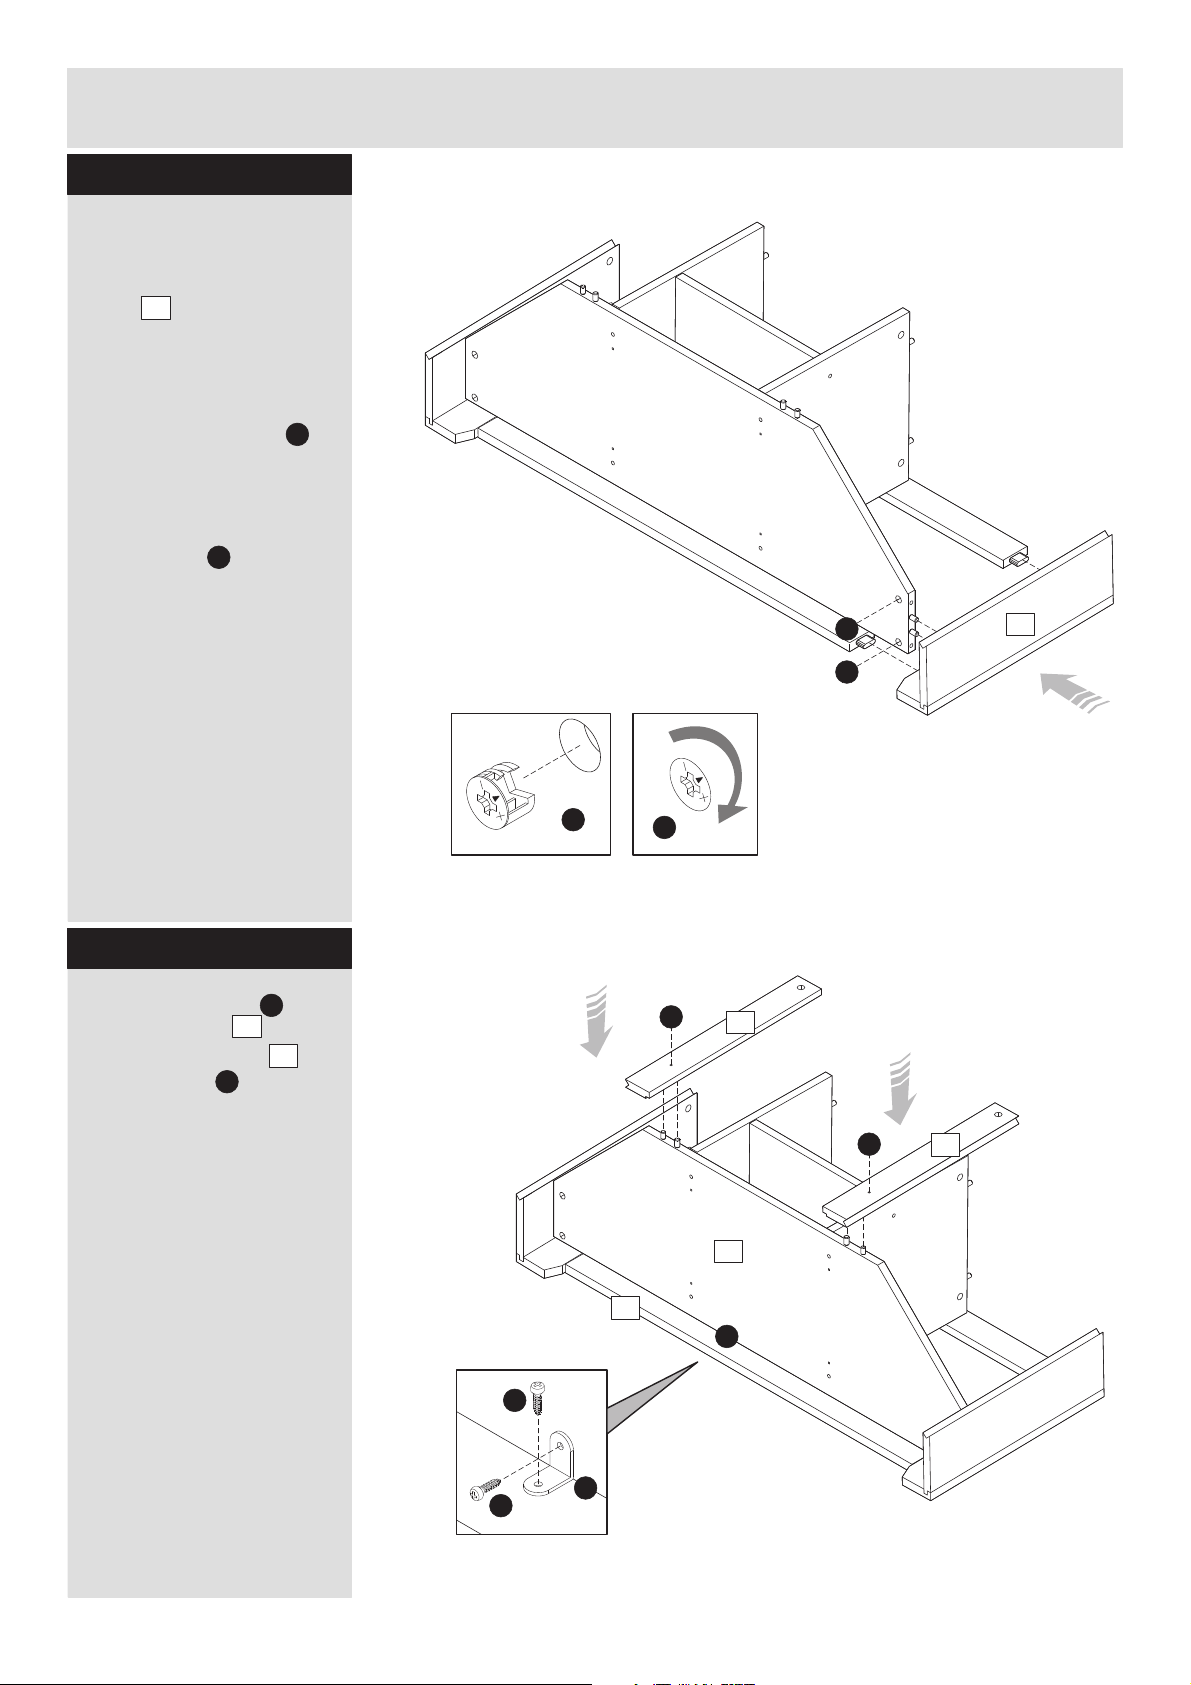
Assembly Instructions
Step 9
Fixing right side panel.
With help, place left side
panel properly
ensuring dowels and front
frames are all fit into their
holes at the same time.
8
Insert 2 locking nuts
G
into base panel where
shown.
Use a screwdriver to turn
locking nuts clockwise
G
to lock.
Do not over tighten.
Step 10
Fix metal bracket in
the base panel and
bottom front frame
using screws as
shown.
L
2
3
B
G
G
G
G
D
11
8
D
2
3
L
B
L
B
12
8
Page 10
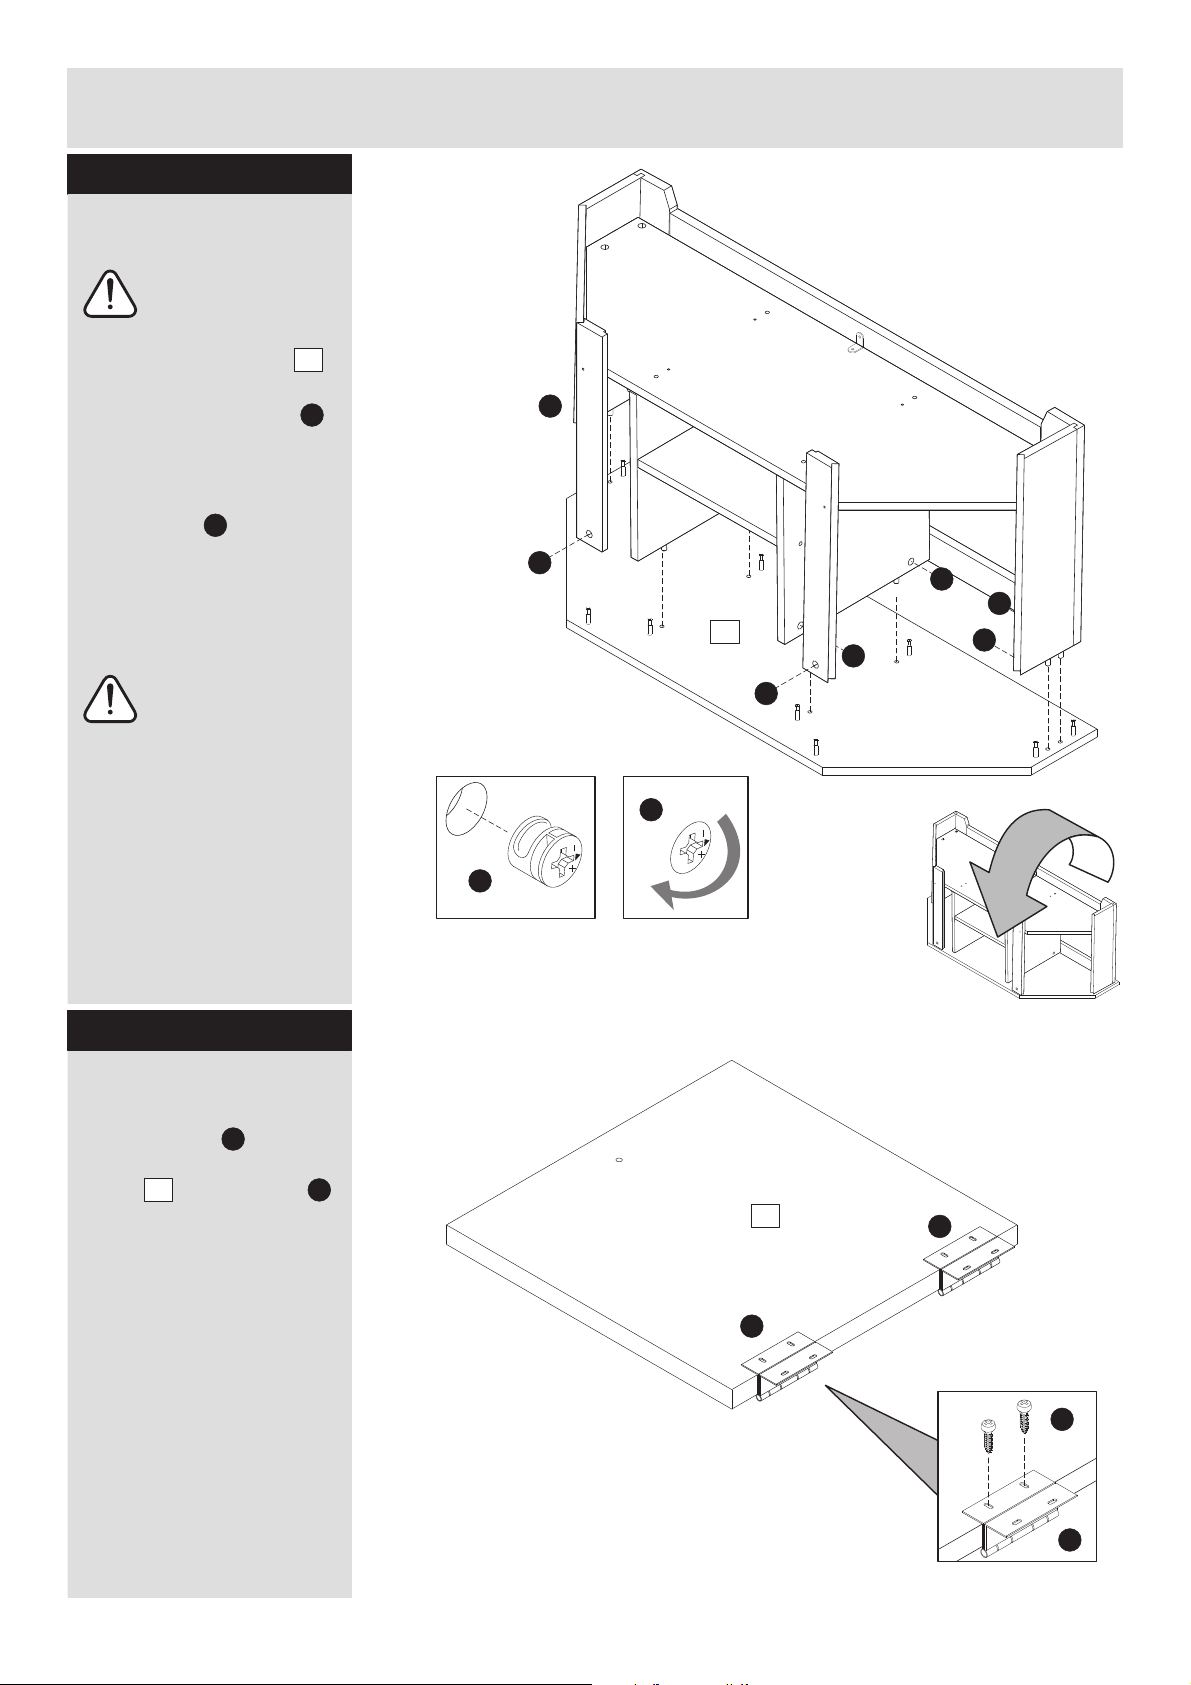
Assembly Instructions
Step 11
Fixing top panel.
Important:
With help, carefully
turn the product upside
down on top of panel .
1
Insert locking nuts10
G
the p sinto anel shown.
Use a screwdriver to turn
locking nuts clockwise
G
to lock.
Do not over tighten.
With help, stand
the product upright.
G
G
1
G
G
G
G
G
G
G
Step 12
Fitting hinges to doors.
Attach hinges in the
pre marked holes on
doors using screws
6
as shown.
H
B
2x
6
H
H
H
B
H
9
Page 11
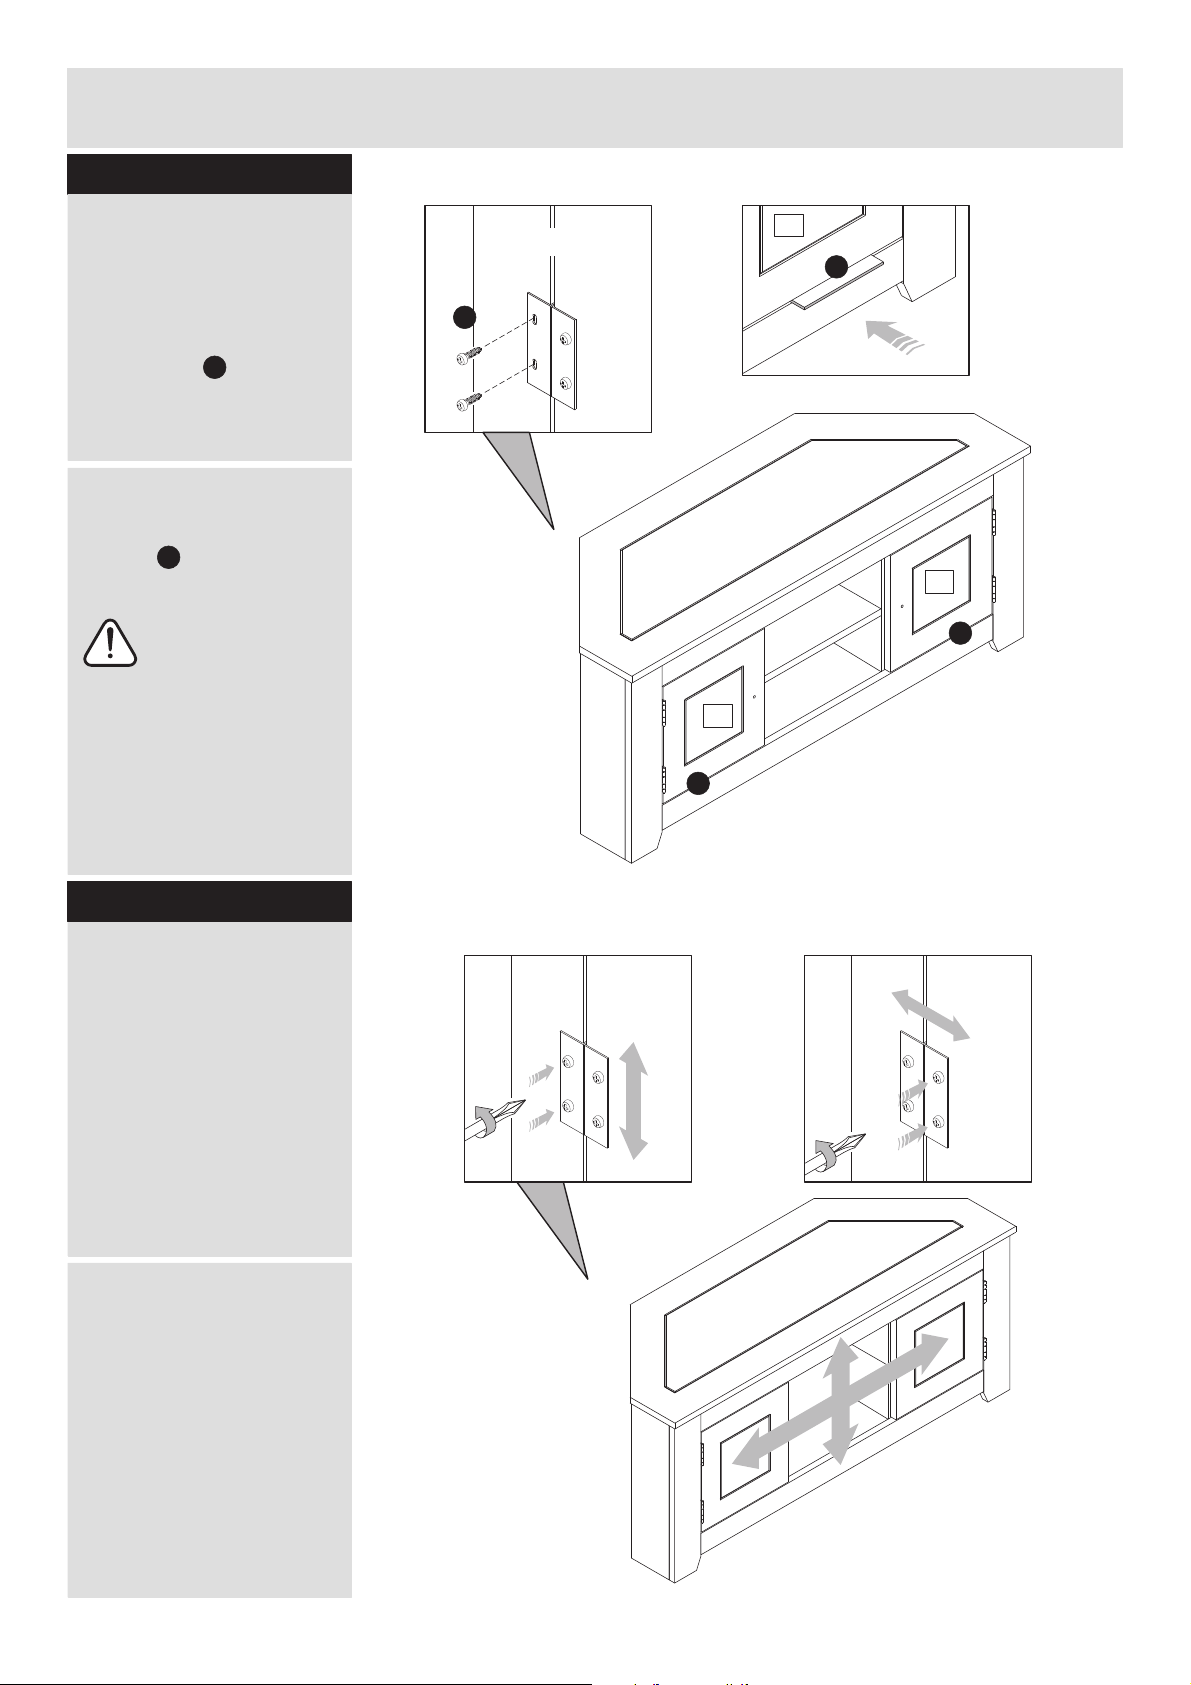
Assembly Instructions
Step 13
Hanging doors.
With help, centralise
a:
the doors in the opening
of the cabinet using the
door spacer to ensure
correct spacing, as
shown.
b: From inside the
cabinet fix hinges using
screws as shown.
alignment of the doors is
correct, centralise the
doors in the opening
before attaching to the
cabinet.
M
B
Note:
To ensure the
b:
View from behind
B
a:
6
M
6
M
6
M
Step 14
Hinge adjustment.
a: To move doors up or
down: loosen screws
shown and move doors
to suit.
Once doors are aligned,
re-tighten screws.
b: To move doors left or
right: loosen screws
shown and move doors
to suit.
Re-tighten screws.
View from behinda: b:
10
Page 12
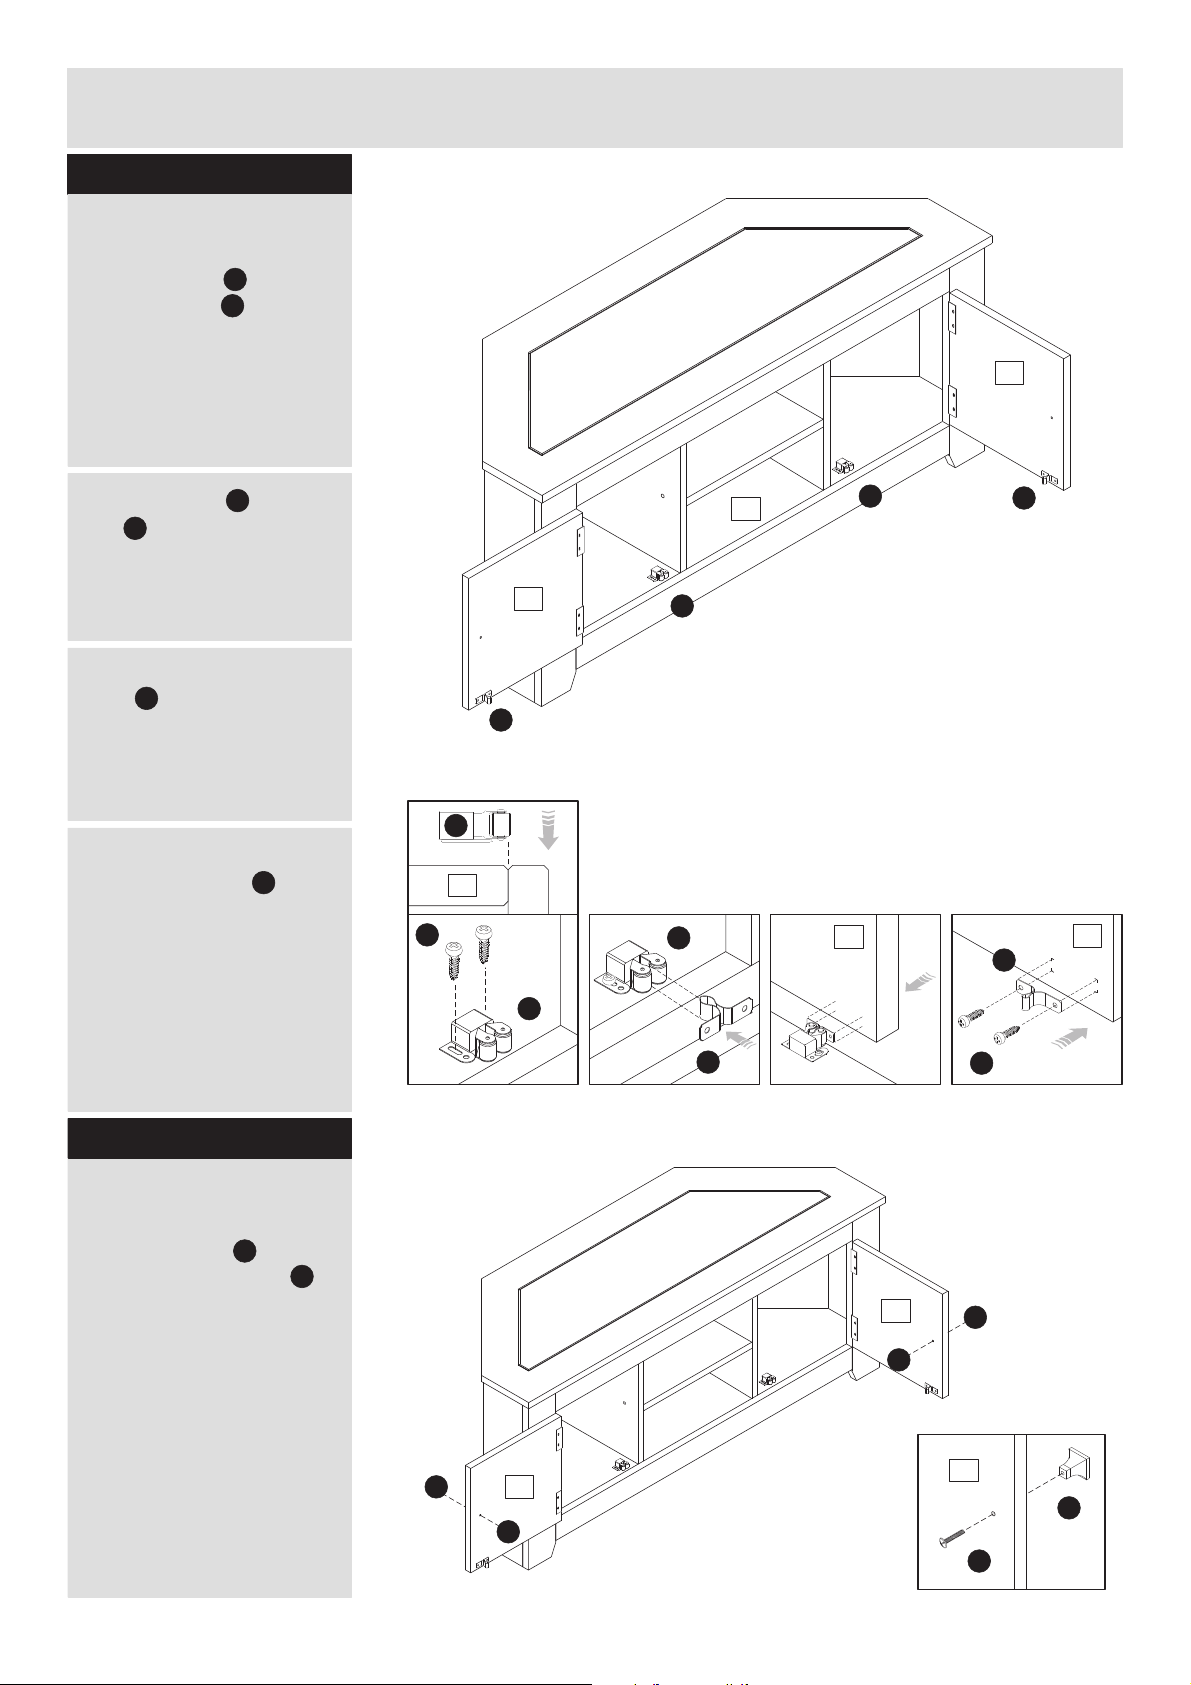
Assembly Instructions
Step 15
Fitting door lock.
a: Screw clip in place
using screws .
Ensure that the 2 small
wheels are flush with
the edge of the base as
shown in the diagram.
b: Insert plug into
J
clip , ensuring they
are leveled as shown in
the diagram.
J
B
K
c: Push the door against
K
plug . This will make 2
small marks on the door
as shown in the diagram.
d: The door can then be
opened and plug can
be screwed into place
using the 2 marks made
as a guide. This will
ensure that the 2 parts of
the door clips are lined
up correctly.
K
a:
B
6
2
6
K
J
2
J
b:
J
c:
J
K
J
d:
2
K
2
K
B
Step 16
Fitting handles to doors.
Attach handles to
the doors using bolts
as shown.
11
11
I
E
6
E
I
6
E
I
6
I
E
Page 13
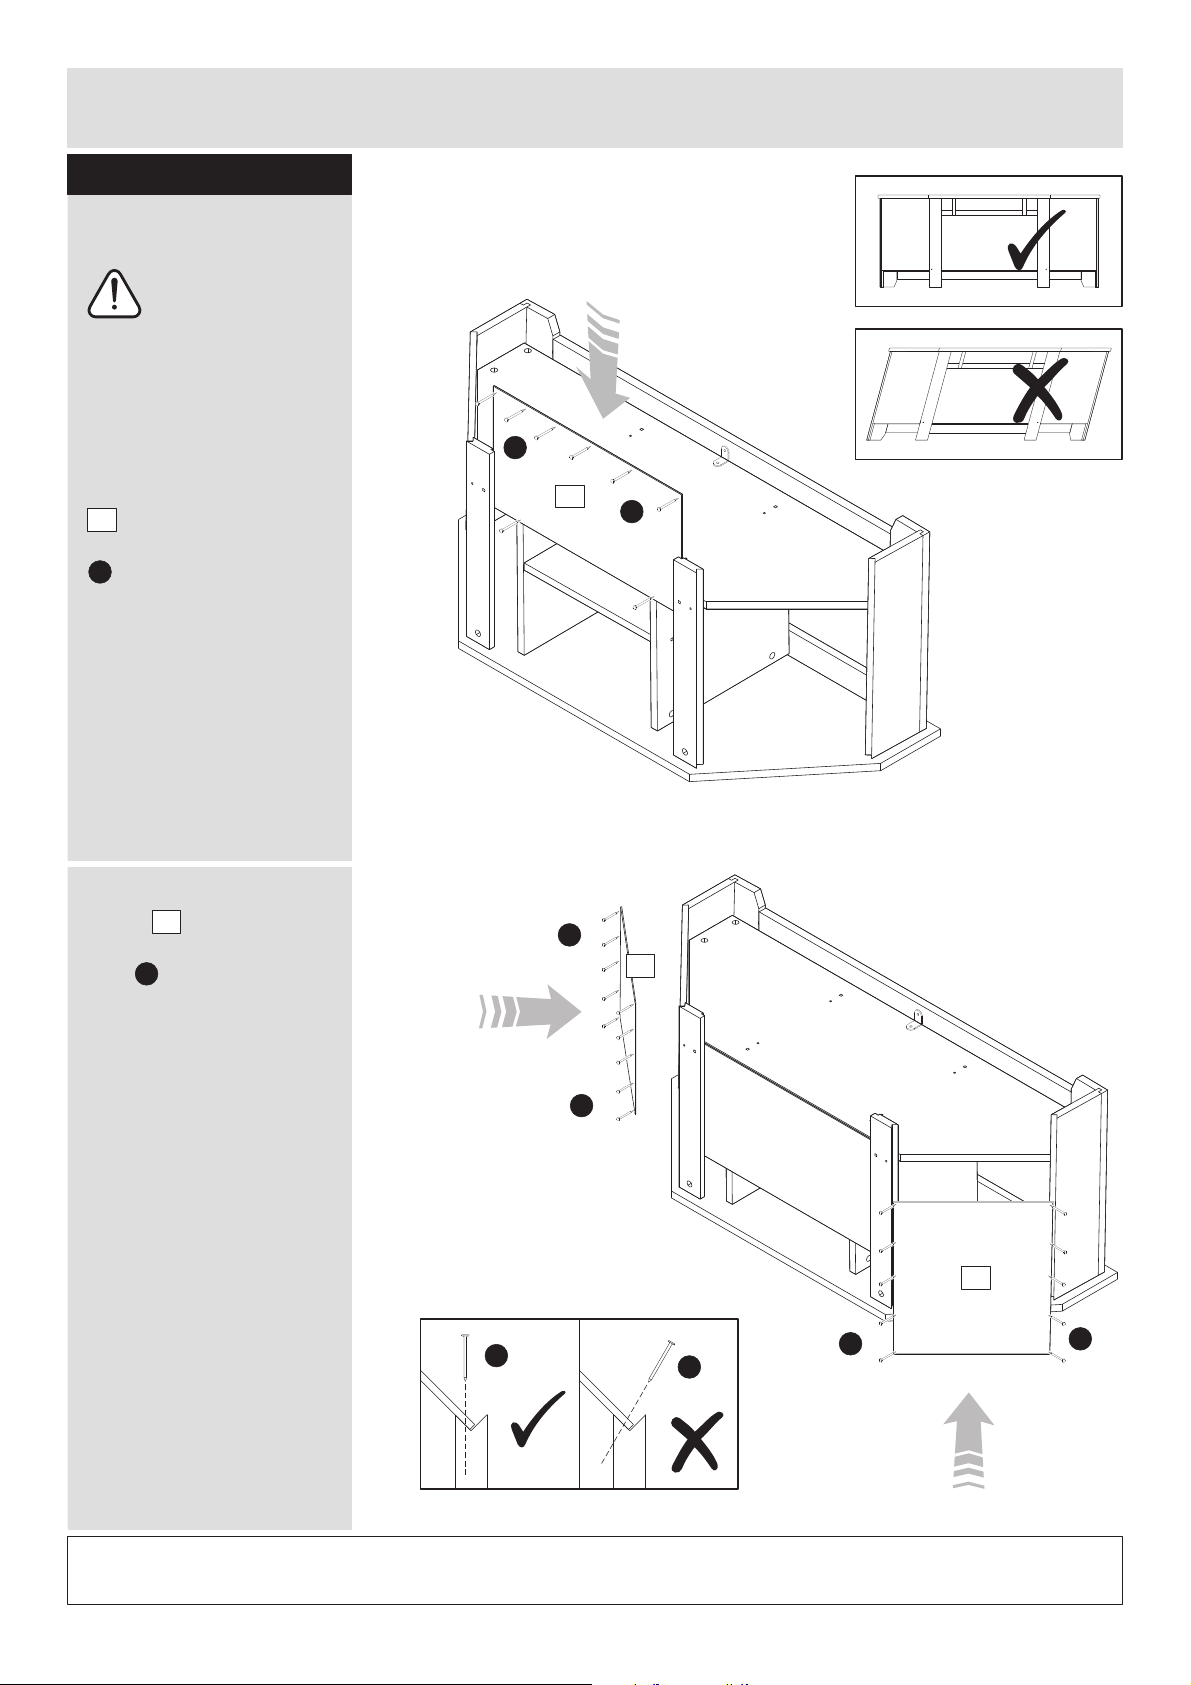
Assembly Instructions
Step 17
Fixing back panel.
Important:
Cabinet beMUST
‘square’ when back
panels are attached.
With help, turn cabinet
upside down.
Slide large back panel
a:
13
within grooves and
then attach it using nails
N
.
a:
N
13
N
b:
Place small back
panels within grooves
and then attach using
nails .
14
N
b:
Attention:
N
N
14
N
14
N
N
N
Assembly is complete.
If you need help or have damaged or missing parts, call the Customer Helpline: 03456 400 800
12
Page 14
Your 1 Year Guarantee
Peace Of Mind
Knowing Your Furniture Is Protected
Protection received within the
Manufacturer’s Guarantee
Covers you for manufacturing defects
for 1 year.
he event of a problem within this time
please call , or visit an Argos0345 640 0800
store. Please retain your receipt and order
number as proof of purchase.
Key exclusions applying to both the Manufacturer’s Guarantee and Furniture Care include where
the fault is due to misuse, abuse, deliberate damage, wear and tear, neglect, use in contravention
with the instructions, or if the product has been the subject of unauthorised alterations or
commercial use (for full list of exclusions please visit or visithttps://argos.productaftercare.co.uk
an Argos store for more information).
You have up to 45 days post purchase to take out Furniture Care.
Terms and conditions apply. Your statutory rights remain unaffected.
Optional Added Protection
with Furniture Care
Covers you for up to 2 years
for specific following thestructural defects
expiry of the manufacturer’s guarantee.
- covers you for up toPlus accidental damage
3 years for incidents such as household spills,
rips, tears and burns. Accidental damage cover
begins from the moment your plan starts.
If you want to purchase
Furniture Care visit
https://argos.productaftercare.co.uk
or go into an Argos store
Register
For Your Manufacturer’s Guarantee
Thank you for choosing Argos Home.
We hope you love your shiny new things!
To provide you with the best possible after sales service, don’t forget to visit
where you can for yourhttps://argos.productaftercare.co.uk register
guarantee.
Once you’ve registered, you can upload your receipt to store safely online,
alongside details of our after sales support service, ready at hand should you
need it.
You can also take out Furniture Care which protects you against accidental
damage, from the moment you take the plan out, to keep your new furniture
looking newer for longer.
Register Today
https://argos.productaftercare.co.uk
 Loading...