

Page 1
9. Any battery may leak battery acid or explode if disposed of in fire or an
attempt is made to charge a battery not intended to be recharged.
10. Never recharge a cell of one type in a recharger made for a cell of
another type.
11. Discard leaky batteries immediately. Leaky batteries can cause skin
burns or other personal injury. When discarding batteries, be sure to
dispore of them in the proper manner, according to your state and local
regulations.
12. Always remove batteries if the product is not going to be used for a
month or more. Batteries left in the unit may leak and cause damage.
13. Recommended type batteries-alkaline disposables, size C(LR14-1.5V).
Never mix battery types. Change batteries when product ceases to
operate satisfactorily.
MAINTAIN AND CLEAN
1) In order to keep the product attractive keep it clean (wipe with a damp
cloth). Also avoid long sun exposure.
2) Store item in dry and properly ventilated places.
3) Do not bleach and do not tuble dry.
4) Never soak the musical and vibrating unit.
IMPORTANT! KEEP FOR FUTURE REFERENCE.
INSTRUCTIONS FOR ASSEMBLY AND USE
COMPLIES WITH EN 12790:2009
Cat No: 8571294
ARGOS LTD
489-499 Avebury Boulevard,
Central Milton Keynes MK9 2NW.
For the safety of your child please read these
instructions before using the product.
Page 2
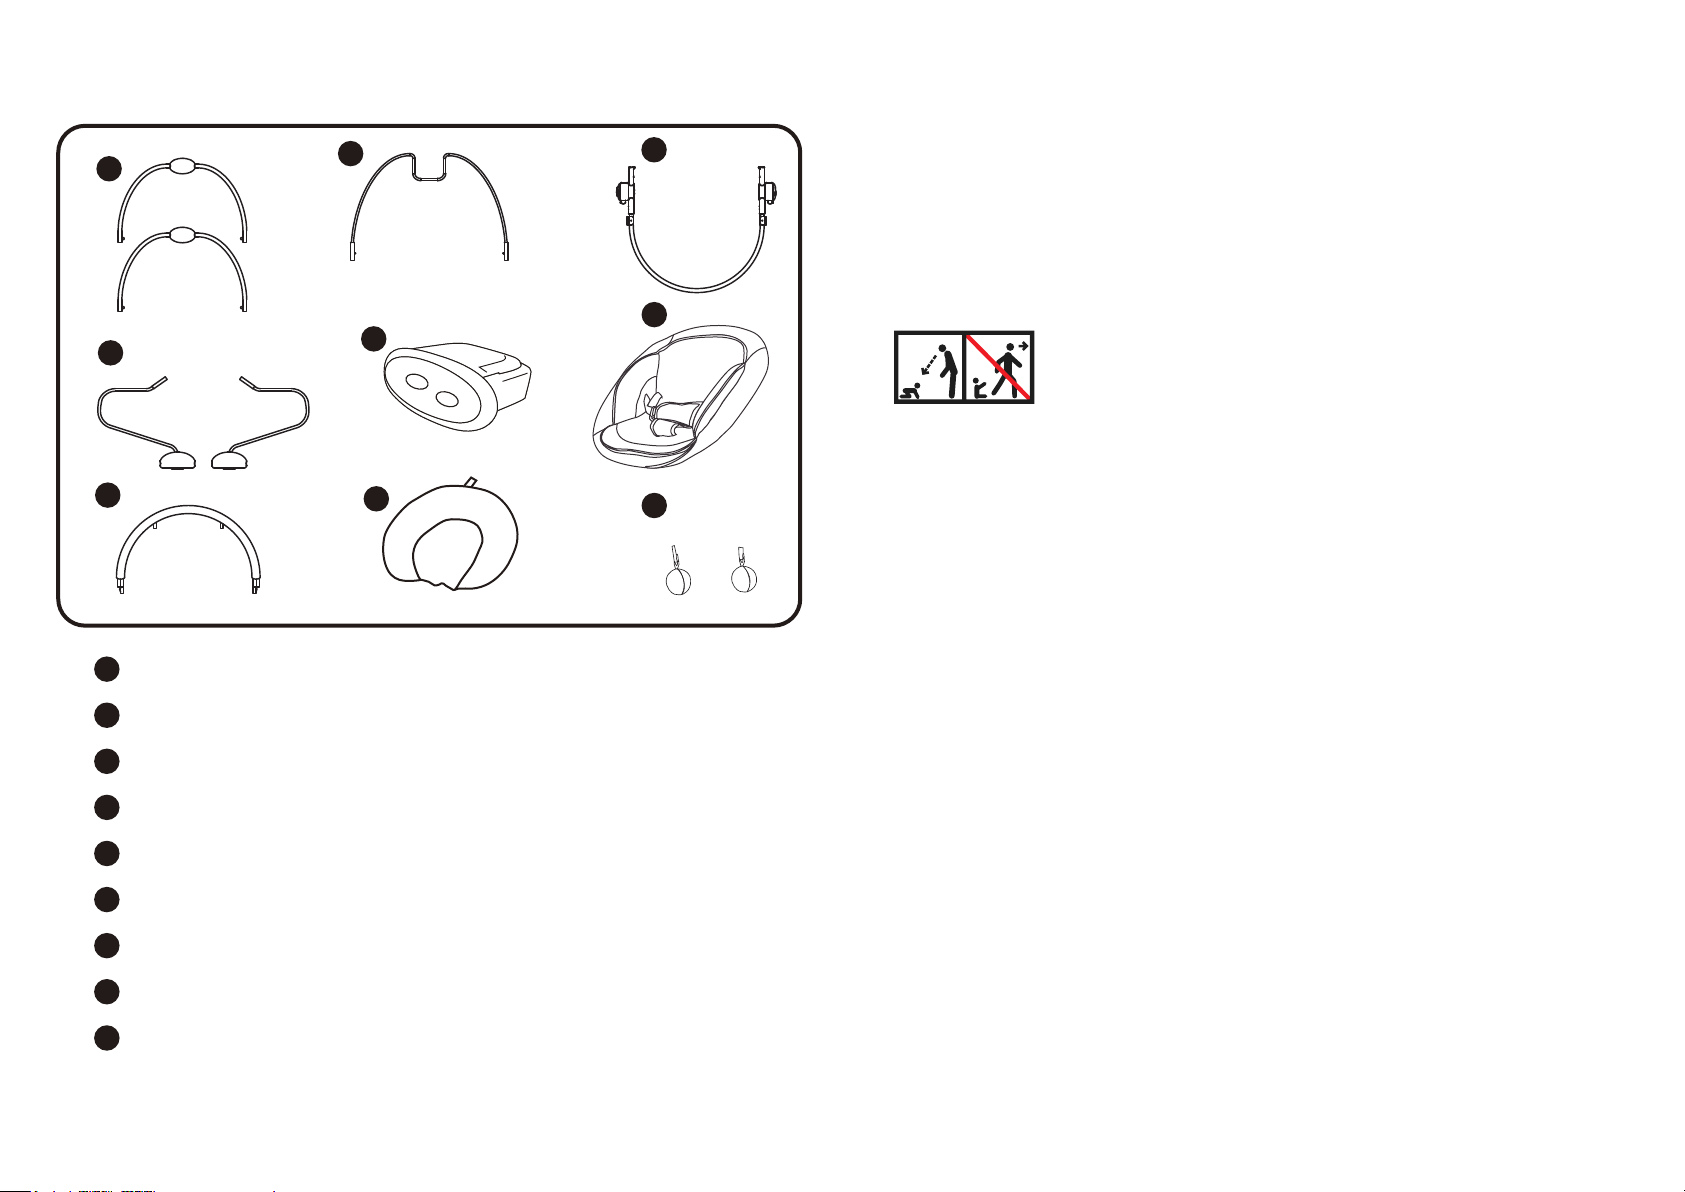
STANDARD CONFIGURATION PARTS
1
4
5
1
Chassis tube
2
Seat wire
3
Backrest tube
2
6
7
WARNING
Read this instruction carefully before using and keep it for future reference.
Failure to follw these warnings and the assembly instruction could result in
3
8
9
serious injury or death.
Products need to be installed by adult and used under adult’s supervision.
1. Use for babies aged around up to 6 months with maximum weight 9kg.
2. Do not use the product if any parts are broken, torn or missing and use
only spare parts approved by the manufacturer.
3. Always use harness. Do not move or lift this product with the baby inside it.
4. Never leave child unattended. Do not let children play with this product.
5. Stop using product when child attempts to climb out or reaches 9kg.
6. It is dangerous to place this product on an elevated sureface. Always use
on a flat, level floor.
7. To avoid injury ensure that children are kept away when unfolding and
folding this product.
8. Be aware of the risk of open fire and other sources of strong heat, such
as electic bar fires, gas fires, etc. In the vicinity of the product.
9. This product does not intend for prolonged period of sleep. Should your
child need to sleep, then place the child in a suitable cot or bed.
10. Do not use the product without the seat cushion.
11. Discontinue using your product should it become damaged or broken.
12. Do not use the reclined cradle once your child can sit unaided.
13. Never use the toy bar to carry the reclined cradle.
4
Support wire frame
5
Toy bar
Music and vibration
6
7
Head support
Seat pad
8
Toys
9
FOR SAFE BATTERY USE
1. Keep the batteries out of children’s reach.
2. Only the recommended batteries or equivalent are to be used, volts and
size.
3. Batteries are inserted with the correct polarity.
4. Remove exhausted batteries from the product.
5. Do not short-circuit supply terminals.
6. Rechargeable batteries are to be removed before being charged.
7. Rechargeable batteries are only to be charged under adult supervision.
Non-rechargeable batteries are not to be recharged.
8. Any battery may leak battery acid if mixed with a different battery type, if
inserted incorrectly(put in back-wards) or if all batteries are not replaced or
recharged at the same time. Do not mix old and new batteries. Do not mix
1
alkaline, standard(carbon-zinc) or rechargeable(nickel-cadmium) batteries.
Page 3
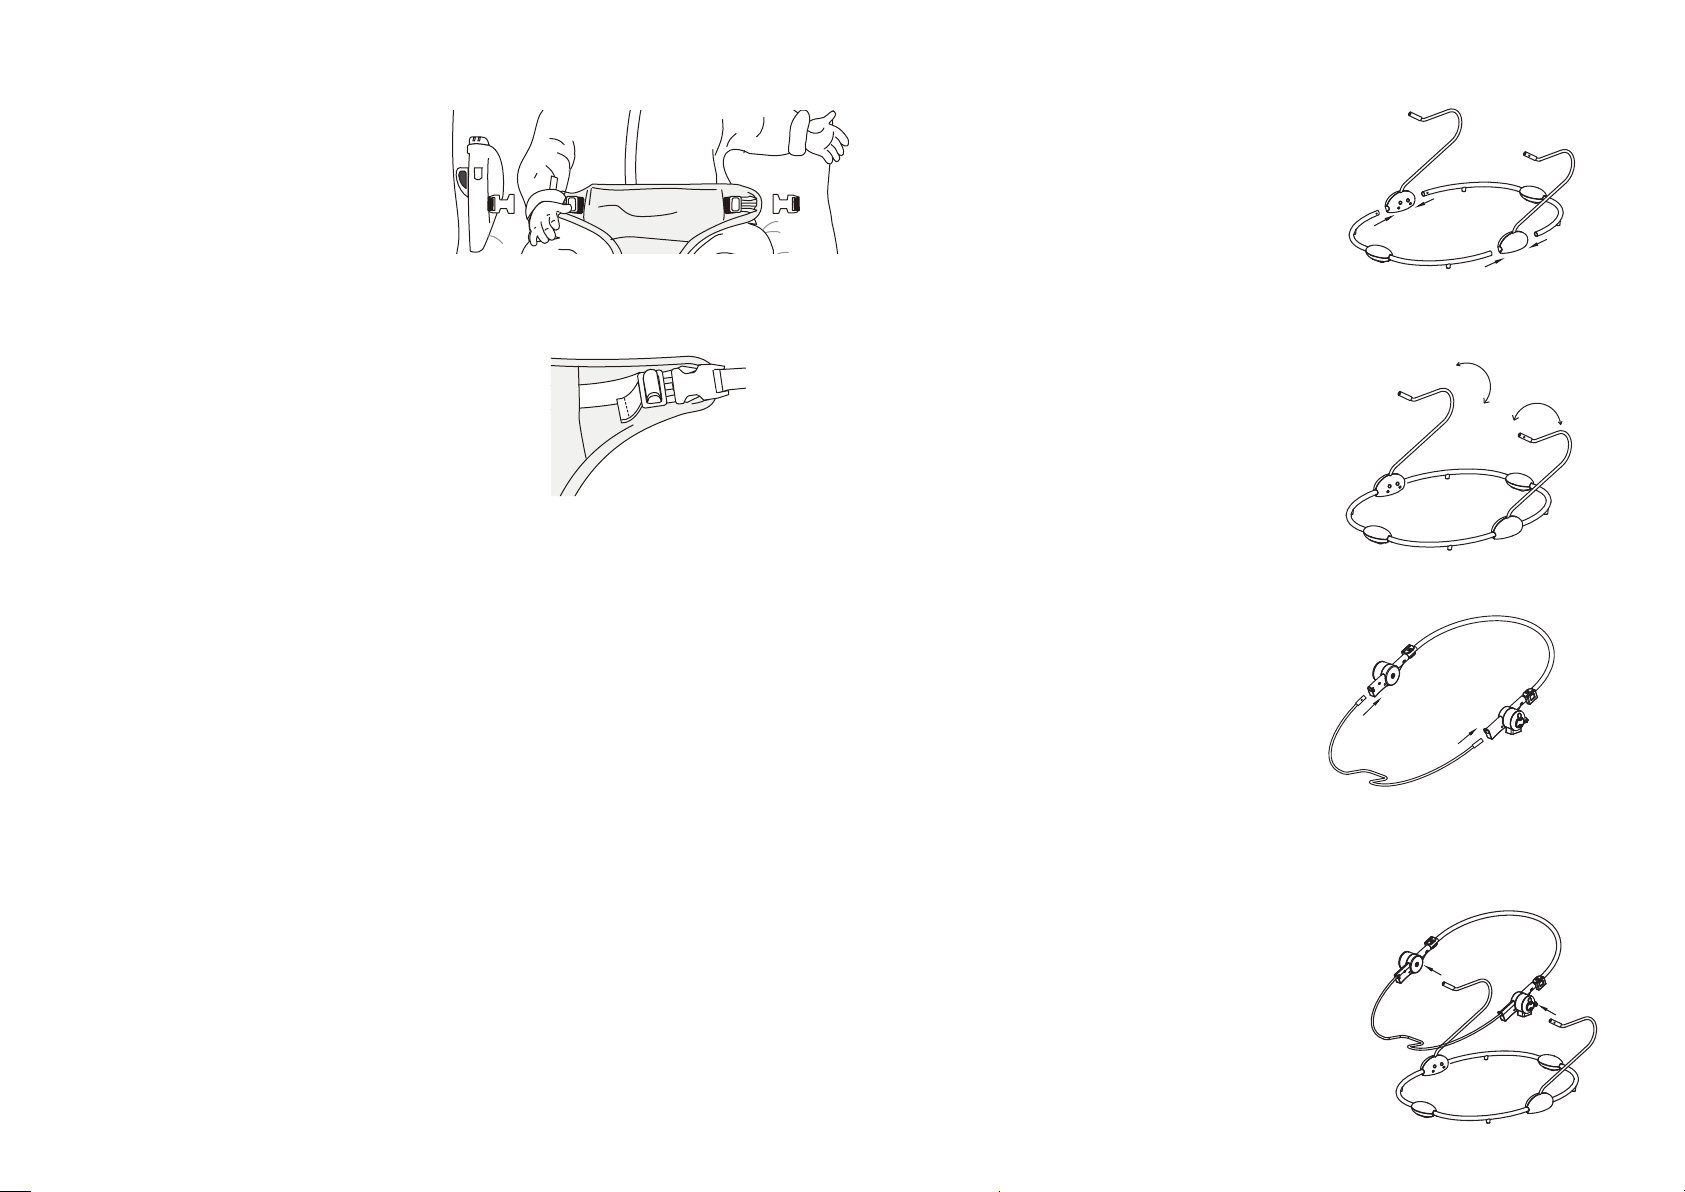
ASSEMBLY
9. Place the crotch strap between
child’s legs and fasten the buckle
on both sides.The child should
always wear a safety harness.
Warning! Ensure the child’s
fingers are kept away when
fastening the buckles. Always
use the restraint system.
Pull loose ends of the harness to
get a snug fit around the child.To
release the buckle,press on the
prongs and pull apart. Repeat on
the other side.
1. Insert chassis tube into plastic
hole of support tube until a ''click'' is
heard.
Attention:chassis tube with anti
slip pad face to floor.
2. 2 support wire frames can rotate
inward.
3. Backrest tube and seat wire
assembly,insert seat wire into
backrest tube until the shrapnel
pop-up,like right picture.
Attention:Intermediate folding
section of seat wire
should face downside.
4. Insert support wire frame into
seat joint hole until a 'click' is heard,
like right picture.
5
2
Page 4
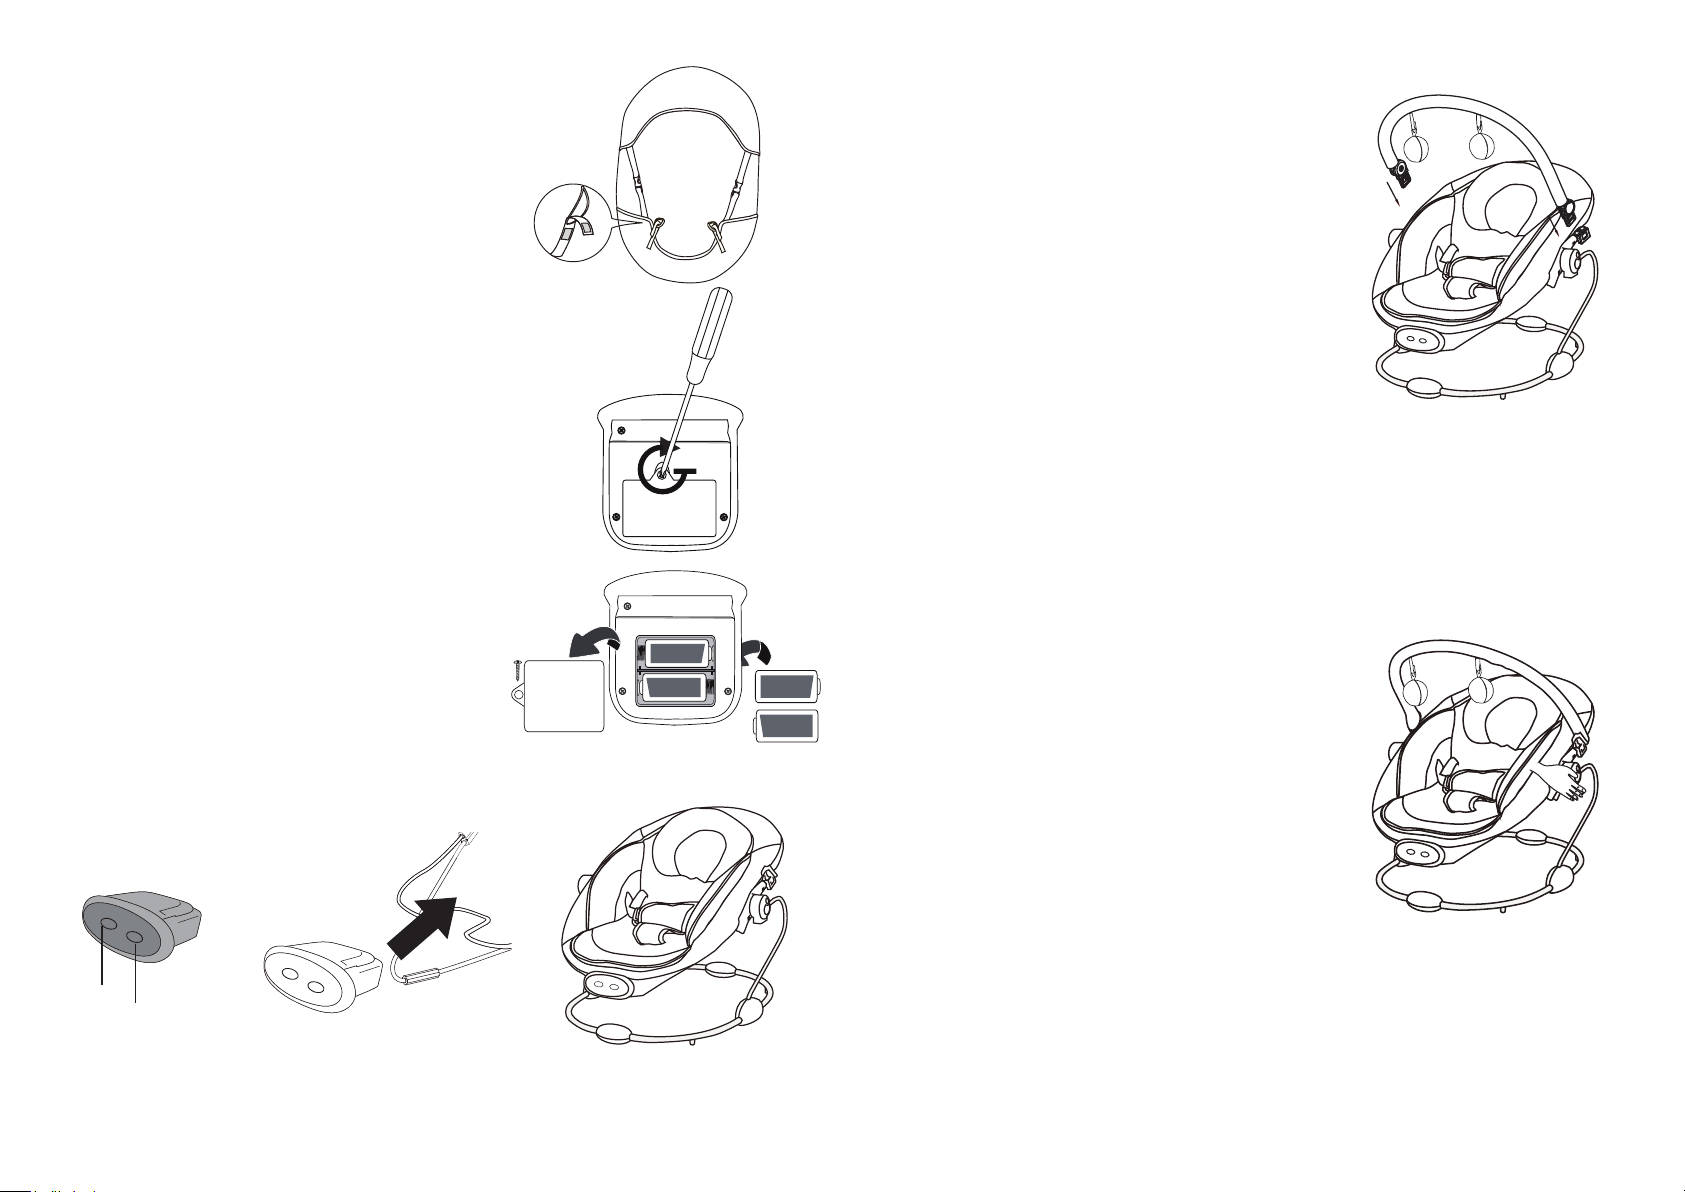
5. Place the seat pad over the seat
frame,and fasten velcro tabs at the rear to
secure.Position the head support at the top
of the seat pad by velcro.
6. The music and vibration unit requires 2 x
C batteries (not included). Use a Phillips
screwdriver to unfasten the battery cover.
Insert batteries.
Secure battery cover back into position.
Warning! Remove batteries before
storing the bouncer.
Insert music and vibration unit
Attention: Battery compartment should
face downside.
C/ R14
-
C / R 14
+
C/ R14
C / R 14
-
+
2X 1.5V SIZE C/LR14
7. Toy bar assembly
insert the toy bar frame into plastic
holes each side ,then adjust the toy
bar to suitable degree as you like.
And hang up the toys.
8. Adjust the backrest:
C / R 14
-
+
Press the 2 side buttons on the seat
joint together to adjust the position of
-
C / R14
+
the backrest, there are 2 positions.
Vibration/sound unit
Sound
Vibration
3
4
 Loading...