

Page 1
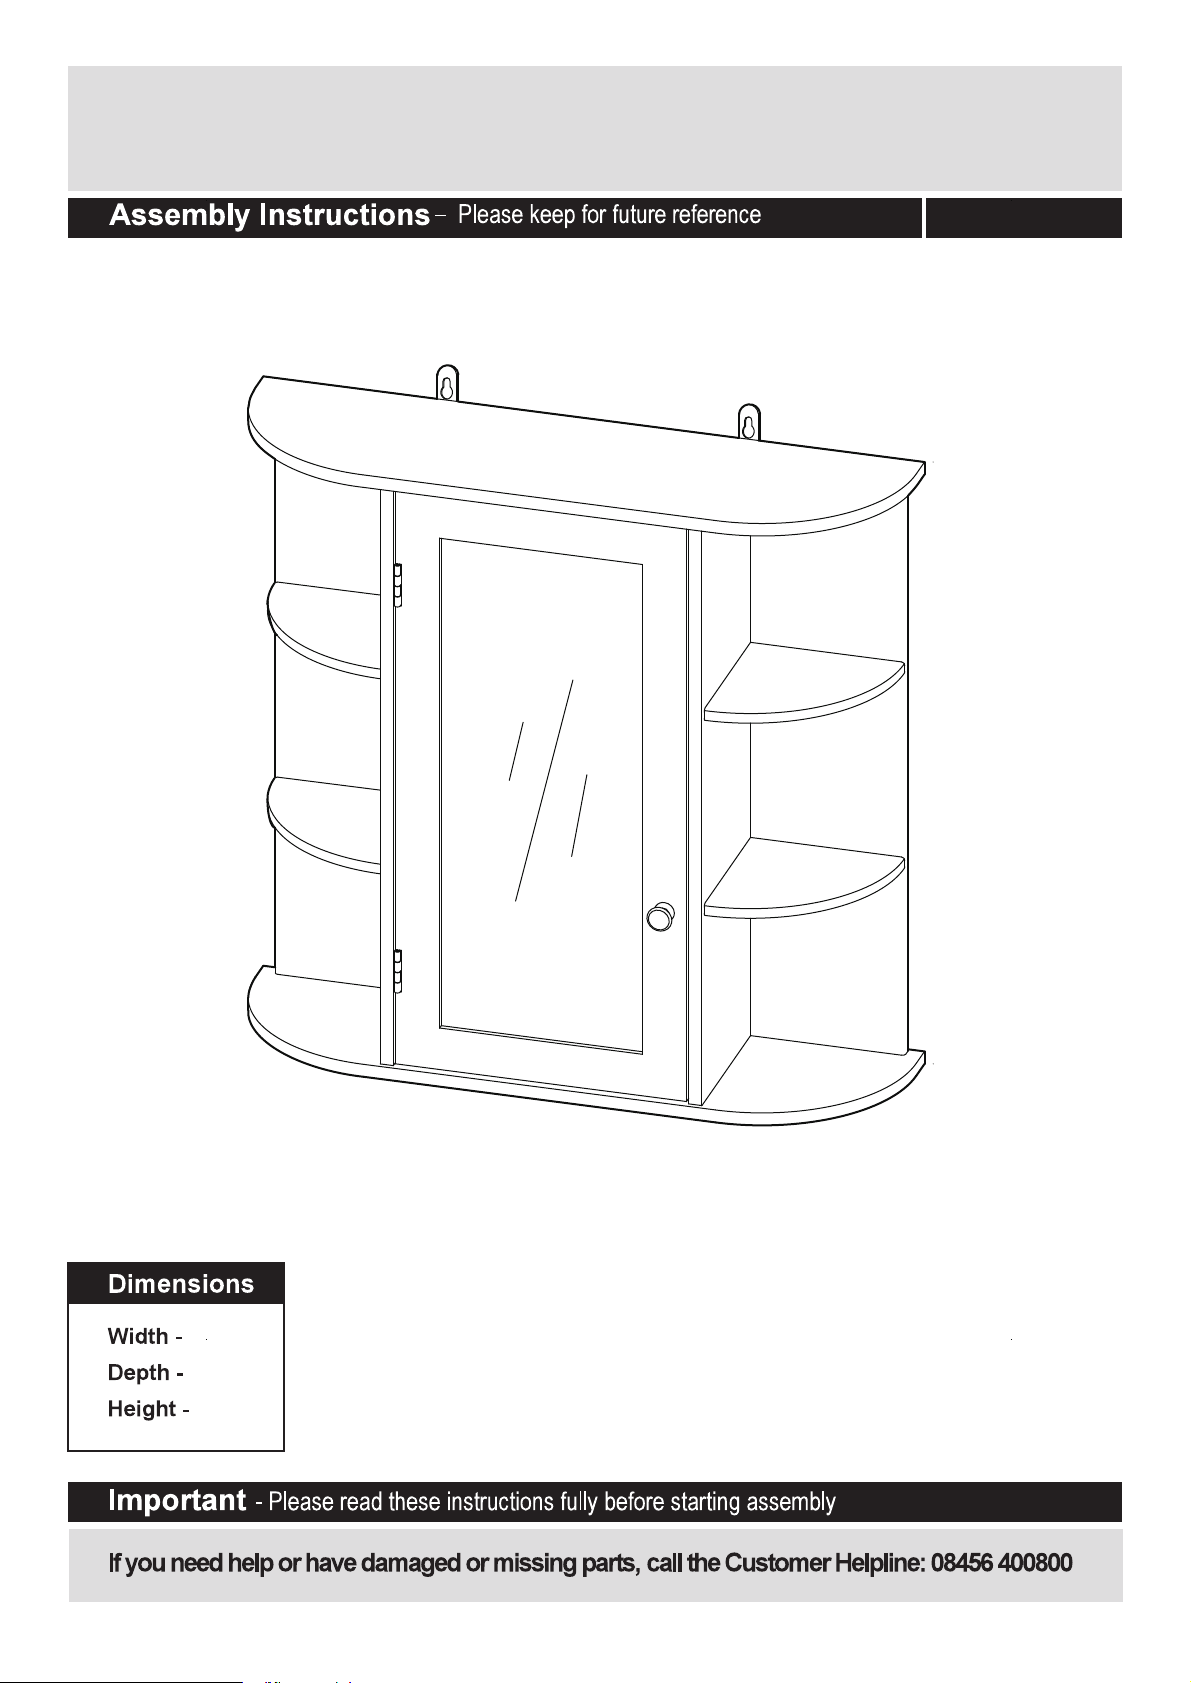
White Mirrored Cabinet With EXT Shelves
833/0325
60cm
16.5cm
58cm
Issue 5 - 06/13/13
Page 2
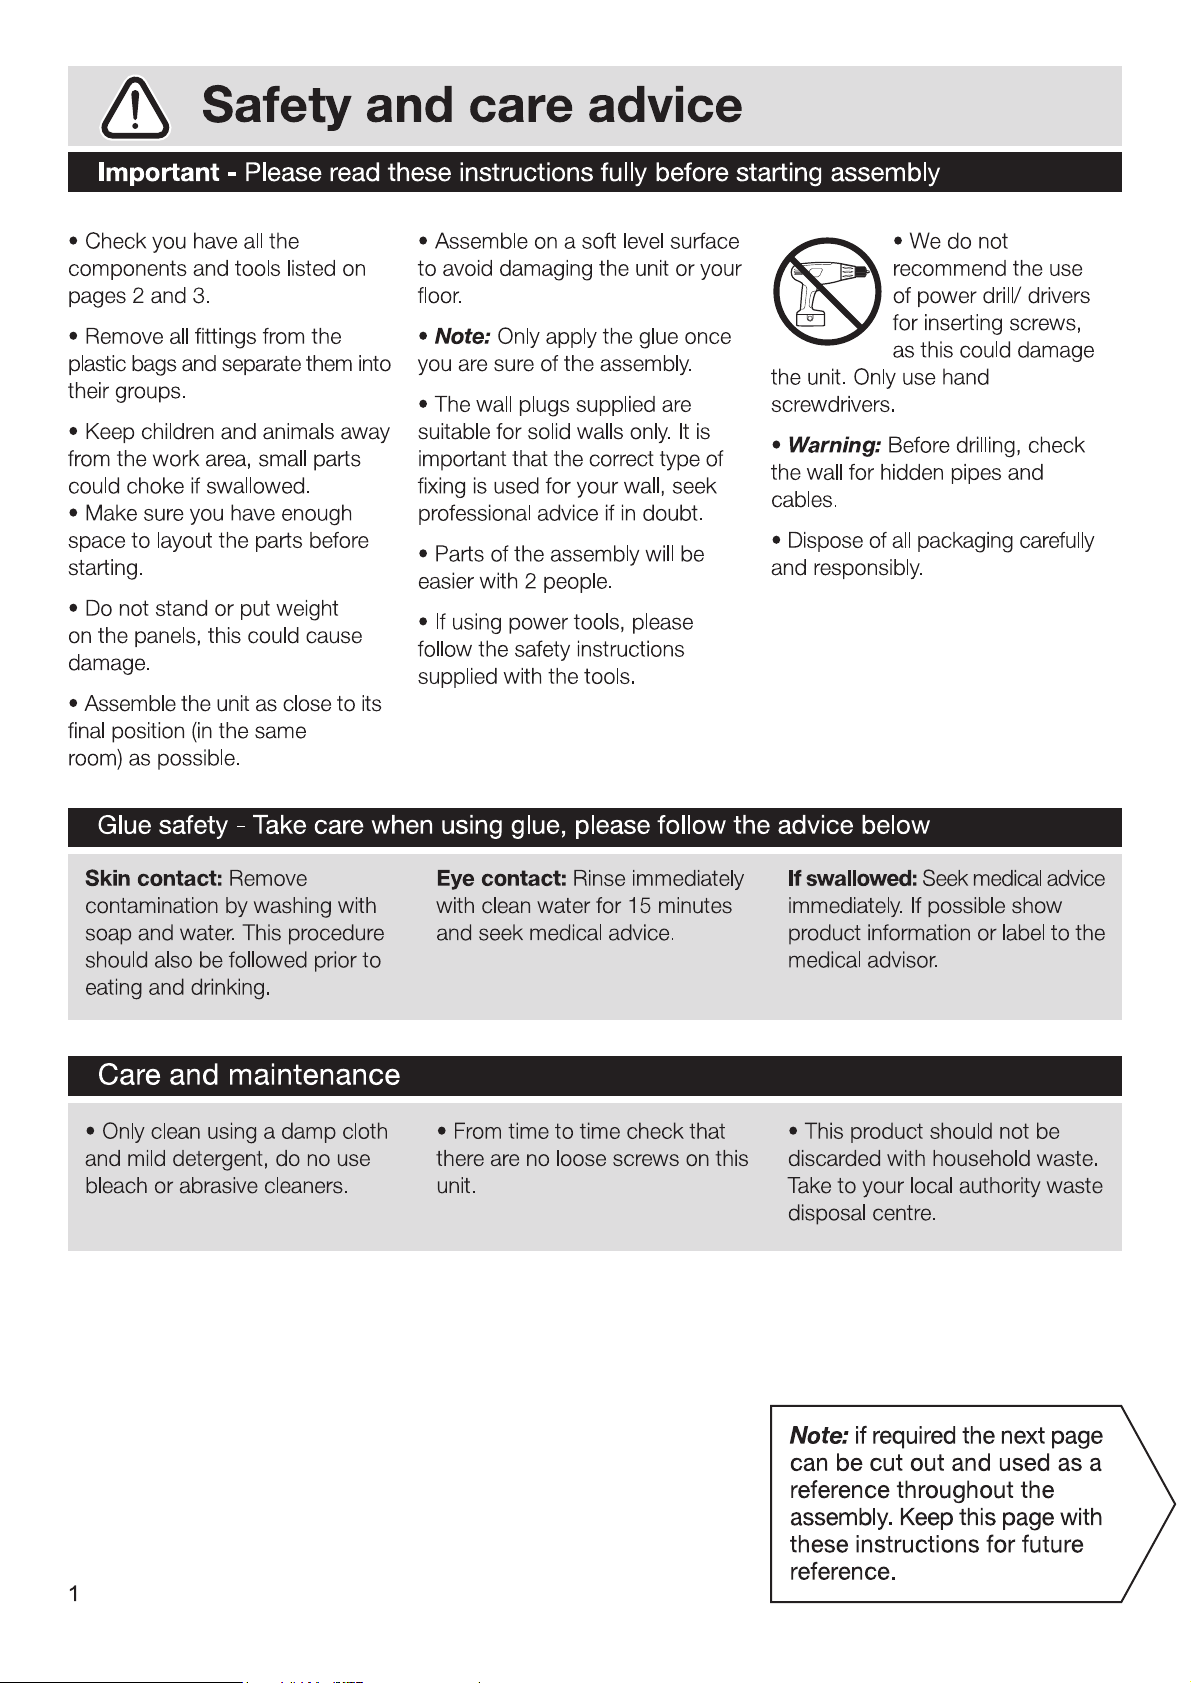
CAUTION: please do not place metal containers on the shelves – as this could mark the paint
Page 3
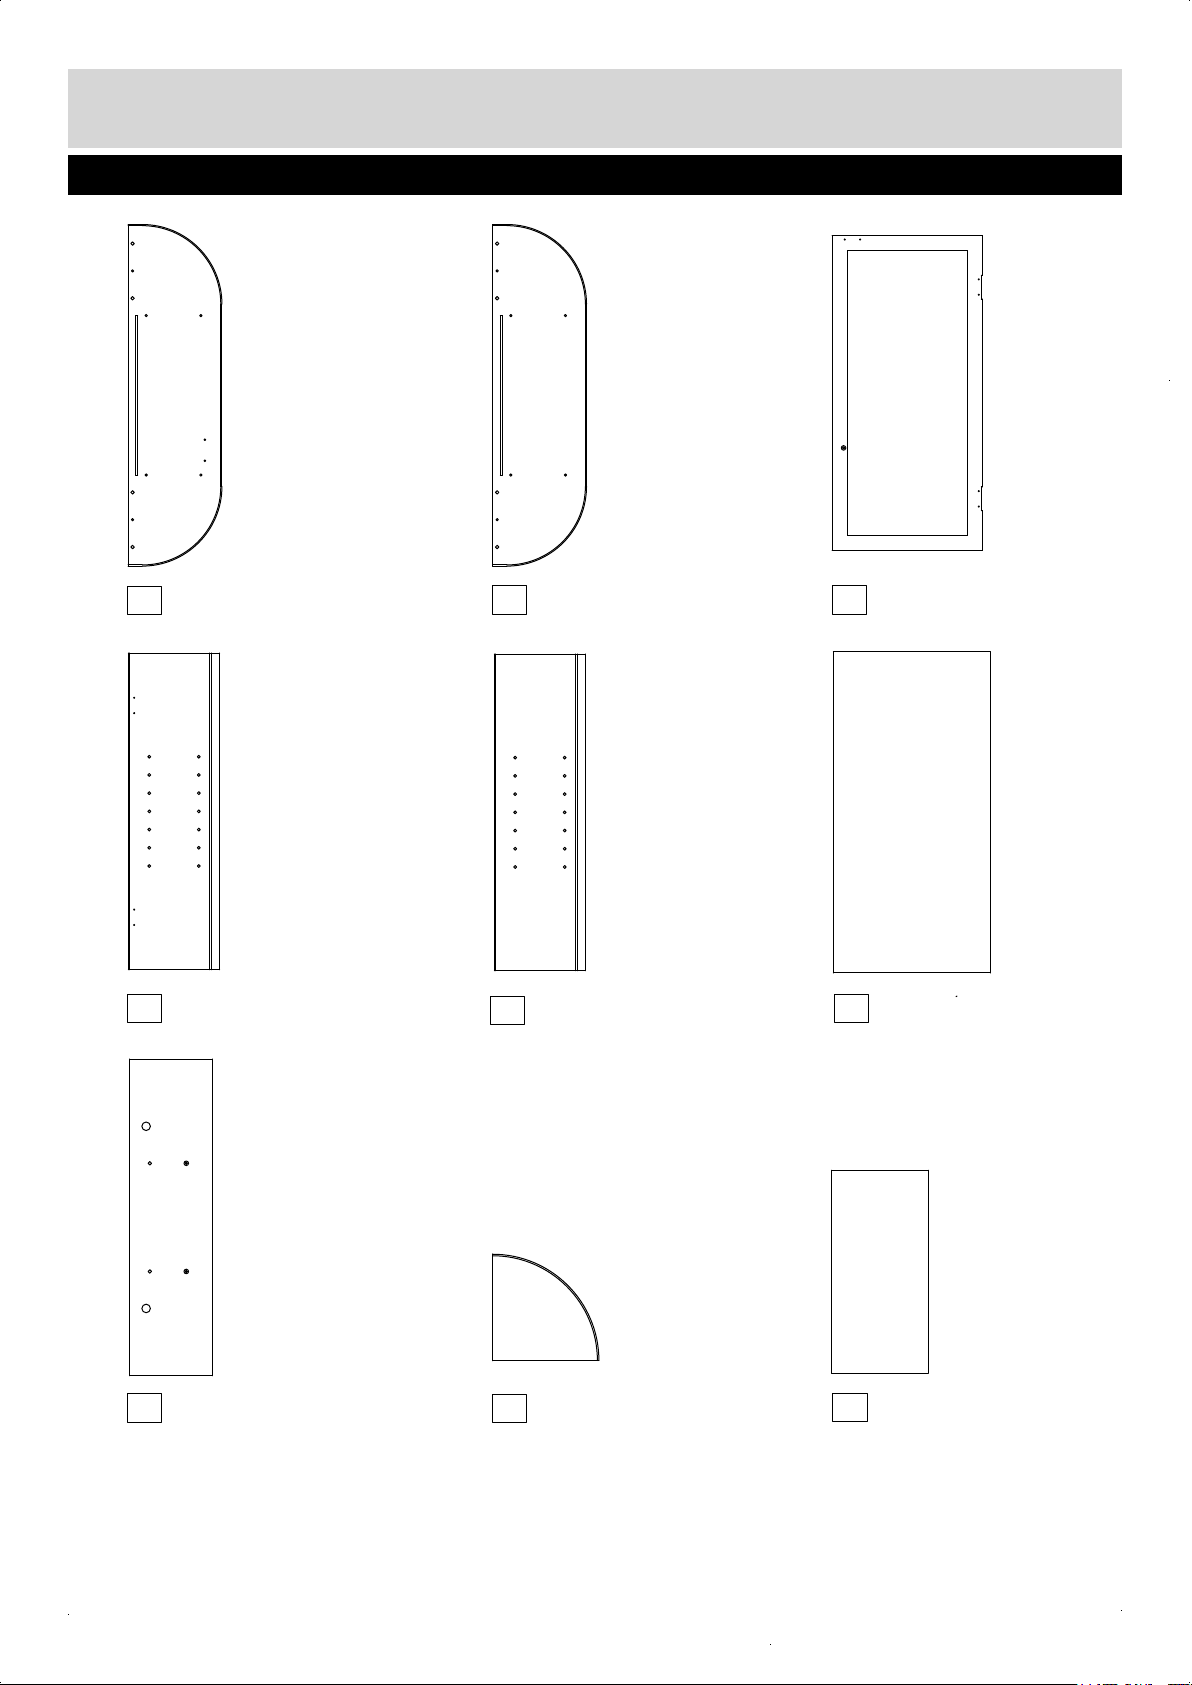
Components - Panels
Please check you have all the panels listed below
If you have damaged or missing components,
call the Customer Helpline:08456 400800
1
Top Panel
4
Left side Panel
2
Bottom Panel
5
Right side Panel
3
Door
6
Back Panel
7
Left & Right back Panel x 2
2
8
Shelf x 4
9
Adjustable Shelf
Page 4
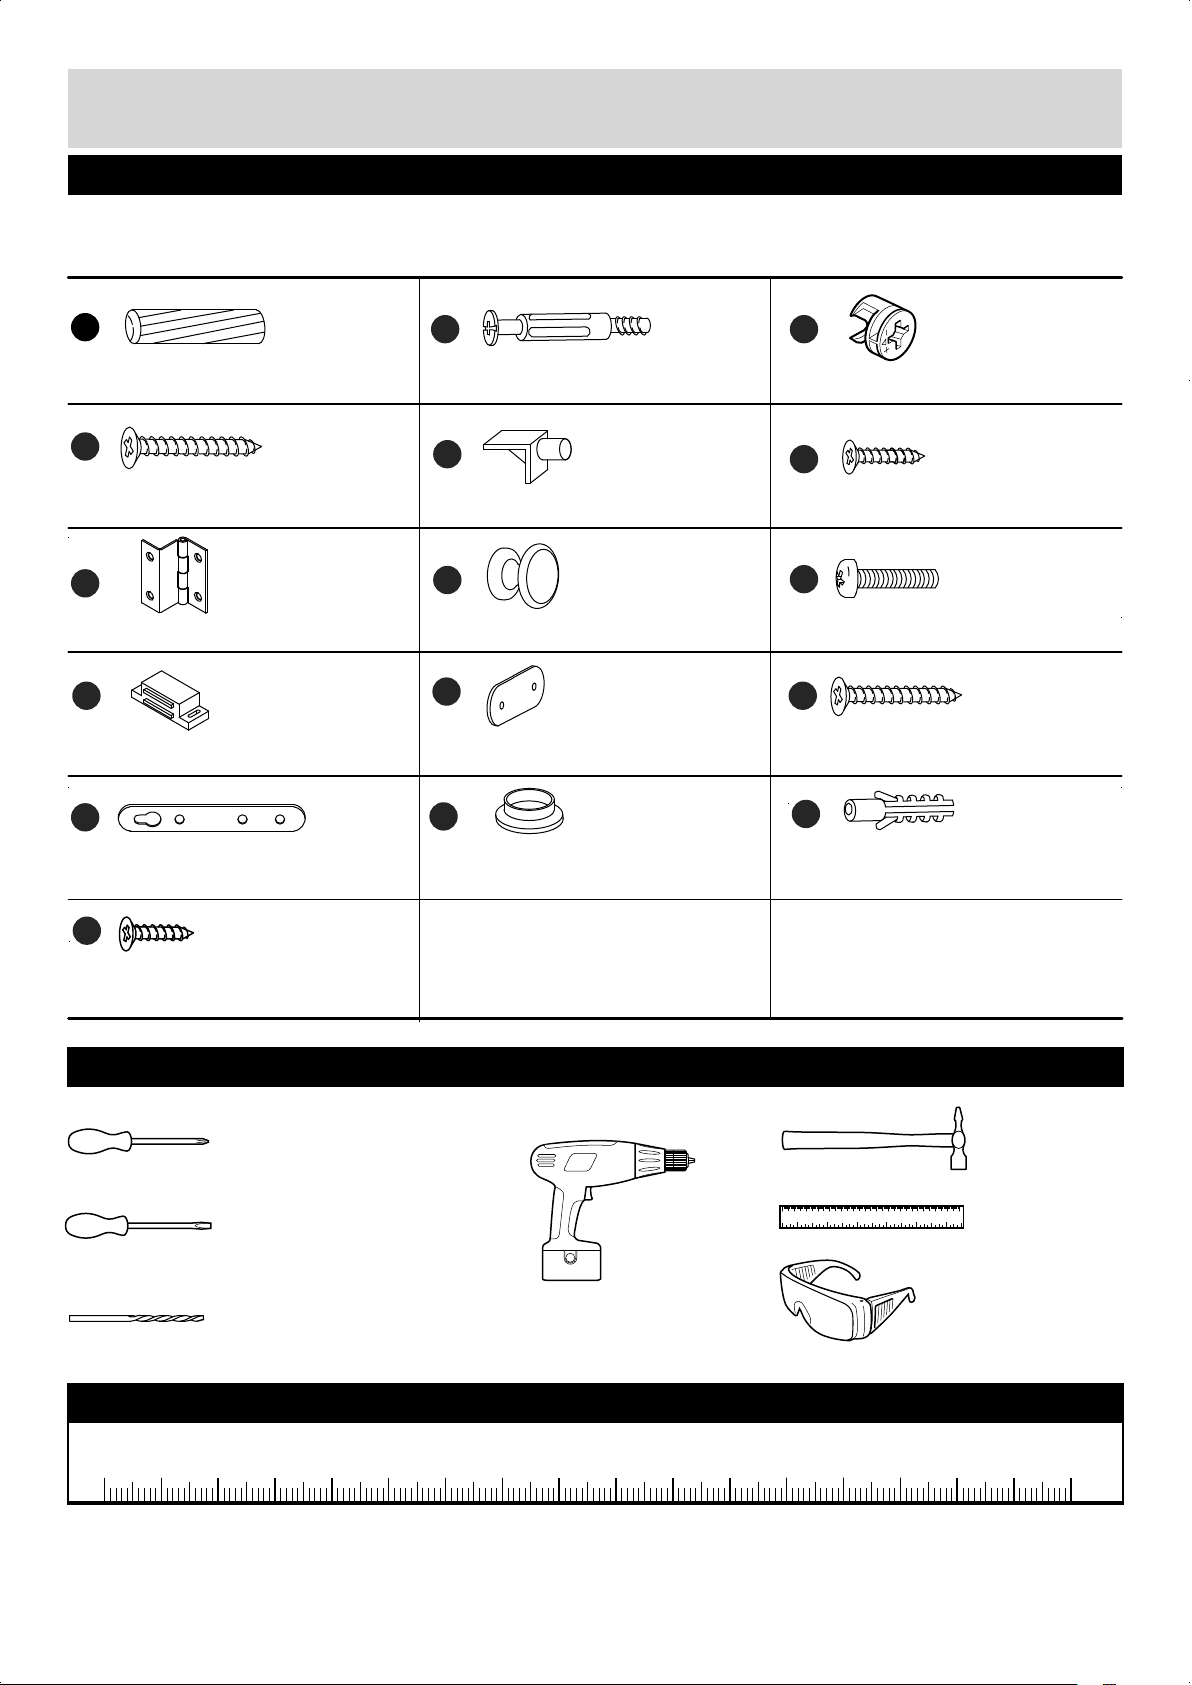
Components - Fittings
Please check you have all the fittings listed below
Note:The quantities below are the correct amount to complete the assembly .In some cases more
fittings may be supplied than are required.
A
Wooden Dowel x 20
D
35mm Screw x 18
G
Hinge x 2
J
Magnetic Catch x 1
M
Hanger Bracket x 2
B C
Locking Pin x 4
E
Plastic Support x 4
H
Door Knob x 1
K
Strike Plate x 1
N
Screw Cap x 12
Locking Nut x 4
F
12mm Screw x 2
I
Bolt x 1
L
16mm Screw x 6
O
Wall Plug(for solid wall only) x 2
P
10mm Screw x 10
Tools
required
Phillips screwdriver
(medium & large)
Flatblade screwdriver
(medium)
7mm Suitable drill bit
(for use with wall plug)
Ruler -
0 5 10 15 20 25 30 35 40 45 50 55 60 65 70 75 80 85 90 95 100
Use this ruler to help correctly identify the screws
Drill
Small
hammer
0 10 20 30 40 50 60 70 80 90 100 110 120 130 140 150
0 1 2 3 4 5 6
Ruler/tape
measure
Eye protection
(when using a
hammer or glue)
105
110 115 120 125 130 135 140 145 150 155 160 165 170
3
Page 5
Assembly Instructions
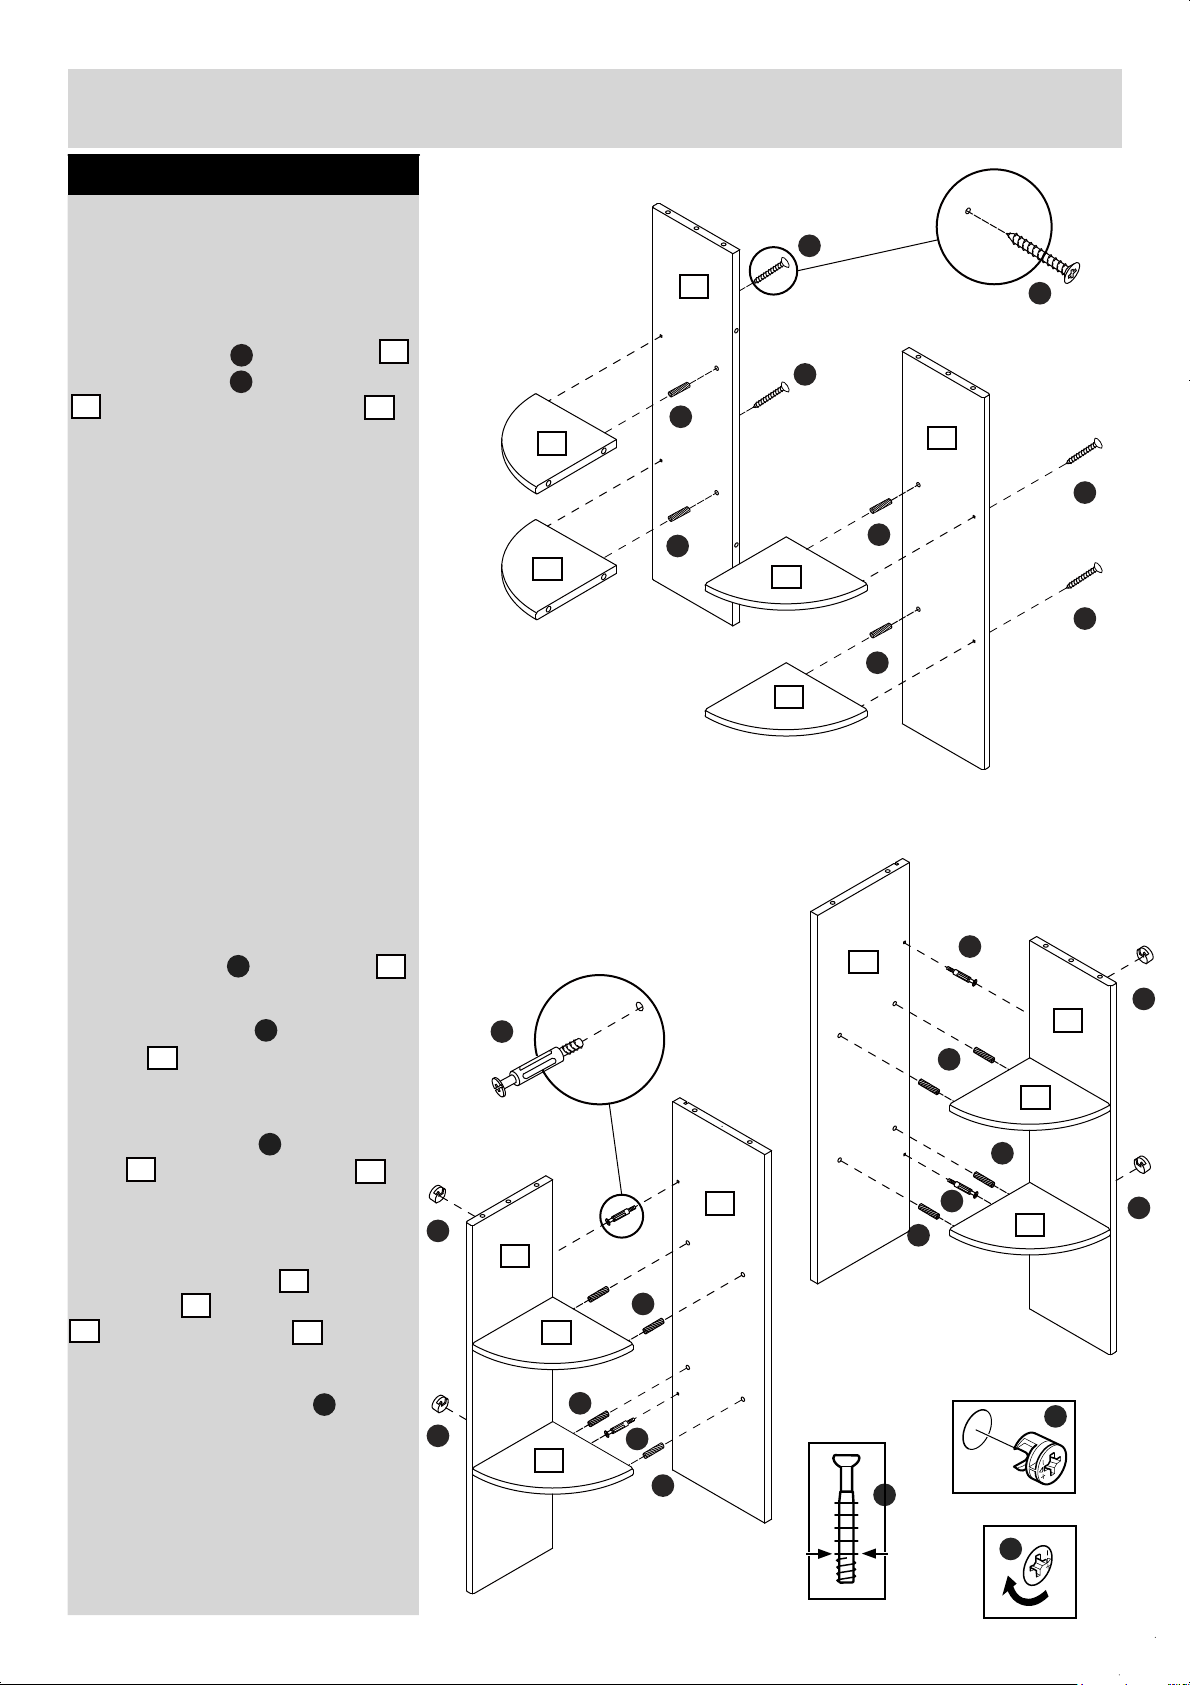
Step 1
Assembling side panels
NOTE:It would be useful to ask
someone to help you at this stage.
a: Insert dowels into shelves
and use screws to fix the shelves
8
on left & right back panels .
A
D
8
7
a:
D
7
D
A
8
A
8
8
8
A
A
7
D
D
D
b:Insert dowels into shelves .
Insert locking nuts into back
panels .
7
Screw locking pins into left side
panel and right side panel .
4
Attach left side panel to left
back panel and right side panel
5
to right back panel .
A
C
B
4
7
7
8
5
Tighten the locking nuts to
C
secure the unit.
b:
5
B
B
C
7
A
8
A
C
8
B
4
A
B
B
C
7
A
8
A
B
A
8
C
C
C
4
Page 6
Assembly Instructions
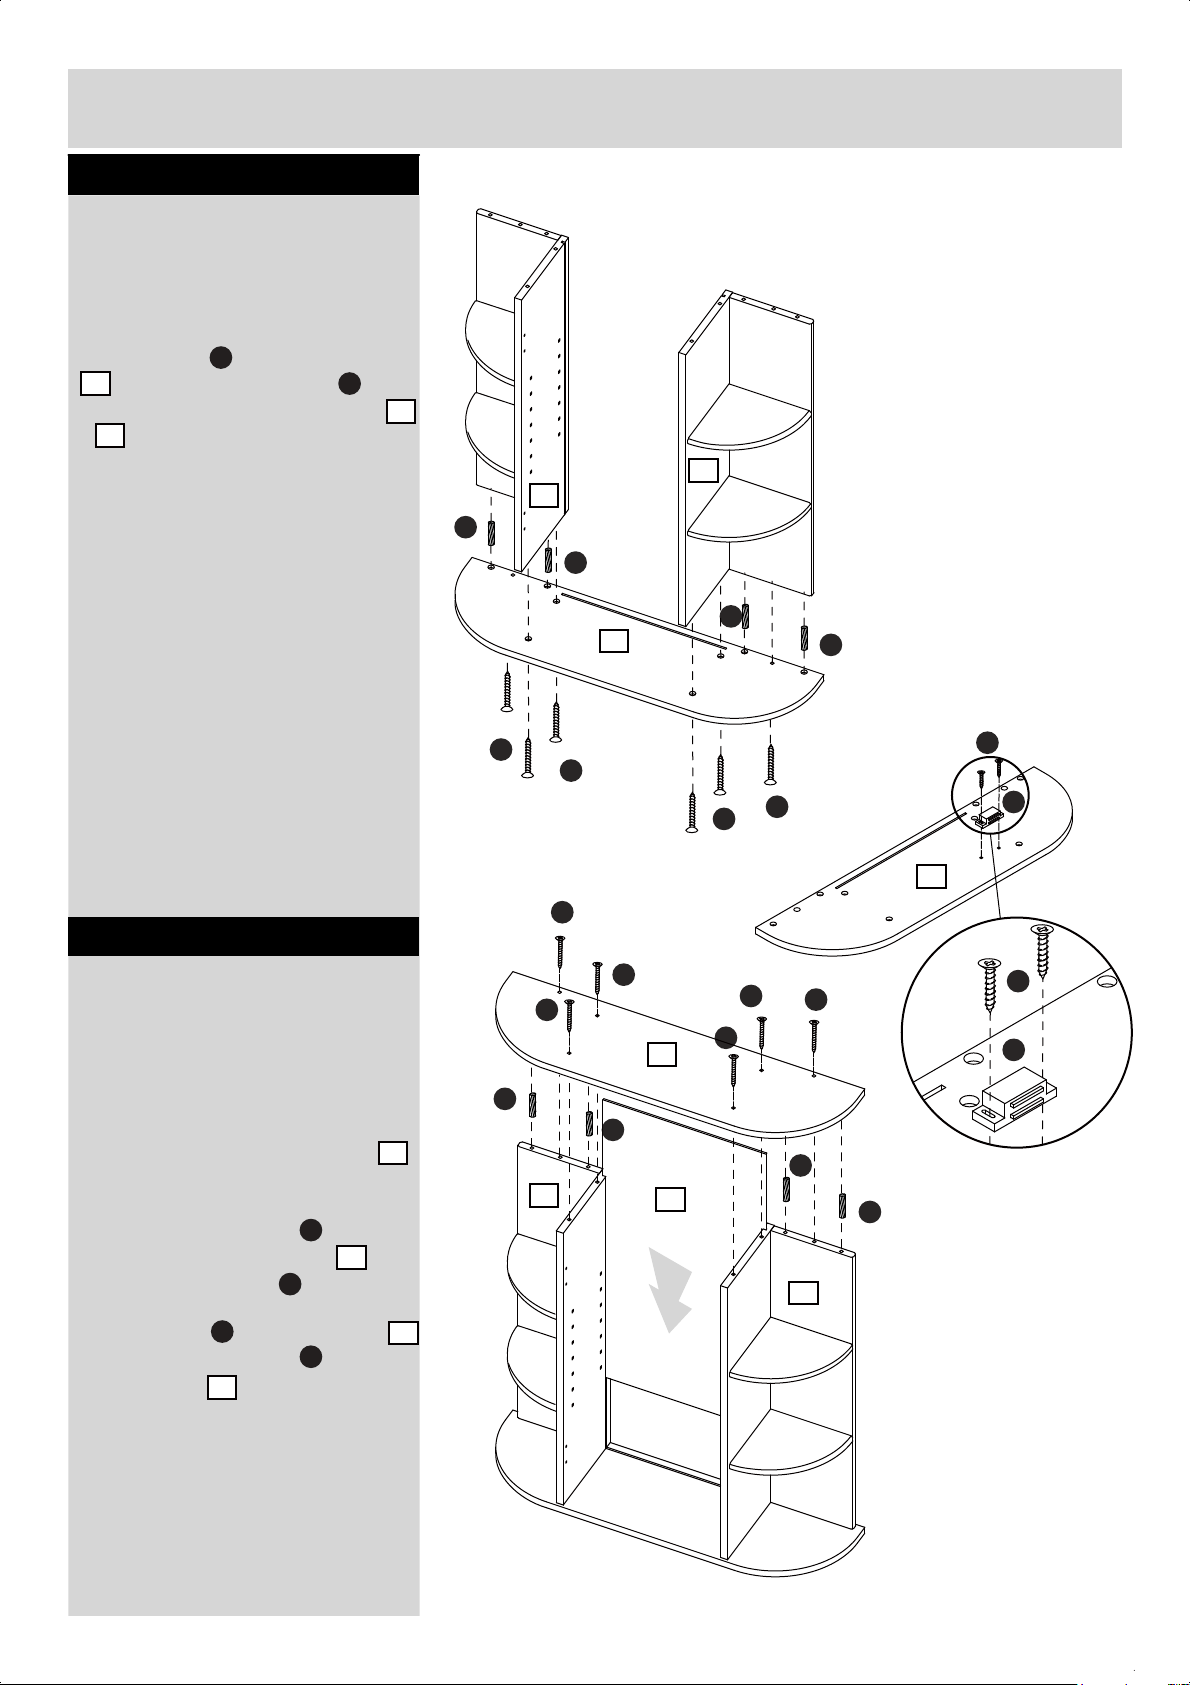
Step 2
Assembling bottom panel
NOTE:It would be useful to ask
someone to help you at this stage.
Insert dowels into bottom panel
and use 35mm screws to fix
2
A
D
the bottom panel to side panels
5
& .
Step 3
Assembling top and back panels
NOTE:It would be useful to ask
someone to help you at this stage.
4
5
4
A
A
A
2
D
D
D
D
D
D
1
D
D
A
F
D
1
D
J
F
J
Carefully slide the back panel
into the unit.
Attach magnetic catch to the
underside of the top panel
using 12mm screws .
Insert dowels into back panel
A
and use 35mm screws to fix
the top panel to the unit.
1
J
1
F
D
5
A
A
6
7
7
6
A
A
7
Page 7
Assembly Instructions
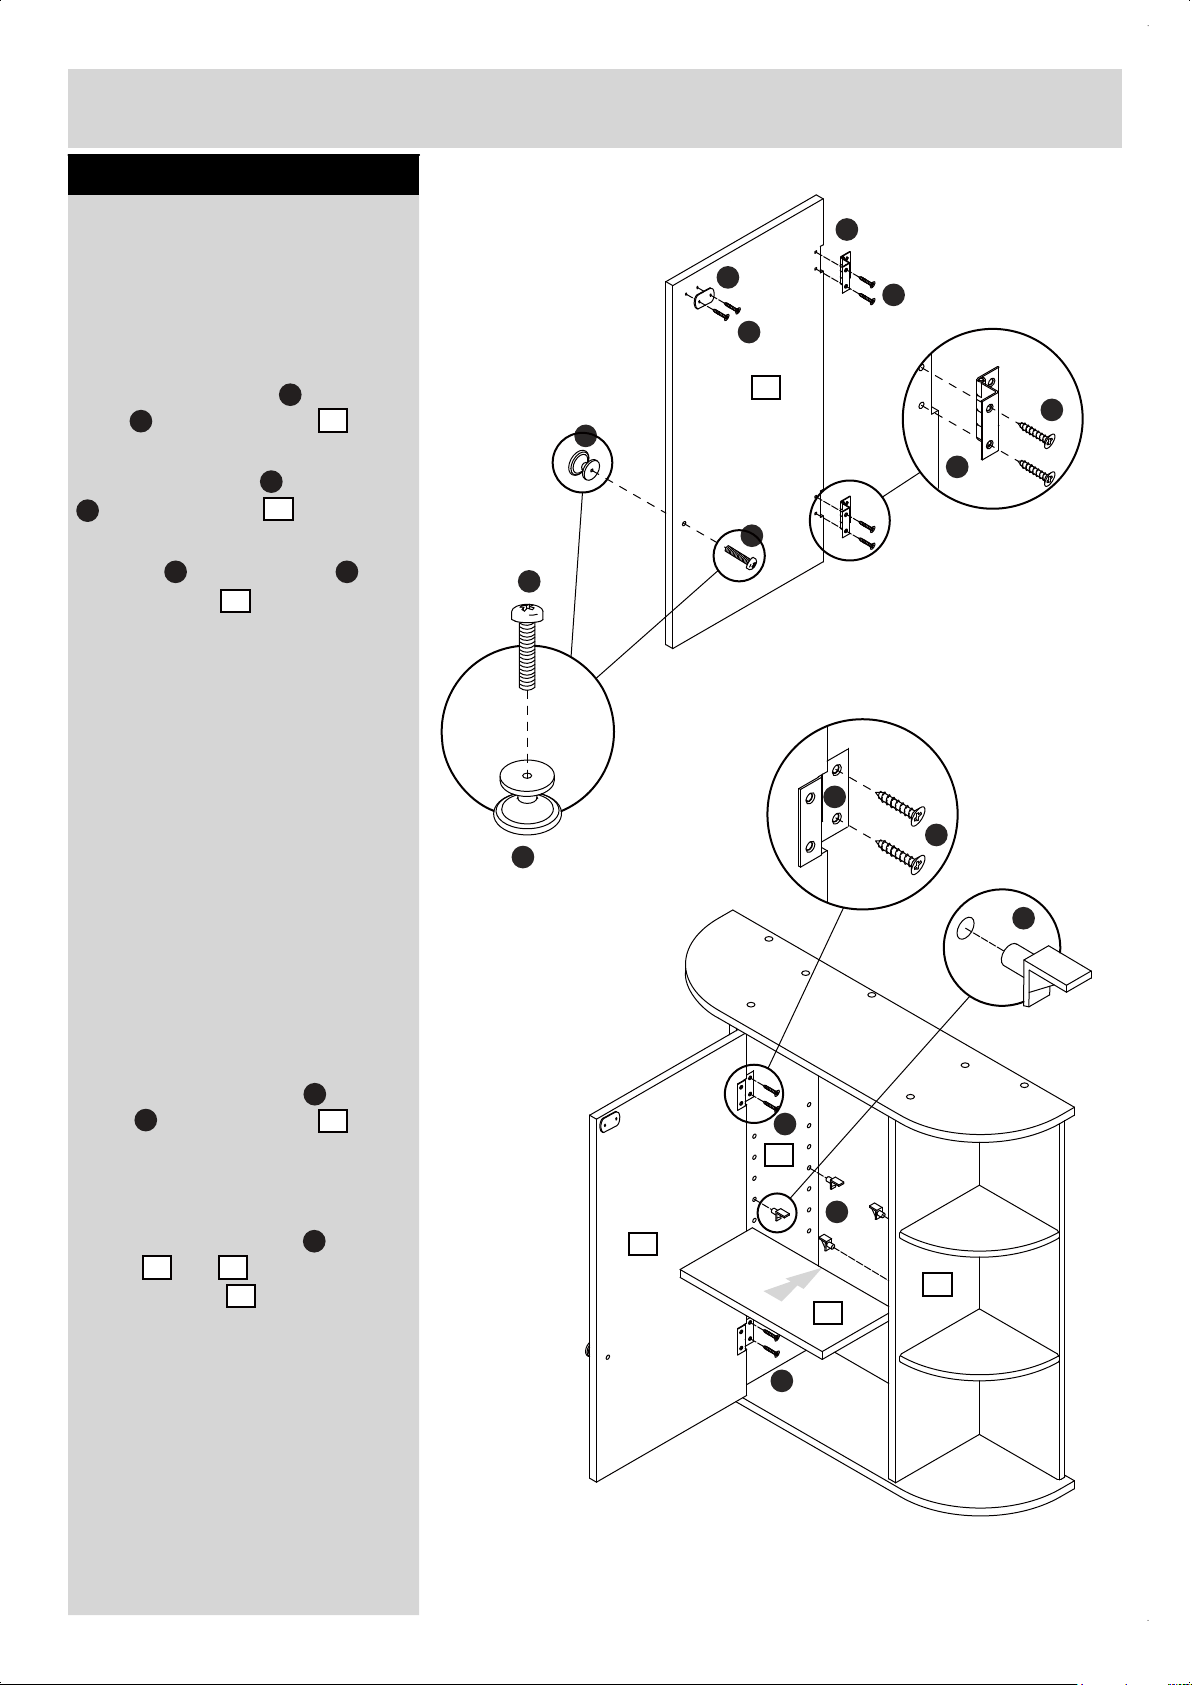
Step 4
Assembling door panel and
adjustable panel
NOTE:It would be useful to ask
someone to help you at this stage.
a:
G
K
P
P
a:Use 10mm screws to fix strike
K
plate onto door panel .
Use 10mm screws to fix hinges
G
onto door panel .
Use bolt to fix the knob onto
the door panel .
P
3
P
3
HI
3
3
P
H
G
I
I
G
P
H
E
b:Carefully use screws to fix the
hings onto side panel .
G
Insert plasetic supports into side
panels and ,carefully put
4
adjustable shelf on it.
5
9
P
4
E
6
b:
P
4
E
3
5
9
P
Page 8
Assembly Instructions
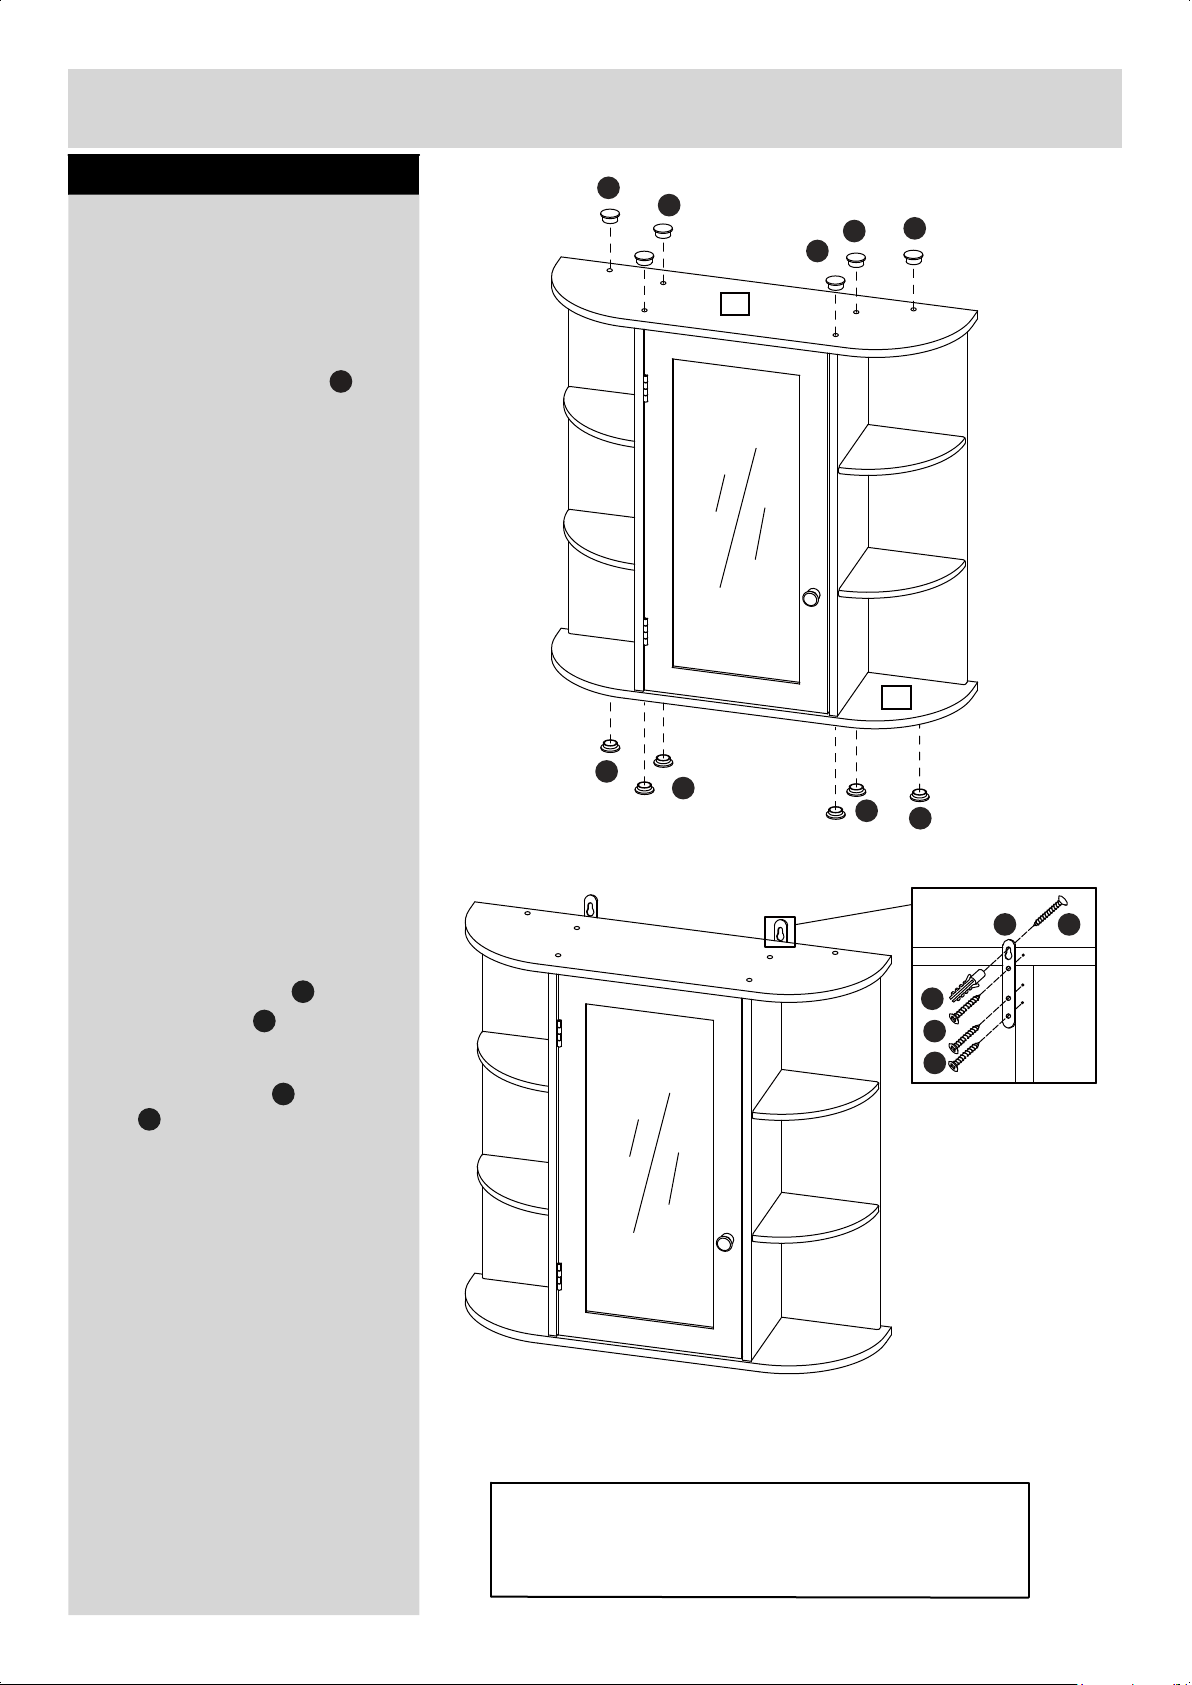
Step 5
Finishing the unit
NOTE:It would be useful to ask
someone to help you at this stage.
a:Insert the screw caps over
the screw holes on the outside.
N
a:
N
N
N
N
1
N
2
b:Use 16mm screws to fix
hanger brackets onto the unit.
Use 35mm screws and wall
O
plug to fix the unit ont he wall.
L
M
D
With help , place the unit in the
intended position.
b:
N
N
N
N
M
O
L
L
D
NOTE: Please make sure the
unit is secure before use
The assembly is now complete
7
NOTE:If you have damaged or missing components,
call the Customer Helpline:08456 400800
Argos LTD,489-499 Avebury Boulevard,
Central Milton Keynes, MK9 2NW
Page 9
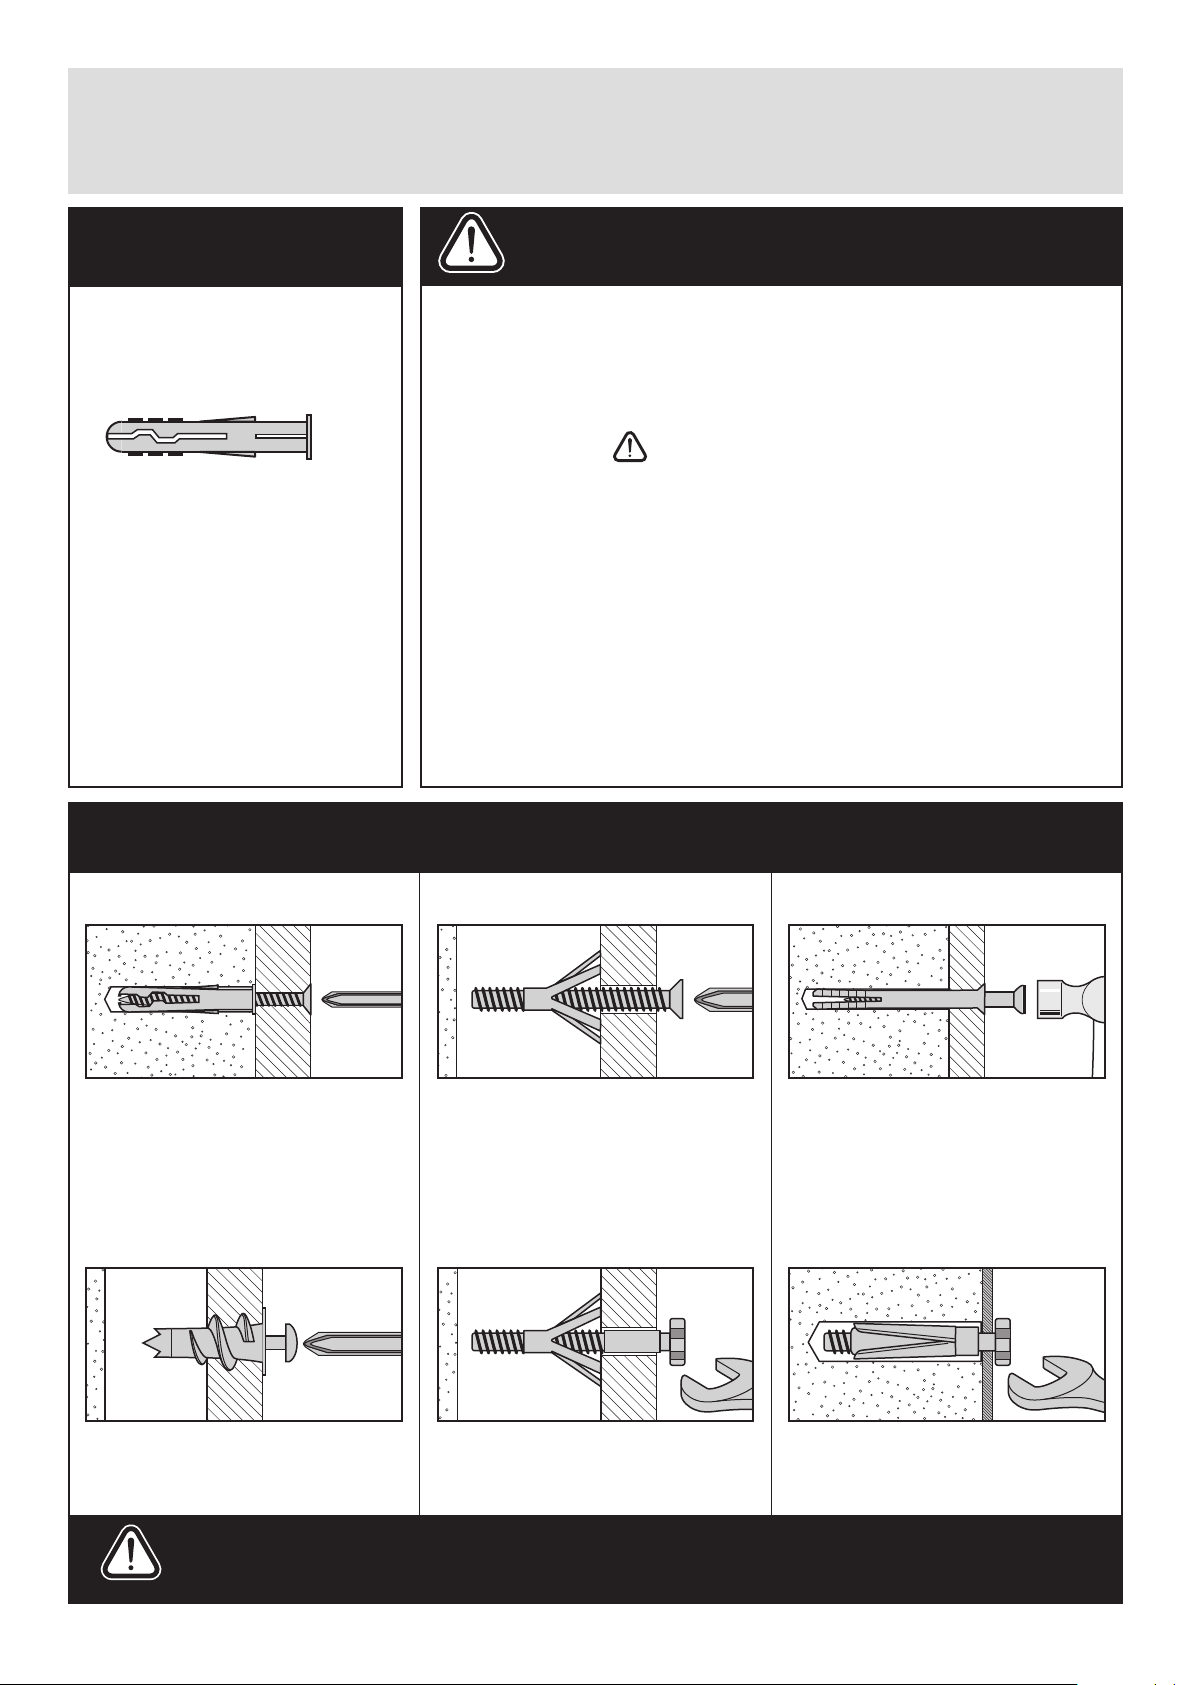
A Guide to - Wall Mounting & Fixings
Important note:
If plastic wall plugs
are supplied with your
product:
- these are only suitable for
use in masonry walls.
If you are in any doubt about
the correct wall plugs for
your wall, seek professional
advice.
Failure of the product due to
using incorrect xings is the
responsibility of the installer.
Important: When drilling into walls always
check that there are no hidden wires or pipes etc.
Make sure that the screws and wall plugs being used
are suitable for supporting your unit. Consult a qualified
tradesperson if you are unsure.
Hints:
1: General rule: Always use a larger screw and wall plug
if you are not sure.
2: Ensure you use the recommended drill bit to match the wall
plug and hole size.
3: Ensure you drill the hole horizontally, do not force the drill or
enlarge the hole.
4: Take extra care when drilling high walls, ceilings and ceramic
tiles. Ensure wall plugs are inserted beyond the thickness of
the ceramic tiles to avoid the tiles splitting or cracking.
5: Ensure wall plugs are well tted and are a tight t in the
drilled hole.
Types of walls
No.1 “General Purpose” wall plug
Generally aerated blocks should not
be used to support heavy loads, use
a specialist tting in this case. For light
loads, general purpose wall plugs can
be used.
No.2 “Plasterboard” wall plug
You can use one of the following types of wall plug if your walls are made
of brick, breeze block, concrete, stone or wood.
No.3 “Cavity Fixing” wall plug
For use with plasterboard partitions or
hollow wooden doors.
No.4 “Cavity Fixing-Heavy Duty”
wall plug
No.5 “Hammer Fixing” wall plug
For use with walls stuck with
plasterboard. The hammer xing allows
it to be xed to the wall rather than the
plasterboard. Always check the xing
is secure to the retaining wall.
No.6 “Shield Anchor” wall plug
Heavy loads
For use when attaching light loads on
to plasterboard partitions.
Care &
Maintenance
For use when tting or supporting
heavy loads such as shelving, wall
cabinets and coat racks.
Safety: Always check the fitting
and location to ensure your safety
in and around the home.
For use with heavier loads such as TV
& HiFi speakers and satelite dishes etc.
Fitting: From time to time check
the fitting to ensure the wall plugs
or screws do not become loose.
Revision 2 - 7/10/09
 Loading...