

Page 1
Assembly Instructions
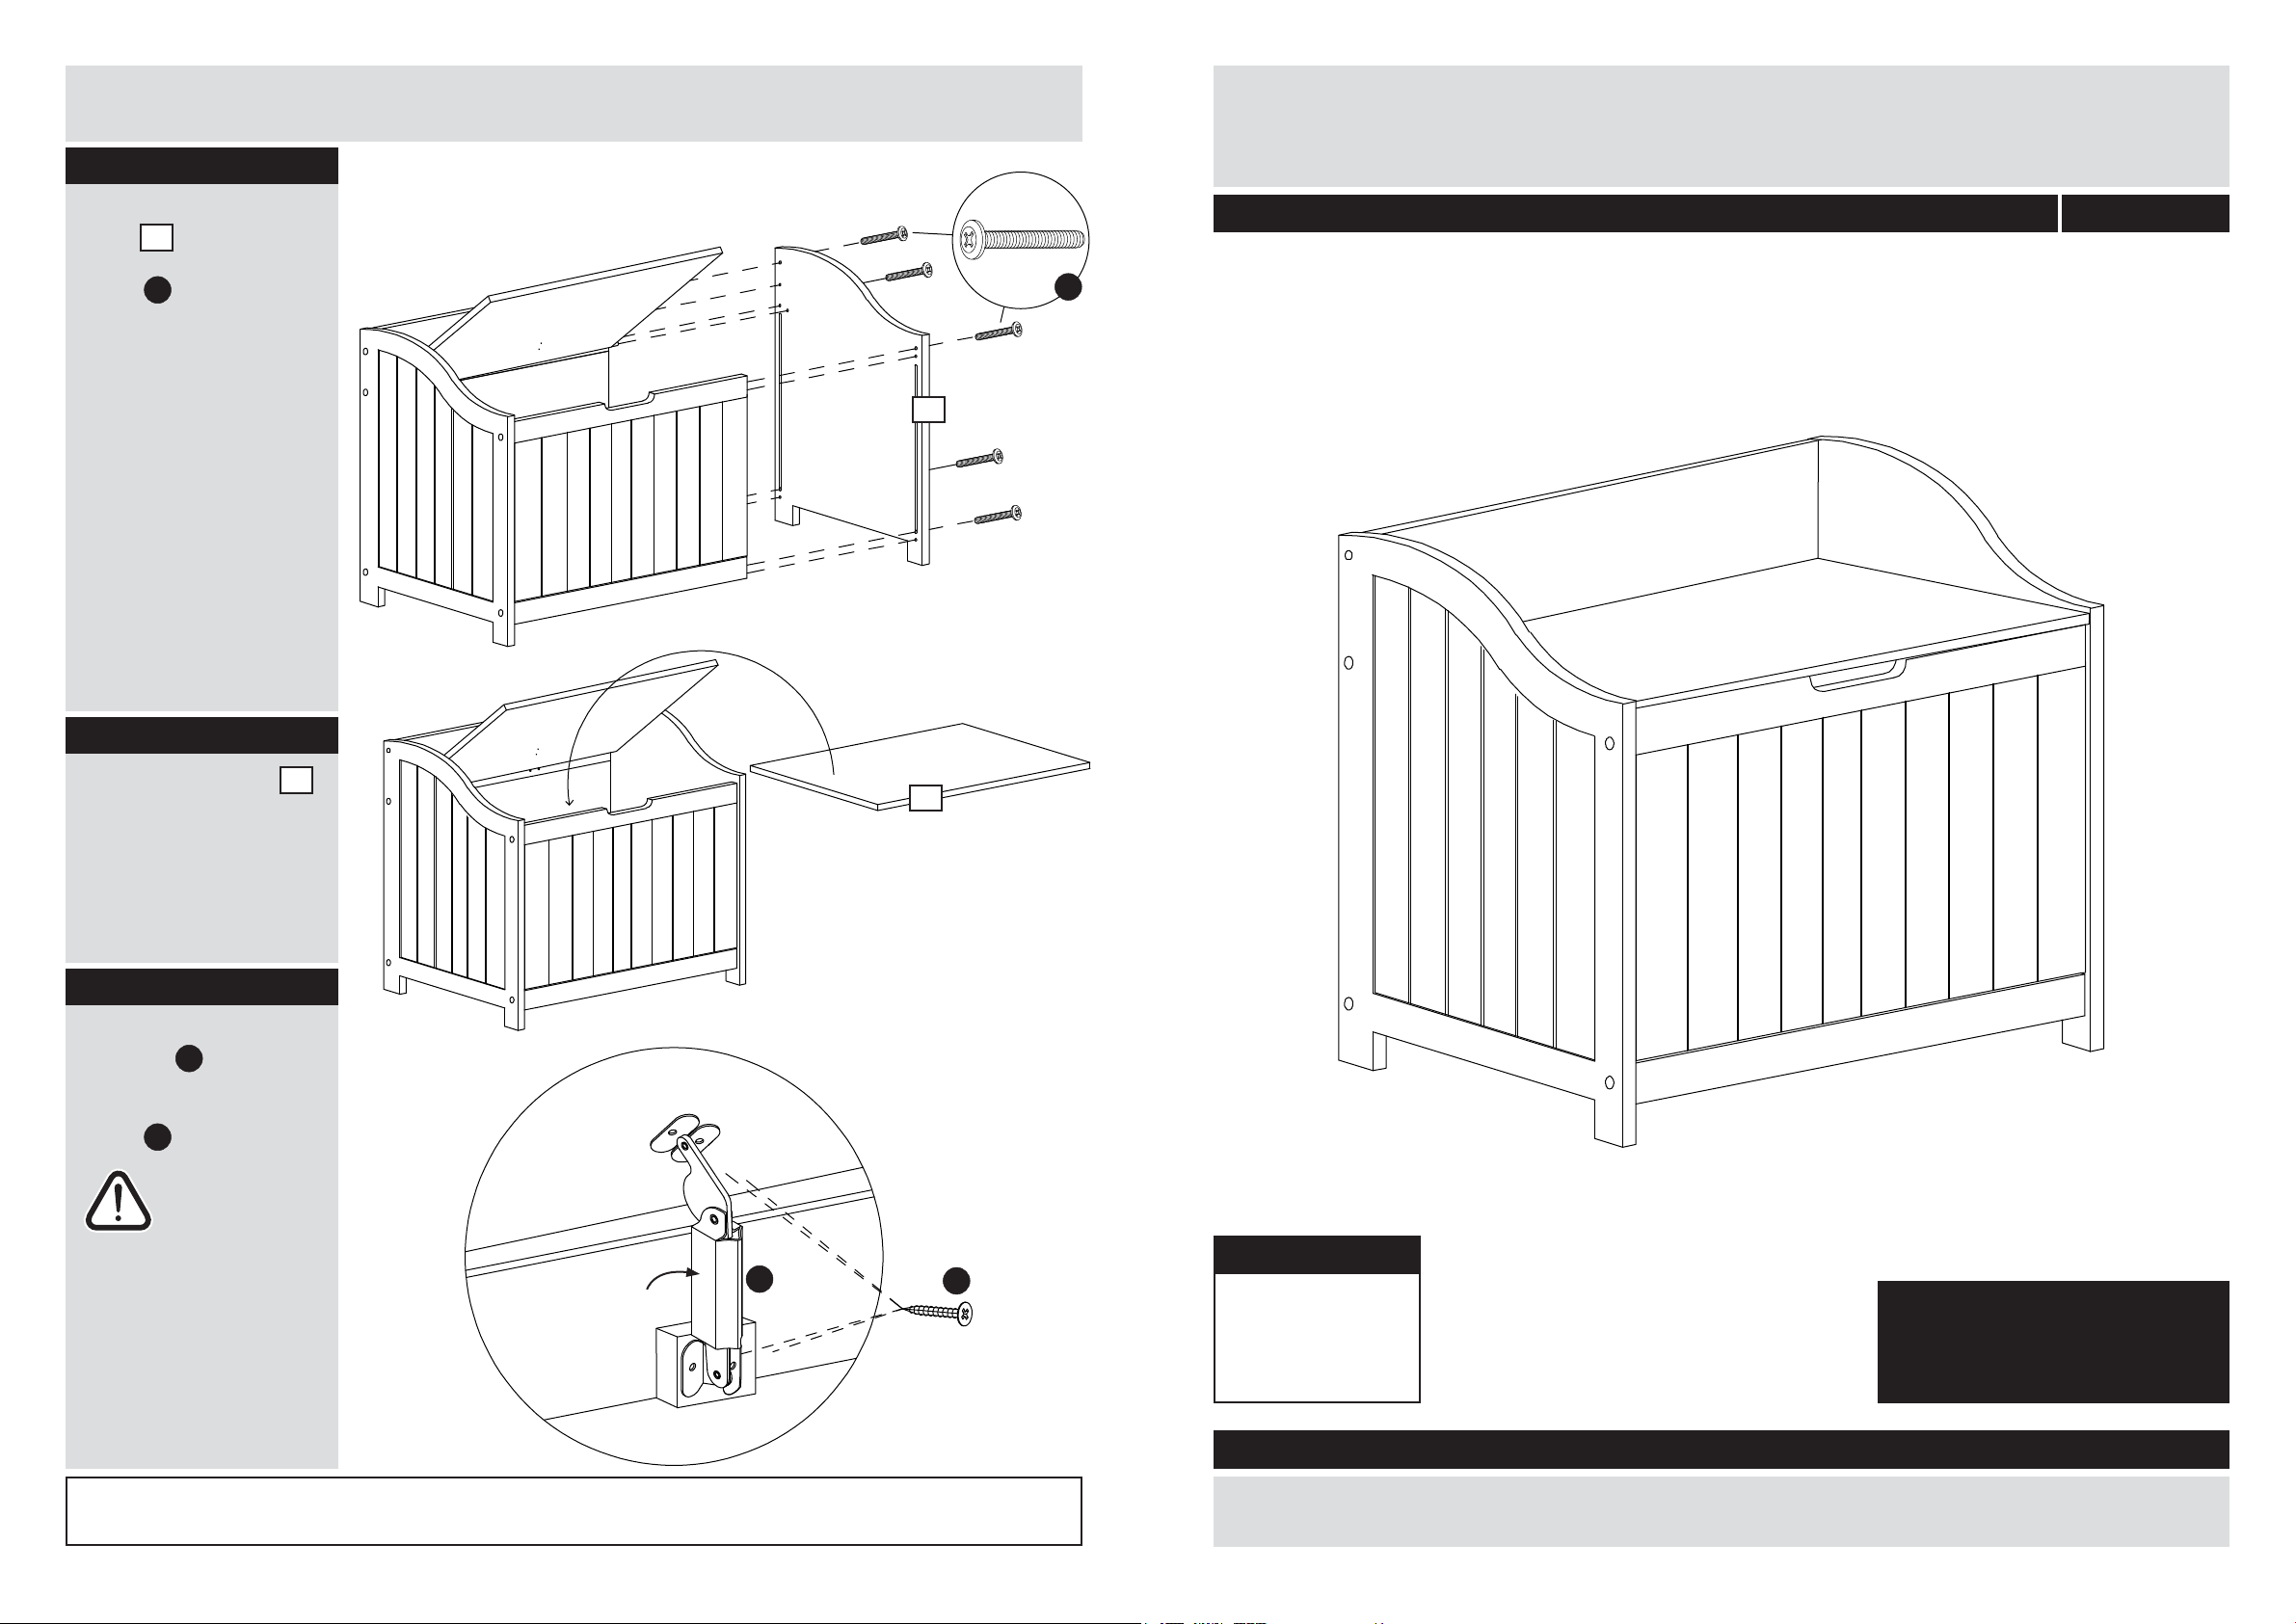
Step 12
Monk’s Bench Style Linen Bin
Screw the right side
panel
the rails using 5 x 40mm
screw
Ensure that the righthand hinge of the lid is
properly located in its
hole in the right side
panel.
6
the ends of
B
as shown.
Step 13
Assembly Instructions- please keep for future reference
B
6
832/5299
Drop the base panel
onto the bottom rails
inside the unit.
9
Step 14
Lift the lid and connect
the hinge
and the top back rail as
shown using 4 x 12mm
screw
Please pay attention to
diagram
installation.
F
to the lid
G
.
Important:
The hinge
must must be
attached the
correct way up.
a: for correct
9
a:
Dimensions
spring
F
G
Width - 55cm
Depth - 35cm
Height - 58cm
THIS PRODUCT IS NOT
DESIGNED OR INTENDED
AS A TOY STORAGE CONTAINER
Assembly complete.
If you need help or have damaged or missing parts, call the Customer Helpline: 0845 640 0800
LP 255.96.774
Important – Please read these instructions fully before starting assembly
If you need help or have damaged or missing parts, call the Customer Helpline: 0845 640 0800
Issue 3 - 24/08/10
Page 2
Safety and Care Advice
Components - Panels
Important – Please read these instructions fully before starting assembly
• Check you have all the
components and tools listed on
pages 1 and 2.
• Remove all ttings from the
plastic bags and separate them
into their groups.
• Keep children and animals
away from the work area, small
parts could choke if swallowed.
• Make sure you have enough
space to layout the parts before
starting.
• Do not stand or put weight on
the product, this could cause
damage.
• Assemble the item as close
to its nal position (in the same
room) as possible.
• Assemble on a soft level
surface to avoid damaging the
unit or your oor.
• Parts of the assembly will be
easier with 2 people.
• We do not
as this could damage the unit.
Only use hand screwdrivers.
• Dispose of all packaging
carefully and responsibly.
Care and maintenance
• Only clean using a damp
cloth and mild detergent, do
no use bleach or abrasive
cleaners.
• From time to time check that
there are no loose screws on
this unit.
• This product should not be
discarded with household
waste. Take to your local
authority waste disposal
centre.
recommend the
use of power
drill/drivers for
inserting screws,
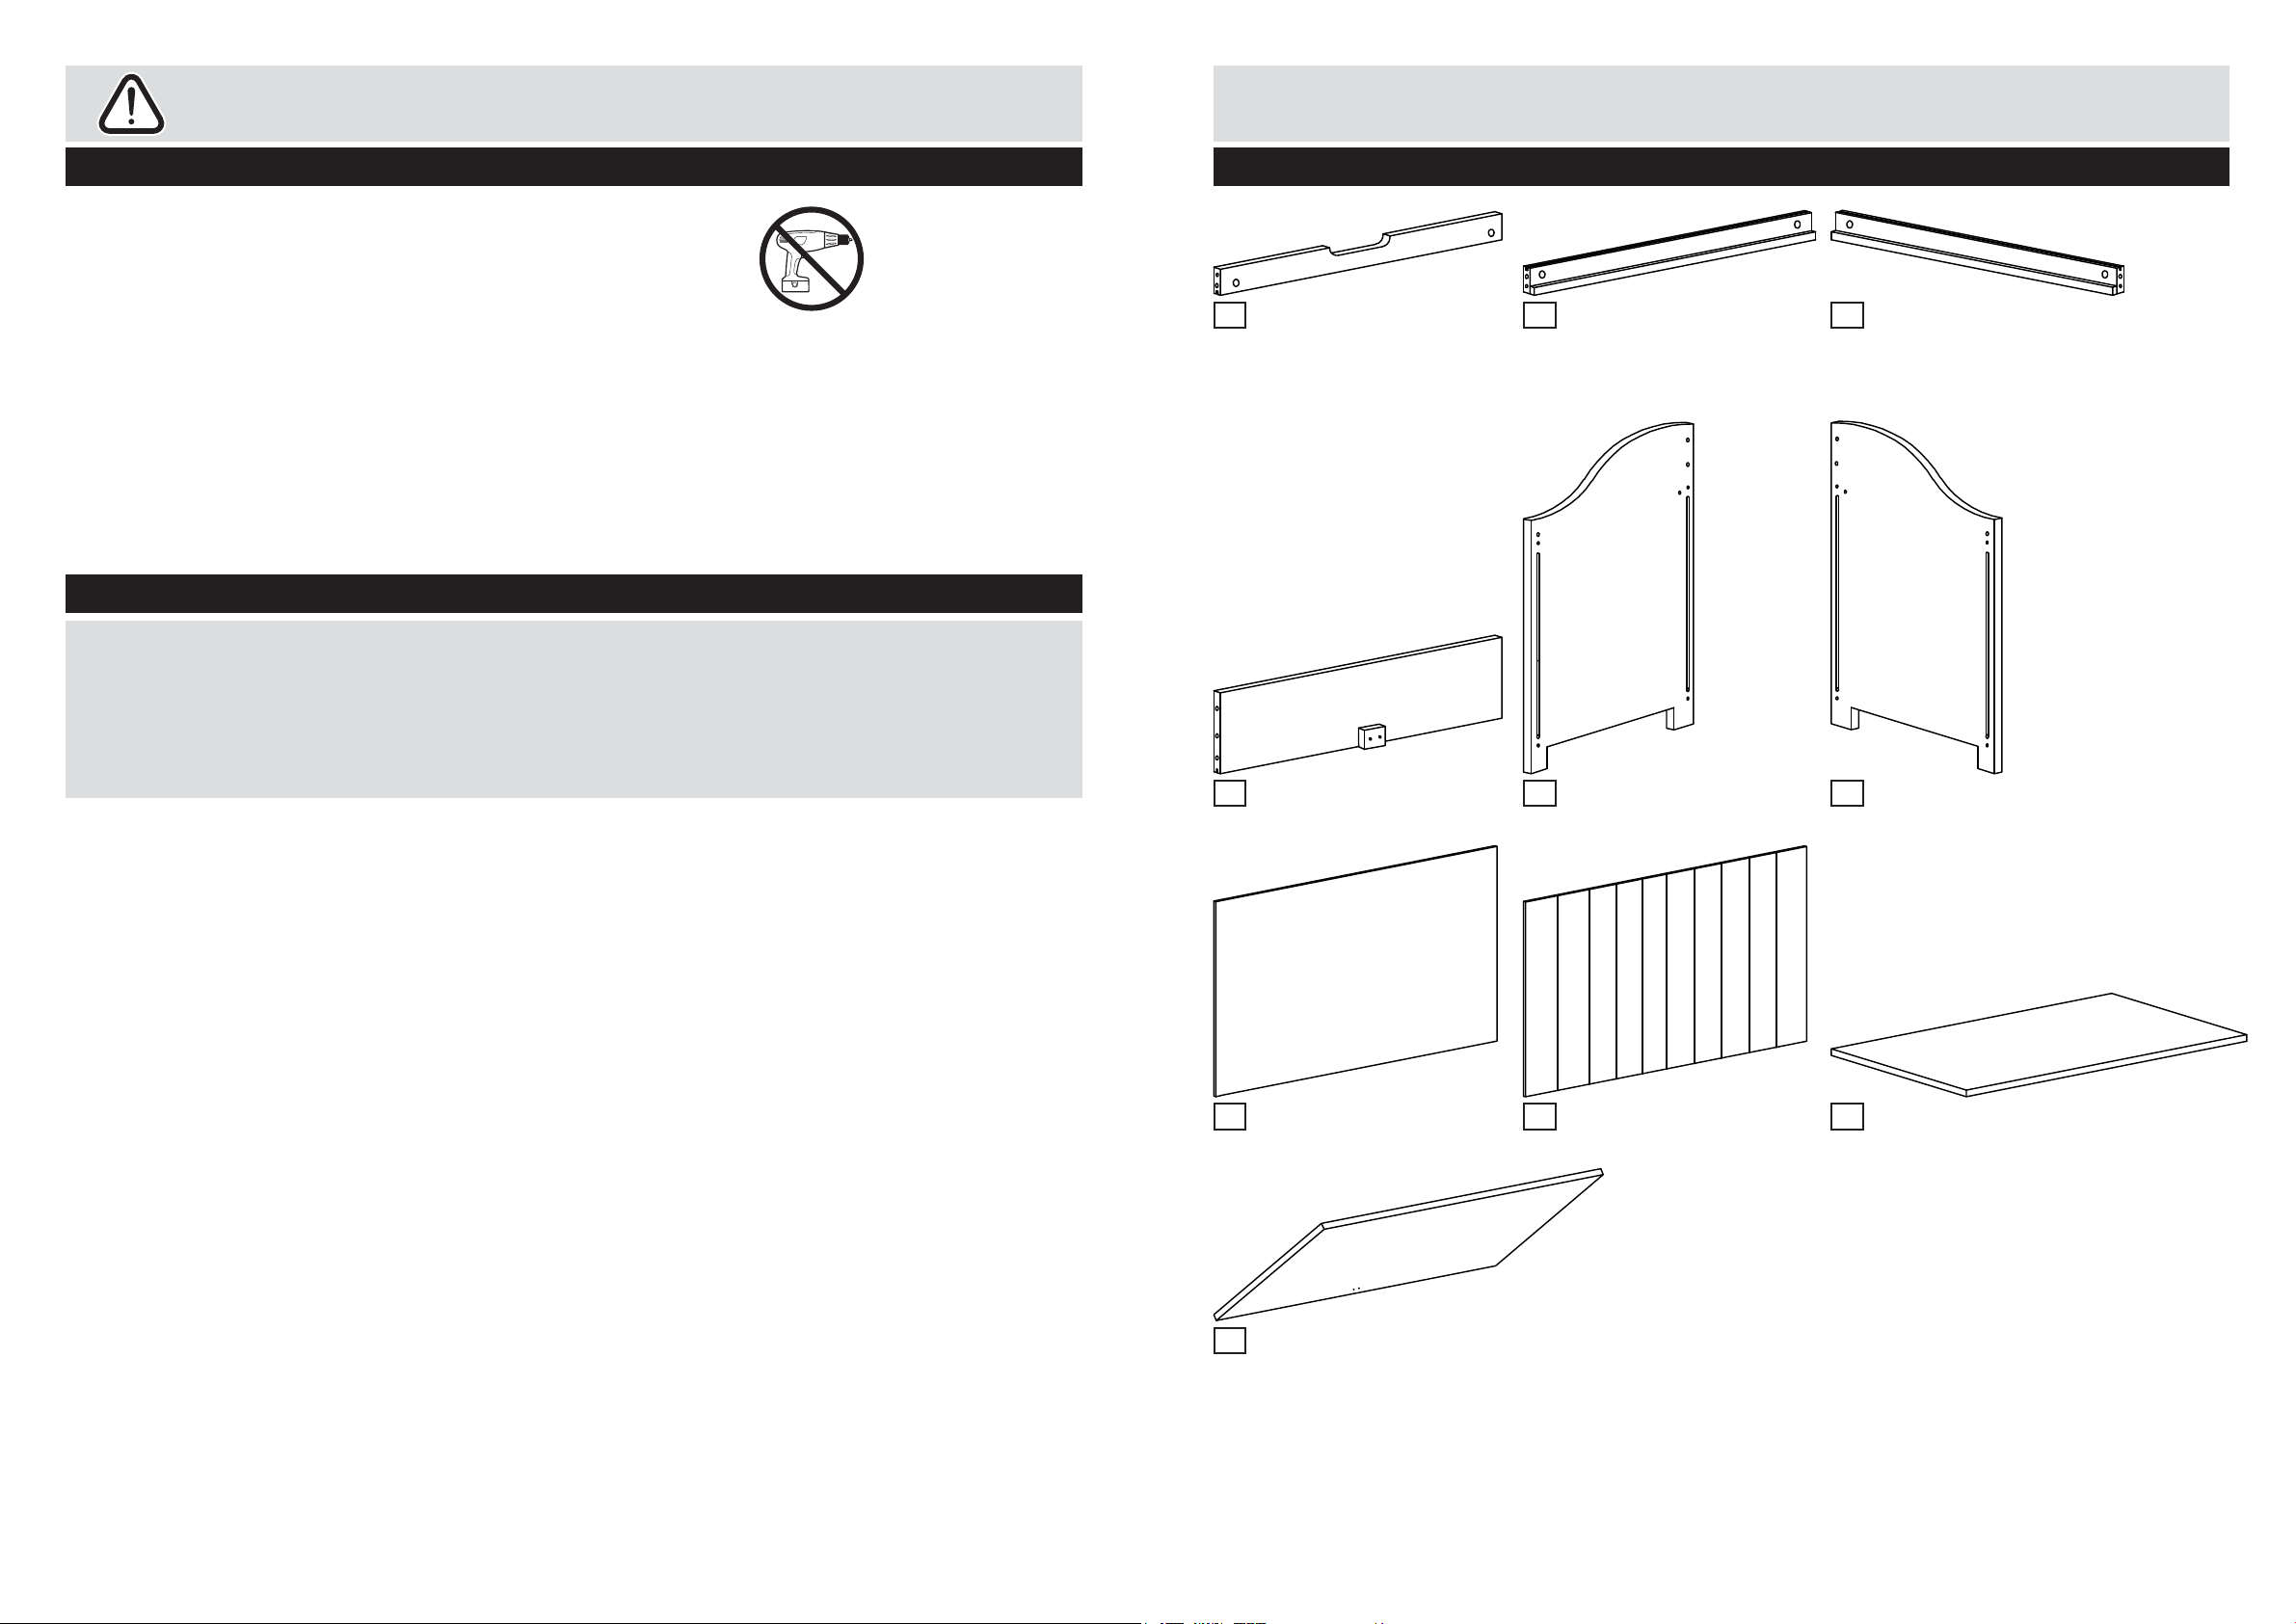
Please check you have all the panels listed below
1
Top front rail x 1
(5(h)cm x 52(w)cm)
2
Bottom back rail x 1
(5(h)cm x 52(w)cm)
3
Bottom front rail x 1
(5(h)cm x 52(w)cm)
Note: this part can be distinguished
from part 2 by the wider groove.
4
Top back rail x 1
(18.5(h)cm x 52(w)cm)
7
Back panel x 1
(31(h)cm x 53(w)cm)
10
Lid x 1
(51.7(w)cm x 32.4(d)cm)
5
Left side x 1
(58(h)cm x 35(d)cm)
8
Front panel x 1
(32(h)cm x 53(w)cm)
6
Right side x 1
(58(h)cm x 35(d)cm)
9
Base panel x 1
(51.7(w)cm x 30(d)cm)
1
Page 3
Components - Fittings
If you have damaged or missing components,
call the Customer Helpline: 0845 640 0800
Assembly Instructions
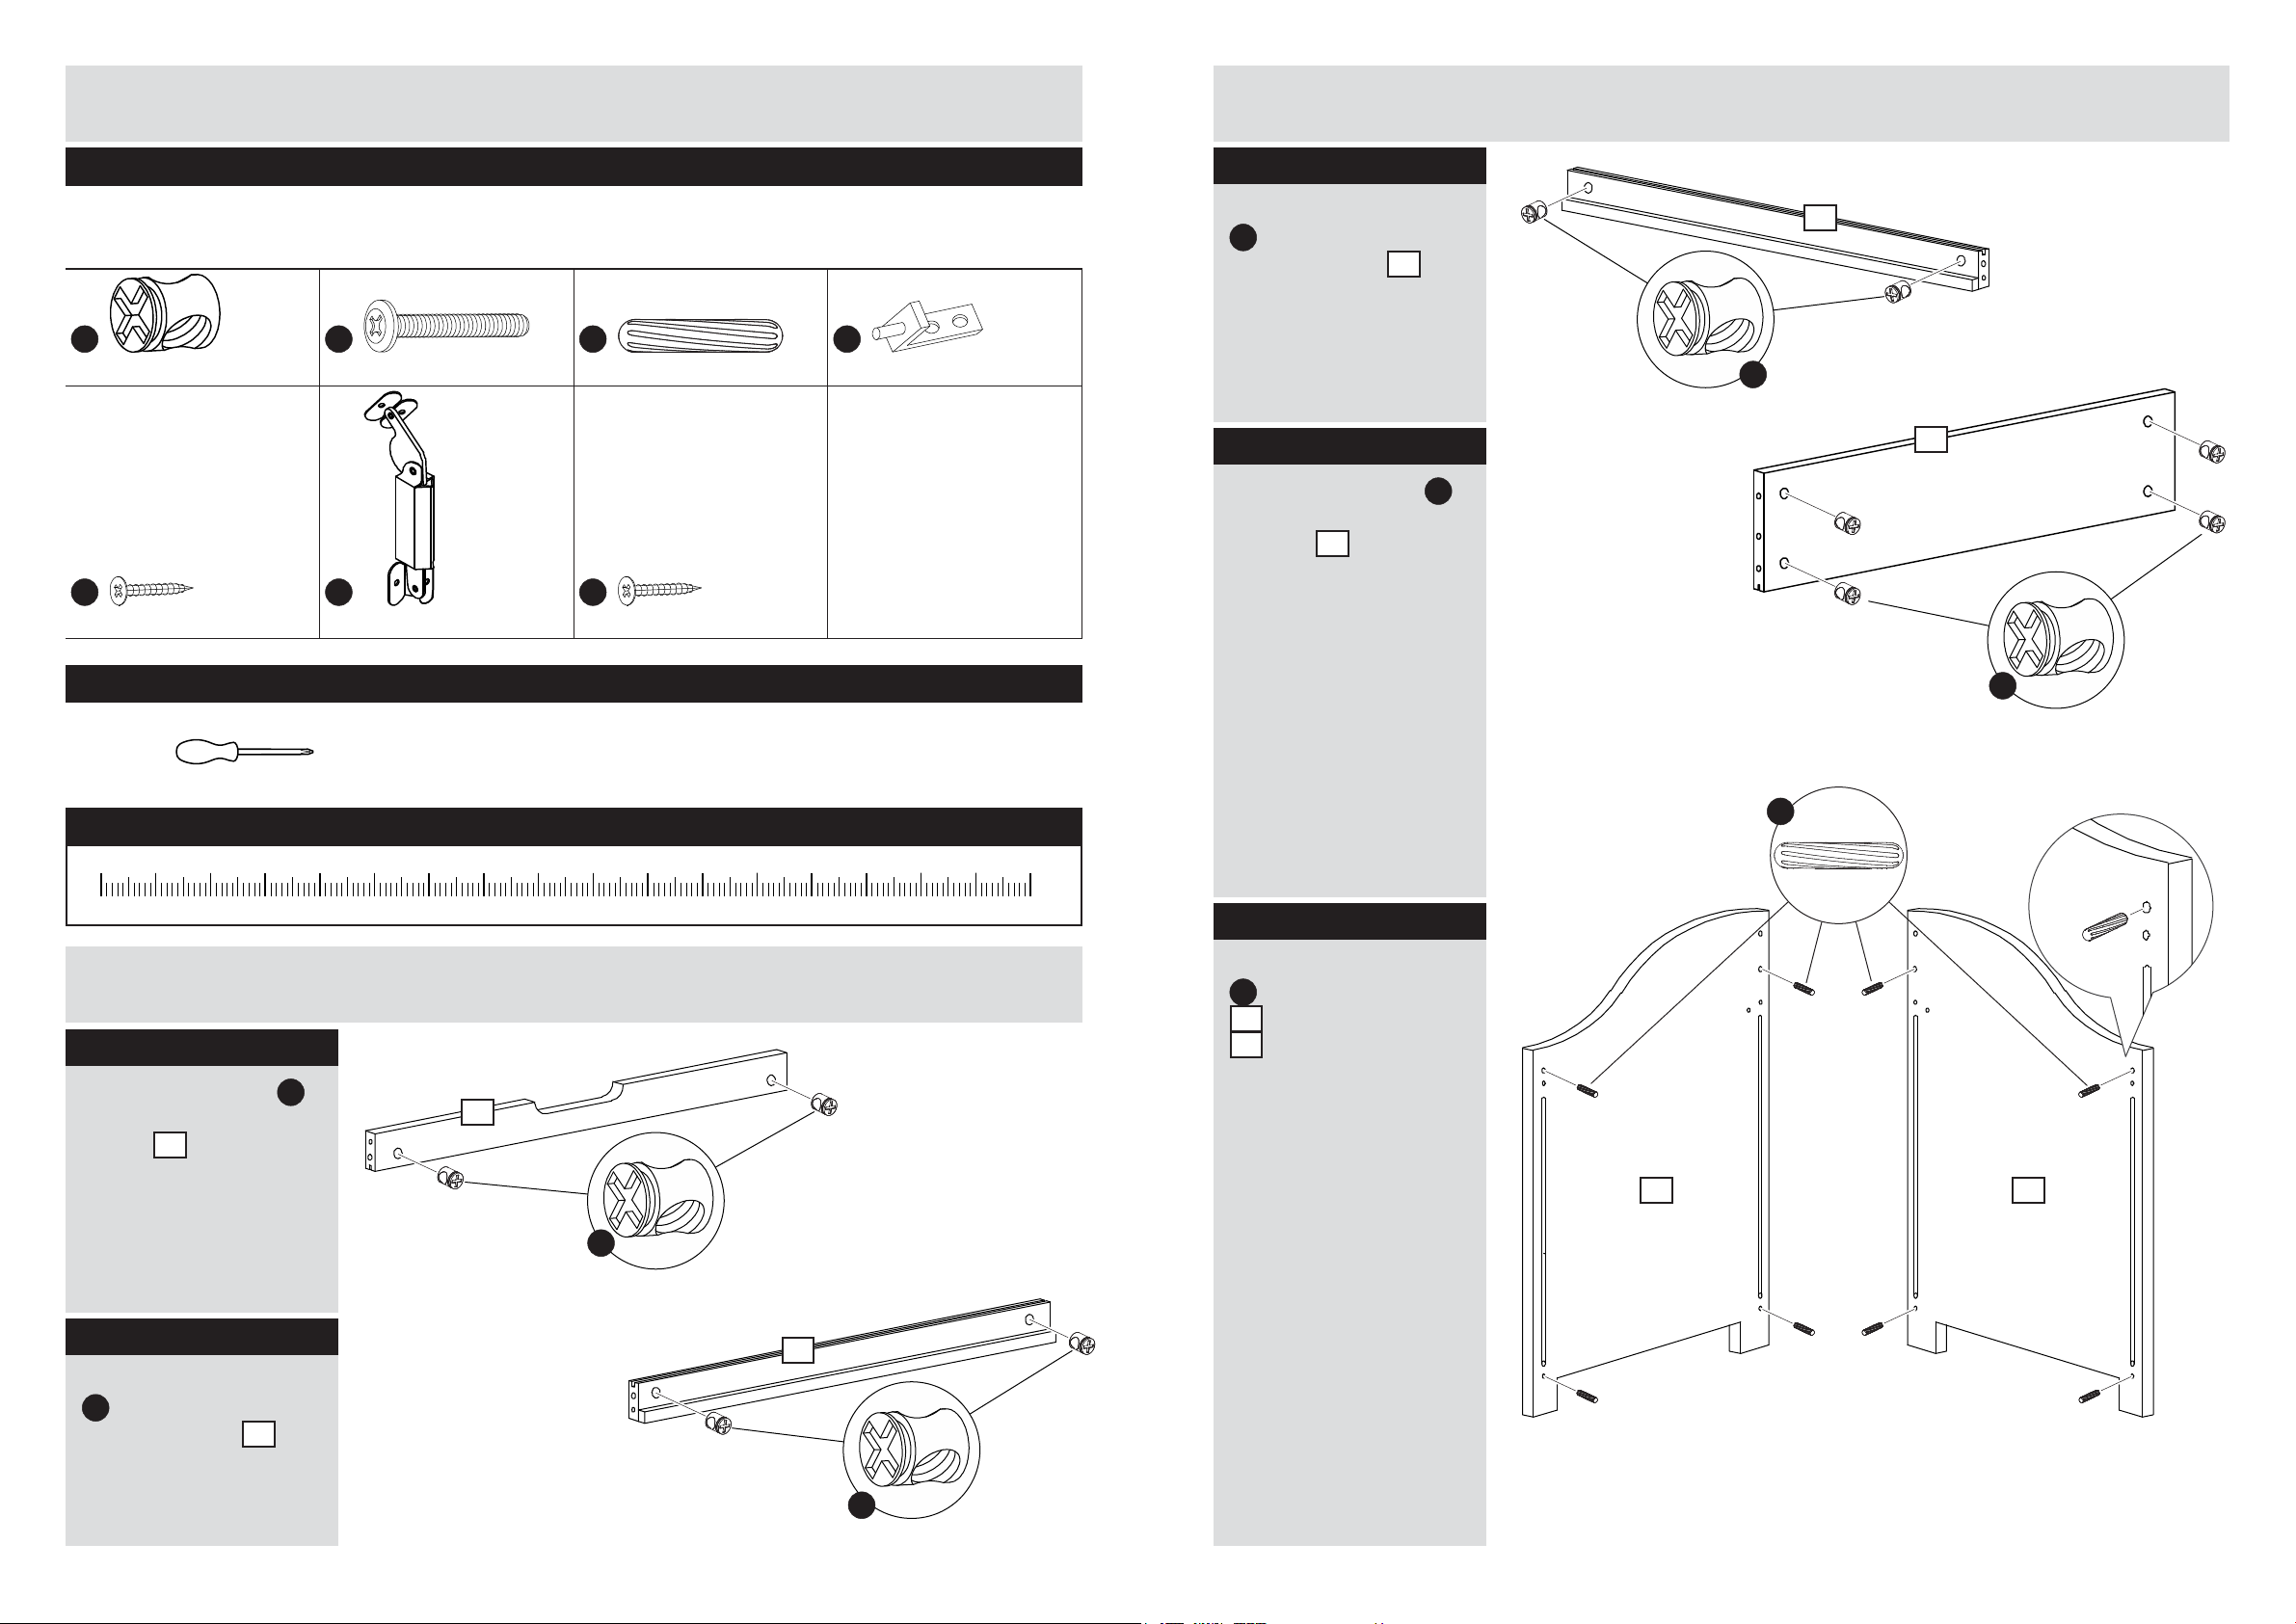
Please check you have all the ttings listed below
Note: The quantities below are the correct amount to complete the assembly. In some cases more ttings
may be supplied than are required.
A
Connector x 10 40mm Screw x 10 30mm Wooden dowel x 8 Hinge x 2
E
3x12mm Screw x 4 Spring hinge x 1 4x12mm Screw x 4
B
F
G
C
D
Tools required
Step 3
Insert 2 x connector
A
into the holes in the
bottom front rail
shown.
3
as
Step 4
Insert 4 x connector
into the holes in the top
back rail
4
as shown.
A
3
A
4
A
Phillips screwdriver
(medium & large)
Ruler – Use this ruler to help correctly identify the screws
105
0 5 10 15 20 25 30 35 40 45 50 55 60 65 70 75 80 85 90 95 100
110 115 120 125 130 135 140 145 150 155 160 165 170
Assembly Instructions
Step 1
Insert 2 x connector
into the holes in the front
top rail
1
as shown.
A
1
A
Step 5
Insert 4 x 30mm dowel
C
into the left side panel
5
and right side panel
6
as shown.
C
5 6
Step 2
Insert 2 x connector
A
into the holes in the
bottom back rail
shown.
2 3
2
as
2
A
Page 4
Assembly Instructions Assembly Instructions
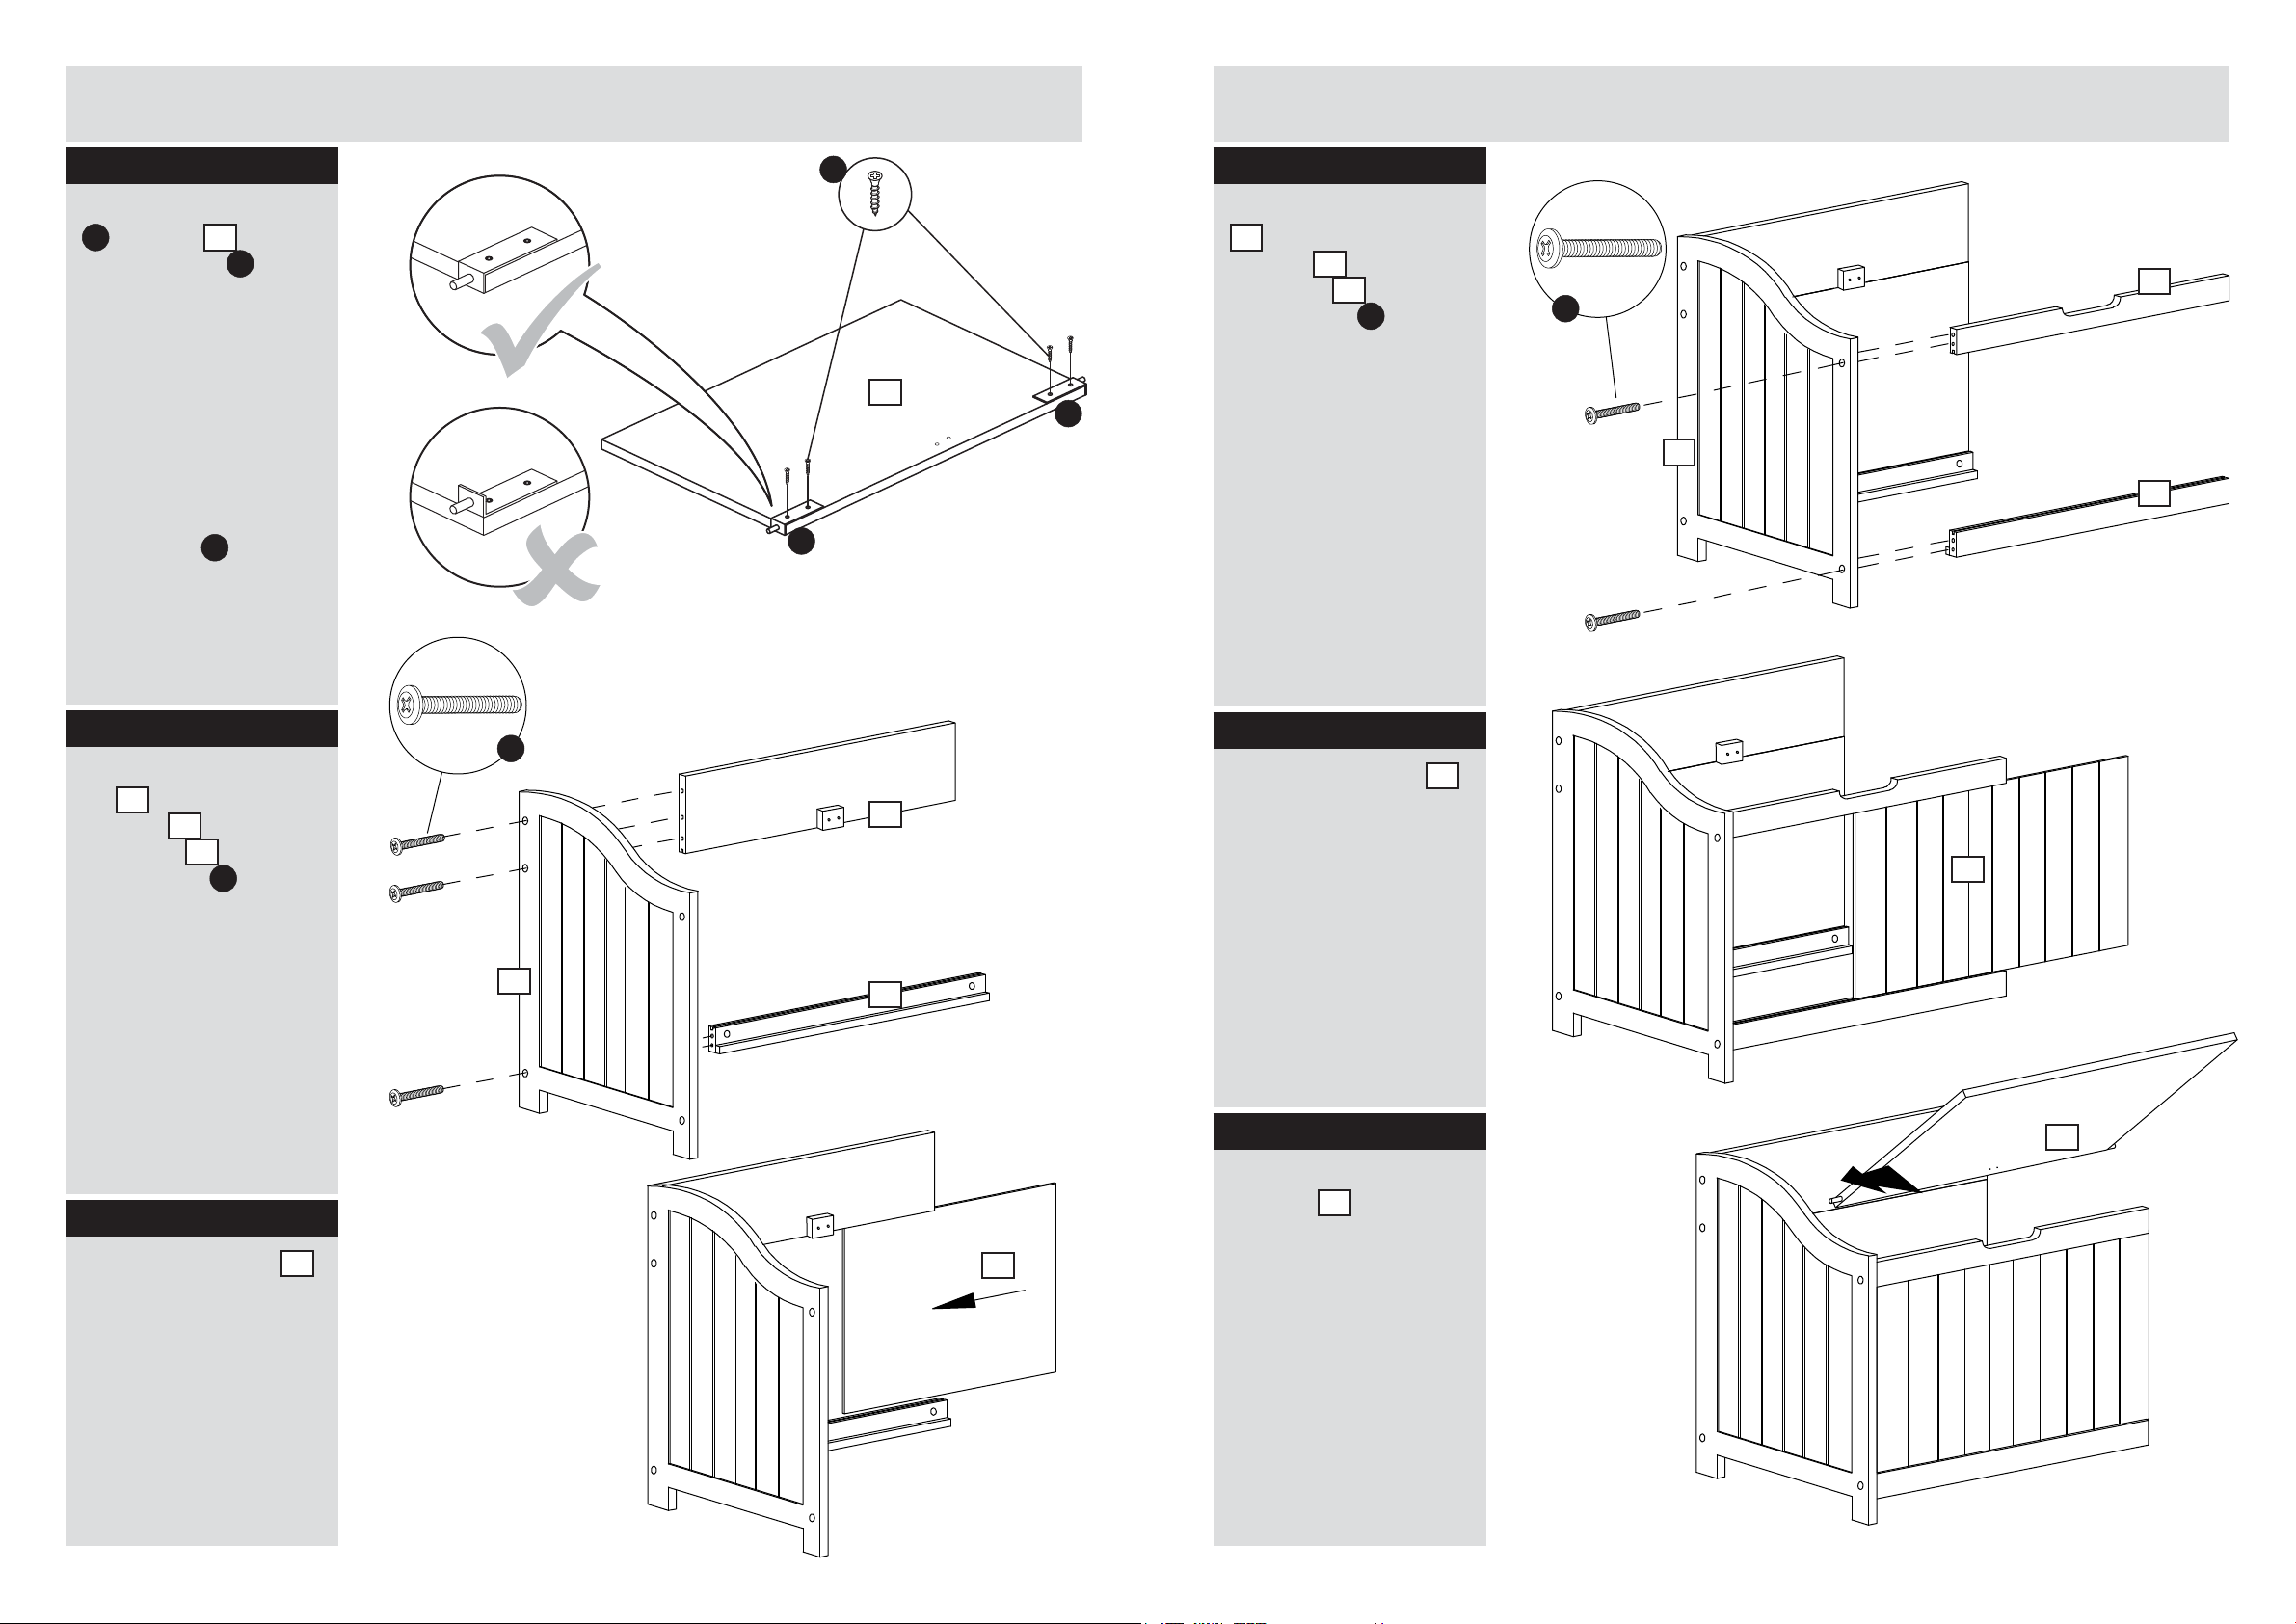
Step 6
Screw both the hinges
D
to the lid
x 12mm screw
Important: the hinge
must t ush to the edge
of the lid (
If the hinge post
protrudes from the lid as
shown (
t the linen bin.
Important: when tting
metal hinges to lid, t
both screws
tightening either of them.
10
using 4
E
.
a:).
b:), the lid will not
E
before
a:
b:
D
E
10
D
Step 9
Screw the top front rail
1
and the bottom
front rail
side panel
40mm screw
3
to the left
5
using 2 x
B
.
1
B
5
3
Step 7
Screw the top back
4
rail
back rail
side panel
40mm screw
and the bottom
2
to the left
5
using 3 x
B
.
Step 8
Slide the back panel
into the slots of the two
back rails.
7
B
4
5
2
7
Step 10
Slide the front panel
into the slots of the two
front rails.
8
Step 11
Slot the left-hand hinge
of the lid
hole provided on the
inside of the left side
panel.
10
into the
8
10
4 5
 Loading...