

Page 1
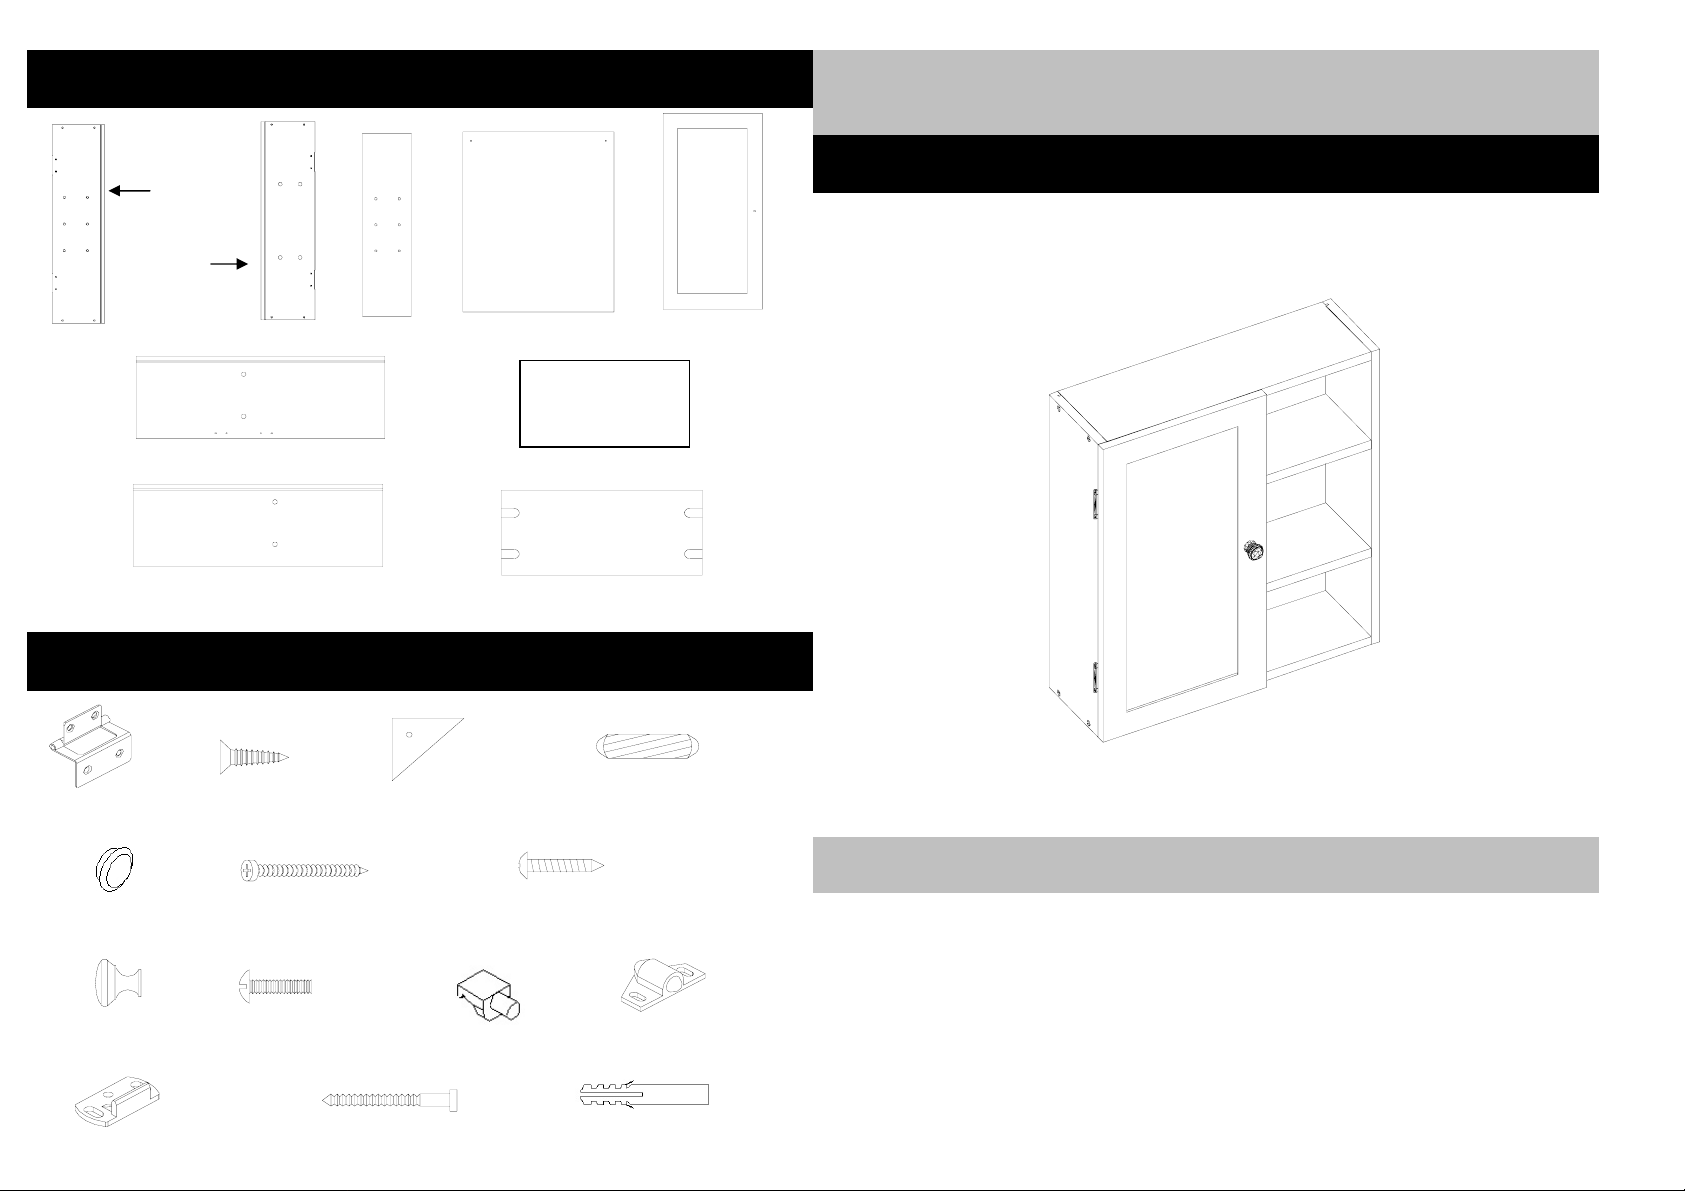
Components
Single Mirror Cabinet With Open Shelf
Fittings
A. L Side
Panel x 1
B. R Side
Panel x 1
F. Top Panel x 1
G. Base Panel x 1
C. Divider x 1
Simple Assembly Instructions - Please keep for future reference
D. Back Panel x 1 E. Door Panel x 1
H. Side Shelf x 2
I. Shelf x 1
J. Hinge x 2
N. Screw Cap x 8 O. Assembly Screw x 8
Q. Door Knob x 1
U. Catch Plate x 1
K. Hinge Screw x 8
R. Knob Bolt x 1 S. Shelf Support x 4 T. Door Catch x 1
L. Triangle Plate x 2
V. Wall Screw x 2
M. Wooden Dowel x 12
P. Lock & Plate Screw x 4
W. Wall Plug x 2
IMPORTANT
1. Read these instructions carefully and 3. Take all the fittings out of the plastic bag
familiarise yourself with the procedure and separate them into their groups.
before assembling the unit.
4. Ensure you have enough space to lay out
2. Check that you have all the component all the parts before assembly.
parts following the list on the BACK
cover and familiarise yourself with 5. To avoid scratching it is recommended
each part before proceeding. that you assemble the trolley on a soft
level surface.
Page 2
Assembly Instructions
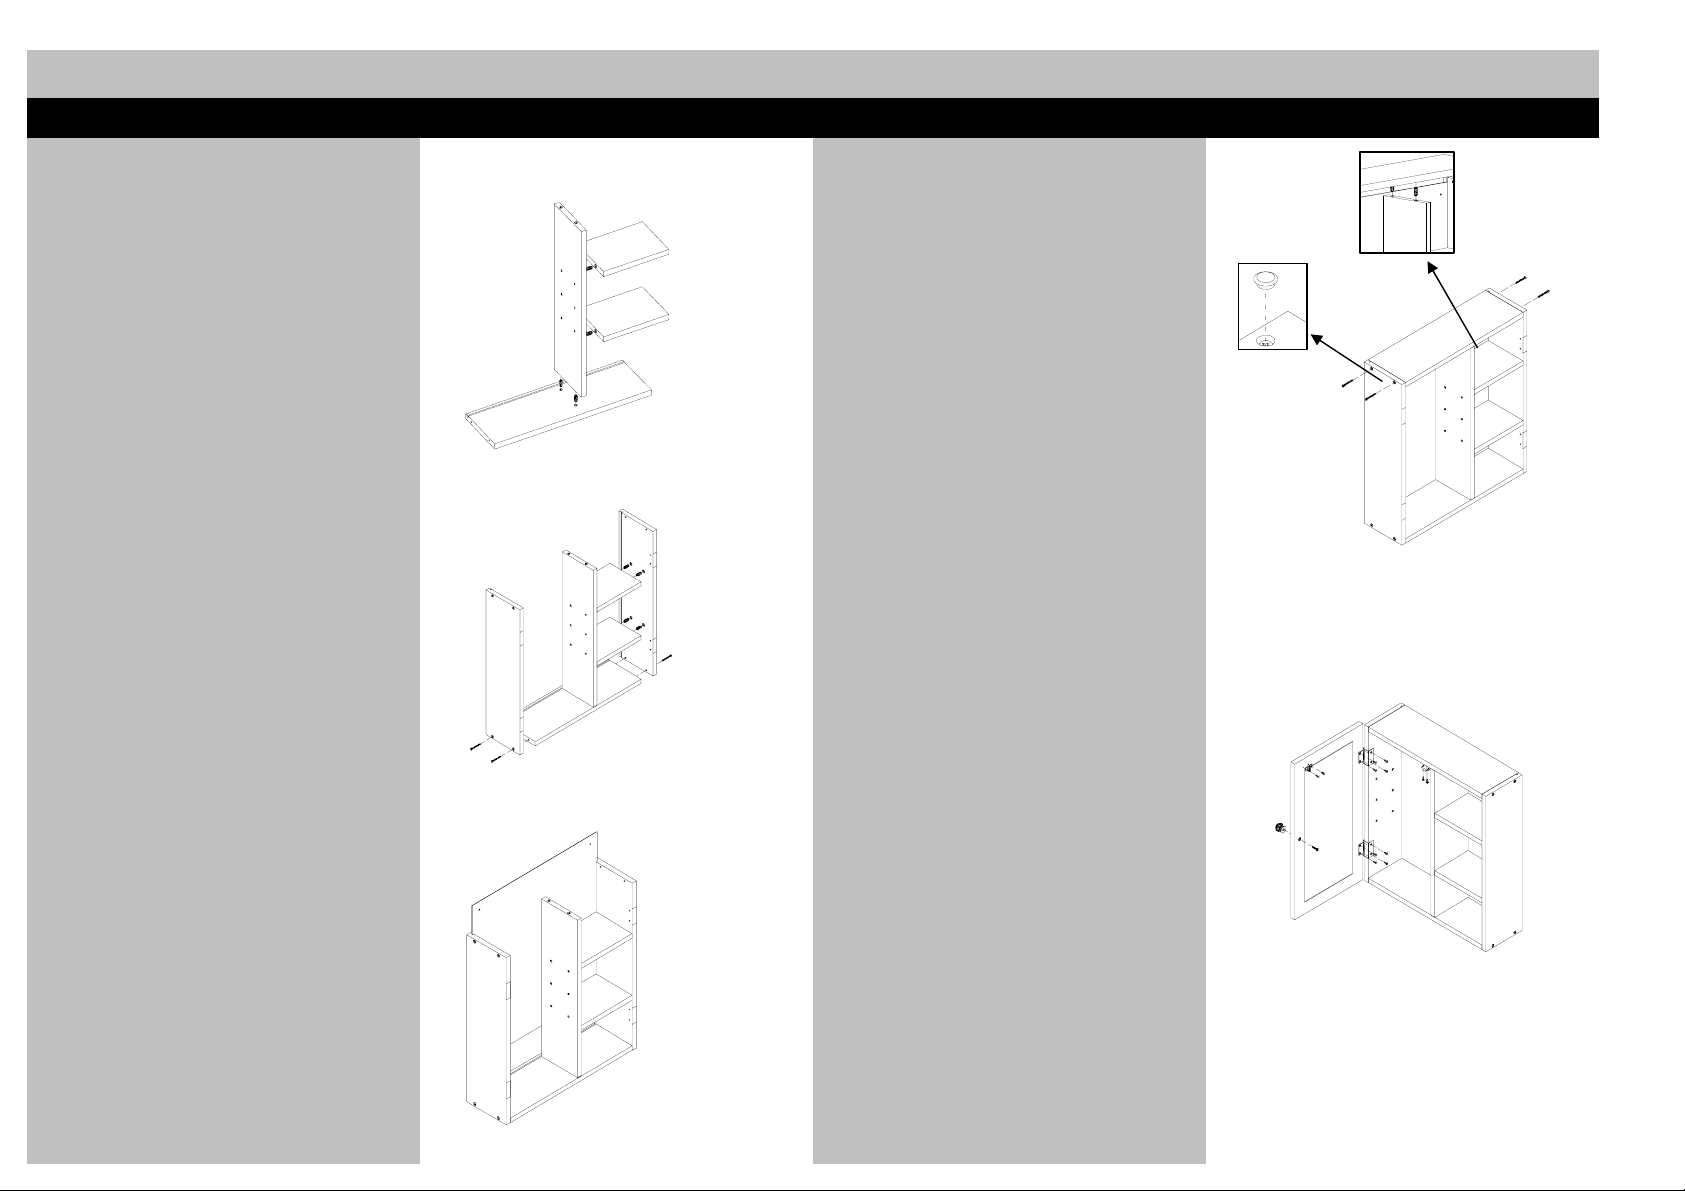
Stage 1 - Fitting the Support Frame
NOTE: It would be useful to ask someone
to help you to assembly this unit.
4. Attach the top panel (F) to assemble the
1. Attach the divider (C) to base panel (G) frame, using screws & wooden dowels
with wooden dowel (M), and then attach the (O&M) (See Fig. 4).
side shelf (H) to the divider with wooden
dowels (See Fig. 1). Make sure that the back panel is located
Fig. 1
properly in the groove in the top panel
before tightening the screws.
2. Attach the R side panel (B) to the unit use
wooden dowel(N) first, and then fit it to the
base panel with assembly screw(O). 5. Insert the screw cover caps (S) over the
Fit the L side panel (A) to the unit with holes in the L side & R side panels (A&B).
assembly screw(O) too. (See Fig.2).
Ensure that the grooves in the side panels
face inwards and are aligned with the
groove in the base panel. 6. Fit the door catch (T) into the circular
3. Insert the back panel (D) by sliding it into hinge screws (J&K).(See Fig.5).
the grooves of the side panels (See Fig. 3).
Ensure that the laminated white surface
is facing inwards and the holes are
positioned as shown.
Fig. 2
recesses in the door (E),securing with
screws (P), and then attach the door panel
(E) to the cabinet by using door hinges &
Fig. 4
Fig. 5
Fig. 3
Page 3
Assembly Instructions
Stage 2 - Fitting the Drawer
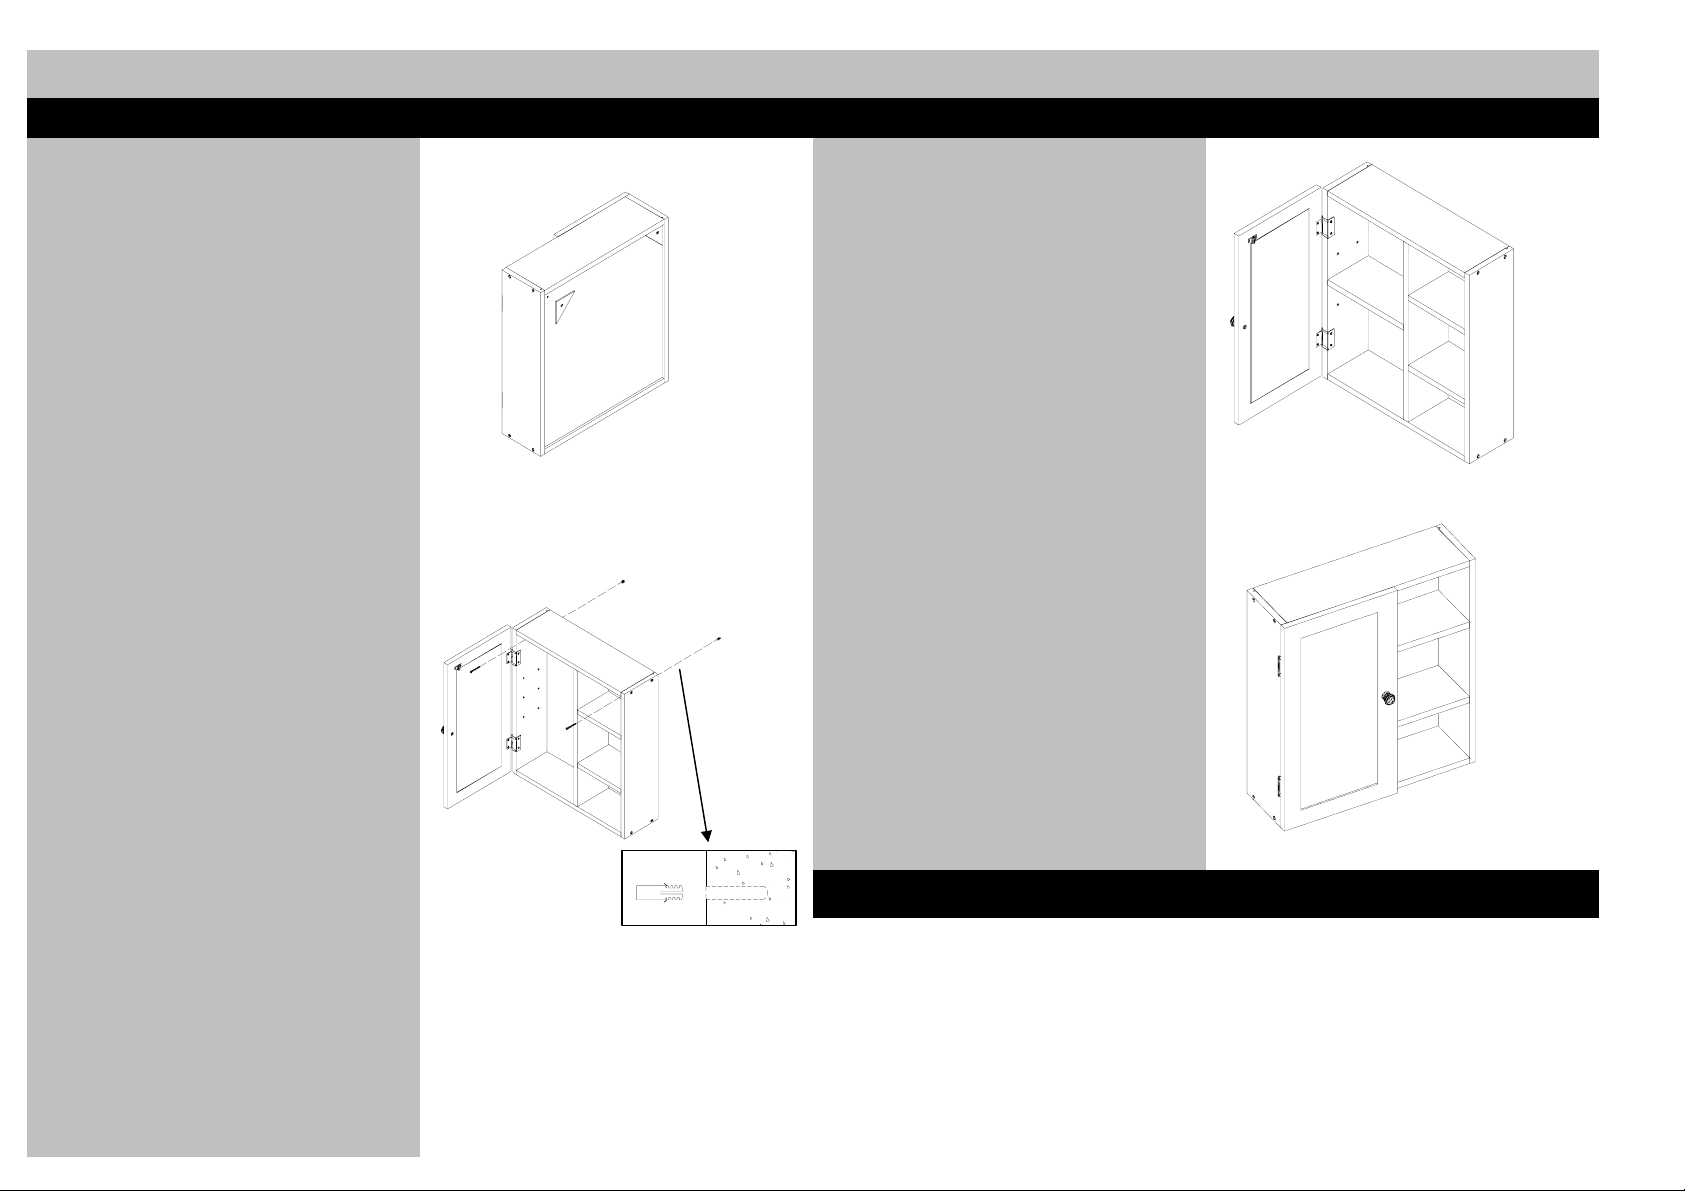
7. Attach the triangle plate (L) to the
corners of back panel, securing it with glue
(not provided) (See Fig. 6) 10. After wall mounting the cabinet, fit the
shelf supports (S) into the holes on each
side of cabinet and place the wooden
Ensure the holes in triangle plates are in shelf (I) onto the supports (See Fig. 8).
line with those in the back panel.
8. Fit the chrome door knob (Q) to the door
panel with knob bolt(R).
9. Select a suitable location against a wall to
fix the cabinet onto the wall using the
screws provided. Mark the position for the
screw fixings through the top two fixing
holes in the cabinet back. Drill the fixing
holes in the wall and insert the wall plugs
(W). Hold the cabinet over the drilled holes
and fit the screws (Y) into the wall plugs
through the cabinet back (See Fig. 7)
Fig. 6
Care and Maintenance
SAFETY
Fig. 7
abrasive products.
From time to time please ensure there are no loose screws on the product.
To avoid any risk of suffocation to animals or children dispose of the plastic bags
immediately.
CLEANING
As with all surfaces clean with a damp cloth and mild detergent,do not use bleach or
FITTING
Fig. 8
Page 4

SAFETY WARNING INFORMATION BS7449 : 1991
Keep these instructions for future use: Catalogue Number: 832-3679 (D)
Manufacture date:
Retailer: ARG
Retailer address: 489-499 Avebury Boulevard
Saxon Gate West
Central Milton Keynes
WARNINGS Bucks, MK9 2NW
*Do not place very hot or very cold items against or in
close proximity to glass surface unless an adequately This unit contains film backed mirror of nominal thickness
thick insulating material is used to prevent such items of 3 mm
from coming into contact with the glass.
This unit contains safety backed mirrored doors of a
nominal thickness of 3 mm, which is not required to be
*Do not strike the glass with hard or pointed items. classified to BS6206 Class C.
*When cleaning glass panels or mirrors use a damp If a glass is chipped or broken replace with
or leather with washing up liquid or soft soap if necessary; glass of the type described on this label. Consult the
do not use washing powders or any other substance manufacturer, retailer, or agent with regard to
containing abrasive since these substances scratch glass. obtaining a manufacturing specification and shape for
replacement glass quoting the model number, and batch
number or date of manufacture.
 Loading...