

Page 1
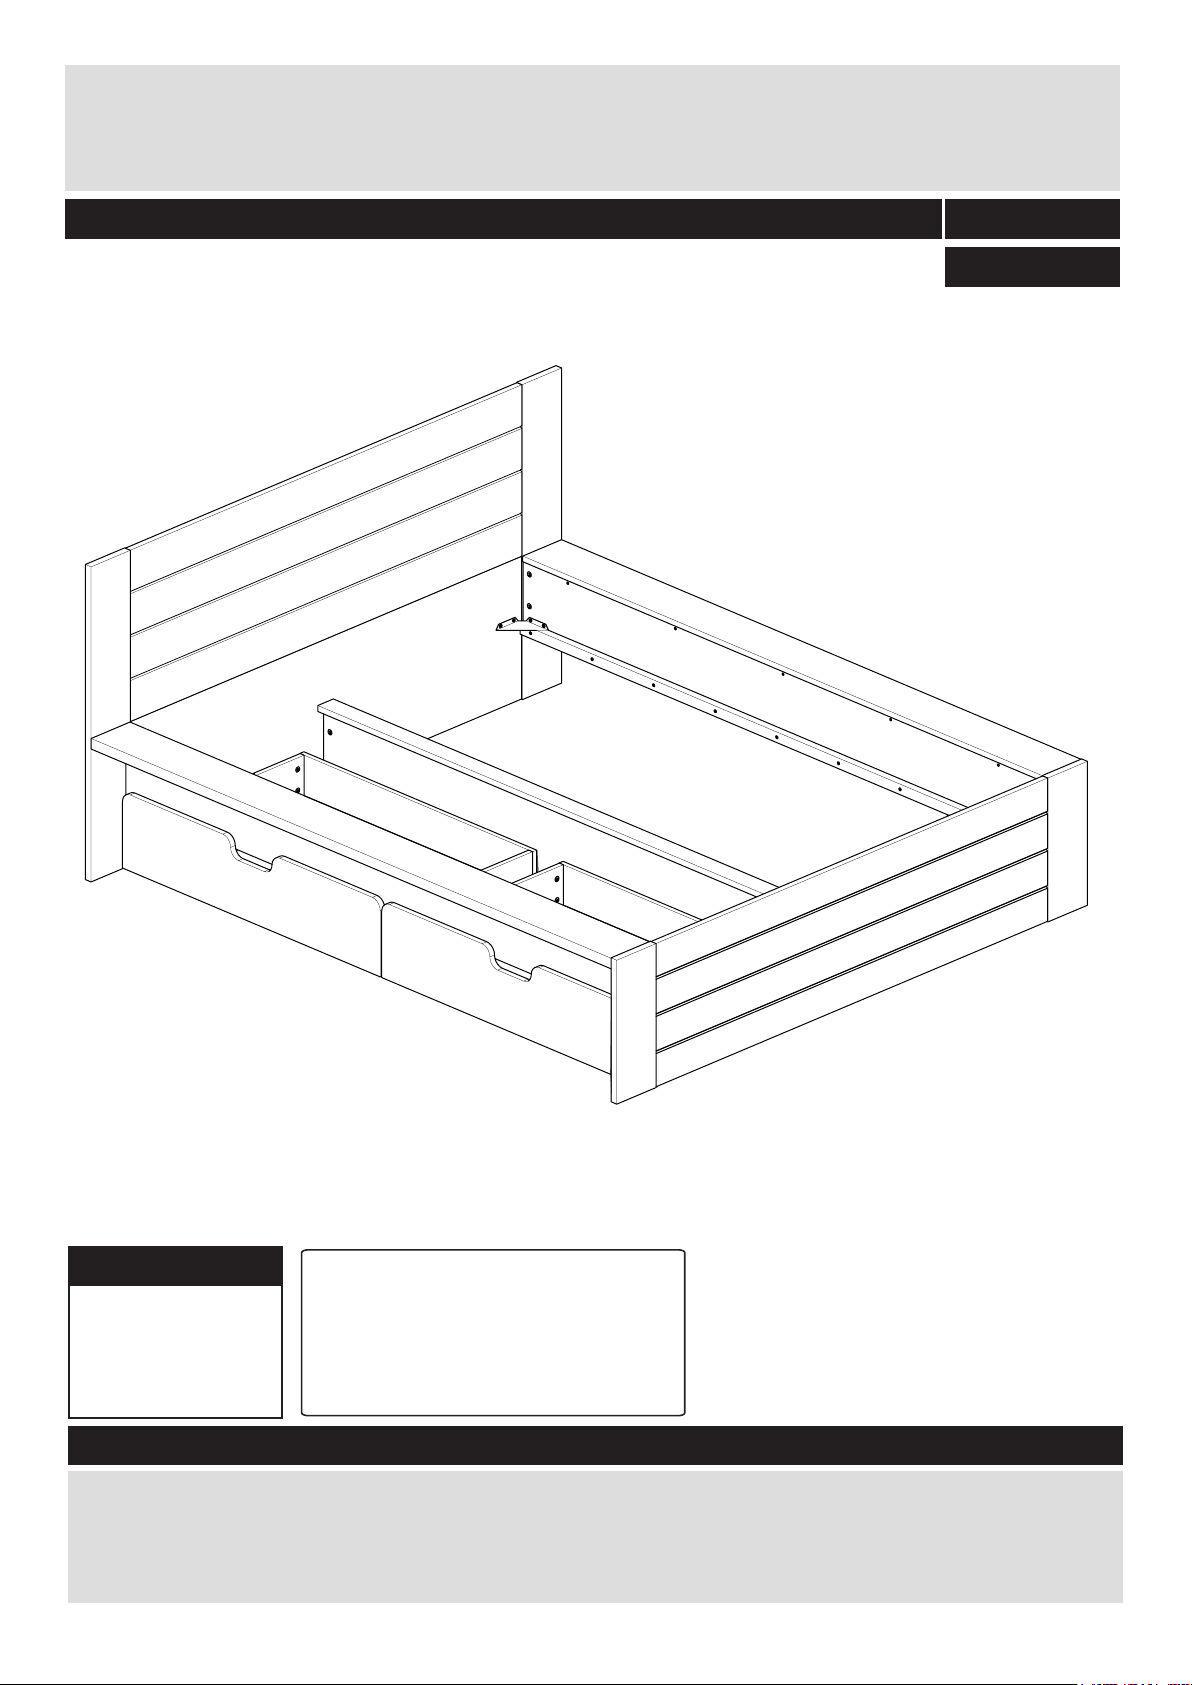
Seattle 5Ft
Assembly Instructions- Please keep for future reference
DR82533
2582722
2458461
Dimensions
Width - 181,9cm
Depth - 205,4cm
Height - 95,0cm
Tip : To prevent damage,
we recommend that you
build your unit on the
carton(s) it was packed in.
Important – Please read these instructions fully before starting assembly
If you need help or have damaged or missing parts, please visit: www.argos-support.co.uk
or email: [email protected] (quoting your original order number)
Alternatively, call the Spares Helpline on: 0370 112 1928
For any other queries please contact the Customer Helpline on: 0345 640 2020
Issue 1.1 - 02/07/15
Page 2
Safety and Care Advice
Important – Please read these instructions fully before starting assembly
• Check you have all the
components and tools listed on
pages 2 and 3.
• Remove all fittings from the
plastic bags and separate them
into their groups.
• Keep children and animals
away from the work area, small
parts could choke if swallowed.
• Make sure you have enough
space to layout the parts before
starting.
• Do not stand or put weight on
the product, this could cause
damage.
• Assemble the item as close
to its final position (in the same
room) as possible.
• Assemble on a soft level
surface to avoid damaging the
unit or your floor.
• Parts of the assembly will be
easier with 2 people.
power drill is set on a low torque
setting.
• Dispose of all packaging
carefully and responsibly.
Glue safety - Take care when using glue, please follow the advice below
Skin contact: Remove
contamination by washing with
soap and water. This procedure
should also be followed prior to
eating and drinking.
Eye contact: Rinse immediately
with clean water for 15 minutes
and seek medical advice.
If swallowed: Seek medical
advice immediately.
•To reduce the
likelihood of
damaging your
product please
ensure that your
Care and maintenance
• Only clean using a damp cloth
and mild detergent, do no use
bleach or abrasive cleaners.
Handy Hints
• Assemble all parts and bolts
loosely during assembly, only
once the product is complete
should you fully tighten the bolts
• From time to time check that
there are no loose screws on
this unit.
• Regularly check and ensure
that all bolts and fittings are
tightend properly.
• This product should not be
discarded with household
waste. Take to your local
authority waste disposal centre.
Note: if required the next
page can be cut out and used
as reference throughout the
assembly. Keep this page with
these instructions for future
reference.
2
Page 3
Components - Panels
For damaged or missing parts, please visit:
www.argos-support.co.uk or email: [email protected]
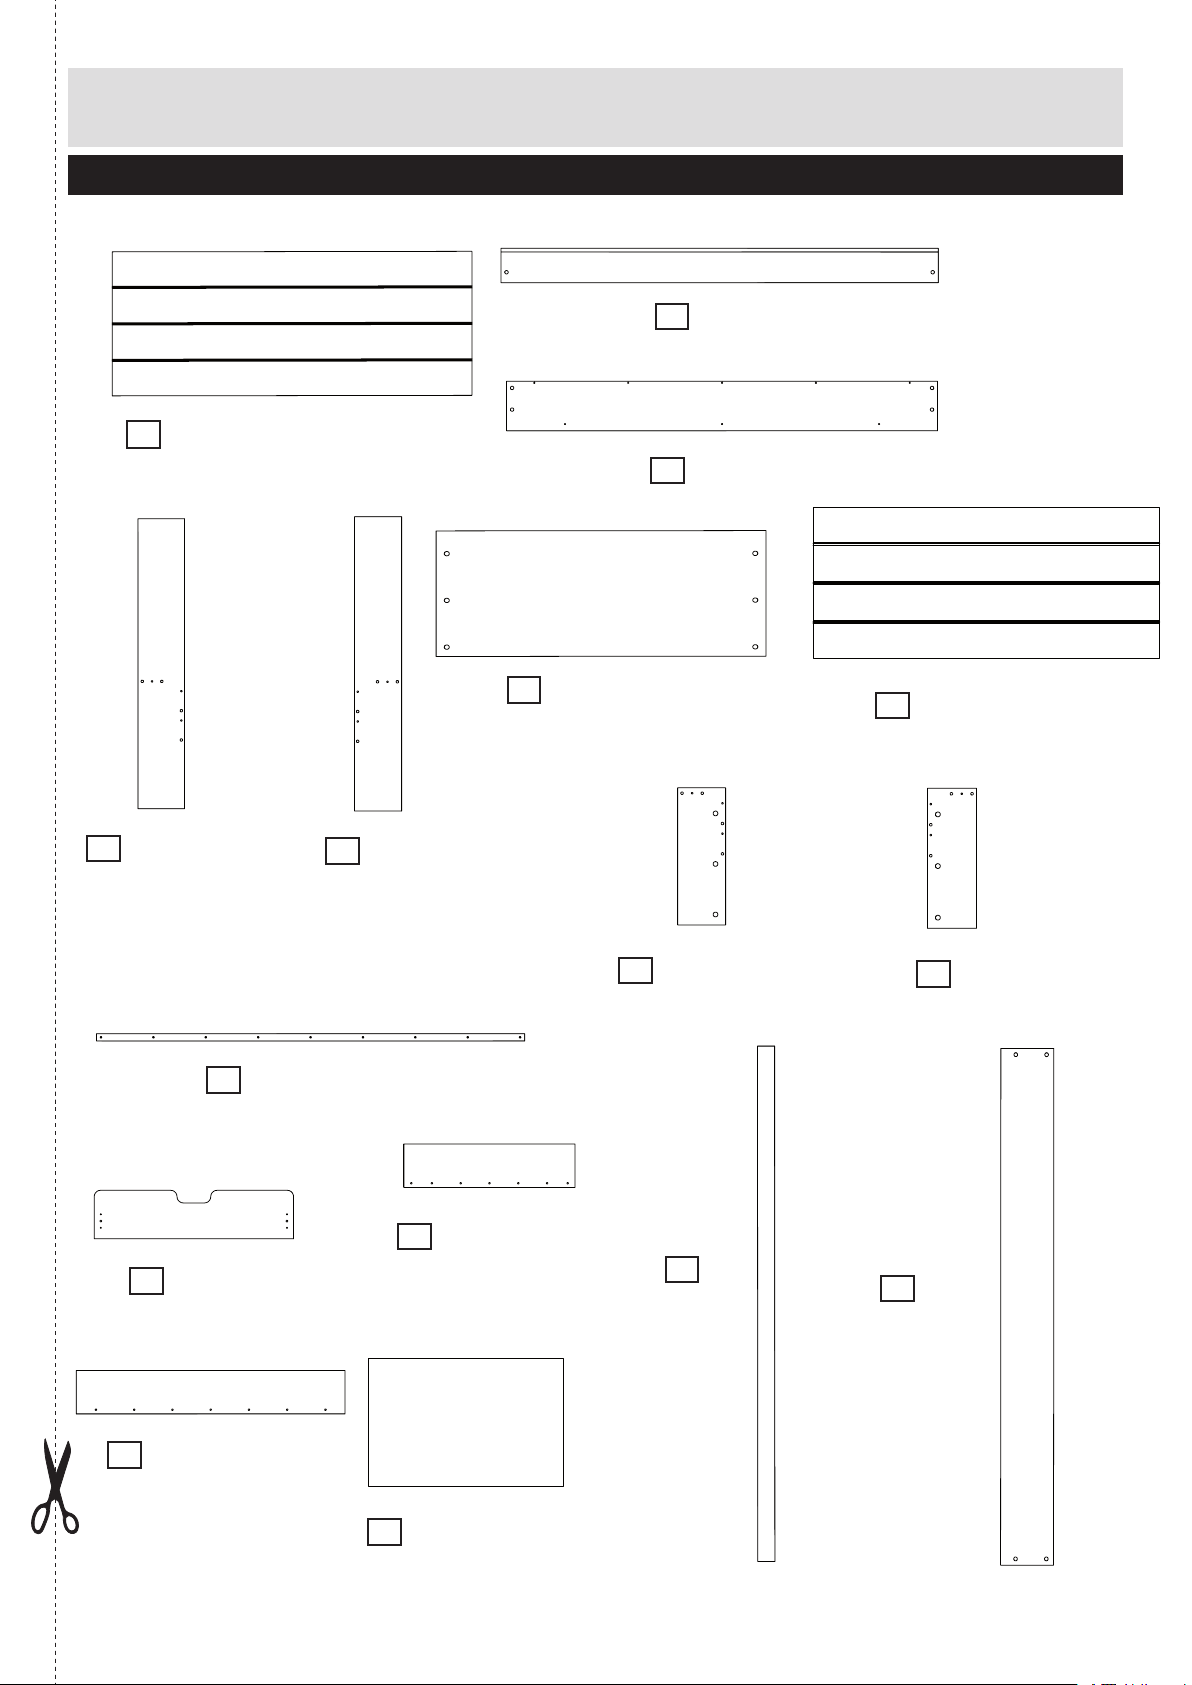
Please check you have all the panels listed below
2
Head board
1
(151.5x 51.7cm)
FA2534
3
P2041
Left & Right plinth x 2
(201.0x 15.0cm)
FA2531
Left & right rail X2
(201.0x 22.0cm)
leg head left side
7
(90.5 x 15.2cm)
P6006
10
Drawerfront x 2
11
(99.6x 23.0 cm)
P4106
leg head end right
6
(90.5 x 15.2cm)
P6007
Support rail X2
(198.5x 3.2cm)
MA2250
Drawer Side x 4
12
(62.0x 14.5cm)
P4108
Head pannel
4
(151.5x 43.0cm)
P2039
leg foot right side
8
(43.4 x 15.2cm)
P6009
15
mid plinth up
(201.4x 6.0cm)
P7048
Foot board
5
(151.5x 43.2cm)
FA2537
9
16
mid rail down
(201.4x 22.0cm)
P2043
leg foot left side
(43.4 x 15.2cm)
P6008
Drawer Back x 2
13
(90,0x 14,5cm)
P4109
Drawer Base x 2
14
(86.8 x 62,0cm)
P4 111
3
Page 4
For damaged or missing parts, please visit:
105
Components - Fittings
www.argos-support.co.uk or email: [email protected]
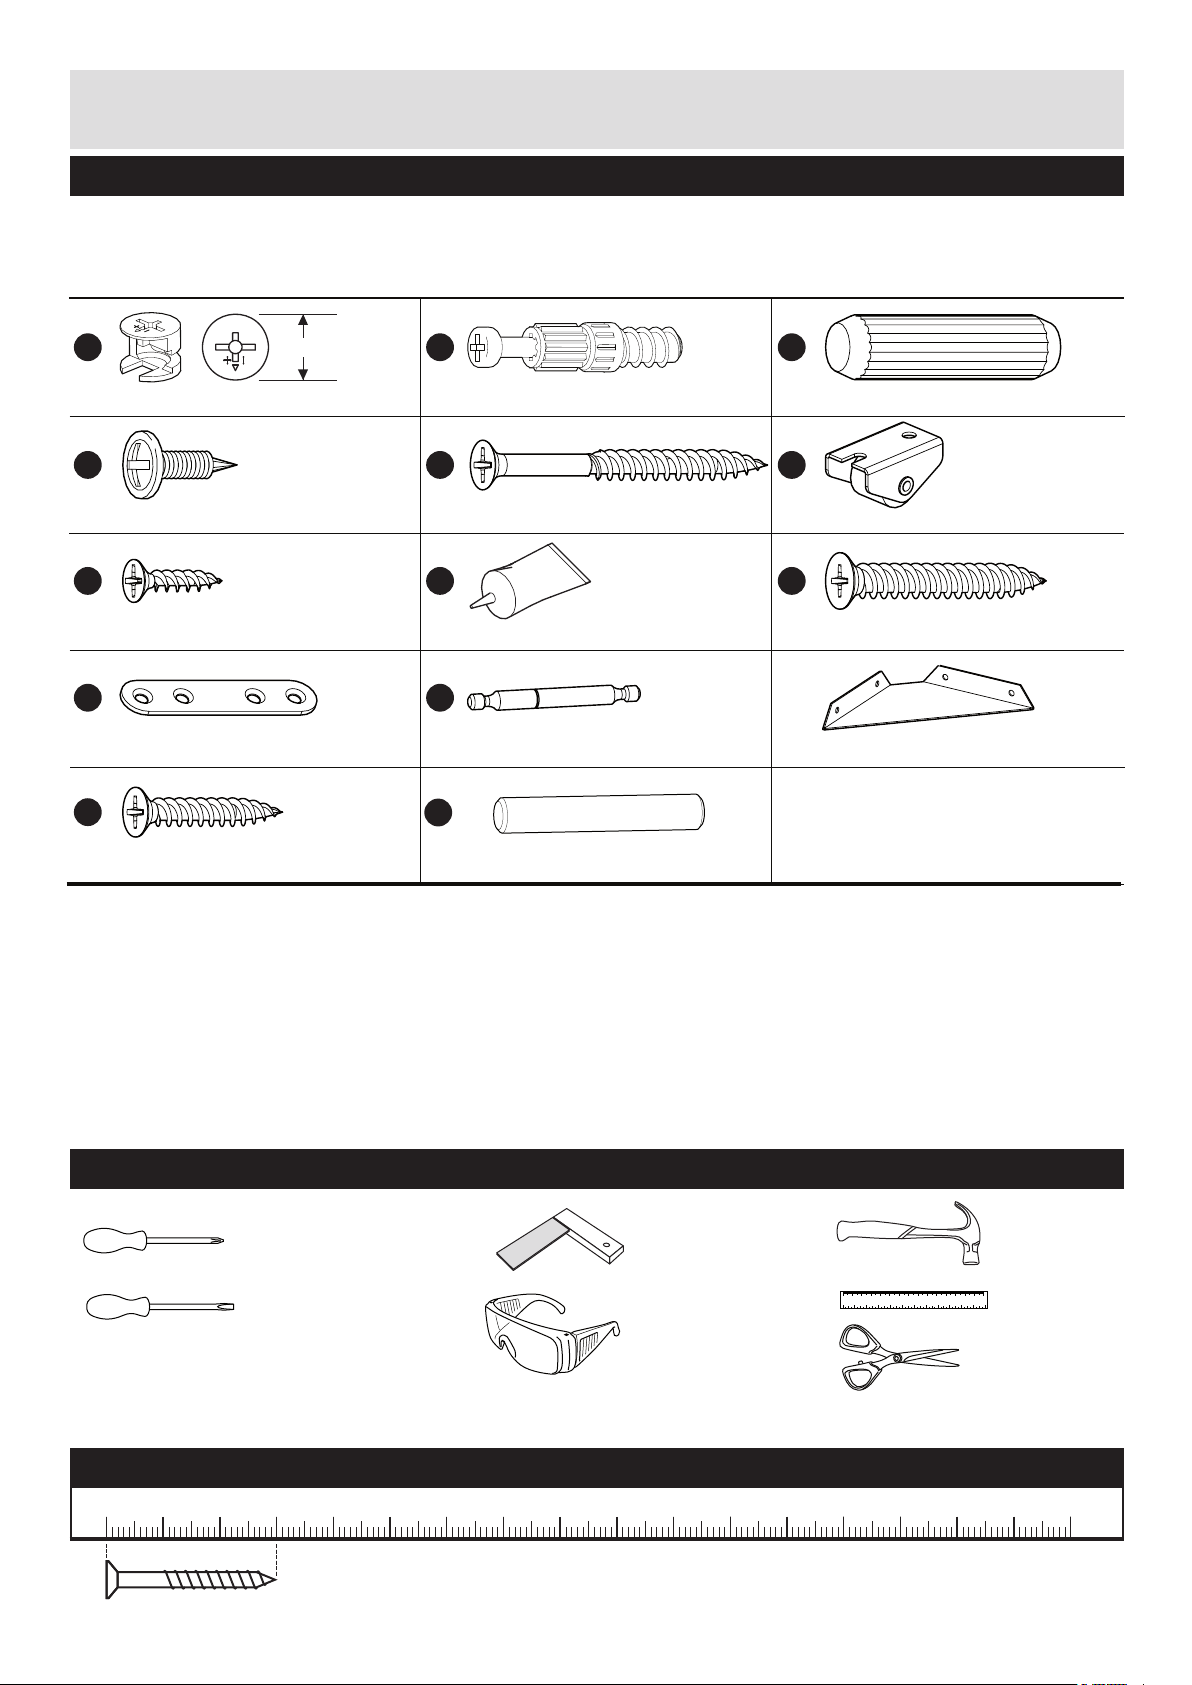
Please check you have all the fittings listed below
Note: The quantities below are the correct amount to complete the assembly. In some cases more
fittings may be supplied than are required.
1/1
FK1012
A
15mm
Large locking nut x 68 (15x12mm) Wood dowel x 40 (8x30mm)
FK1400
D
Backpannelscrew x 28 (4x15mm)
FK1311
G
Chipboardscrew x 20 (3x15mm)
FK1236
J
Connecting plate x 3
FK1314
M
Chipboardscrew x 8 (4x25mm)
B
Locking screw x 32 (5x24mm)
E
Carcase screw x 52
(4x40mm)
H
Glue x 1
K
Double locking screw x 18
N
Wood dowel x 4 (5x30mm)
FK1011
FK1006
FA1510
FK1052
(24/24mm)
FK1410
C
F
Wheel x 10
I
Chipboardscrew x 18 (5x35mm)
L
Corner bracket x4
FK1411
FK1244
FK1326
FA15040
Tools required
Phillips screwdriver
(medium & large)
Flatblade screwdriver
(medium)
Setsquare
Eye protection
(when using a
hammer or drill)
Ruler - Use this ruler to help correctly identify the screws
0 5 10 15 20 25 30 35 40 45 50 55 60 65 70 75 80 85 90 95 100
The screws length is measured from the head to the point (30mm screw shown).
4
Small
hammer
0 10 20 30 40 50 60 70 80 90 100 110 120 130 140 150
0 1 2 3 4 5 6
Ruler/tape
measure
Scissors
110 115 120 125 130 135 140 145 150 155 160 165 170
Page 5
Assembly Instructions
8
AAAAA
KKKKK
K
A
A
9
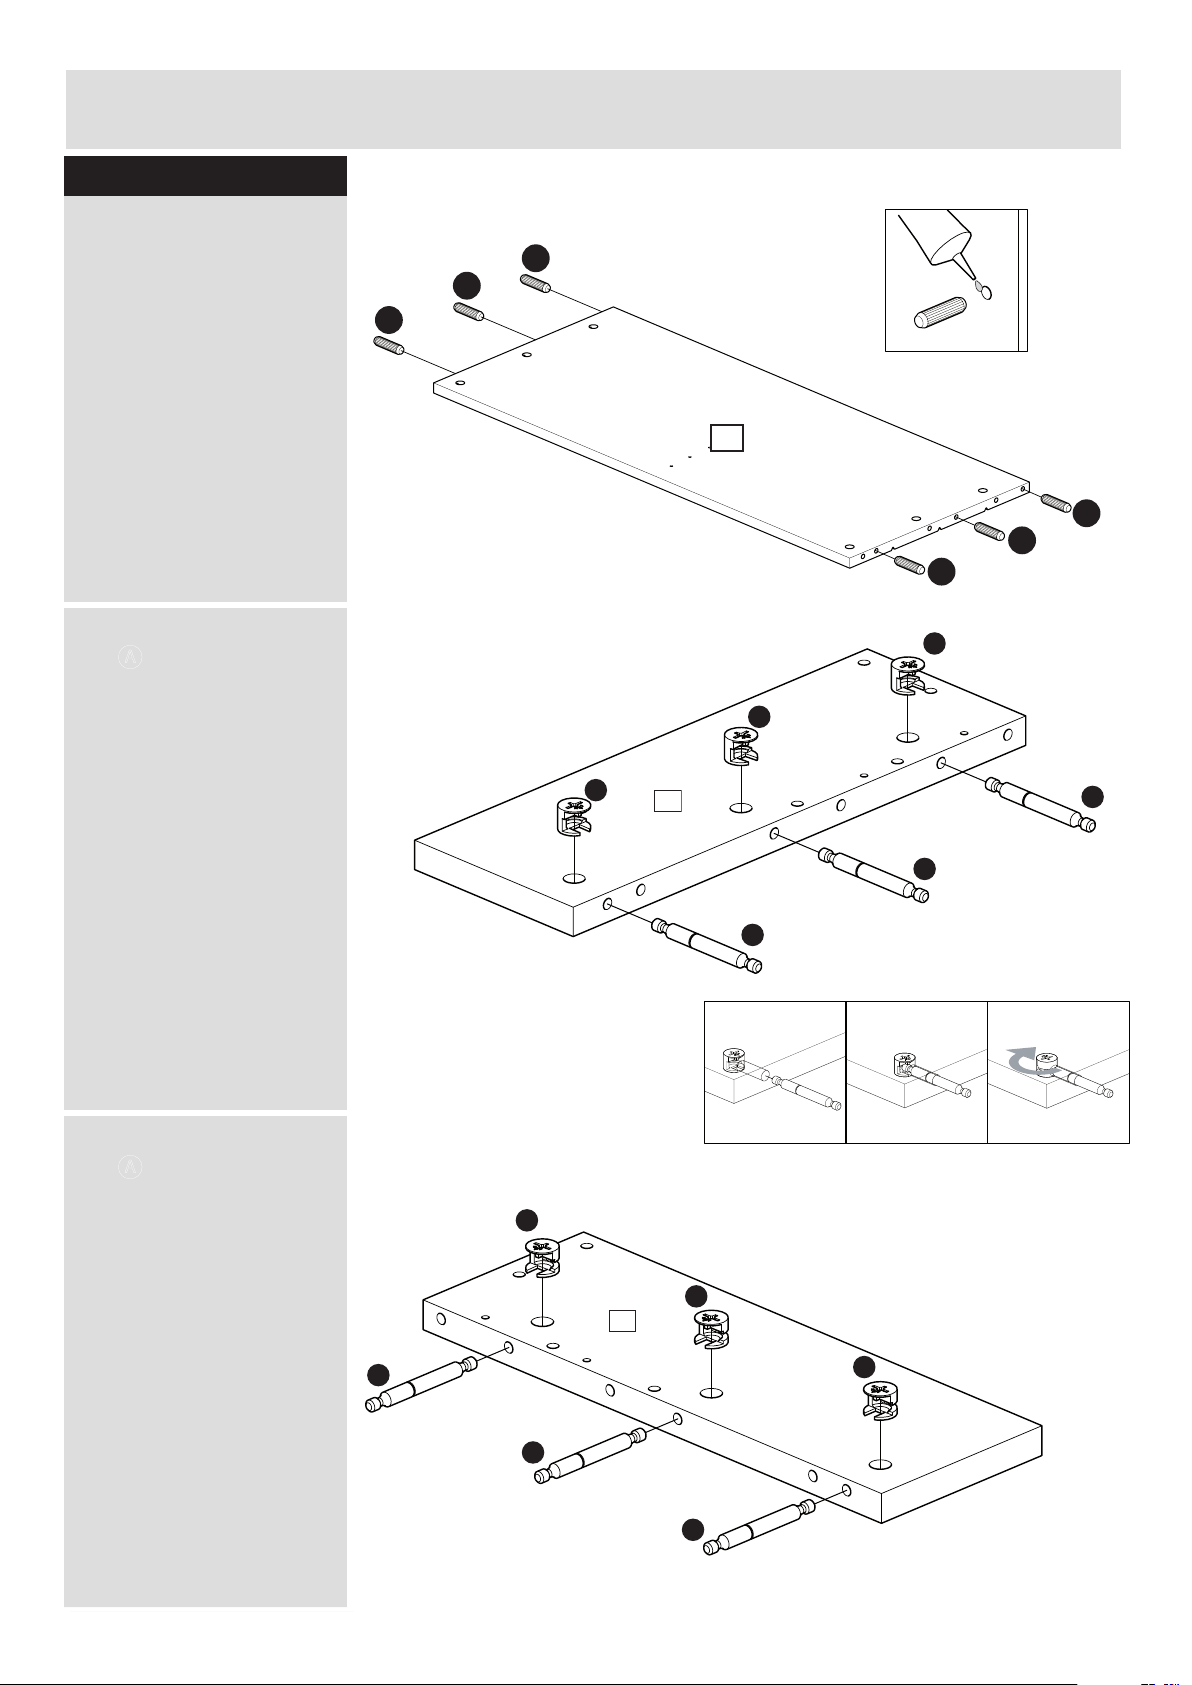
Step 1
a:
Foot end assembly
a: Insert 6x wood dowel
C with a smal amount of
glue H into the holes of
foot board 5.
b: Insert 3x large locking
nut A
lockinginto screw K into
leg foot right side 8.
Use a screwdriver to
turn 3x large locking nut
A clockwise to lock.
and 3x double
C
C
b:
C
5
C
C
C
C: Insert 3x large locking
nut A
lockinginto screw K into
leg foot left side 9.
Use a screwdriver to
turn 3x large locking nut
K clockwise to lock.
Continued on next page.
and 3x double
c:
5
Page 6
Assembly Instructions
AAAAA
A
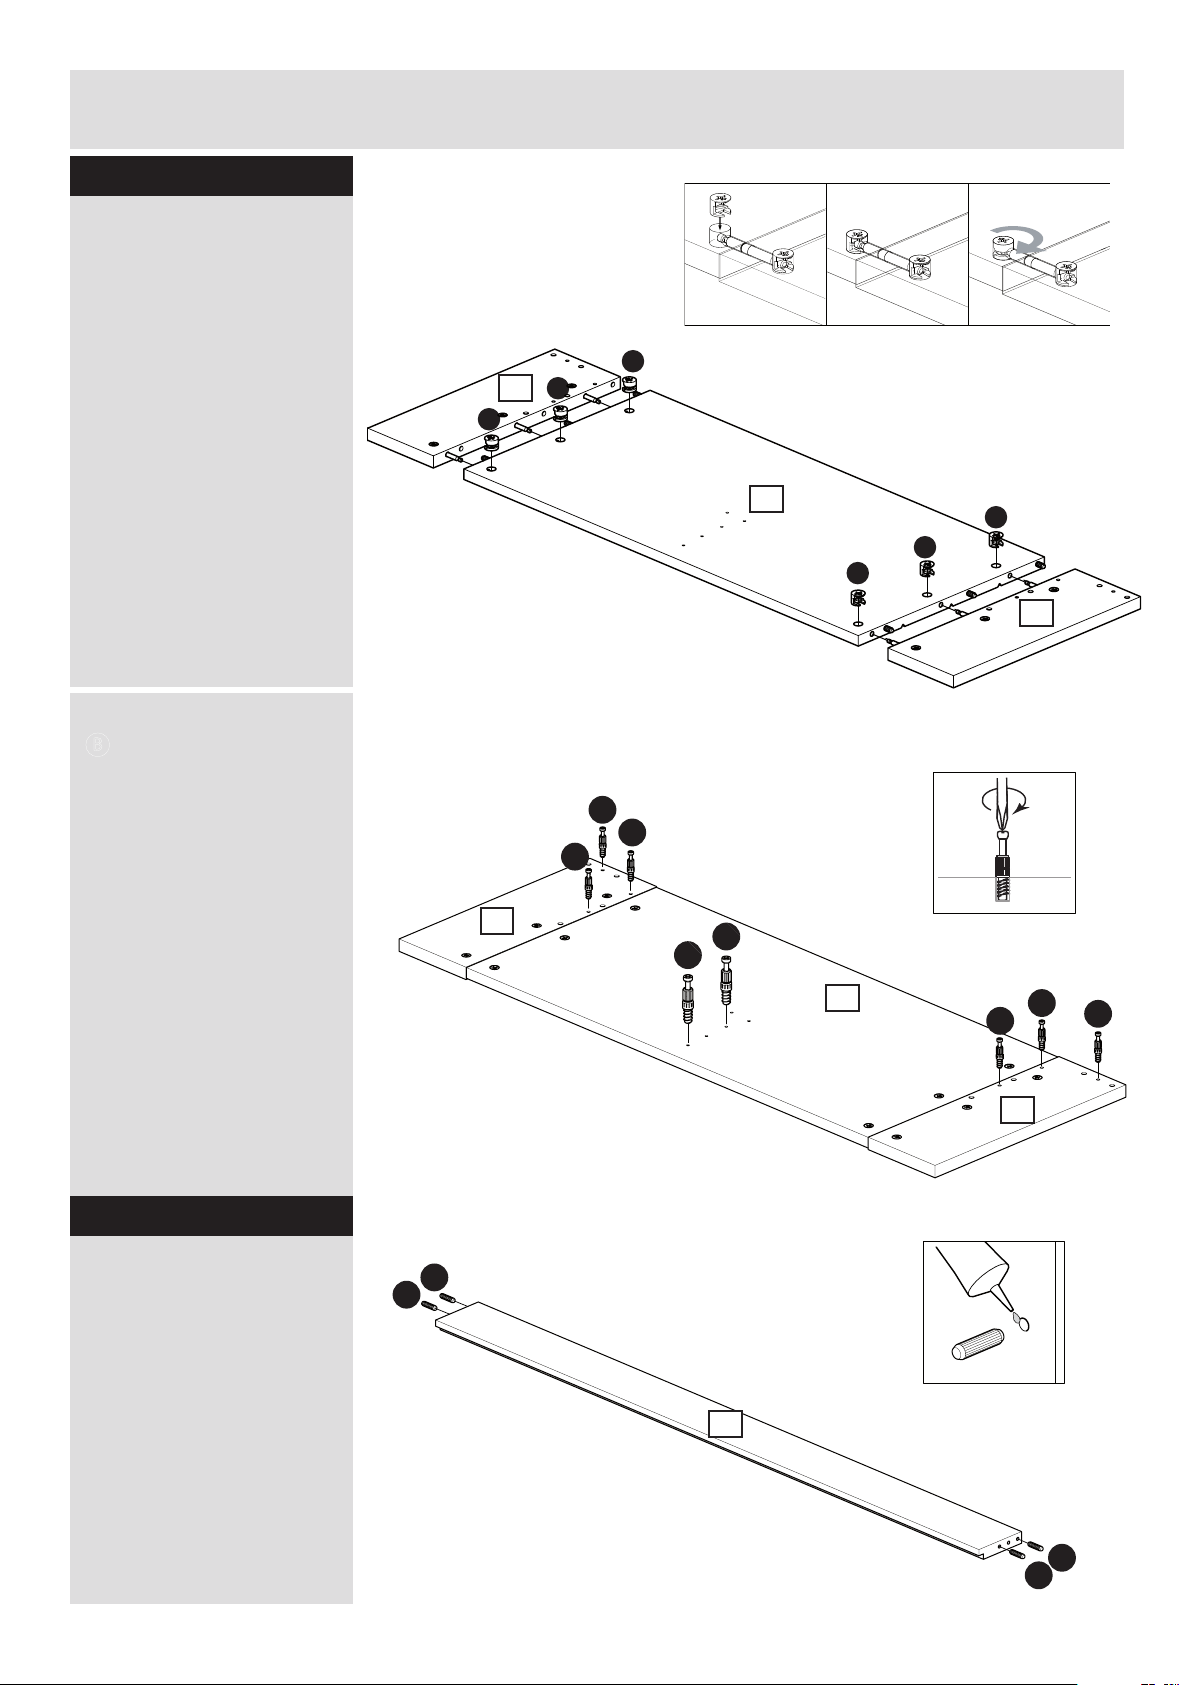
Step 1 - continued
d:
Foot end assembly
d: Attach leg foot right
side 8 and leg foot left
side 9 on foot board 5
using 6x Large locking nut
A.
Use a screwdriver to
turn 6x large locking nut
A clockwise to lock.
8
5
9
e: Screw 8x locking screw
B
into the holes on leg
foot side right 8, foot
board 5 and leg
foot side left 9
Step 2
Side assembly
next few steps must be
done 2 times!
(one assembly is left side
other is right side.)
a:
e:
C
B
B
B
8
C
B
B
5
B
B
9
B
a: Insert 4x wood dowel
C with a smal amount of
glue H into the holes of
left & right plinth 2.
2
2x
Continued on next page.
6
C
C
Page 7

Assembly Instructions
10
3
IIIIIIIII
2
EEEEE
3
3
Assembly Instructions
Step 2 - continued
Step x
Side assembly
Xxxxxx
x: x
b: Insert 4x wood dowel
C with a smal amount of
glue H into the holes of
left & right rail 3.
c: Attach support rail
0 with 9x chipboard
srews I to left & right rail
3
.
x: xx
b:
c:
C
C
2x
C
C
d: Attach left & right plinth
2 with 5x carcase srew
E to left & right rail 3
x: xxx
Note: This step requires
2 people.
.
2x
d:
2x
7
Page 8

Assembly Instructions
Assembly Instructions
Step x
Step 3
a:
Xxxxxx
Mid pannels assembly
x: x
a: Insert 2x wood dowel
C with a smal amount of
glue H into the holes of
mid rail ^.
Insert 4x large locking nut
A into the holes of
mid rail ^.
x: xx
C
A
A
16
A
A
C
b: Insert 4x wood dowel
N with a smal amount of
glue H into the holes of
mid plinth %.
x: xxx
b:
N
N
15
N
N
8
Page 9

Assembly Instructions
1
4
CCCCCCC
C
KKKKKKKKKKK
K
4
1
AAAAAAAAAAA
A
Step 4
Head end assembly
a: Insert 8x wood dowel
C with a smal amount of
glue H into the holes of
head board 1 and head
pannel 4.
Note: We recommend to
build this part on the
packiging cartons to
prevent damage to your
product.
a:
b: Insert 12x large locking
nut A and12x double
lockinginto screw K head
board 1 and head pannel
4.
Use a screwdriver to
turn 12x large locking nut
K clockwise to lock.
b:
Continued on next page.
9
Page 10

Assembly Instructions
416
7
AAAAAAAAAAA
A
Step 4 - continued
Head end assembly
c: Apply a smal amount of
glue H onto wood
dowel C already fixed into
head board 1 and head
pannel 4.
Attach leg head right
side 6 and leg head left
side 7 to head panel 4
and head board 1 with
12x large locking nut A.
Use a screwdriver to
turn 12x large locking nut
A clockwise to lock.
c:
Head end assembly
Turn the head end on
the other side.
2 people required!
d: Screw 8 locking screws
into the holes on leg
B
head right side 6 , head
pannel 4 and
leg head left side 7.
d:
B
B
B
7
B
B
4
1
B
B
B
6
10
Page 11

Assembly Instructions
AAAAA
Step 5
Final assembly
2 people required!
a: Glue dowels.
Attach the left and right
rail and mid pannels to the
foot board
with 8x locking nuts A.
Use a screwdriver to
turn 8x locking nut A
clockwise to lock.
a:
2x
Continued on next page.
11
Page 12

Assembly Instructions
AAAAA
Step 5 - continued A
Final assembly
2 people required!
b: Glue dowels attach the
left and right side and mid
pannels to the foot board
with 8x locking nut A.
Use a screwdriver to
turn 8x large locking nut A
clockwise to lock.
b:
9x
2x
Continued on next page.
12
Page 13

Assembly Instructions
Step 5 - continued
Final assembly
C: Attach 4x connector
bracket L with each 4x
Back panel screw D on
the corner of
left & right rail 3,
head pannel 4
and foot board 5
.
c:
L
4
3
L
L
3
5
L
3 4
D
D
L
10
D
D
4x
13
Page 14

Assembly Instructions
BBBBC
C
13
121213
AAA
A
Step 6
Drawer assembly
a: Insert 2x wood dowel
C with a smal amount of
glue H and screw 4
locking screw B
drawer back #.
into
b: Apply a smal amount of
glue H onto 2x wood
dowel C already
fixed onto drawer back #.
a:
2x
b:
Attach left & right drawer
side @ onto drawer back
#, insert 4x large locking
nut A
drawer side @.
Use a screwdriver to
turn 4x large locking nut A
clockwise to lock.
into left & right
2x
Continued on next page.
14
Page 15
Assembly Instructions
11
121213
14
EEEEEEEEEEEEEEEEEEEEEBBBBCC
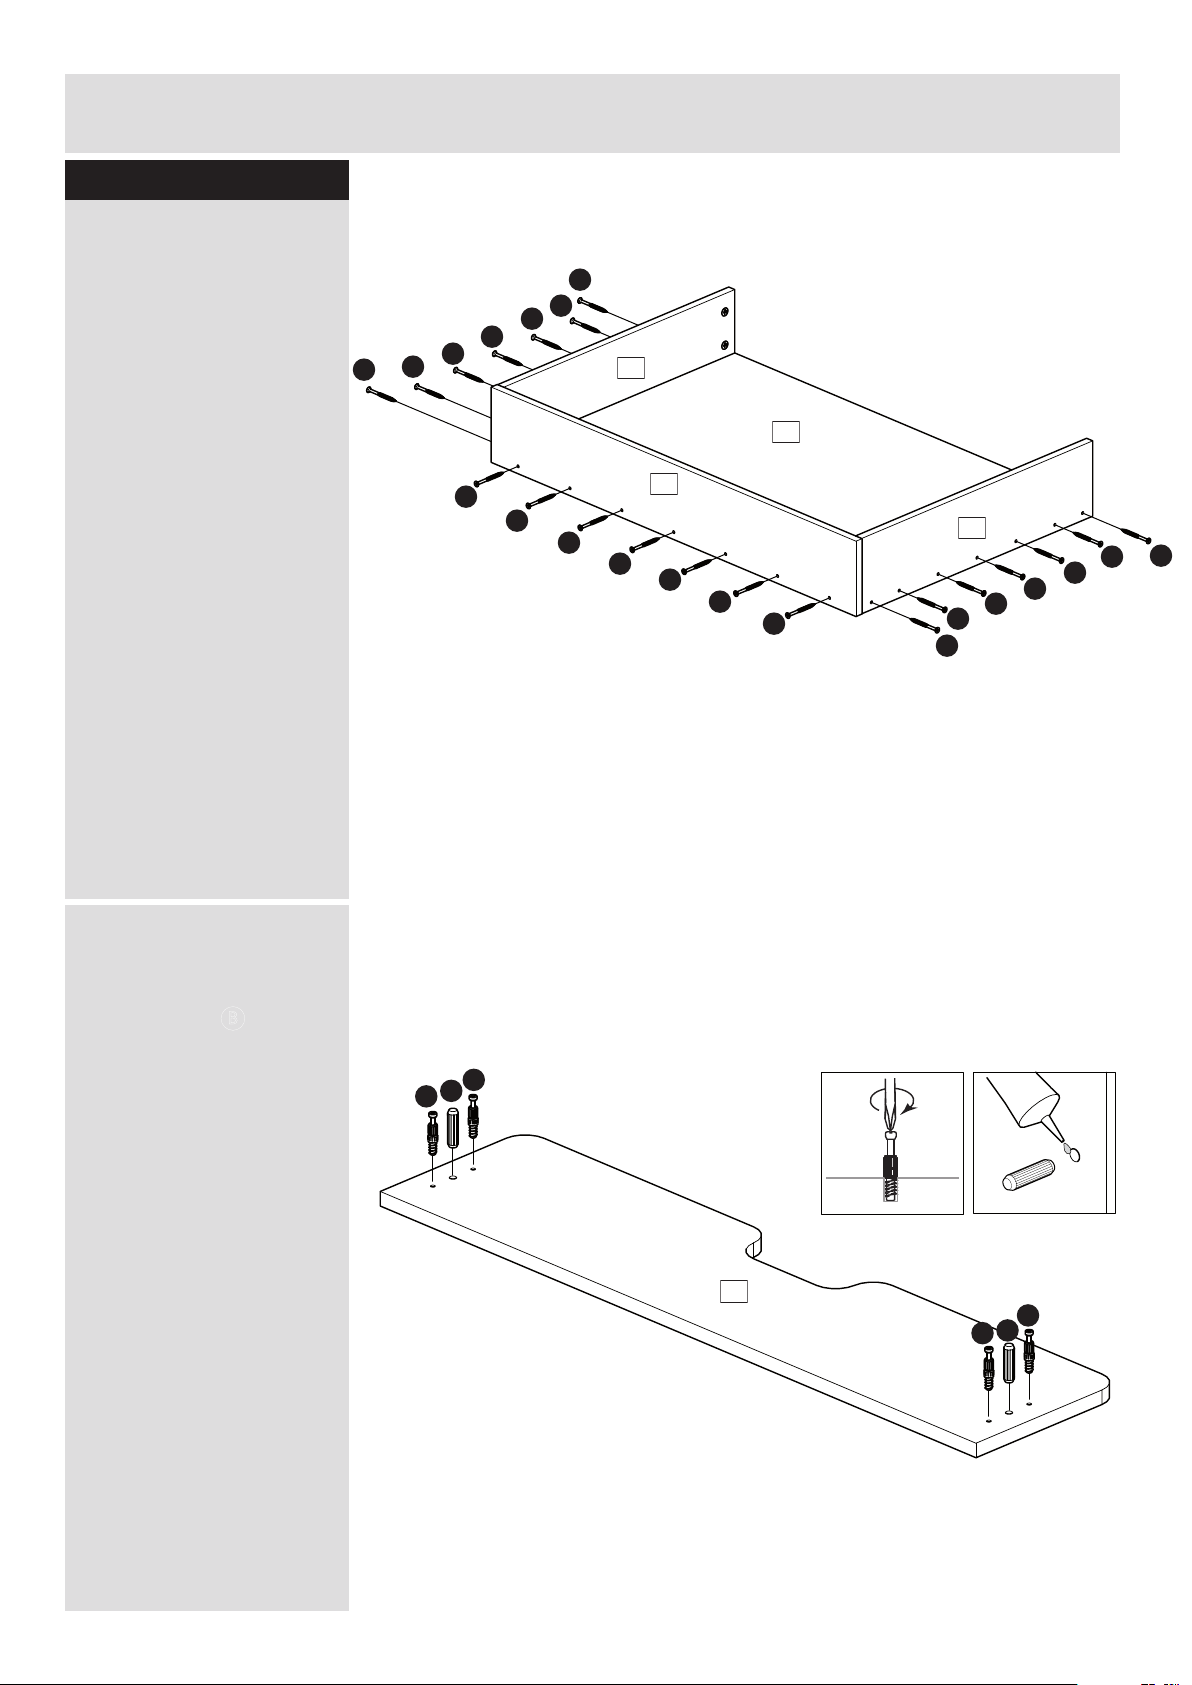
Step 6 - continued
Drawer assembly
c: Attach Drawer base
$ with 21x carcase
srew E to left & right
drawerside @ & drawer
back #.
c:
2x
d: Insert 2x wood dowel
C with a smal amount of
glue H and screw 4x
locking screw B
drawer front !.
into
d:
2x
Continued on next page.
15
Page 16

Assembly Instructions
AAA
A
111212
FFFFF14GGGGGGGGG
G
Step 6 - continued
Drawer assembly
e: Apply a smal amount of
glue H onto 2x wood
dowel C already
fixed onto drawer front !.
Attach left & right drawer
side @ onto drawer front
!, insert 4x large locking
nut A
drawer side @.
Use a screwdriver to
turn 4x large locking nut A
clockwise to lock.
into left & right
e:
f: Attach 5x wheel F with
each 2x chipboardsrew G
on drawer base $.
f:
2x
3mm
3mm
2x
16
Page 17

Assembly Instructions
Dx4Dx4D
Step 7
Slats and drawers
a: Attach adult 5 ft slats
to support beam 0 with
8x chipboard screws M
roll the 2 drawers under
the bed.
a:
M
.
M
M
M
M
M
M
M
M
10
M
b: Attach 3X smal
connecting plate J on
back of head end with
each 4x back pannel
screws D
The assembly is now
completed
.
If you need help or have damaged or missing parts, call the Customer Helpline:
03456 400 800
b:
J
J
J
x4
D
17
 Loading...