

Page 1
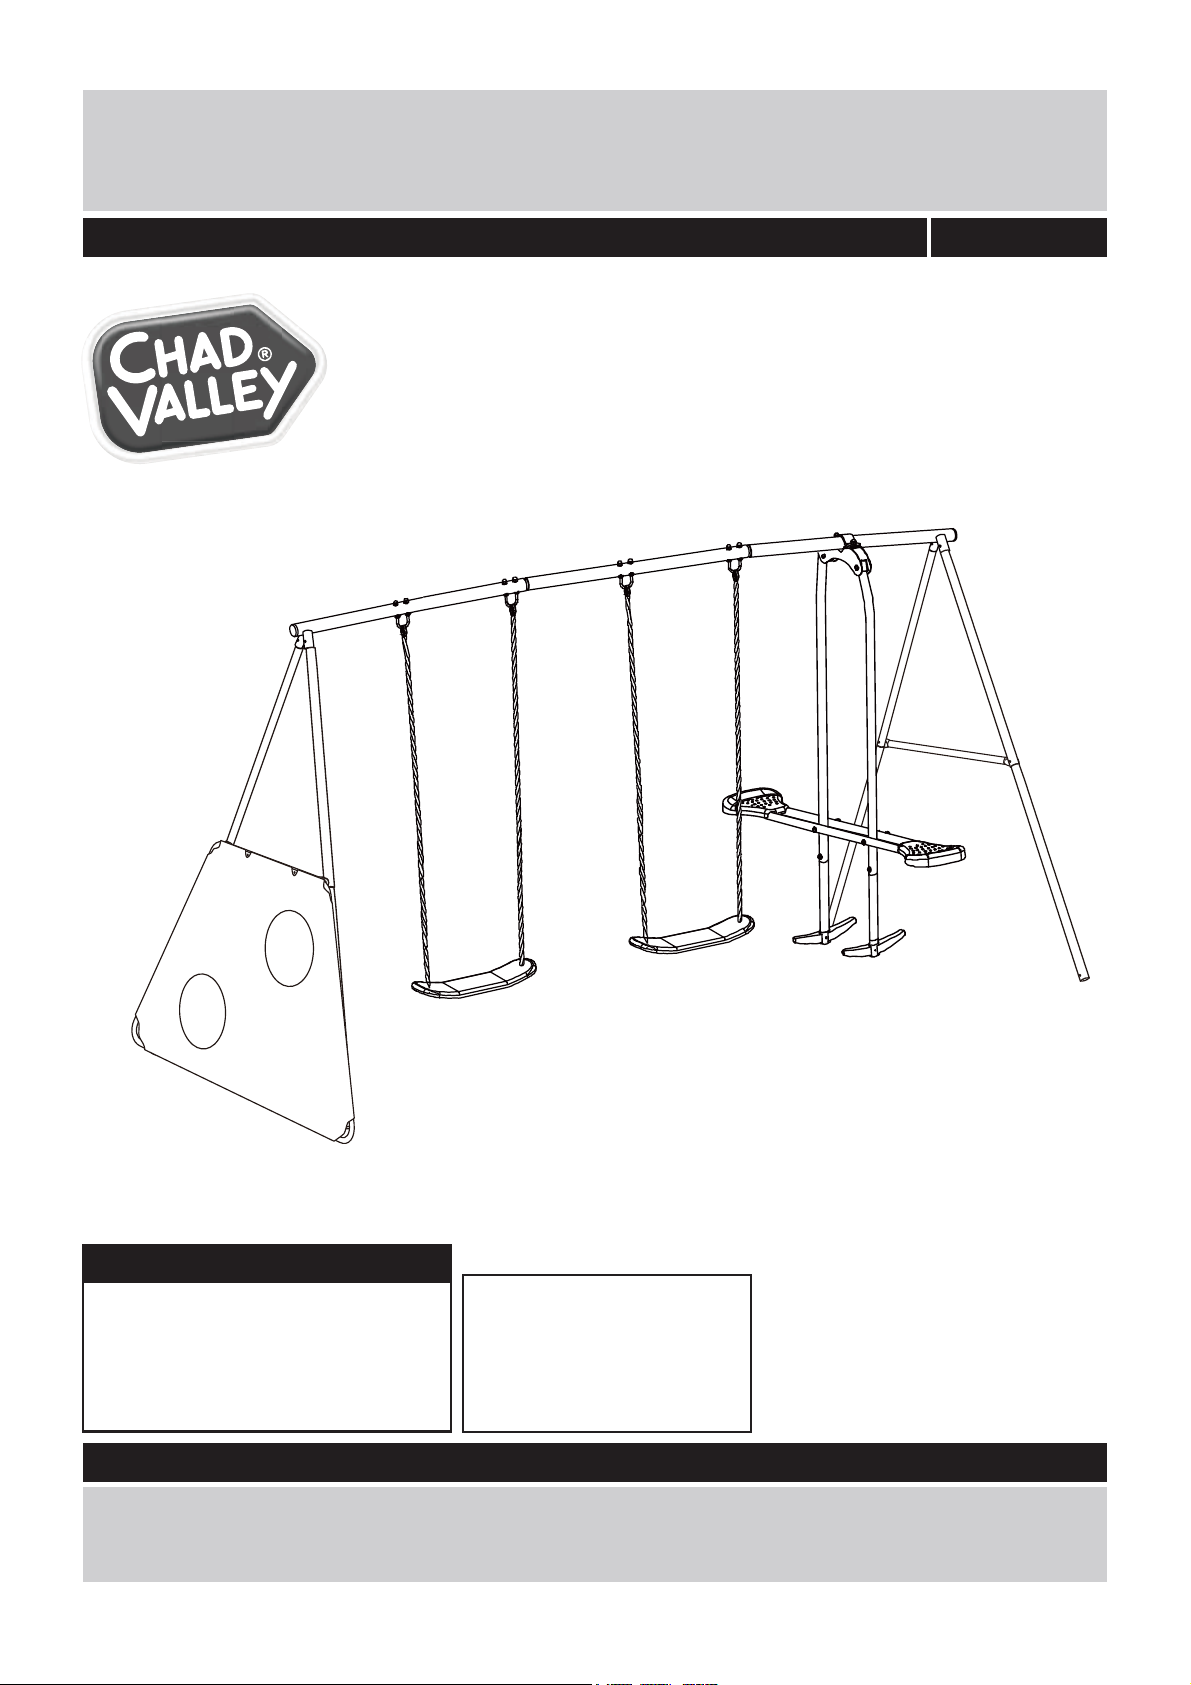
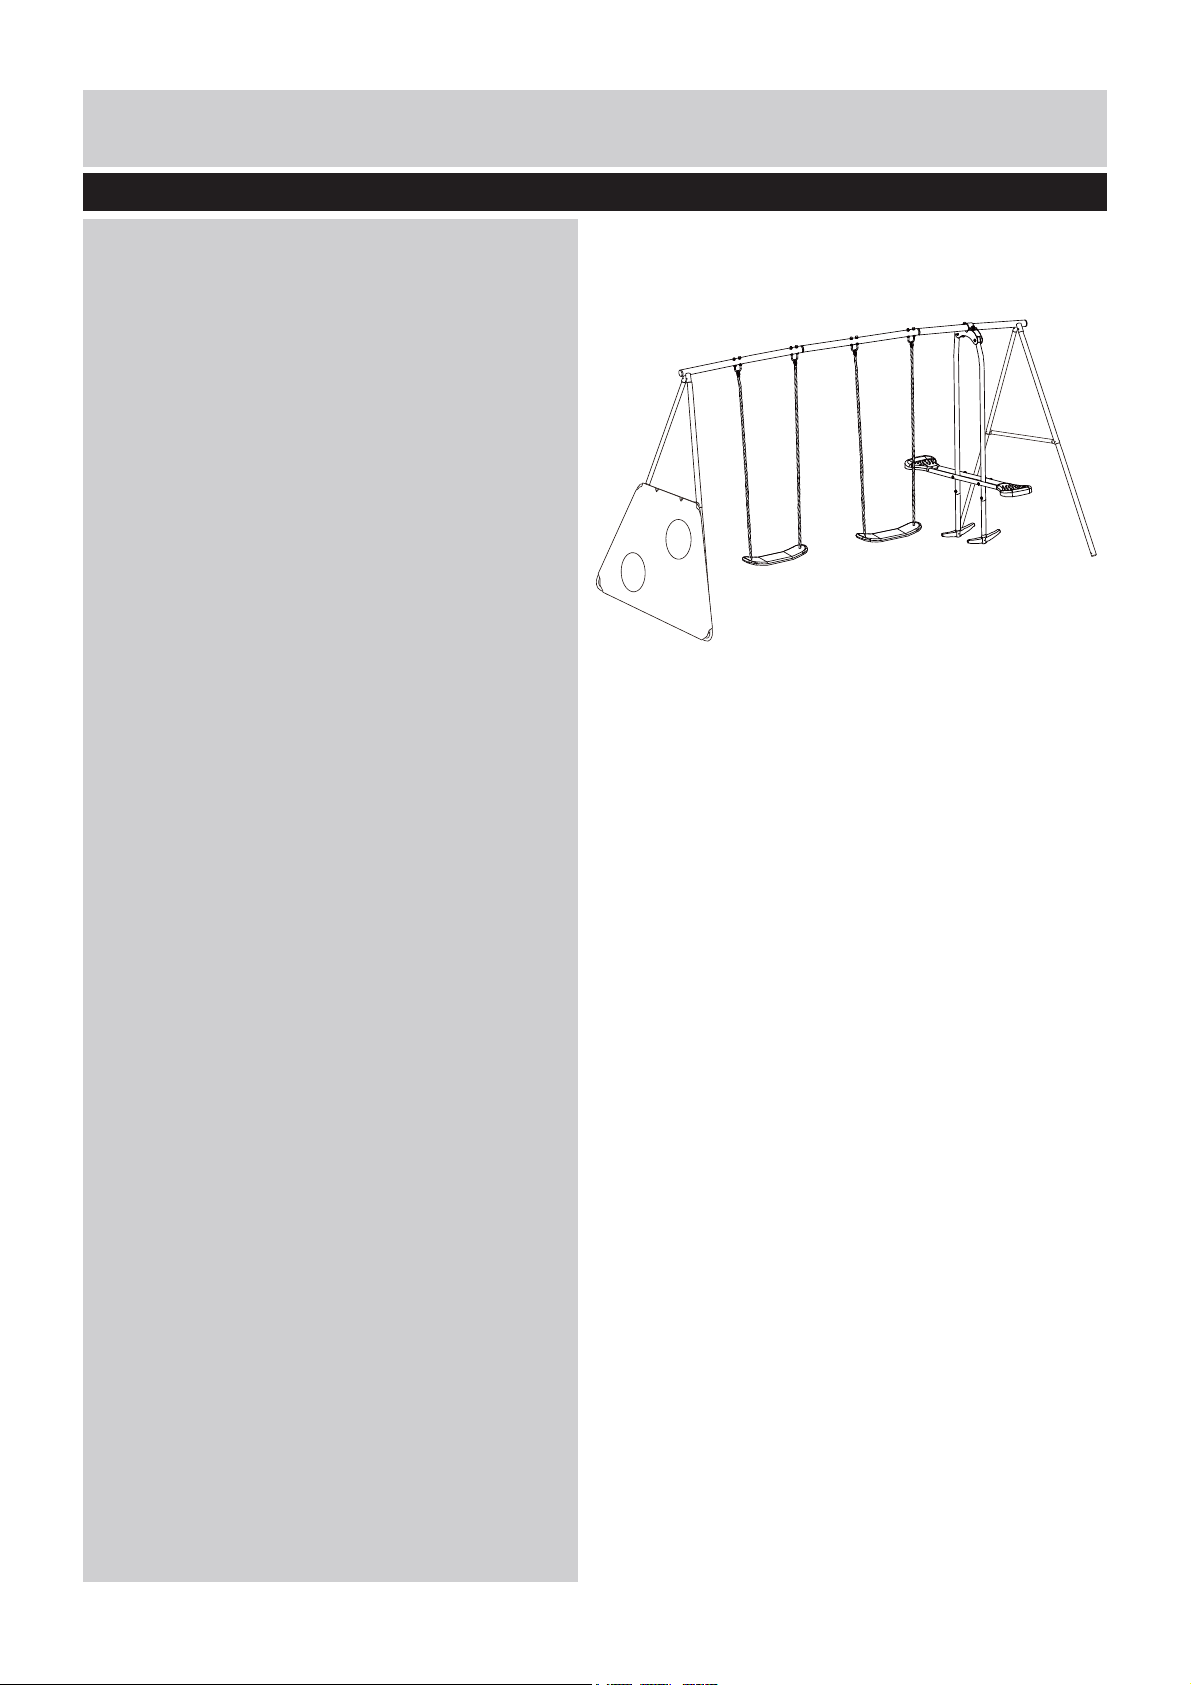
SWING AND GLIDE MULTIPLAY
Assembly & User Instructions -
Please keep for future reference
792/0987
Important
Limit:
Age:3 - 8 years
Maximum user: 5
Max user weight: 45kg per seat
Max combined weight: 180kg
Important -
These instructions contain important information which will help you get the best from your
product and ensure safe and correct assembly, use and maintenance.
If you need help or have damaged or missing parts, call the
Please read these instructions fully before assembly or use.
Tips: It will take 2 adults
around 30 minutes to
assemble.
Customer Helpline:
(+44) 0330 0904 420
Page 2
Contents
Warning
Parts
Assembly Instructions
Care and Maintenance
2-3
4-5
6-17
18
1
Page 3
Warning
Important –Please read these instructions fully before assembly or use.
● DO NOT allow children to climb or play on the equipment
WARNING
Observing the following statements and warnings reduces
the likelihood of serious injury.
● Warning! DO NOT allow use by children under the age of
36 months as small part(s) and long cord(s) may be
choking and entanglement stangulation hazards.
● This unit is designed to be used by up to 5 children
between the age of 3 to 8, with a maximum weight of
45kg per seat. Combined weight not exceed of 180kg.
● Provide on-site adult supervision for children of all ages
at all times.
● It is recommended that the playground equipment be
located on level ground and anchored. Be certain that all
anchoring devices (including concrete) are placed below
the level of the playing surface and covered with
protective soft material to prevent tripping.
● Teach children to sit in the centre of the swing play items,
with their full weight in the centre of the seats. DO NOT
allow children to lean to the side when on play items or to
collide with other playmates. DO NOT allow children to
stand on the swing seat.
● Dress children appropriately while on and around this
equipment. DO NOT allow children to wear ponchos,
scarves, jewelry,loose shoes, jackets or clothing with
loose strings and/or clothing that might be potentially
hazardous whilst using this equipment.
● DO NOT let children use this equipment in any manner
other than intended.
● Anchor all play equipment. DO NOT install over concrete,
asphalt, gravel or any other hard surface which may
cause injury should a fall occur. Swing set shall be
placed over protective soft material such as sand bed,
soft woodbark, grass lawn. The depth of sand and soft
woodbark shall be a minimum of 183cm. The anchor
shall be placed level with or under the ground in order to
reduce tipping hazards.
● DO NOT let children use this equipment until it has been
properly assembled and anchored. Place equipment on
level ground not less than 2M from any structures or
obstacles such as fences, overhanging branches, laundry
or electrical lines, garages, sheds or houses.
● Instruct children not to swing empty play items. They may
strike other children, or the play equipment may come
back and strike you.
● Instruct children not to walk closely in front of, behind or in
between moving play equipment. Instruct children to keep a
safe distance away to avoid being struck by the items in use.
● Instruct children not to twist chains or ropes, or loop them
over the support bar. This adds stress, reduces strength
and may result in failure and cause injury.
● Instruct children not to get off play equipment whilst in
motion. DO NOT allow children to jump from moving play
equipment.
2
whilst wet (slips or falls may occur).
● DO NOT allow children to climb on or swing from
structural members (eg legs or top bar and chin bars).
These are structural components ONLY and NOT play
features.
● DO NOT allow children to swing play equipment more
than 60 degrees.
● After completion of assembly, ensure all the nuts and
bolts are tightened and in the correct position.
● Not suitable for hiring or commercial use.
● Never use the equipment in any manner other than
intended.
● Please retain these instructions for future reference.
● Warning! only for dometic use.
Maintenance Instructions
● Check all nuts and bolts twice monthly during the
season and tighten as required. We recommend you
check the swing beam and hardware every two weeks.
It is particularly important that this procedure be
followed at the beginning of each season.
● Oil all metallic moving parts monthly during the usage
period.
● Check all nuts and bolts twice monthly during the
season to be certain they are in place. Replace when
necessary. It is especially important to do this at the
beginning of each new season.
● Check swing seats, ropes, cables and chains monthly
during usage season for evidence of deterioration.
Replacement should be made of any swing seat that
has developed cracks in the plastic seat or has
exposed metal in the edges of the swing seat. If there
are already exposed metal inserts on the edge of the
seat, immediately remove the seats and chains to
prevent serious injury. Ropes, cables and chains
should be removed and replaced if excessive wear is
found. Contact OUR SERVICE CENTER for
replacement parts.
● Maintaining the Play set on a level location is very
important. As your children play, your Play set will
slowly dig its way into soil, and it is very important that
is settled evenly. Make sure the play set is level and
true once each year or at the beginning of each play
season.
● Toys shall be accompanied by maintenance
instructions drawing attention to the need of carrying
out checks and maintenance of the main parts at
regular intervals , if these checks are not carried out
the toy could overturn and otherwise become a hazard.
Whenever practical, the instructions shall also be
affixed to the toy.
Page 4

Safety Information
Important –Please read these instructions fully before assembly or use.
● Hardware: inspect for tightness.
● Swing hangers: check to insure correct installation.
Make sure that the bend of the swing hanger is
positioned tightly against the stop washer and swing
beam. The axis of the swing hanger bushing must be
perpendicular to the swing motion. If squeaking occurs
the nylon bushings can be sprayed with WD-40 or
other house hold lubricant.
● The instructions and owner’s manual for your new play
set should be read in its entirety before assembly, to
minimize problems and safety issues. We recommend
reading the owner manual thoroughly after you have
identified all of the parts for your play set.
● Check all coverings for bolts and sharp edges and
replace when required.
● DO NOT attach items to the playground equipment that
are not specifically designed for use with this
equipment, such as, but not limited to, jump ropes,
clotheslines, pet leashes, cables and chains as they
may cause strangulation hazards.
● At the end of each play season, remove all plastic parts
and take indoors. DO NOT allow the use of plastic
items when the temperature drops below 0 degree.
● Dispose of all packaging properly after the unit has
been assembled.
● This equipment is for family domestic use and is
intended for outdoor use only.
● Check all nuts and bolts for tightness and tighten when
required.
● Check swing seats, chains, and other means of
attachments for evidence of deterioration, replace
when required in accordance with the manufacturer’s
instructions.
● Not suitable for children under 3 years because of
small part(s)-choking hazard.
● This unit must be assembled by adults, ensure bolts
and small components are kept out of reach of young
children.
● Check all fixings regularly, tighten if necessary, and
that the suspension system is secure.
● Check metal sections or components for signs of
corrosion.
● Discontinue use if weakening or breakage found.
● Young children in play are unaware of potential
dangers and hazards, therefore responsible adults
supervision is essential.
● Failure to comply with these precautions may result in
injury.
● Disassemble and store indoors during the winter.
Positioning Your Play Set
● Require at least 2 adults for assembly. Try to place in a
flat area of your yard to minimize ground preparation.
Place the equipment not less than 2M from any
structure or obstruction such as a fence, garage,
house, overhanging branches,laundry lines, or
electrical wires.
● It is a good idea to place your play set in an area that is
convenient for adults to watch children at play.
● The area that you choose should be policed for glass,
rocks or anything jagged or sharp that could endanger
your children’s safety. The surface underneath your
play system can cause or prevent injuries.
● Shredded bark mulch, wood chips, fine sand of fine
gravel are considered to be acceptable
shock-absorbing surfaces when installed and
maintained at a sufficient depth under and around
playground equipment. However each material is only
effective when properly maintained. Material should be
checked periodically and replenished to maintain
correct depth as determined necessary for your
equipment. Otherwise serious injuries may occur from
a fall.
● Do not build your play set on top of surfacing material.
● Please install this equipment facing away from the sun
to avoid causing dizziness whilst playing. The surface
underneath your play system can cause or prevent
injuries. We have additional suggestions in the
suggested playground surfacing section.
3
Page 5
Parts
call the Customer Helpline:
(+44) 0330 0904 420
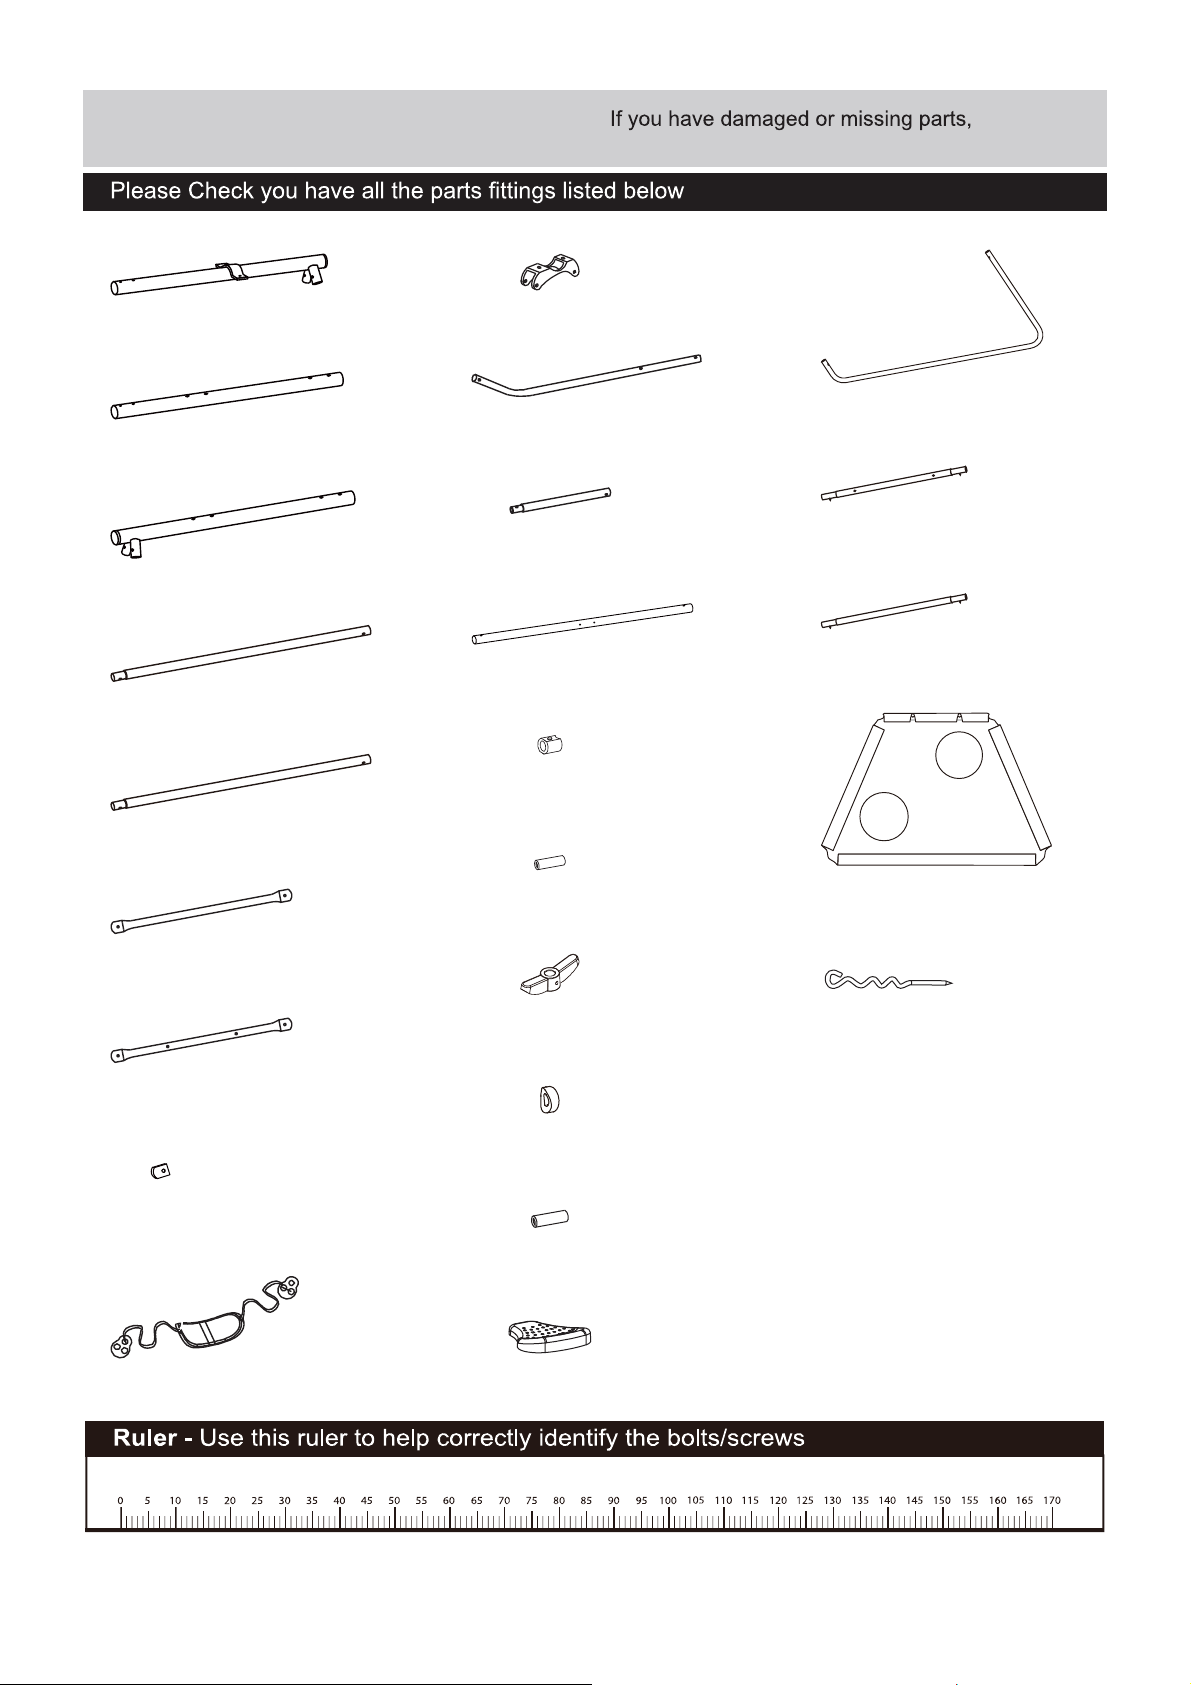
1 Right Top Bar x 1pcs
2 Center Top Bar x 1pcs
3 Left Top Bar x 1pcs
4 Upper Leg x 4pcs
5 Lower Leg x 4pcs
10 Glider Bracket x 1pcs
11 Glider Upper Tube x 2pcs
12 Glider Lower Tube x 2pcs
13 Glider Seat Tube x 2pcs
14 Plastic Connector x 2pcs
20 Target Side Tube x 2pcs
21 Target Connector Tube x 1pcs
22 Target Connector Tube x 1pcs
6 Cross Bar x 1pcs
7 Target Cross Bar x 1pcs
8 Plastic cap x 4pcs
9 Swing Seat x 2pcs
15 Plastic Tube x 2pcs
16 Footrest x 2pcs
17 Plastic Connector x 4pcs
18 Plastic x 2pcs
19 Glider Seat x 2pcs
23 Target Sheet x 1pcs
24 Anchor x 4pcs
4
Page 6
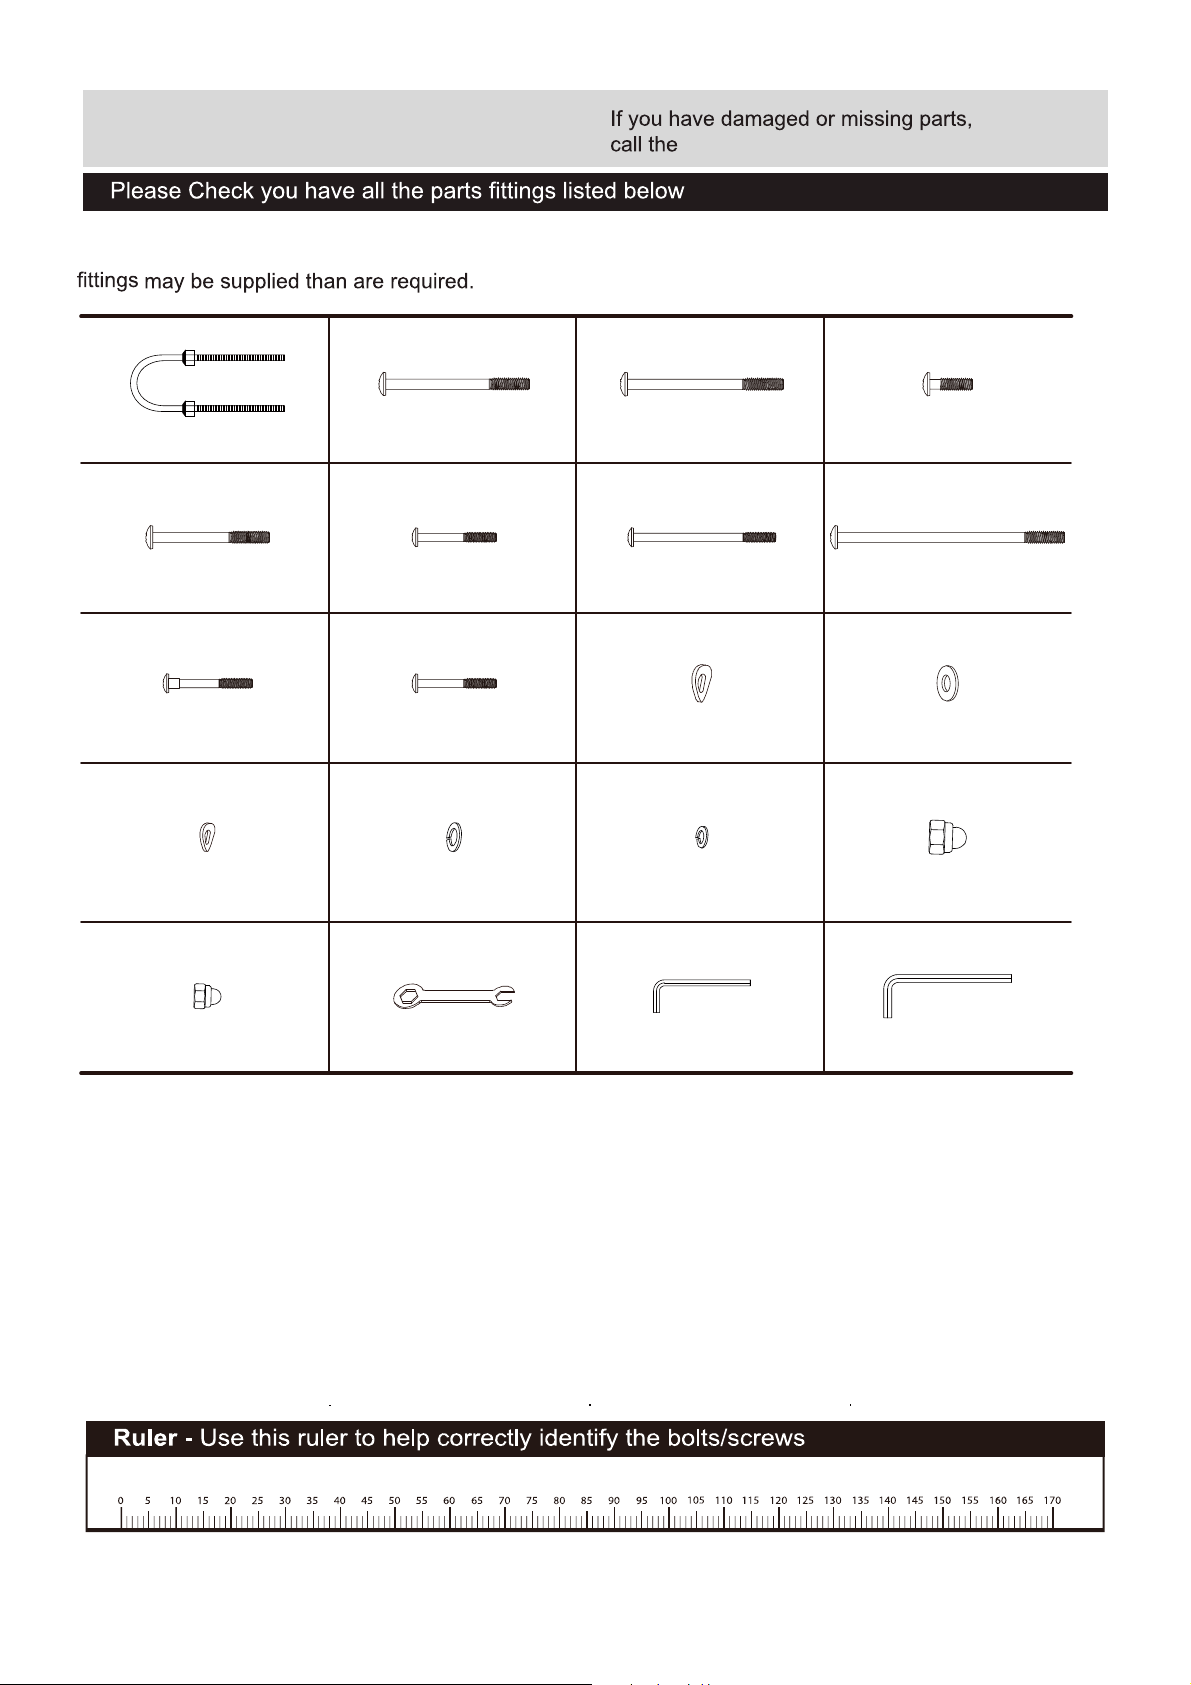
Parts
Note: The quantities below are the correct amount to complete the assembly. In some cases more
Customer Helpline:
(+44) 0330 0904 420
A B DC
x4 (M8x114mm)
x6 (M8×50mm)
I J K
x4 (M6×36mm)
×16 (Ø14×Ø6.5mm) ×22 (Ø8×Ø2mm) ×10 (Ø6×Ø1.5mm) ×22 (M8)
x4 (M8x61mm)
FE G
x2 (M6×34mm)
x2 (M6x60mm)
x2 (M8×20mm)x4 (M8×54mm)
H
x2 (M8×95mm)
L
x2 (M6×50mm) ×32 (Ø19×Ø8.5mm) ×12 (Ø19×Ø8.5mm)
NM
O P
S
TQ R
×10 (M6) ×1 (10&13mm) ×1 (6mm)
5
×1 (4mm)
Page 7
Assembly Instructions
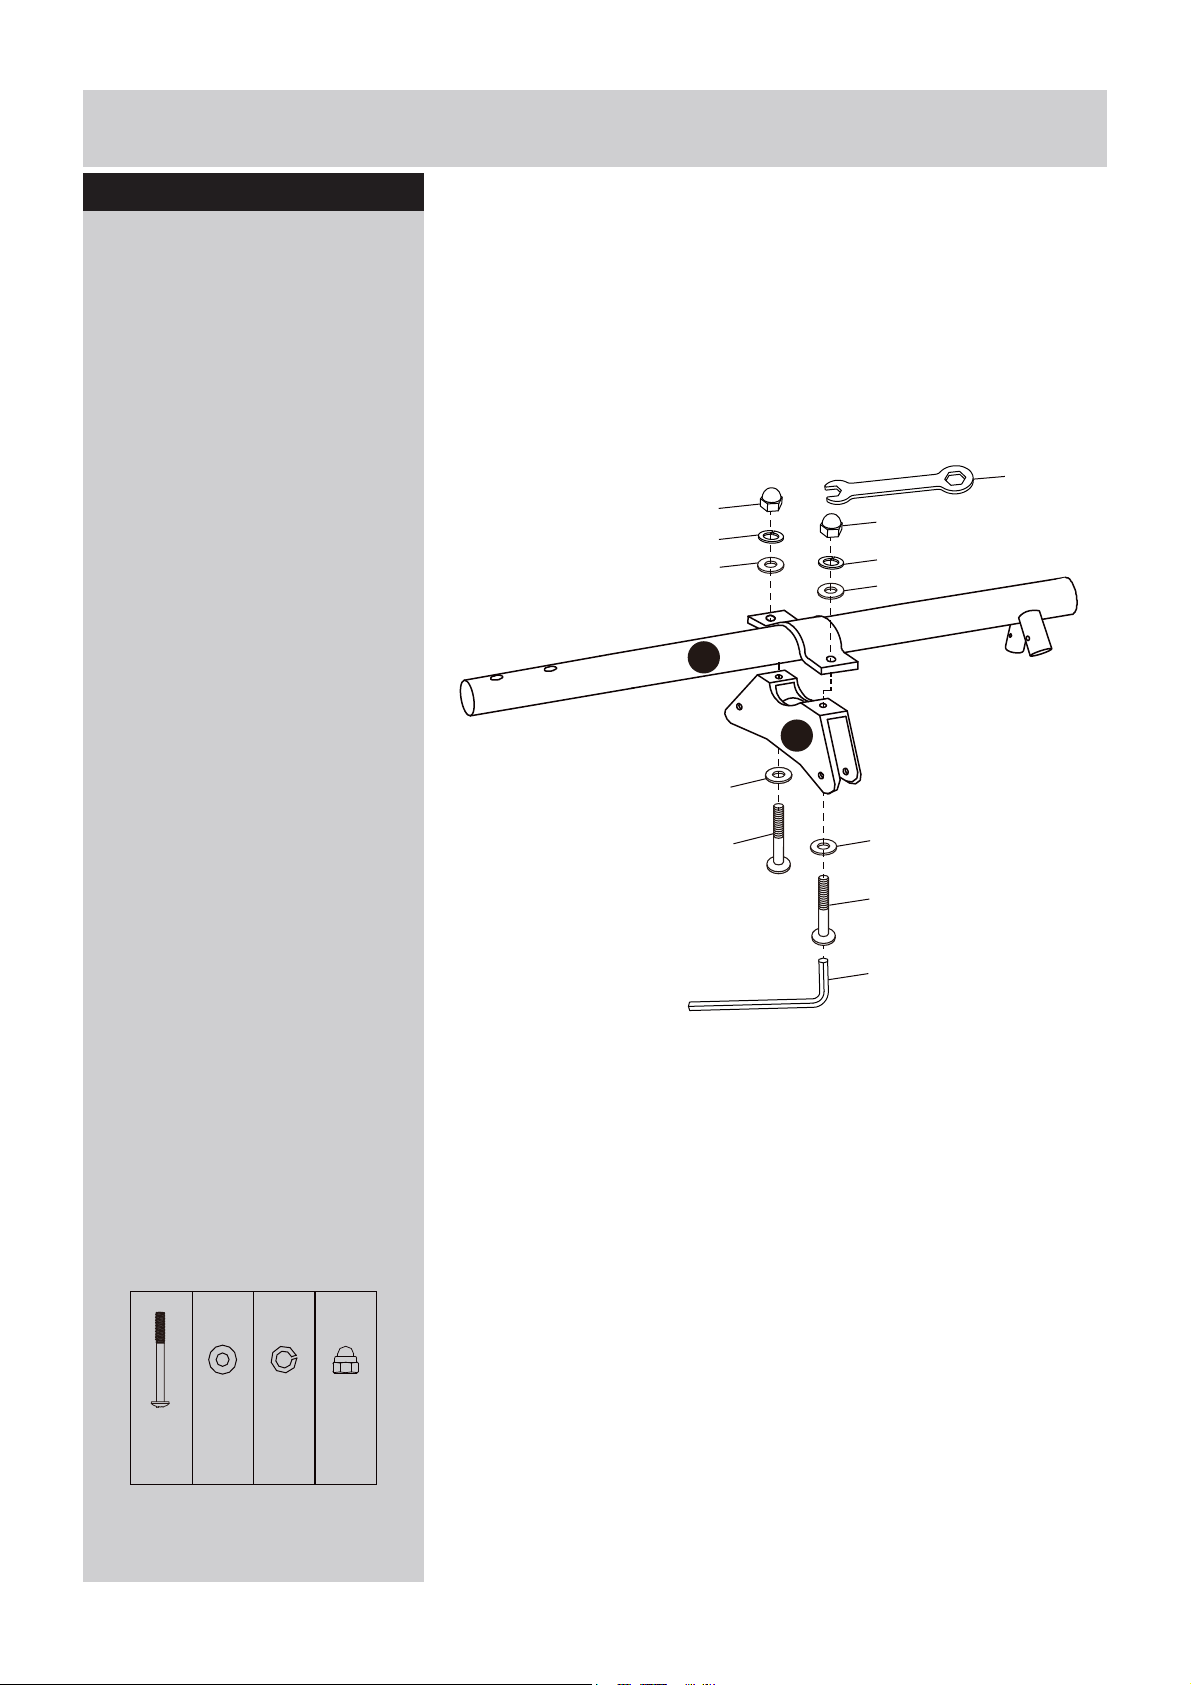
Step 1
Attach Glider Bracket (10) to
Right Top Bar (1) as shown in
figure 1.
1
P
N
L
R
P
N
L
10
L
D
L
D
T
D
x2pcsLx4pcsNx2pcsPx2pcs
6
Figure 1
Page 8
4
4
Assembly Instructions
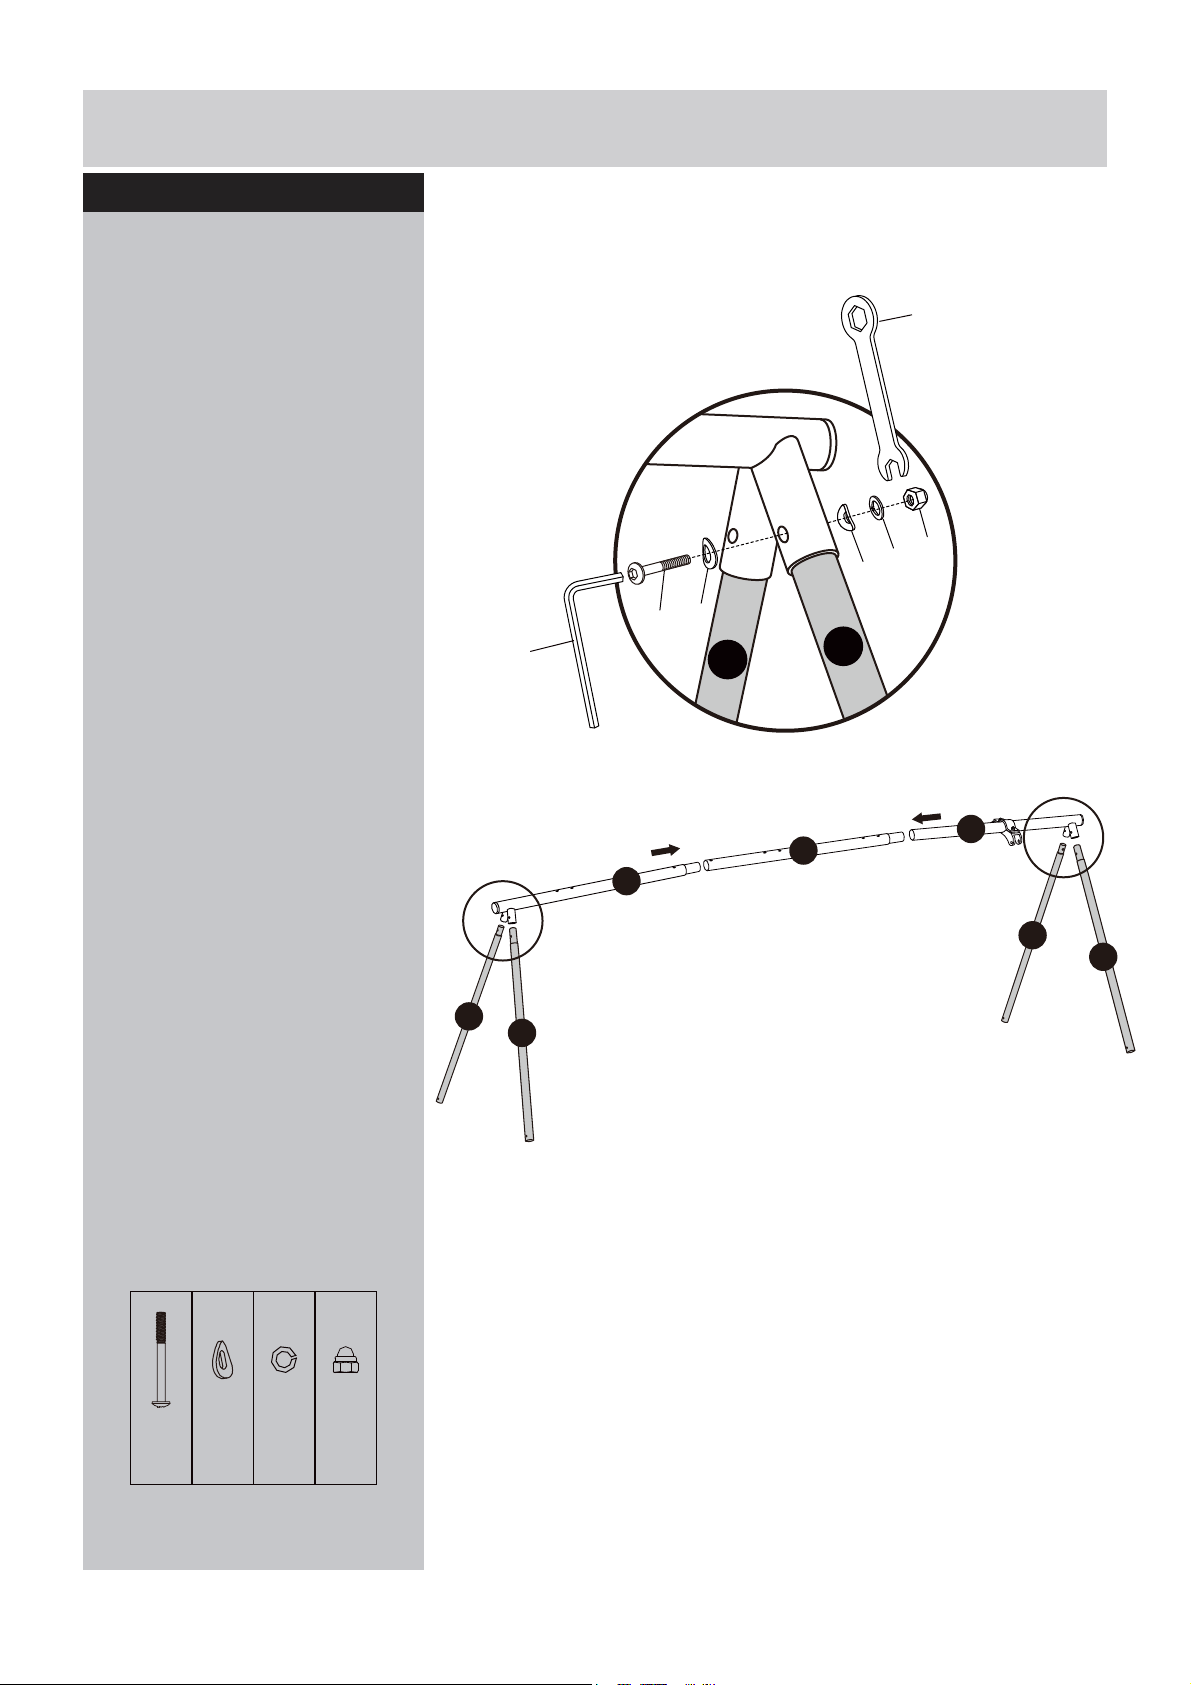
Step 2
Attach Upper Legs (4) to Left
and Right Top Bar (1) and (3) as
shown in Figure 2.
T
B
K
K
N
R
P
3
2
1
4
4
4
4
B
x4pcsKx8pcsNx4pcsPx4pcs
7
Figure 2
Page 9
A
K
K
N
P
Figure 3
A
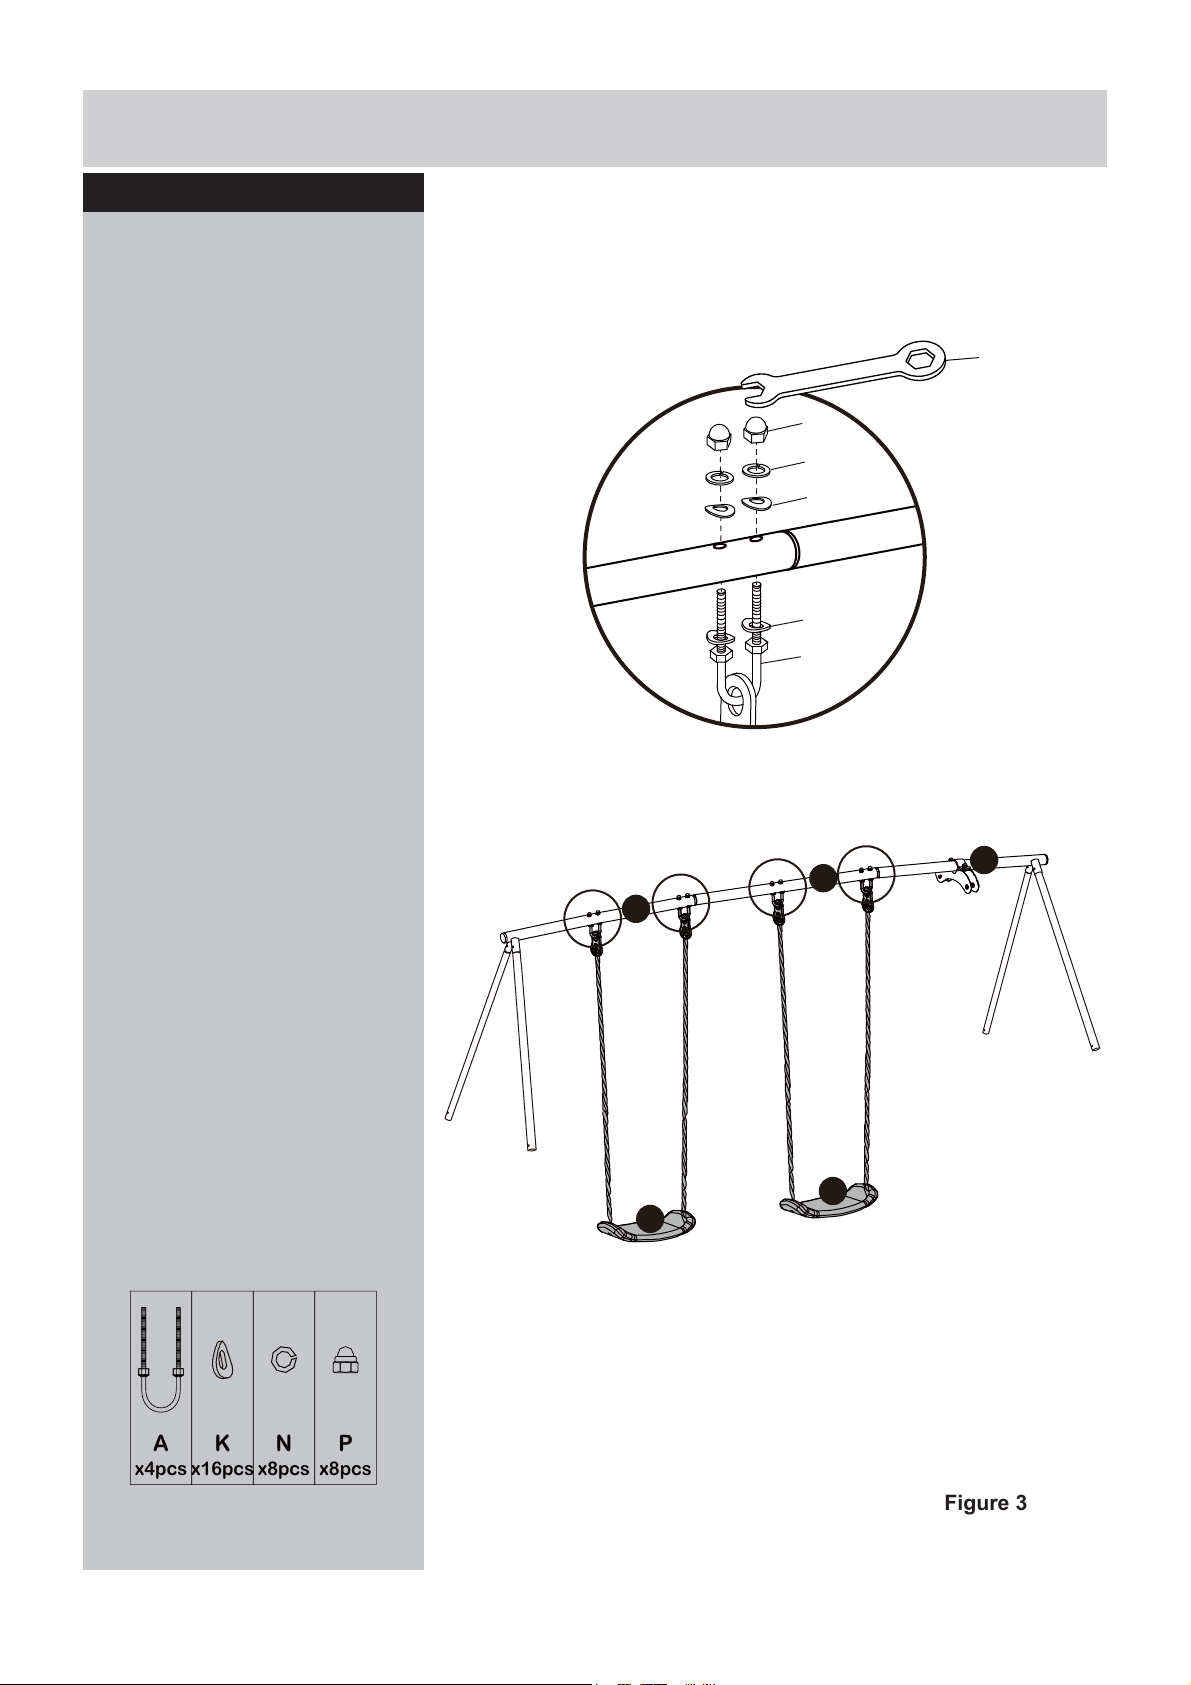
x4pcsKx16pcsNx8pcsPx8pcs
Assembly Instructions
Step 3
Attach Swing Seats (9) to the
top bars as shown in Figure 3.
R
2
1
3
9
9
8
Page 10
N
P
L
C
K
4
5
8
Assembly Instructions
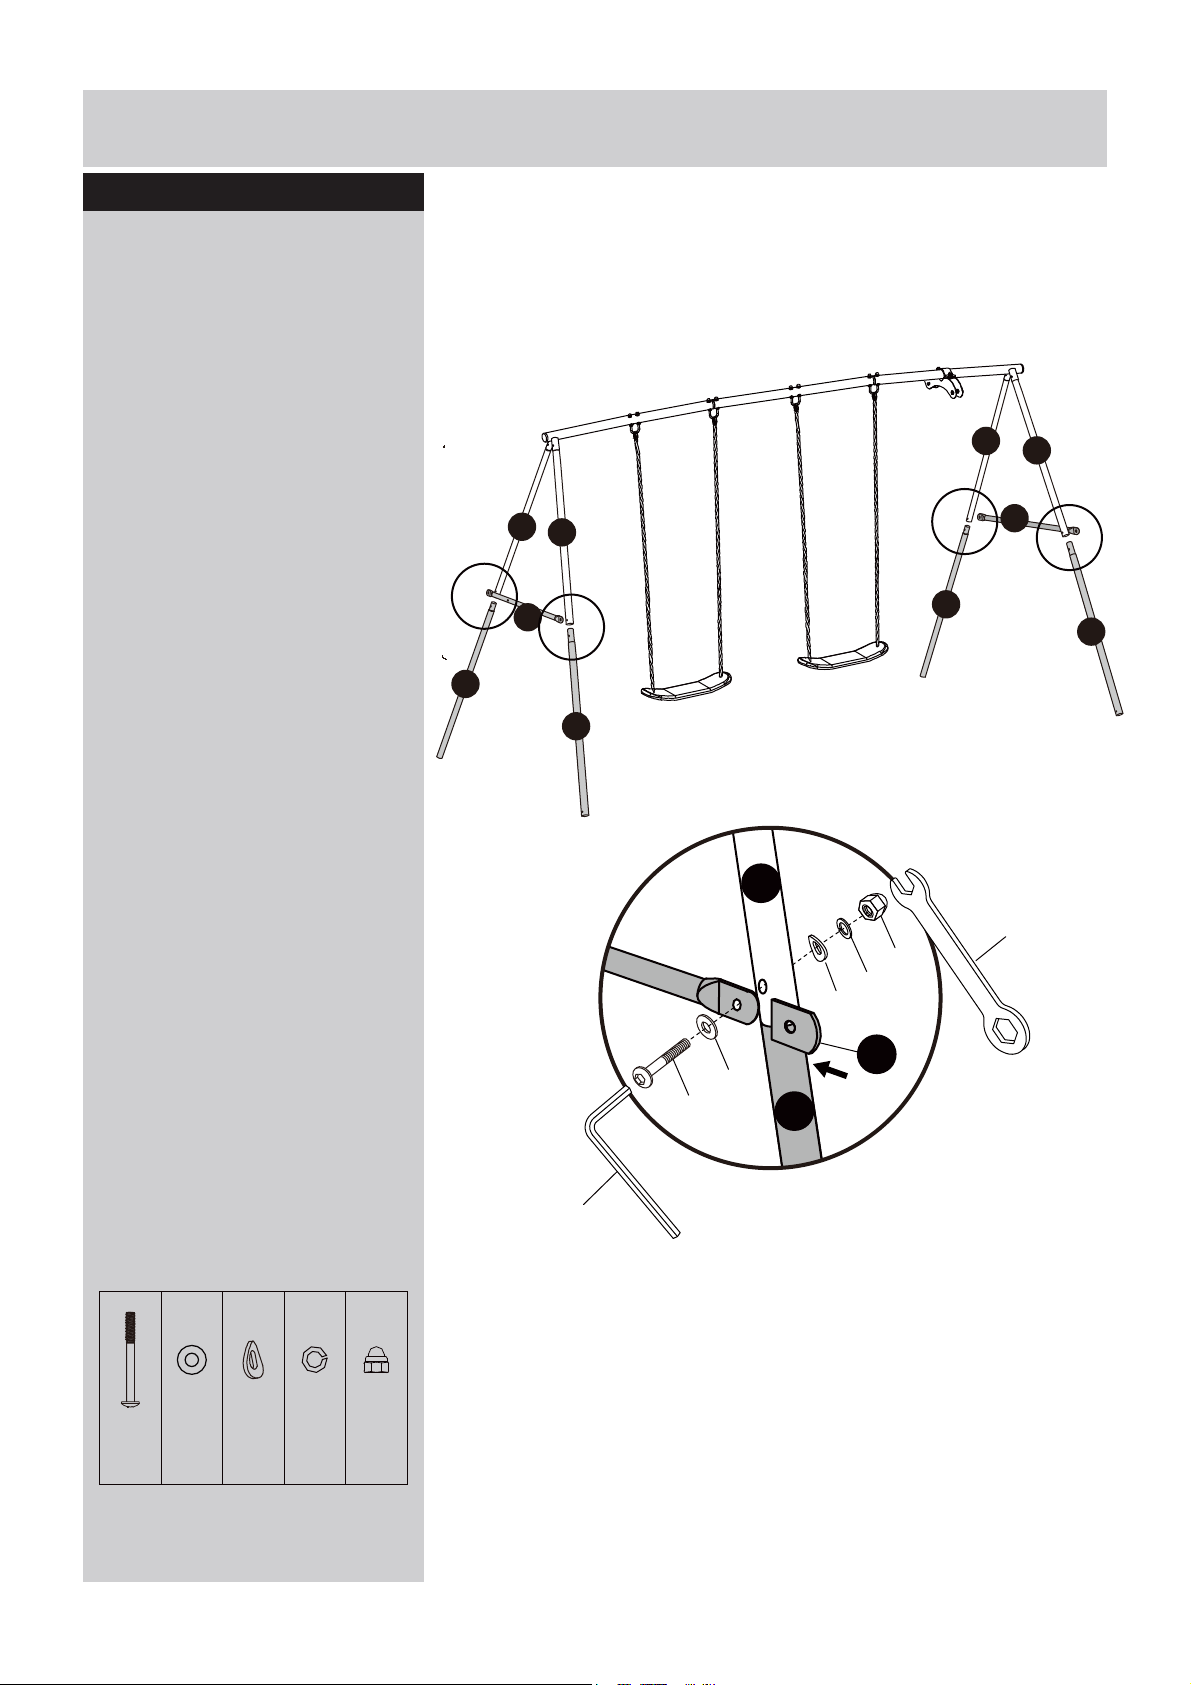
Step 4
Insert Lower Legs (5) into Upper
Legs(4) and secure together
with Target Cross Bar (7) on the
left side of swing and Cross Bar
(6) on the right side as shown in
Figure 4.
Note:
-Plastic cap (8) needs to be
placed onto Cross Bar (7)
before securing the bolt.
-Cross bars need to be attached
to the outer sides of the swing
frame.
4
7
5
4
4
4
5
6
5
5
T
R
9
C
x4pcs
L
x4pcsKx4pcsNx4pcsPx4pcs
Figure 4
Page 11
L
11
14
10
L
N
P
E
Assembly Instructions
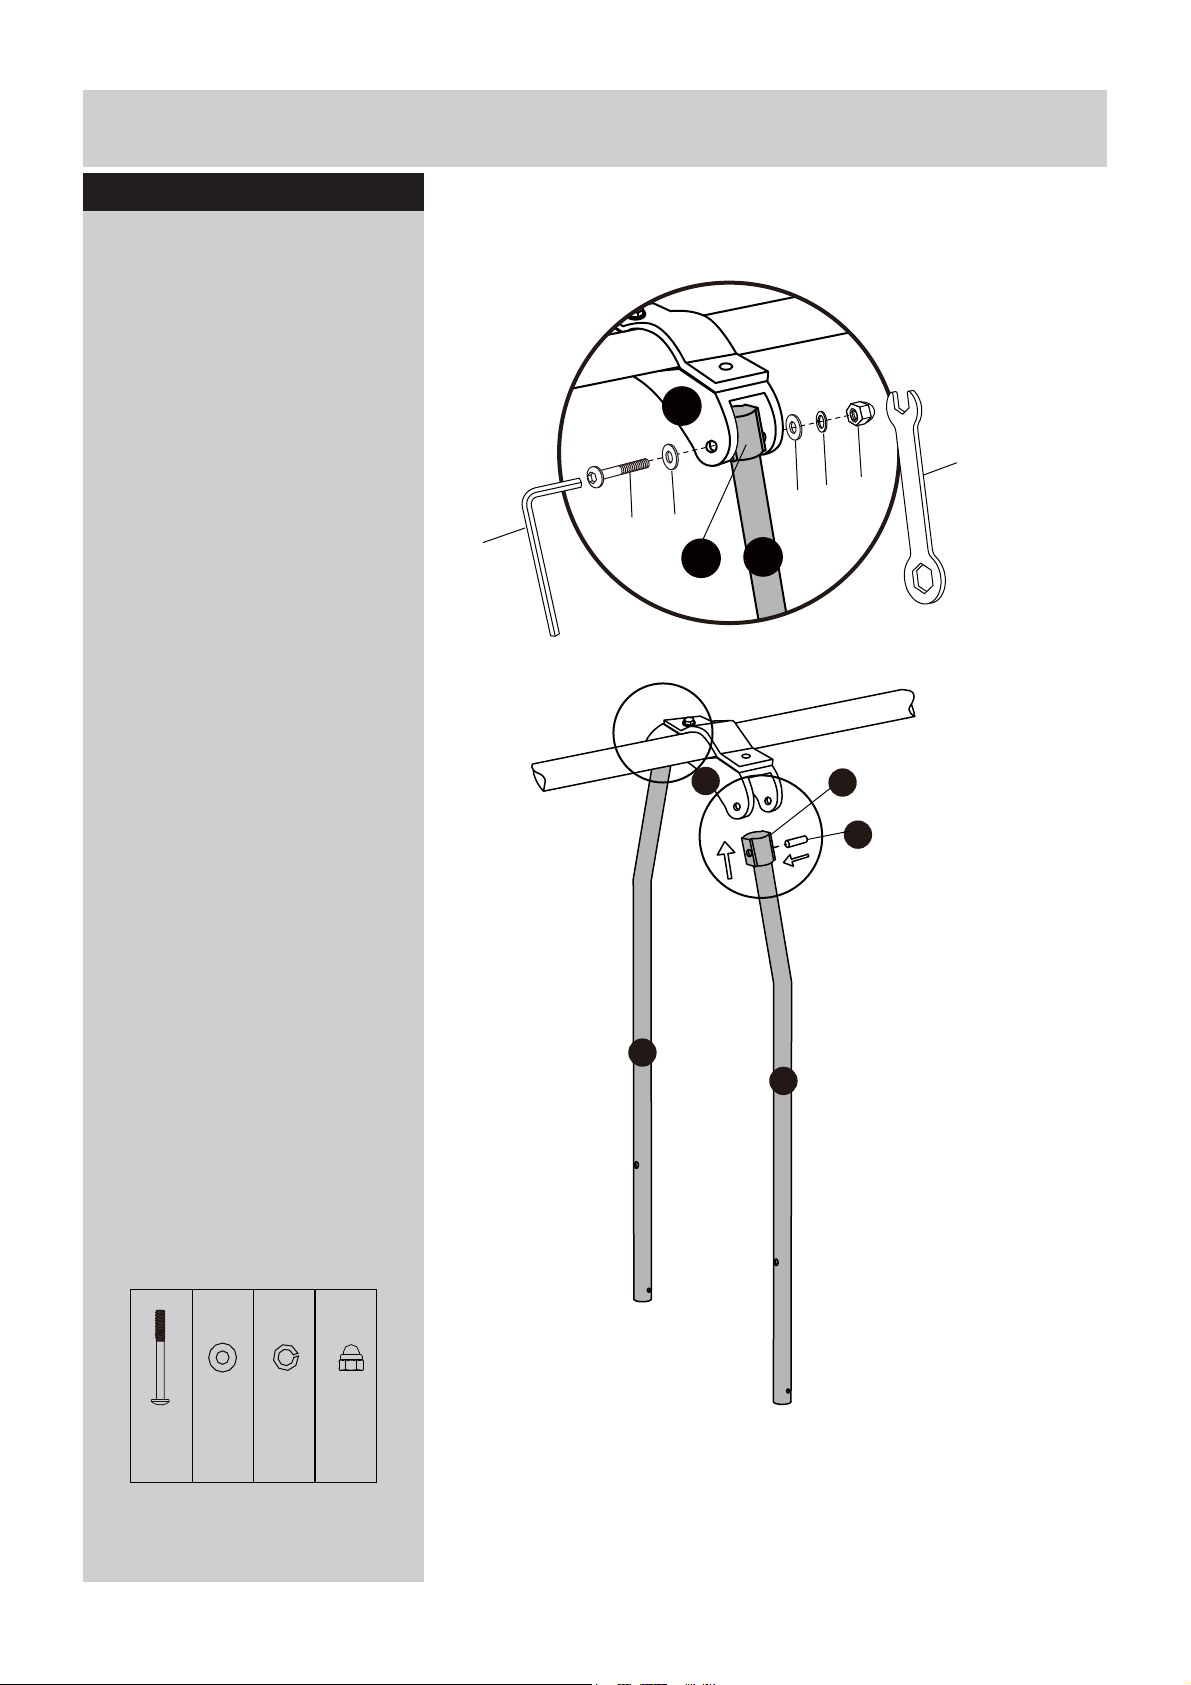
Step 5
Insert Glider Top Tubes (11) into
Plastic Connector (14) first, then
attach it to the bracket on both
sides as shown in Figure 5.
Tip: Ensure to insert Plastic
Tube (15) before connecting the
bolt.
T
R
10
11
14
15
11
E
x2pcsLx4pcsNx2pcsPx2pcs
10
Figure 5
Page 12
11
12
F
M
M
O
Q
Q
O
M
G
M
Assembly Instructions
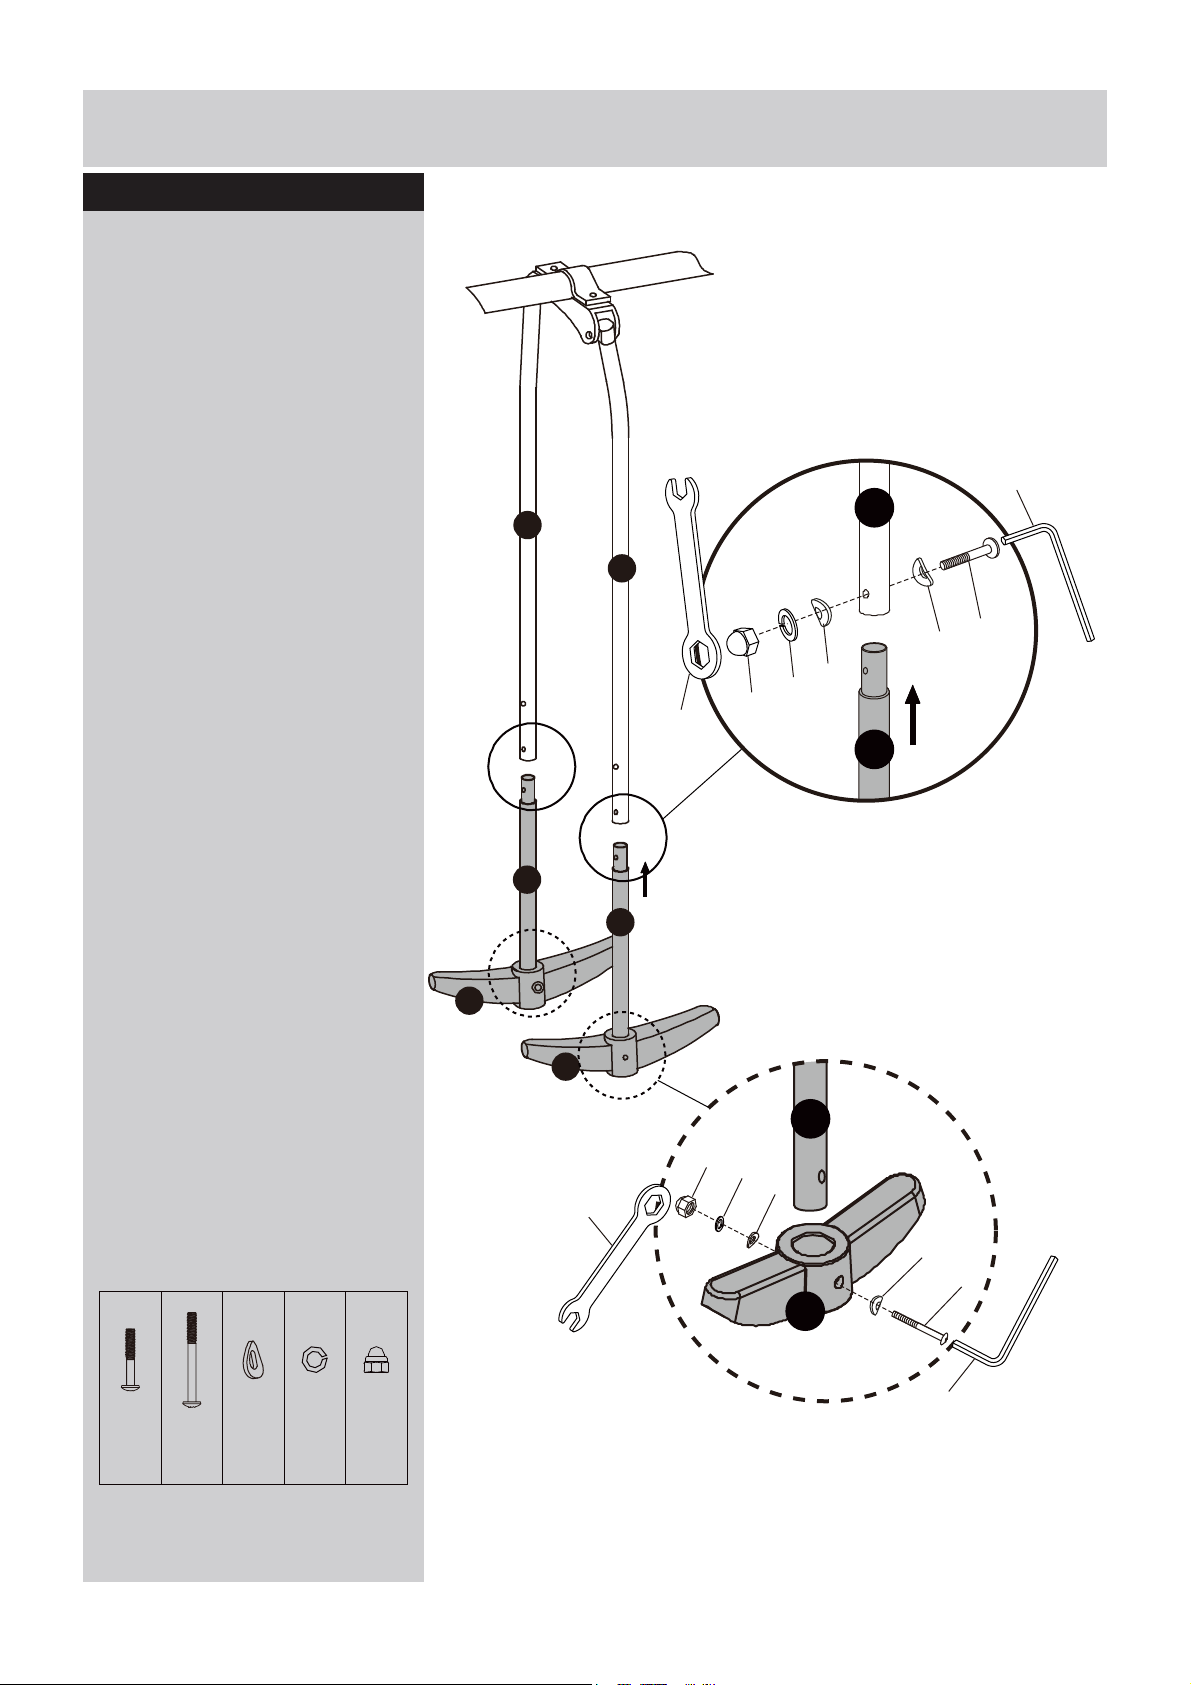
Step 6
Attach Foot Rest (16) to Glider
Lower Tube (12) and connect it
with Glider Upper Tube (11) as
shown in Figure 6.
11
S
11
16
R
12
12
16
12
R
11
F
x2pcs
G
x2pcsMx8pcsOx4pcsQx4pcs
16
S
Figure 6
Page 13
K
K
N
P
H
13
13
17
11
18
M
I
O
Q
I
x4pcsMx4pcsOx4pcsQx4pcs
H
x2pcsKx4pcsNx2pcsPx2pcs
Figure 7-2
Figure 7-1
Assembly Instructions
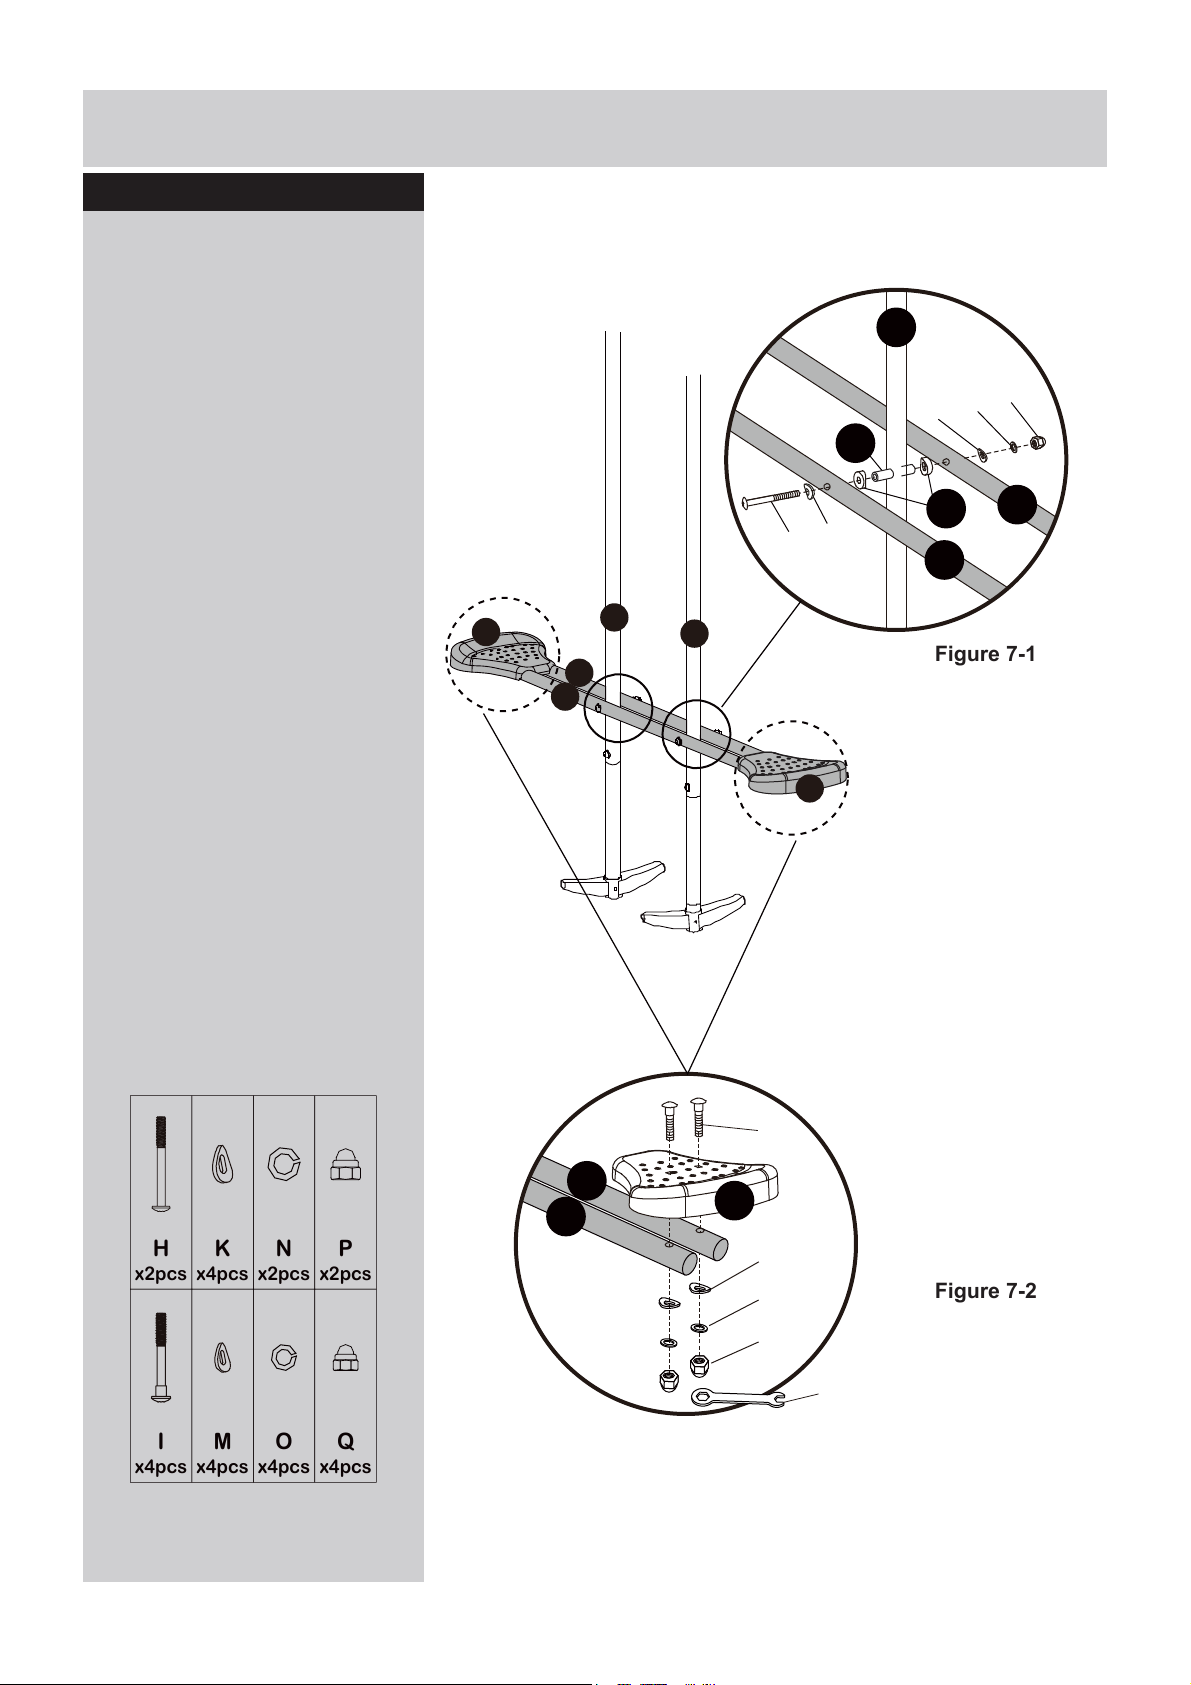
Step 7
- Attach Glider Seat Tube (13) to
both sides of Glider Upper
tubes (11), using the bolt (H),
arc washer (K), Spring washer
(N) and nut (P) as shown in
Figure 7-1.
Tip: Need to insert Plastic
Connector (18) through tubes
(11) and (13) first.
- Attach Glider Seats (19) onto
Glider Seat Tubes (13) using
the bolt (I), flat washer (M)
spring washer (O) and nut (Q)
as shown in Figure 7-2.
After finishing all steps above go
over the entire unit and make
sure all bolts and nuts are
securely tightend.
19
11
11
13
13
19
13
13
19
R
12
Page 14
Assembly Instructions
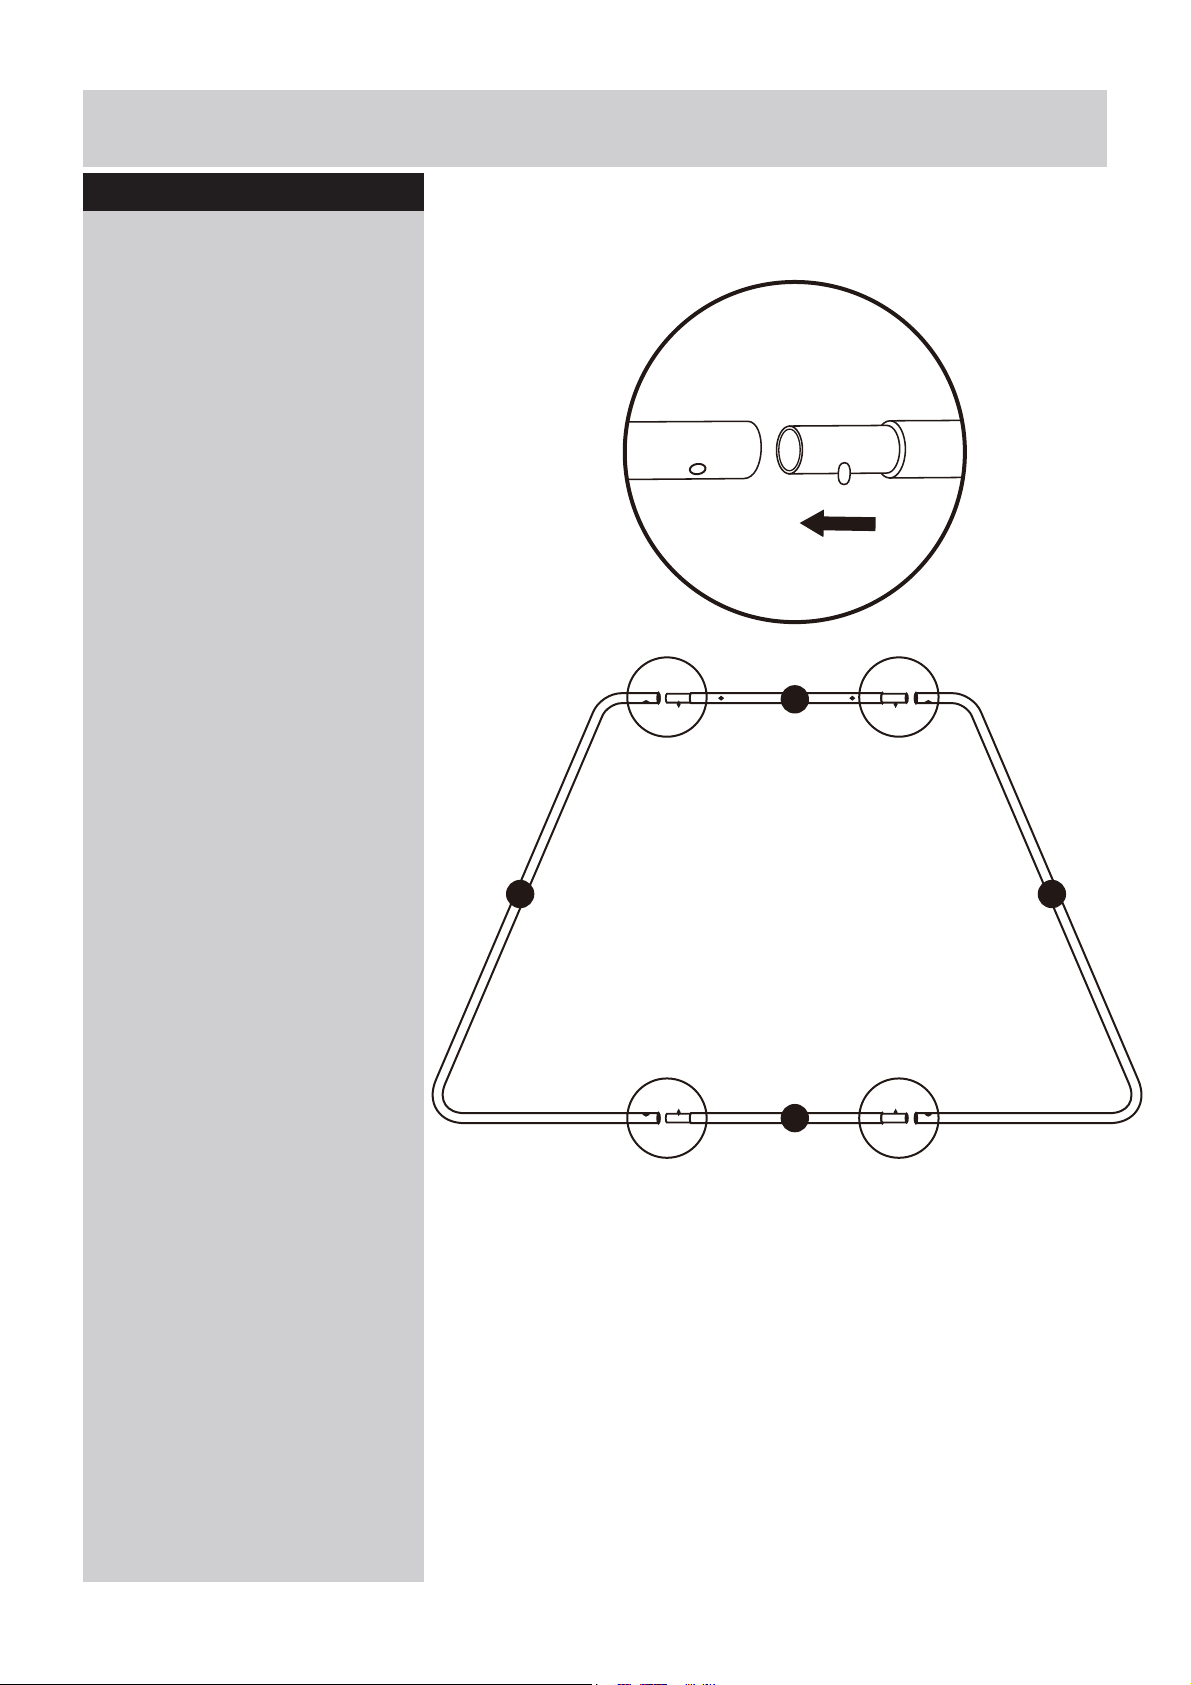
Step 8
Connect Target Center Tubes
(21) and Side Tubes (22) as
shown in Figure 8.
21
20 20
22
Figure 8
13
Page 15
Assembly Instructions
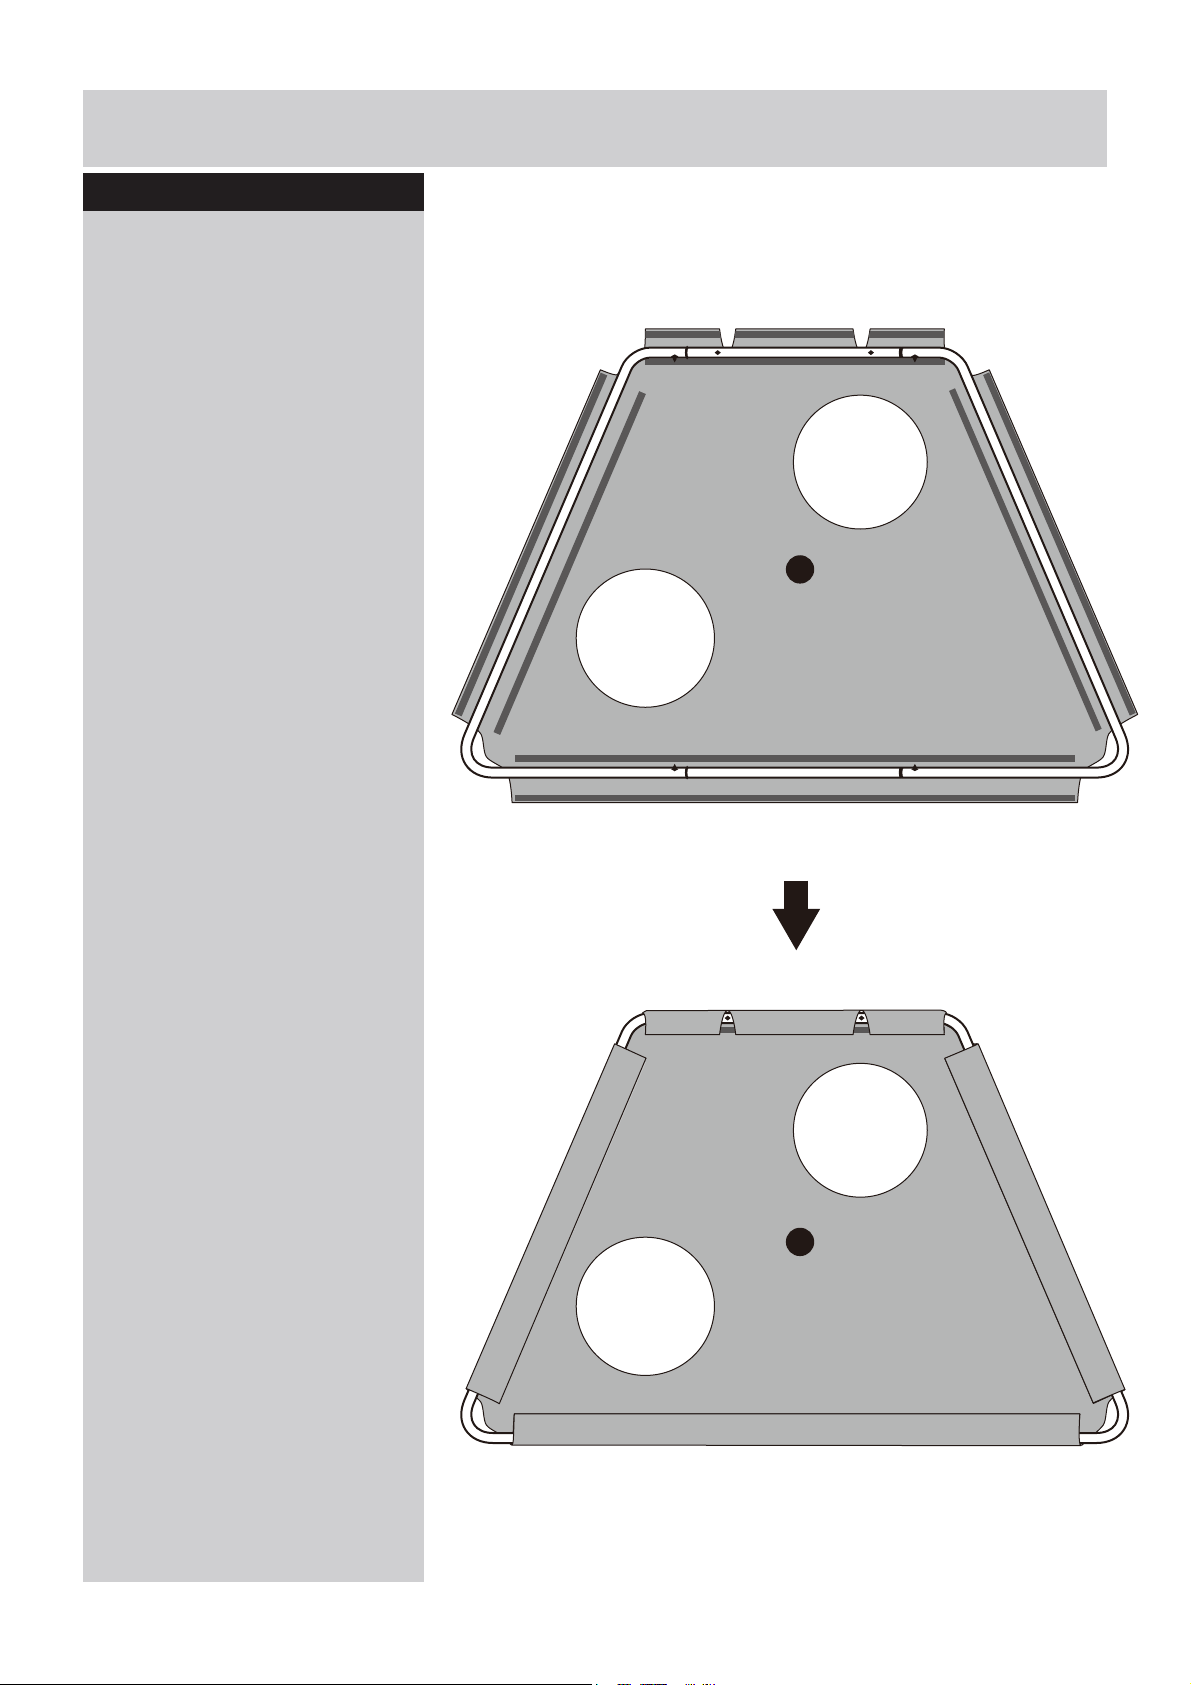
Step 9
Lay Target Sheet (23) flat on the
ground and wrap the velcro
edges around the assembled
frame as shown in Figure 9.
23
14
23
Figure 9
Page 16
Assembly Instructions
23
7
O
P
M
J
M
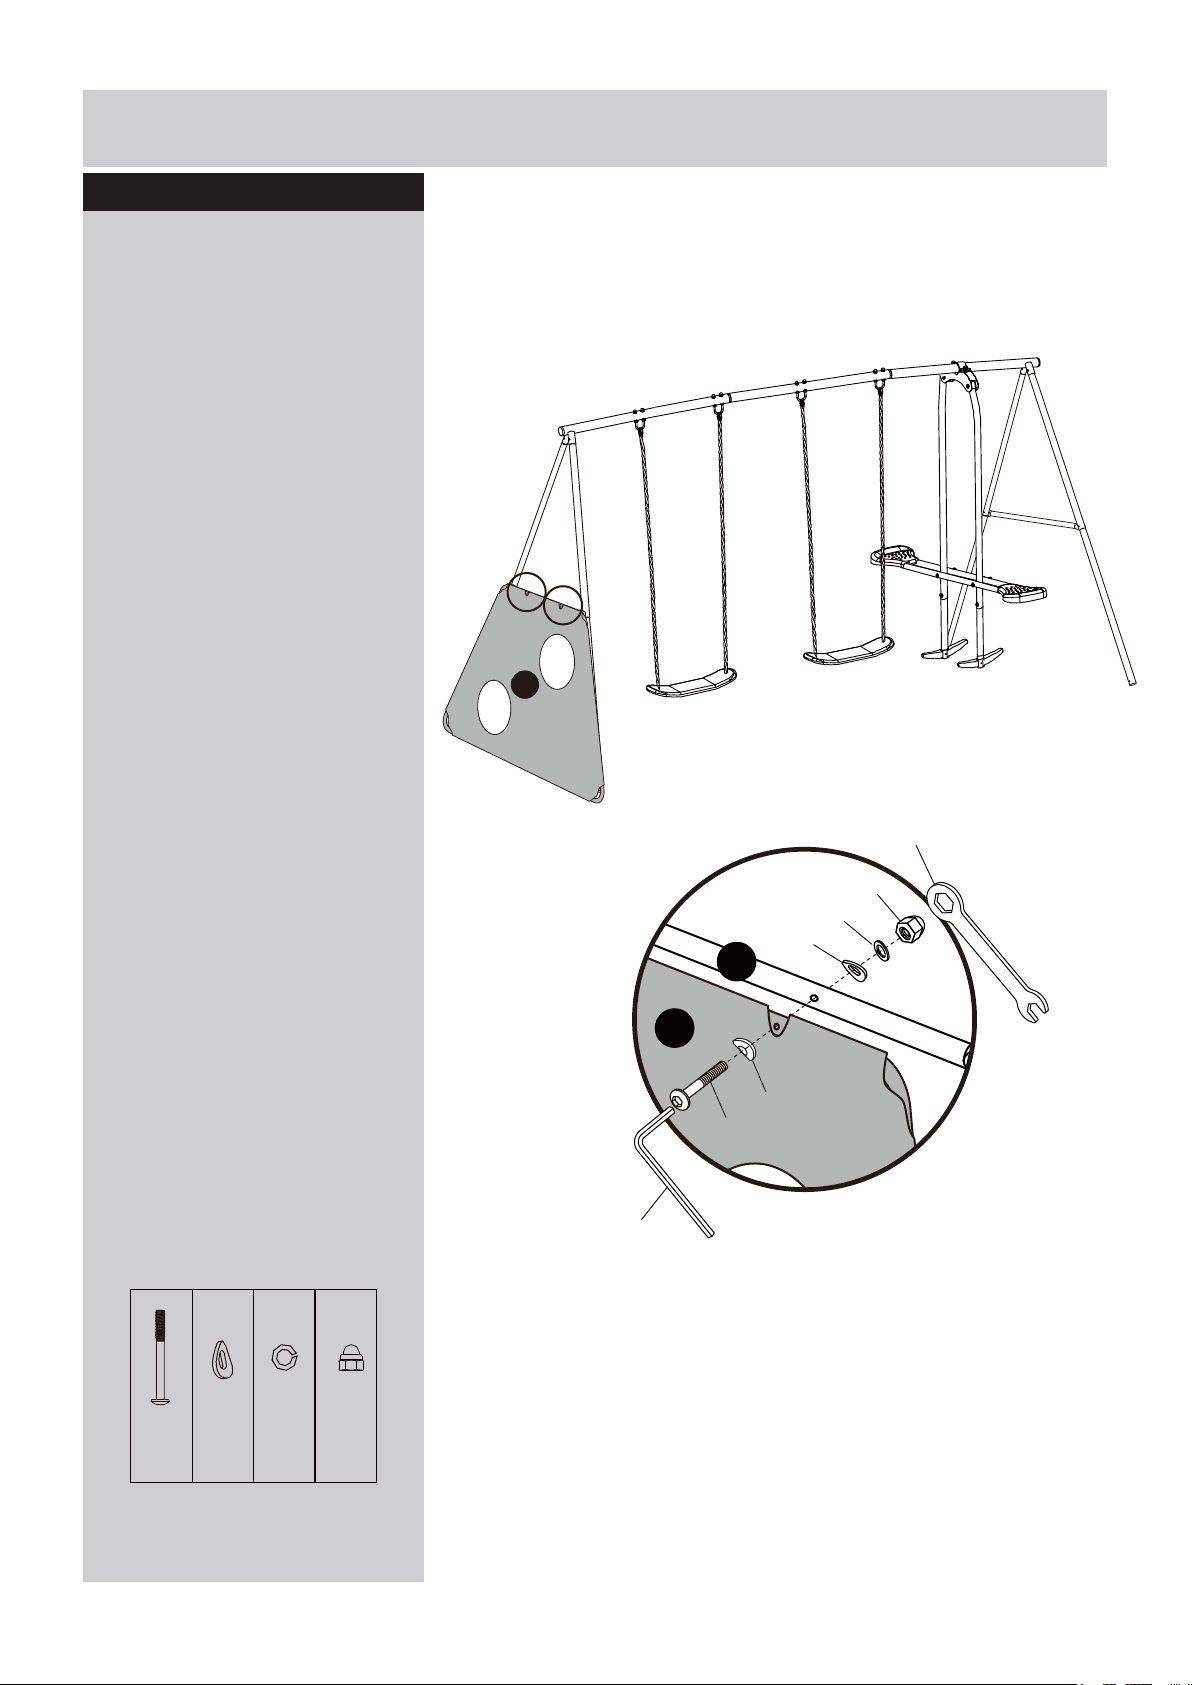
Step 10
Attach the assembled target to
Target Cross Bar (7) as shown
in Figure 10.
23
J
x2pcsMx4pcsOx2pcsPx2pcs
R
S
15
Figure 10
Page 17
Assembly Instructions
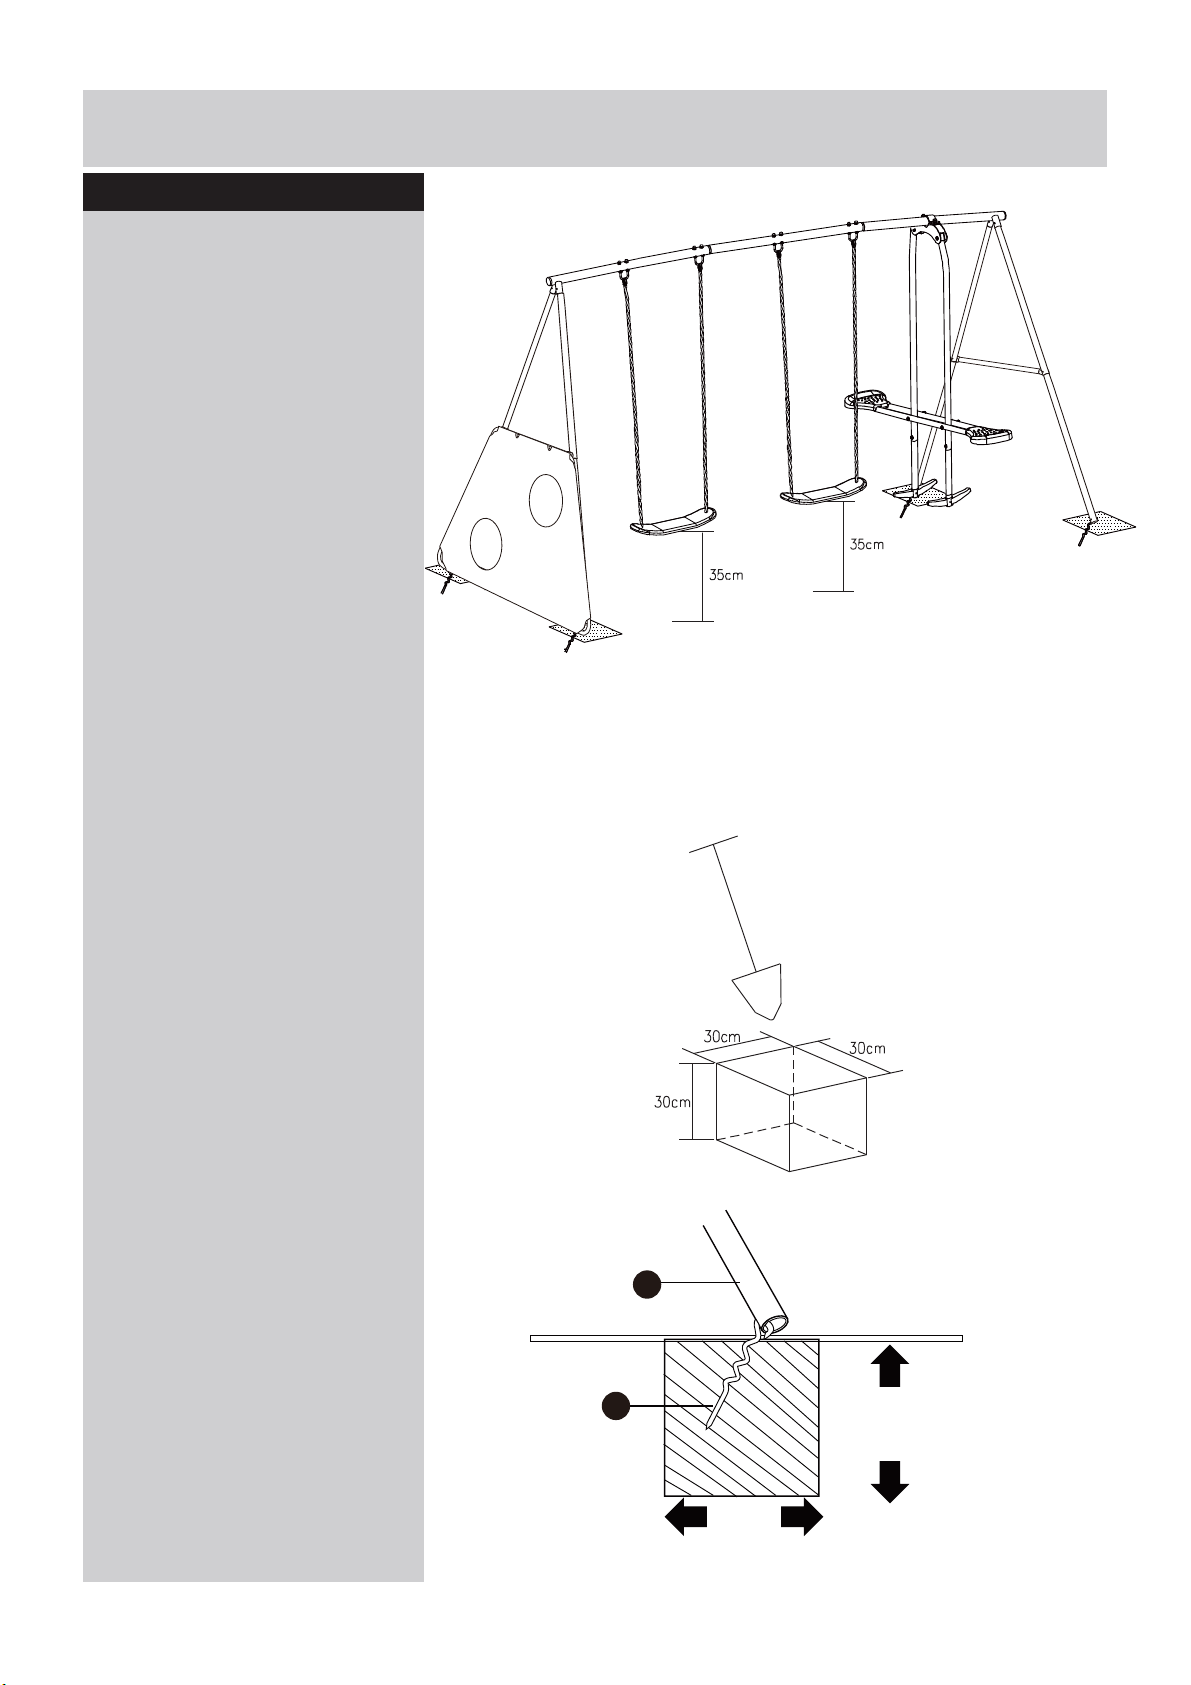
Step 11
Attach Anchors (24) to the
Lower Legs (5) as shown in
Figure 11.
IMPORTANT: The product must be anchored into the ground.
For optimum safety and performance, we recommend concreting
in the corners as shown in the diagram.
Minimum clearance between the footrest/seat
and the ground should be 35 cm.
Figure 11
5
Ground
16
24
30cm Depth
Concrete
30cm
Width
Page 18
Assembly Instructions
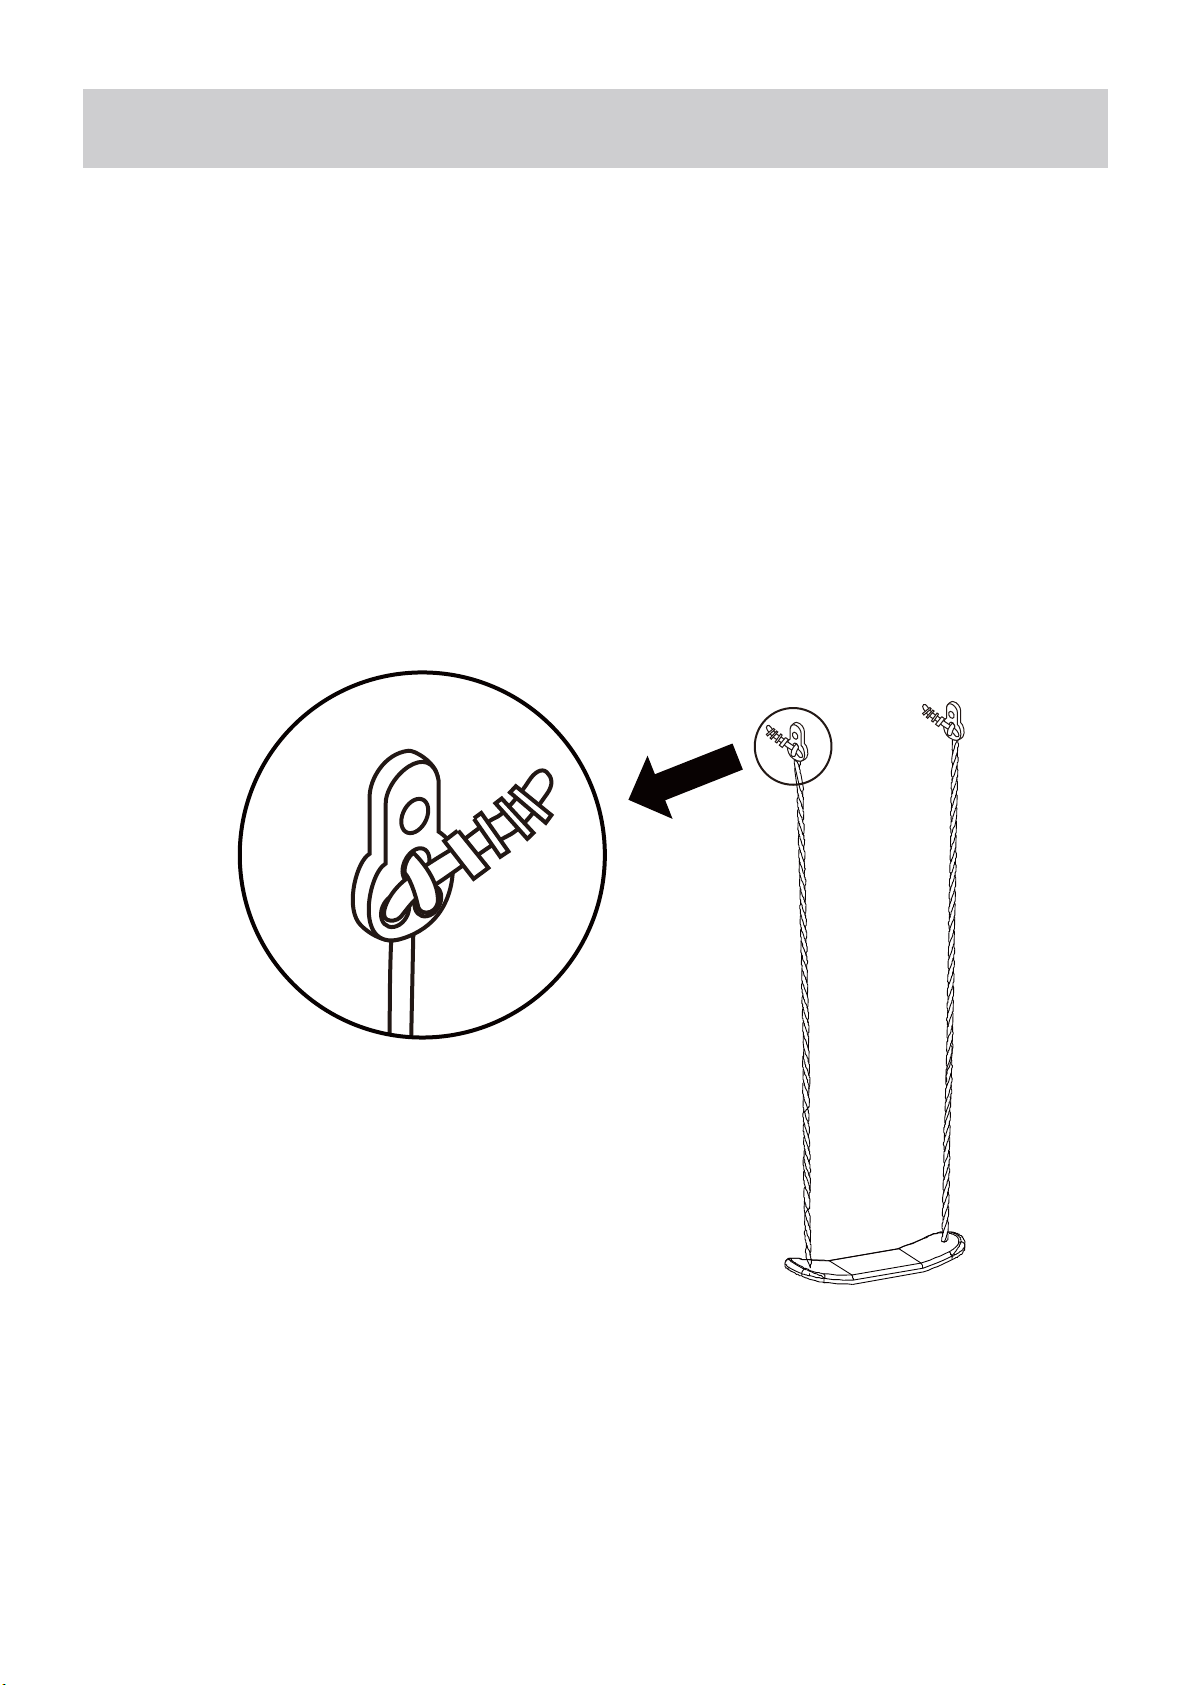
SEAT ADJUSTMENT GUIDE
THE LENGTH OF THE ROPE IS ADJUSTABLE TO ACCOMODATE THE HEIGHT OF
THE CHILD.
TO ADJUST, LOOSEN THE KNOT ON THE SEAT CONNECTOR, PULL ROPE
THROUGH THE HOLE TO THE APPROPRIATE LENGTH AND RE-TIE THE KNOT
AGAIN.
MAKE SURE THAT THE KNOTS ARE TIGHT AND THAT BOTH ROPES ARE
ADJUSTED EVENLY SO THAT THE SEAT IS HORIZONTAL.
17
SEAT CONNECTOR
Page 19
Care and Maintenance
General
T his Mul t i Play was d e signe d and
manufactured with quali ty materials and
craftsmanship.
Inspect regularly for:
CHECK ALL NUTS AND BOL T S TWICE
MONTHLY DURING THE USAGE SEASON FOR
TIGHTNESS AND TIGHTEN AS REQUIRED.
IT IS PARTICULARLY IMPORTANT THAT THIS
PROCEDURE BE FOLLOWED AT THE BEGINNING
OF EACH SEASON.
Never use pliers to tighten up screws –these can
cause damage to both the paintwork and the special
anti-corrosion plating.
Tighten all nuts and bolts securely. Replace as
needed. If not checked regularly, bolts can be loose or
missed and components can become detached
and cause injuries.
Check the unit at the beginning of the usage season
and monthly thereafter for evidence of deterioration.
Immediately remove and replace any items that
appear to be weak or broken. Contact Customer
Support for replacement parts.
Check all covers designed for bolts and sharp edges
regularly to be certain they are present and in good
condition. Replace as needed. It is particularly
use each season.
Inspect handle bar, hardware, and etc., for proper
closure and for signs of wear, deterioration, rust and/
or damage. Replace as needed.
Lubricate all metallic moving parts monthly
during the usage season. Applying a light coat of
automobile wax to all metal tubing surfaces will help
protect your unit and add to its longevity. Sand any
rusted areas of the metal tubing and repaint using a
non-lead based paint.
Remove plastic seats and store indoors, or do not
use when the temperature drops below 32°F/0°C.
Check unit for scuffs, burrs, sharp edges and any
other defects that may occur from assembly, abuse,
shipping or everyday use. Burrs and sharp edges
may be filed down until smooth and covered with
duct tape if necessary.
If correct care and maintenance is taken, it will
provide users with longer usage for exercise,
fun and enjoyment.
To help maintain the products appearance,
occasionally clean the seats and metal framework
with a damp cloth lightly – but DO NOT use
abrasive chemical cleaners.
When the time comes to disassemble and dispose
of this product, please completely disassemble the
unit and discard of it in a safe place and manner
so as not to present any hazard to any individual. It
is important to check and maintain the main parts
at regular intervals.If these checks are not carried
out,the toy could overturn or otherwise become a
hazard.Whenever practical,the instructions shall
IMPORTANT!KEEP FOR FUTURE REFERENCE.
WARNING!
Ensure product is properly anchored to the
ground before use. For outdoor use only. To be
played in an open area with adult supervision.
Maximum weight per seat is 45kg with a
maximum combined weight of 180kg on all seats.
This unit is designed for a maximum of 5 children.
For family domestic use only. As an extra
precaution, check this toy regularly for signs of
wear or damage. Packaging materials are not
toys. Please remove all packaging and packing
tags/wires before allowing children to use.
Maintenance to be carried out under the direct
supervision of a responsible adult. Colour,
designs and decorations may vary from those
shown in the photographs.
WA RNING! Not suitable for
children under 3 years due to
small parts, chocking hazard.
If you need help or have damaged or missing parts,call the Customer
Helpline:(+44) 0330 0904 420
Produced for Chad Valley Toys. Argos Ltd. Country of origin: China
Address: 489 - 499 Avebury Boulevard, Central Milton Keynes, MK9 2NW. www.argos.co.uk
SP-19-SW091-ARGOS-17001
18
 Loading...