

Page 1
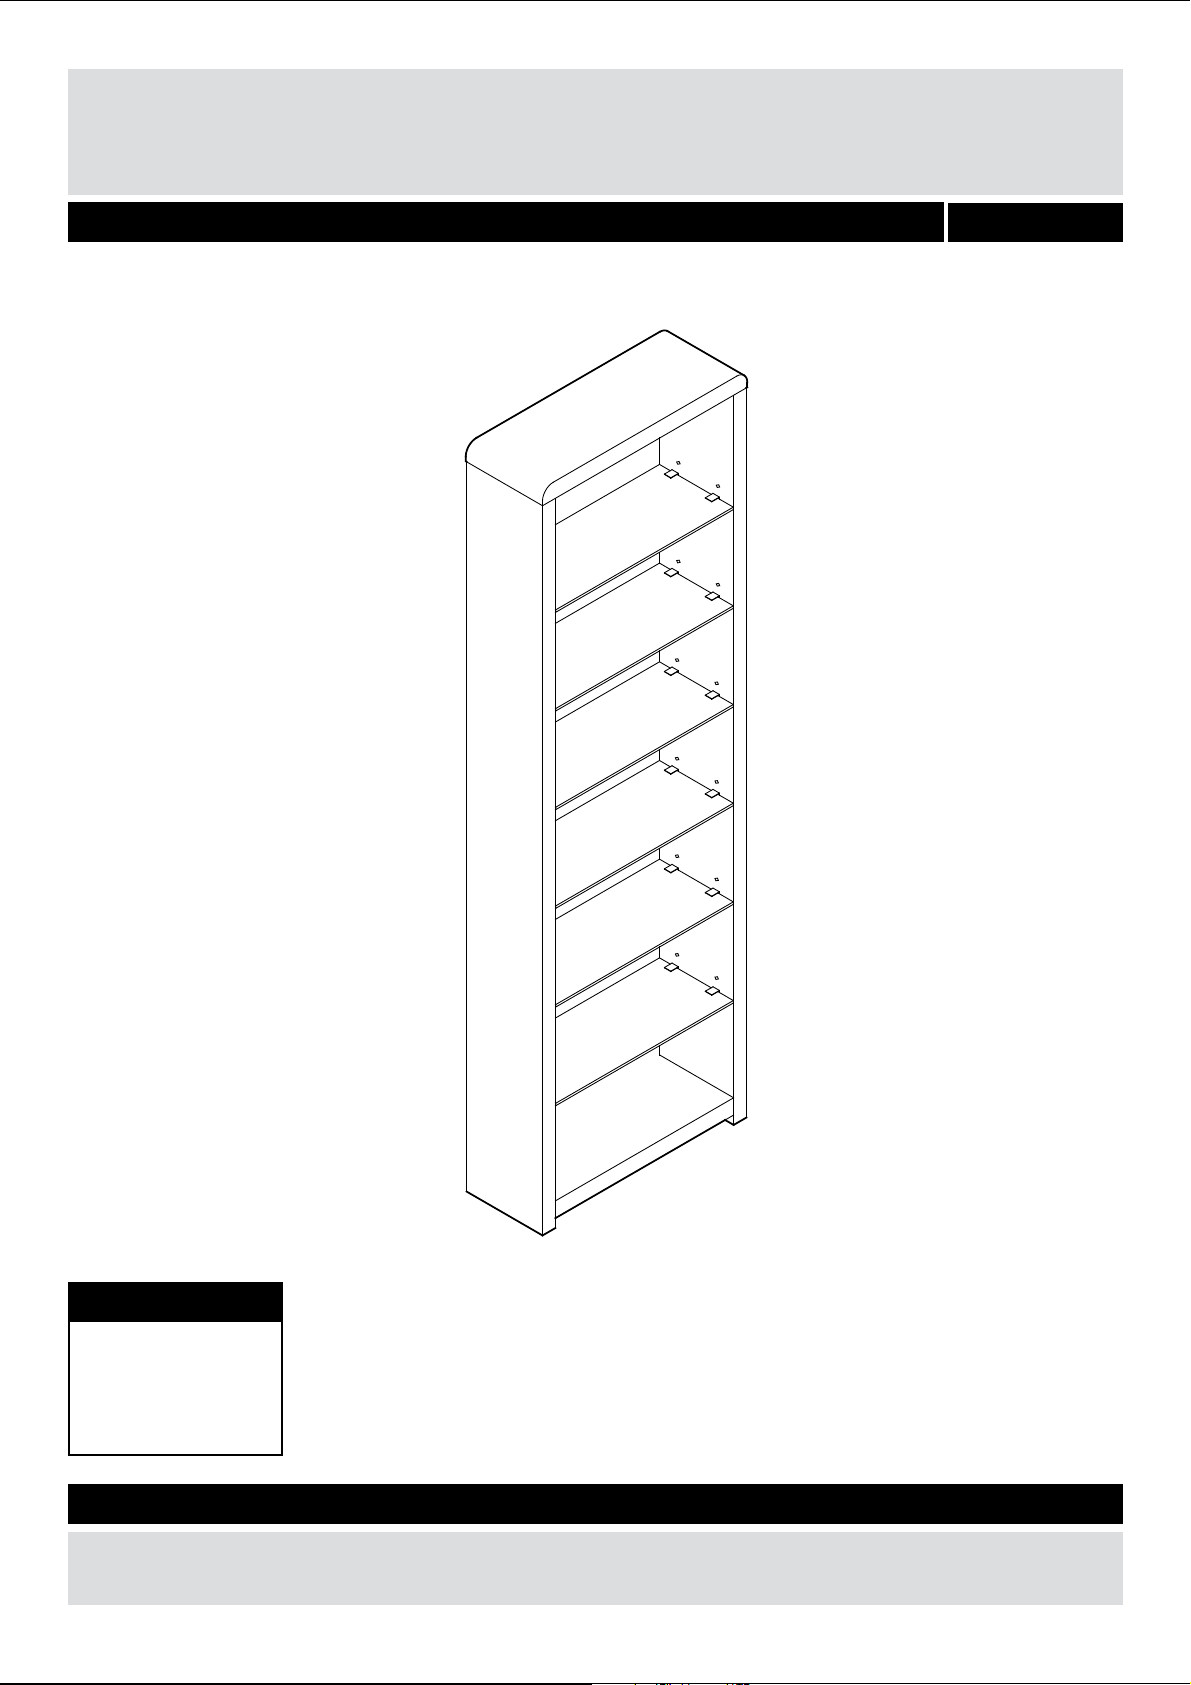
Gloss Media Unit with Glass Shelves
Assembly Instructions - Please keep for future reference 790/5153D
Dimensions
Width - 48cm
Depth - 18cm
Height - 152cm
Important – Please read these instructions fully before starting assembly
If you need help or have damaged or missing parts, call the Customer Helpline: 03456 400800
Issue 1 - 15/10/17
Page 2
Safety and Care Advice
Important – Please read these instructions fully before starting assembly
• Check you have all the
components and tools listed on
pages 1.
• Remove all fittings from the
plastic bags and separate them
into their groups.
• Keep children and animals
away from the work area, small
parts could choke if swallowed.
• Do not stand or put weight on
the product, this could cause
damage.
• Assemble the item as close
to its final position (in the same
room) as possible.
• Assemble on a soft level
surface to avoid damaging the
unit or your floor.
as this could damage the unit.
Only use hand screwdrivers.
• Dispose of all packaging
carefully and responsibly.
• We do not
recommend the
use of power
drill/drivers for
inserting screws,
• Make sure you have enough
space to layout the parts before
starting.
Glass safety – Take care when handling glass, please follow the advice below
This product complies with
•
BS EN 14749:2005 and BS6206.
If a glass component is
•
chipped or broken replace with
glass of the type described on
this instructions. Consult the
manufacturer, retailer or agent
with regard to obtaining a
manufacturing specification and
shape for replacement glass
quoting the model number, and
batch or date of manufacture.
•
Do not place very hot or
cold items against or in close
proximity to the glass
surfaces unless adequately
thick insulating material is
used to prevent such items
coming into contact with the
glass.
•
Do not strike the glass with
hard or pointed items.
When cleaning glass panels
•
use a damp cloth or leather with
washing up liquid or soft soap if
necessary.
•
Do not use washing powders
or any other substances
containing abrasives since these
substances scratch glass.
Care and maintenance
Only clean using a damp
• • •
cloth and mild detergent, do not
use bleach or abrasive cleaners.
1
From time to time check that
there are no loose screws on this
unit.
This product should not be
discarded with household waste.
Take to your local authority waste
disposal centre.
Note: if require the next
page can be cut out and used
as reference throughout the
assembly. Keep this page with
these instructions for future
reference.
Page 3
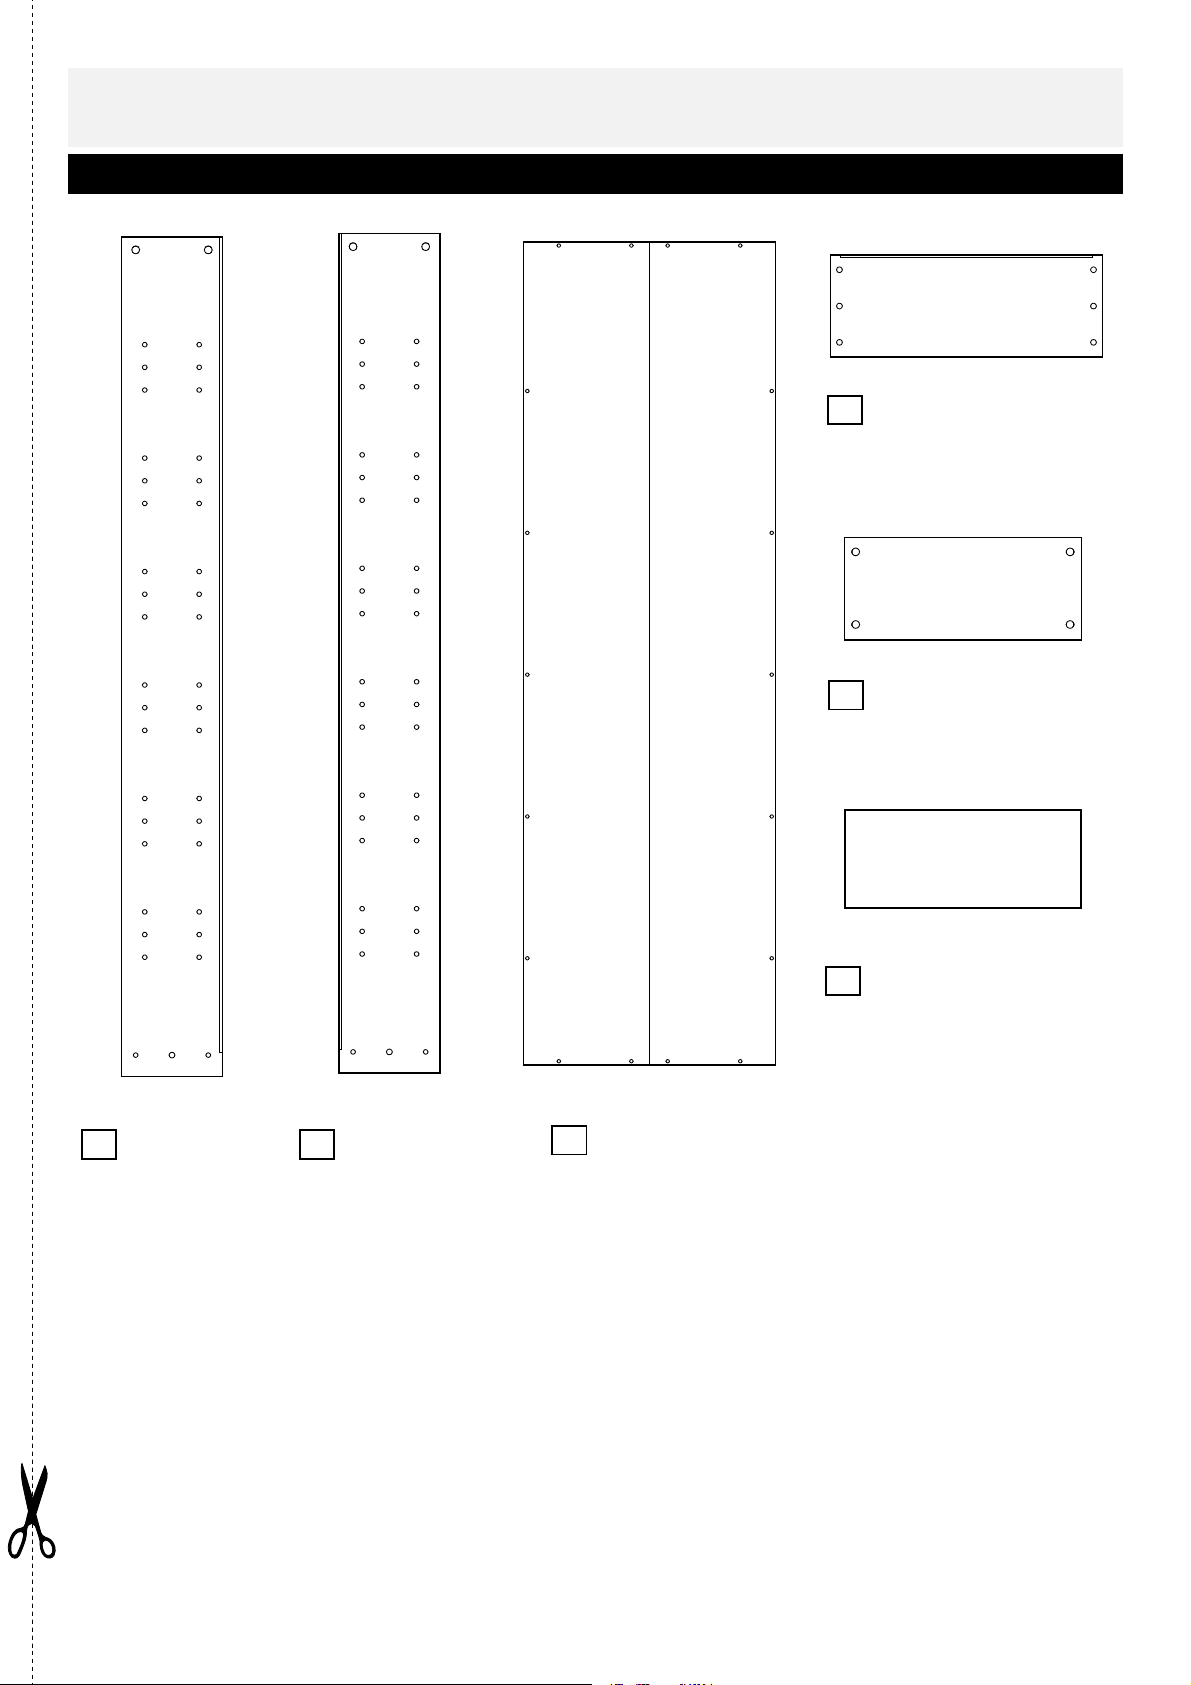
Components - Panels
Please check you have all the panels listed below
Top panel
4
(480 x 180mm)
Bottom shelf
5
(400 x 179mm)
Left side panel
1 2
(1482 x 180mm) (1482 x 180mm)
Right side panel
Back panel
3
(1461 x 438mm)
Tempered glass shelf x 6
6
(
392 x 165mm)
2
Page 4
If you have damaged or missing components,
A
x
24
D
14mm Screw
G
x
18
110 115 120 125 130 135 140 145 150 155 160 165 170
105
Metal dowel
x8Metal cam
x 8
J
Components - Fittings
call the Customer Helpline: 03456 400800
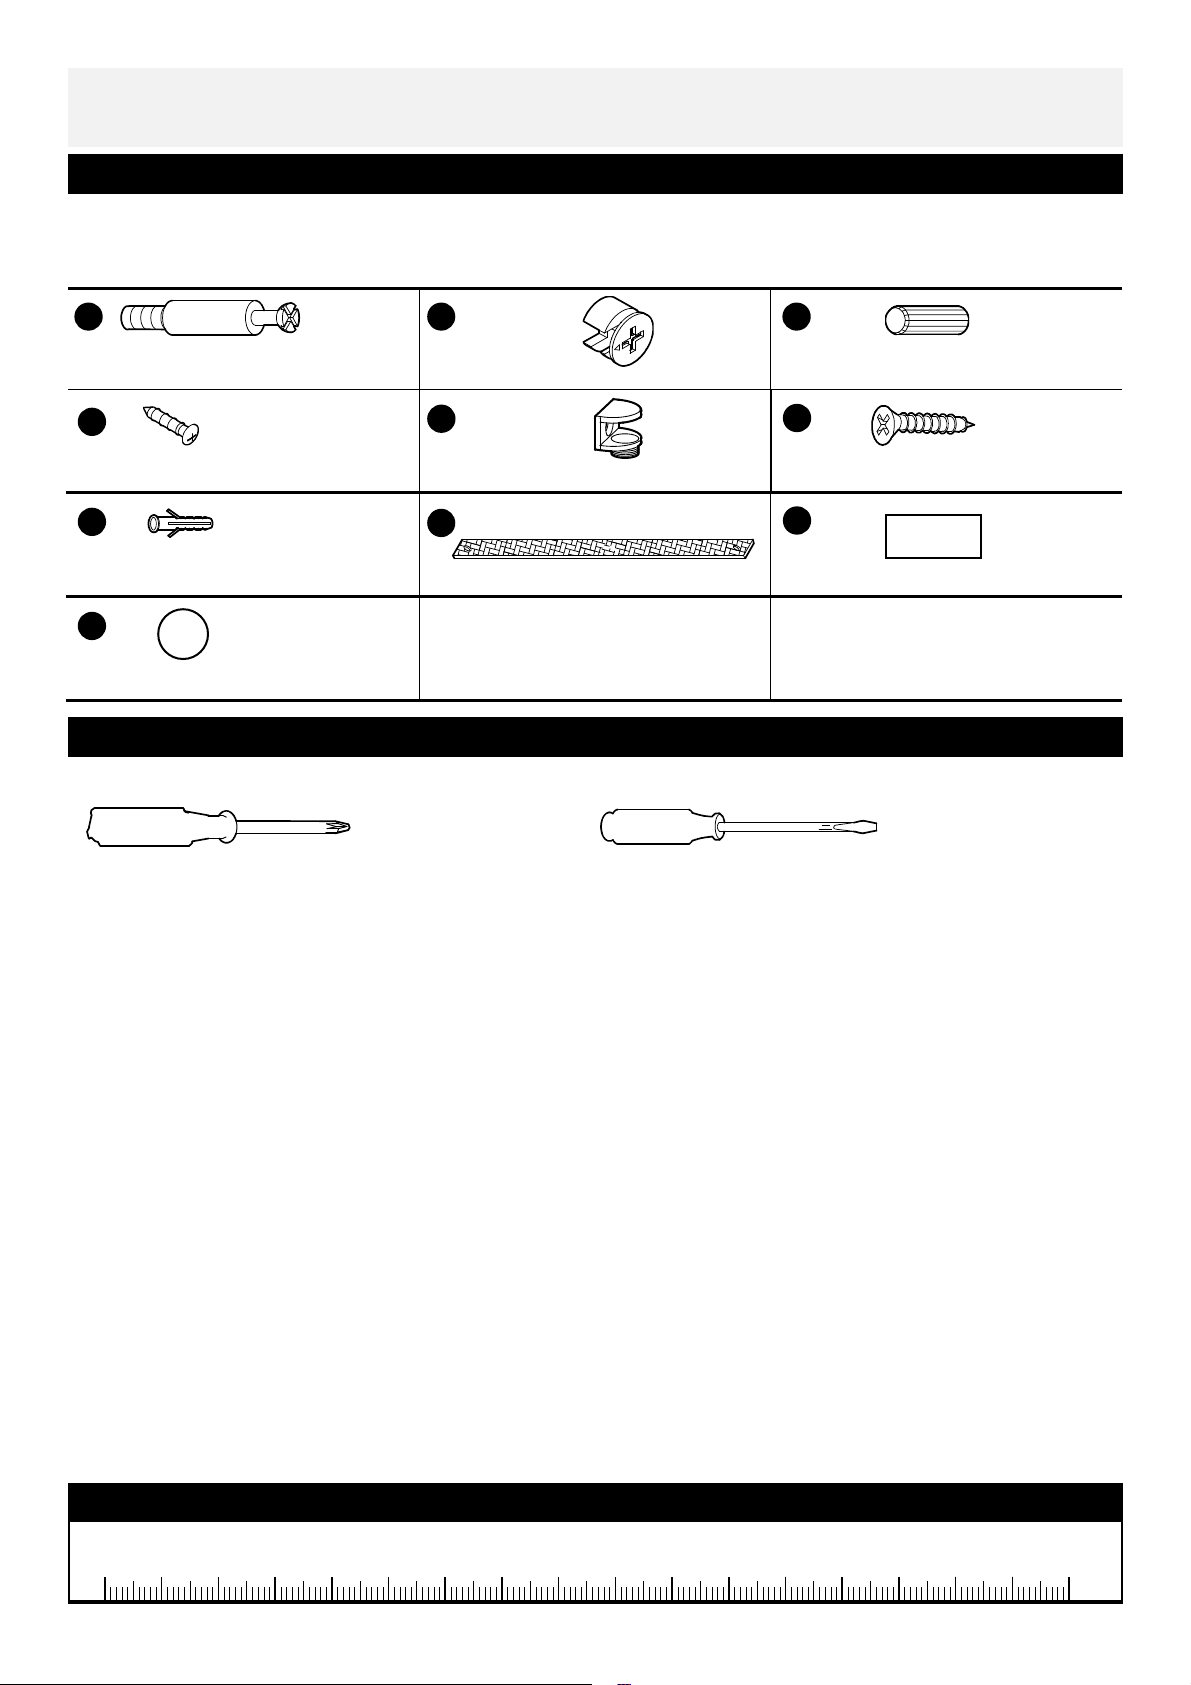
Please check you have all the fittings listed below
Note: The quantities below are the correct amount to complete the assembly. In some cases more
fittings may be supplied than are required.
B C
Plastic dowel x 4
Wall plug x 1
Cover pad x 4
Tools required
E
Shelf support
H
Webbing x 1
Philips screwdriver Flatblade screwdriver
F
40mm Screw x 1
I
Foot pad x 4
Ruler - Use this ruler to help correctly identify the screws
0 5 10 15 20 25 30 35 40 45 50 55 60 65 70 75 80 85 90 95 100
3
Page 5
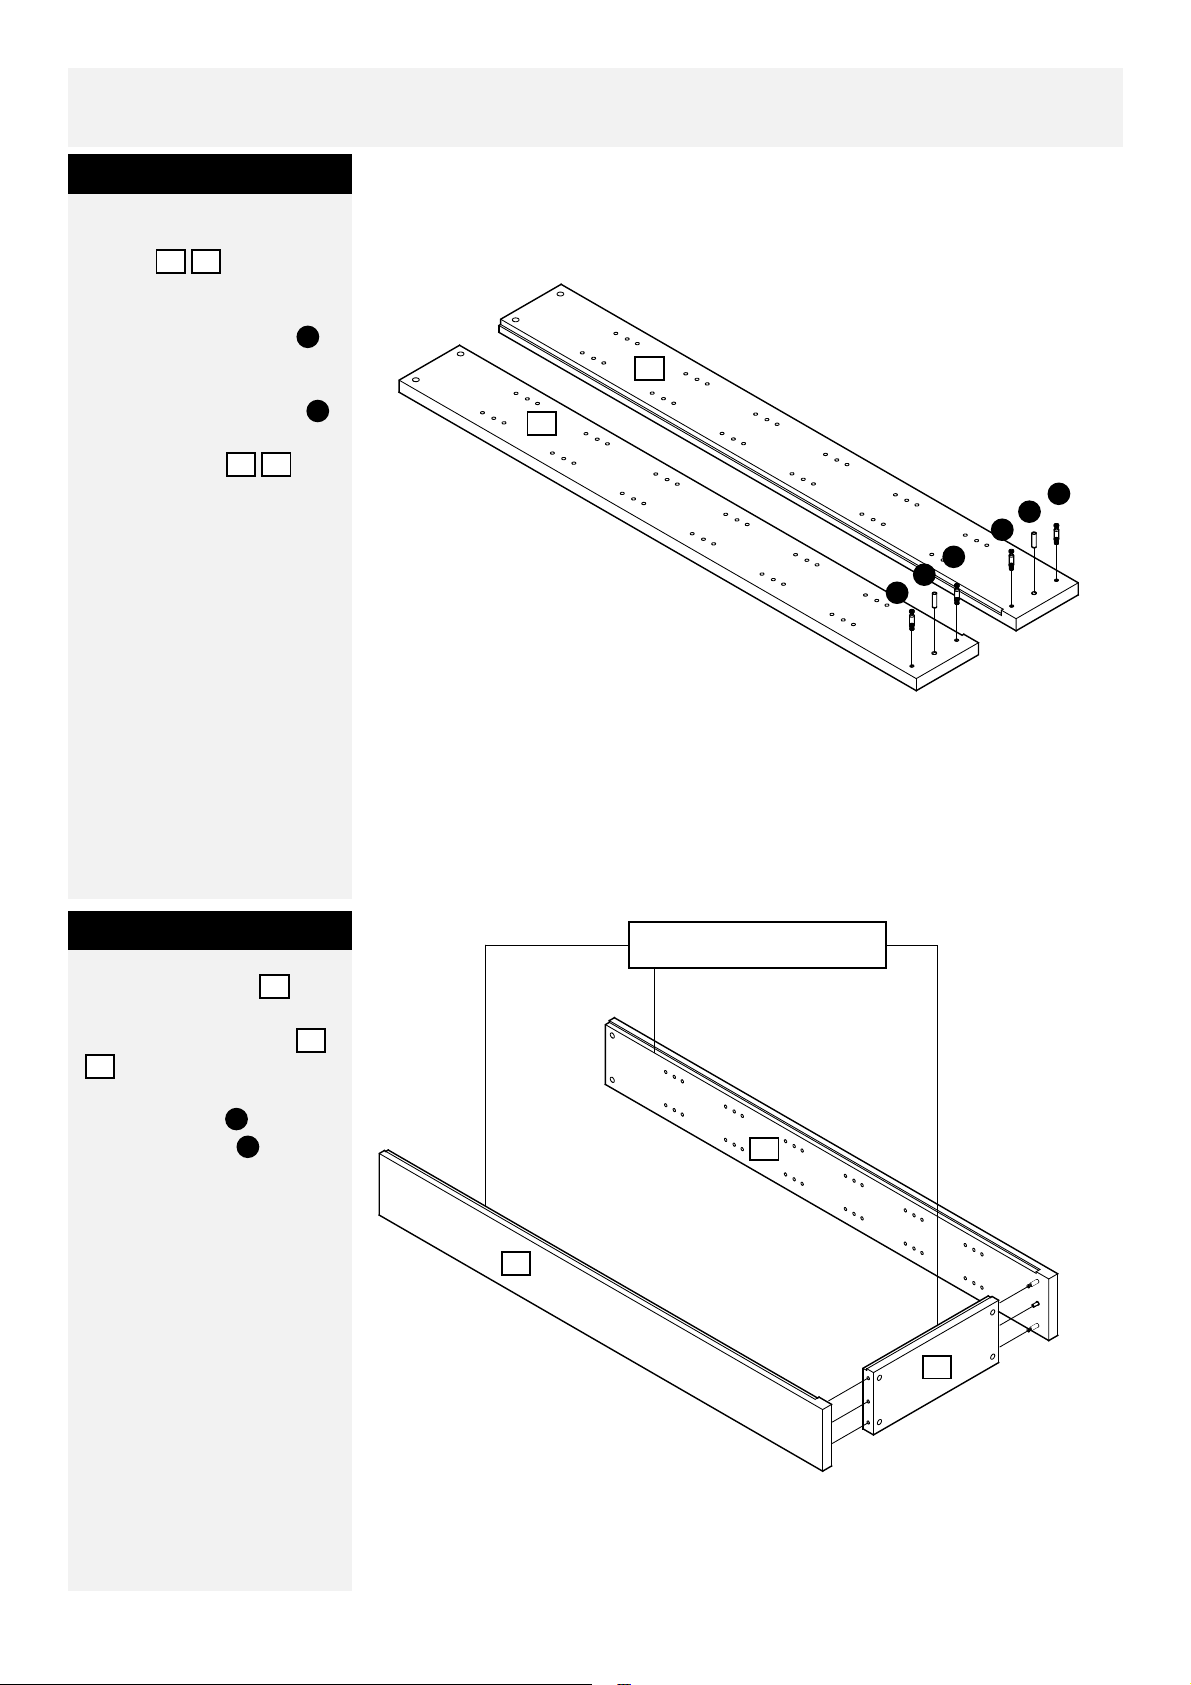
Assembly Instructions
Step
Step
1
Lay Left and Right side
panels on a flat
soft surface.
112
Insert Plastic dowels
C
into the indicated holes.
Screw 4 Metal dowels
A
into the threaded holes
in side panels
1 2
as shown.
2
A
C
A
A
C
A
2
Lay Bottom shelf on
the flat edge. Firmly
push the Side panels
2
onto the ends as
shown, ensuring the
Metal dowels and
Plastic dowels enter
corresponding holes.
5
1
A
C
Grooves for back panel.
1
2
5
4
Page 6
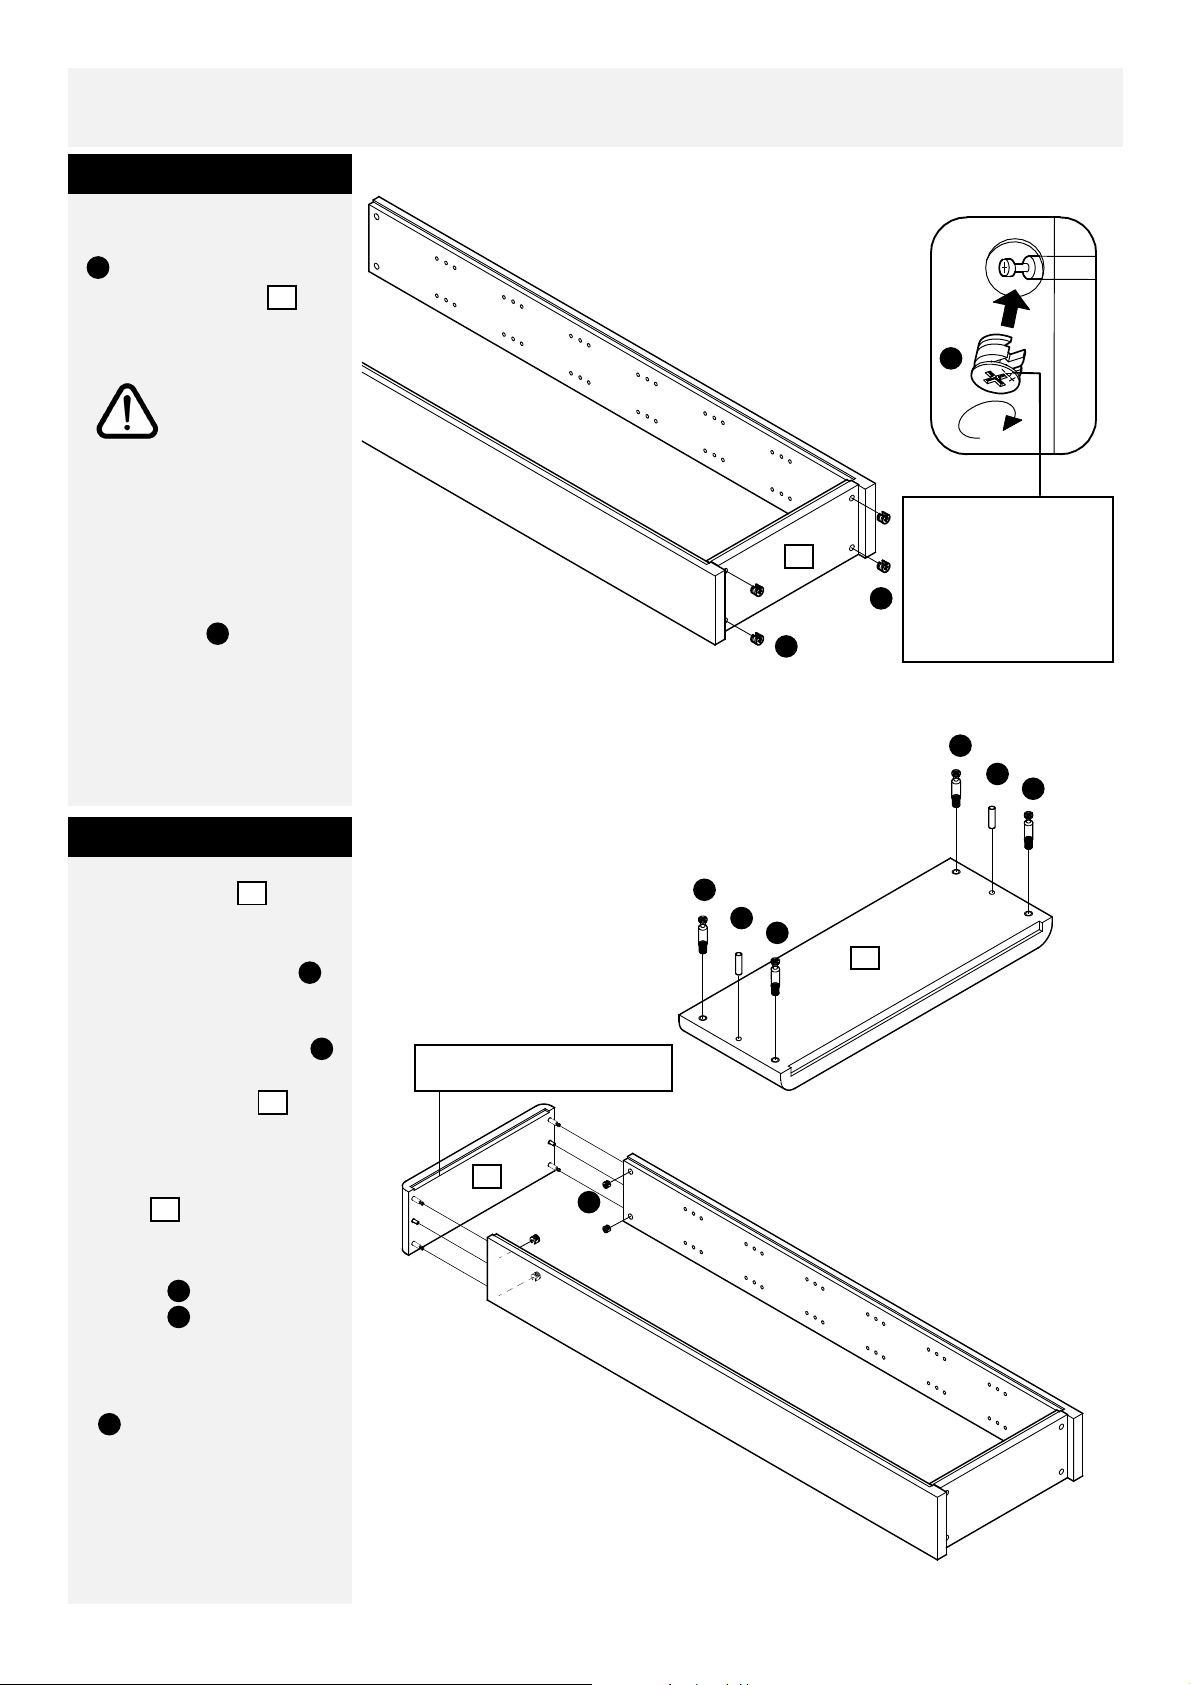
Assembly Instructions
Step
3
Insert the 4 Metal Cams
B
into the 4 holes on
the Bottom panel
and push in firmly.
Note: Longer
leg of the cross
on the Metal
Cams must face towards
metal dowels (as shown).
Then, using a Philips
Screwdriver, screw all 4
Metal Cams
B
clockwise until they are
‘ hand tight’.
5
B
Note: Longer leg of
5
the cross on the
Metal Cams must
B
face towards metal
B
dowels.
Step 4
Lay Top panel on a
flat soft surface.
Insert Plastic dowels
into the indicated holes.
Screw 4 Metal dowels
into the threaded holes
in the Top panel as
shown.
Firmly push the Top
panel onto the ends
4
of Side panels as shown,
ensuring the Metal
dowels and Plastic
dowels enter
A
C
corresponding holes.
4
C
A
4
Groove for back panel.
4
B
A
C
A
A
C
A
4
Secure with Metal Cams
.
B
5
Page 7
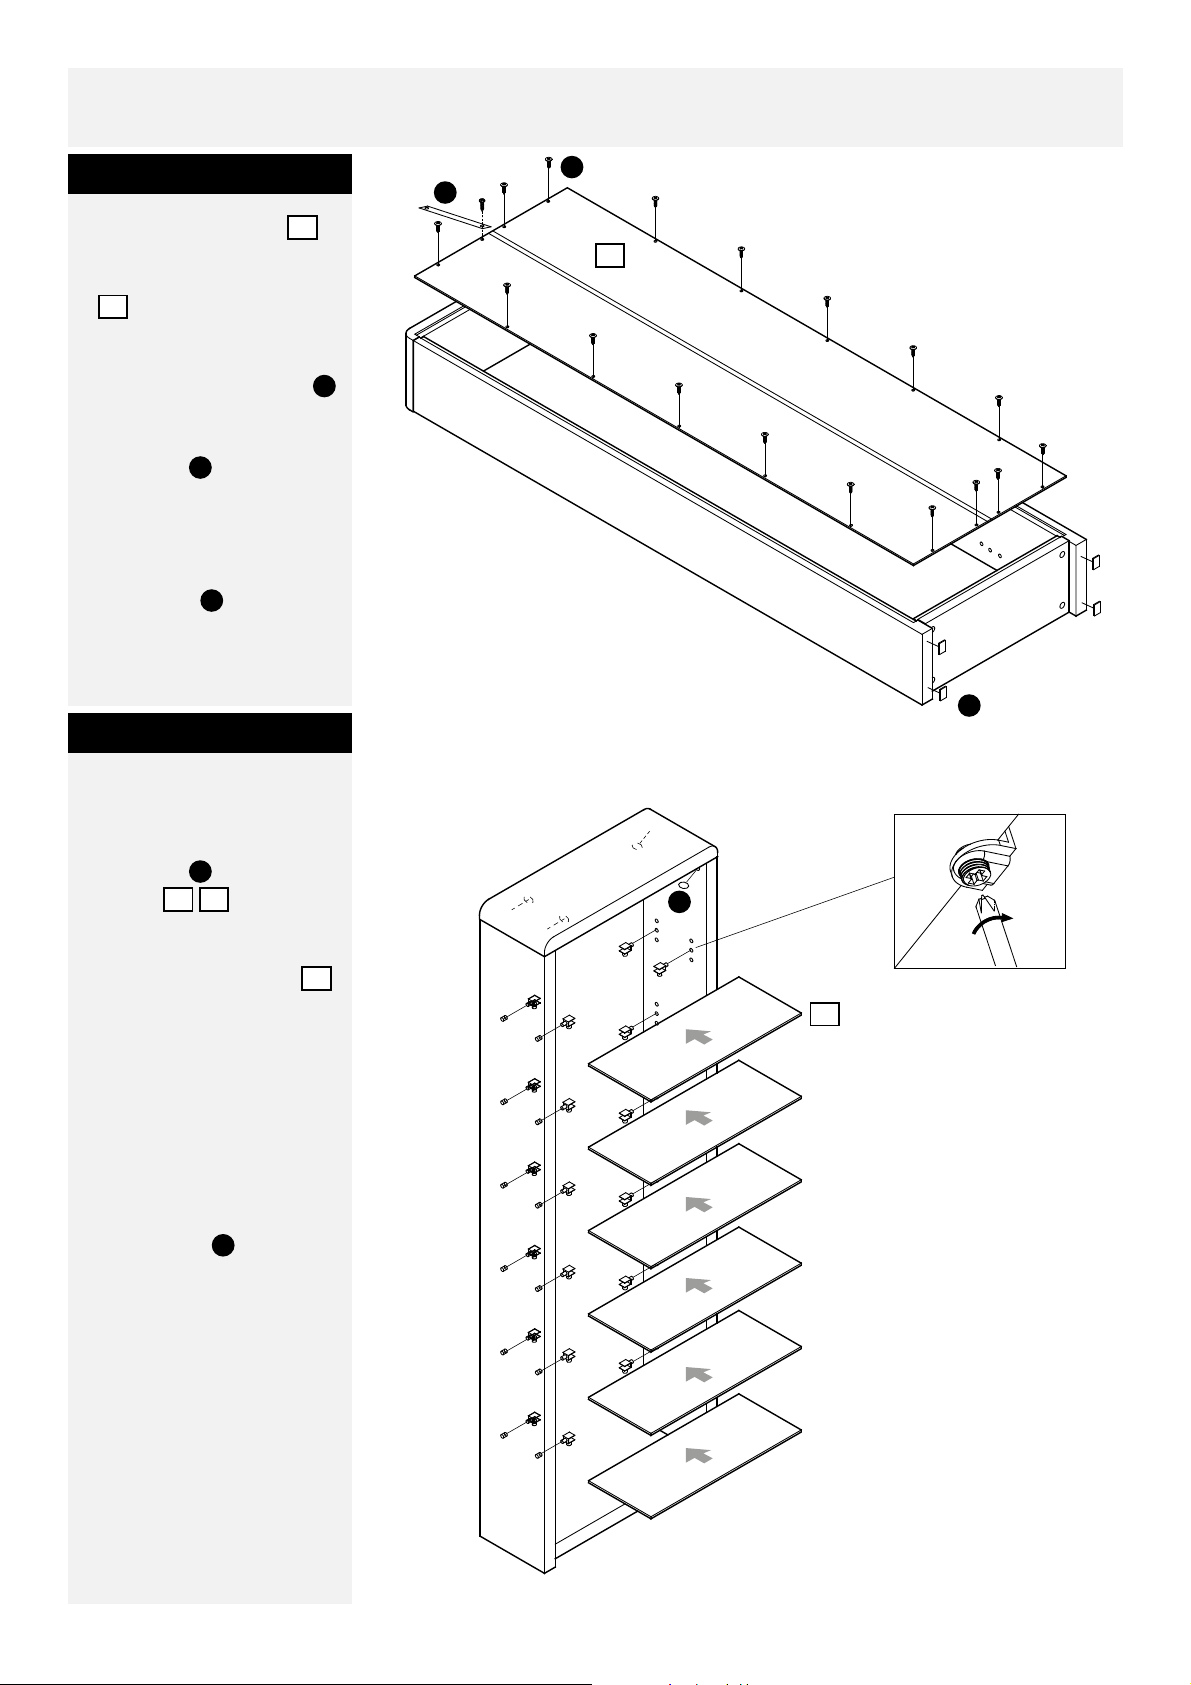
Assembly Instructions
Step
Step
5
Unfold Back Panel .
Secure the Back Panel
3
into the recess on
the edges of side panels,
top panel and bottom
shelf using 17 Screws .
Secure one end of the
Webbing to the top
H
left hole in Back panel as
shown.
Peel off the cover of the
Foot pads , attach
I
to the bottom edges of
side panels as shown.
3
D
6
D
H
3
I
Turn the unit upright.
Firmly push Shelf
supports into Side
panels at desired
E
1 2
height.
Insert Glass shelves
6
into the shelf supports
and secure with
screwdriver as
illustrated.
Ensure the shelf supports
are not overtightened.
Cover cam holes with
Cover pads .
J
J
6
6
Page 8
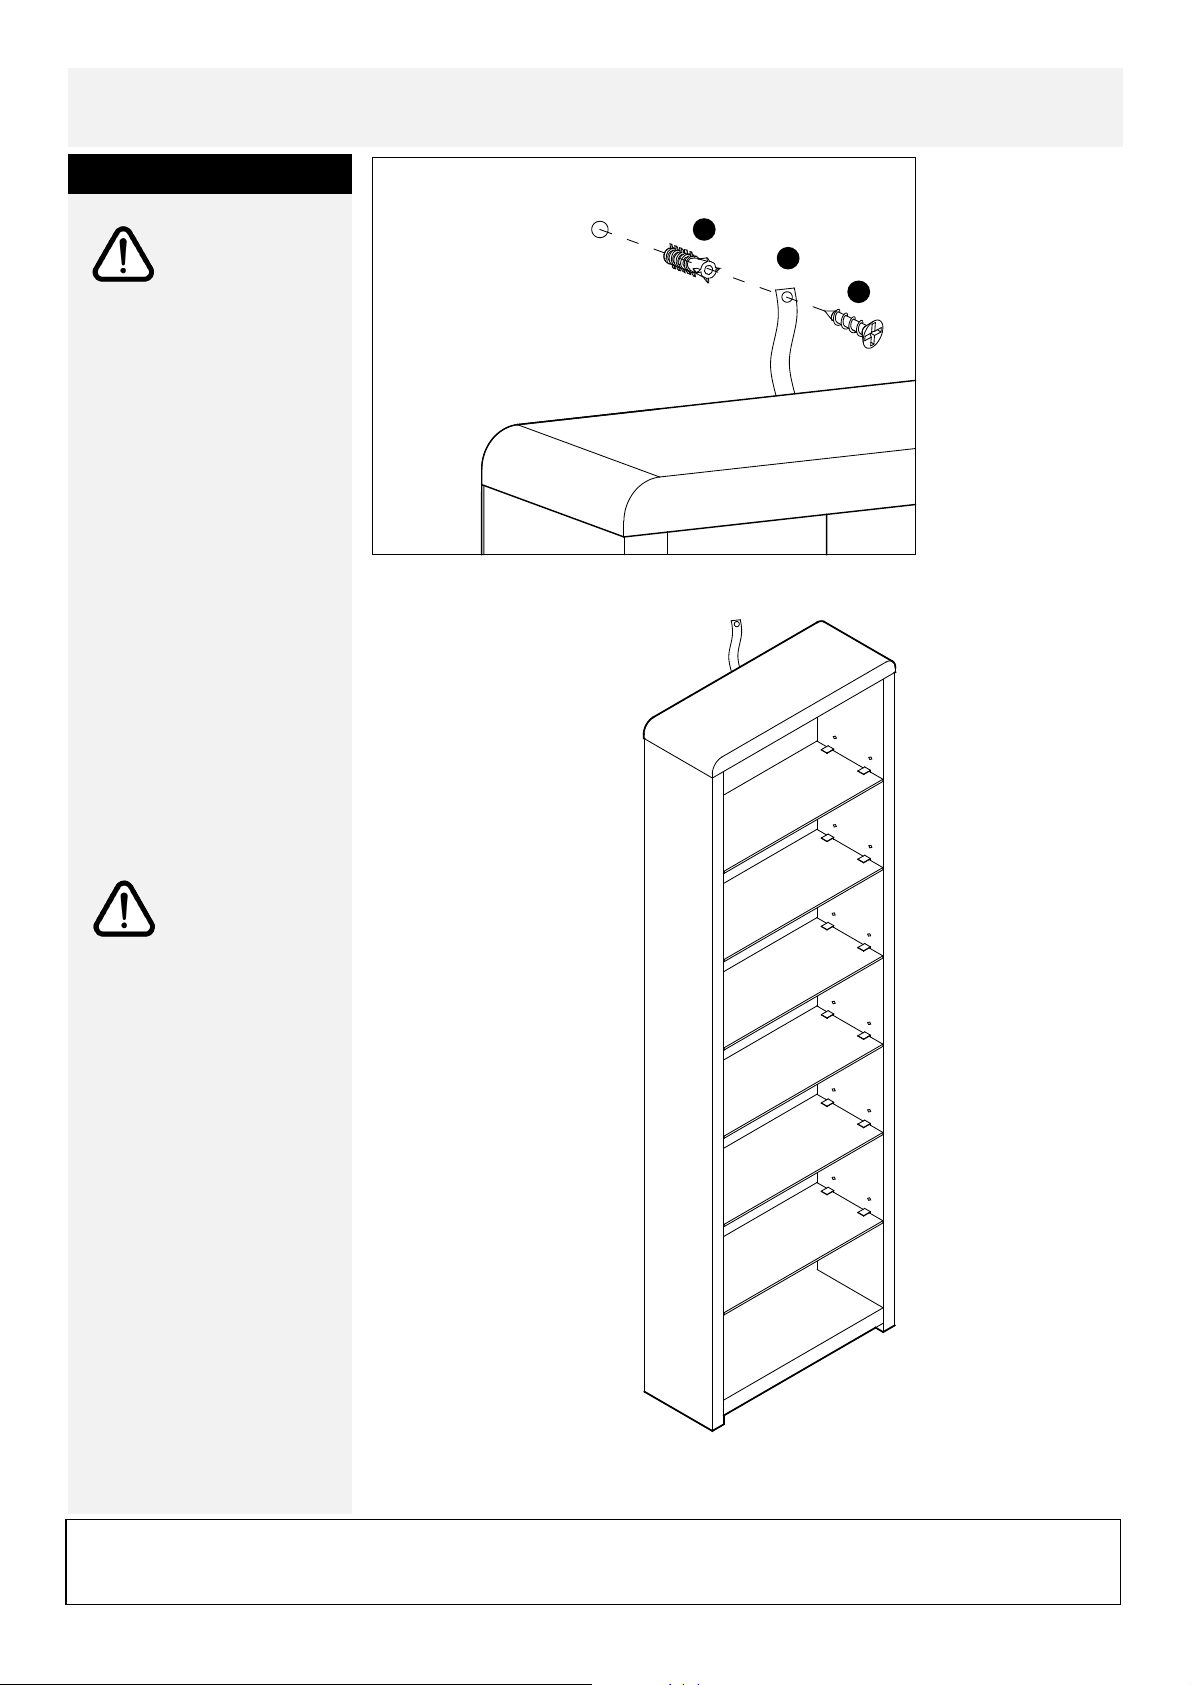
Assembly Instructions
Step
7
Note: This Step
is for securing
the unit to a
wall and should only be
attempted by
experienced persons.
You will Need the
Following:
- Another person to
assist you
- Electric Drill (& Drill
Bits)
- Screwdriver
Fixings Supplied:
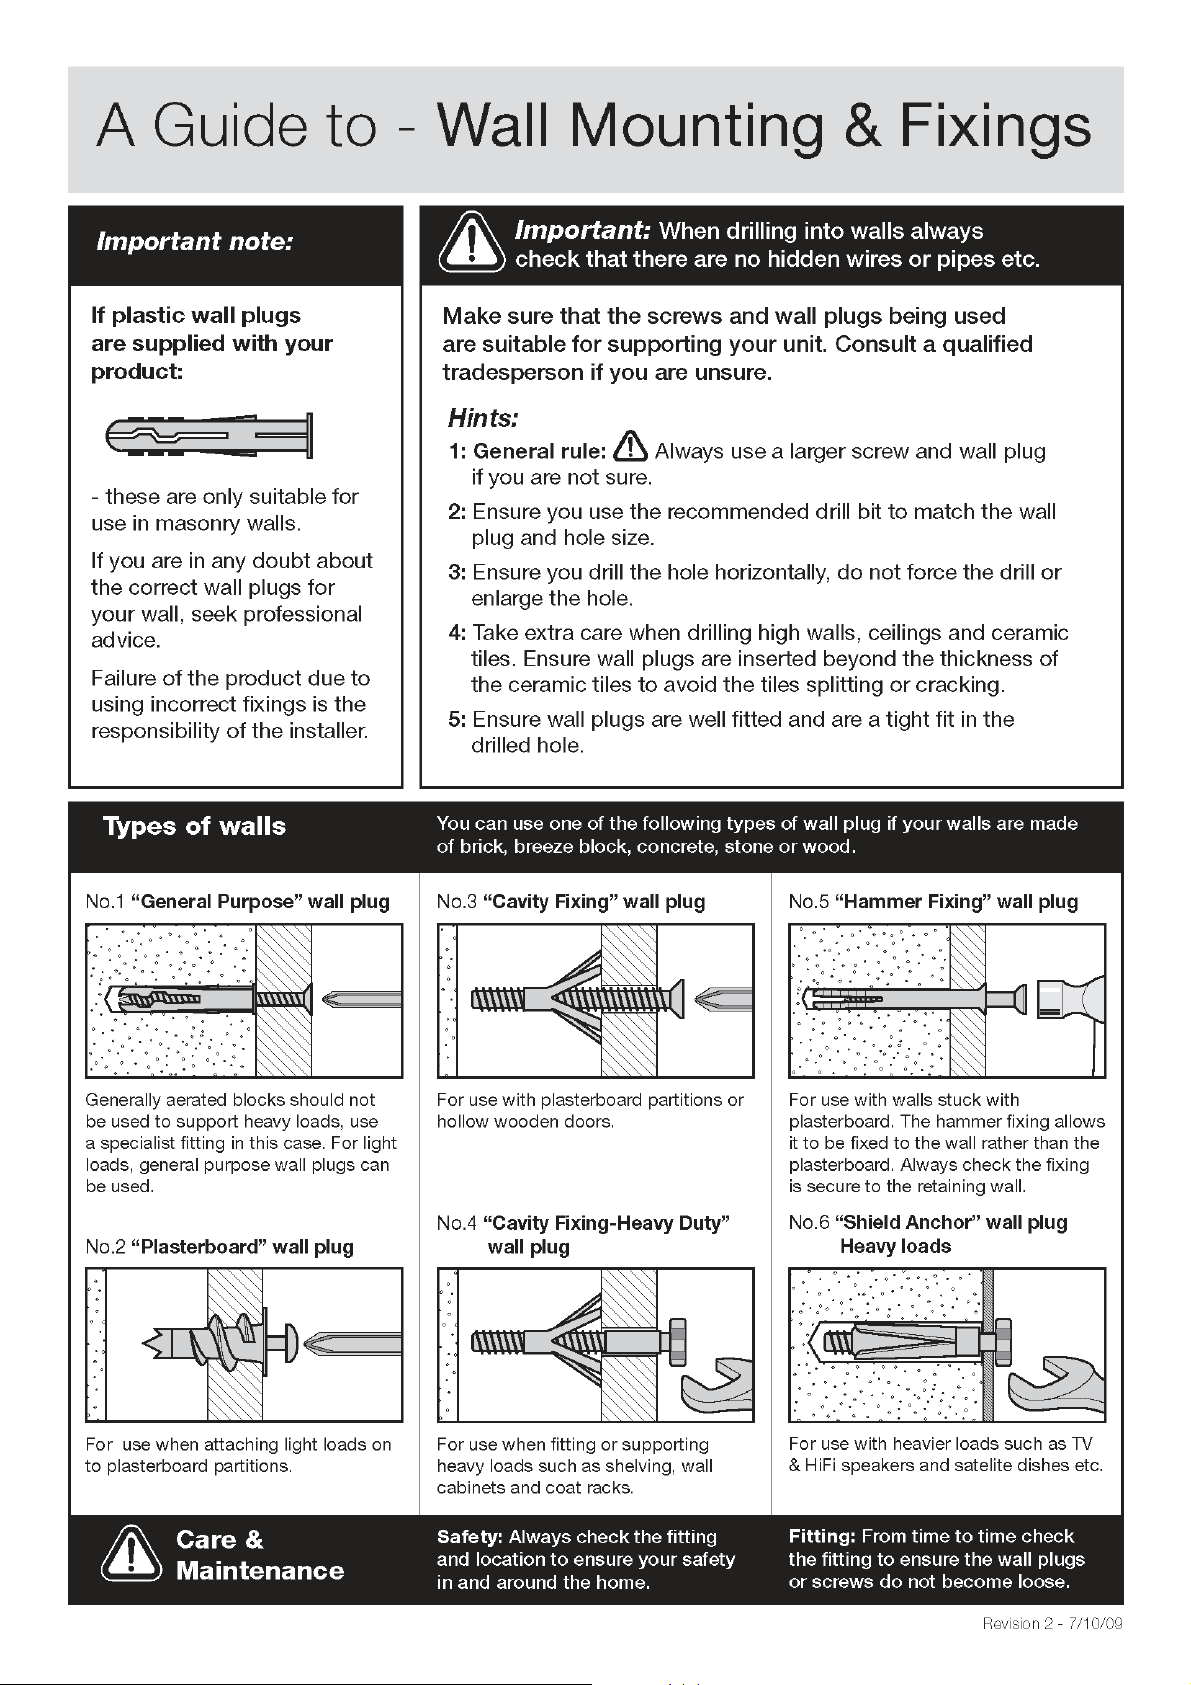
- 1 Webbing
- 1 Screw
- 1 Wall plug
Wall
G
H
F
Note: The
fixings
described are
for use with solid
masonry walls only.
Alternative fixings should
be purchased if you have
a different wall
construction.
Assembly is complete.
If you need help or have damaged or missing parts, call the Customer Help Line: 03456 400800
Home Retail Group plc. Avebury, 489-499 Avebury Boulevard. Milton Keynes. MK9 2NW
7
Page 9
 Loading...