

Page 1
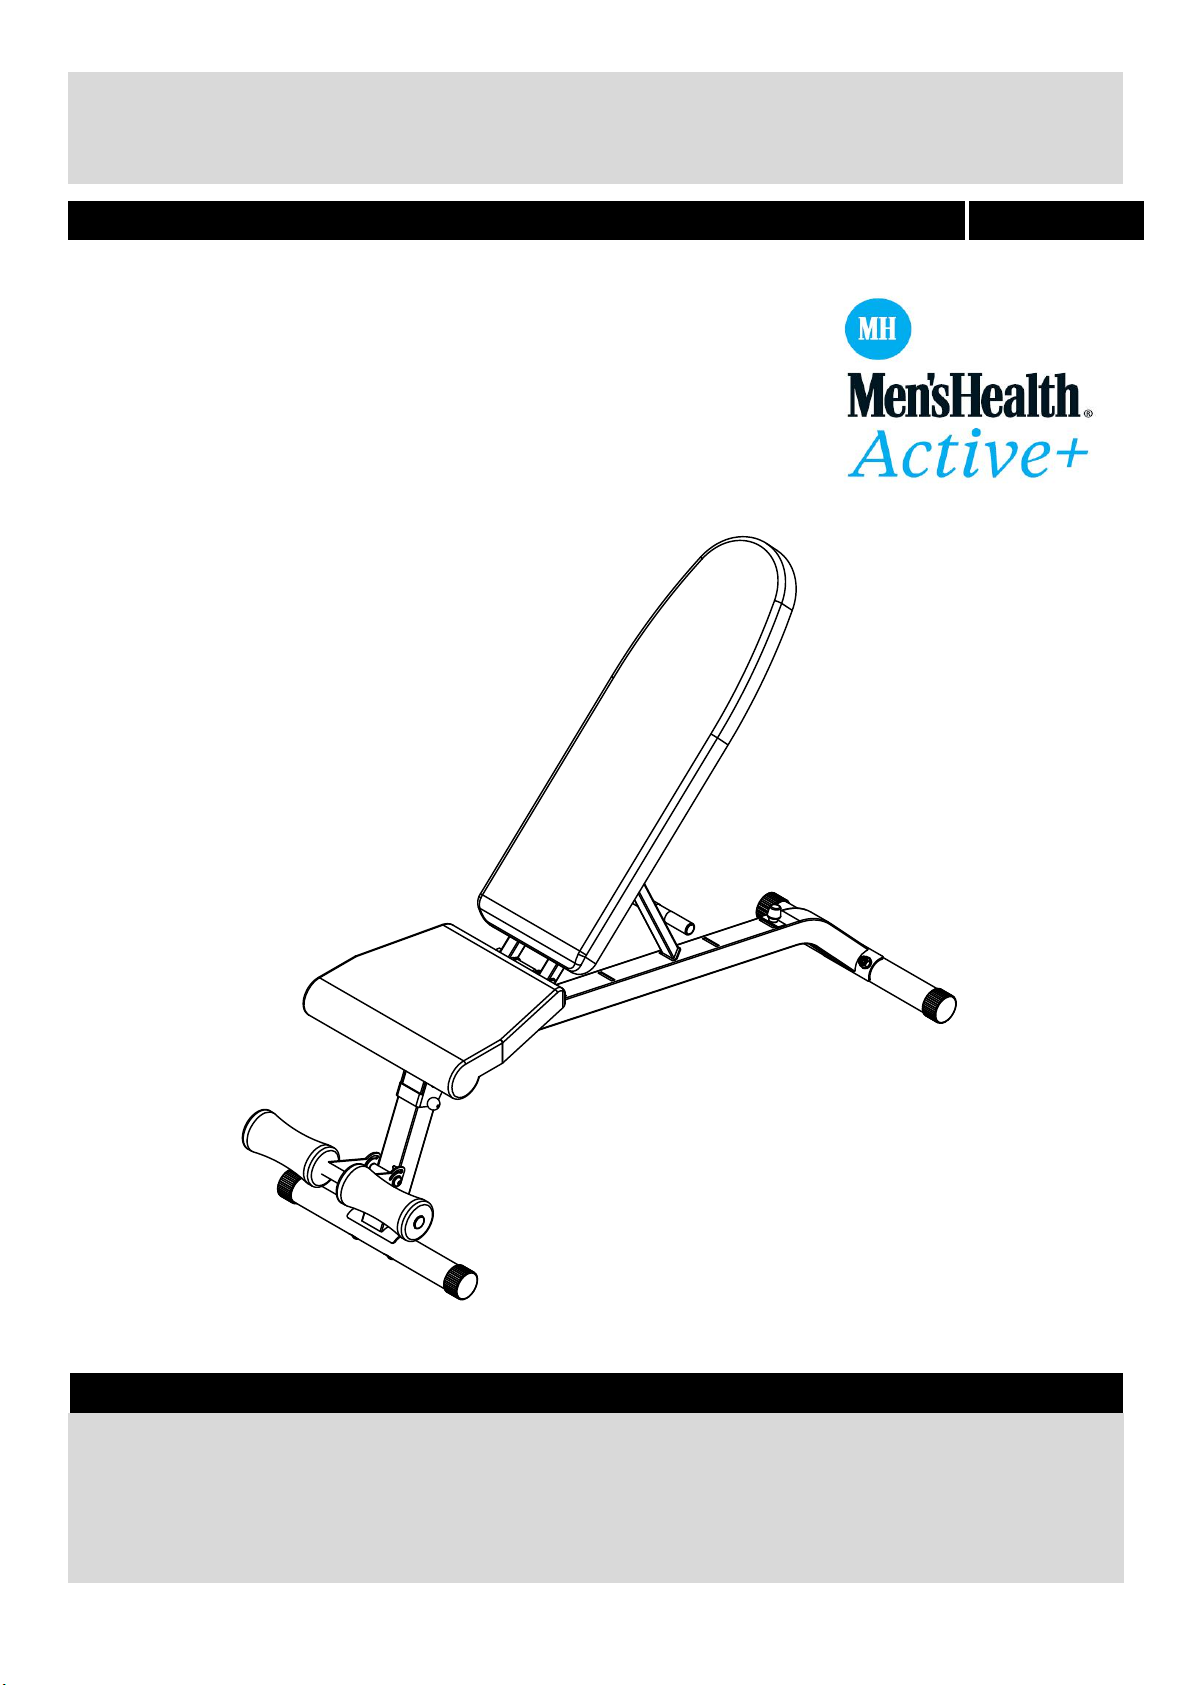
MH Incline & Decline Bench
Assembly & User Instructions-Please
Keep for future reference
760/3259
Important – Please read these instructions fully before assembly or use
These instructions contain important information which will help you get the best from your
equipment and ensure safe and correct assembly, use and maintenance.
If you need help or have damaged or missing parts, call the Customer Helpline: 0345 600 1714
or visit www.argos-support.co.uk
Issue 2 -5/18/17
Page 2
错误!未定义书签。-3
错误!未定义书签。
错误!未定义书签。
错误!未定义书签。-10
11
错误!未定义书签。
2-18
错误!未定义书签。
2
13
14-15
19
20
Contents
Safety Information 2
Components - Parts 3
Components - Fixings 4
Assembly Instructions 5-10
Workout Area 11
Workout
To Fold & Store Your Bench 13
Care and Maintenance 14
Exploded Parts Diagram 15
Parts List 16
Information 12
1
Page 3
Safety Information
Assembly
• The product must be installed on a stable and level
surface.
• Make sure you have enough space to layout the
parts before starting.
• Keep children and animals away from the exercise
area, small parts could pose a choking hazard if
swallowed.
• Dispose of all packaging carefully and responsibly.
• Check you have all the components and tools
listed in the parts list, bearing in mind that, for ease
of assembly, some components are pre-assembled.
Use
• It is the responsibility of the owner to ensure that
all users of this product are properly informed as to
how to use this product safely.
• This product is intended for domestic use only.
Do not use in any commercial, rental, or institutional
setting.
• Use the equipment only for intended use, as
described in this manual. Do not use attachments
not recommended by the manufacturer.
• Keep this equipment indoors, away from
moisture and dust. Do not put the equipment in a
garage, outbuilding, covered patio, or near water.
• Your product is intended for use in clean dry
conditions. You should avoid storage in excessively
cold or damp places as this may lead to corrosion
and other related problems that are outside our
control.
• Keep unsupervised children away from the
equipment.
• Disabled persons should not use the equipment
without a qualified person or doctor in attendance.
• Always wear appropriate workout clothing when
exercising. Do not wear loose or baggy clothing,
as it may get caught in the equipment. Wear
trainers to protect your feet while exercising.
• Do not place any sharp objects around the
equipment.
• Keep hands away from all moving parts.
• If any of the adjustment devices are left projecting,
they could interfere with the user’s movement.
• Before using the equipment to exercise, always
perform stretching exercises to properly warm up.
• Only one person at a time should use the
equipment.
• A spotter is recommended during exercise.
• If the user experiences dizziness, nausea, chest
pain, or other abnormal symptoms stop the
workout and seek immediate medical attention.
• Injuries to health may result from incorrect or
excessive training.
• This product is suitable for a maximum user weight
of: 120kg.
• The maximum training mass is 50kg (i.e. the total
additional weight used for your workout).
• This product conforms to: BS EN ISO 20957-1 and
-4 Class (H) - Home Use
.
Warning: Before beginning any exercise program, consult your Doctor. This is especially
Important – Please read fully before assembly or use
This exercise equipment is built for optimum safety. However, certain precautions apply whenever you
operate a piece of exercise equipment.Be sure to read the entire manual before you assemble,operate or
use this equipment.
MUST read all instructions before using any fitness equipment. Argos and its associates assumes no
responsibility for personal injury or property damage sustained by or through the use of this product.
important for persons over the age of 35 or persons with pre-existing health problems. You
2
Page 4
Components - Parts
If you have damaged or missing parts, please call
the Customer Helpline: 0345 600 1714
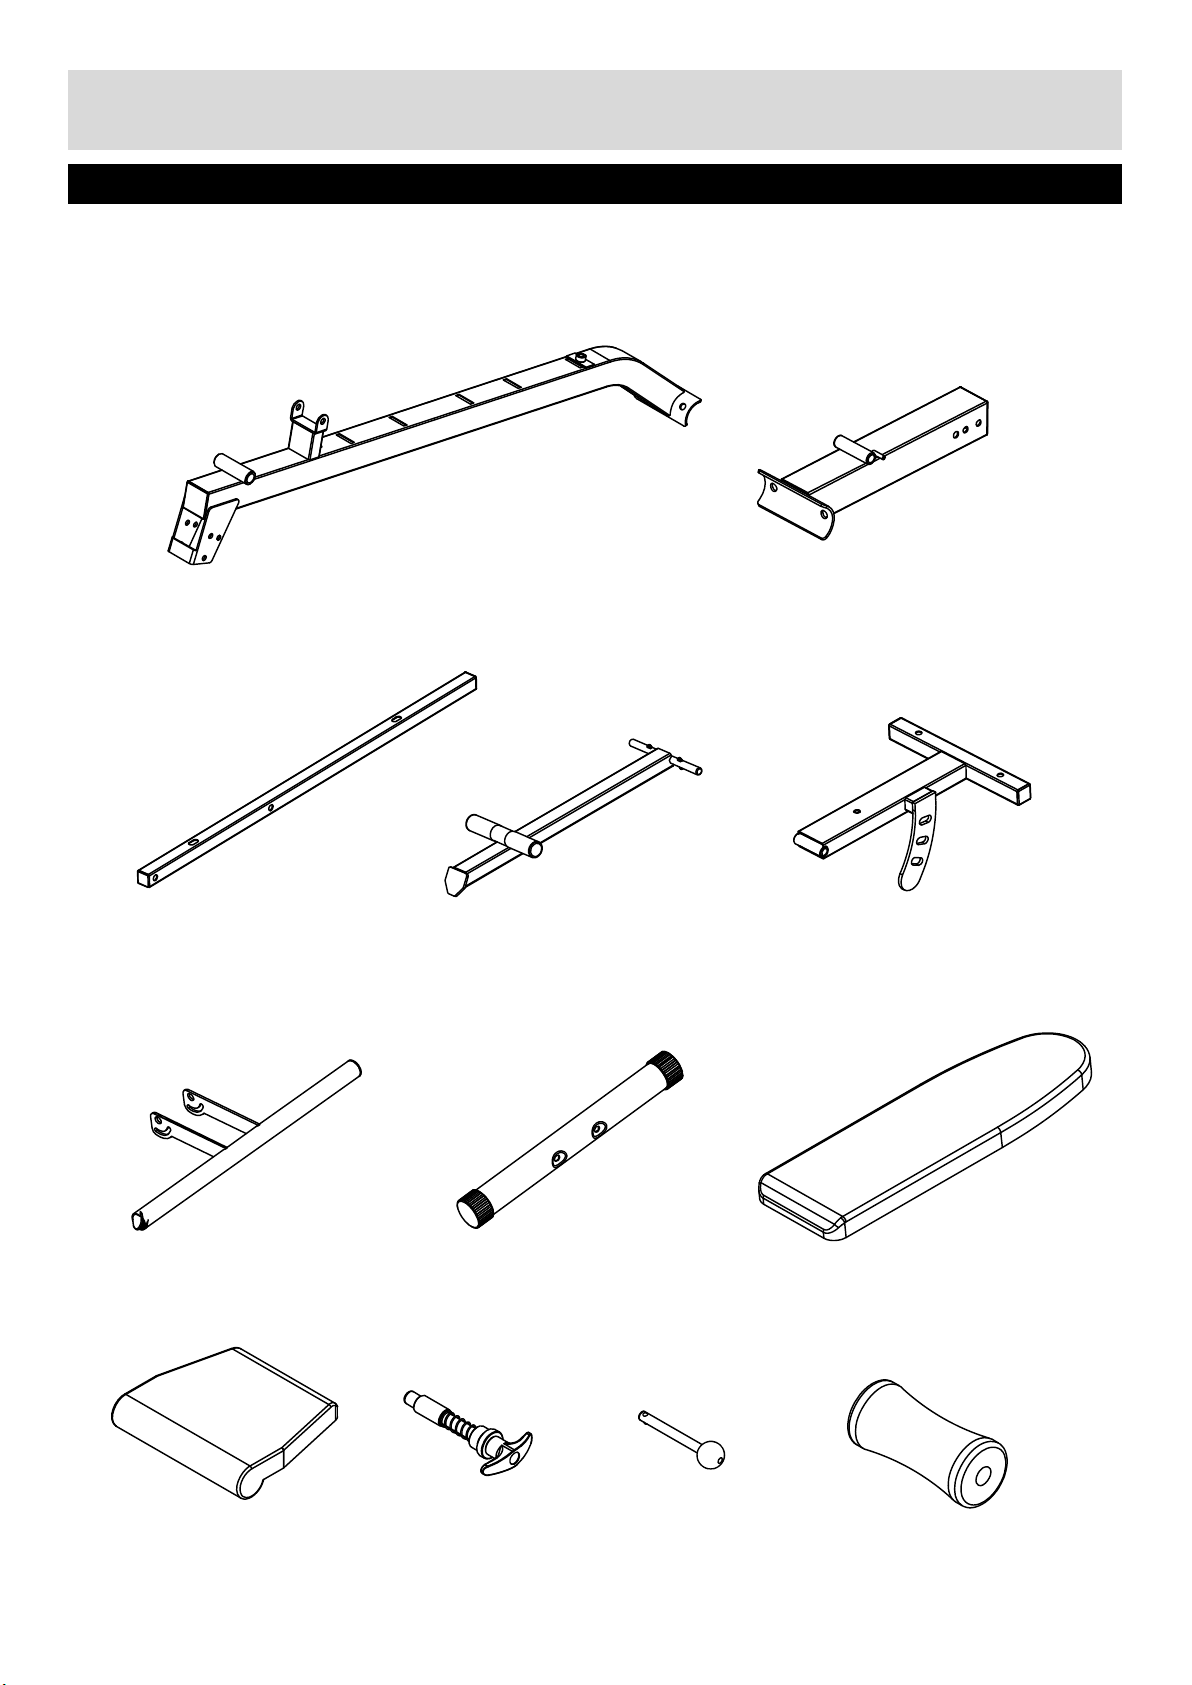
Please check you have all parts listed below
Note: Some of the smaller components may be pre-fitted to larger components. Please check carefully
before contacting Argos regarding any missing components.
Total mass of the product is13.8kg.The dimensions of the equipment after being assembled are (width)46 ×
(depht)140×(height)128.5 cm.
1.Main Base Frame×1
3. Backrest Pad
Support ×2
4. Backrest Pad
Incline
Support ×1
2. Front Support Frame×1
5. Seat Pad Support ×1
6. Leg Developer ×1
9. Seat Pad ×1
3
17. Spring Pin ×1
7. Stabilizer ×2
18.Lock Pin×1
8.Backrest Pad ×1
24.Foam Roll ×2
Page 5
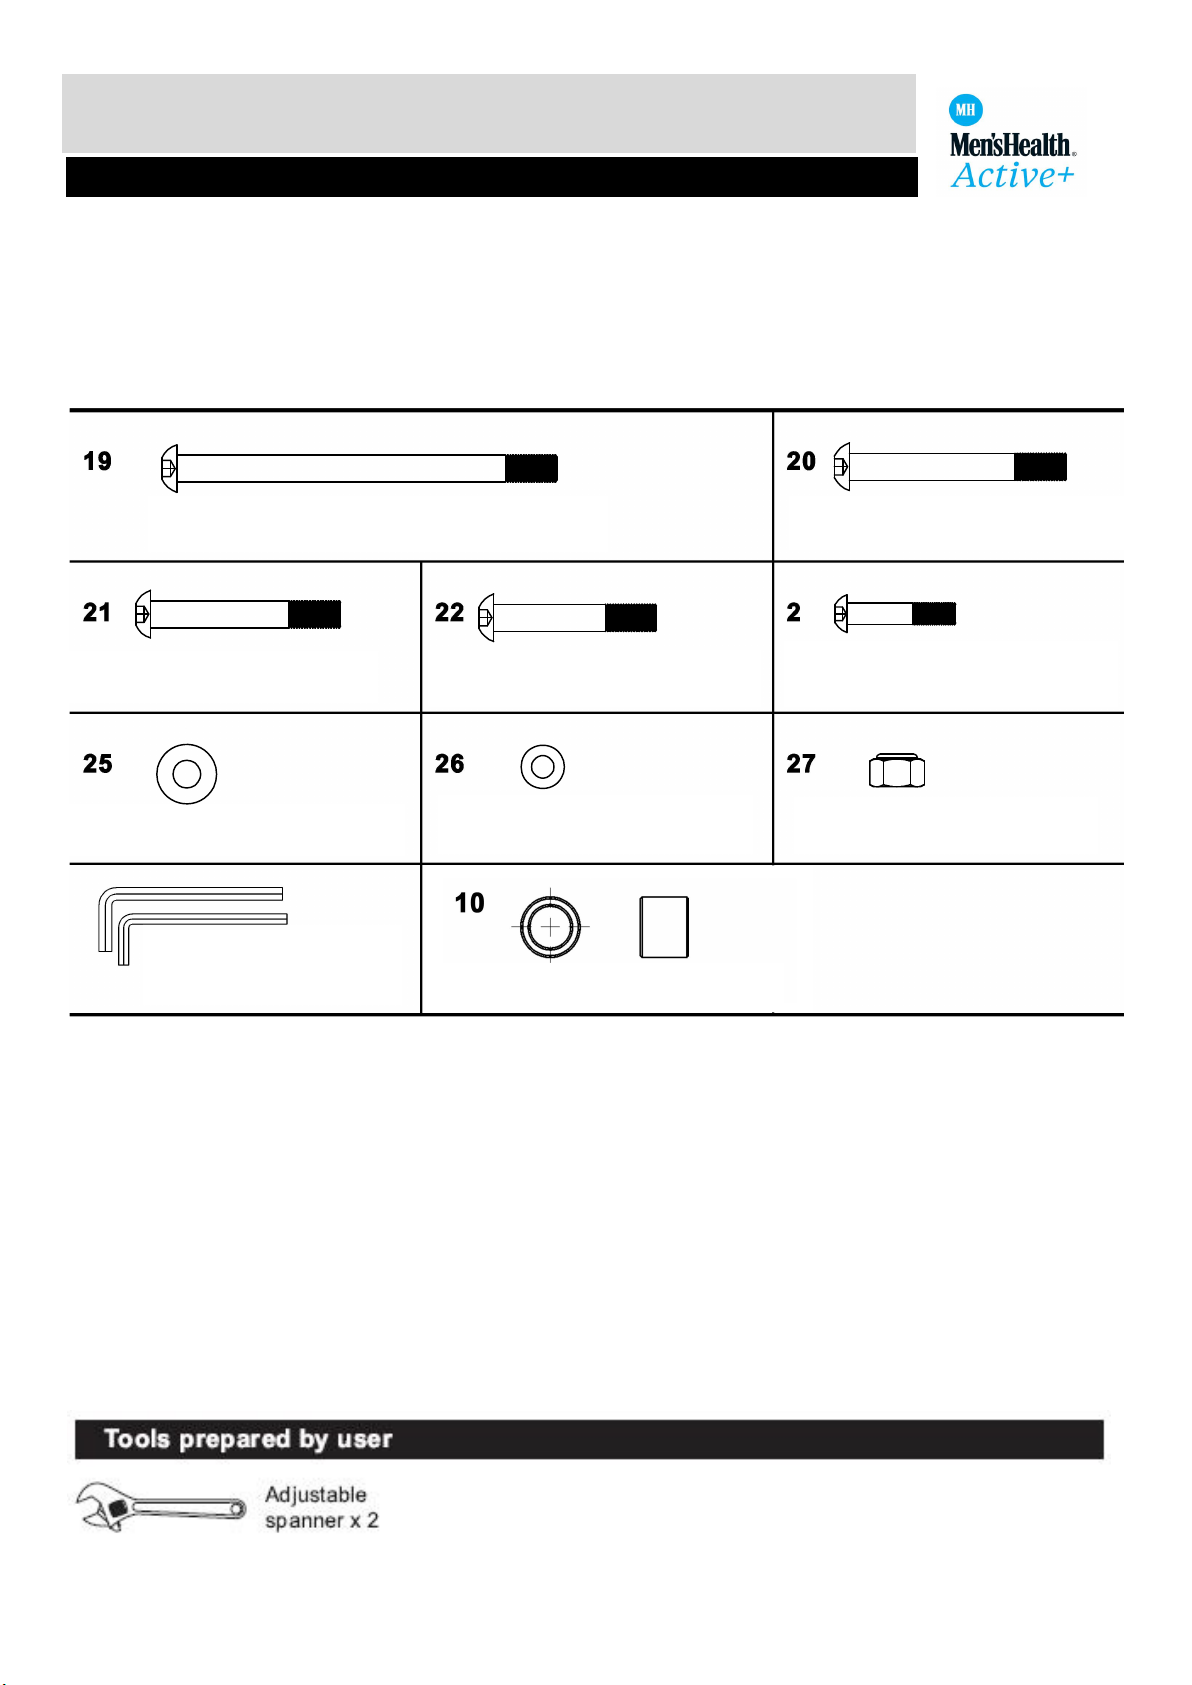
Components - Fixings
Please check you have all parts listed below
Note: The quantities below are the correct amount to complete the assembly. In some cases more hardware
may be supplied than are required. Some of the fixings are pre-fitted to the larger components. Please
check carefully before contacting Argos regarding any missing fixings.
M10X140 Allen Bolt X1 M10X80 Allen BoltX1
3
M10X70 Allen Bolt X1
φ10 washer X14
5# Allen Bolt Wrench X1
6# Allen Bolt Wrench X1
M10X60 Allen Bolt X4
8washer X7
Φ
Ø16×Ø11×13 BushingX2
M8X40
M10 Aircraft Nut X7
Allen Bolt X7
4
Page 6
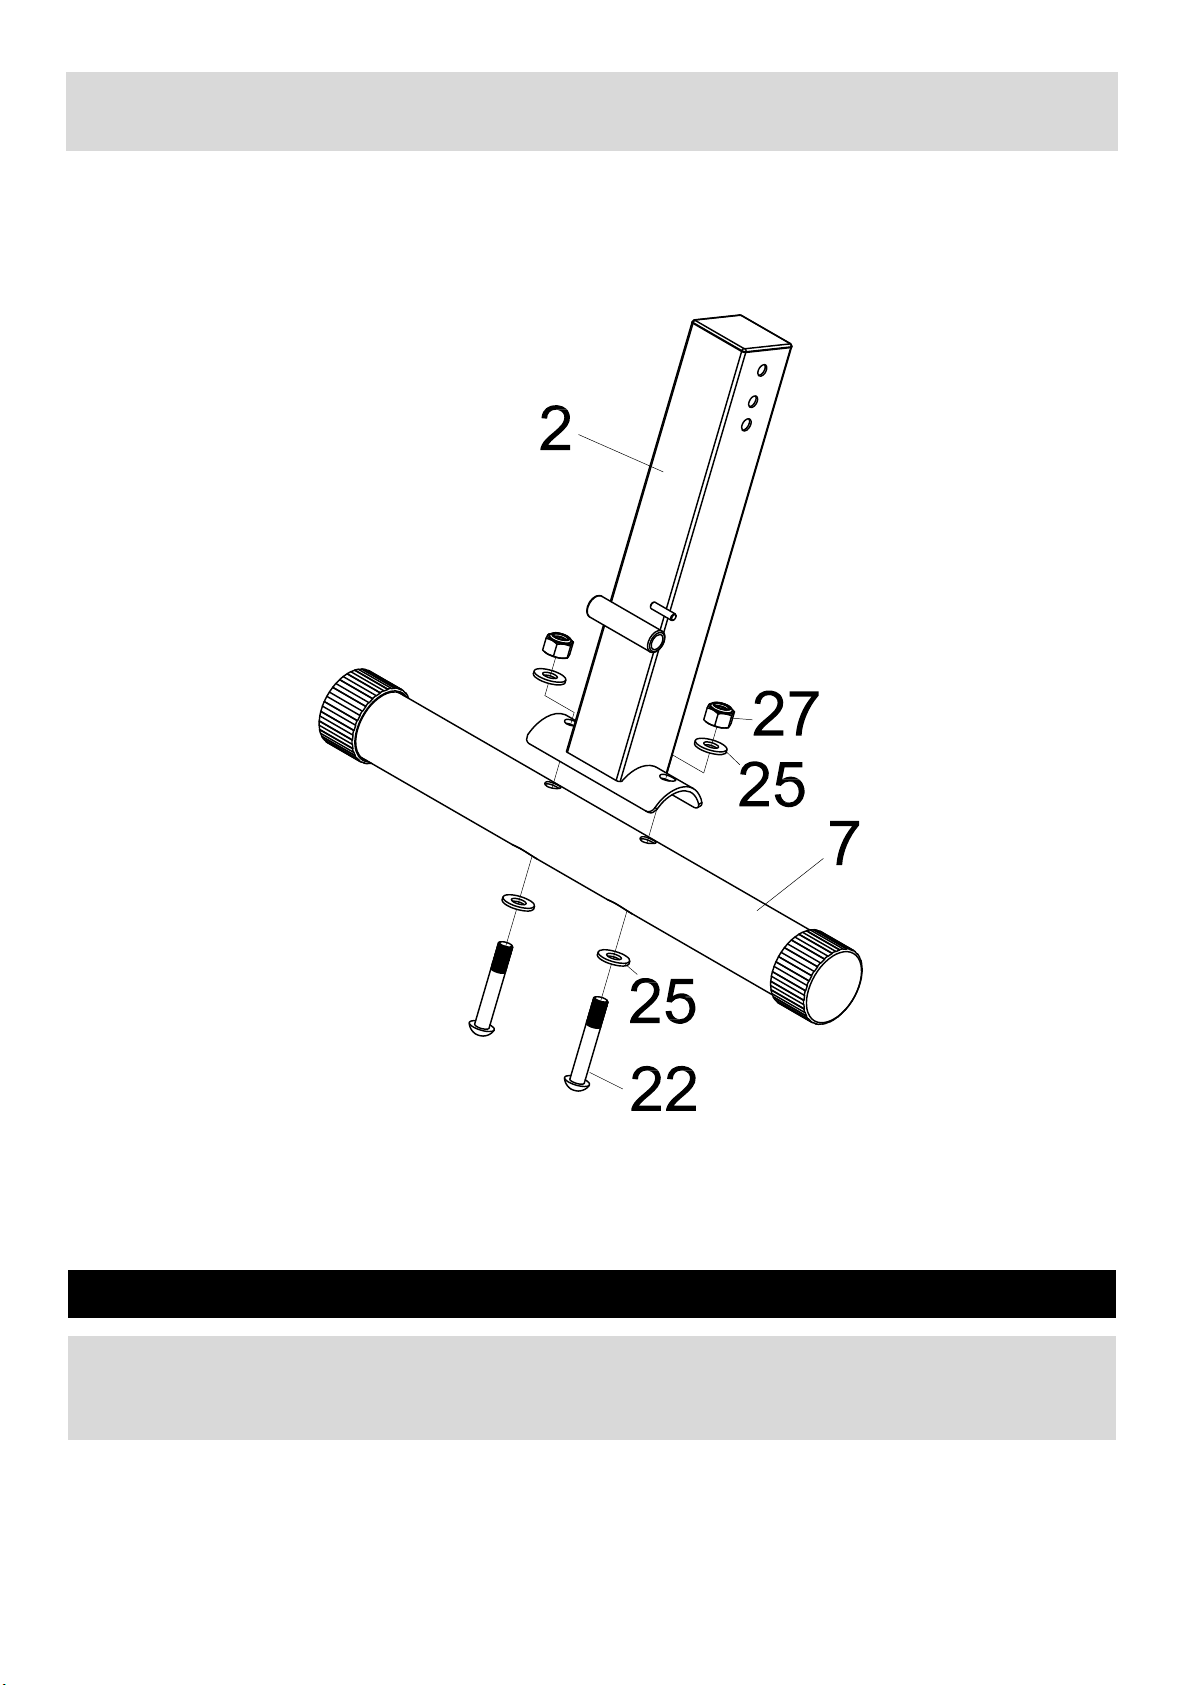
Assembly instructions
Step 1
Attached the Front Support Frame(2) onto the Stabilizer(7),Align the hole and secure with 2xM10X60
Allen Bolts(22), 4xØ10 Washers (25)
5
and 2XM10 Aircraft nuts (27).
Page 7
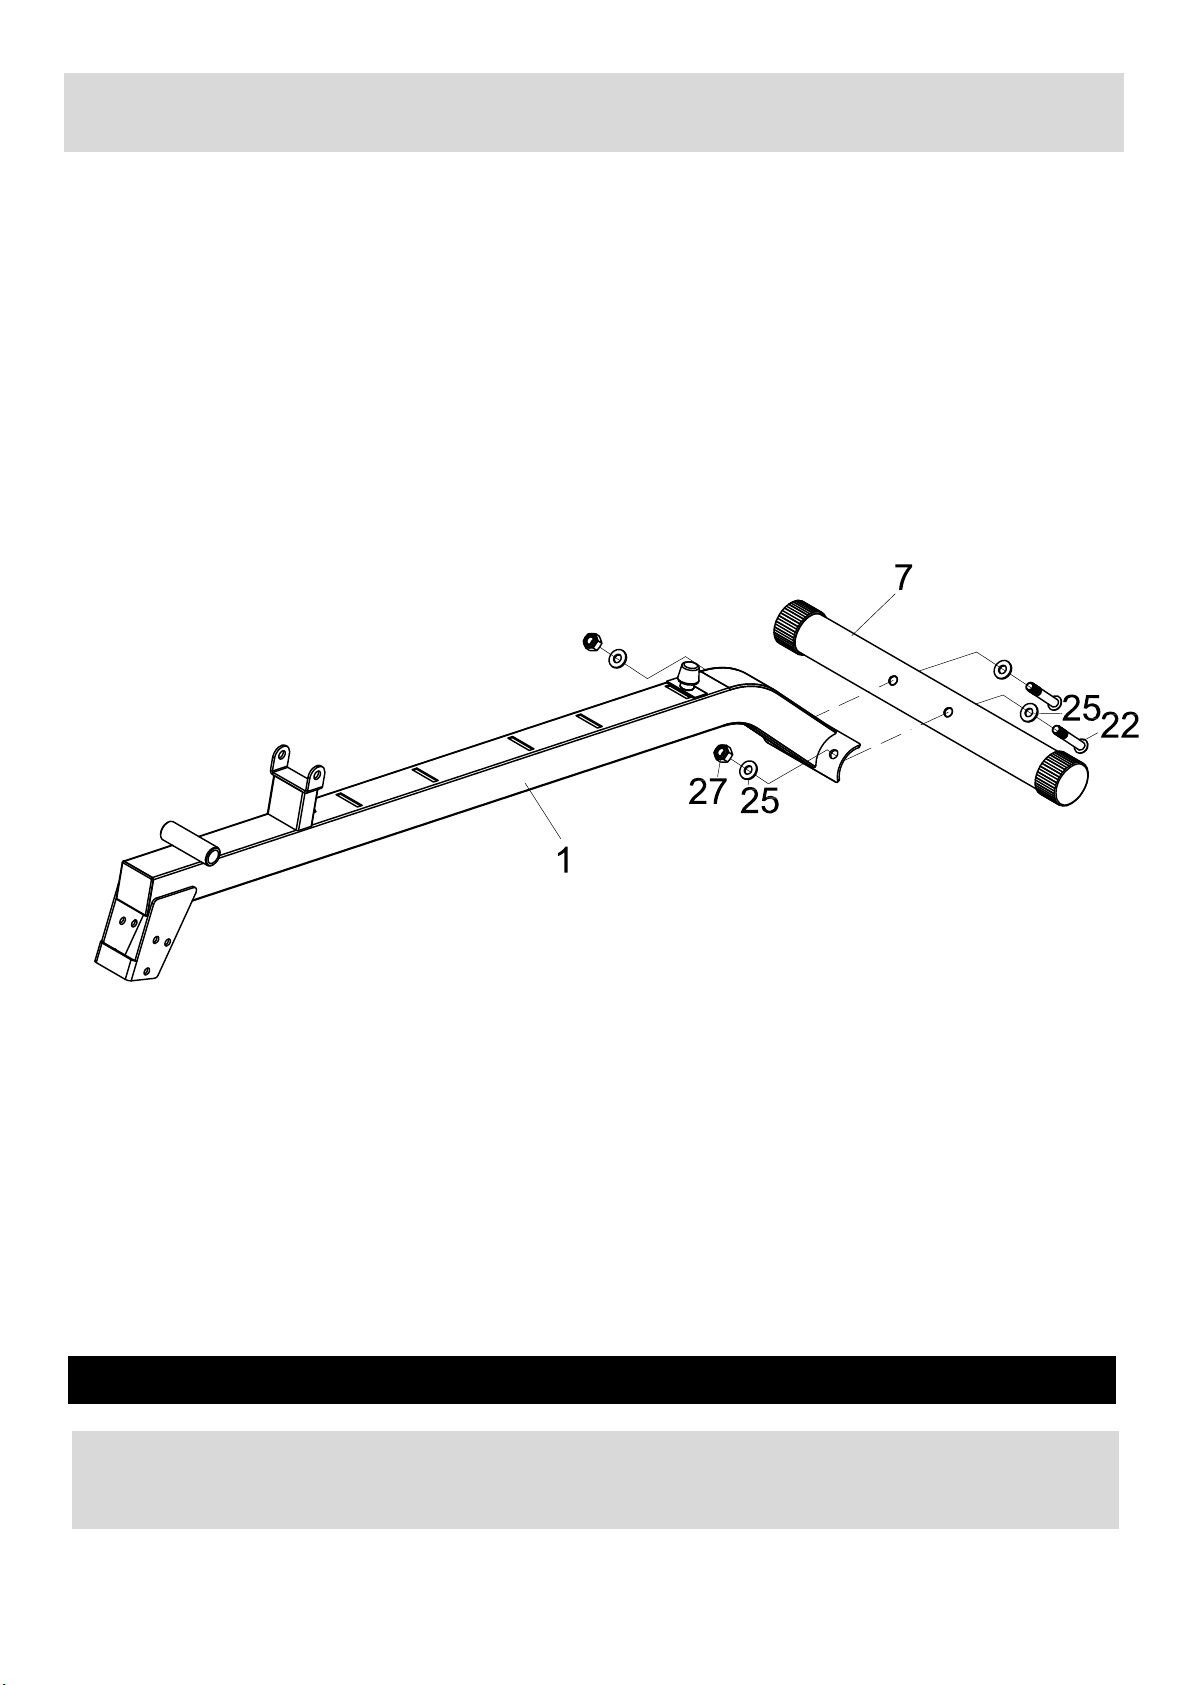
Assembly instructions
Step 2
Attach one end of Main Base Frame (1) to the Stabilizer(7), Align the hole and secure with
2xM10X60 Allen Bolts(22), 4xØ10 Washers (25)
and 2XM10 Aircraft nuts (27).
6
Page 8
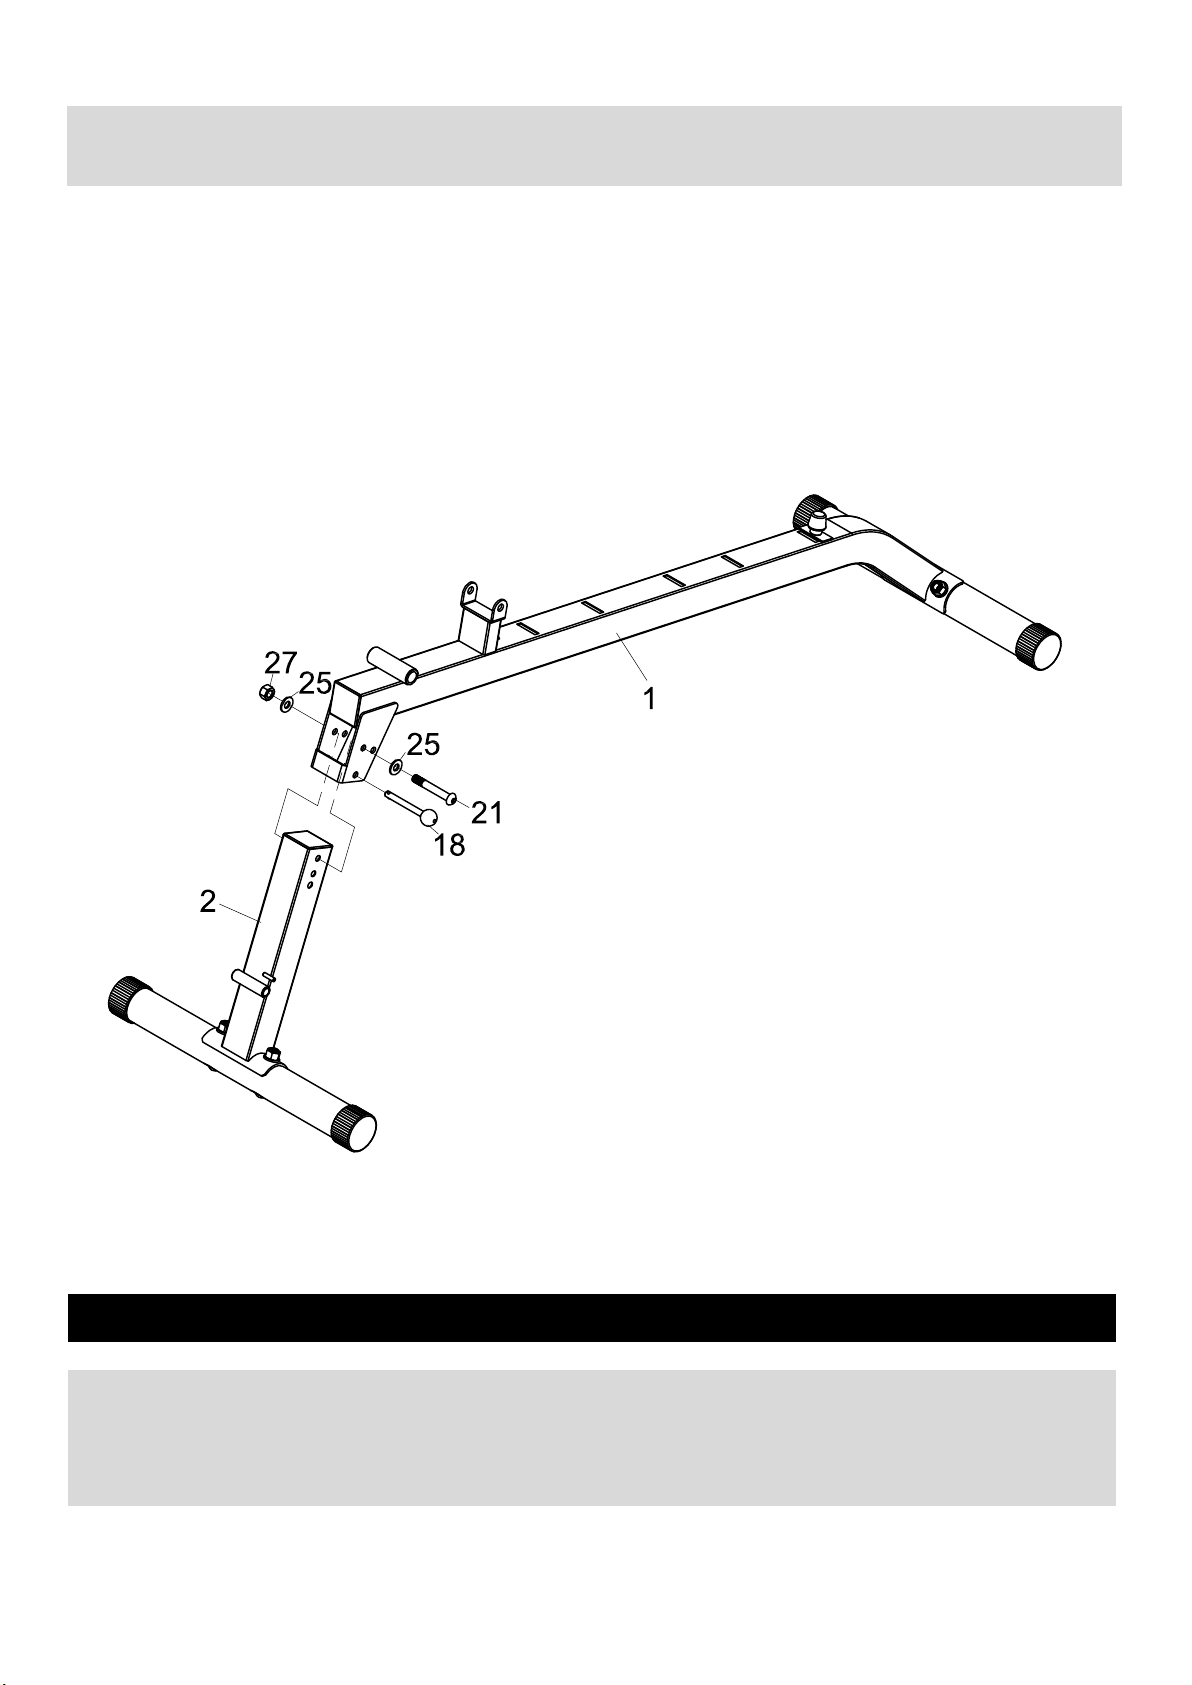
Assembly instructions
Step 3
Attach the other end of the Main Base Frame(1) to the Front Support Frame (2),Align the hole and secure
with 1xM10X70 Allen Bolt(21),2xØ10 Washers (25),1XM10 Aircraft nut(27) and Lock Pin (18) .
7
Page 9
Assembly instructions
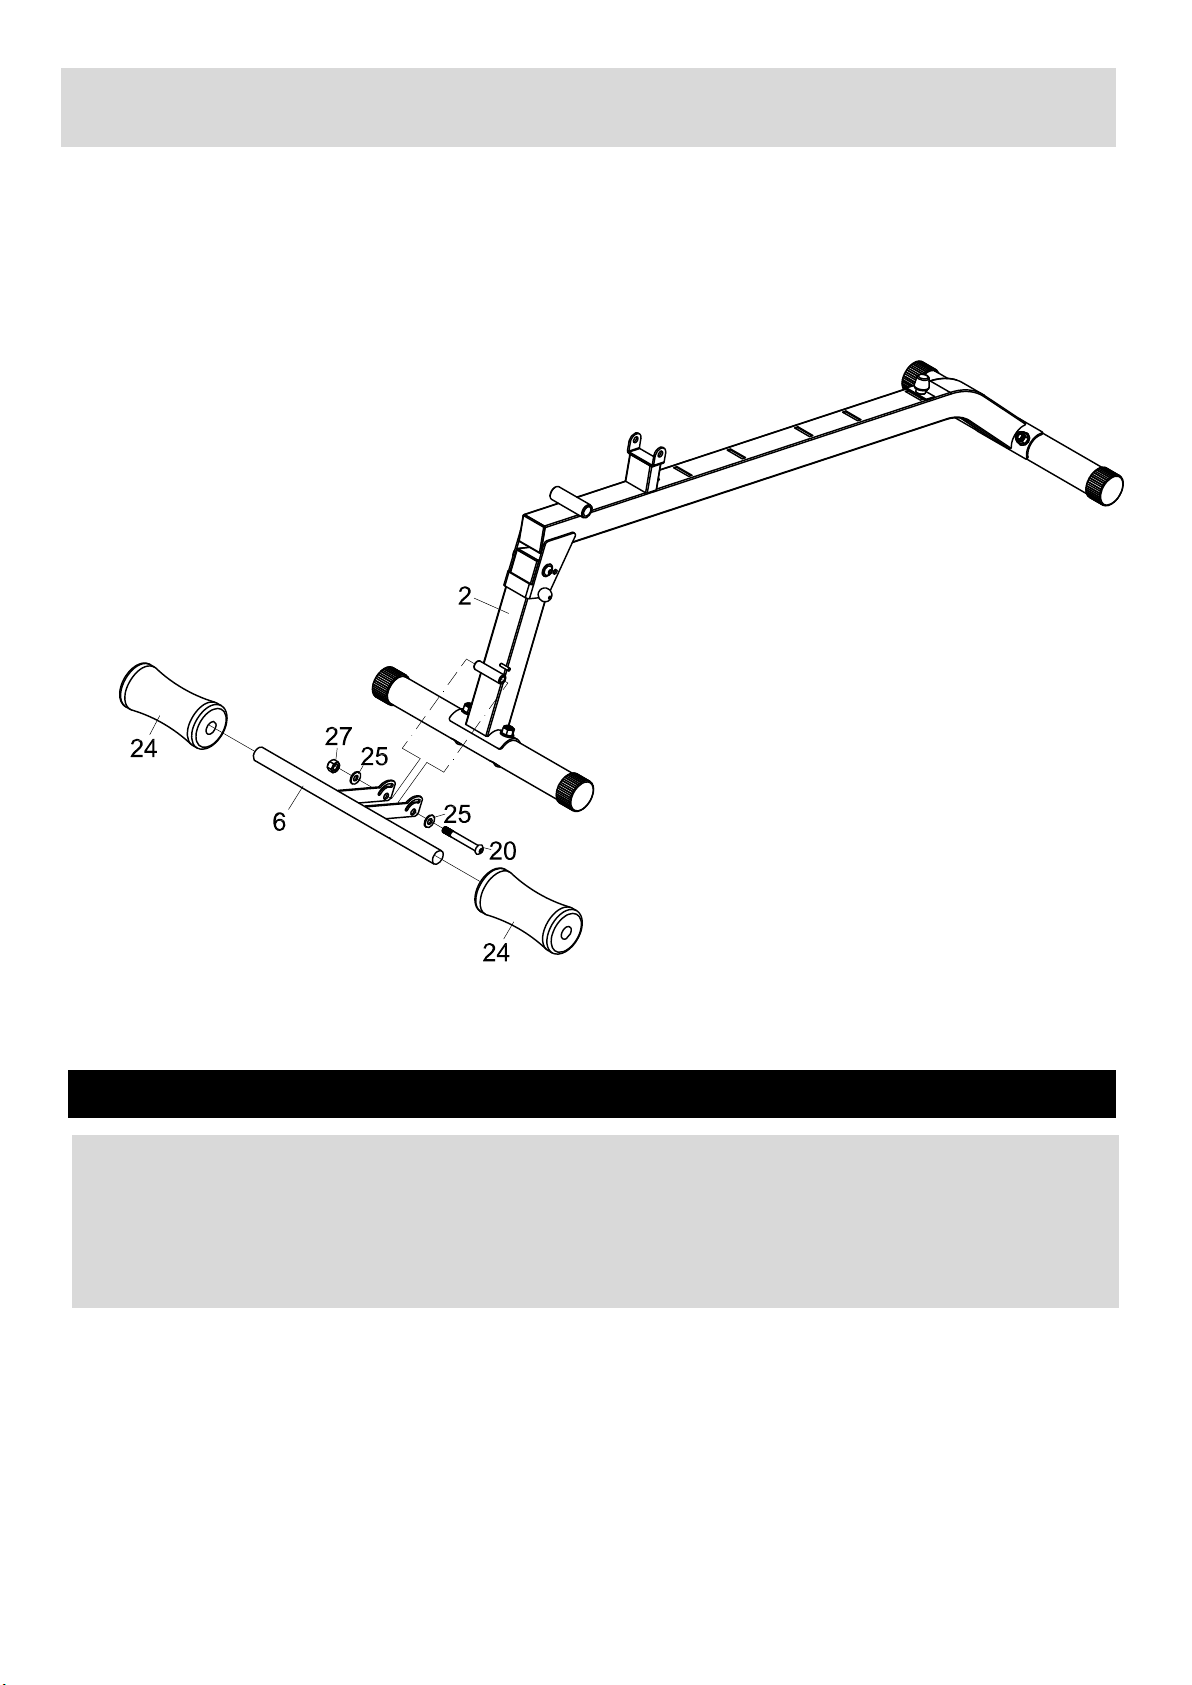
Step 4
Attach the Leg Developer(6) to the Front Support Frame(2),Align the hole and secure with 1xM10X80
Allen Bolt(20),2xØ10 Washers (25)
Push 2XFoam Roll(24) from both ends separately as the diagram shows.
and
1XM10 Aircraft nut(27).
8
Page 10
Assembly instructions
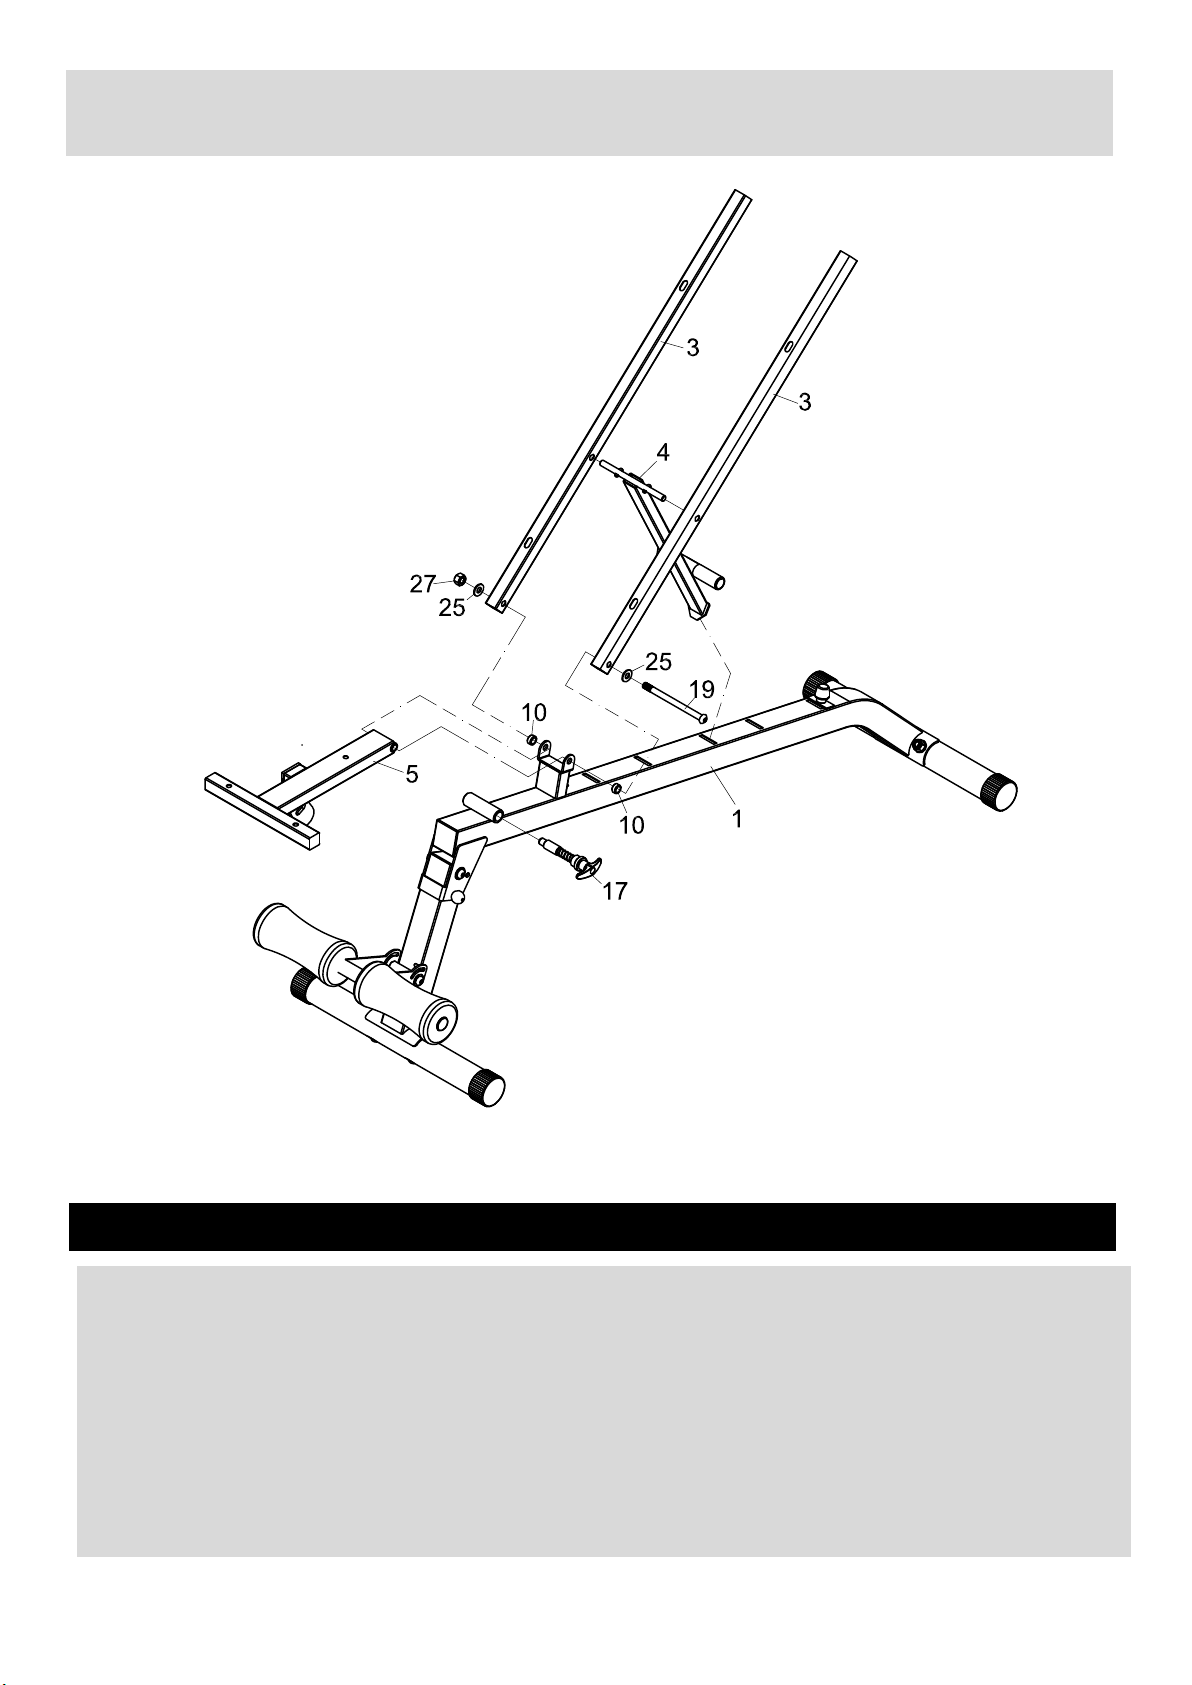
Step 5
Attach 2xBackrest Pad Support (3) to the Backrest Pad Incline Support (4) as shown in the
diagram. Then attach it and the Seat Pad Support(5) to the bracket on the Main Base Frame(1),
aligning the holes and securing them with 1xM10x140 Allen Bolt(19), 2x 10 Washers(25),
Ø
2x 16x 11x13 Bushing(10) and 1xM10 Aircraft nut(27).
Attach the Spring Pin (17) to the Main Base Frame (1) and tighten it by turning clockwise.
Seat height adjustment - Pull the Spring Pin(17) backwards and select the seat height you desire.
(If the seat is still locked by the Spring Pin(17), turn the Spring Pin(17) counter-clockwise until it
does not lock the seat when being pulled backwards.) Then restore the Spring Pin(17) and turn it
clockwise to lock the seat firmly.
9
Ø
Ø
Page 11
Assembly instructions
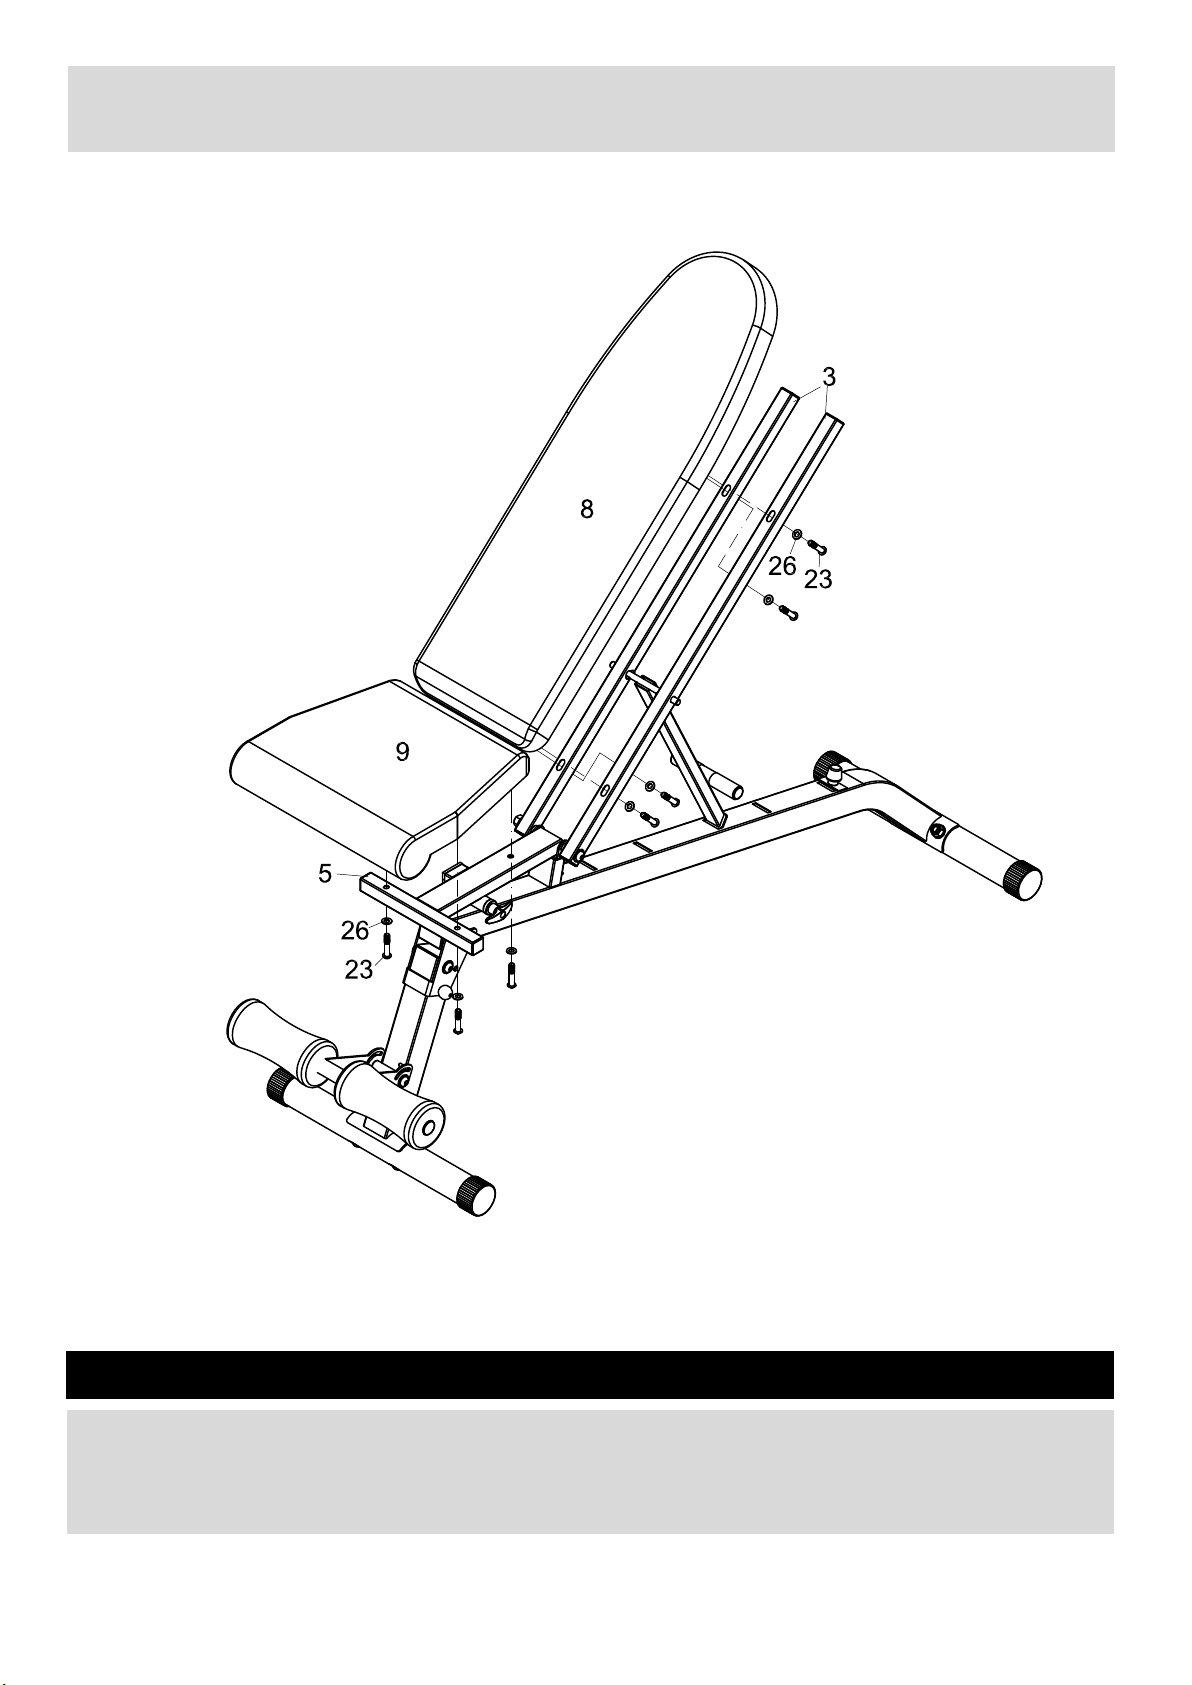
Step 7
Attach the Seat Pad(9) to the Seat Pad Support(5). Align the holes and secure with 3xM8x40
Allen Bolts (23) and 3x 8 Washers(26).
Attach the Backrest Pad(8) to the Backrest Pad Support(3). Align the holes and secure with
4xM8x40 Allen Bolts (23) and 4x 8 Washers(26).
10
Ø
Ø
Page 12
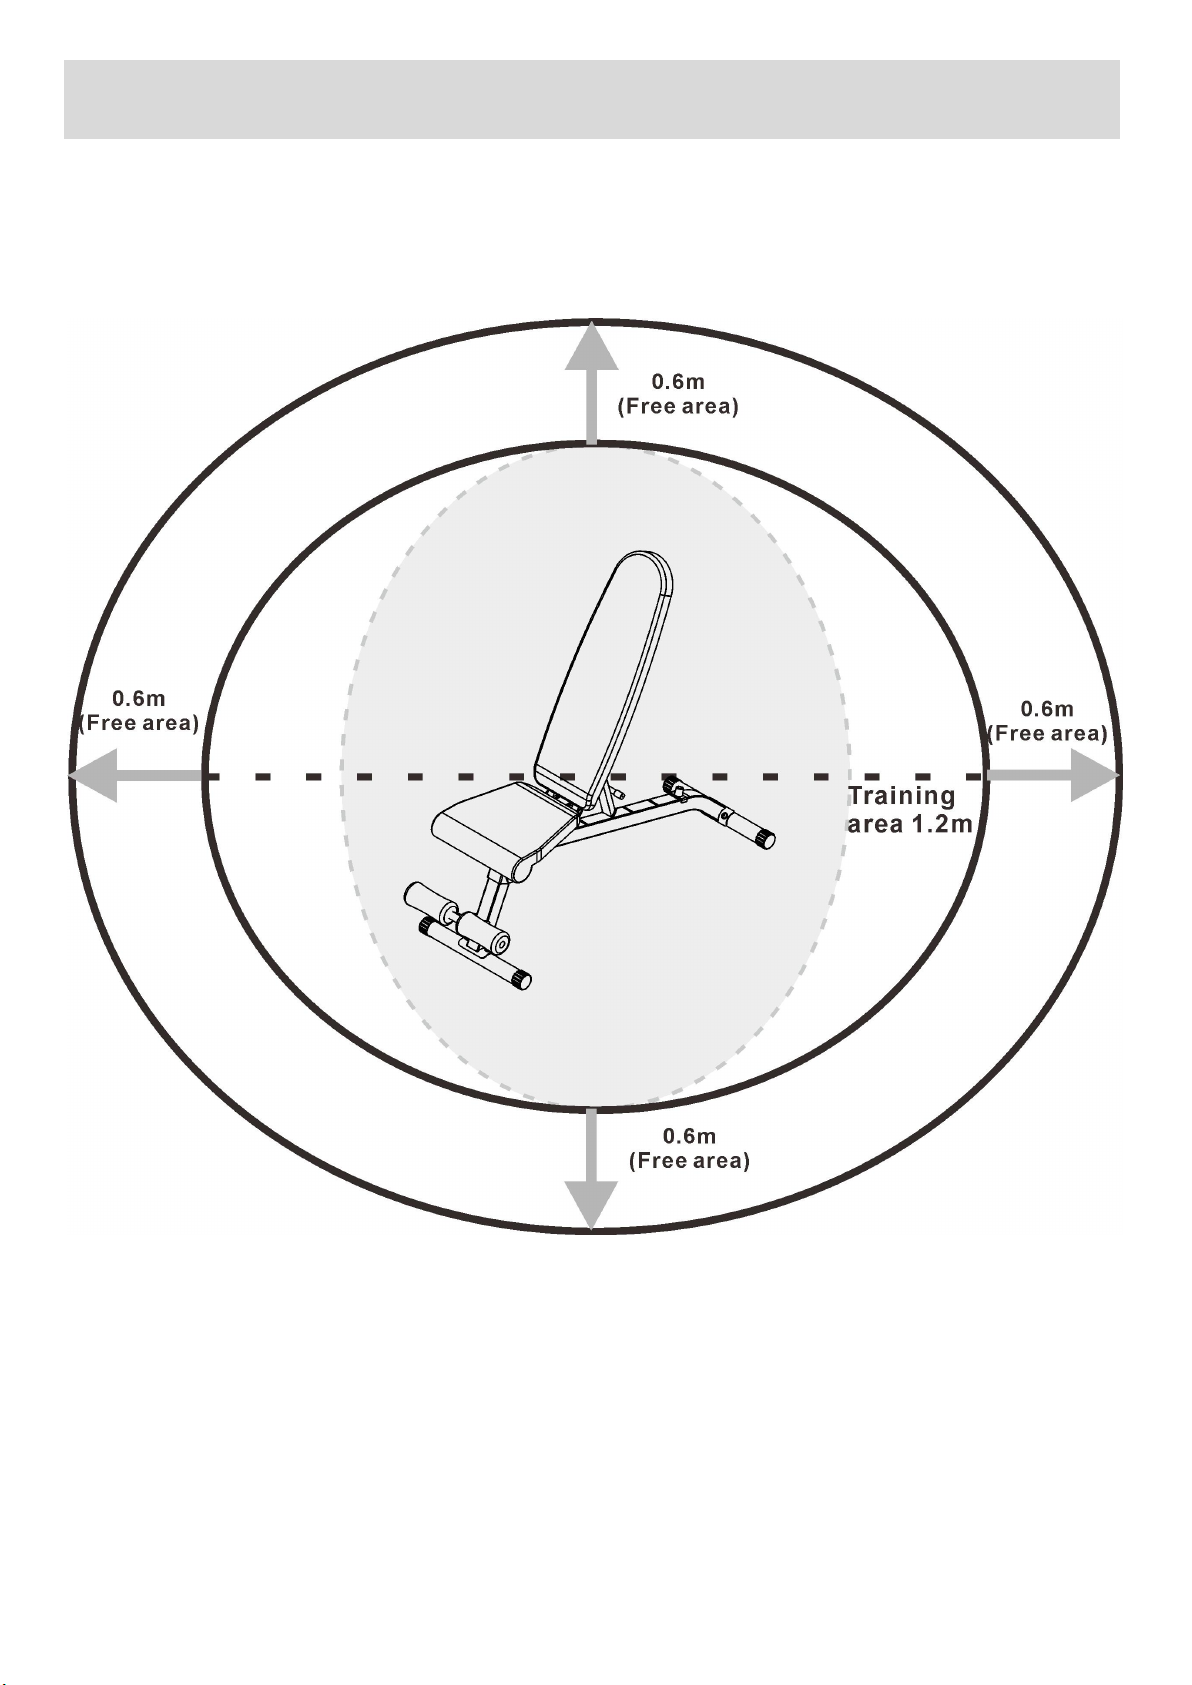
Workout Area
The free area must be at least 0.6m greater than the training area. This is a space where you can safely
dismount, without obstruction, in case of an emergency. Where two pieces of equipment are positioned
adjacent to each other the free area may be shared.
Only one person should be within the training area when the equipment is in use.
11
12
Page 13

Workout Information
If you have not exercised for a while or are unsure as to how to use this equipment we recommend that you
seek medical and professional advice to using the Men’s Heath Multi-Function Bench.
Every individual will have their own training goals and will need to workout at different levels to achieve the
desired result.
It is advised that you make sure that you have an understanding of the muscle groups you will be using and
the correct form needed to use this equipment safely. It is also recommended that you make sure that you
exercise safely and always ensure you have sufficient time to warm-up and cool-down before and after
exercise.
FREE WORKOUT RESOURCES
Go to Menshealth.co.uk/workout to explore our FREE online workout library.
The Men’s Health workout library allows you to select and tailor programmes according to your very own
training goals.
Choose your workout based on difficulty, time available, muscles worked and equipment available.
You’ll also find an exercise directory to show you how to perform individual exercises with the correct form to
help you optimise your workout.
Men’s Health - the UK’s No.1 Men’s Magazine
www.menshealth.co.uk
12
Page 14
Workout Information
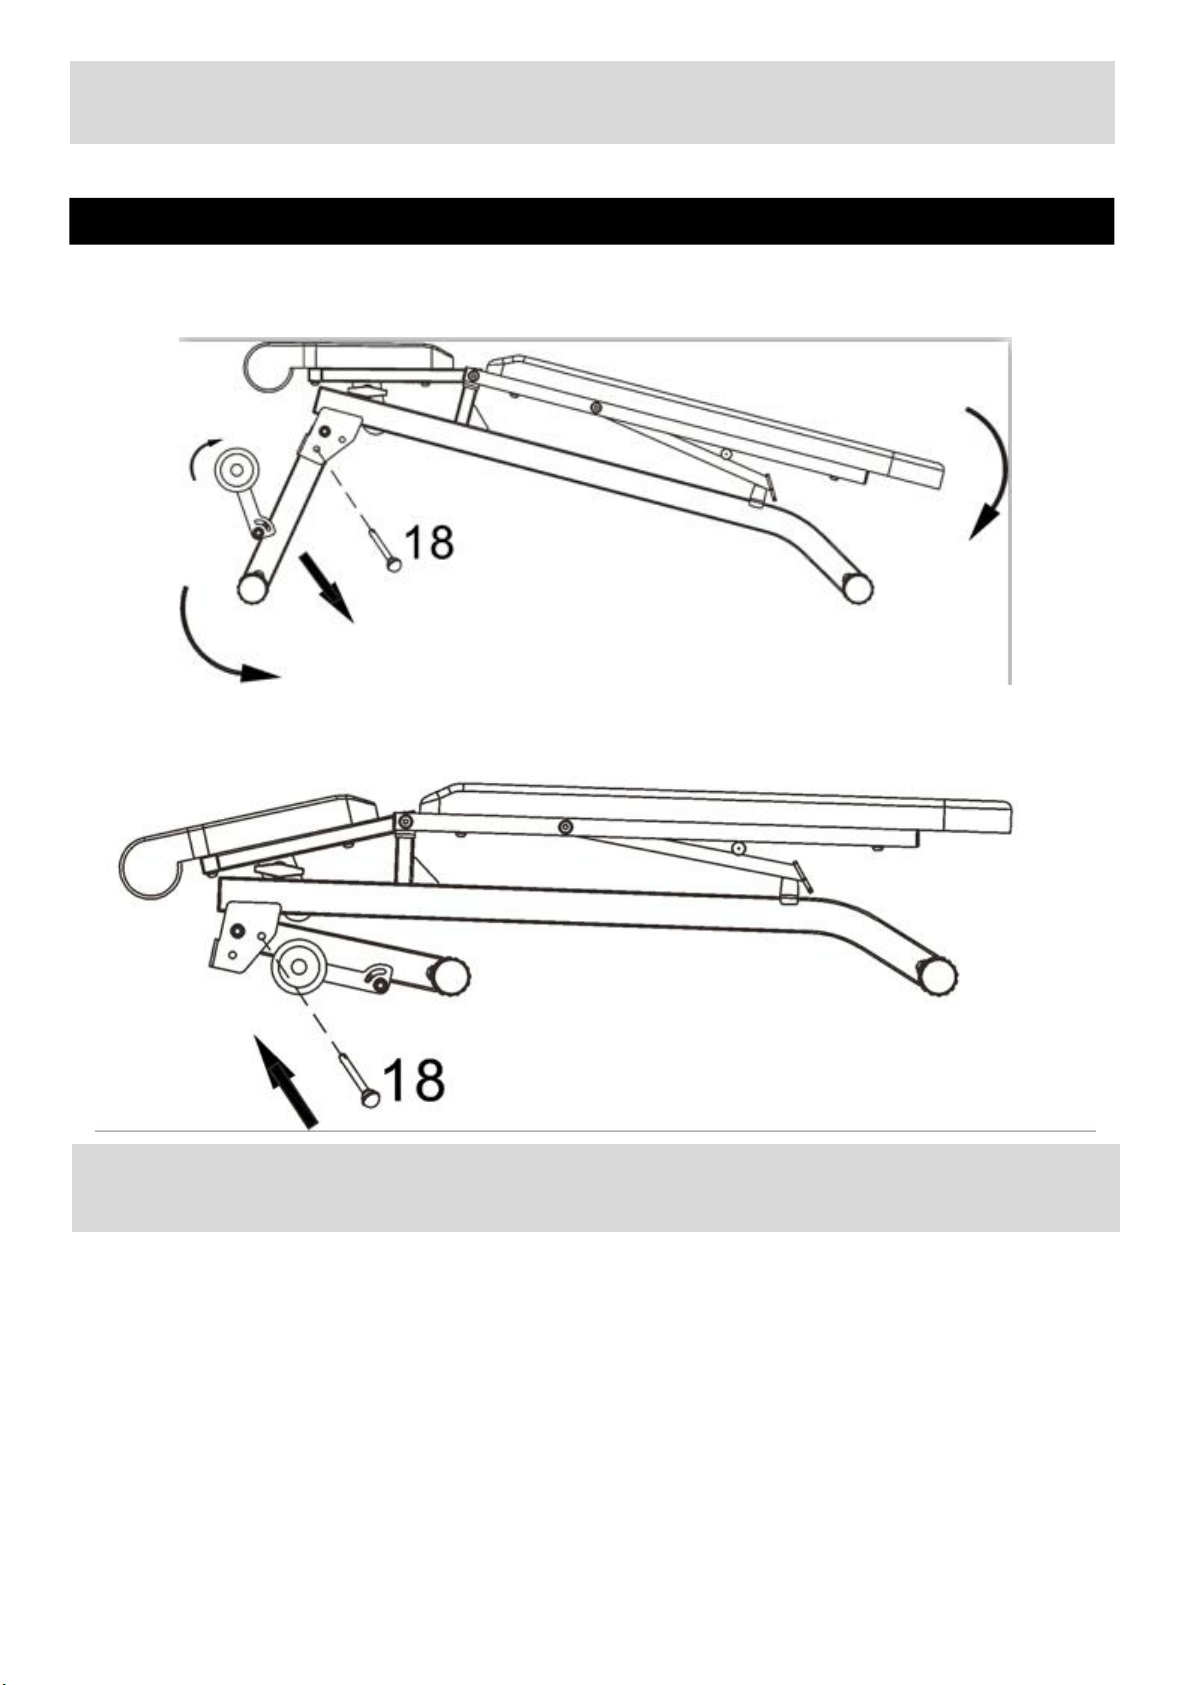
To Fold & Store Your Bench
2
2
Remove the Lock Pin(18) and fold the Front Support Frame(2) and the Leg Developer(6). Then
insert the Lock Pin(18) into the other hole to lock it in folding position as shown in the diagram.
13
Page 15

1. The safety level of the
equipment can only be
maintained if it is examined
regularly for damage and wear
e.g.ropes,pulleys and
connection points.
2.
Lubricate moving parts with
light oil periodically to prevent
premature wear.
3. Inspect and tighten all parts
before using the equipment,
replace defective components
immediately, and/or keep the
equipment out of use until
repair.Pay special attention to
components most susceptible
to wear.
4. The equipment can be
cleaned using a damp cloth and
mild non-abrasive detergent. Do
not use solvents.
5. Do not attempt to repair this
equipment yourself. Should
you have any difficulty with
assembly, operation or use of
your exercise product or if you
think that you may have parts
missing, contact Customer
Helpline: 0345 6001714
www.argos-support.co.uk
Guarantee:
For guarantee purposes,
please retain your purchase
receipt.
Care and Maintenance
14
Page 16
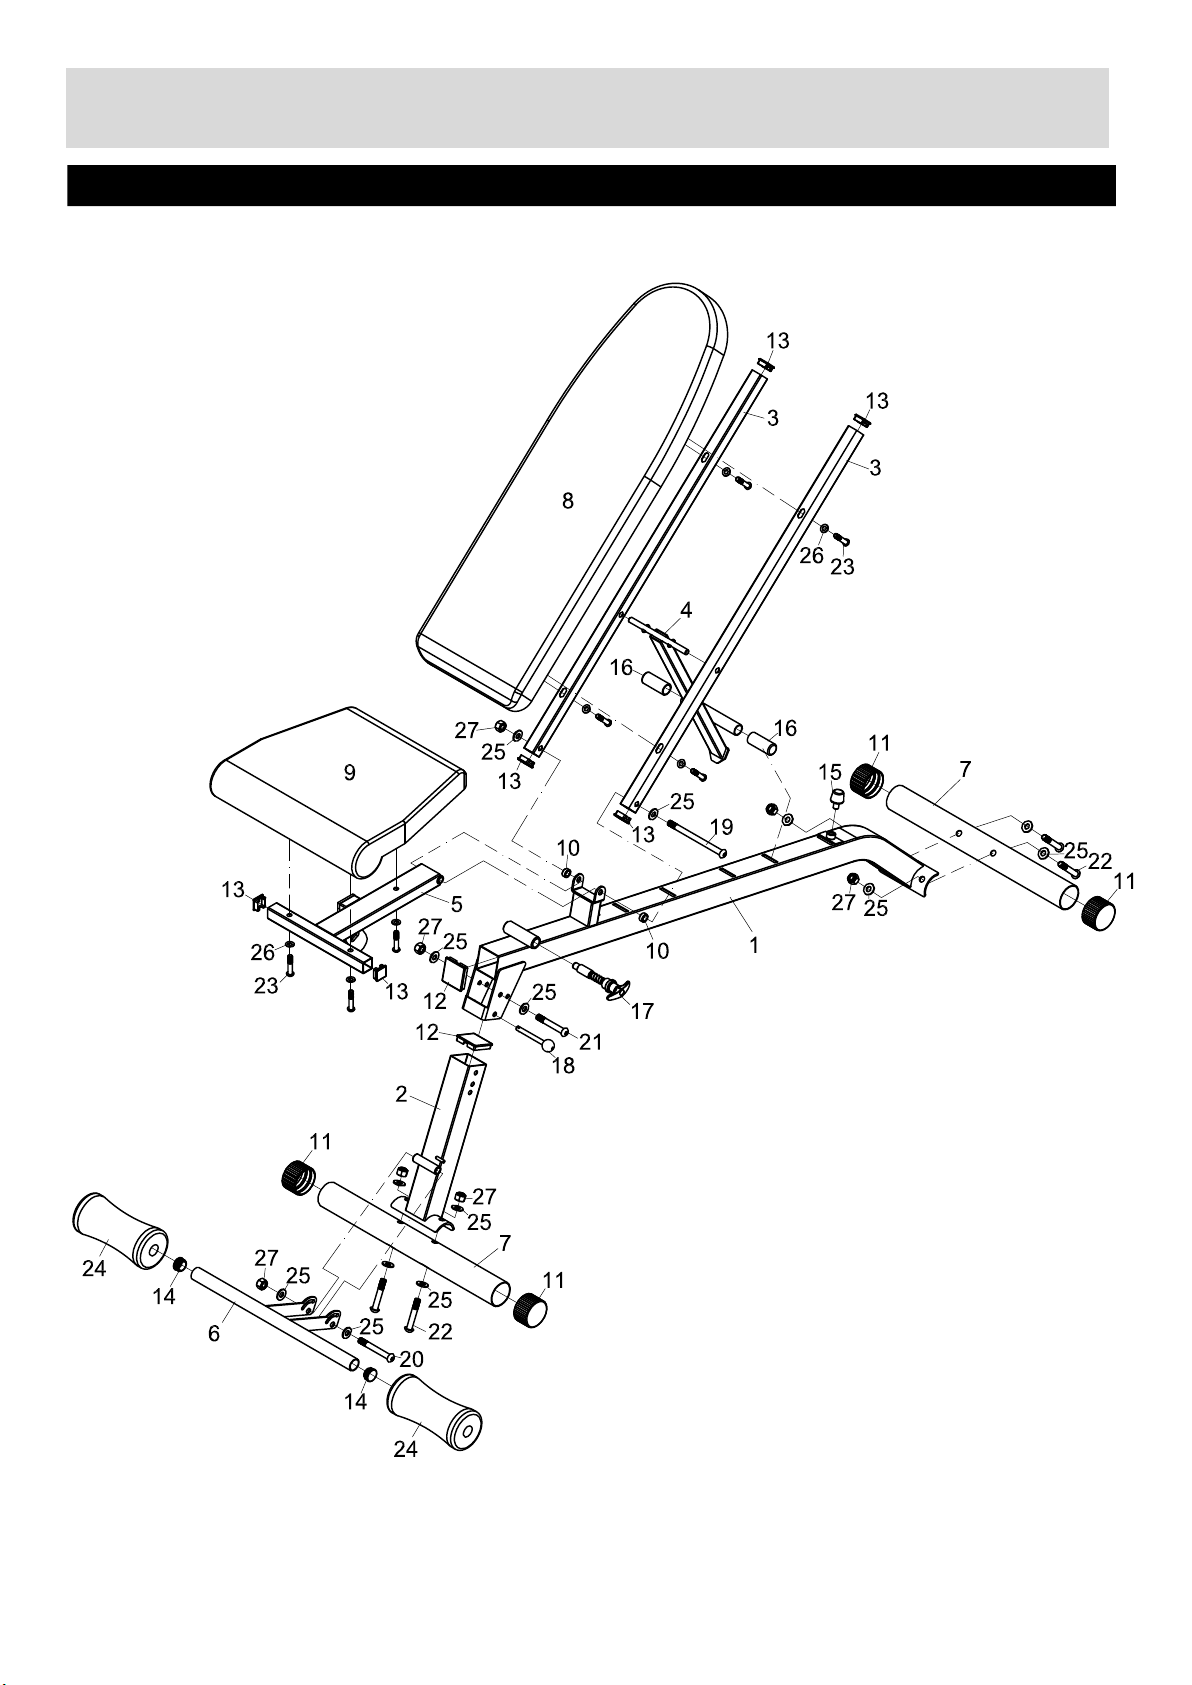
Exploded Parts Diagram
Note: Some of above parts have been pre-fitted to the large component at the factory.
15
Page 17

Parts List
Part Description Qty. Part Description Qty.
1 Main Base Frame 1 17 Spring Pin 1
2 Front Support Frame 1 18 Lock Pin 1
16
3 Backrest Pad Support 2 19
4 Backrest Pad Incline Support 1 20
5 Seat Pad Support 1 21
6 Leg Developer 1 22
7 Stabilizer 2 23
8 Backrest Pad 1 24
9 Seat Pad 1 25 φ
Ø16×Ø11×13 Bushing
10
11 φ
12 口50×
50 Foot
1.5 End Cap
2 26 φ
4 27 M10 Aircraft Nut 7
2
M10×140 Allen Bolt
M10×80 Allen Bolt
M10×70 Allen Bolt
M10×60 Allen Bolt
M8×40 Allen Bolt
Foam Roll 2
10 washer
8 washer
14
1
1
1
4
7
7
13 口25×
Ø25×1.2 End Cap
14
Ø26×25 Rubber Bumper
15
16 Rubber Protection 2
16
1.5 End Cap
6
2
1
Page 18
Guarantee
This product is guaranteed for twelve months from the date of original
purchase. Any defect that arises due to faulty materials or workmanship will
either be replaced, refunded or repaired free of charge where possible
during this period by the dealer from whom you purchased the unit.
The guarantee is subject to the following provisions:
The guarantee does not cover accidental damage, misuse, cabinet parts,
knobs or consumable items.
The product must be correctly installed and operated in accordance with
the instructions contained in this manual.
It must be used solely for domestic purpose.
The guarantee will rendered invalided if the products is re-sold or has
been damaged by inexpert repair.
Specifications are subject to change without notice.
The manufacturer disclaims any liability for the incidental or consequential
damages.
The guarantee is in addition to, and does not diminish your statutory or
legal right.
In the event of problem with the product with in the guarantee period call
Guarantor: Argos Ltd
489 – 499 Avebury Boulevard
Central Milton Keynes
MK9 2NW
This product is guaranteed against manufacturing defects from a period of
Product Guarantee
Year
Customer Helpline: 0345 6001714 www.argos-support.co.uk
 Loading...