

Page 1
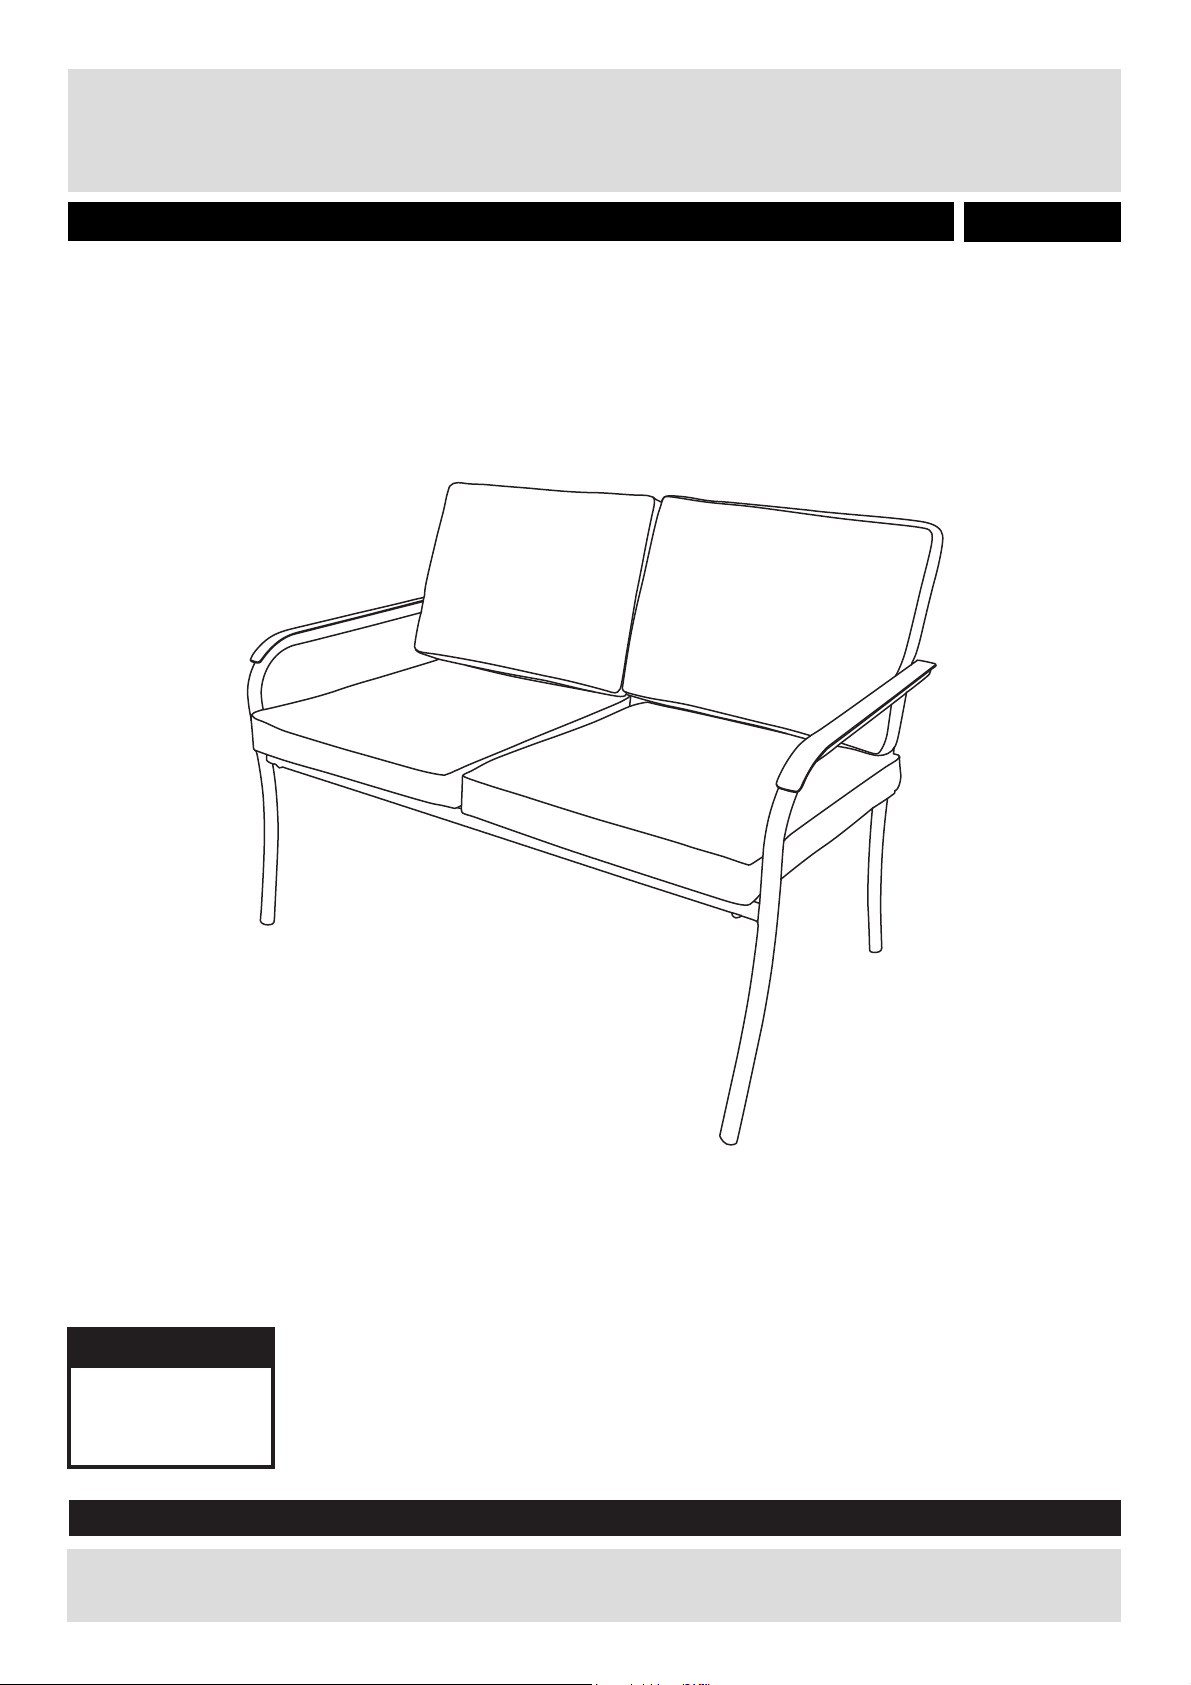
RONDA CONVERSATIONAL SET
Assembly Instructions - Please keep for future reference
7592573
Dimensions
Width -114cm
Depth -71cm
Height -76cm
Important - Read these instructions fully before starting assembly
If you need help or have damaged or missing parts, call the Customer Helpline: 03456400800
For further assistance please visit http://www.argos-support.co.uk/
Issue 1 - 24/10/17
Page 2

!
Safety and Care Advice
Important - Please read these instructions fully before starting assembly
• Check you have all the
components and tools listed on
page 2 & 3.
• Remove all fittings from the
plastic bags and separate them
into their groups.
• Keep children and animals
away from the work area, small
parts could choke if swallowed.
• Make sure you have enough
space to layout the parts before
starting.
• Do not stand or put weight on
the components during assembly,
this could cause damage.
• Assembly on a soft level surface
to avoid damaging the unit or your
floor.
• Parts of the assembly will be
easier with 2 people.
• Dispose of all packaging carefully
and responsibly.
• Do not stand on this lounge.
• Warning: The unit weighs
approximately 9.6 kgs. Please lift
with care.
Care and maintenance
• Wash frame parts with mild
soap and water, rinse thoroughly,
and dry completely. Do not use
bleach, acid, or other solvents
on the frame parts.
• We recommend the use of
furniture covers when not in use.
• Inspect and tighten all bolts
and fasteners on a regular basis
to ensure the proper performance
and safety of your ottoman.
• In order to prolong the life and
beauty of your ottoman, we
recommend that it be stored in a
dry and protected area when not
in use .
1
Page 3
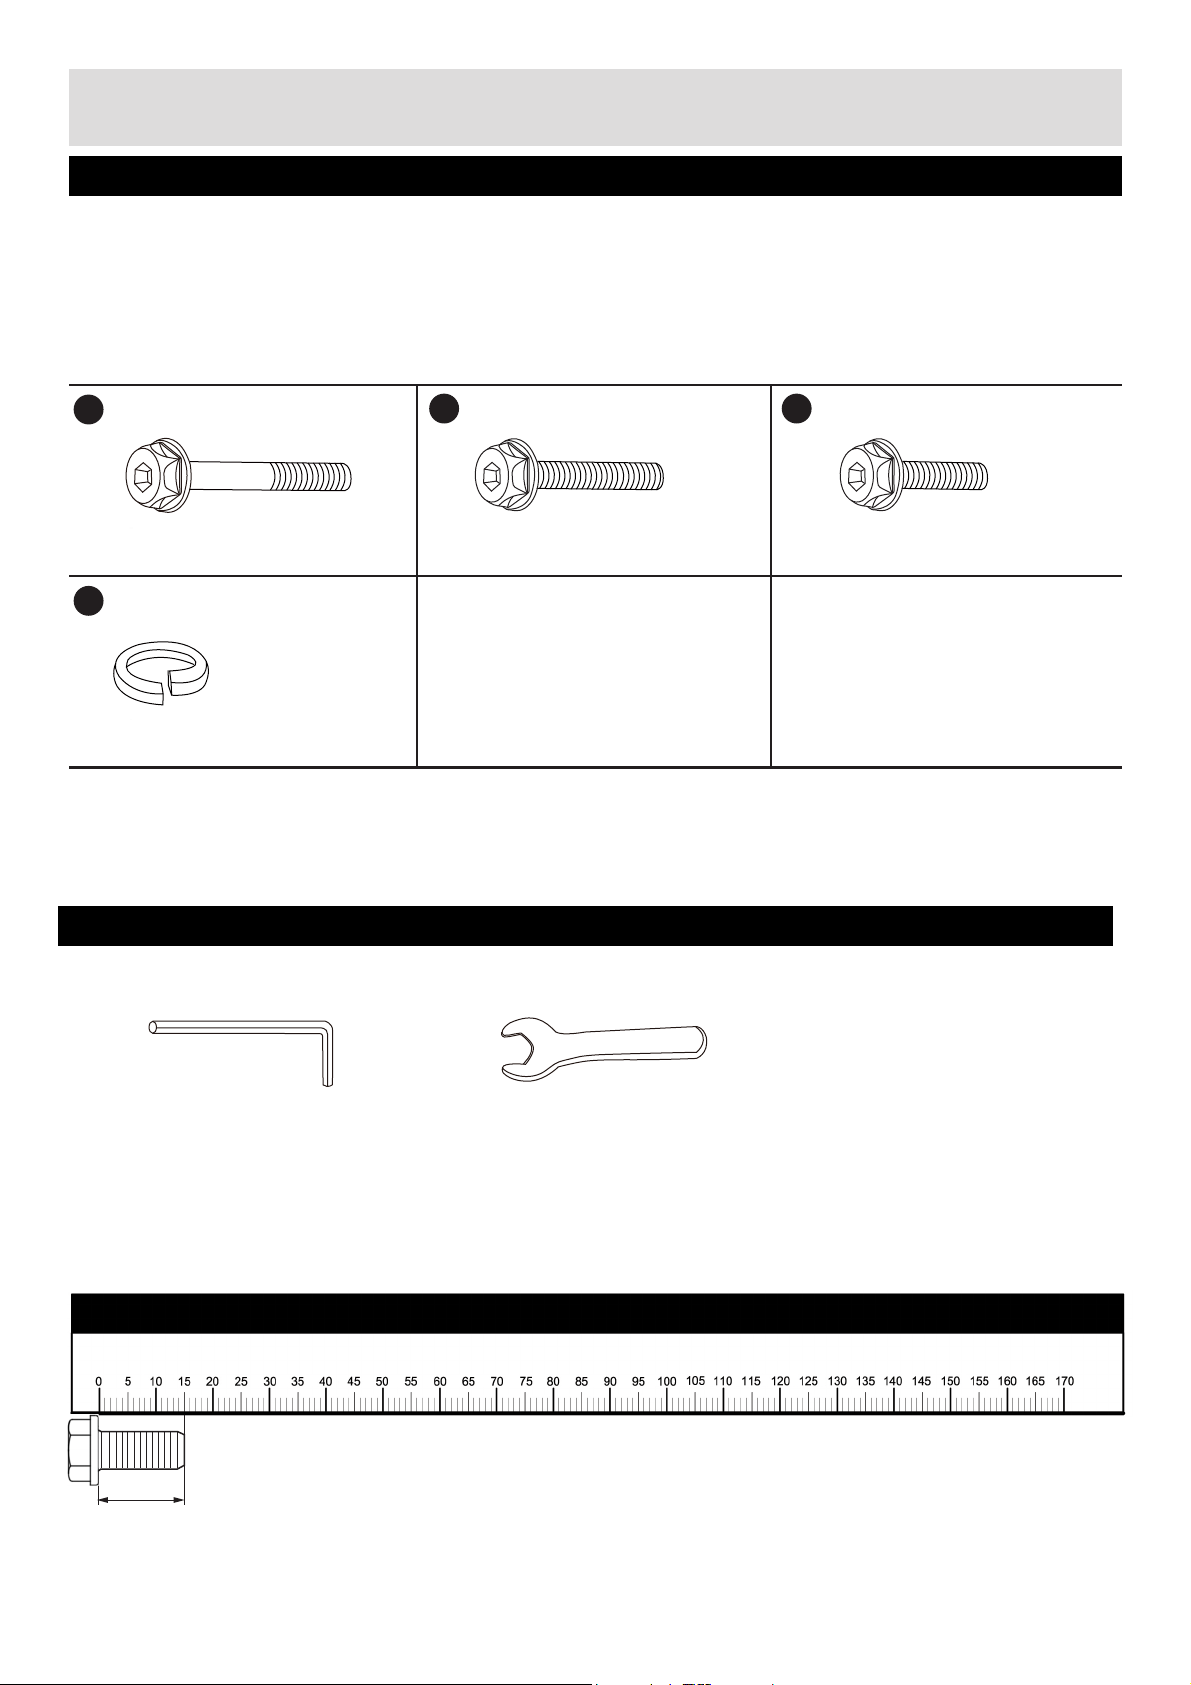
Components - Fittings
Please check you have all the fittings listed below
Note: The quantities below are the correct amount to complete the assembly.
A
M6 x 70mm Bolt x 3 M6 x 35mm Bolt x 2 M6 x 15mm Bolt x 2
D
D10 Spring Washer x 7
B C
Tools required
4mm Hex Key
10mm Hex Key
Ruler - Use this ruler to help correctly identify the screws
15
2
Page 4
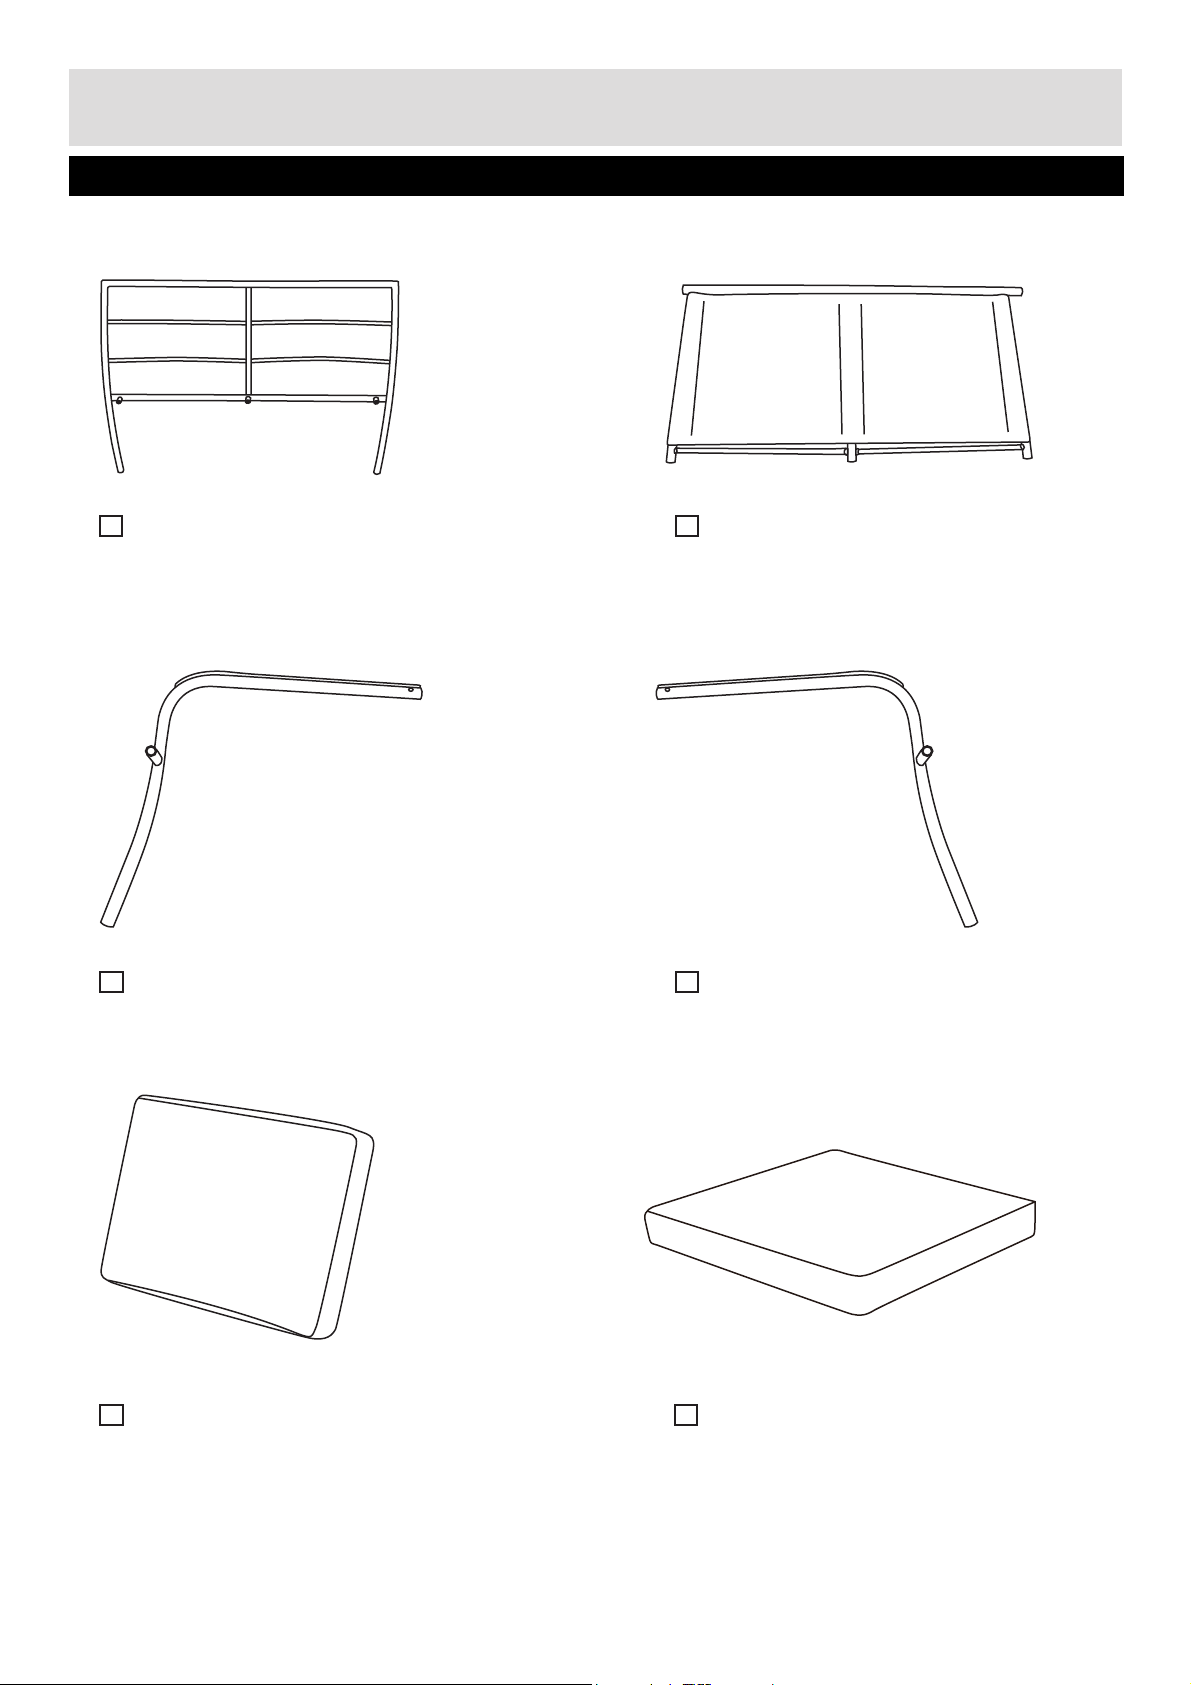
Components - Parts
Please check you have all the parts listed below
1
3
Right Arm x 1
2
Seat Assembly x 1Back Assembly x 1
4
Left Arm x 1
5
Back Cushion x 2
3
6
Seat Cushion x 2
Page 5
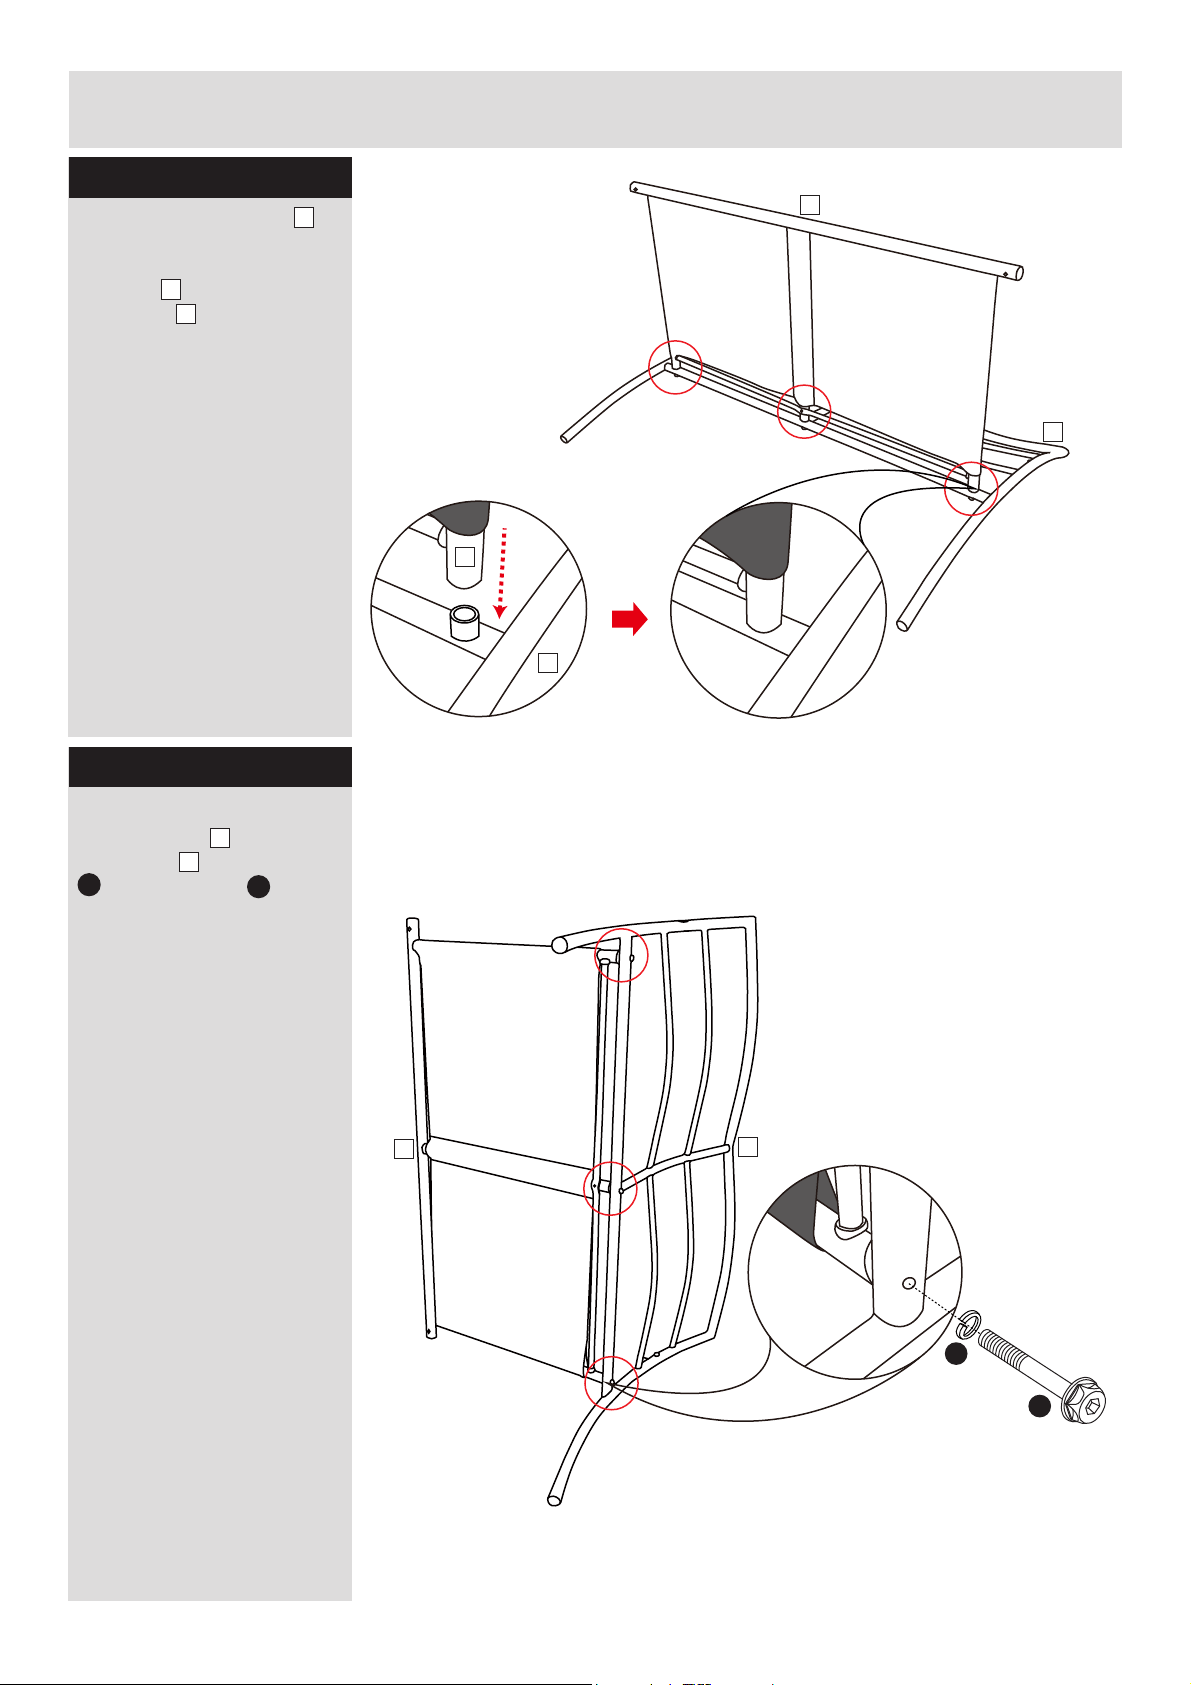
Assembly Instructions
Step 1
Place the back assembly
onto a non-abrasive surface,
such as a carpet. Insert the seat
assembly into the back
assembly 1 .
2
1
1
2
1
2
1
Step 2
At the rear of the seat, fix the
seat assembly to the back
assembly 1 by using bolts
A
, spring washers .
Keep the bolts loose.
2
1
D
2
1
D
A
4
Page 6
Assembly Instructions
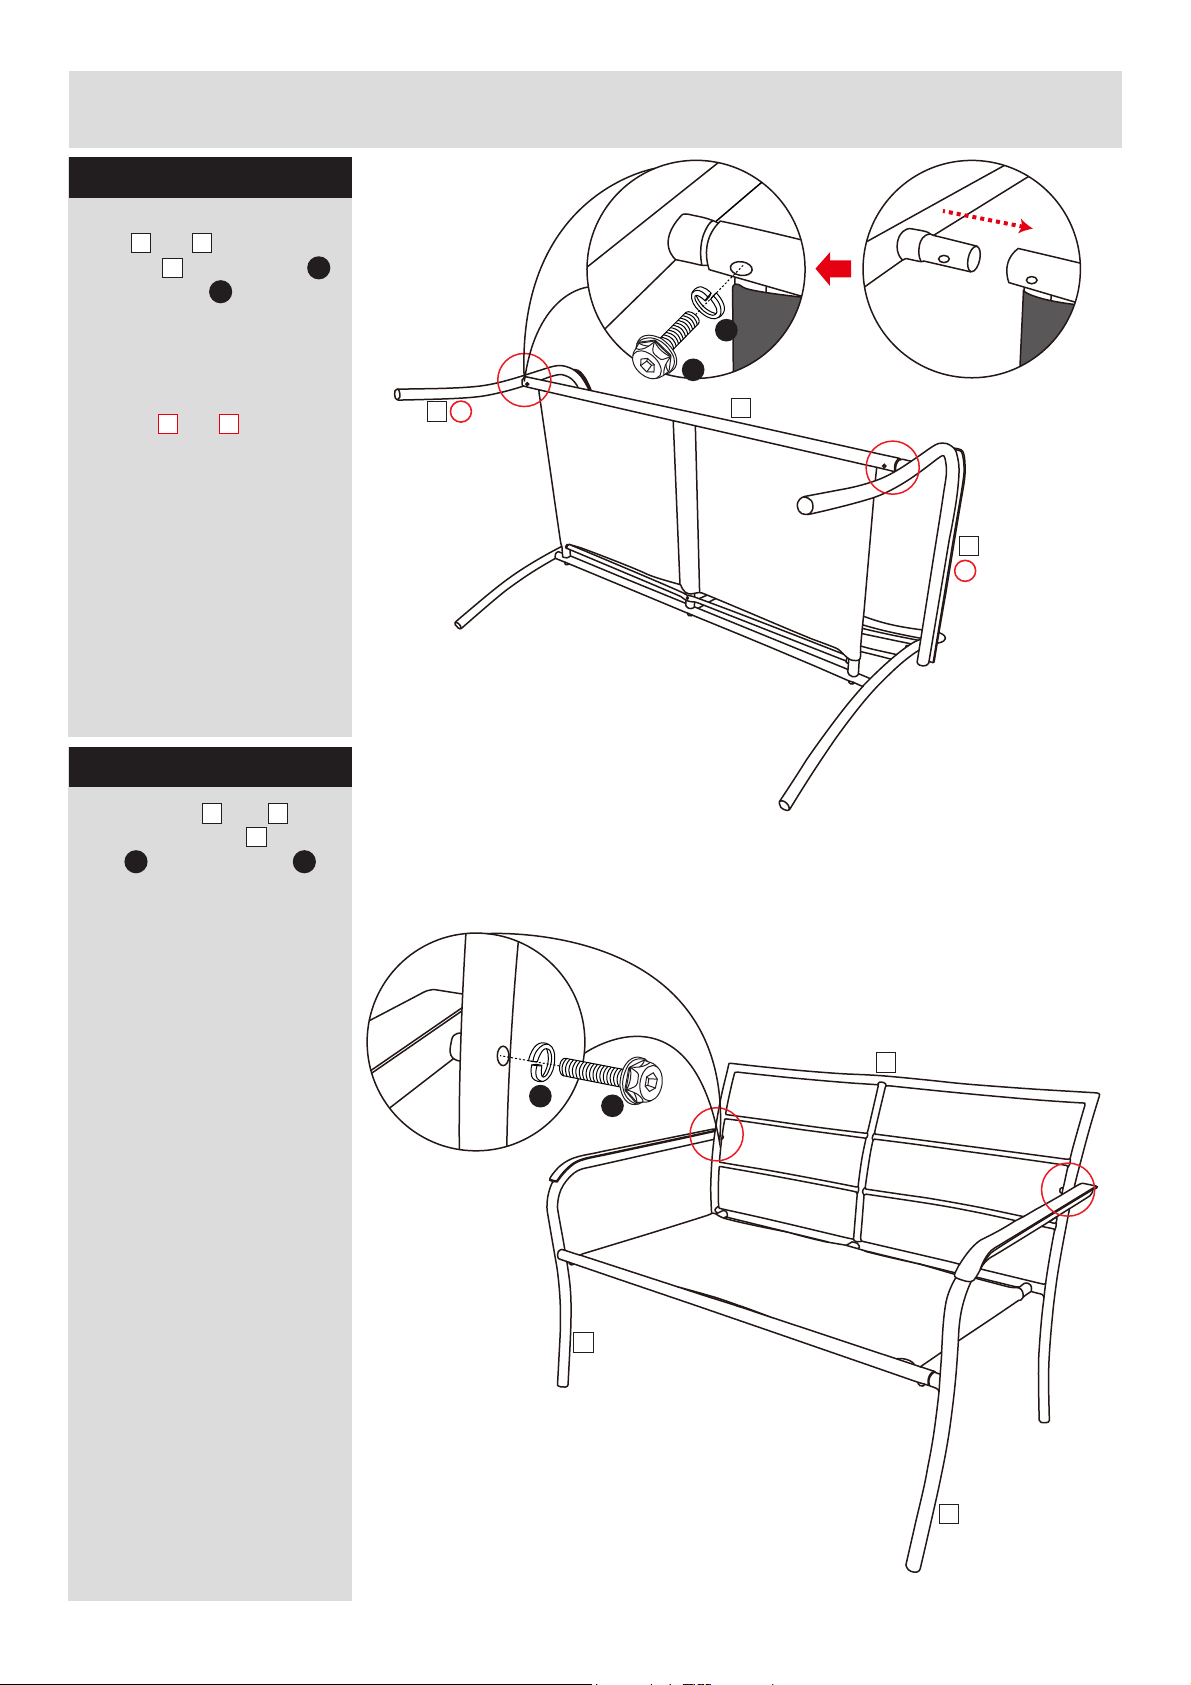
Step 3
At the front of the seat, fix the
arms ( and ) to the seat
assembly by using bolts ,
spring washers .
Keep the bolts loose.
3 4
2
C
D
D
Note:
The labels marked “L” and “R”
on arms ( and ) should
coincide with Step 3 to ensure
proper assembly.
3 4
Step 4
Fix the arms ( and ) to
the back assembly by using
bolts , spring washers .
B
Make sure that all of the bolts
have been tightened
completely.
3
4
1
D
C
R
3
2
4
L
1
D
B
3
4
5
Page 7
Assembly Instructions
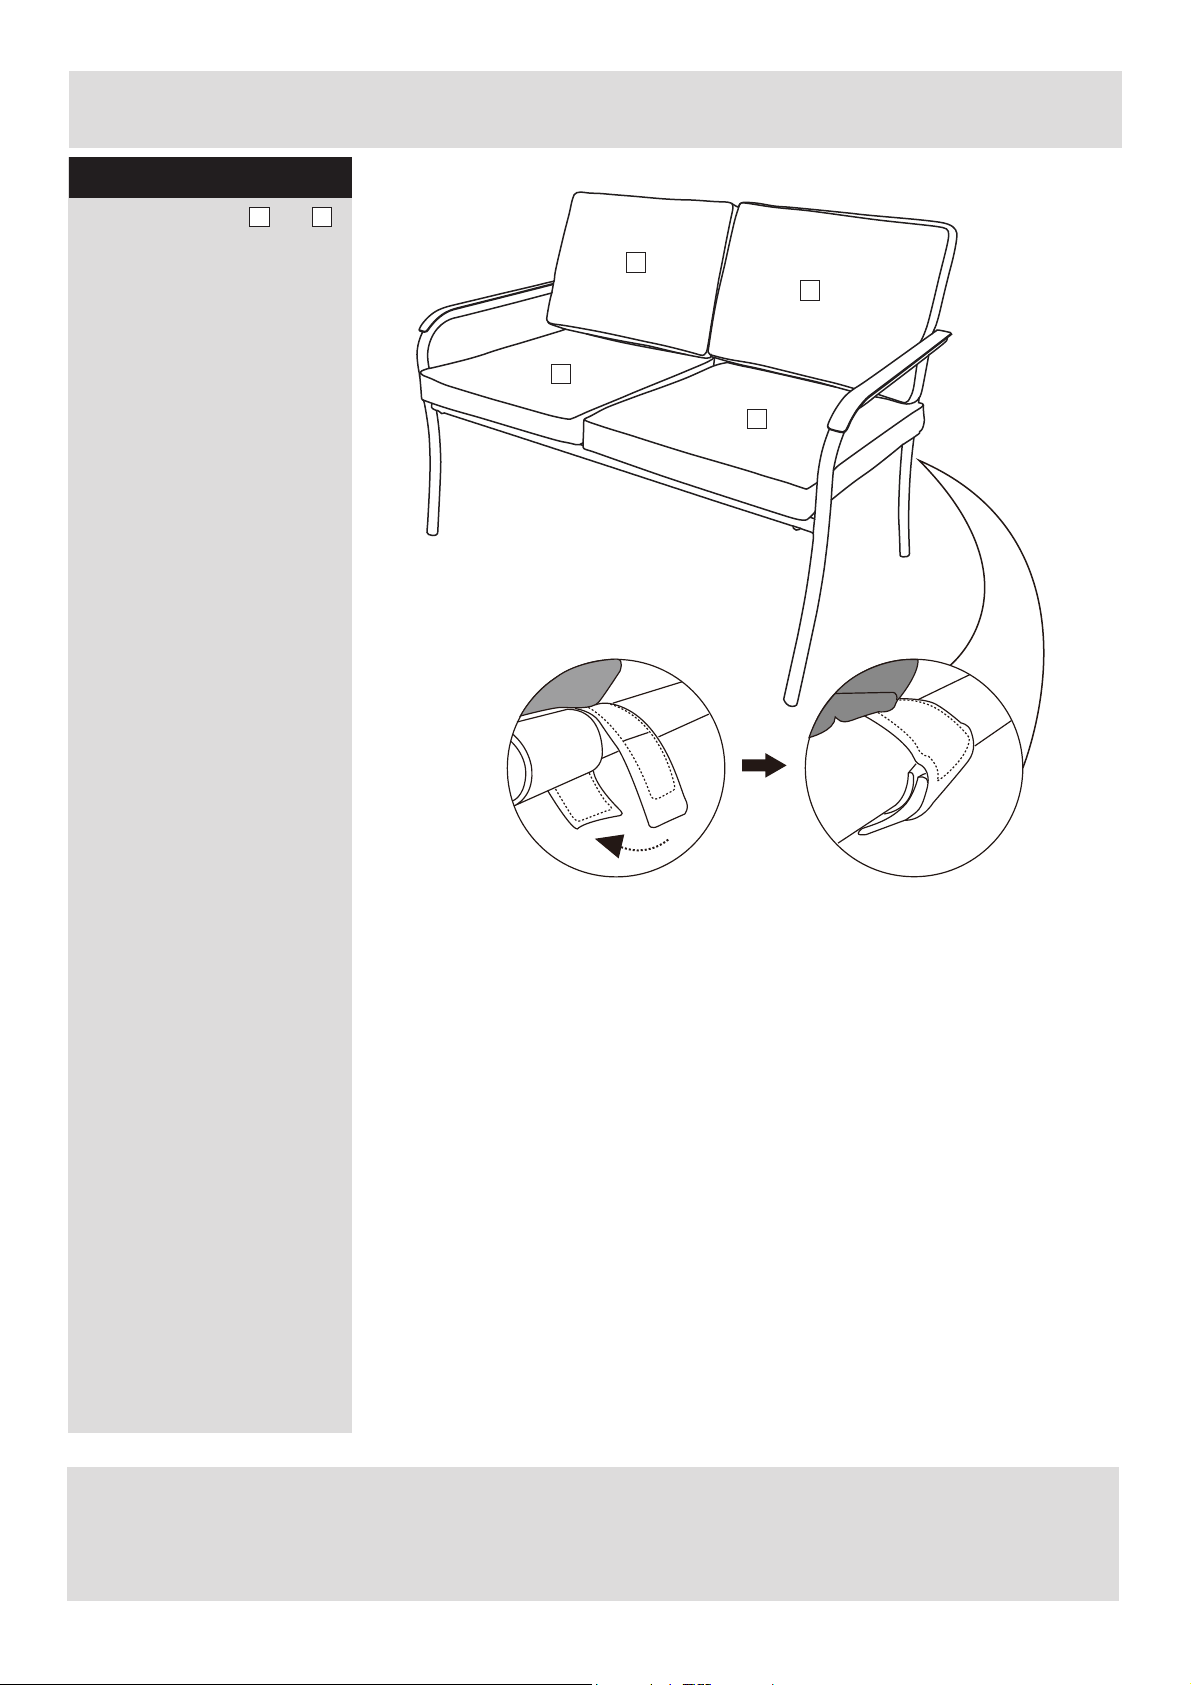
Step 5
Place the cushions and
onto the chair. Secure the
cushion to the chair by using
the velcro straps.
5
6
5
5
6
6
Assembly is completed.
If you need help or have damaged or missing parts, call the Customer Helpline: 03456400800
For further assistance please visit http://www.argos-support.co.uk/
Retailer: Argos
Address: 489-499 Avebury Boulevard Saxon Gate West, Central Milton Keynes Bucks, MK9, 2NW
6
 Loading...