

Page 1
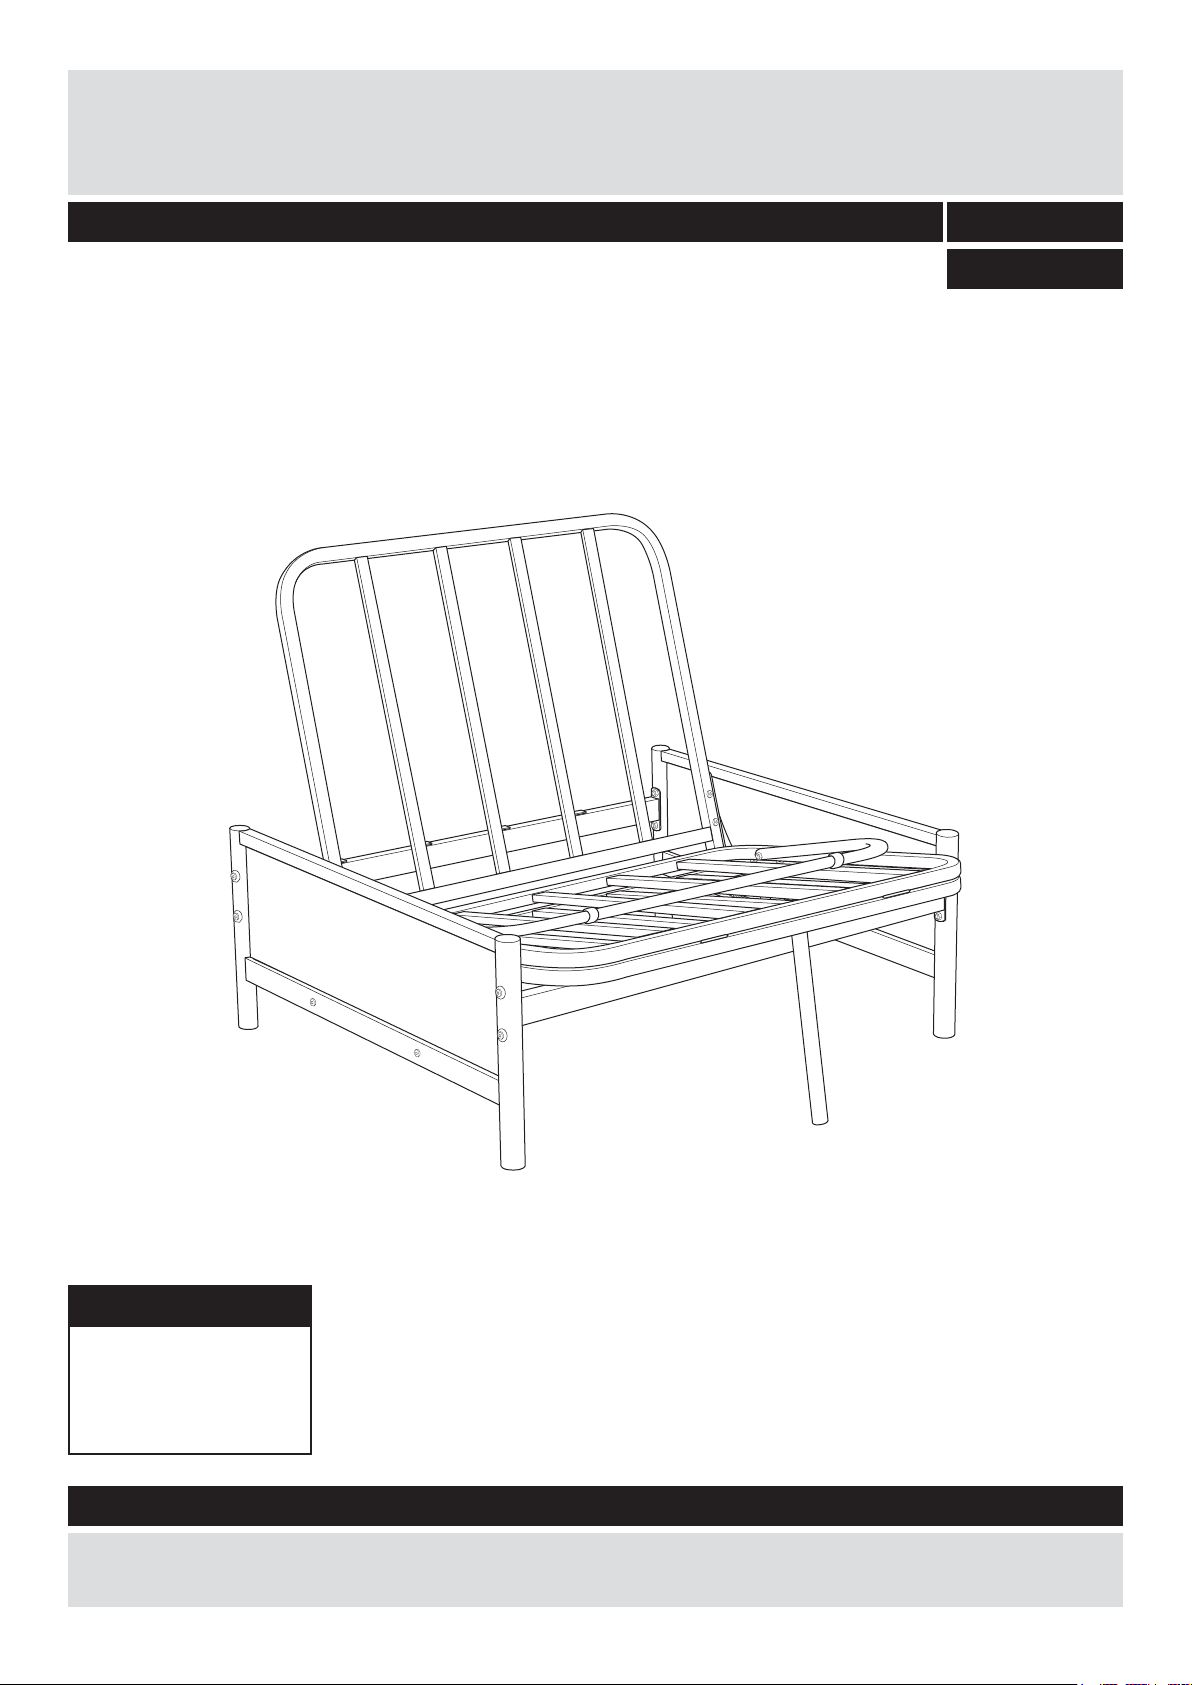
Single Metal Futon
Assembly Instructions - Please keep for future reference 7585418
7585401
Dimensions
Width - 82cm
Depth - 80-170cm
Height - 30-69.5cm
Important
If you need help or have damaged or missing parts, call the Customer Helpline: 08456 400800
- Please read these instructions fully before starting assembly
Issue 1 - 21/08/12
Page 2

Safety and Care Advice
Important - Please read these instructions fully before starting assembly
• Because of the size of this unit,
it is recommended to assemble it
in the room intended for use.
• Do not discard any of the
packaging until you have
checked that you have all the
parts and the pack of fittings.
• Assemble this product on a flat
surface.
• Assemble all parts loosely
before tightening any bolts.
Warnings
• This product should only be
used on firm, level ground.
• Make sure the legs remain in
contact with the ground.
• Do not stand on the product.
• Discard all extra fittings and
keep fittings out of reach of
children.
• Unit weight: 45kgs.
• At least 2 people are required
to assemble this product.
• Retain Assembly Instructions
for future reference.
• Keep hands away from folding
mechanisms to prevent possible
entrapment or injury.
• Do not allow children to jump
on the unit as this could cause
damage to the frame.
• We do not
recommend the
use of power
drill/drivers for
inserting screws,
as this could damage the unit.
Only use hand screwdrivers.
• Dispose of all packaging
carefully and responsibly.
• Folding and unfolding this
product should only be carried
out under adult supervision.
Care and maintenance
• Please clean the unit surface
using either damp (not wet)
cloth and a mild domestic soap
solution or by using an
appropriate polish.
• Do not use any abrasive
materials when cleaning.
• From time to time check that
there are no loose bolts on this
unit.
1
Page 3
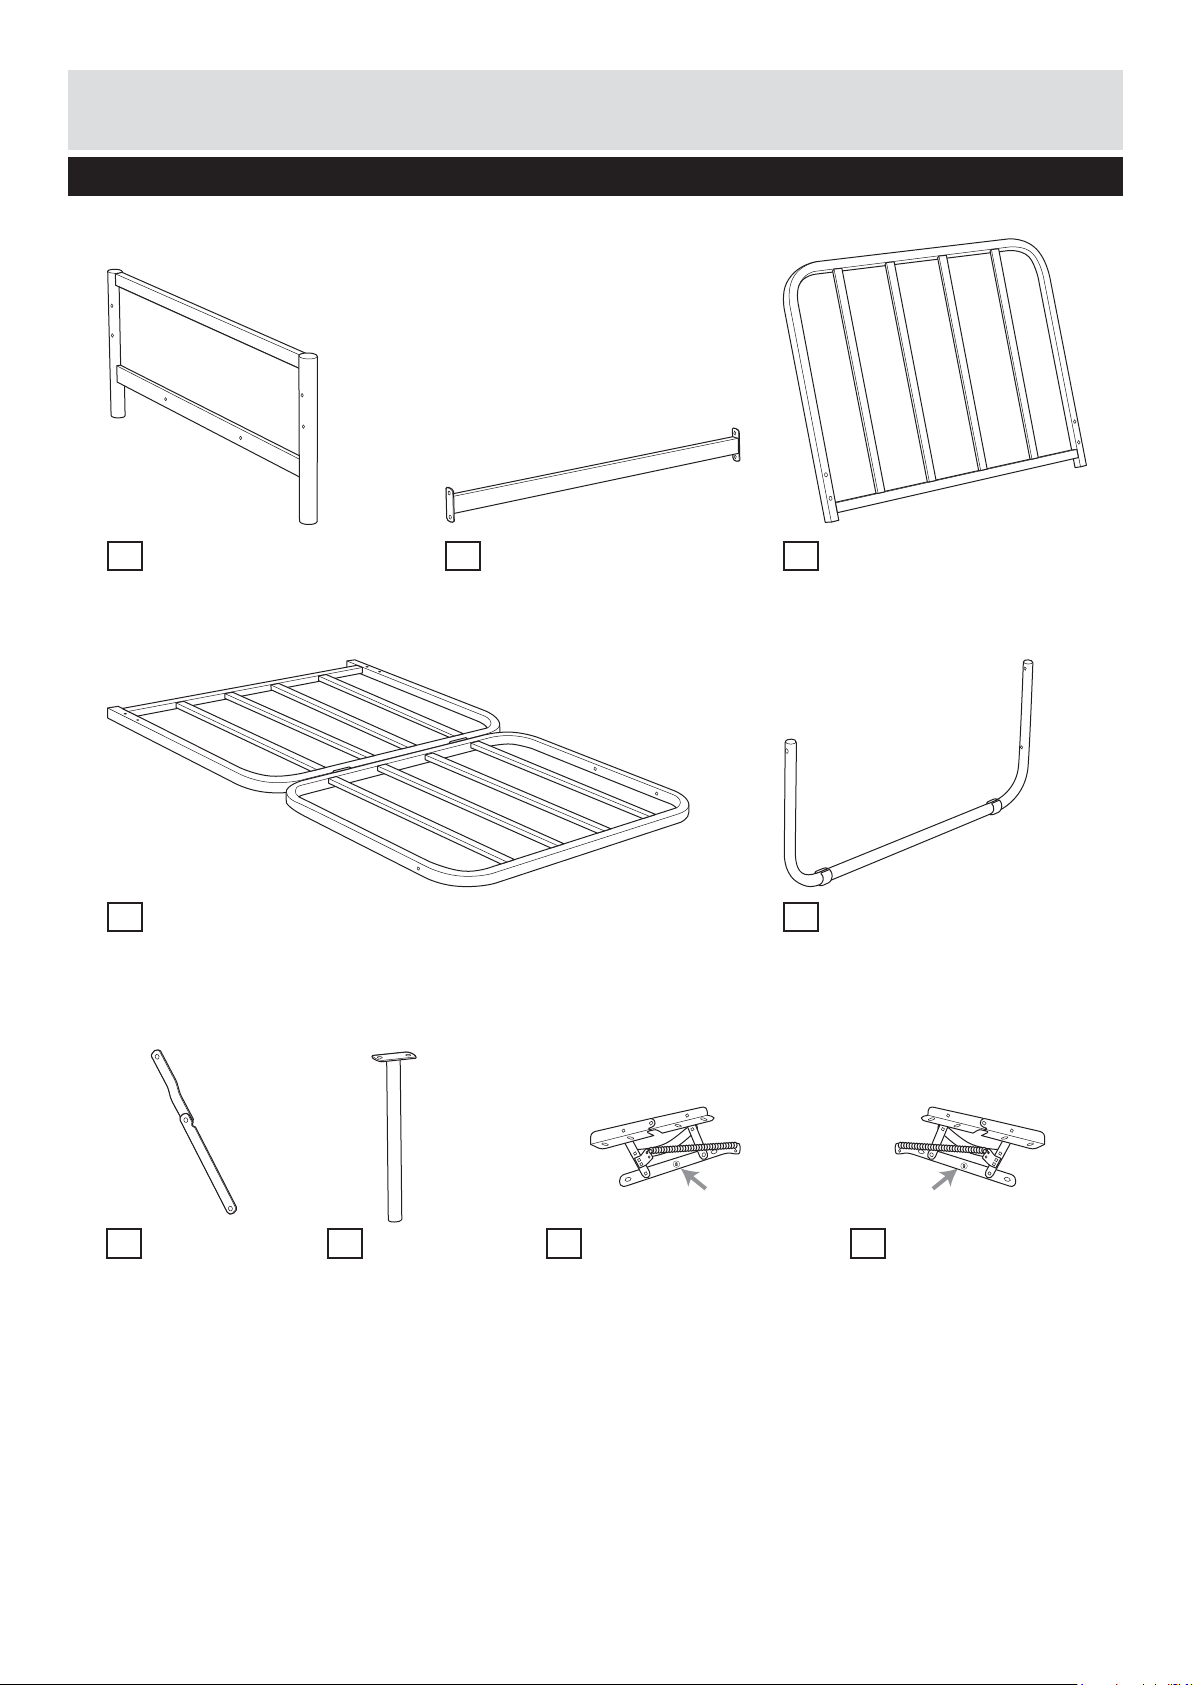
Components - Parts
Please check you have all the parts listed below
Futon side frame x 2
1 Front / back rail x 2
(70 x 30 x 3.2cm)
Seat frame
4 Front leg
(110 x 70 x 2cm)
2 Back frame
(76 x 8.5 x 2.5cm)
3
(70 x 55 x 2cm)
5
(63 x 26 x 2.4cm)
6 Centre leg
Flap stay
(23.5 x 1.5 x 1cm)
7 Right futon mechanism
(23 x 7.5 x 2.2cm)
8
(42.5 x 18 x 5.5cm)
Sticker “9”Sticker “8”
9Left futon mechanism
(42.5 x 18 x 5.5cm)
2
Page 4
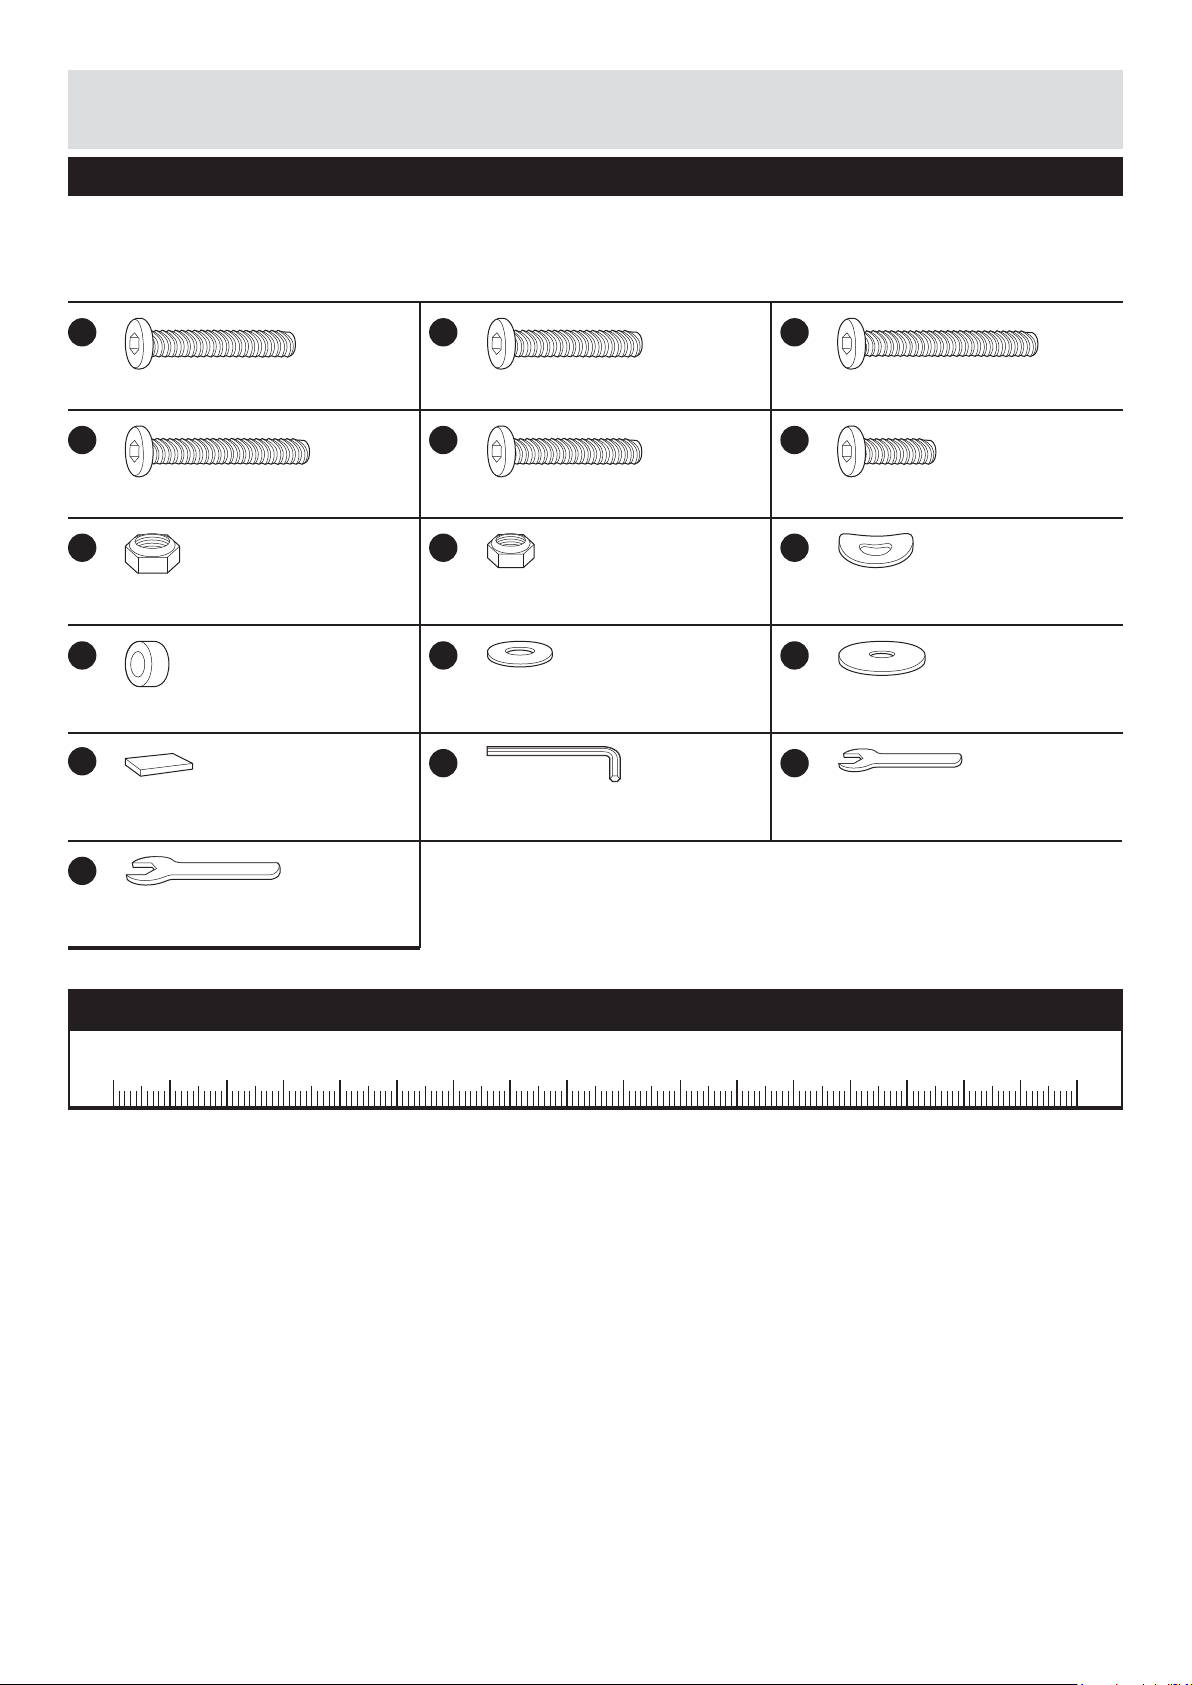
If you have damaged or missing components,
Components - Fittings
call the Customer Helpline: 08456 400800
Please check you have all the fittings listed below
Note: The quantities below are the correct amount to complete the assembly. In some cases more fittings
may be supplied than are required.
A
M8 x 40mm Bolt x 8
D
M6 x 50mm Bolt x 1
G H I
M8 Lock nut x 20
J
Spacer x 2
M
Adhesive pad x 8
P
B
M8 x 30mm Bolt x 12
E F
M6 x 30 mm Bolt x 2
M6 Lock nut x 4 Curved metal washer x 8
K
Flat metal washer x 3
N
Allen key x 1
C
M6 x 60mm Bolt x 1
M6 x 15 mm Bolt x 2
L
Plastic washer x 1
O
Small spanner x 1
Big spanner x 1
Ruler - Use this ruler to help correctly identify the screws
0 15 30 45 60 75 905 20 35 50 65 80 9510 25 40 55 70 85 100 120 140105 125 145110 130 150115 135 155 160 165 170
3
Page 5
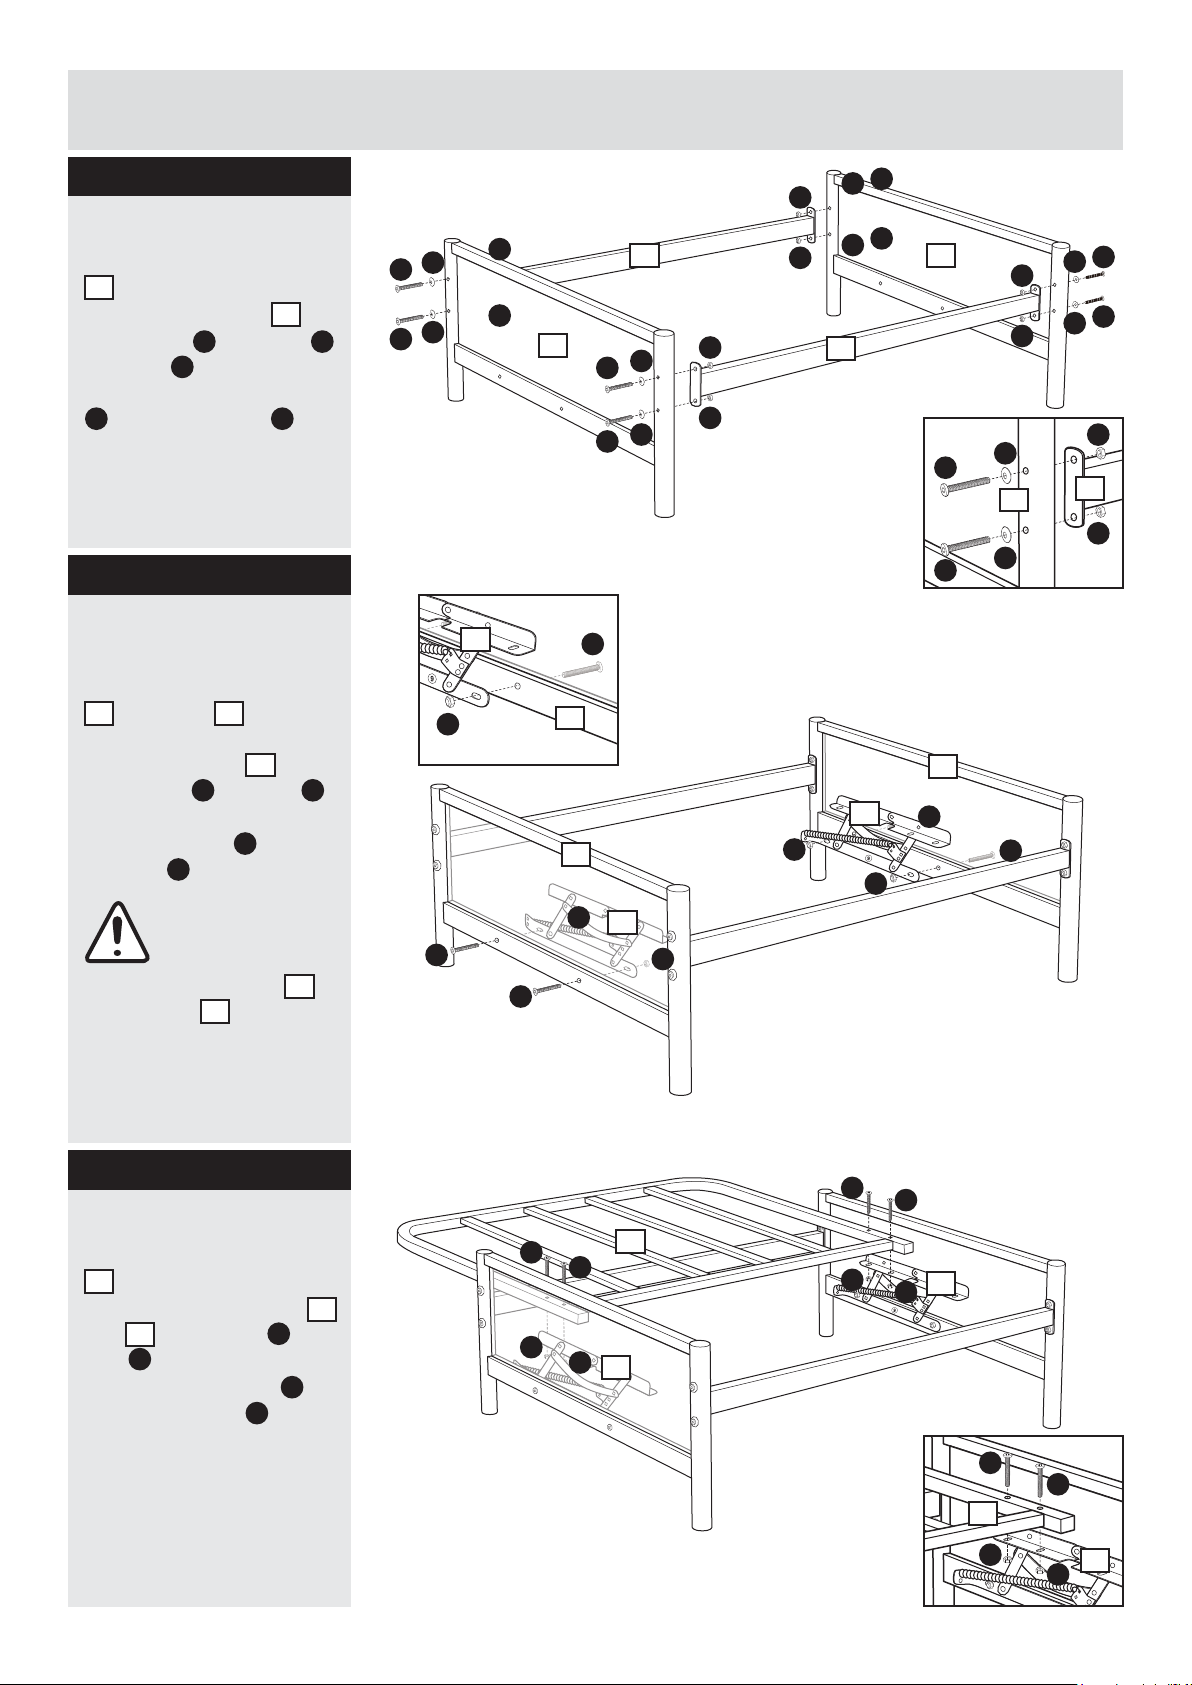
Assembly Instructions
Step 1
Attaching side frames
Position the side frames
1
as shown and attach
the front/back rails
using bolts , washers
and nuts . Tighten bolts
A
G
2
I
and nuts using allen key
N P
and big spanner .
Step 2
Attaching futon
mechanisms
Correctly position the left
8
and right futon
mechanisms and attach
it to side frames
using bolts and nuts .
Tighten bolts and nuts
using allen key and big
spanner .
Note: Identify and
correctly position
the futon
mechanisms
and by
looking for the
sticker labels
pasted on the
rails.
9
1
B G
N
P
8
9
A
I
G
A
I
A
I
A
B
G
G
1
9
G
1
1
G
B
2
I
A
I
A
B
8
G
G
G
G
I
G
2
9
G
1
G
G
A
A
1
B
I
1
I
B
A
I
A
I
G
2
G
Step 3
Attaching back frame
Position the back frame
3
as shown and attach
it to futon mechanisms
9
and using bolts and
G
nuts . Tighten bolts and
nuts using allen key
and big spanner .
P
8
B
N
B
B
B
G
3
B
G
8
G
9
G
B
B
3
G
9
G
4
Page 6
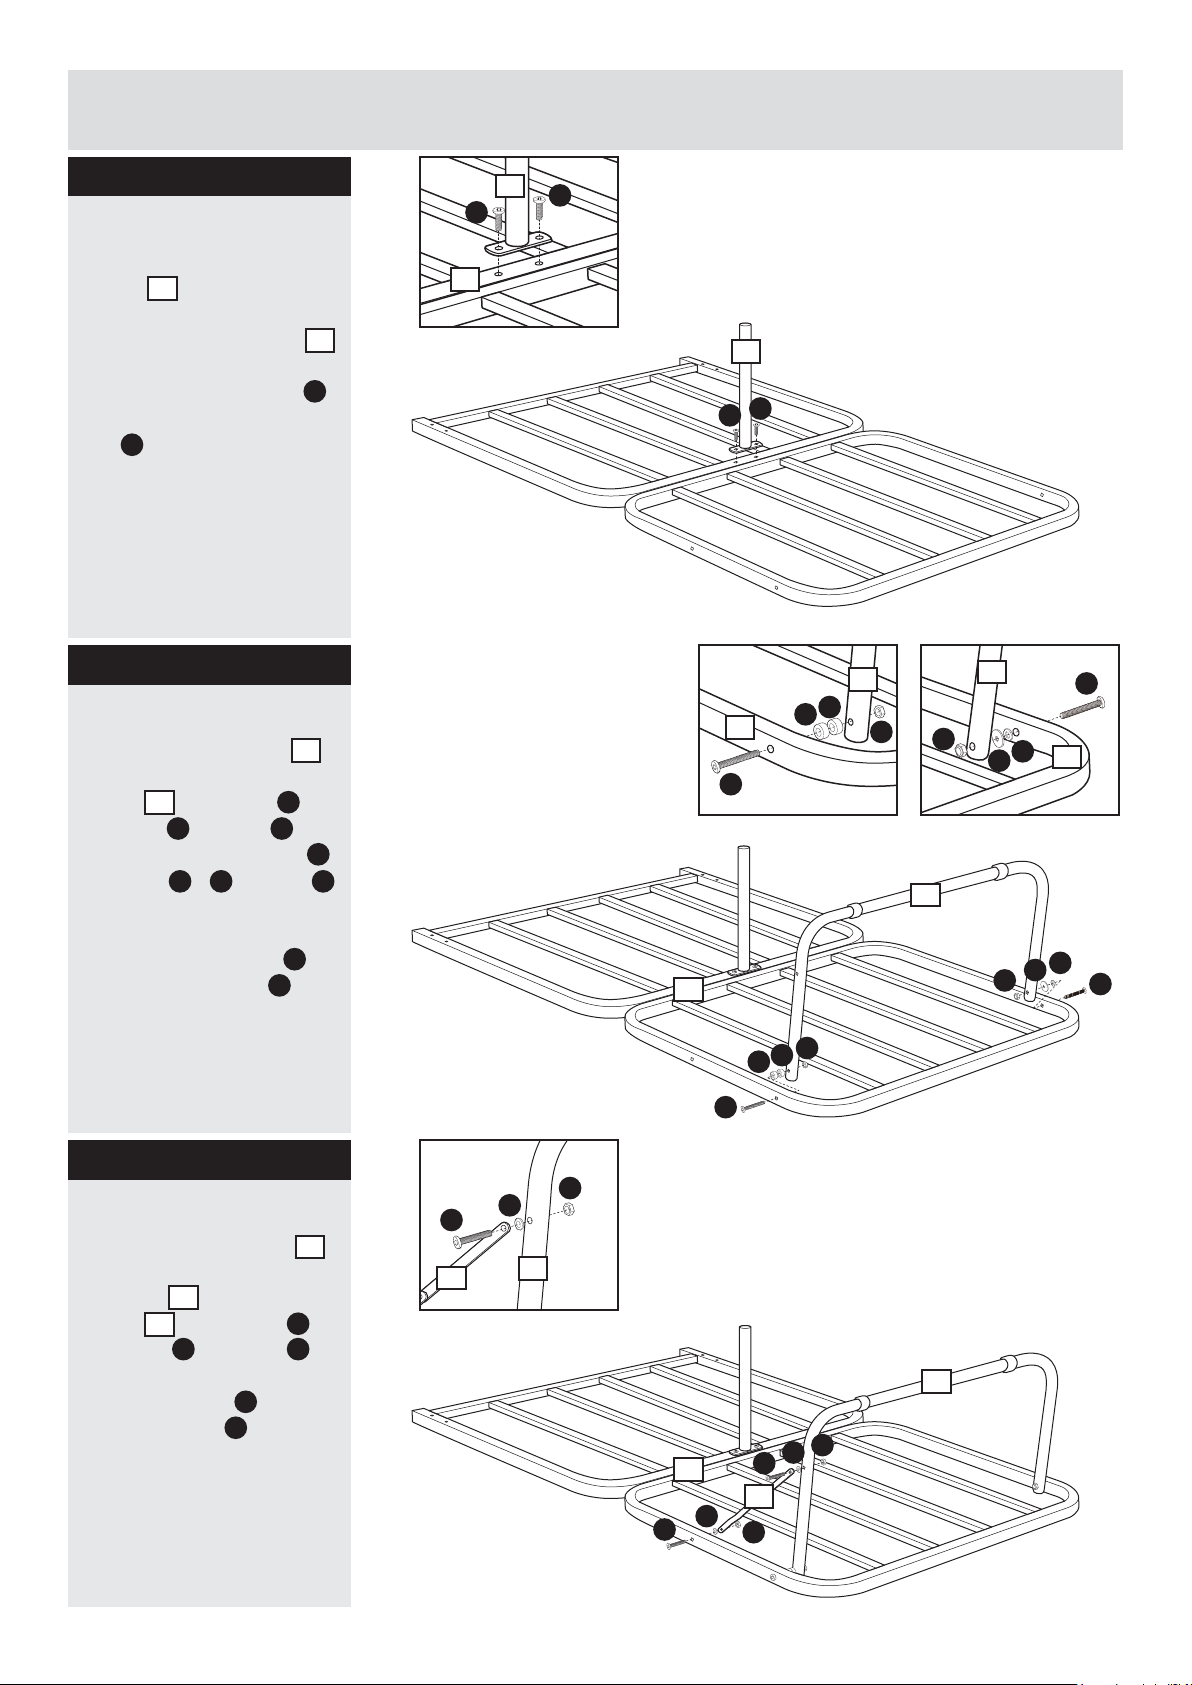
Assembly Instructions
Step 4
Attaching centre leg
Carefully lay the seat
frame face down on a
4
flat protected surface.
Position the centre leg
7
as shown and attach it to
seat frame using bolts .
F
Tighten bolts using allen
N
key .
Step 5
Attaching front leg
Position the front leg
and attach it to seat
frame using bolt ,
spacers and nut on
4
J H
one side then using bolt ,
washers & and nut
K L H
on the other side as
shown. Tighten bolts and
nuts using allen key
and small spanner .
5
C
D
N
O
7
F
4
F
7
F
F
5
J
4
C
4
J
H
5
5
H
K
L
H
D
4
K
L
D
Step 6
Attaching flap stay
Position the flap stay
as shown and attach it to
front leg and seat
frame using bolts ,
washers and nuts .
Tighten bolts and nuts
using allen key and
small spanner .
5
5
4
K H
N
O
H
J
J
C
K
E
6
6
E
H
5
5
H
K
4
E
E
6
K
H
Page 7
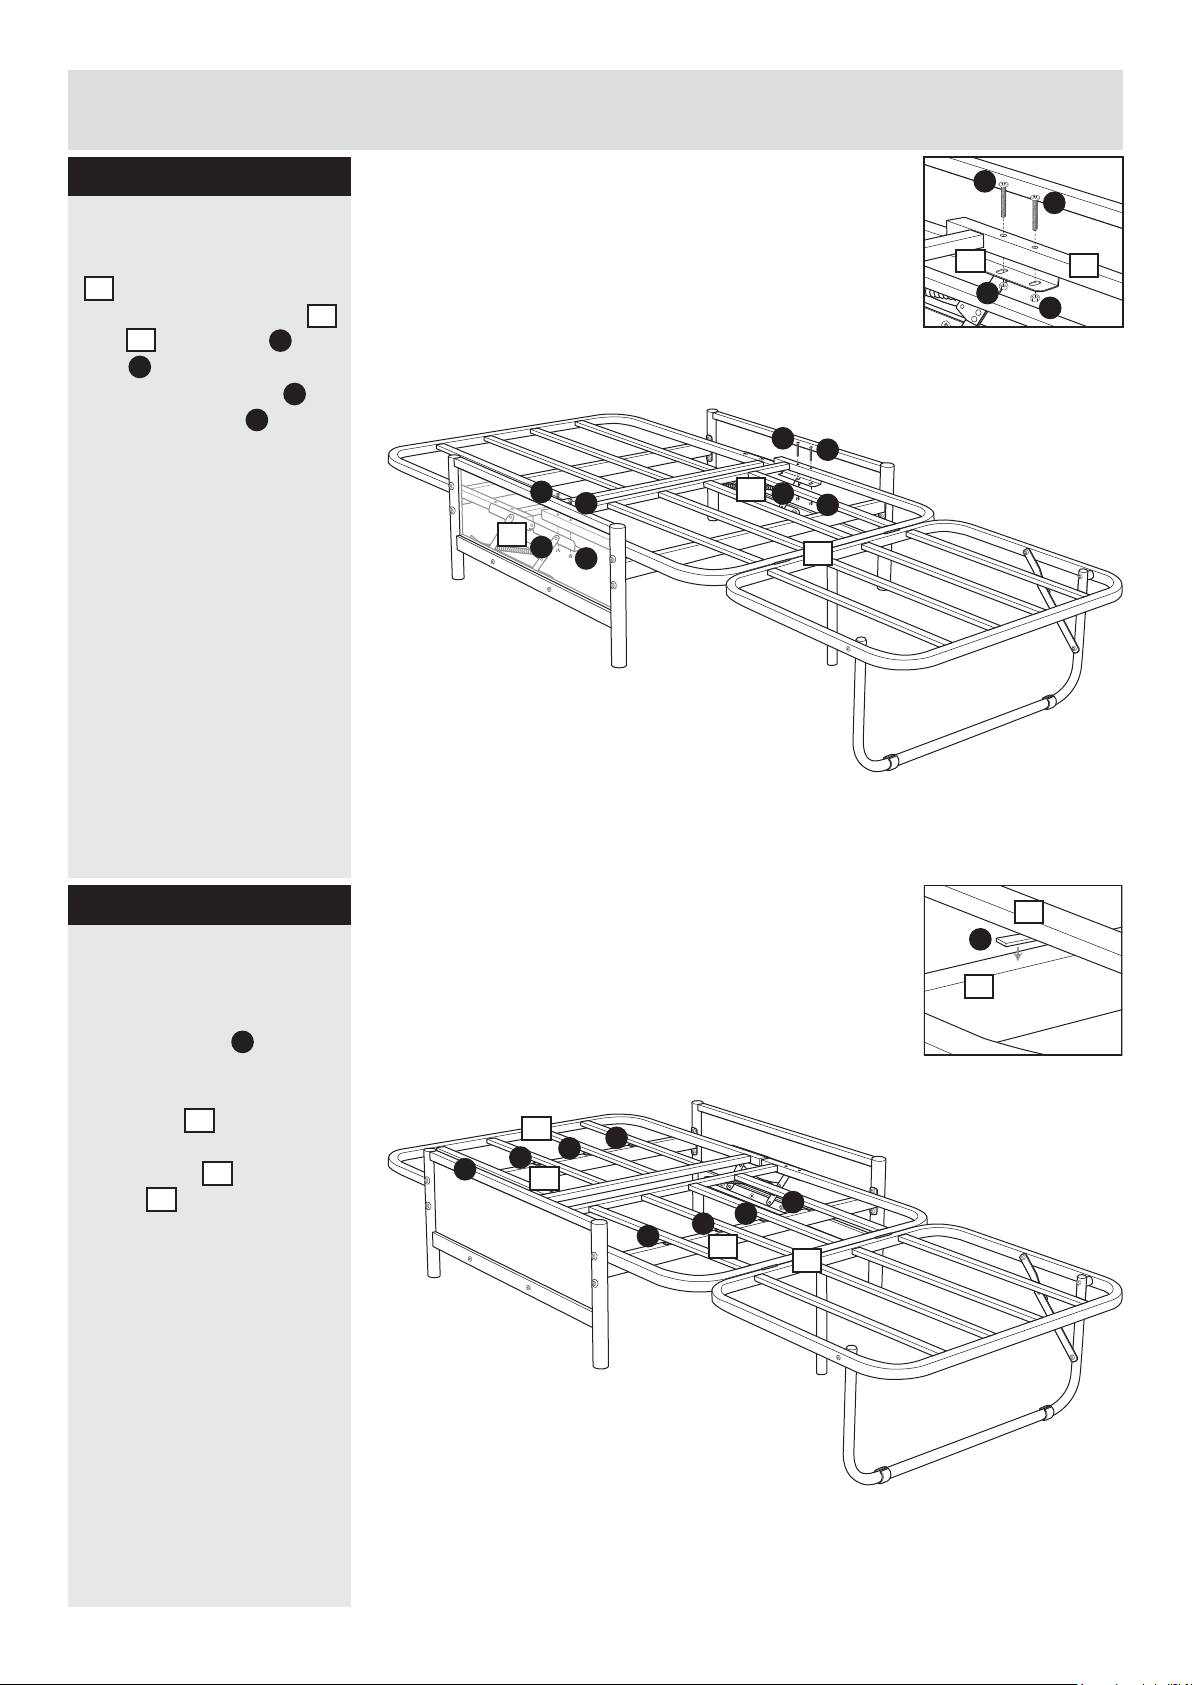
Assembly Instructions
Step 7
Attaching seat frame
Position the seat frame
4
as shown and attach
it to futon mechanisms
9
and using bolts and
G
nuts . Tighten bolts and
nuts using allen key
and big spanner .
P
8
B
N
B
B
9
G
B
B
B
B
8
G
G
9
G
G
4
4
G
Step 8
Attaching adhesive
pads
Remove backing from
adhesive pads then
carefully position it on the
top surface of front &
back rails and under
the four middle rails of
seat frames and back
frame as shown.
3
M
2
4
4
M
2
3
M
M
2
M
M
M
M
M
M
2
4
Assembly is complete.
6
Page 8
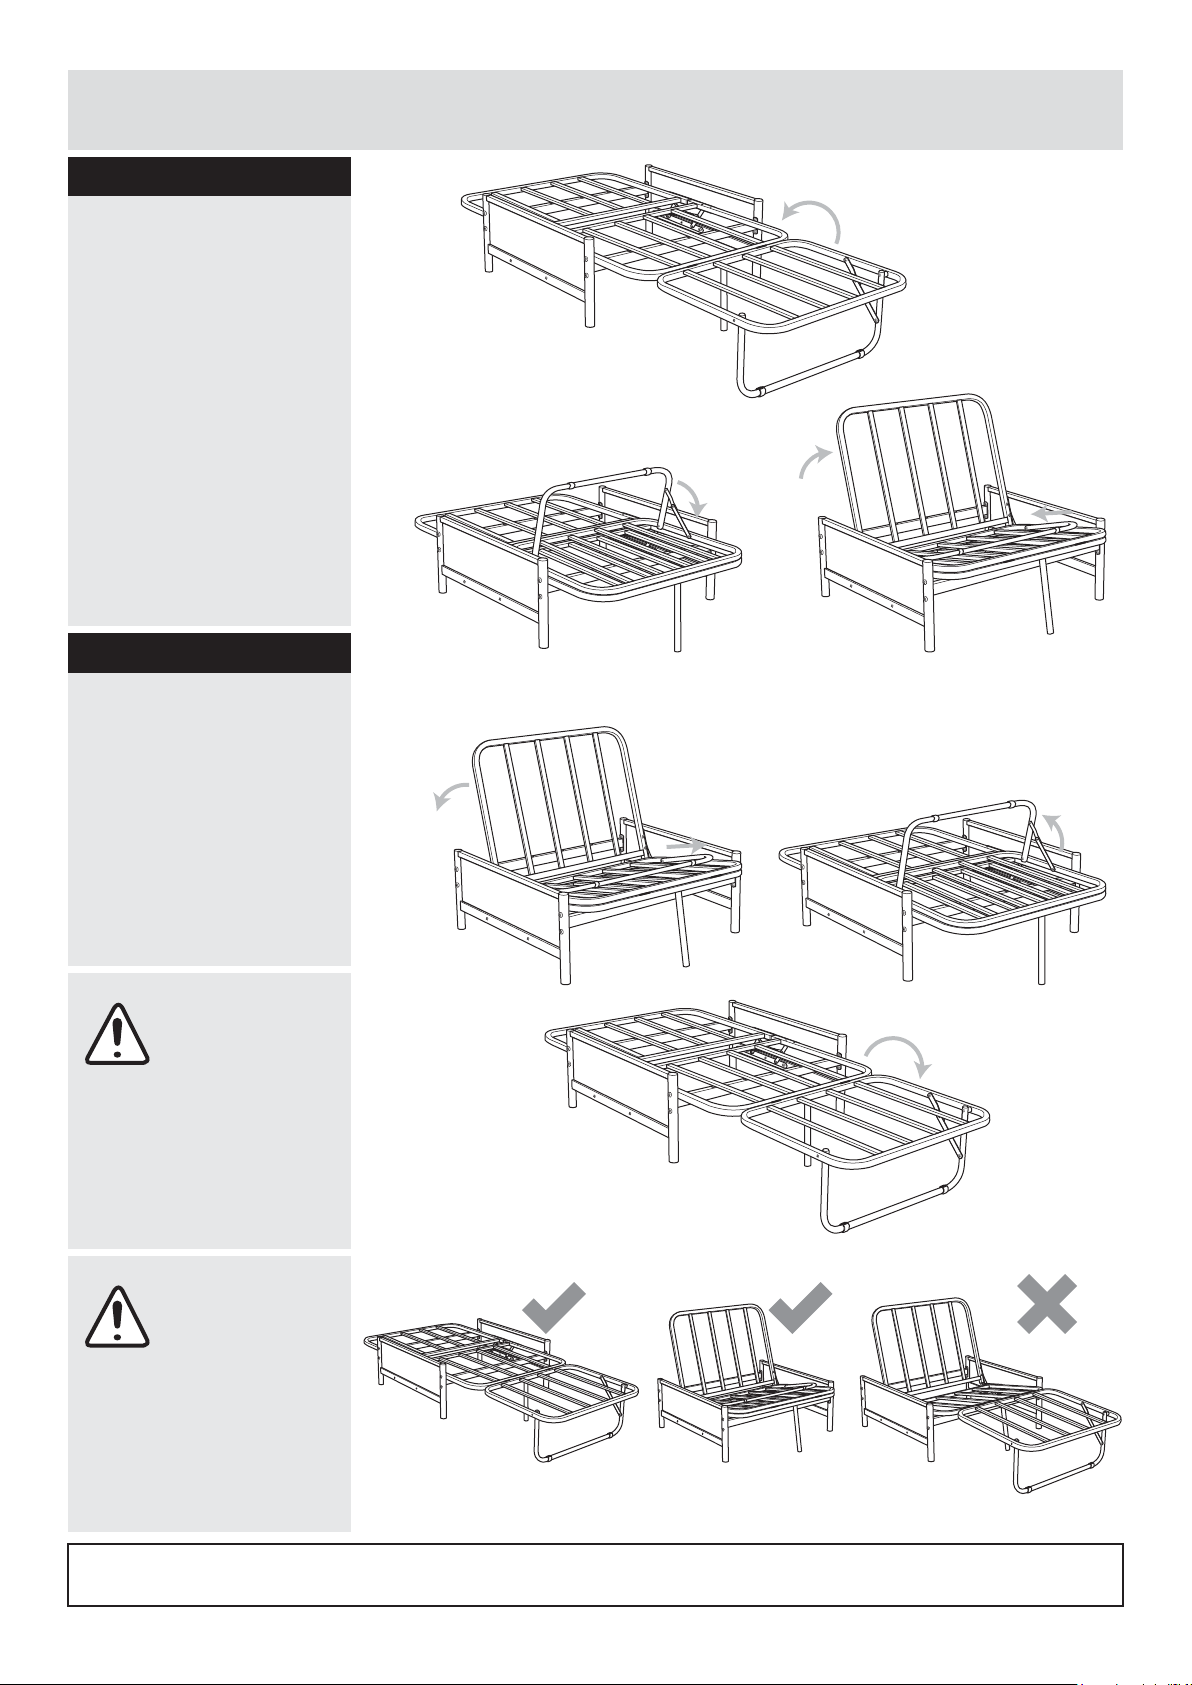
Operation Instructions
Step 1
Folding the futon
a: Carefully pull up the
front leg and fold down
the front seat frame.
b: Fold down the front
leg.
c: Then carefully push in
the seat frame and pull
up the back rest.
Step 2
Opening the futon
a: Carefully pull out the
front seat frame and fold
down the back frame.
a:
b:
c:
a: b:
b: Pull up the front leg.
c: Then carefully open
the seat frame as shown.
Warning:
Keep hands away
from hinges and
folding
mechanisms to
prevent possible
entarpment or
injury.
Warning:
This futon can be
used only as bed
and seat. The
recilining position
as shown on the
right is prohibited
for this unit.
c:
Recilining positionSeat positionBed position
If you need help or have damaged or missing parts, call the Customer Helpline: 08456 400800
7
 Loading...