

Page 1
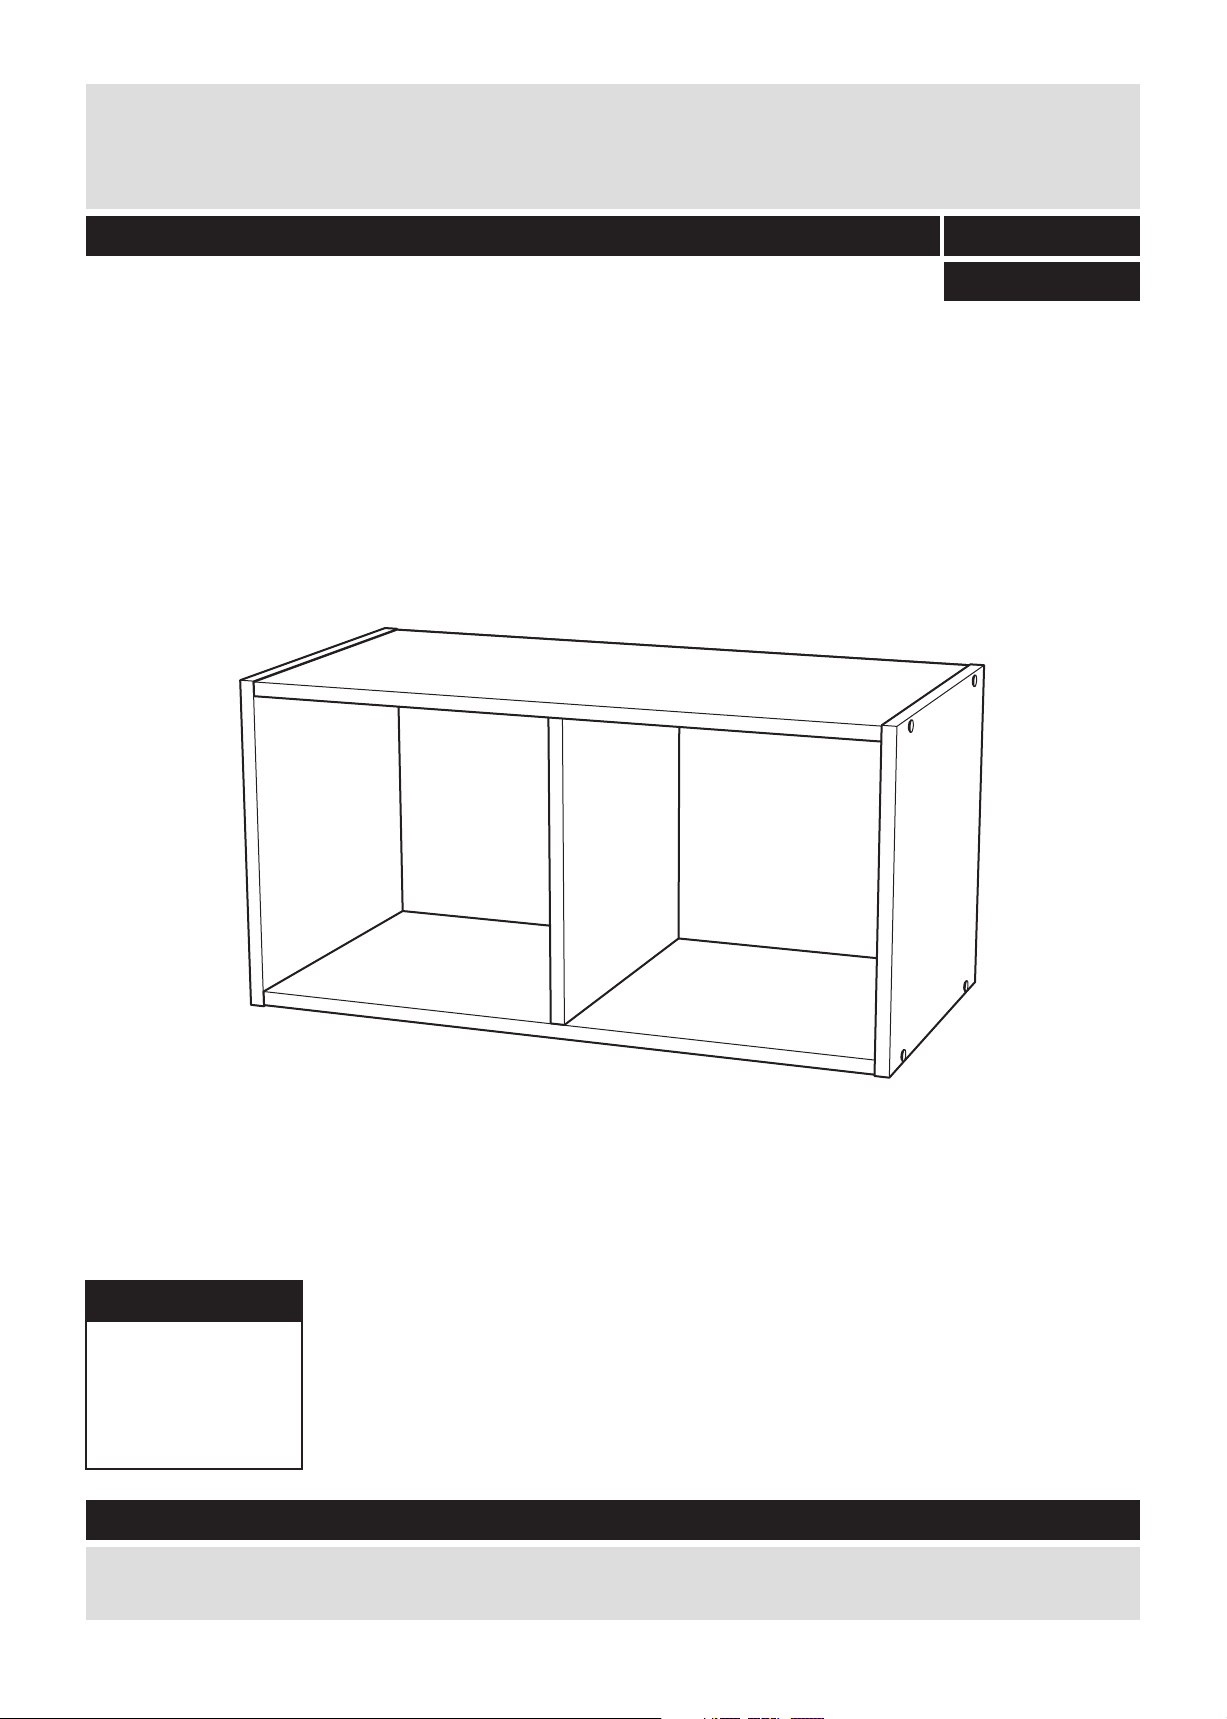
Phoenix 2 Cube Unit
Assembly Instructions - Please keep for future reference
719/1448
719/1118
Dimensions
Width - 70cm
Depth - 35cm
Height - 35cm
Important - Please read these instructions fully before starting assembly
If you need help or have damaged or missing parts, call the Customer Helpline: 08456 400800
issue 1 9/02/’10
Page 2
Safety and Care Advice
Important - Please read these instructions fully before starting assembly
Check you have all the
components and tools listed on
pages 2 and 3.
Remove all fittings from the
plastic bags and separate them
into their groups.
Keep children and animals
away from the work area, small
parts could choke if swallowed.
Make sure you have enough
space to layout the parts before
starting.
Care and maintenance
●Only clean using a damp cloth
and mild detergent, do no use
bleach or abrasive cleaners.
Assembly to be carried out by
the competent adult only.
Do not stand on the panels, this
could cause damage.
Assemble the unit as close to its
final position (in the same room)
as possible.
Assemble on a soft level
surface to avoid damaging the unit
or your floor.
Parts of the assembly will be
easier with 2 people.
●From time to time check that
there are no loose screws on this
unit.
During assembly children
should be kept away from the
product due to the potential risk of
injury.
We do not
recommend the use
of power drill/ drivers
for inserting screws,
as this could damage
the unit. Only use hand
screwdrivers.
Dispose of all packaging carefully
and responsibly.
Warning: The unit weighs
approximately kgs.10
Please lift with care.
●This product should not be
discarded with household waste.
Take to your local authority waste
disposal centre.
Do not use this item if any
components are missing or
damaged.
“IMPORTANT: RETAIN THESE
INSTRUCTIONS FOR FUTURE
REFERENCE”.
Argos Ltd. MK9 2NW.
The maximum weight of the
children user: 50kgs.
Regularly check all fastenings
to ensure that they are properly
tightened.
This product is suitable for
children in the age of 6 or above.
1
Page 3
Components - Panels
If you have damaged or missing components,
call the Customer Helpline:08456 400800
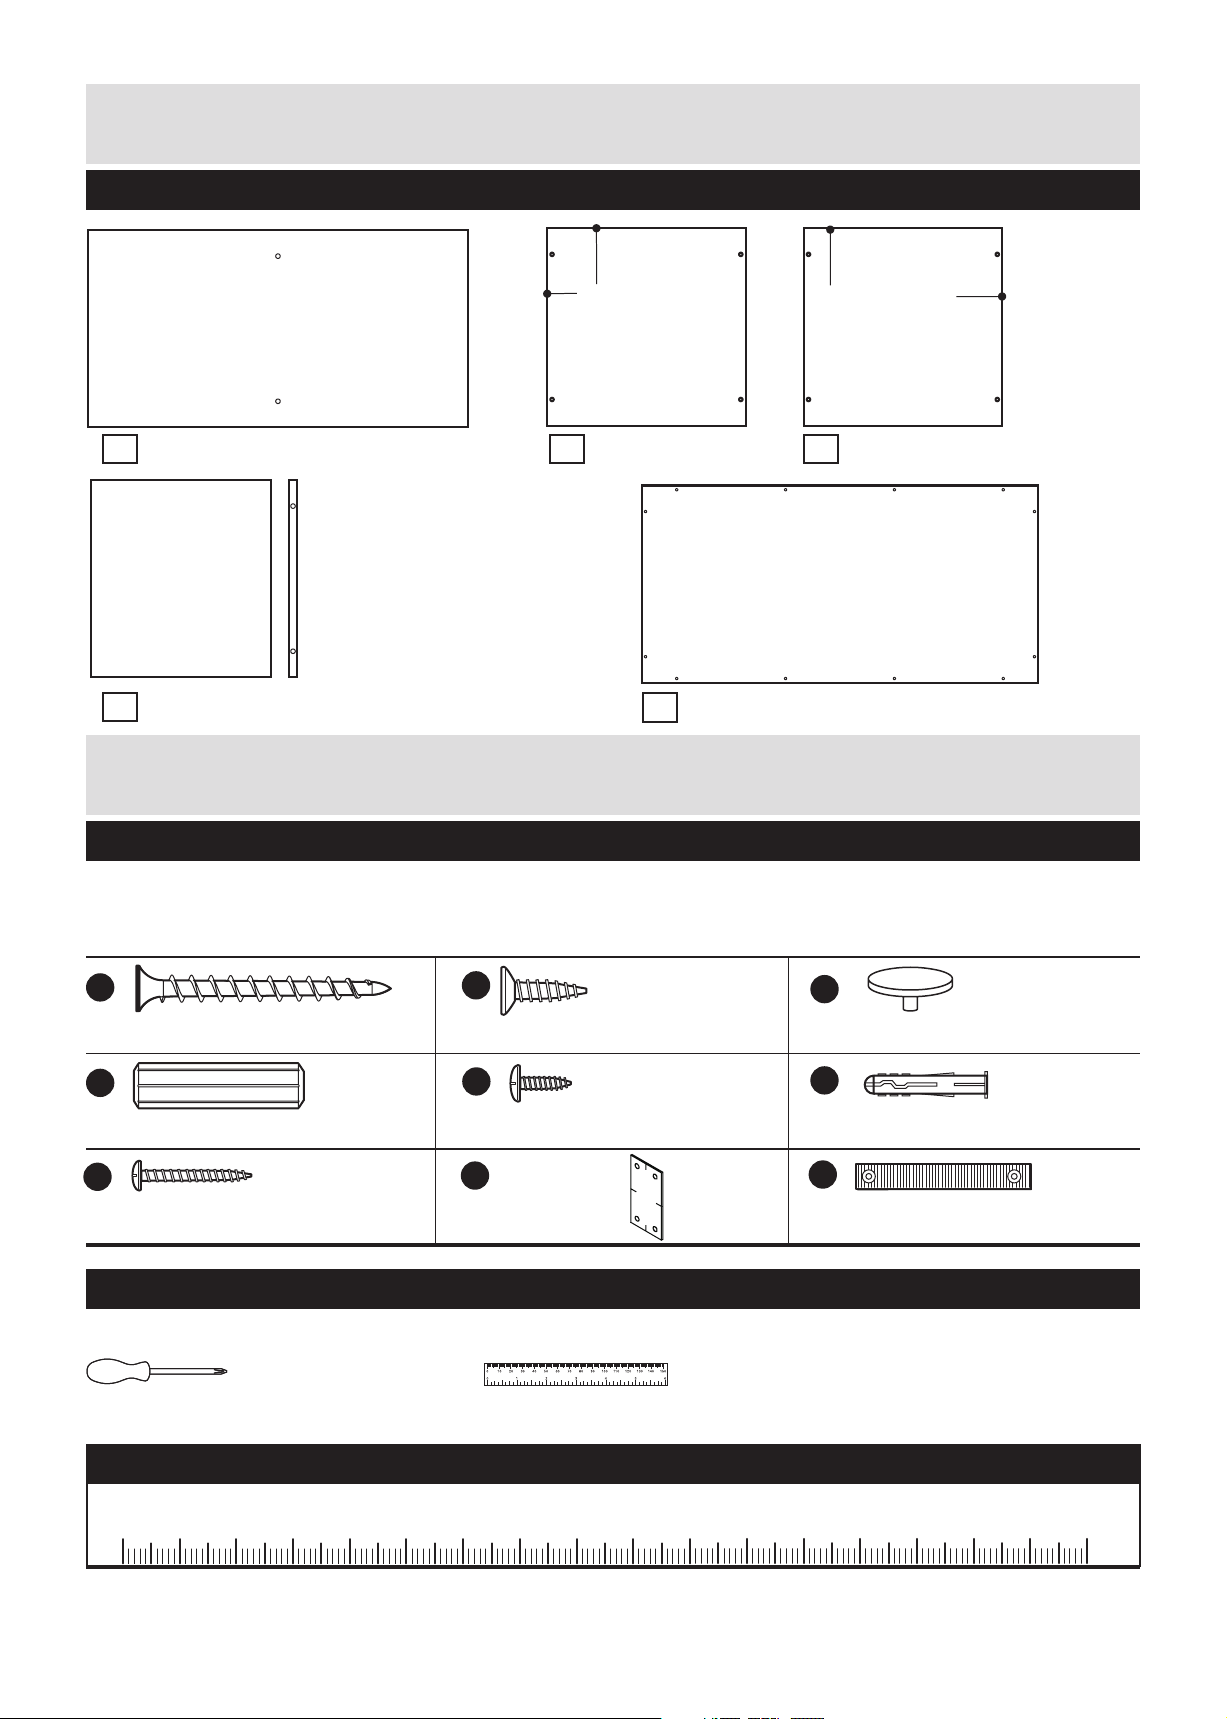
Please check you have all the panels listed below
Unfi nished ed ge
1
Shelf x 2 (67 x 34.9cm)
2
Middle (34.8 x 31.9cm)
Left side (35 x 35cm)
3
5
Components - Fittings
Please check you have all the fittings listed below
Unfi nished ed ge
Right side (35 x 35cm)
4
Back (69.8 x 34.8cm)
Note: The quantities below are the correct amount to complete the assembly. In some cases more fittings
may be supplied than are required.
A
45mm Screw x 8
D
Wood dowel x 4
G
26mm Screw x 1
B
15mm Screw x 16
E
12mm Screw x 1
H
Metal plate x 1
C
Cap x 8
F
Wall plug x 1
I
Wall strap x 1
Tools required
Phillips screwdriver
(medium & large)
Ruler/tape
measure
Ruler - Use this ruler to help correctly identify the screws
0 5 10 15 20 25 30 35 40 45 50 55 60 65 70 75 80 85 90 95 100
105
110 115 120 125 130 135 140 145 150 155 160 165 170
2
Page 4
Assembly Instructions
Step 1
Step 1
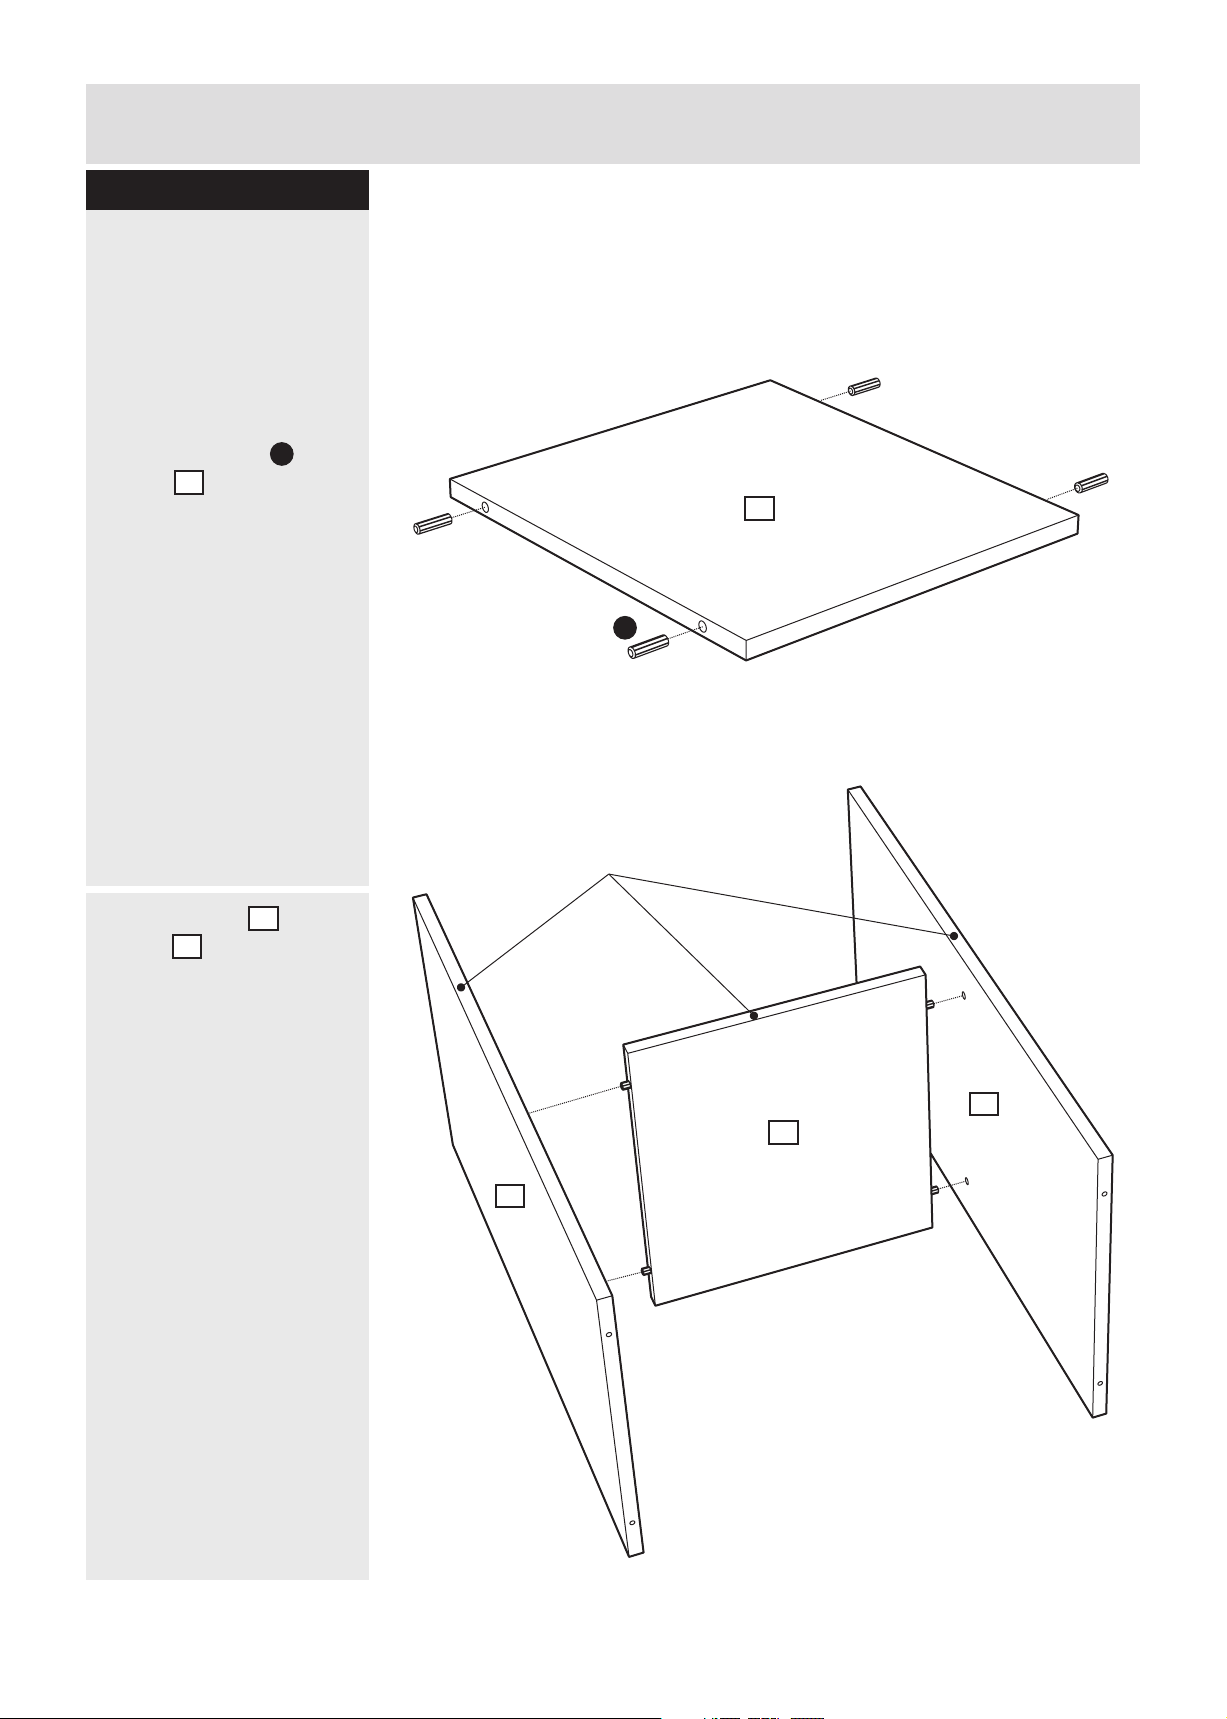
Fitting the shelves
a: Insert Dowels into
Middle .
2
b: Fit Shelves onto
Middle .
2
D
1
a:
b:
2
D
Unfi nished ed ge
1
2
1
3
Page 5
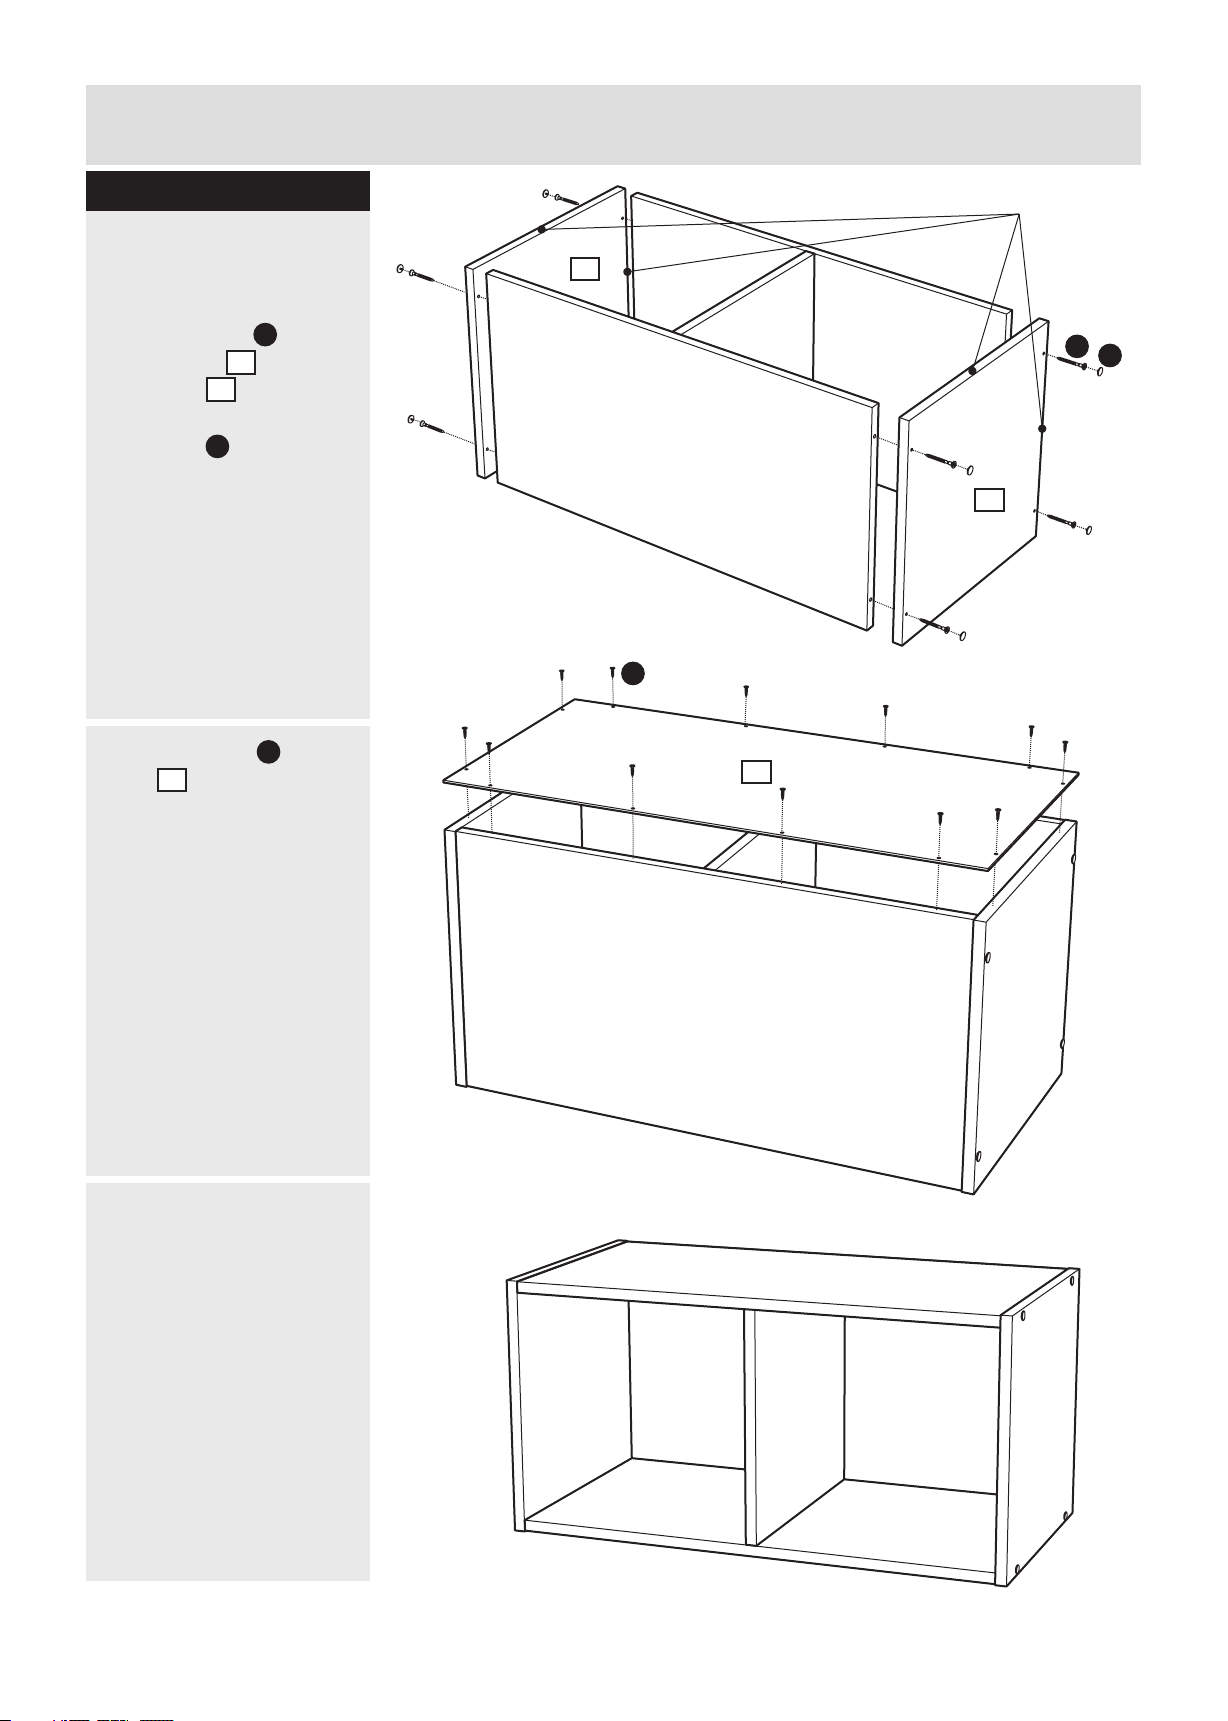
Assembly Instructions
Step 2
Fitting the sides
a: Use Screws to fix
the Left side and
Right side onto the
unit.
Use Caps to cover the
holes on the unit.
b: Use Screws to fix
Back onto the unit.
5
A
3
4
C
B
a:
b:
Unfi nished ed ge
3
A
C
4
B
5
c: Place the unit to the
desired location.
Assembly is complete.
c:
4
Page 6
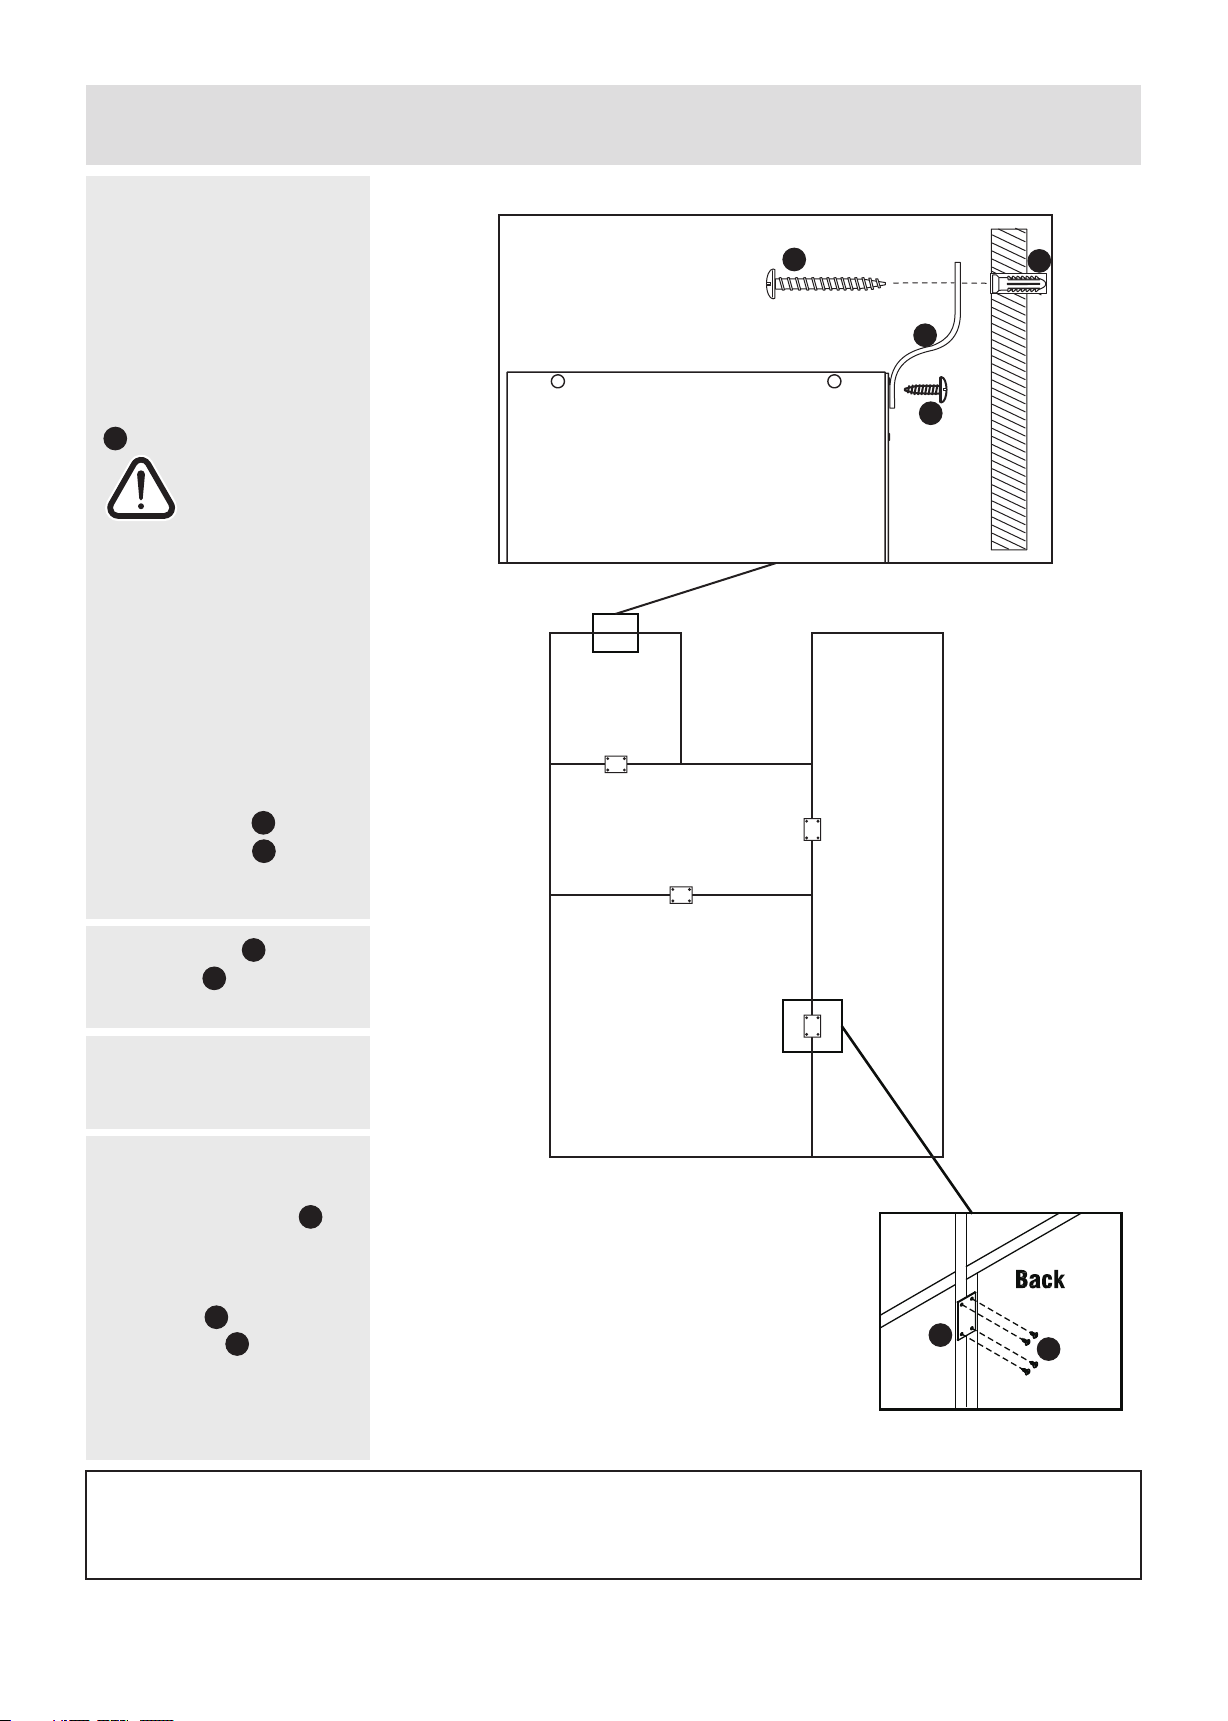
Assembly Instructions
Fixing with another unit
Note: It would be useful to
ask someone to help you
at this stage.
It is strongly recommended
that the unit is attached to
the wall using Wall straps
I
C .
Important: When drilling
into walls always check
that there are no hidden
wires or pipes etc. Make
sure that the screws and
wall plugs supplied are
suitable for supporting
the unit. Consult a
qualified tradesperson if
you are not sure.
a: Use Screws to fix
the Metal plate of link
B
H
another unit from the
back.
G
I
E
F
b: Use Screw to fix the
Wall strap onto the
E
I
back of the unit .
c: With help, place the
unit in the intend position.
d: Drill a hole in the wall
at an appropriate position
and insert Wall plug
(Masonry walls only).
To secure the unit, fix
Wall strap to the wall
using Screw (Masonry
I
G
walls only).
If you need help or have damaged or missing parts, call the
F
Exam ple of differen t configu ration
J
H
Customer Helpline : 08456 400800
B
H
5
Page 7
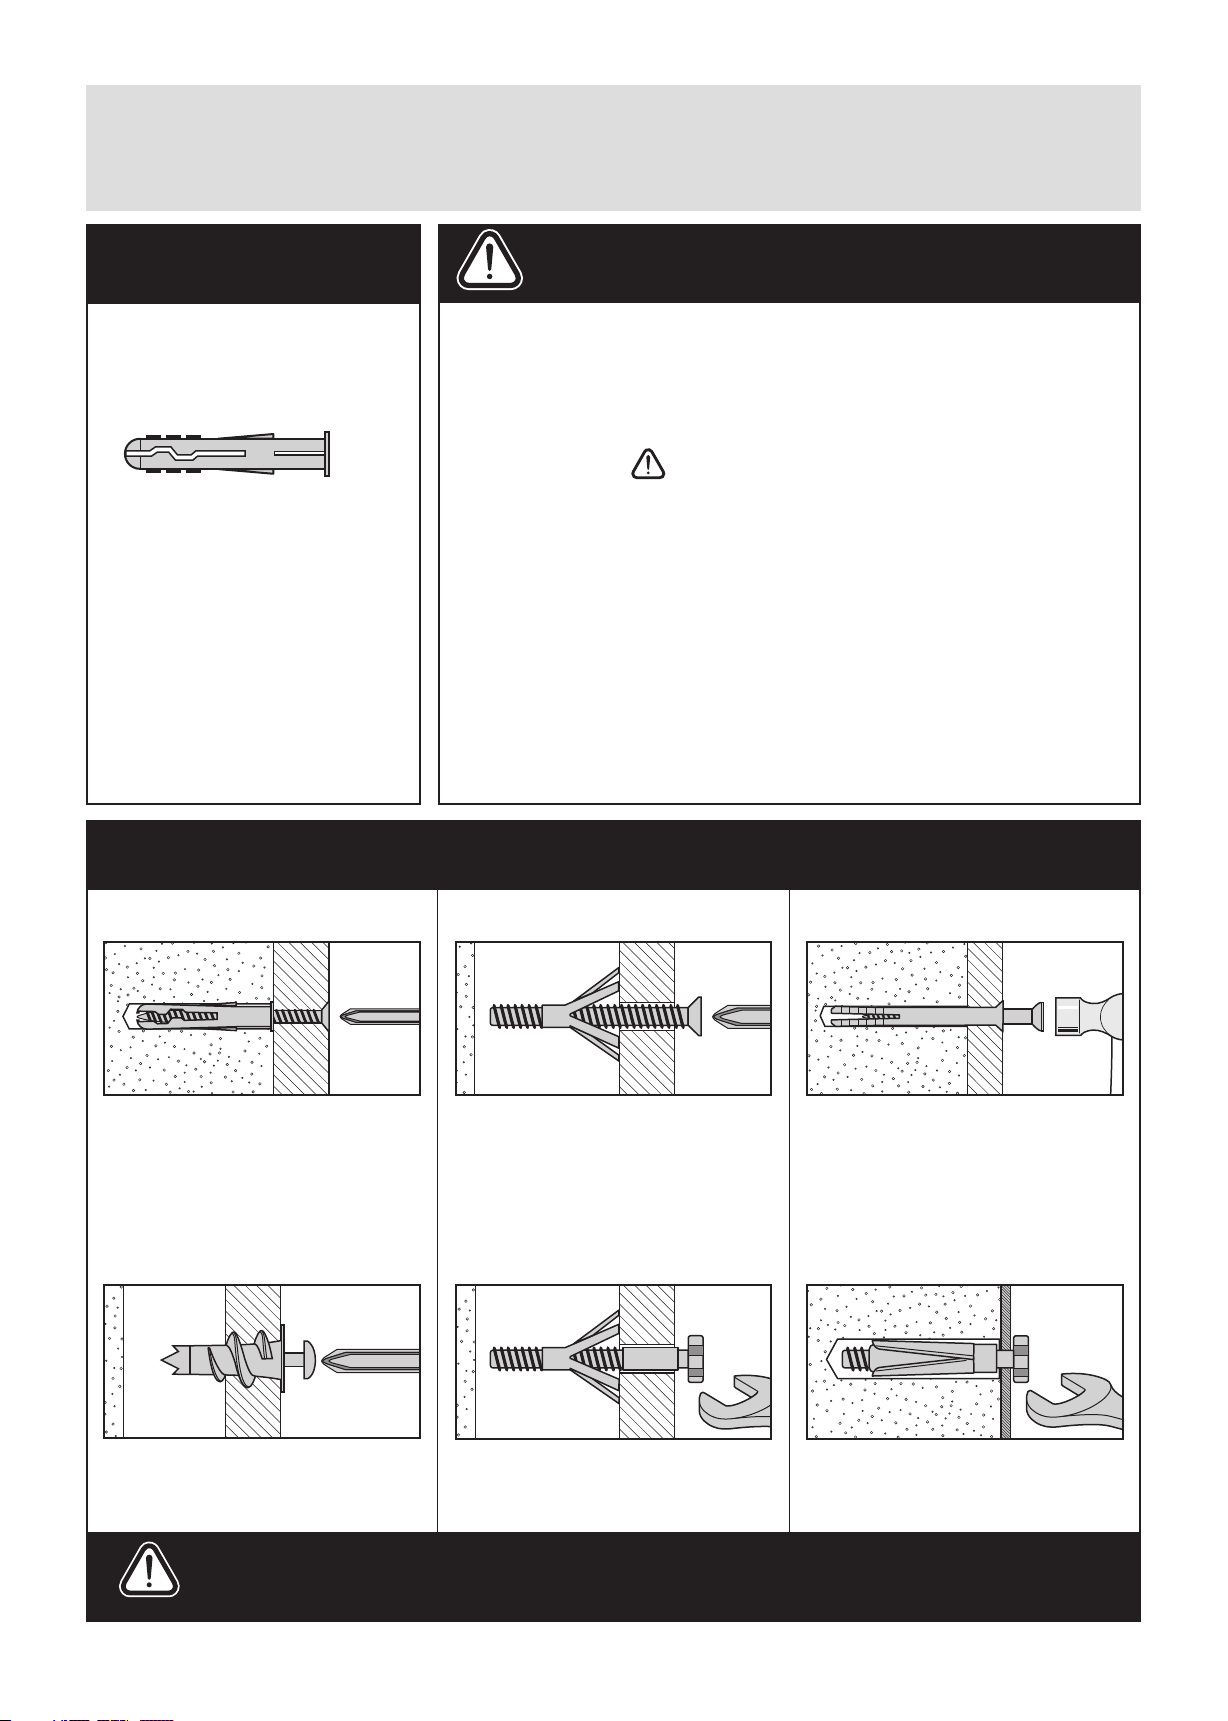
A Guide to - Wall Mounting & Fixings
Important note:
If plastic wall plugs
are supplied with your
product:
- these are only suitable for
use in masonry walls.
If you are in any doubt about
the correct wall plugs for
your wall, seek professional
advice.
Failure of the product due to
using incorrect fxings is the
responsibility of the installer.
Important: When drilling into walls always
check that there are no hidden wires or pipes etc.
Make sure that the screws and wall plugs being used
are suitable for supporting your unit. Consult a qualifed
tradesperson if you are unsure.
Hints:
1: General rule: Always use a larger screw and wall plug
if you are not sure.
2: Ensure you use the recommended drill bit to match the wall
plug and hole size.
3: Ensure you drill the hole horizontally, do not force the drill or
enlarge the hole.
4: Take extra care when drilling high walls, ceilings and ceramic
tiles. Ensure wall plugs are inserted beyond the thickness of
the ceramic tiles to avoid the tiles splitting or cracking.
5: Ensure wall plugs are well ftted and are a tight ft in the
drilled hole.
Types of walls
No.1 “General Purpose” wall plug
Generally aerated blocks should not
be used to support heavy loads, use
a specialist ftting in this case. For light
loads, general purpose wall plugs can
be used.
No.2 “Plasterboard” wall plug
You can use one of the following types of wall plug if your walls ar e made
of brick, breeze block, concrete, stone or wood.
No.3 “Cavity Fixing” wall plug
For use with plasterboard partitions or
hollow wooden doors.
No.4 “Cavity Fixing-Heavy Duty”
wall plug
No.5 “Hammer Fixing” wall plug
For use with walls stuck with
plasterboard. The hammer fxing allows
it to be fxed to the wall rather than the
plasterboard. Always check the fxing
is secure to the retaining wall.
No.6 “Shield Anchor” wall plug
Heavy loads
For use when attaching light loads on
to plasterboard partitions.
Care &
Maintenance
For use when ftting or supporting
heavy loads such as shelving, wall
cabinets and coat racks.
Safety: Always check the ftting
and location to ensure your safety
in and around the home.
For use with heavier loads such as TV
& HiFi speakers and satelite dishes etc.
Fitting: From time to time check
the ftting to ensure the wall plugs
or screws do not become loose.
Revision 2 - 7/10/09
 Loading...