

Page 1
Issue 1 - 29/05/18
Cranford 4'6 and 5' Bed
SKU 7077641
Care & Instruction Manual
Please read and retain these instructions for future
reference
7434583
Page 2

1
Important - Please read these instructions fully before starting assembly
Check you have all the
components and tools listed on
pages 2, 3 and 4.
Remove all fittings from the
plastic bags and separate them
into their groups.
Keep children and animals
away from the work area, small
parts could choke if swallowed.
Make sure you have enough
space to layout the parts before
starting.
Assemble the item as close
to its final position (in the same
room) as possible.
Assemble on a soft level
surface to avoid damaging the
unit or your floor.
Assembly requires 2 people.
Do not fully tighten bolts until
the whole bed is assembled.
Do not overtihgten the nuts to
avoid causing damage to the
threads.
We do not
recommend the
use of power
drill/drivers for
inserting screws,
as this could damage the unit.
Only use hand screwdrivers and
Allen keys.
Dispose of all packaging
carefully and responsibly.
Care and maintenance
Only clean using a damp cloth From time to time check that This product should not be
Safety and Care Advice
Cleaning Guidance
Minor stains and spillages
should be removed immediately
from cushion fabric, by wiping
over lightly with a damp cloth
and mild soapy water.
Light marking can also be
removed using this method.
To remove more stubborn
stains or marking, a good
quality proprietary domestic
fabric cleaner can be used,
although it should first be tested
on and inconspicuous area of
the fabric.
Page 3
5
Bentwood slat
(4'6 -680 x 55mm) X 28
(5' -755 x 55mm) X 30
4
Central support
(4'6 -1920 x 80mm)
(5' -2020 x 85mm)
8
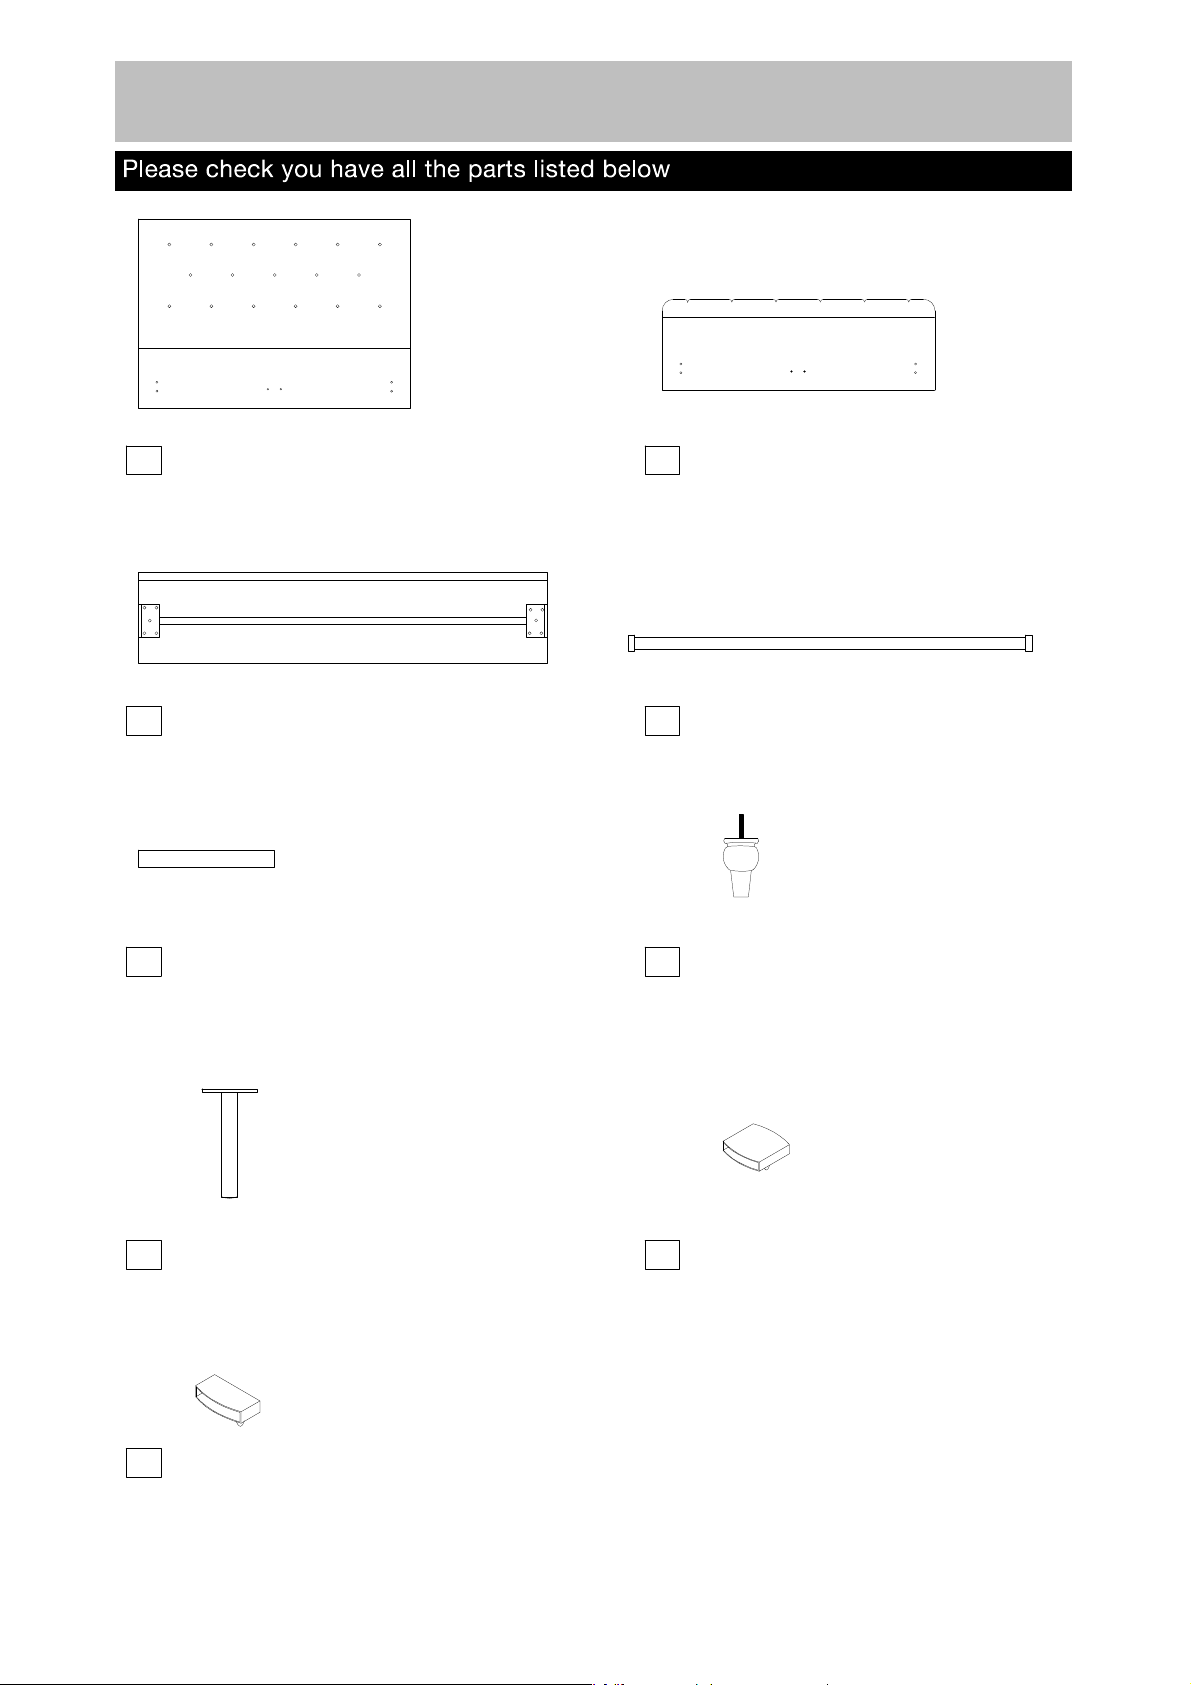
Components - Parts
Please check you have all the parts listed below
2
lf you have damaged or missing components.
call the Customer Helpline: 0345 6400 800
1
Headboard
(4'6 -1480 x 1070mm)
(5' -1630 x 1070mm)
2
Footboard
(4'6 -1480 x 580mm)
(5' -1630 x 580mm)
3
Side rail x 2
(4'6 -1920 x 290mm)
(5' -2020 x 290mm)
7
Support leg X 2
(Ø25 x 260mm)
Leg X 4
(70 x 120mm)
INSIDE
9
Double slat cap (55mm)
(4'6 X 14)
(5' x 15)
Single slat Cap x 28(55mm)
(4'6 X 28)
(5' x 30)
FRONT
INSIDE
6
Page 4

3
Please check you have all the fittings listed below
If you have damaged or missing components,
call the Customer Helpline: 0345 6400 800
Ruler - Use this ruler to help correctly identify the screws
0 5 10 15 20 25 30 35 40 45 50 55 60 65 70 75 80 85 90 95 100 105 110 115 120 125 130 135 140 145 150 155 160 165 170
Tools required
0
0 5 10 15 20 25 30 35 40 45 50 55 60 65 70 75 80 85 90 95 100 105 110 115 120 125 130 135 140 145 150
1 2 3 4 5 6
Ruler/tape
measure
Components - Fittings
B C
D E FAF
G
M8 x 25mm Allen screw x 12
5mm Allen key x 1
Flat Washer x 20
Spring washer x 20
M8 Nut x 4
Spanner x 1
Page 5

4
Step 1
Assembly Instructions
Underside
6
6
1
6
6
2
Attaching feet
With help, carefully place
headboard and
footboard flat on the
floor with the fixing holes
facing up.
Note: Ensure the floor is
suitably protected to
prevent any marking or
damage to the
components.
Screw legs to the
underside of headboard
as shown.
Repeat on the underside of
footboard .
6
1
2
1
2
Page 6

Step 2
2
3
3
1
1
3
A
Assembly Instructions
a:
b:
5
2
A
B
C
A
B
C
1
A
1
2
1
3
1
A
2
A
Attaching side rails
a: Loosely screw fixings
and into headboard
and footboard as
shown.
Note: Do not screw fully in.
b: With help, raise
headboard into the
standing position.
Hang the metal brackets on
the end of side rails ,
over screws in the
headboard as shown.
Note: Do not fully tighten
bolts at this stage. Finger
tighten only.
Repeat to assemble
footboard .
B
C
Page 7

6
Assembly Instructions
212
Step 4
Step 3
4
D
B
C
B
C
E
7
4
A
B
C
1
4
7
4
D
B
C
Preparing support legs
Assemble support legs
to the underside of central
support using fixings ,
, and as shown.
Note: Ensure the holes in
central support are facing
up as shown.
4
E
Locating central support
Assemble central support
in between the
headboard and footboard,
using fixings , and
as shown.
Ensure the frame is straight
and square.
Fully tighten screws from
step 1.
4
A B C
A
Frame must be square
Page 8

We care about our quality and what you think,
If you have any comments, or you require replacement parts,
Please call our Customer Helpline:0345 6400 800
Or visit www.argos.co.uk
Your statutory rights are not affected.
Produced in China for
Argos Limited, 489-499
Avebury Boulevard,
Milton Keynes, MK9 2NW
www.argos.co.uk
Step 5
7
Assembly Instructions
8
5
5
5
9
9
5
Assembly is complete.
5
8
9
3
3
4
Assembling slats
a: Assemble single plastic
slat caps onto one end of
bentwood slats .
Fit bentwood slats into
both side rails by locating
single slat caps into the
holes.
b: Fit bentwood slats into
both sides of double slat
caps , before pushing
caps into the holes in
central support .
9
5
3
5
8
8
4
5
9
a:
b:
 Loading...