

Page 1
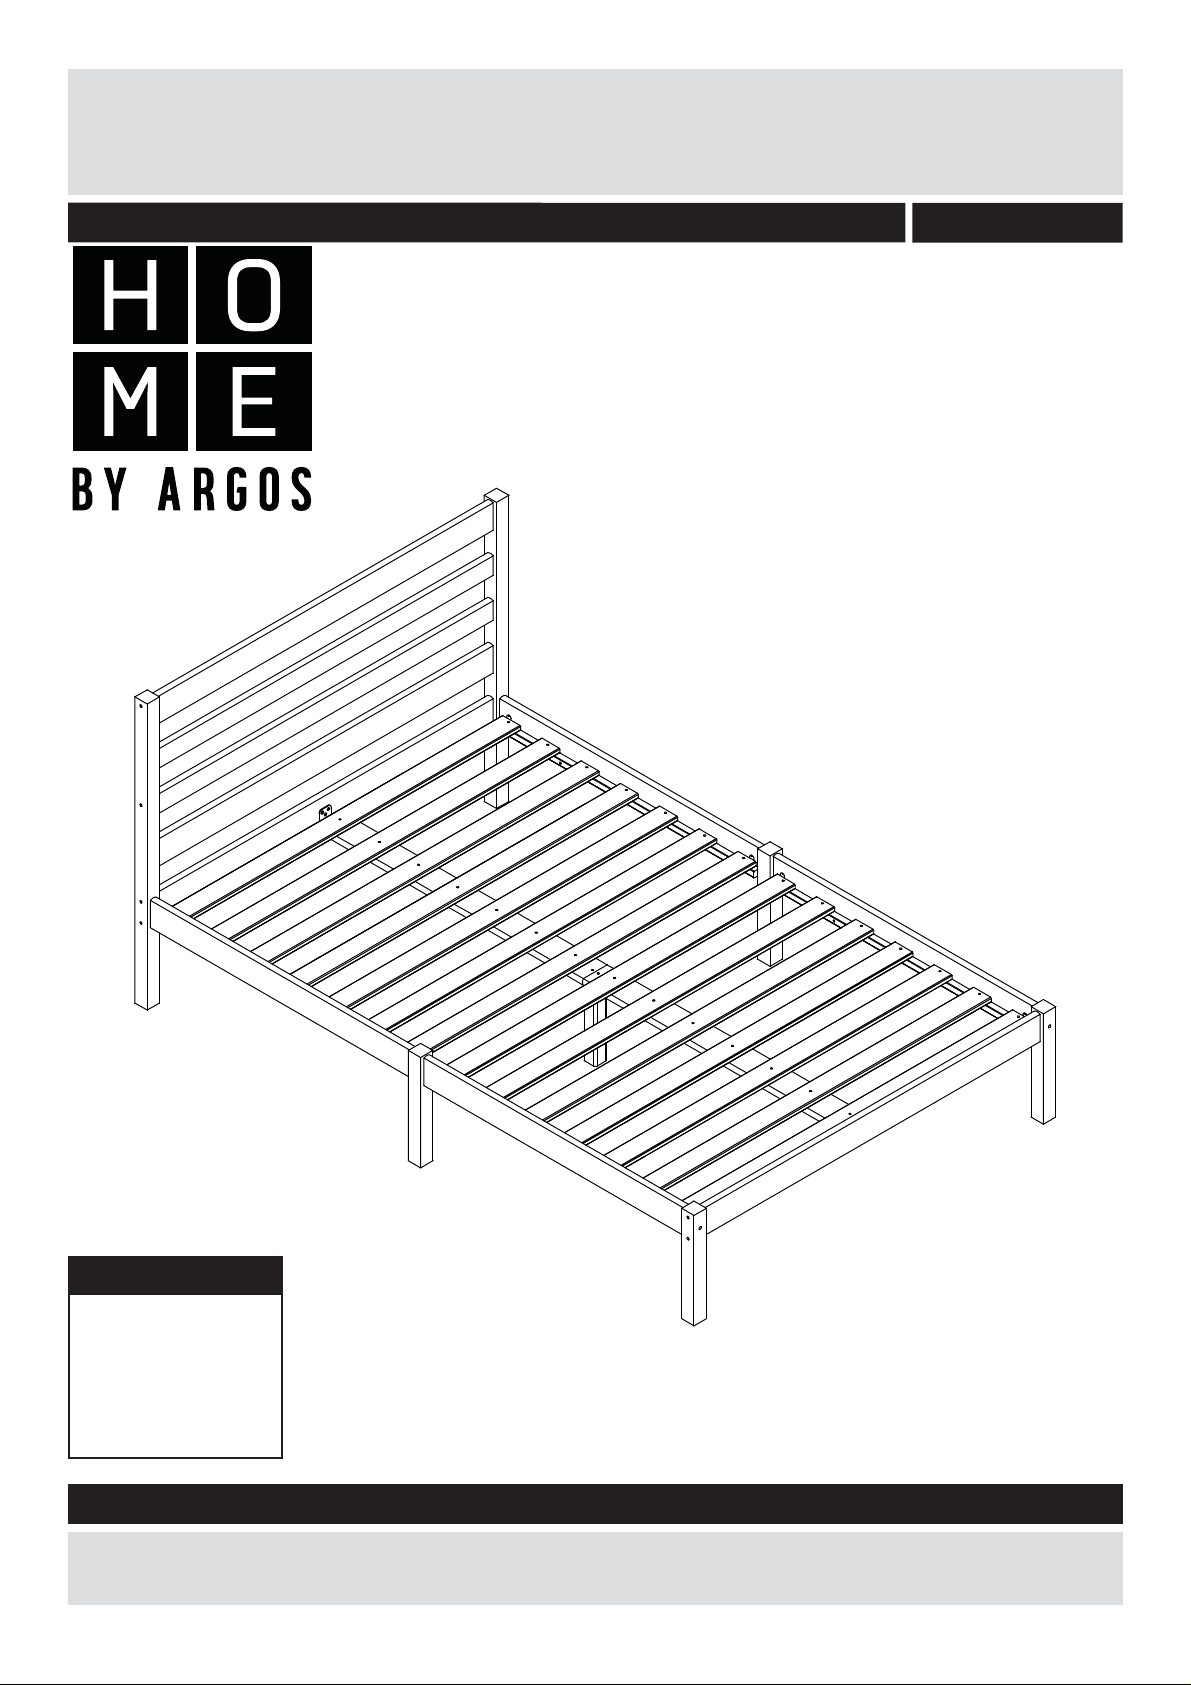
Doublebed White - 4Ft
Assembly Instructions - Please keep for future reference
7037076
Dimensions
Length - 195,3cm
Depth - 126,3cm
Height - 92,6cm
Weight - 22kg
Important – Please read these instructions fully before starting assembly
If you need help or have damaged or missing parts, call the Customer Helpline:
0045 7668 8055 or e-mail: order@fl exa.dk
Issue 2 - 01/06/17
Page 2

Safety and Care Advice
Important – Please read these instructions fully before starting assembly
• Check you have all the
components and tools listed on
pages 2 and 3.
• Remove all fi ttings from the
plastic bags and separate them
into their groups.
• Keep children and animals
away from the work area, small
parts could choke if swallowed.
• Make sure you have enough
space to layout the parts before
starting.
Care and maintenance
• Only clean using a damp cloth
and mild detergent, do no use
bleach or abrasive cleaners.
• Do not stand or put weight on
the product, this could cause
damage.
• Assemble the item as close
to its fi nal position (in the same
room) as possible.
• Assemble on a soft level
surface to avoid damaging the
unit or your fl oor.
• Parts of the assembly will be
easier with 2 people.
• From time to time check that
there are no loose screws on
this unit.
• We do not
recommend the
use of power
drill/drivers for
inserting screws,
as this could
damage the unit. Only use hand
screwdrivers.
• Dispose of all packaging
carefully and responsibly.
• This product should not be
discarded with household waste.
Take to your local authority
waste disposal centre.
Note: if required the next
page can be cut out and used
as reference throughout the
assembly. Keep this page with
these instructions for future
reference.
1
Page 3
If you have damaged or missing components,
Components - Parts
call the Customer Helpline:
Please check you have all the parts listed below
0045 7668 8055
Leg x2 (92,6x4,3x4,3cm)
1
No. 12-04309261-20
Bedside x4
4
No. 12-02009122-20
(91,2x8,9x2,0cm)
2
Leg x2 (33,4x4,3x4,3cm)
No. 12-04303342-20
List x4 (90,4x2,0x2,0cm)
5
No. 12-02009041
Leg x2 (33,4x4,3x4,3cm)
3
No. 12-04303341-20
Slat x14 (119,7x6,5x1,5cm)
6
No. 12-01511972
Endrail x2
7
(111,7x8,9x2,0cm)
No. 12-02011772-20
Midsupport x2
10 11
(93,6x8,9x2,0cm)
No. 12-02009361 No. 12-04302471
Endrail x2
8 9
(117,7x6,5x2,0cm)
No. 12-02011774-20 No. 12-02011773-20
Leg x1
(24,7x4,3x4,3cm)
Endrail x2
(117,7x8,9x2,0cm)
2
Page 4

Components - Fittings
Please check you have all the fi ttings listed below
Note: The quantities below are the correct amount to complete the assembly. In some cases more fi ttings
may be supplied than are required.
No. 3913-06090
A
M6x90mm Connecting bolt x4
No. 3930-10045
D
B
M6 ø14x13mm Barrel nut x4
E
10x45mm Dowel x24 4,0x35mm Chipboard screw x205x40mm Dowel x4
G
6,3x90mm Assembly screw x12
No. 3933-14016
J
Ø14x15,5mm Threaded bush x4
No. 4022-012
M
15 gram Glue tube x2
No. 4008-013
H
M8x10mm Grub screw x4
K
Ø10 Cover cap White x4
N
4,0x60mm Chipboard screw x2
No. 3922-06013
No. 3930-05040
No. 3917-08010No. 3909-63090
No. 3938-00010-2
No. 3901-40060
No. 3928-000083
No. 3901-40030
C
4,0x30mm Chipboard screw x42
No. 3903-40035
F
No. 3921-04065
I
M4x65mm Threaded pin x2
No. 4020-001
L
M4/Ø8x38mm Connecting bolt x4
No. 3903-40020
O
4,0x20mm Chipboard screw x12
P
48x48x40mm Angle x2
Tools required
Phillips
screwdriver
(medium)
Flatblade
screwdriver
(medium)
Allen key
4mm incl.
No. 4033-004
Q
M8/Ø30 Washer x2
Small
hammer
Ruler/tape
measure
Eye protection
(when using a
hammer or glue)
3
Page 5

Assembly Instructions
Step 1
Insert the Ø10 dowels D
into the holes in bedsides
4
and endrails 7 and
8
.
It may be necessary
to tap the dowels in
very gently with a small
hammer.
M
Apply glue
5
and attach it to the
bedside
F
. Repeat for all four
to the list
4
using screws
bedsides.
Step 2
Apply a small amount of
M
glue
holes in legs
the small dowels
gently hammered in.
into the 2 small
1
before
E
are
D
D
E
F
D
D
D
F
1
7
8
4
5 5
F
F
E
E
F
M
D
M
D
F
M
G
Step 3
Attach endrails
9
and
between legs 1
using screws
Don’t overtighten.
7
G
.
Step 4
Attach endrail
between legs
screws
G
Don’t overtighten.
9
3
using
.
, 8
G
G
G
G
One hole up!
G
G
7
8
8
7
9
1
G
One hole up!
3
9
1
G
3
G
4
Page 6

Assembly Instructions
Step 5
Push the threaded pin
I
through the middle
2
hole in leg
connecting bolts
. Attach
L
to the
pin.
Note the position of the
holes in connecting
L
bolt
.
Step 6
Insert threaded bushes
J
into the holes in the
4
bedsides
the bedsides
the leg
bedsides by tightening
the grub screws
threaded bushes
. Connect
4
to
2
. Fasten the
H
in the
J
.
I
L
I
L
2
L
4
H
J
J
4
2
J
H
H
Step 7
Attach the assembled
bedsides by placing the
dowels into the holes in
1
legs
Push barrel nuts
the holes in bedsides
. Put the washer Q on
the 2 connecting bolts
A
attach the headboard.
Push connecting bolt
through legs
to meet the barrel nuts
and fasten with the allen
key.
and 3.
B
into
which are used to
1
and 3
4
A
A
A
Q
1
B
Q
B
1
B
B
4
4
4
4
4
B
3
B
A
Q
3
A
A
B
5
Page 7

Assembly Instructions
Step 8
Attach angles P to the
lower endrails using
O
screws
.
568,5 mm.568,5 mm.
Step 9
Attach midsupports
10
to the angles using
O
screws
midsupports
leg
. Attach the
10
to the
11
using screws N.
O
P
O
P
4 mm.
P
P
P
N
O
10
O
N
10
11
6
Page 8

Assembly Instructions
Step 10
Position three slats 6
into the bed with the
distances shown. Push
the bedsides together
and fasten the slats using
C
screws
.
C
C C
C
715 mm
6 66
65 mm
Step 11
Position the remaining
6
slats
the distance of 65 mm
between one another.
Fasten the slats using
screws
Assembly is complete.
into the bed with
C
.
C
65 mm 65 mm 65 mm
C
66666666666
If you need help or have damaged or missing parts,
E-mail: order@fl exa.dk
7
Ref.no. 44-01688-20 B Stand: 010617 Page 9 (80-12201-20)
C
call the Customer Helpline: 0045 7668 8055
 Loading...