

Page 1
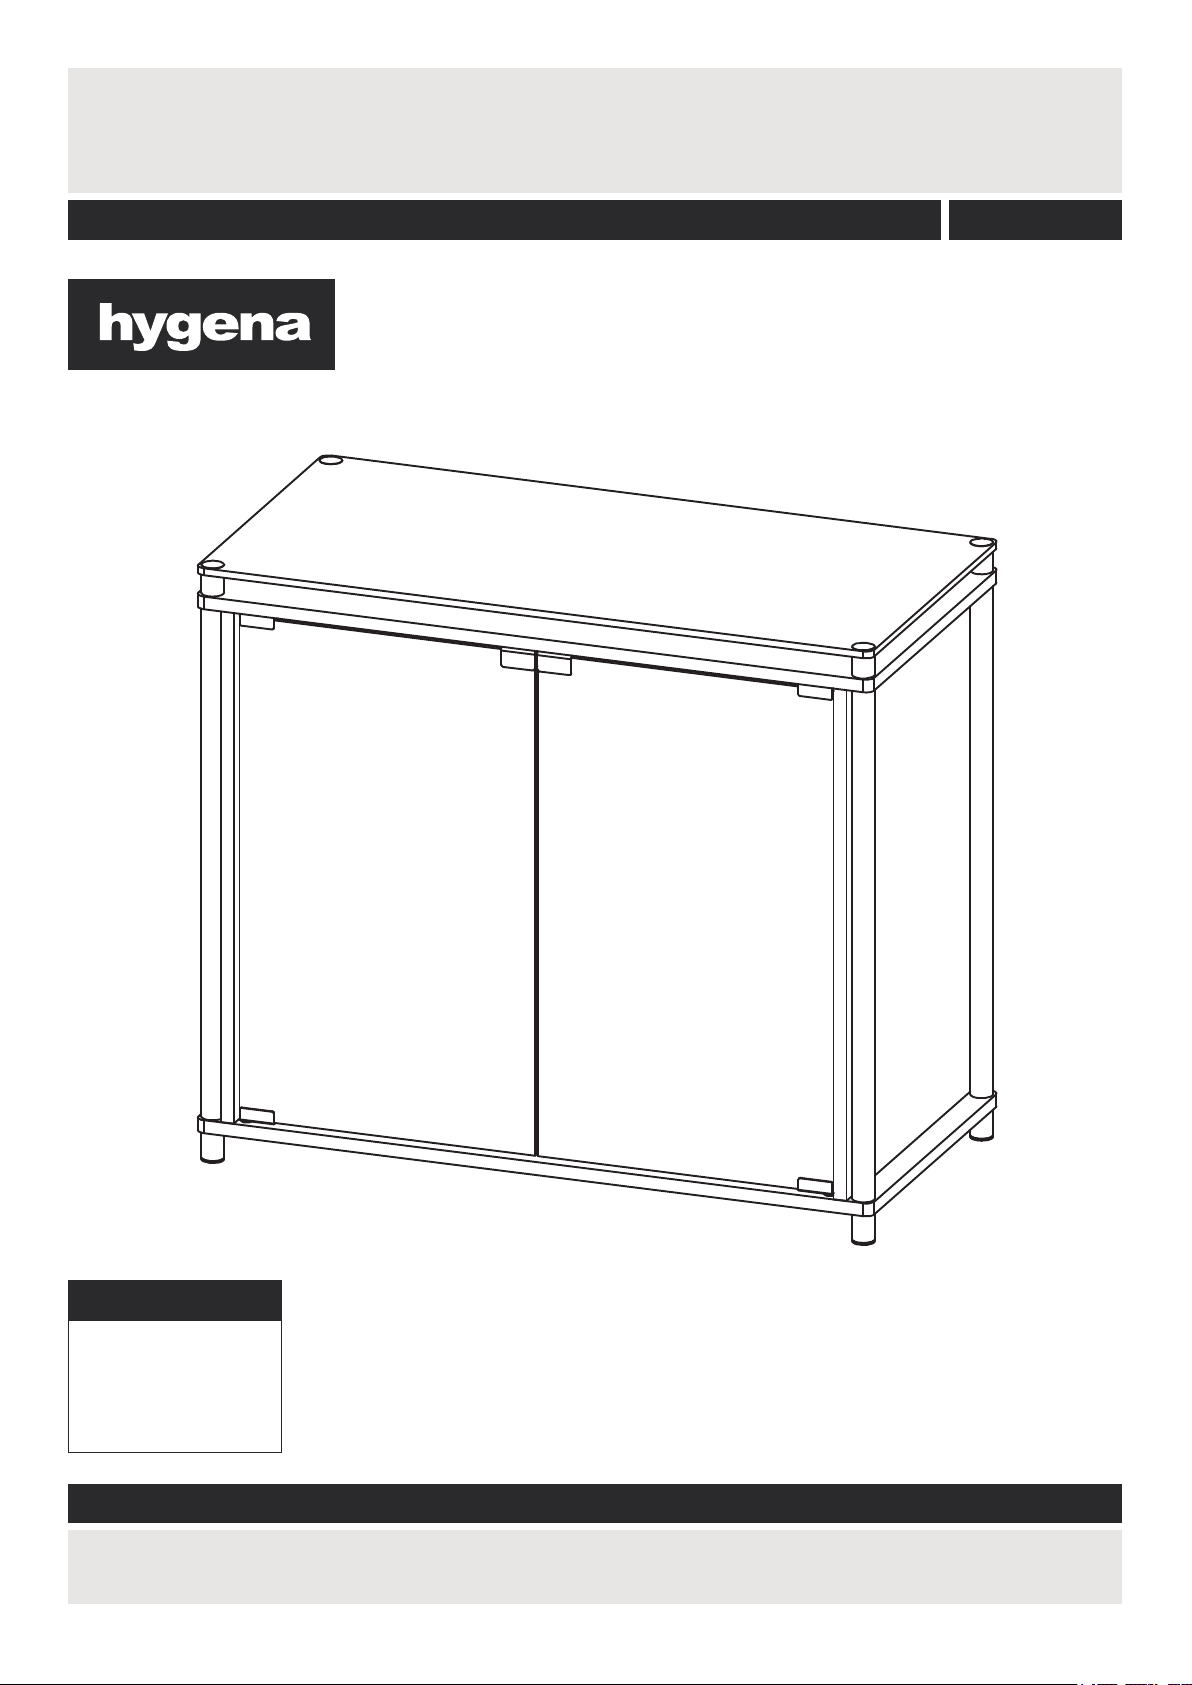
Matrix Sideboard
Assembly Instructions - Please keep for future reference
614/0744
Dimensions
Width - 80cm
Depth - 40cm
Height - 70cm
Important - Please read these instruction fully before starting assembly
If you need help or haved amaged or missing parts,call the
Customer Helpline:03456 400800
Issue 1 08/06/16
Page 2
Safety and Care Advice
Important - Please read these instructions fully before starting assembly
Do not stand on the product,
components and tools listed on
pages 2 and 3.
plastic bags and separate them
into their groups.
this could cause damage.
room) as possible.
as this could damage the unit.
Only use hand screwdrivers.
recommend the
use of power
drill/drivers for
inserting screws,
away from the work area, small
parts could choke if swallowed.
space to layout the parts before
starting.
surface to avoid damaging the
easier with 2 people.
carefully and responsibly.
Glass safety
• Keep these instruction for future
reference.
• Imported by:
Argos Ltd.
489-499 Avebury Boulevard.
Saxon Gate West.
Central Milton Keynes.
Mk9 2NW
Warnings
(a) Do not place very hot or very cold items on the glass surface(s) unless adequately thick mats
are used to prevent such items from coming into contact with the glass.
(b) Do not sit or stand upon the glass surface(s).
• If the glass is chipped or broken, stop using the product and
consult the Manufacturer or Supplier.
• Batch No:
• Date of Manufature:
• Type of glass used: 5mm and 8mm toughened glass.
(c) Do not use the glass as a chopping surface. Do not strike the glass with hard or pointed items.
(d) When cleaning glass panels use a damp clothe or leather with washing up liquid or soft soap if
necessary, do not use washing powders or any other substance containning abrasives since these
substances scratch glass.
Care and maintenance
●Only clean using a damp cloth
and mild detergent, do no use
bleach or abrasive cleaners.
●From time to time check that
there are no loose screws on
this unit.
●This product should not be
discarded with household waste.
Take to your local authority
waste disposal centre.
Page 3
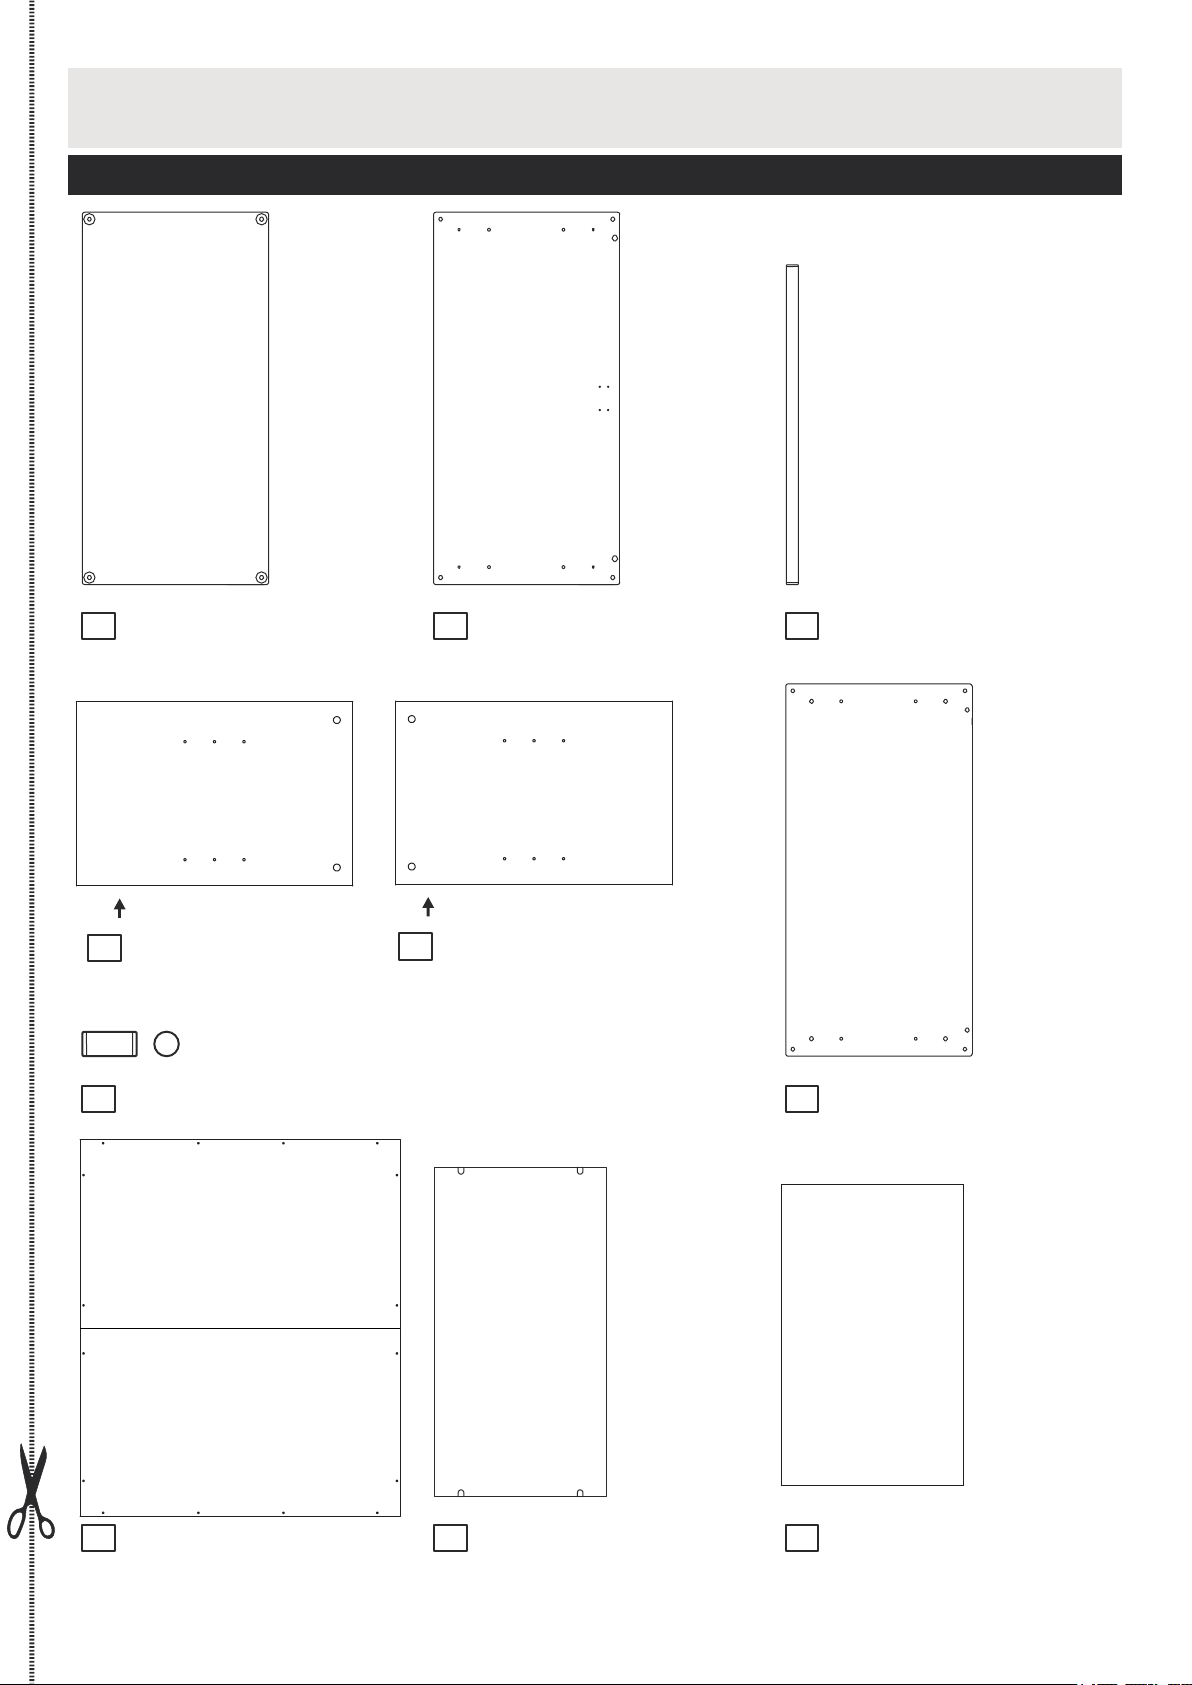
Components - Panels
Please check you have all the panels listed below
1
Glass Top x 1
(80 x 40cm)
Unfinished edge
4
Left side panel x 1
(39.9 x 60cm) (39.9 x 60cm)
7
Feet x 4
(2.5 x 3.5cm)
2
Unfinished edge
5
Right side panel x 1
Top panel x 1
(80 x 40cm)
3
Metal tube x 4
(60 x 2.5cm)
6
Bottom panel x 1
(80 x 40cm)
8
Back Panel x 1
(74 x 61.5cm)
9
Shelf panel x 1
(71 X 37cm)
10
Glass door x 2
(59.2 x 35cm)
2
Page 4
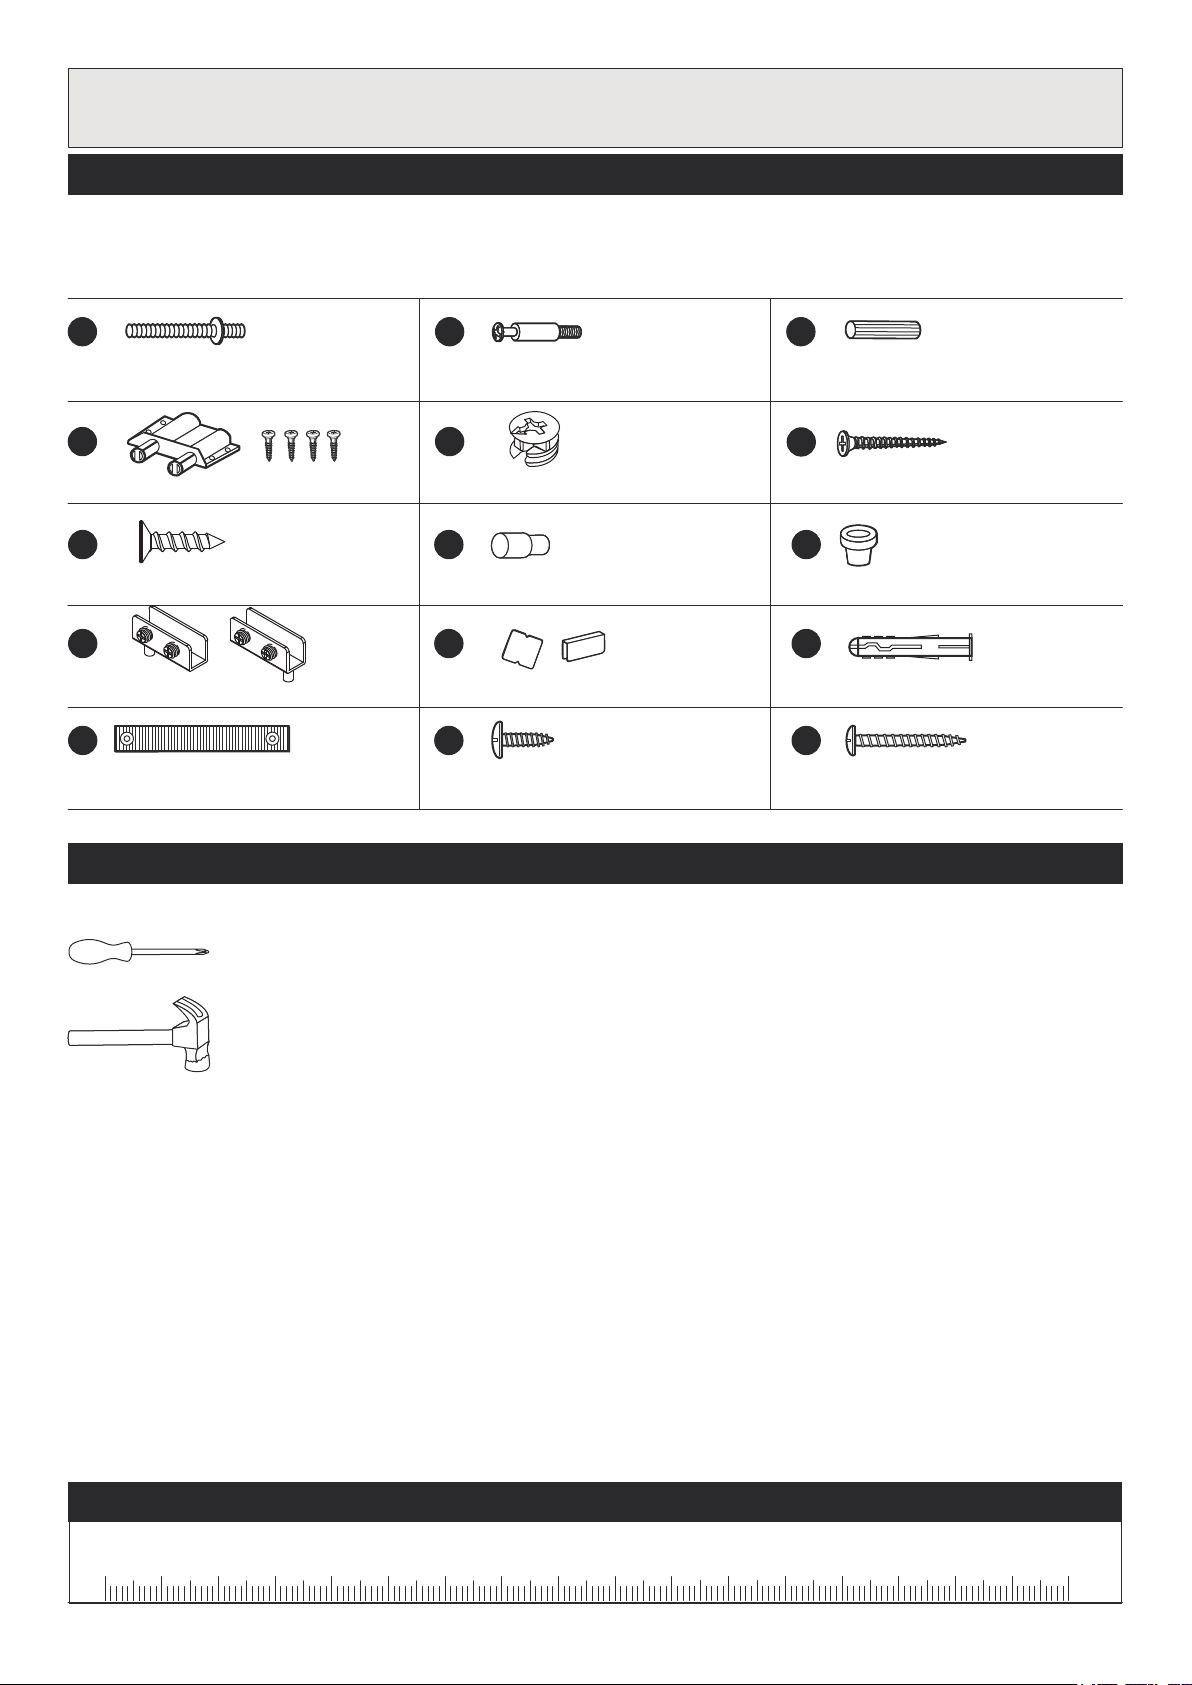
Components - Fittings
If you haved amaged or missing components,
call the C ustomer Helpline:03456400800
Please check you have all the
Note:The quantities beloware the correct amount to complete the assembly.In some cases more
fittings may be supplied than are required.
A
60mm Screw x 8 35mm Cam pillar
D
Door catch set x 1
G
15mm Screw x 16
J
Hinge set x 2
M N O
fittings listed below
B
x 4
E
15mm Cam x 4
H
Supporter x 4
K
Counter plate set x 2
C
30mm Plastic dowel x 8
F
45mm Screw x 4
I
Easy door assembly spring x 4
L
Wall plug x 1
Wall strap x 1
Tools required
15mm Screw x 1
Cross head screw driver
(not included)
Hammer
(not included)
25mm Screw x 1
Ruler- Usethisrulertohelpcorrectlyidentifythescrews
0 5 10 15 20 25 30 35 40 45 50 55 60 65 70 75 80 85 90 95 100 110 120105 115 125 130 135 140 145 150 155 160 165 170
3
- to
Page 5
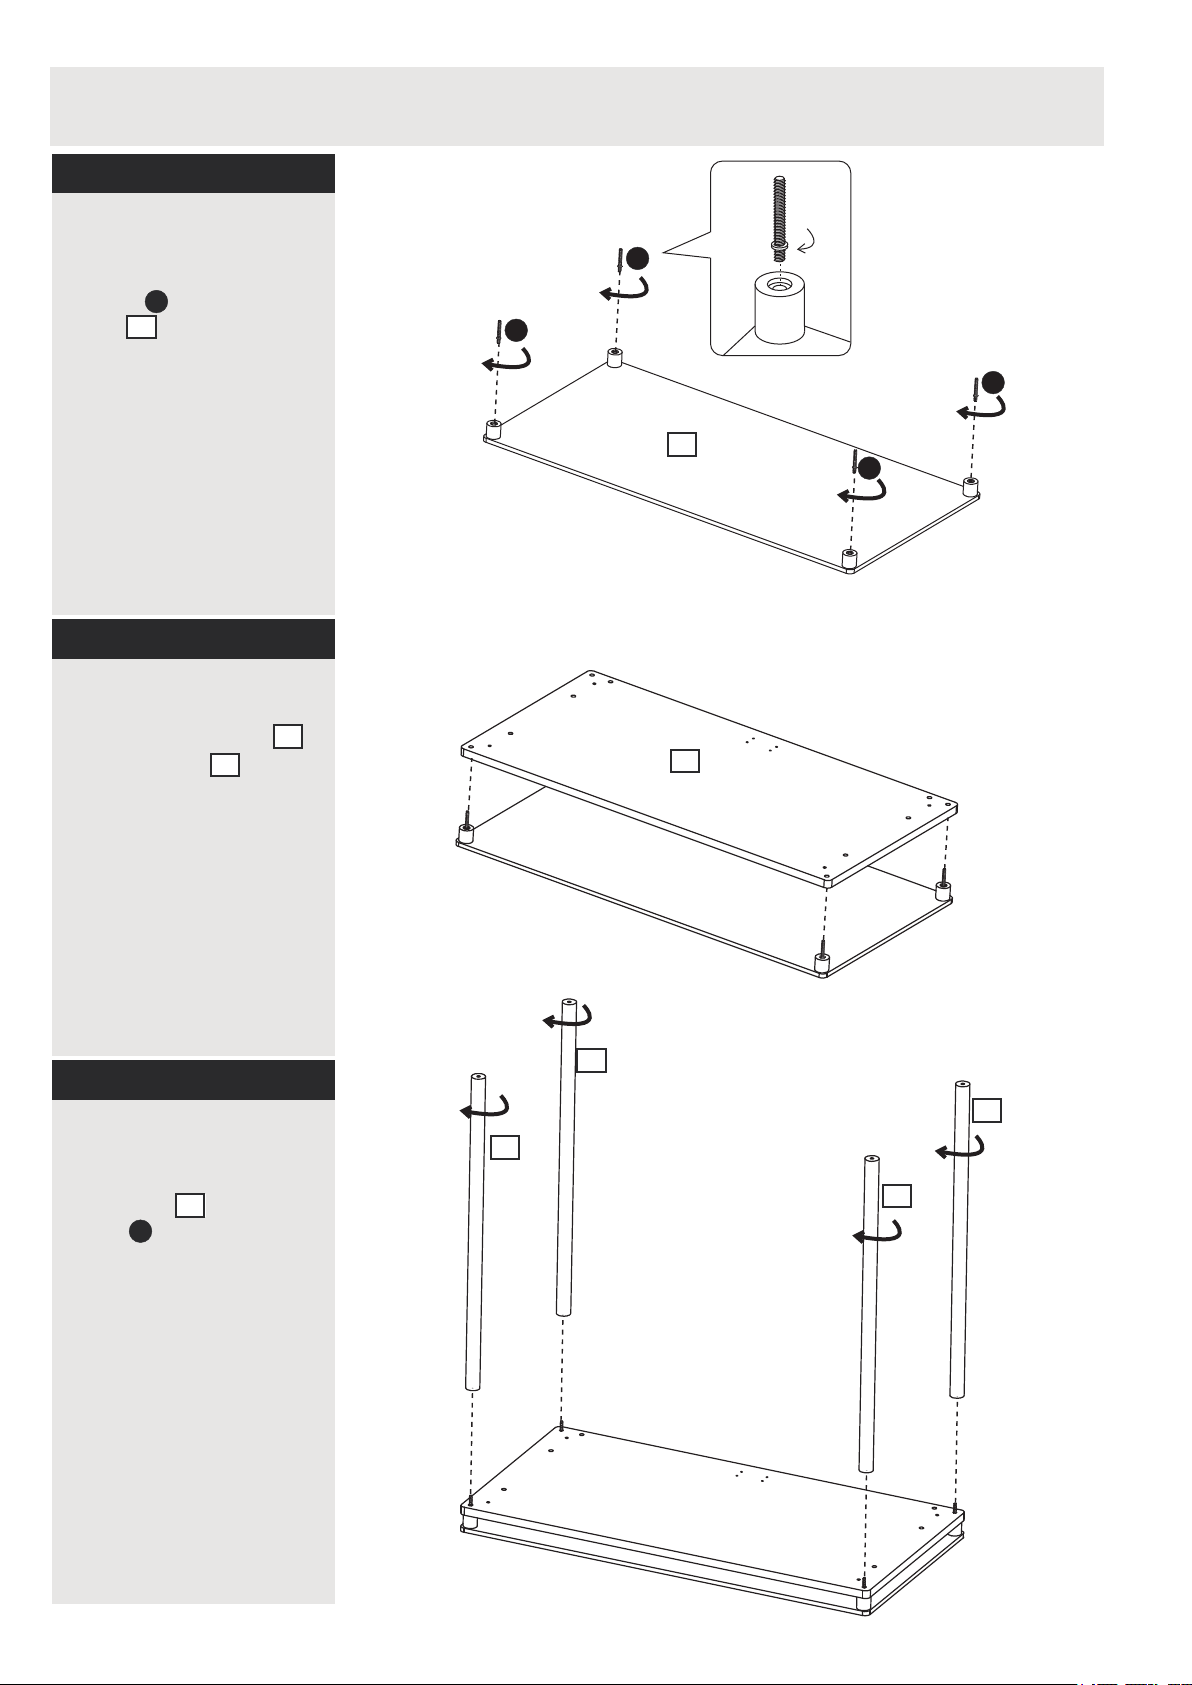
Assembly Instructions
Step1
Attaching screws
Assemble 4 pcs of
screws onto top
glass .
Step2
Attaching panel
A
1
A
A
A
1
A
Assemble top panel
onto top glass
.
1
Step3
Attaching metal tube
Assemble 4 pcs of
onto the
metal tube
screw
3
A
.
2
2
3
3
3
3
4
Page 6
AssemblyInstructions
Assembly Instructions
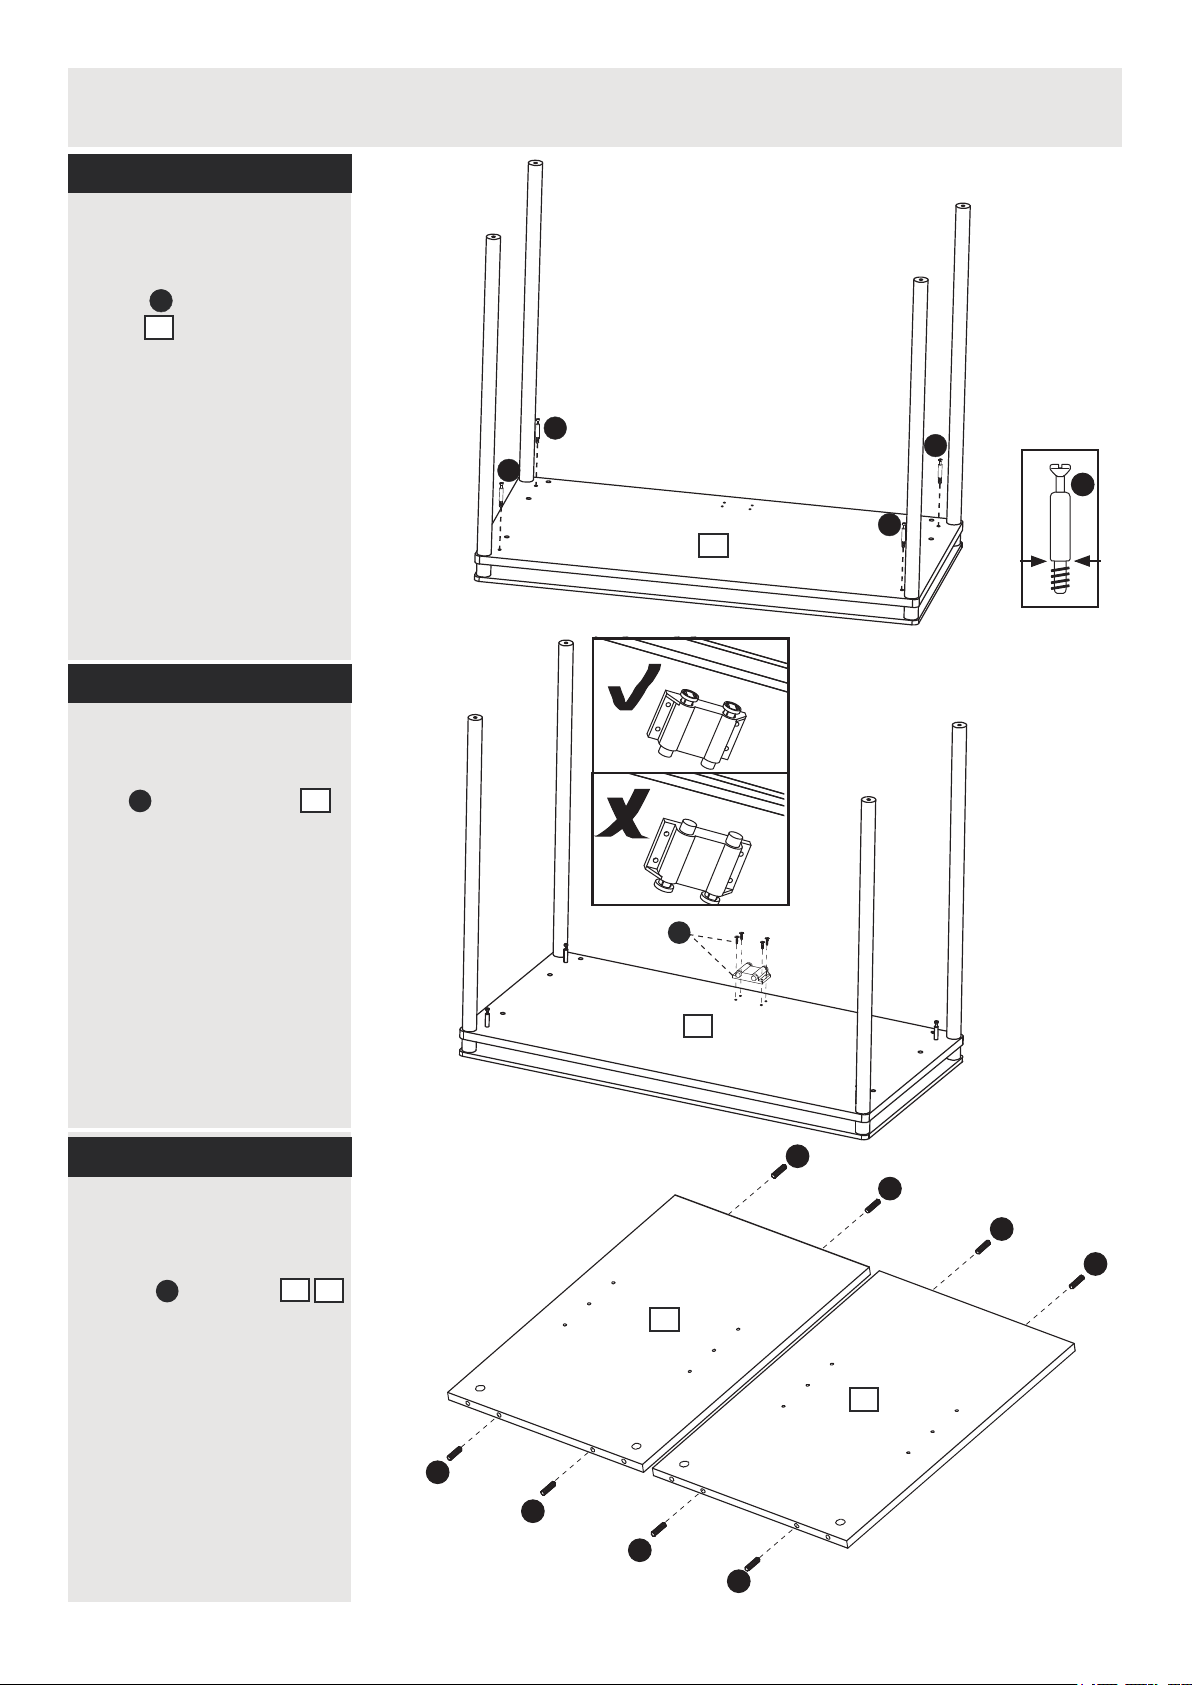
Step4
Attaching cam pillar
Assemble 4pcs of cam
B
pillars onto top
panel .
B
2
Step5
Attaching door catch set
Assemble door catch
D
set onto top panel .
2
B
B
2
D
B
B
B
Step6
Fitting dowels
Insert 8 pcs of plastic
4
dowels into panel .
C
5
2
C
C
C
C
4
5
C
C
C
C
5
Page 7
Assembly Instructions
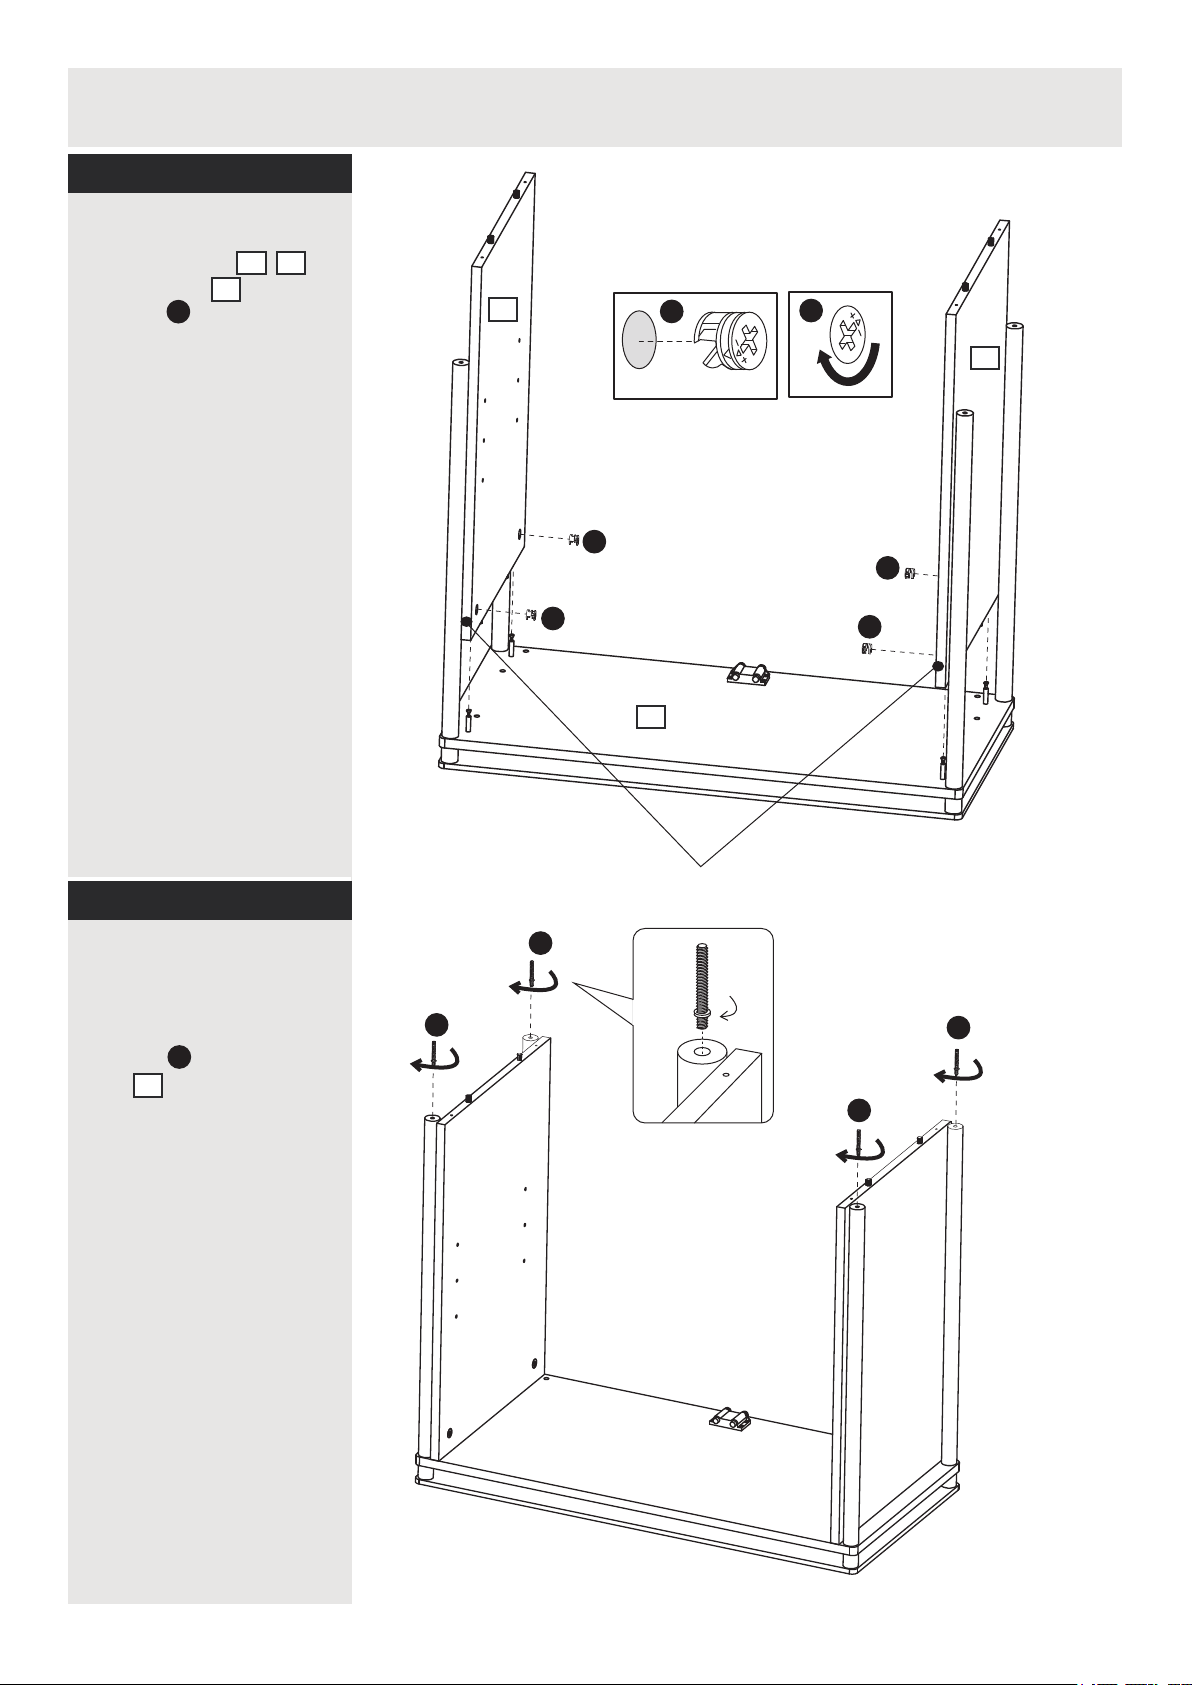
Step7
Attaching cams
Attach side panel
onto top panel
with cam to tighten.
E
4 5
2
5
E
E
E
2
E
4
E
E
Step8
Attaching screws
Assemble 4 pcs of
screws onto metal
tube
A
3
.
Unfinished edge
A
A
A
A
6
Page 8
Assembly Instructions
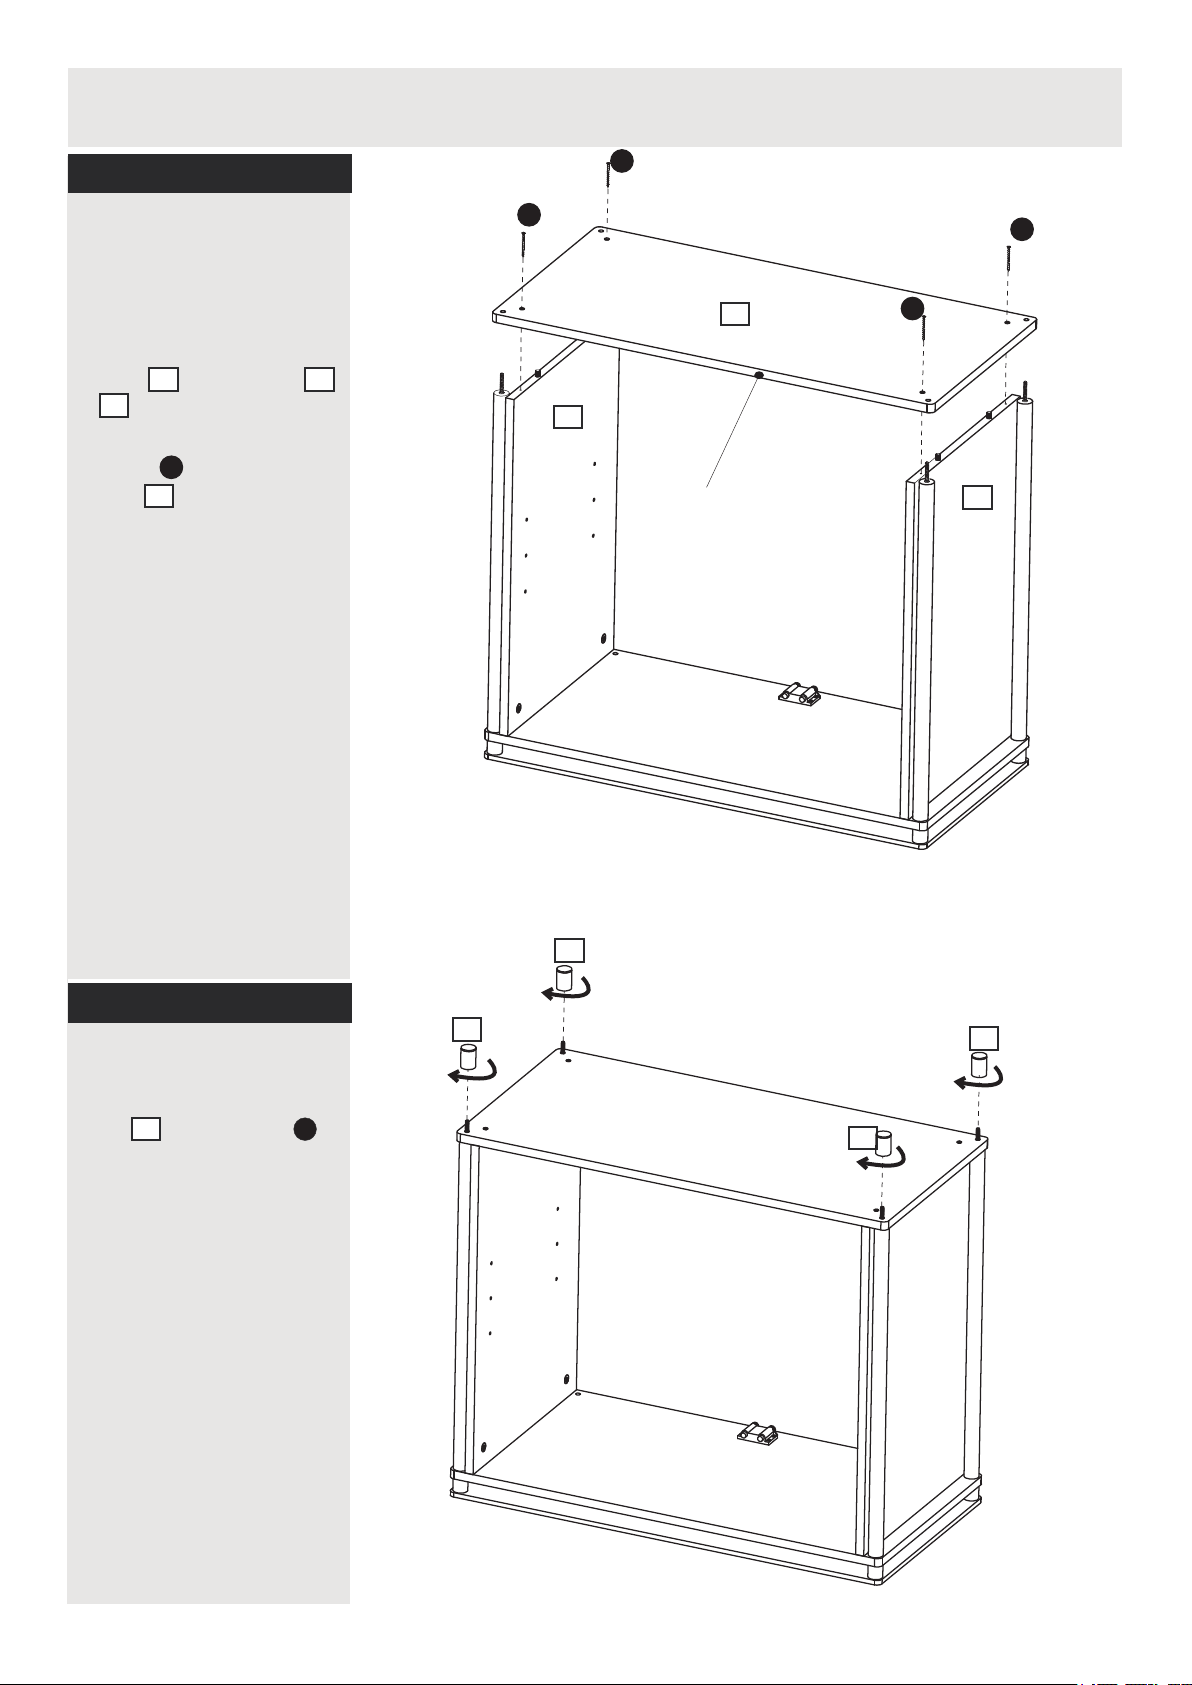
Step9
Attaching panel
Two people are required
here.
Assemble bottom
6
.
F
6
.
onto panels
panel
5
&
Assemble 4 pcs of
screws onto bottom
panel
F
F
6
4
5
Unfinished edge
F
F
4
Step10
Attaching foot
Assemble 4 pcs of
7
foot onto screws .
A
7
7
7
7
7
Page 9
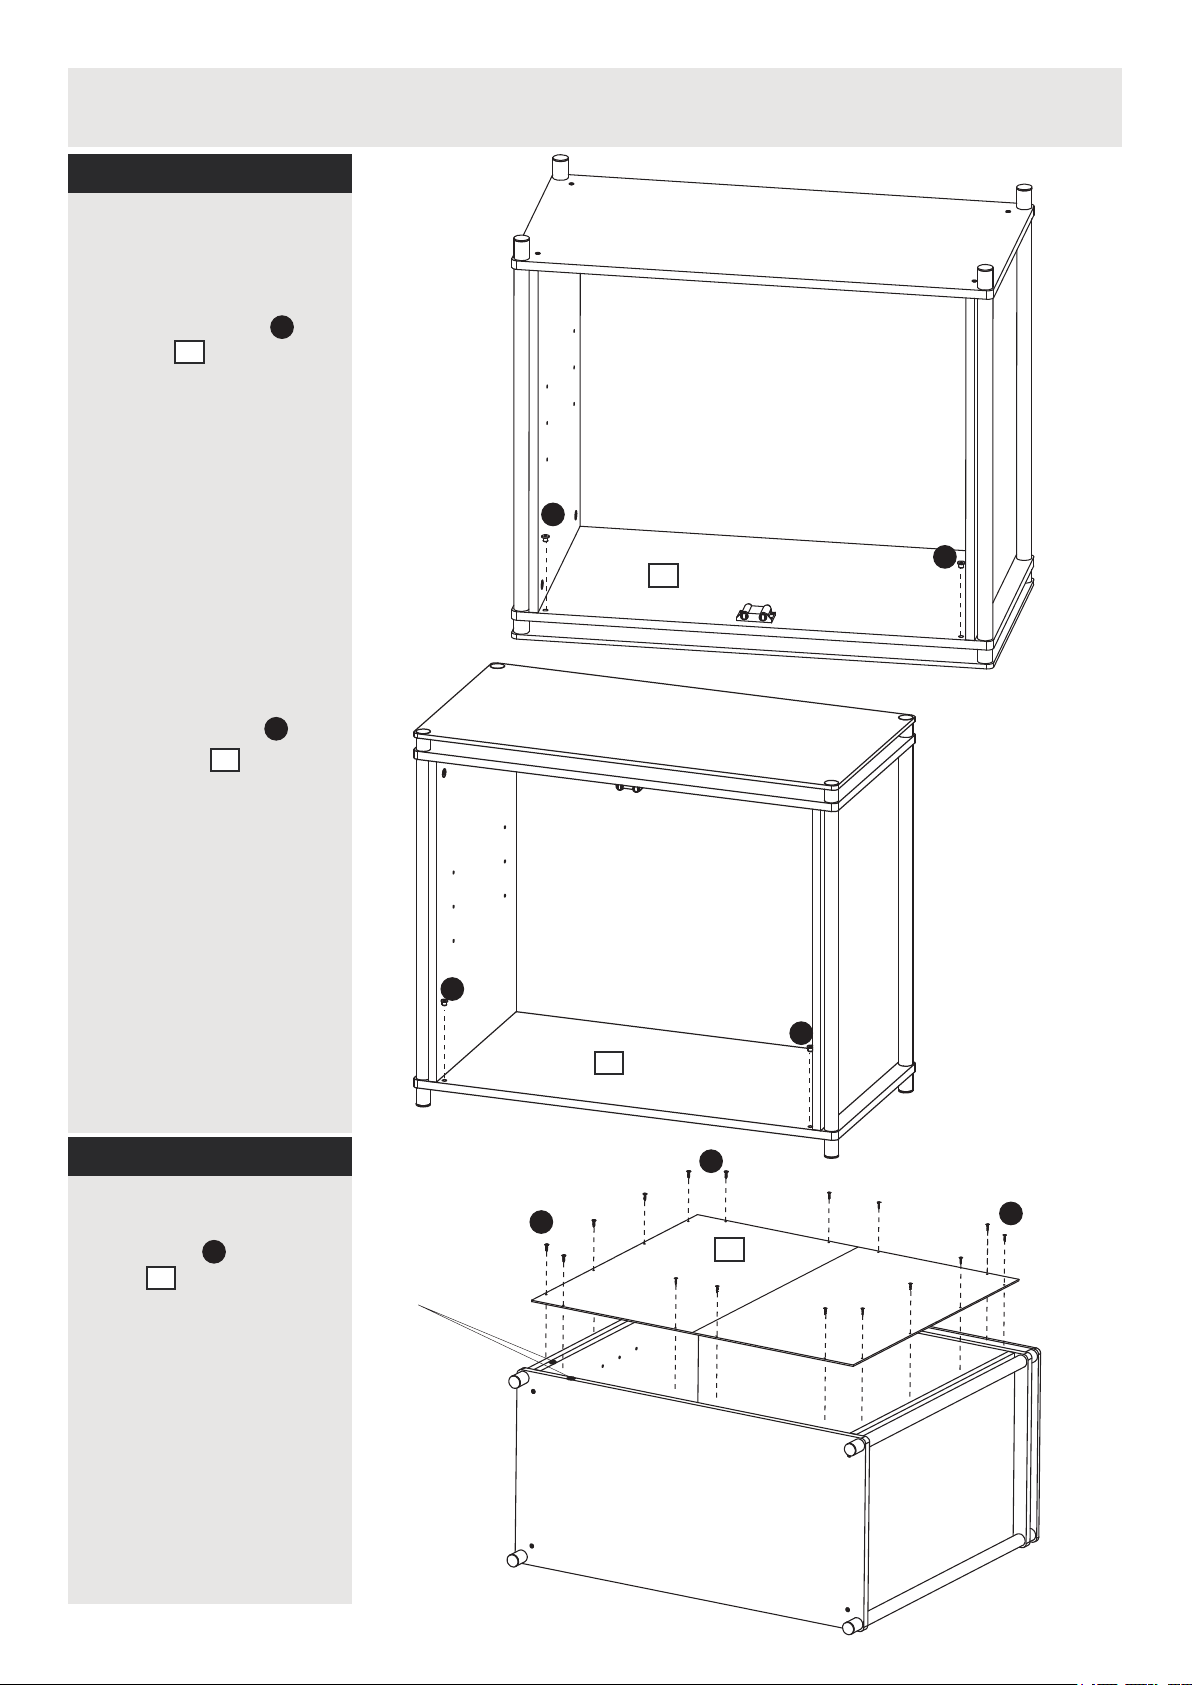
Assembly Instructions
Step11
Insert
door assembly
spring
a:
Insert 2 pcs of door
assembly spring
the top
.
2
b:
Insert 2 pcs of door
assembly spring to
the bottom
6
.
to
I
I
2
I
I
Step12
Attaching back panel
Use screws to fix back
panel otno the unit.
G
8
I
Unfinished edge
I
6
G
G
8
G
8
Page 10
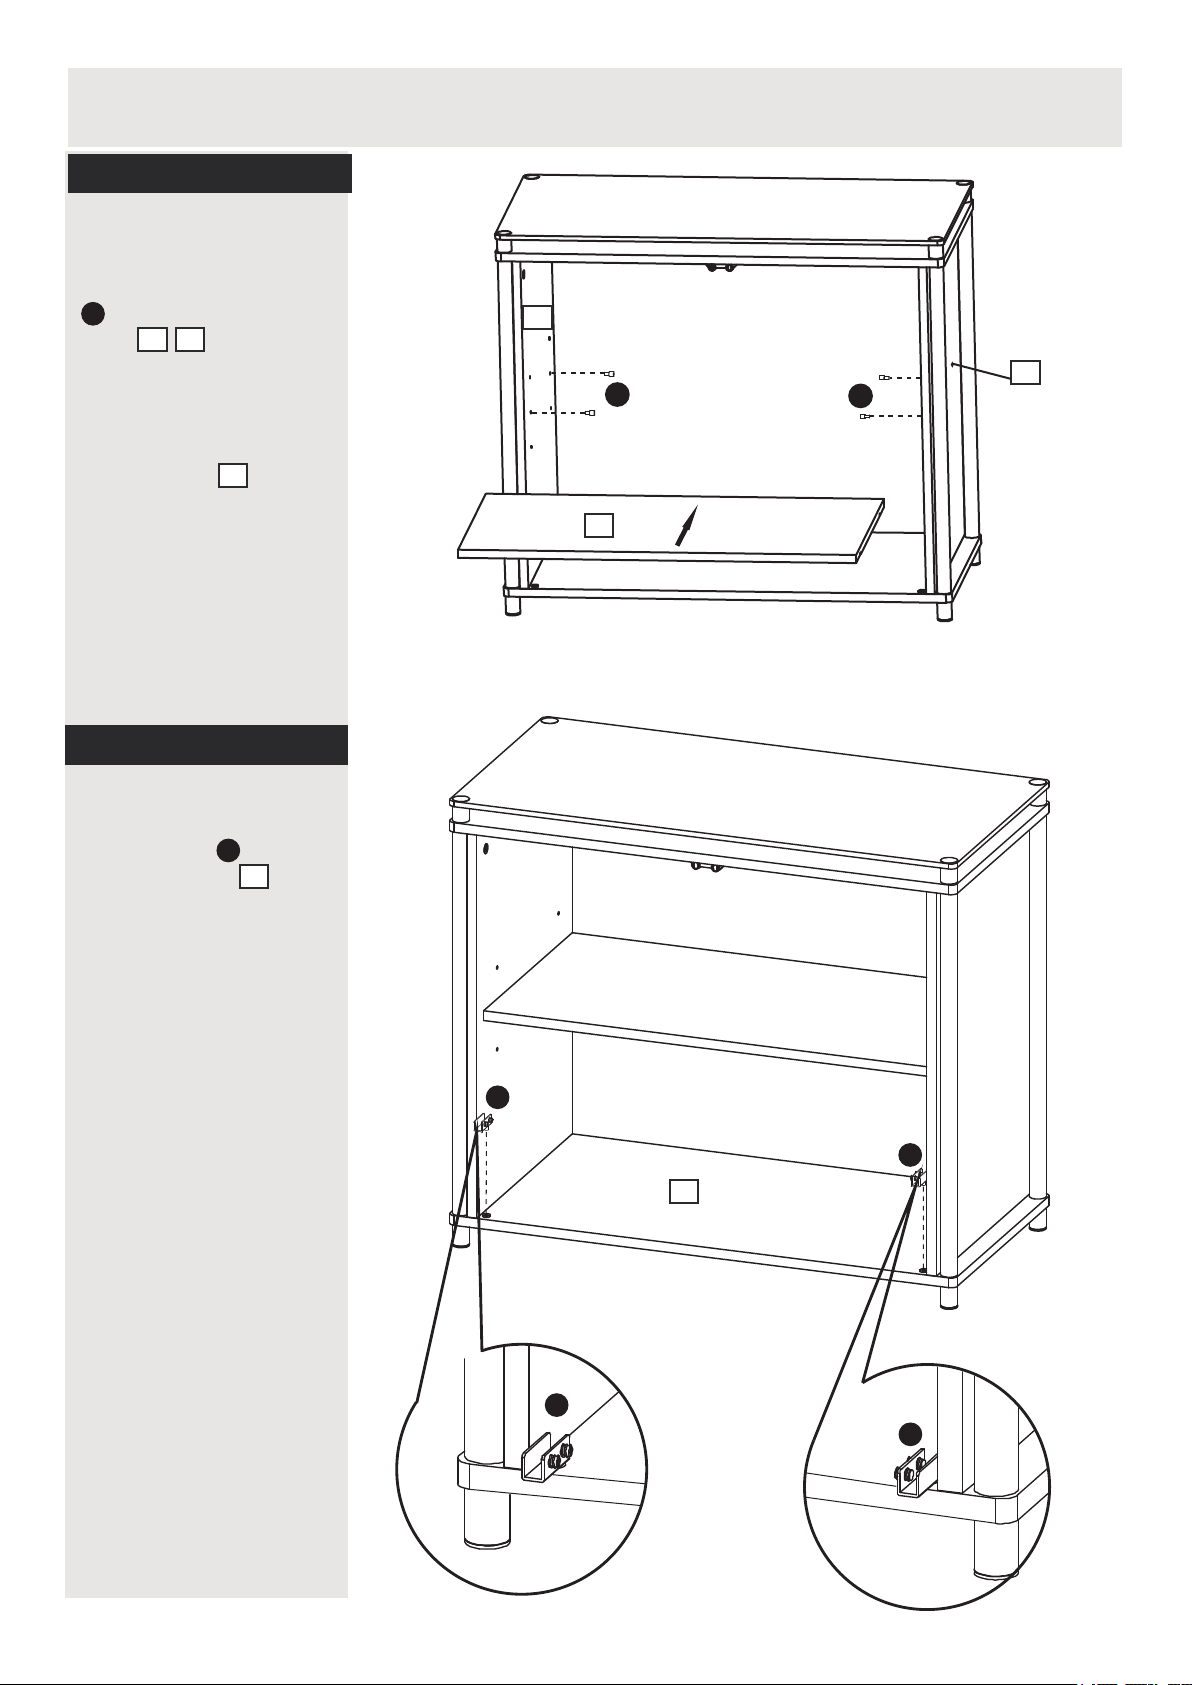
Assembly Instructions
Step13
a:
Inserting shelf support
Insert 4 pcs of shelf support
H
in the proper position of
panel .
5
4
b:
Inserting shelf
Insert the shelf onto unit.
9
4
5
H
9
H
Step14
Attaching hinge set
Attach part onto
bottom board .
J
6
J
J
6
J
J
9
Page 11
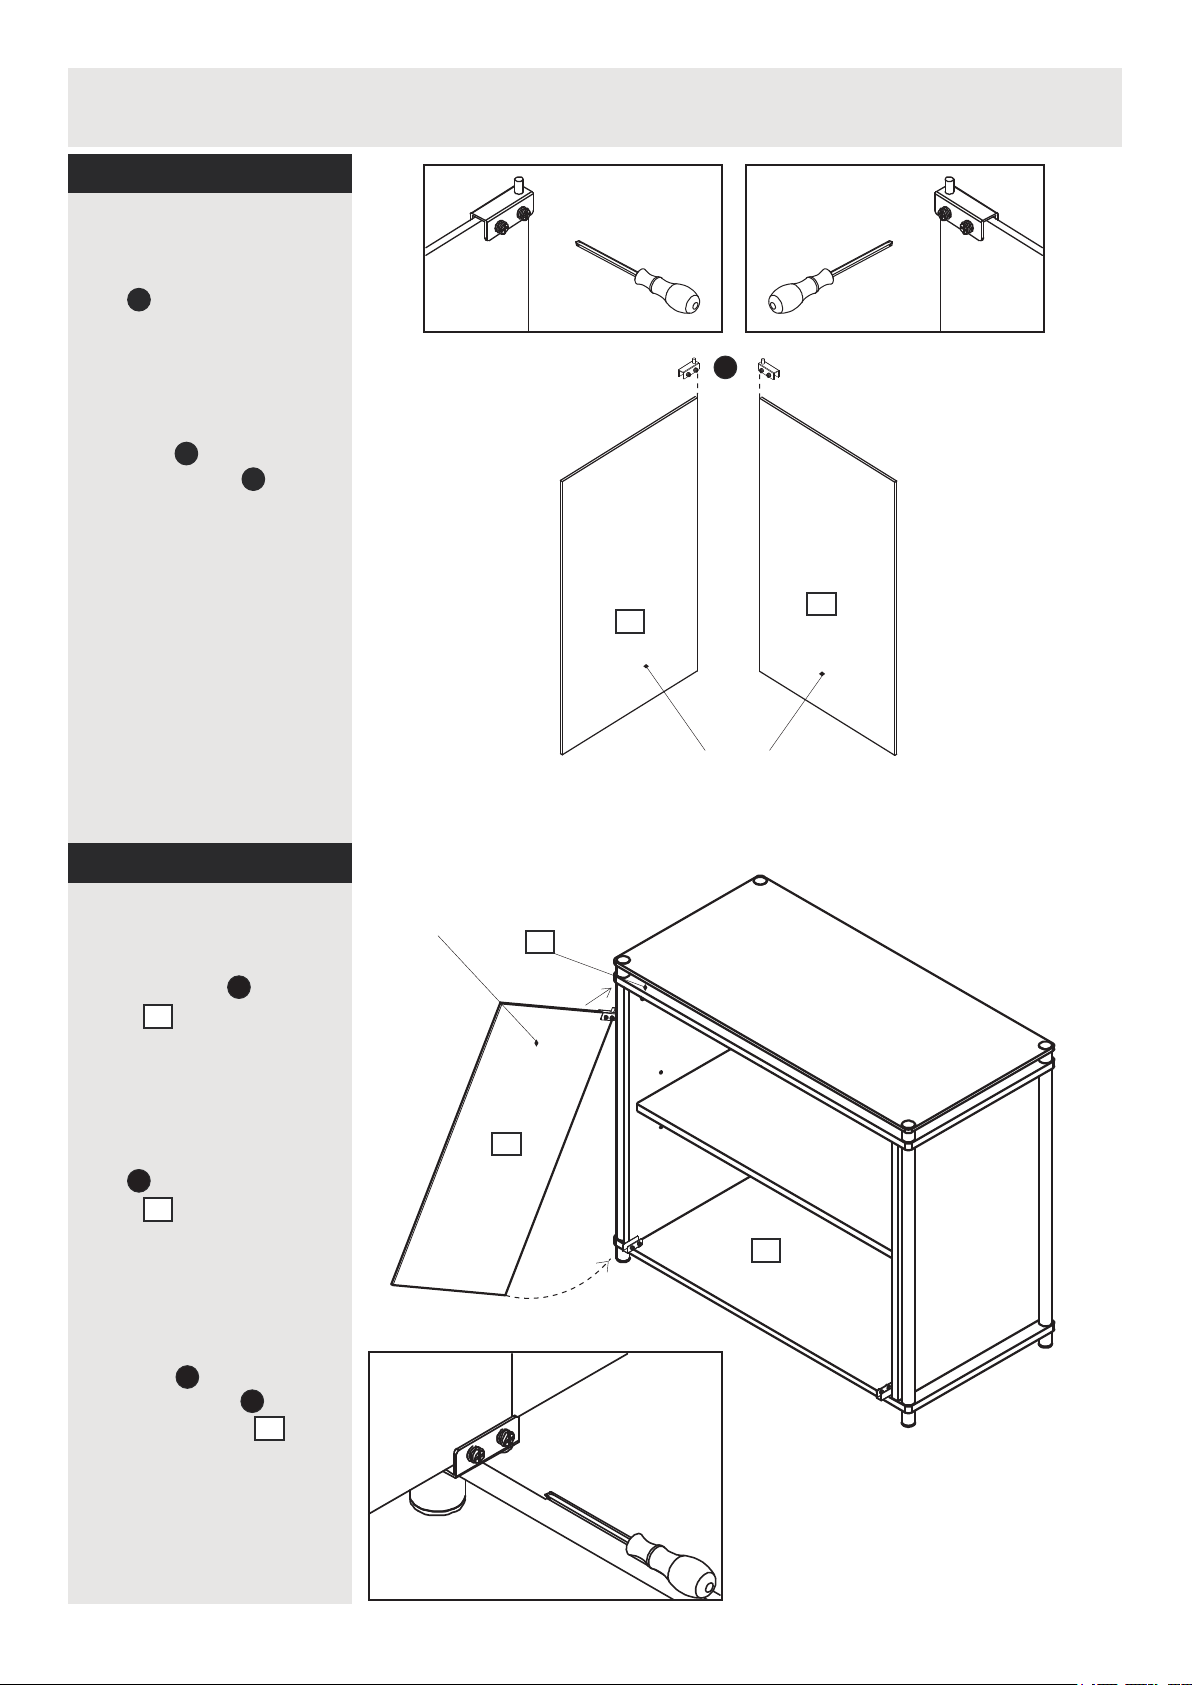
Assembly Instructions
Step15
Attaching door
Please make sure the
part as shown is the
J
correct one for
assembly at this stage.
CAUTION:
Before tighten the glass
with part ,please
ensure the part align
to the edge of glass
door
J
J
.
J
Step16
Attaching door
Insert part
a:
panel .
2
J
into top
b:Slide glass door into
J
part onto bottom
panel .
6
10
10
Frosted side
Frosted side
2
a:
10
c:
Before tighten the glass
with part ,please
ensure the part align
to the glass door .
J
J
10
6
b:
c:
10
Page 12
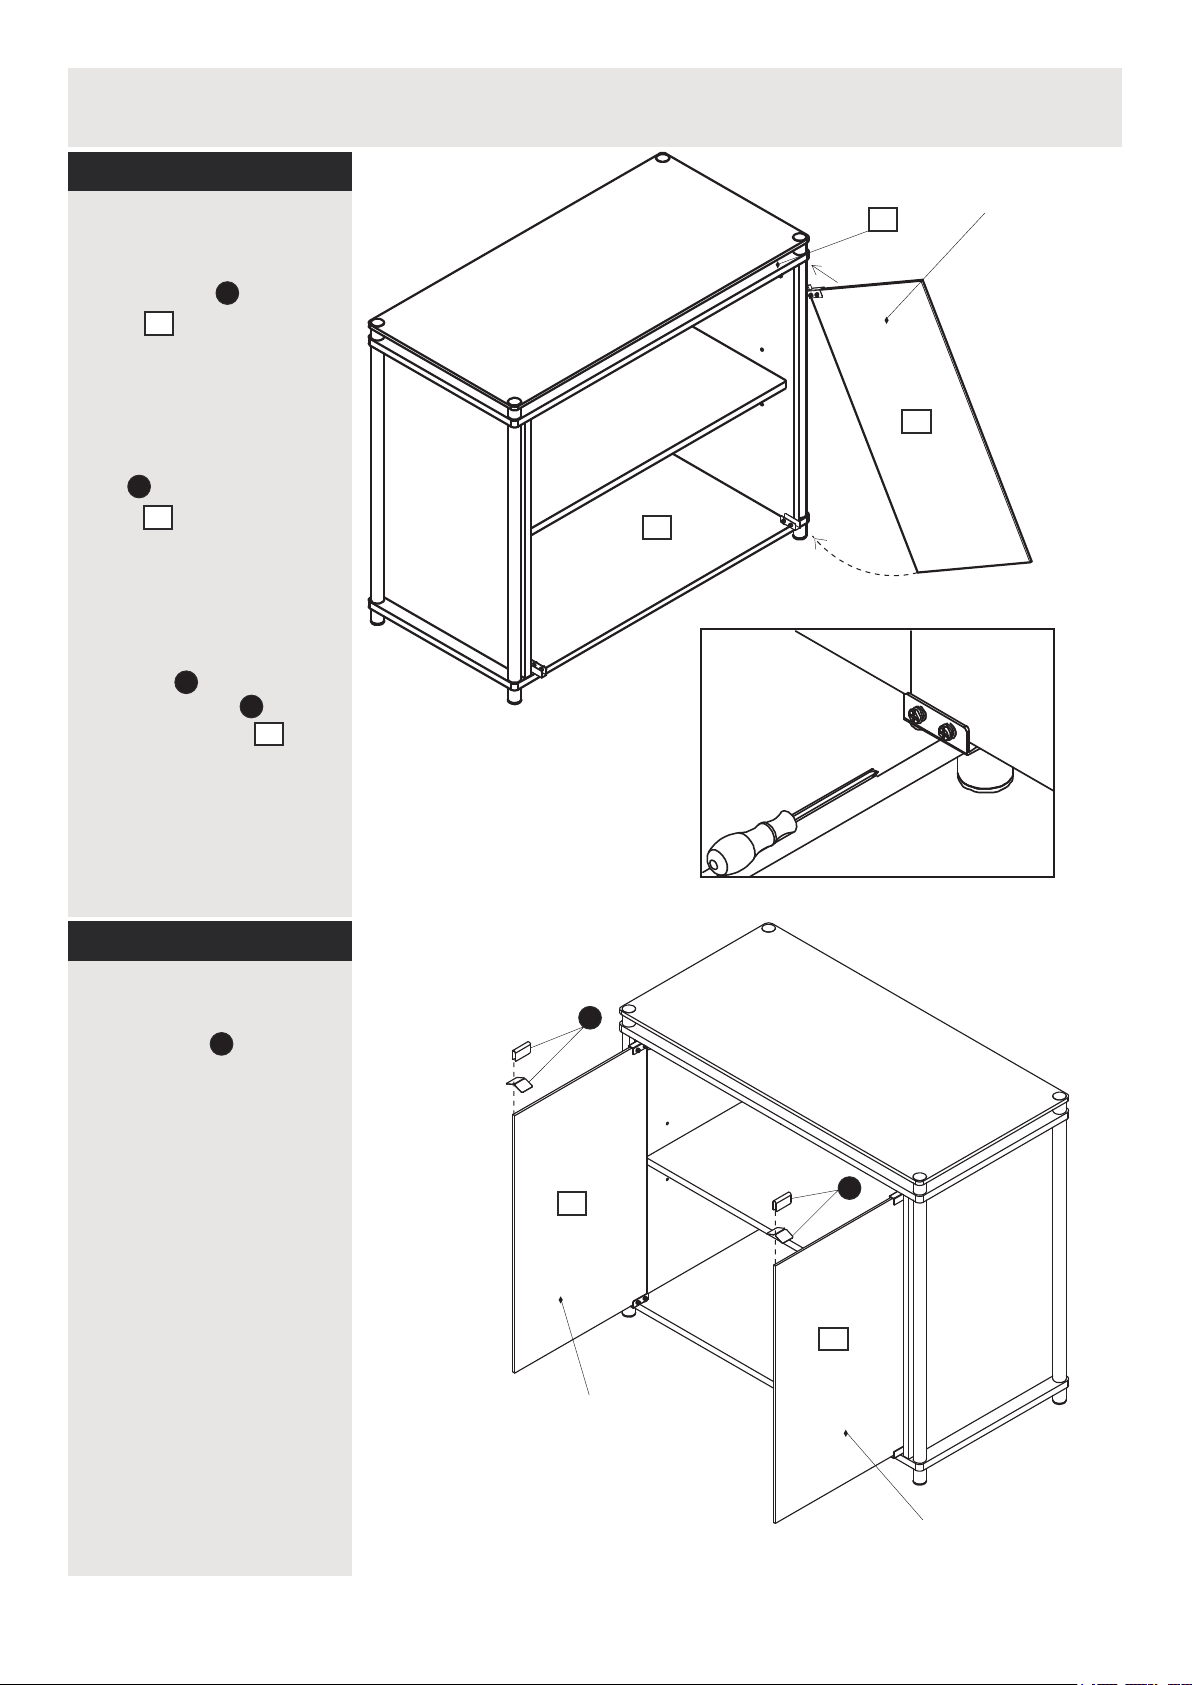
Assembly Instructions
Step17
Attaching door
a:Insert part into top
panel .
2
b:Slide glass door into
J
part onto bottom
panel .
6
J
Frostedside
2
a:
10
6
b:
c:
Before tighten the glass
with part ,please
ensure the part align
to the glass door .
Step18
Attaching plate
Attach plate to the
glass door at the position
as shown.
J
J
10
K
10
c:
K
K
11
10
Frosted side
Unfrosted side
Page 13
Assembly Instructions
Step19
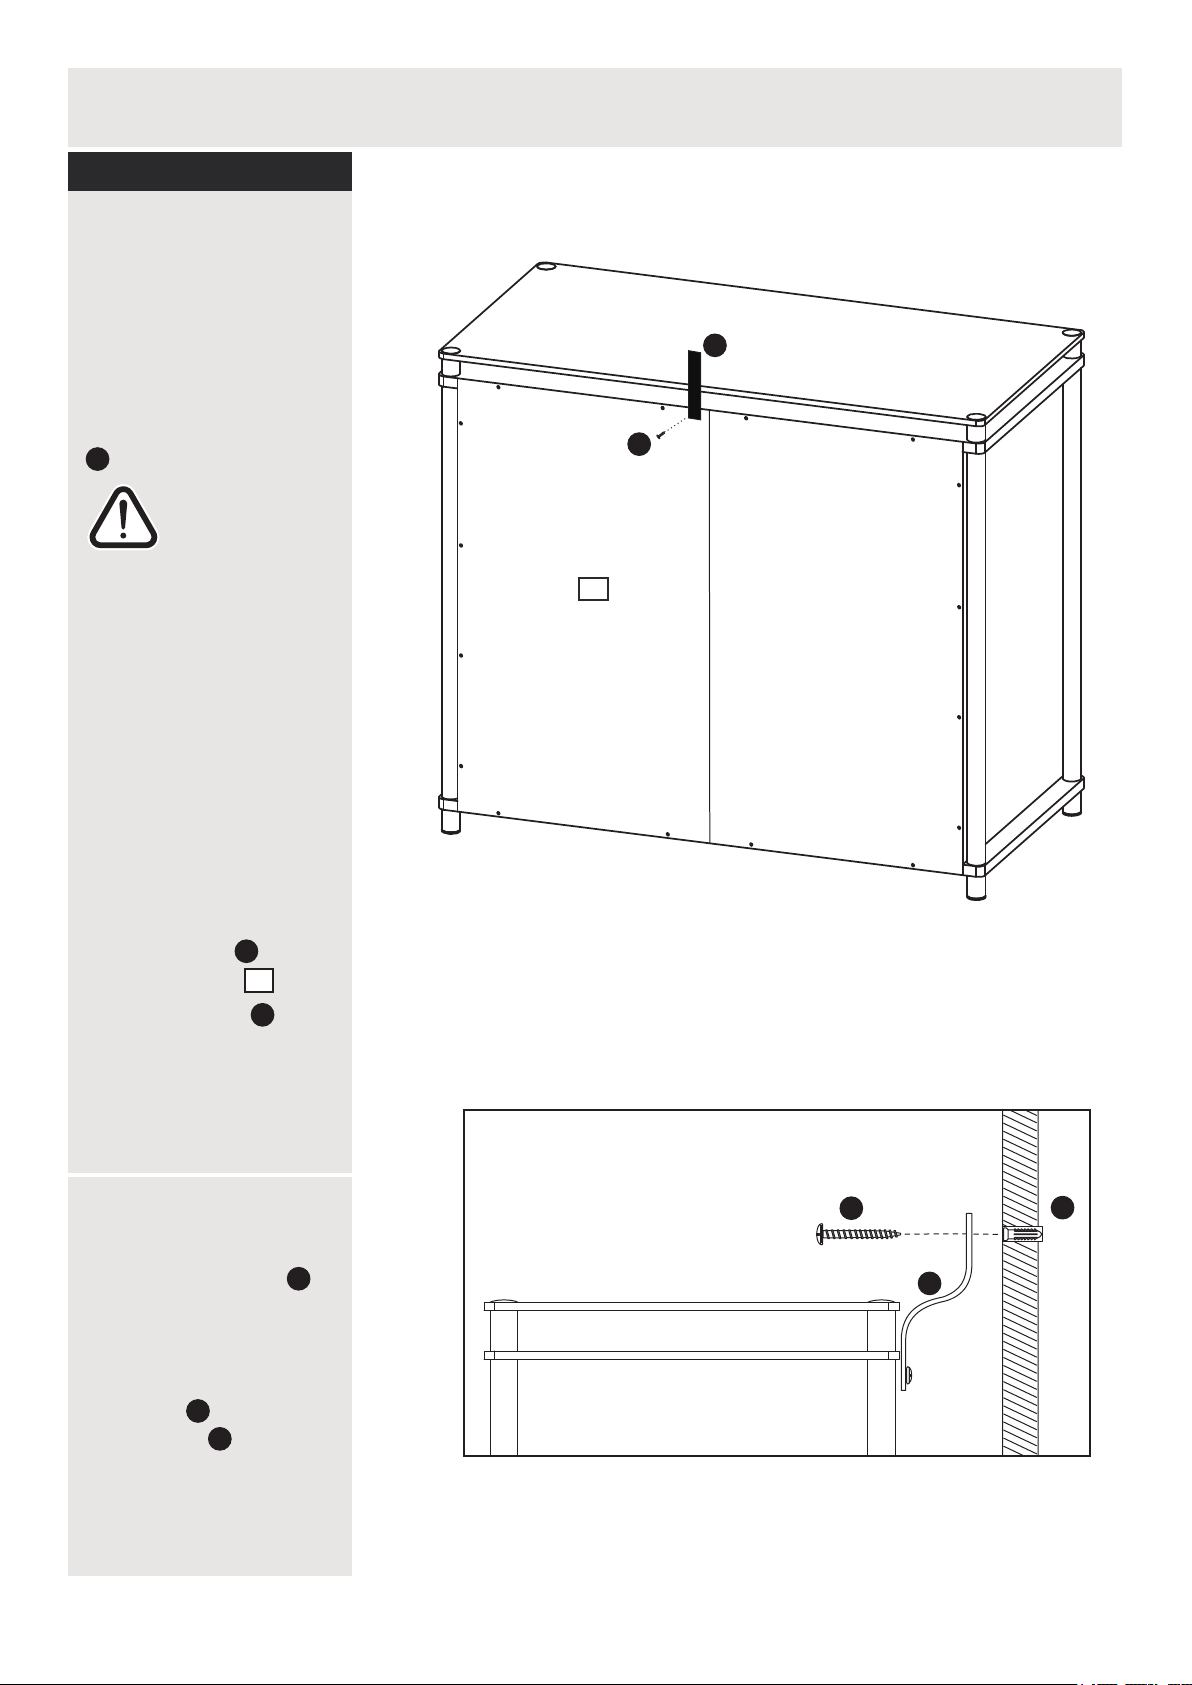
Fixing to wall
Note: It would be useful to
ask someone to help you
at this stage.
It is strongly recommended
that the unit is attached to
the wall using Wall strap
O
C .
M
N
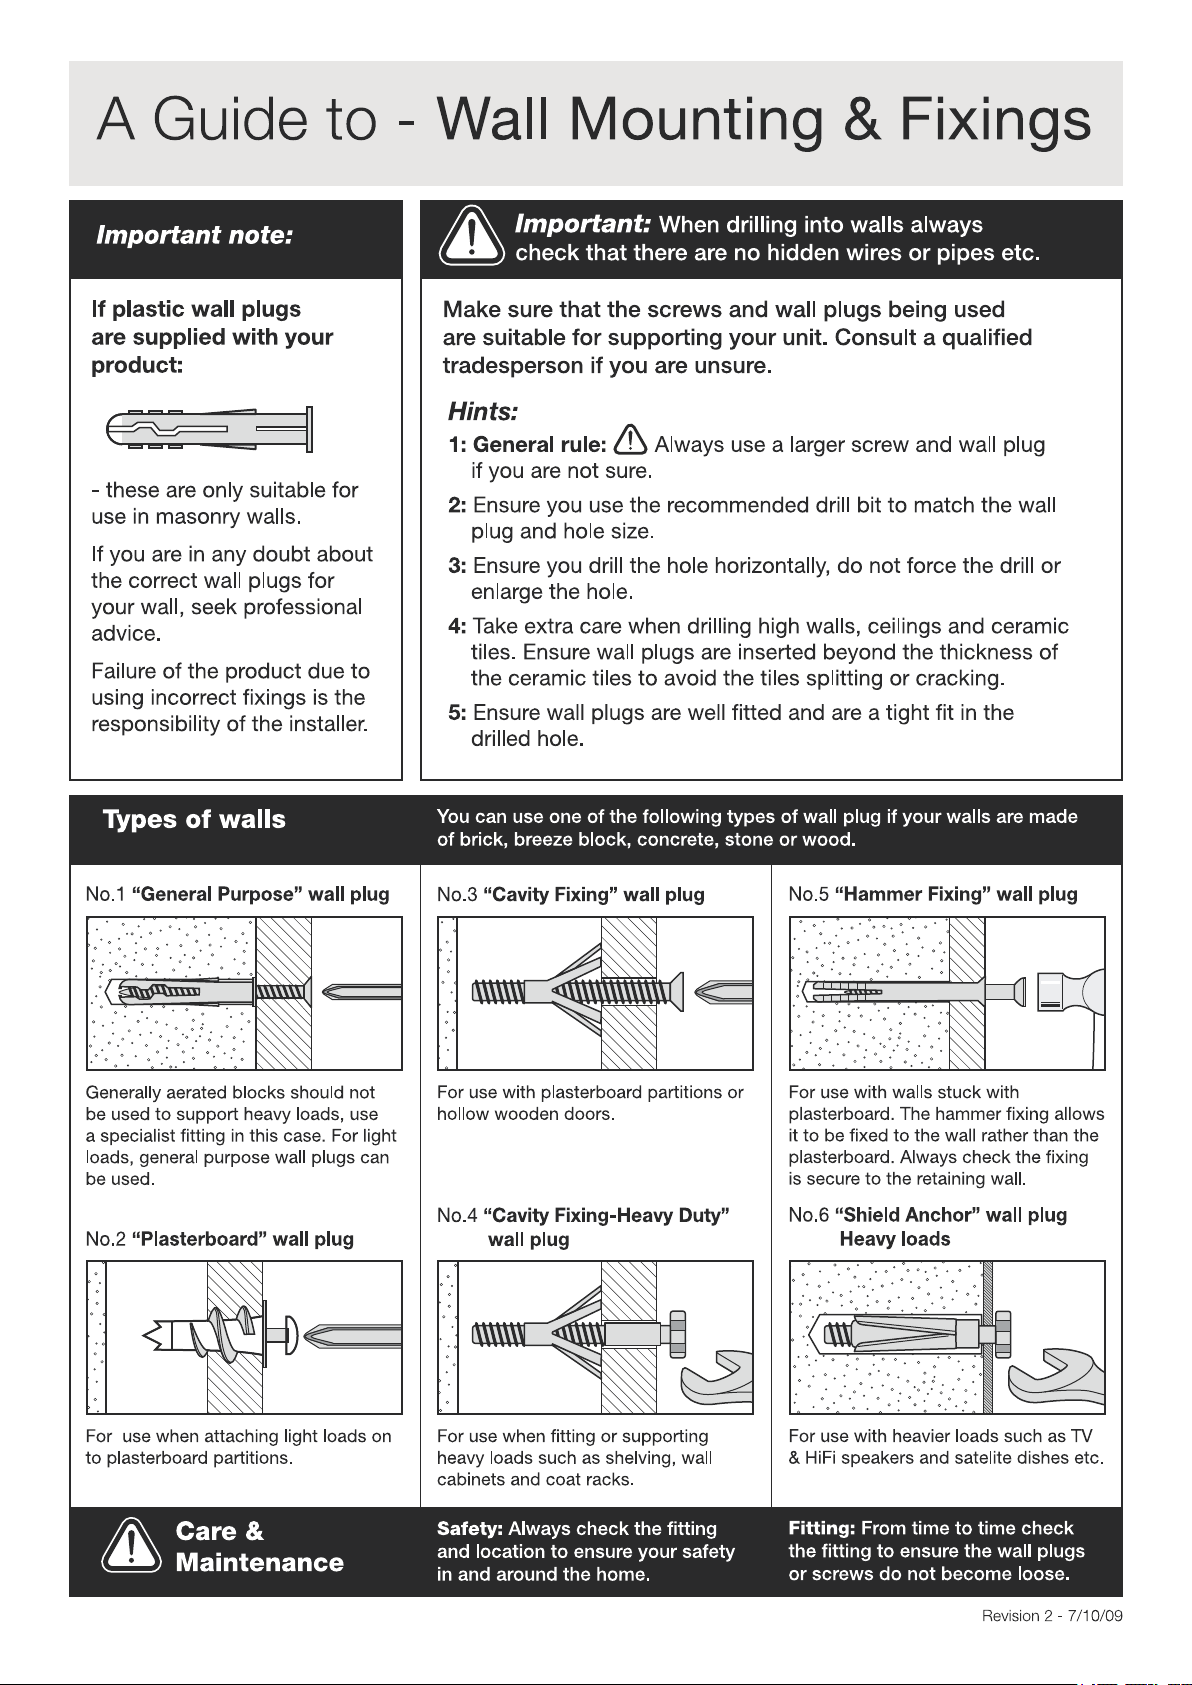
Important: When drilling
into walls always check
that there are no hidden
wires or pipes etc. Make
sure that the screws and
wall plugs supplied are
suitable for supporting
the unit. Consult a
qualified tradesperson if
you are not sure.
a: With help, place the
unit in the intend position.
Fix Wall strap onto
Top back panel by
using the Screw .
M
8
N
8
b: Drill a hole in the wall
at an appropriate position
and insert Wall plug
To secure the unit, fix
Wall strap to the wall
using Screw
M
O
L
O
M
L
12
Page 14
Assembly Instructions
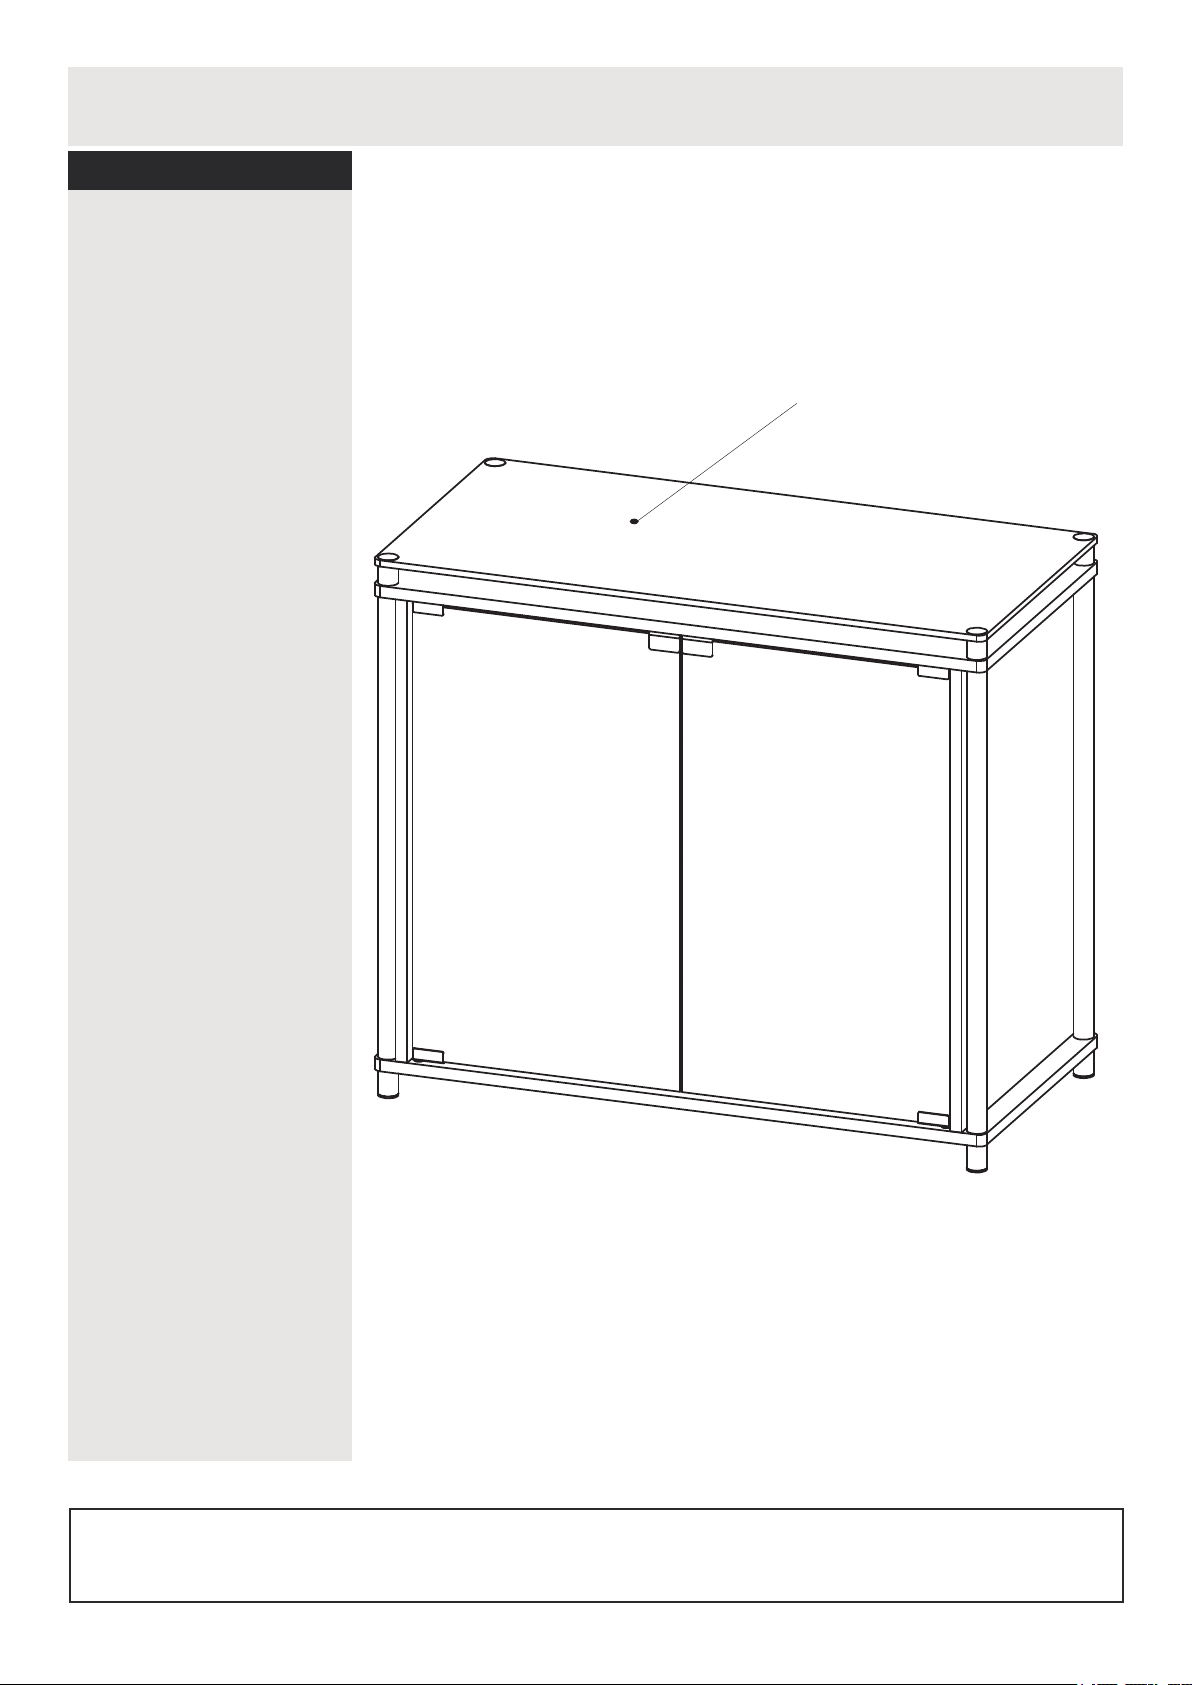
Step20
Assembly is
complete.
MAX:20 kgs
If you need help or haved amaged or missing parts,call the CustomerHelpline:
13
03456 400800
Page 15
 Loading...