

Page 1
Important - Please read these instructions fully before starting assembly
Dimensions
Issue 1 - 07/11/11
Width - 90cm
Depth - 40cm
Height - 46.5cm
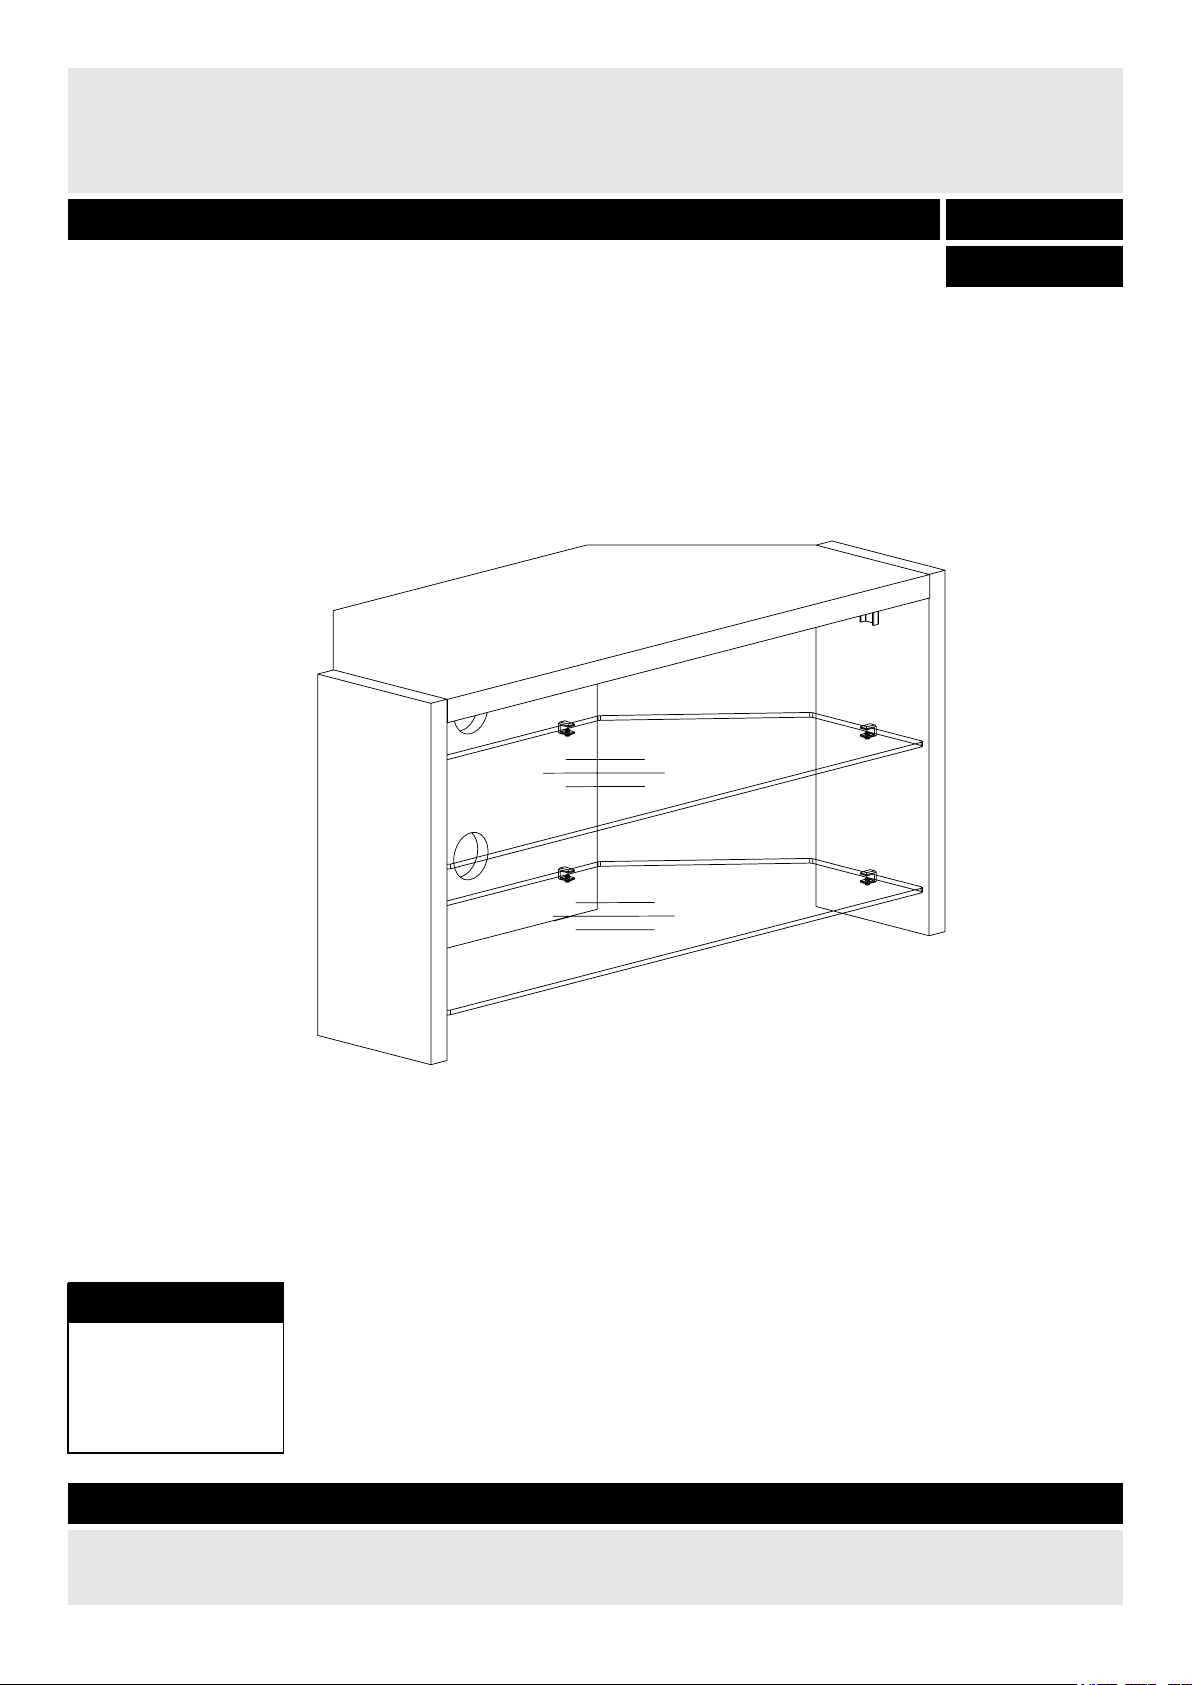
Madison Corner TV Unit
Assembly Instructions - Please keep for future reference
609/6142
If you need help or have damaged or missing parts, call the Customer Helpline: 08456 400800
609/6159
Page 2
• Only clean using a damp cloth
and mild detergent, do no use
bleach or abrasive cleaners.
• From time to time check that
there are no loose screws on
this unit.
• This product should not be
discarded with household waste.
Take to your local authority
waste disposal centre.
Safety and Care Advice
• Product Stock Ref: FMADCTVO
Stock Ref: FMADCTVB
• P/O No:
• If the glass is chipped or broken, stop using the product and
consult the Manufacturer or Supplier.
Warnings
a) Do not place very hot or very cold items on the glass surface(s) unless adequately thick table mats
are used to prevent such items from coming into contact with the glass.
b) Do not sit or stand upon the glass surface(s).
c) Do not use the glass as a chopping surface. Do not strike the glass with hard or pointed items.
d) When cleaning glass panels use a damp cloth or leather with washing up liquid or soft soap if
necessary, do not use washing powders or any other substance containing abrasives since these
substances scratch glass.
Important – Please read these instructions fully before starting assembly
Glass safety
Care and maintenance
1
• Check you have all the
components and tools listed on
pages 2 and 3.
• Remove all fittings from the
plastic bags and separate them
into their groups.
• Keep children and animals
away from the work area, small
parts could choke if swallowed.
• Make sure you have enough
space to layout the parts before
starting.
• Do not stand or put excessive
weight on the product, this
could cause damage.
• Assemble the item as close
to its final position (in the same
room) as possible.
• Parts of the assembly will be
easier with 2 people.
• Dispose of all packaging
carefully and responsibly.
• Place the product on flat and
steady surface during use.
• Assemble on a soft level
surface to avoid damaging the
unit or your floor.
• Keep these instructions for
further use.
• To ensure an easier assembly,
we strongly advise that all
fittings are only finger tightened
during initial assembly. Only
upon completion of the
assembly should all fixing points
be fully tightened.
• This product complies with
BS EN 14749: 2005.
• The glass included with this
product complies with
BS EN 12150-1: 2000
Fragmentation Test
• Imported by:
Justwise Group Ltd
6 The Shires
Shire Hill Industrial Estate
Saffron Walden
Essex
CB11 3AP
Page 3
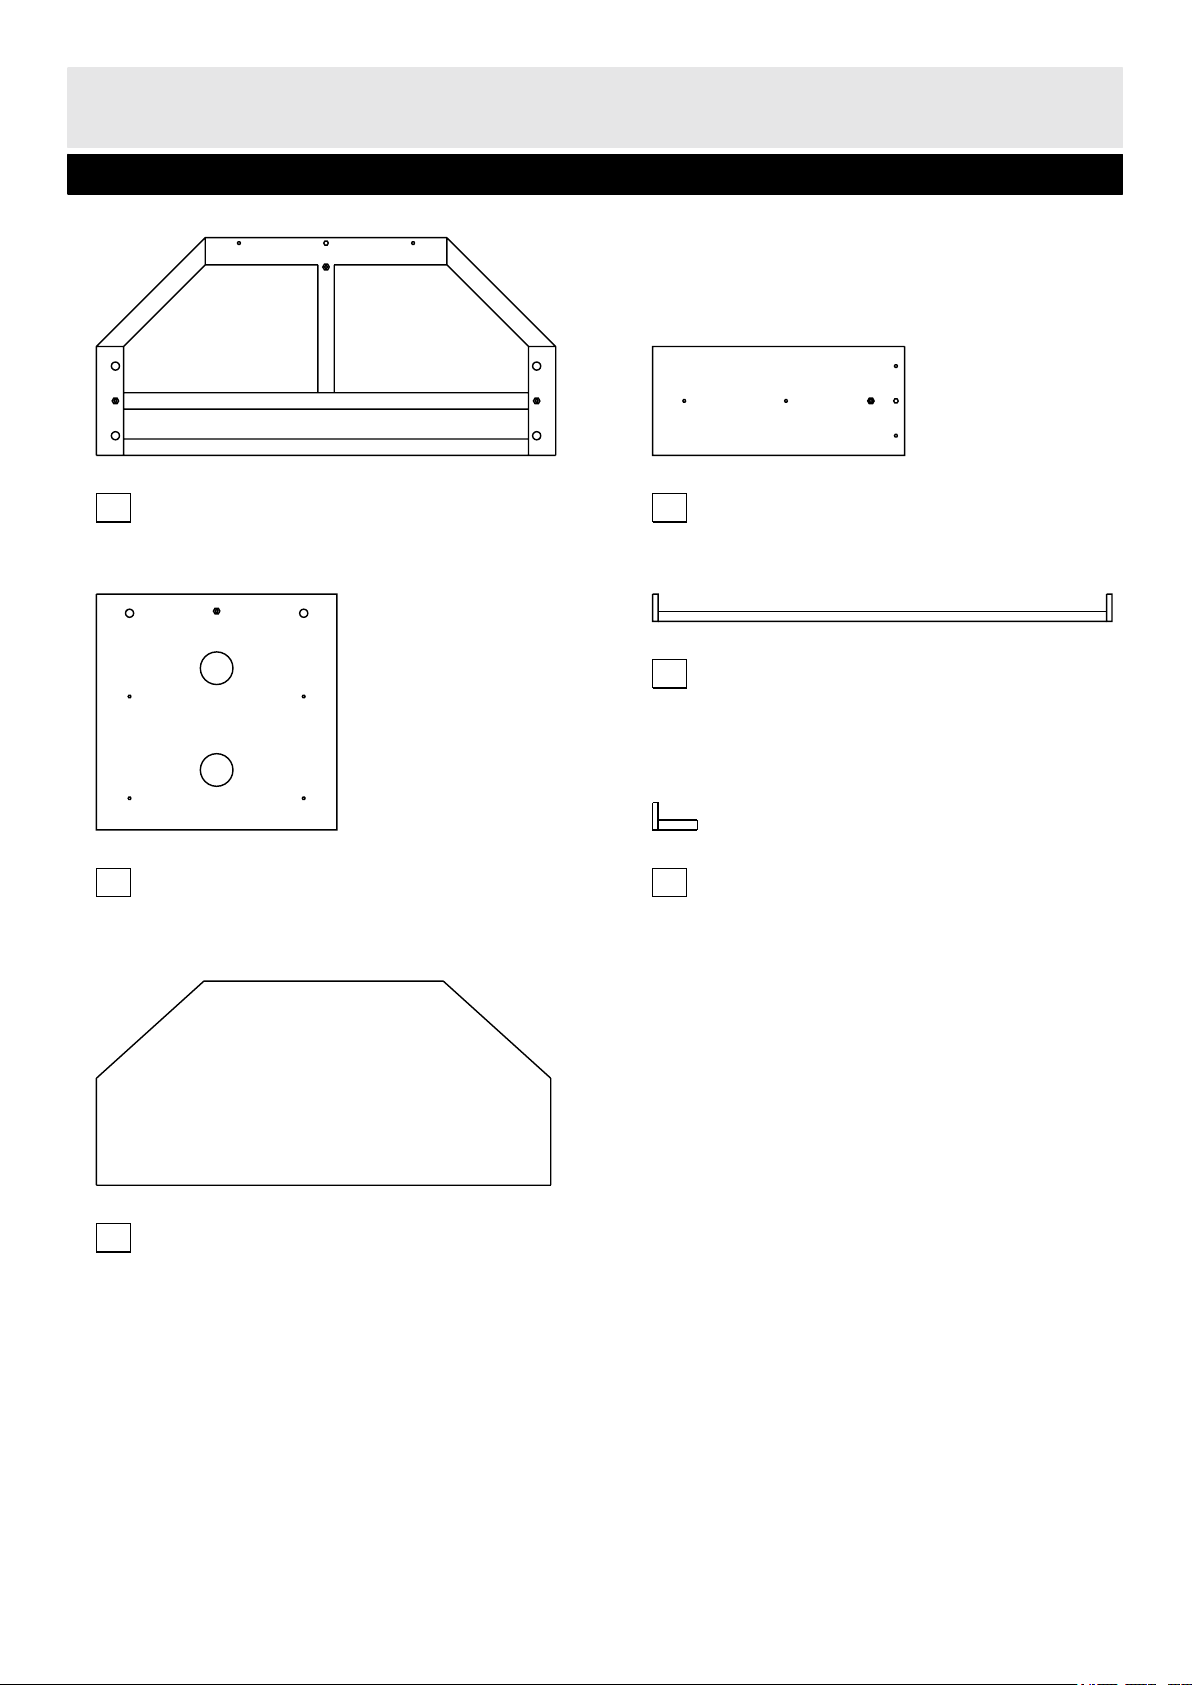
Please check you have all the parts listed below
Components - Parts
2
1
Top (84.4 x 40 x 3cm)
3
Back panel (44.2 x 44.3 x 1.8cm)
If you have damaged or missing components,
call the Customer Helpline: 08456 400800
4
Stretcher x 2 (84.4 x 5cm)
5
Metal bracket (6.8 x 5cm)
6
Glass shelf x 2 (83.5 x 37.5cm)
2
Side panel x 2 (46.3 x 20 x 2.8cm)
Underside
Inside
Inside
Page 4
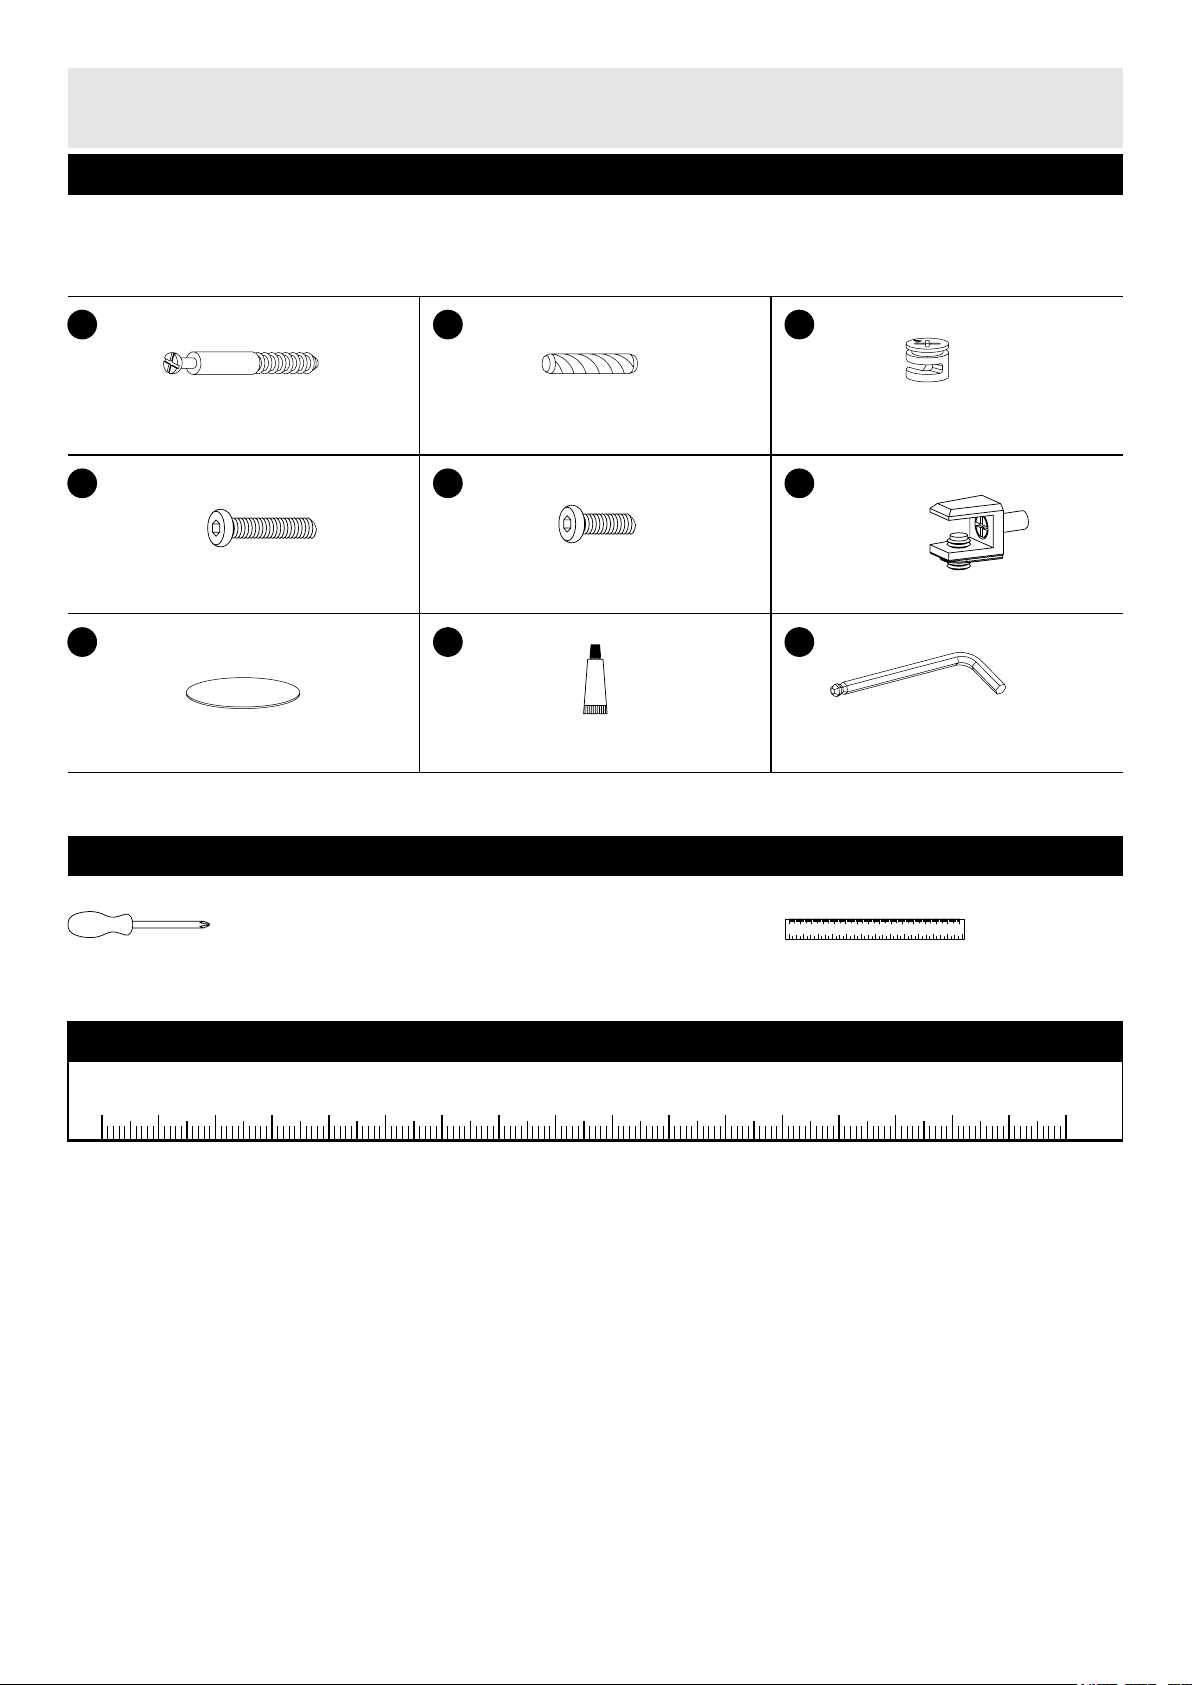
Please check you have all the fittings listed below
Components - Fittings
3
If you have damaged or missing components,
call the Customer Helpline: 08456 400800
Note: The quantities below are the correct amount to complete the assembly. In some cases more
fittings may be supplied than are required.
A
55mm Long metal dowel x 6
C
D
Locking nut x 6
G
Glue x 1
Ruler - Use this ruler to help correctly identify the screws
0
5
10 15 20 25 30 35 40
45
50
55
60 65 70
75
80 85 90 95 100 105 110 115 120 125 130 135 140 145 150 155 160 165 170
Tools required
0
0 5 10 15 20 25 30 35 40 45 50 55 60 65 70 75 80 85 90 95 100 105110 115 120 125130 135 140145 150
1 2 3 4 5 6
Ruler/tape
measure
F
B
Wood dowel x 3
E
30mm Allen screw x 3
Phillips screwdriver
(medium & large)
H
Sticker x 6
Allen key x 1
J
Shelf bracket x 8
15mm Allen screw x 3
Page 5
1
A
B
A
H
D
D
4
2
A
B
H
2
A
B
H
4
Assembly Instructions
B
H
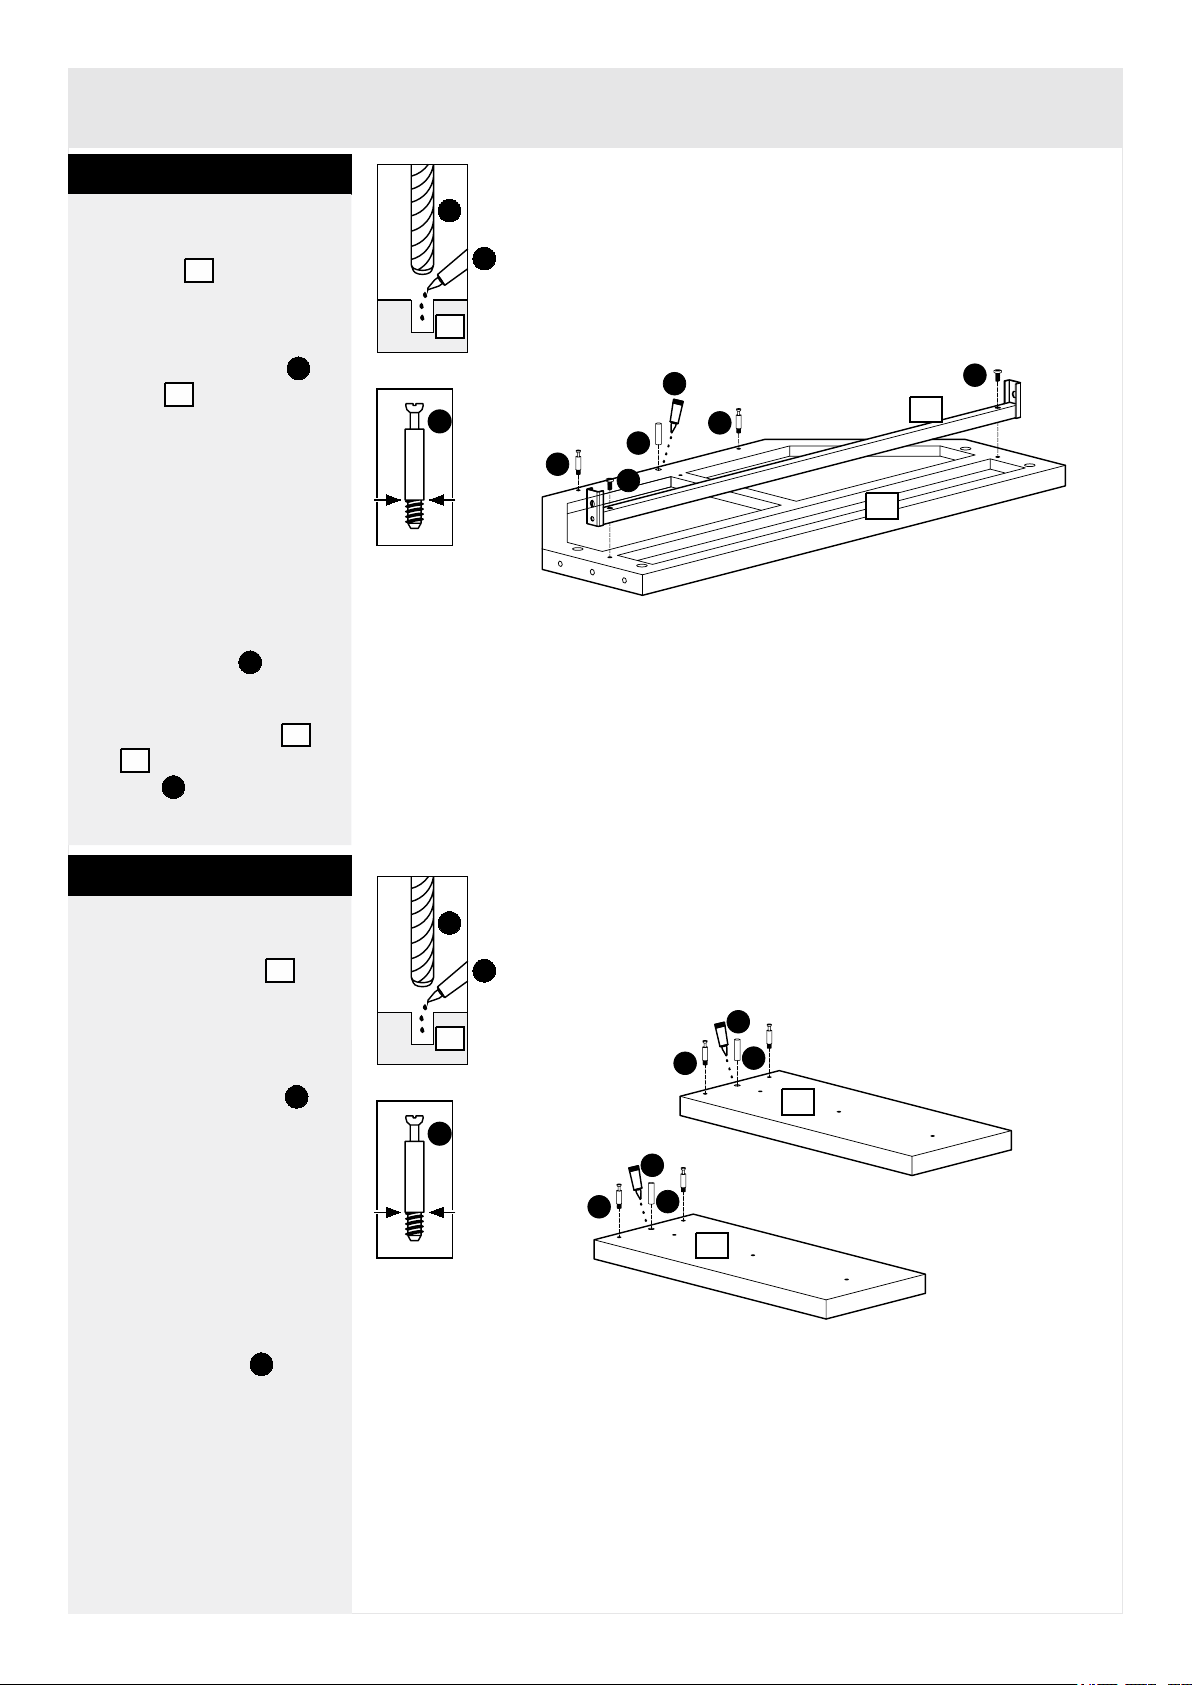
Step 1
Step 2
A
Preparing top
Place top upside
down onto a clean flat
surface.
Screw metal dowels
into top in the
locations shown.
Note: Insert metal dowels
as far as shown.
Do not over tighten.
Apply a small amount of
glue into the dowel holes
as shown.
Fit wood dowel into
the hole.
Assemble stretcher to
top using long
screws .
1
1
4
1
D
A
B
1
B
H
A
2
Preparing side panels
Place side panels
down onto a clean flat
surface with the holes
facing up.
Screw metal dowels
into the panels as shown.
Note: Insert metal
dowels as far as shown.
Do not over tighten.
Apply a small amount of
glue into the wood dowel
holes as shown.
Fit wood dowels into
the holes.
2
A
B
Page 6
2
2
1
4
3
5
D
E
E
Screws to
face up
F
1
2
2
3
C
C
H
H
Front
Back
Inside
Shown upside down
Holes to
face in
5
Step 3
Step 4
4
E
B
H
D
D
Assembly Instructions
21
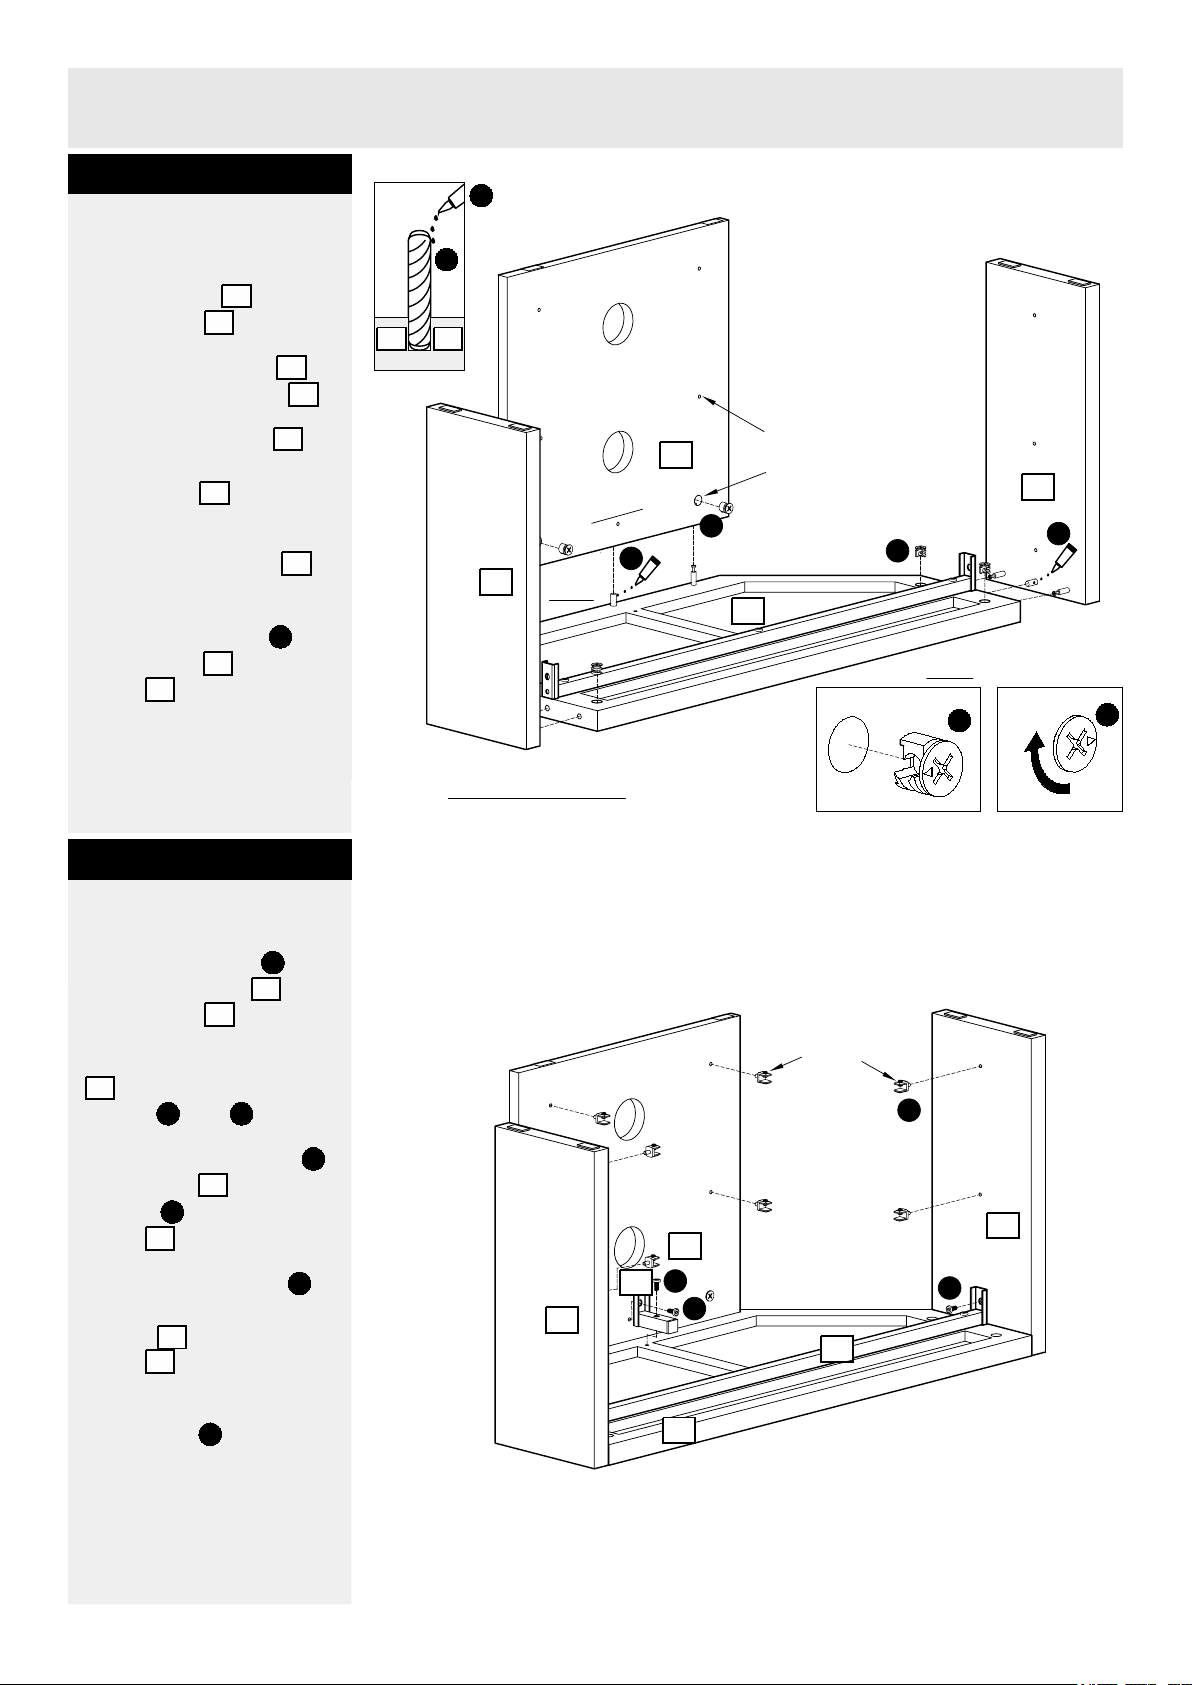
Assembling frame
Apply glue to the wood
dowels in top and
side panels .
Locate side panels
onto the ends of top .
Locate back panel
onto the fixings at the
back of top as shown.
Note:
Ensure the fixing
holes in back panel
are facing in as shown.
Insert locking nuts into
side panels and back
panel .
Using a screwdriver, turn
locking nuts clockwise to
secure.
1
2
2
1
3
1
3
C
2
3
Attaching brackets
Use short screws to
secure stretcher to
side panels .
Assemble metal bracket
as shown, using
fixings and .
Note: Longer screws
go into top , shorter
screws go into back
panel .
Insert shelf brackets
into the holes in side
panels and back
panel .
Note: Ensure the screws
in brackets are facing
up at this stage.
Do not over tighten this
fixing.
2
5
D E
D
E
1
3
F
2
3
F
Page 7
6
6
6
Assembly Instructions
6
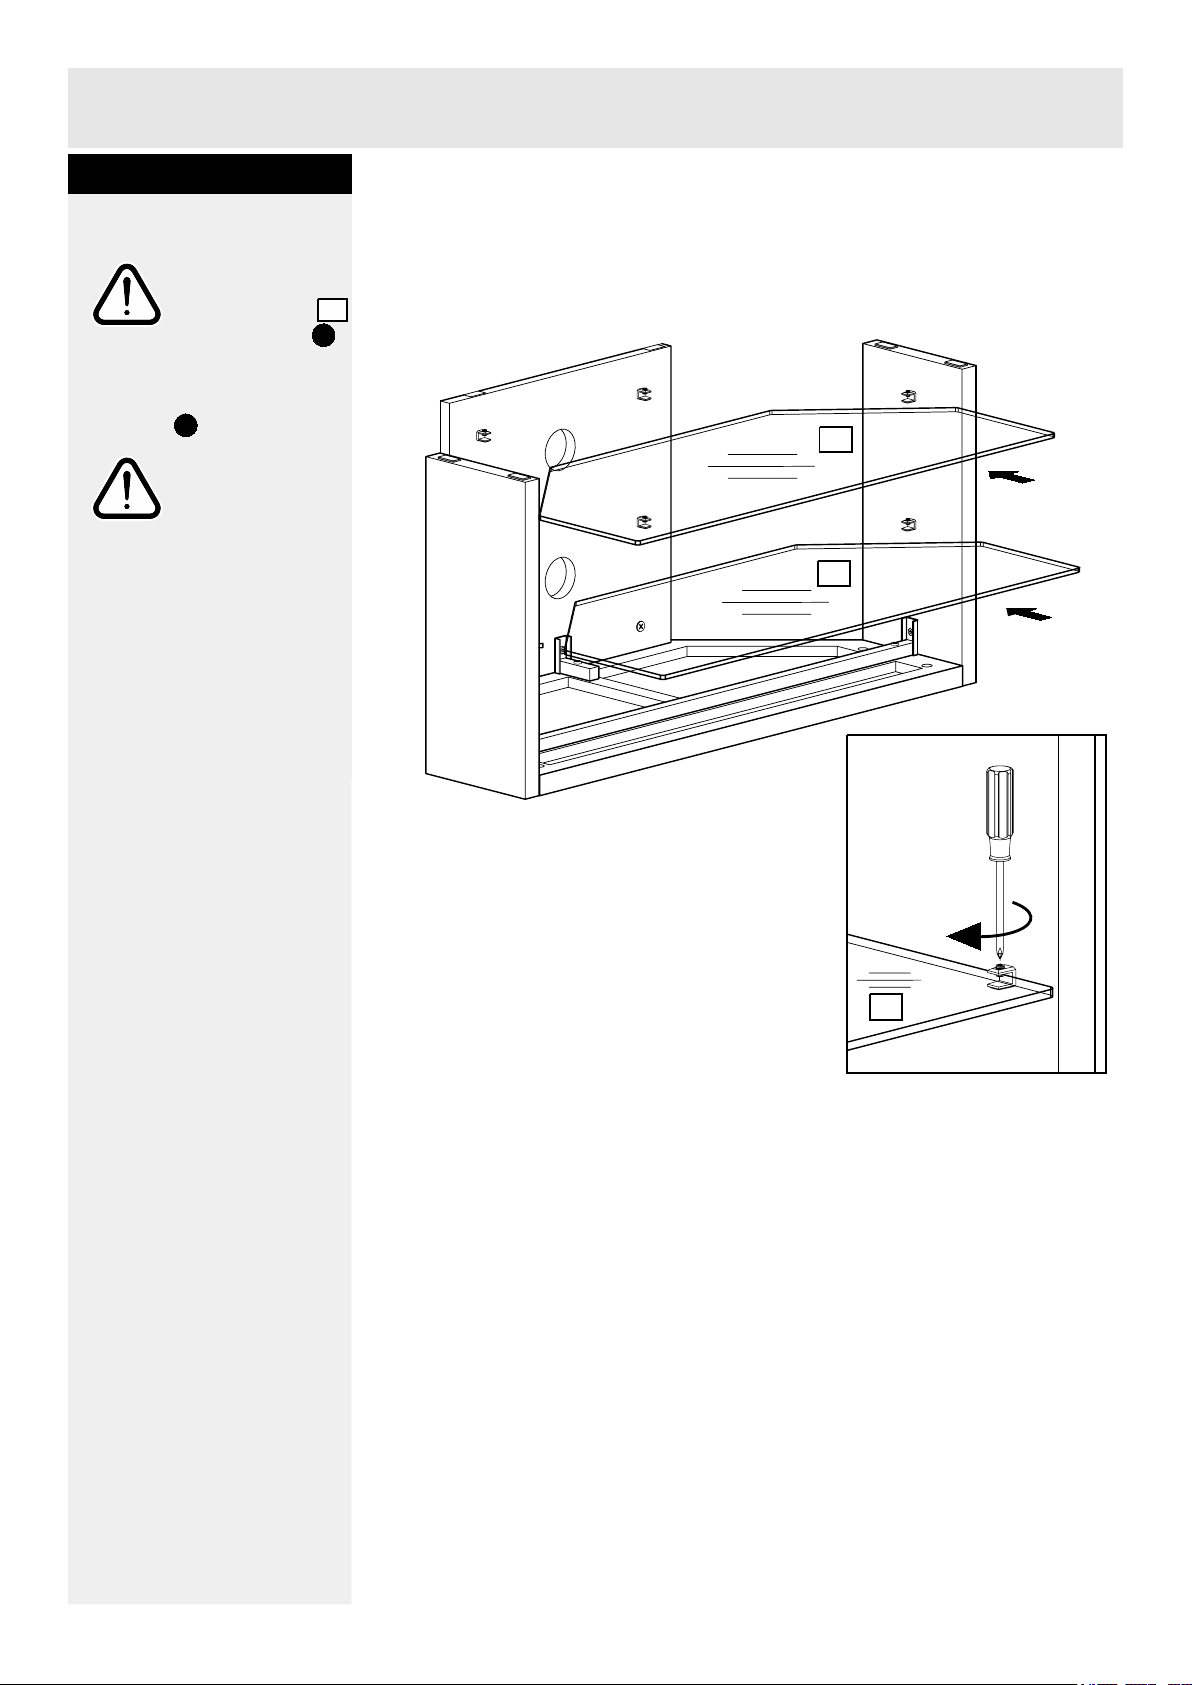
Step 5
With help,
carefully slide
glass shelves
into brackets .
Once aligned, secure by
tightening the screws in
brackets as shown.
Take care not to
over tighten!
Locating glass shelves
6
F
F
Page 8
G
G
G
Assembly Instructions
7
If you need help or have damaged or missing parts, call the Customer Helpline: 08456 400800
Justwise Group LTD., 6 The Shires, Shire Hill Industrial Estate, Saffron Walden Essex. CB11 3AP
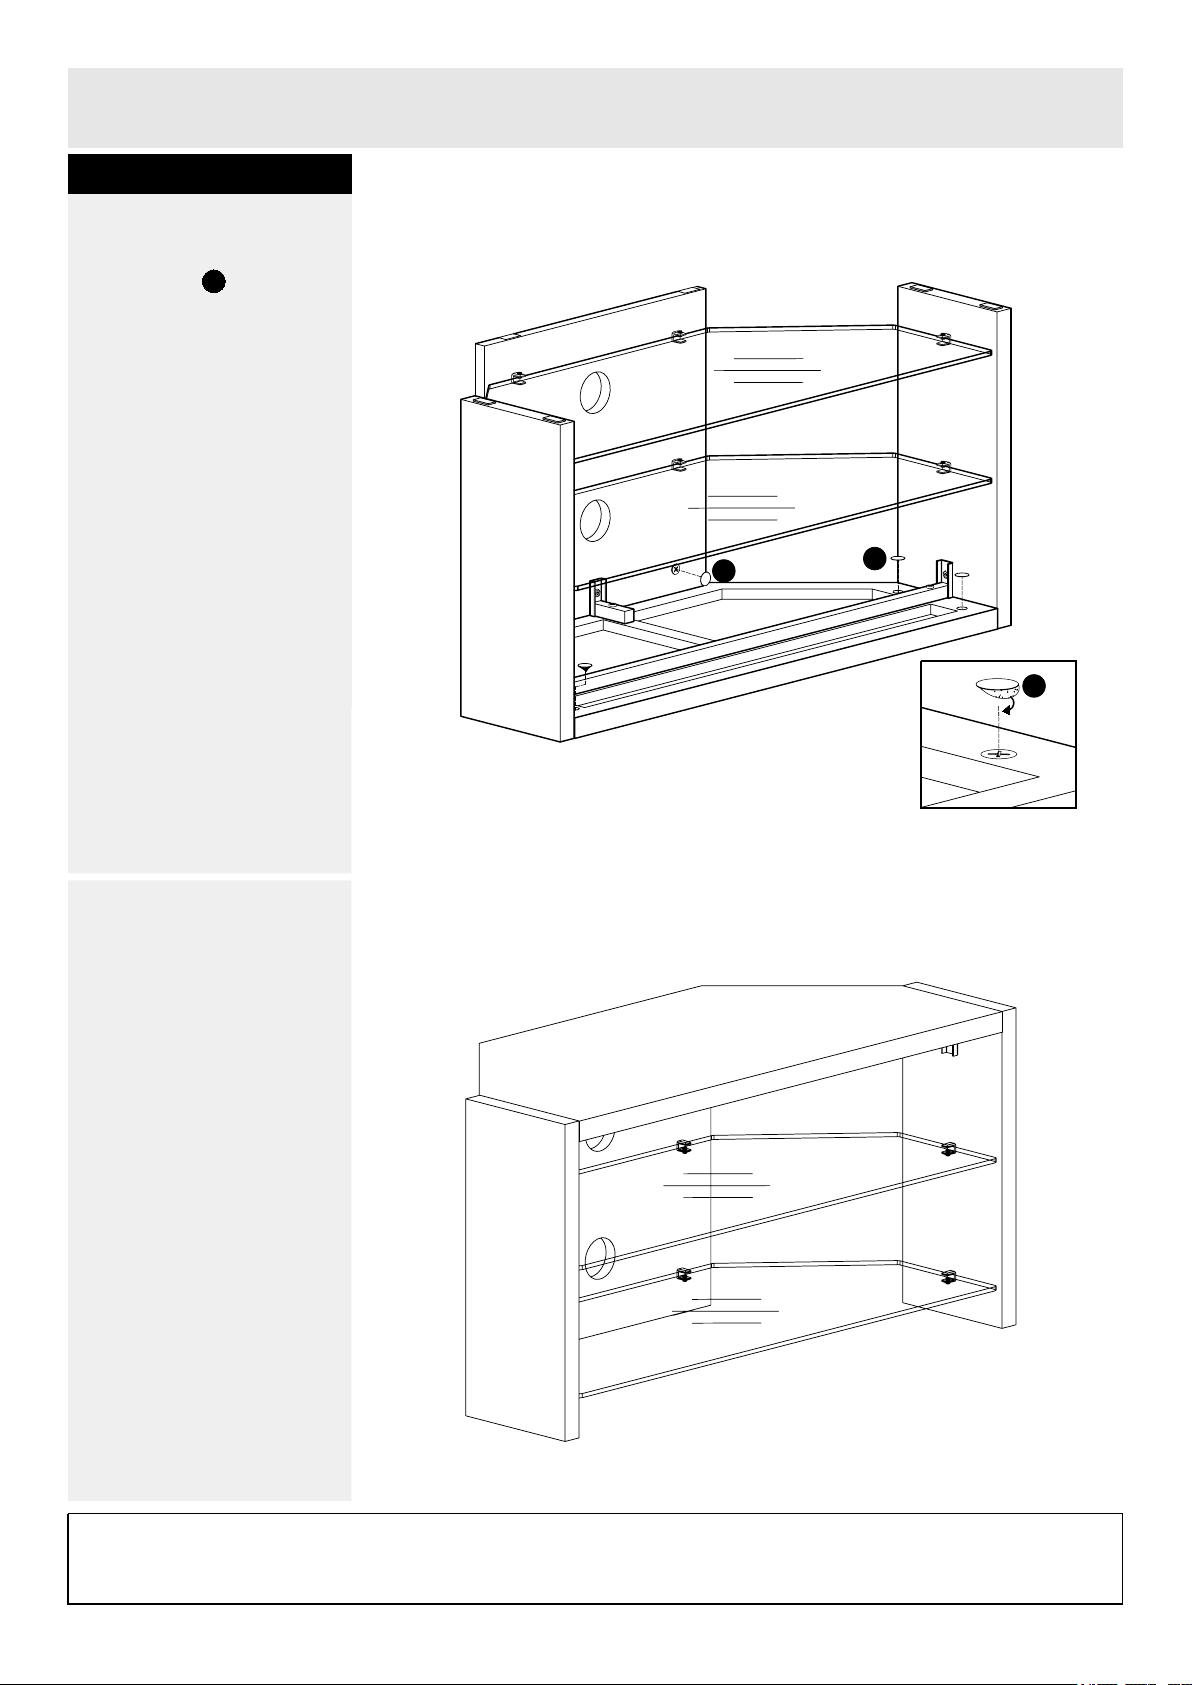
Step 6
G
a:
b:
Fitting stickers
a: Stickers can be
used to cover the fixing
holes.
b: With help,carefully
turn the table over to lts
upright position.
Assembly is complete.
 Loading...