

Page 1
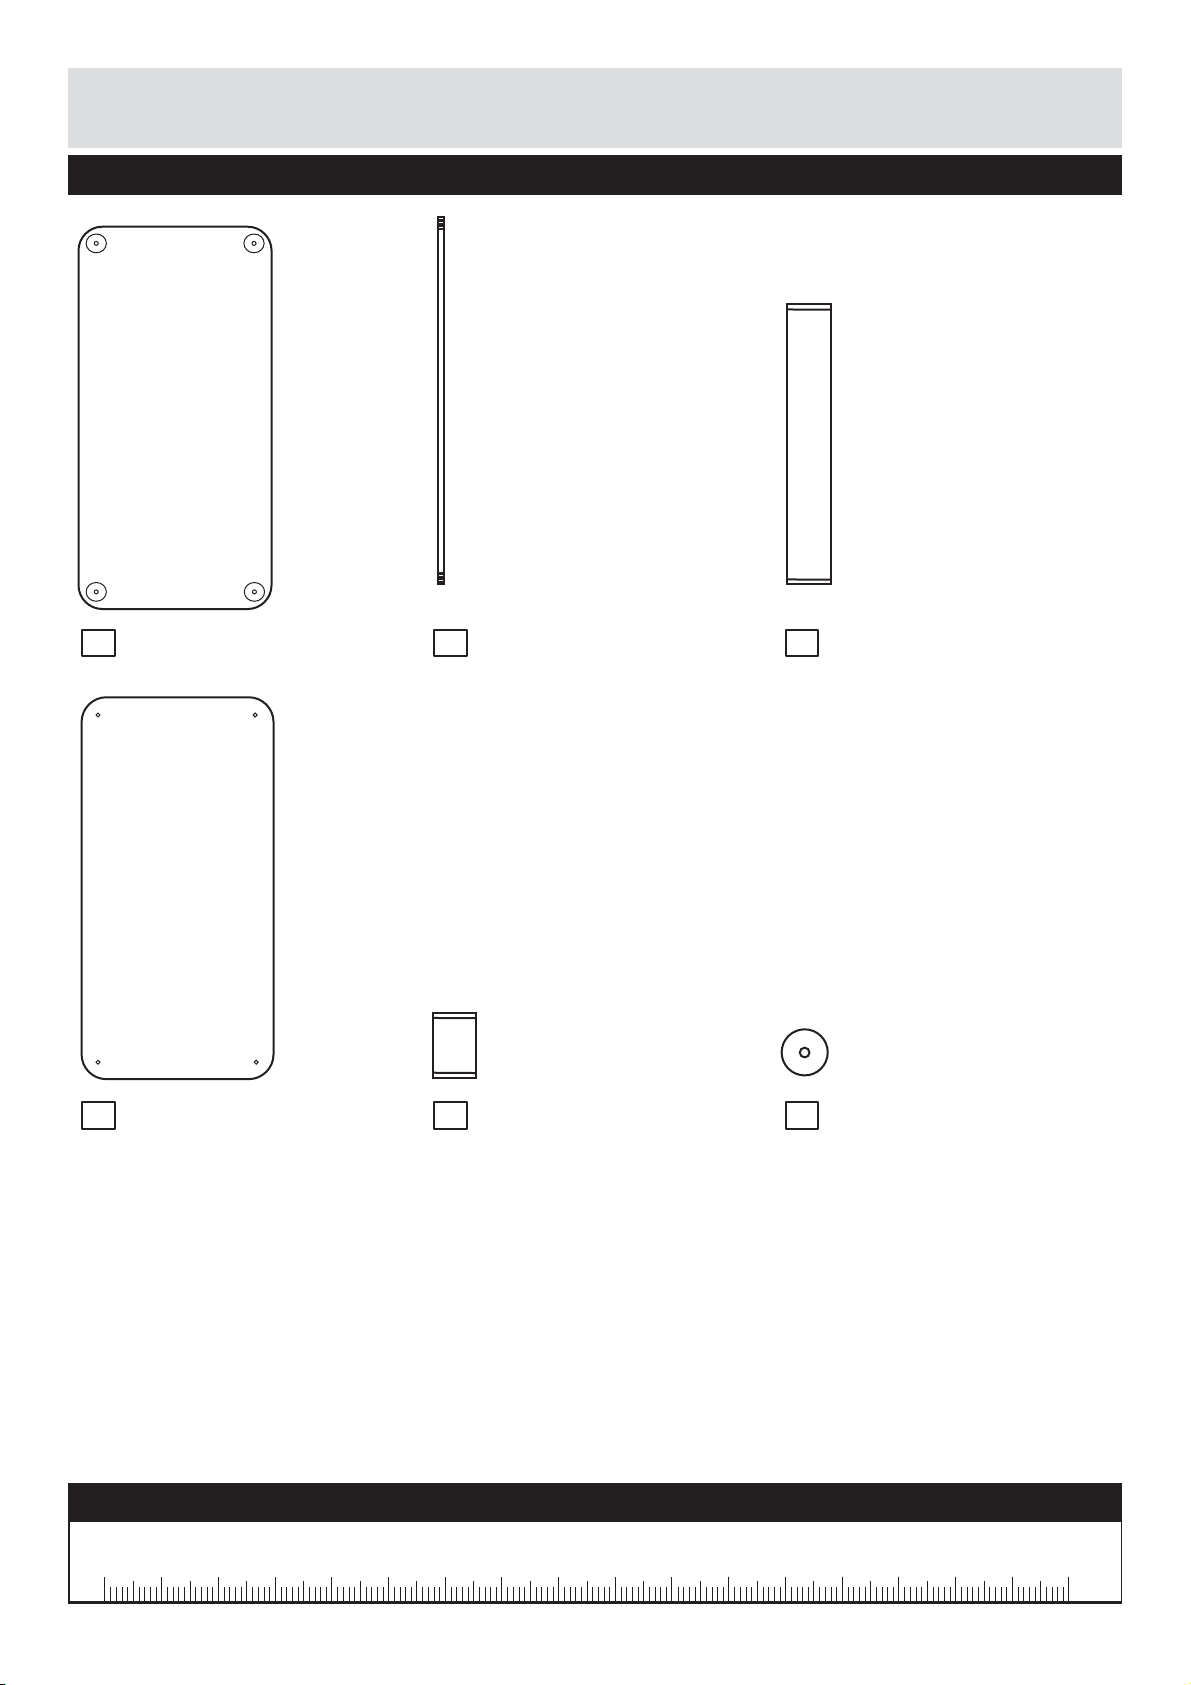
Components
Assembly Instructions
Assembly Instructions
A
Glass Top x 1
B
Metal Rod x 4
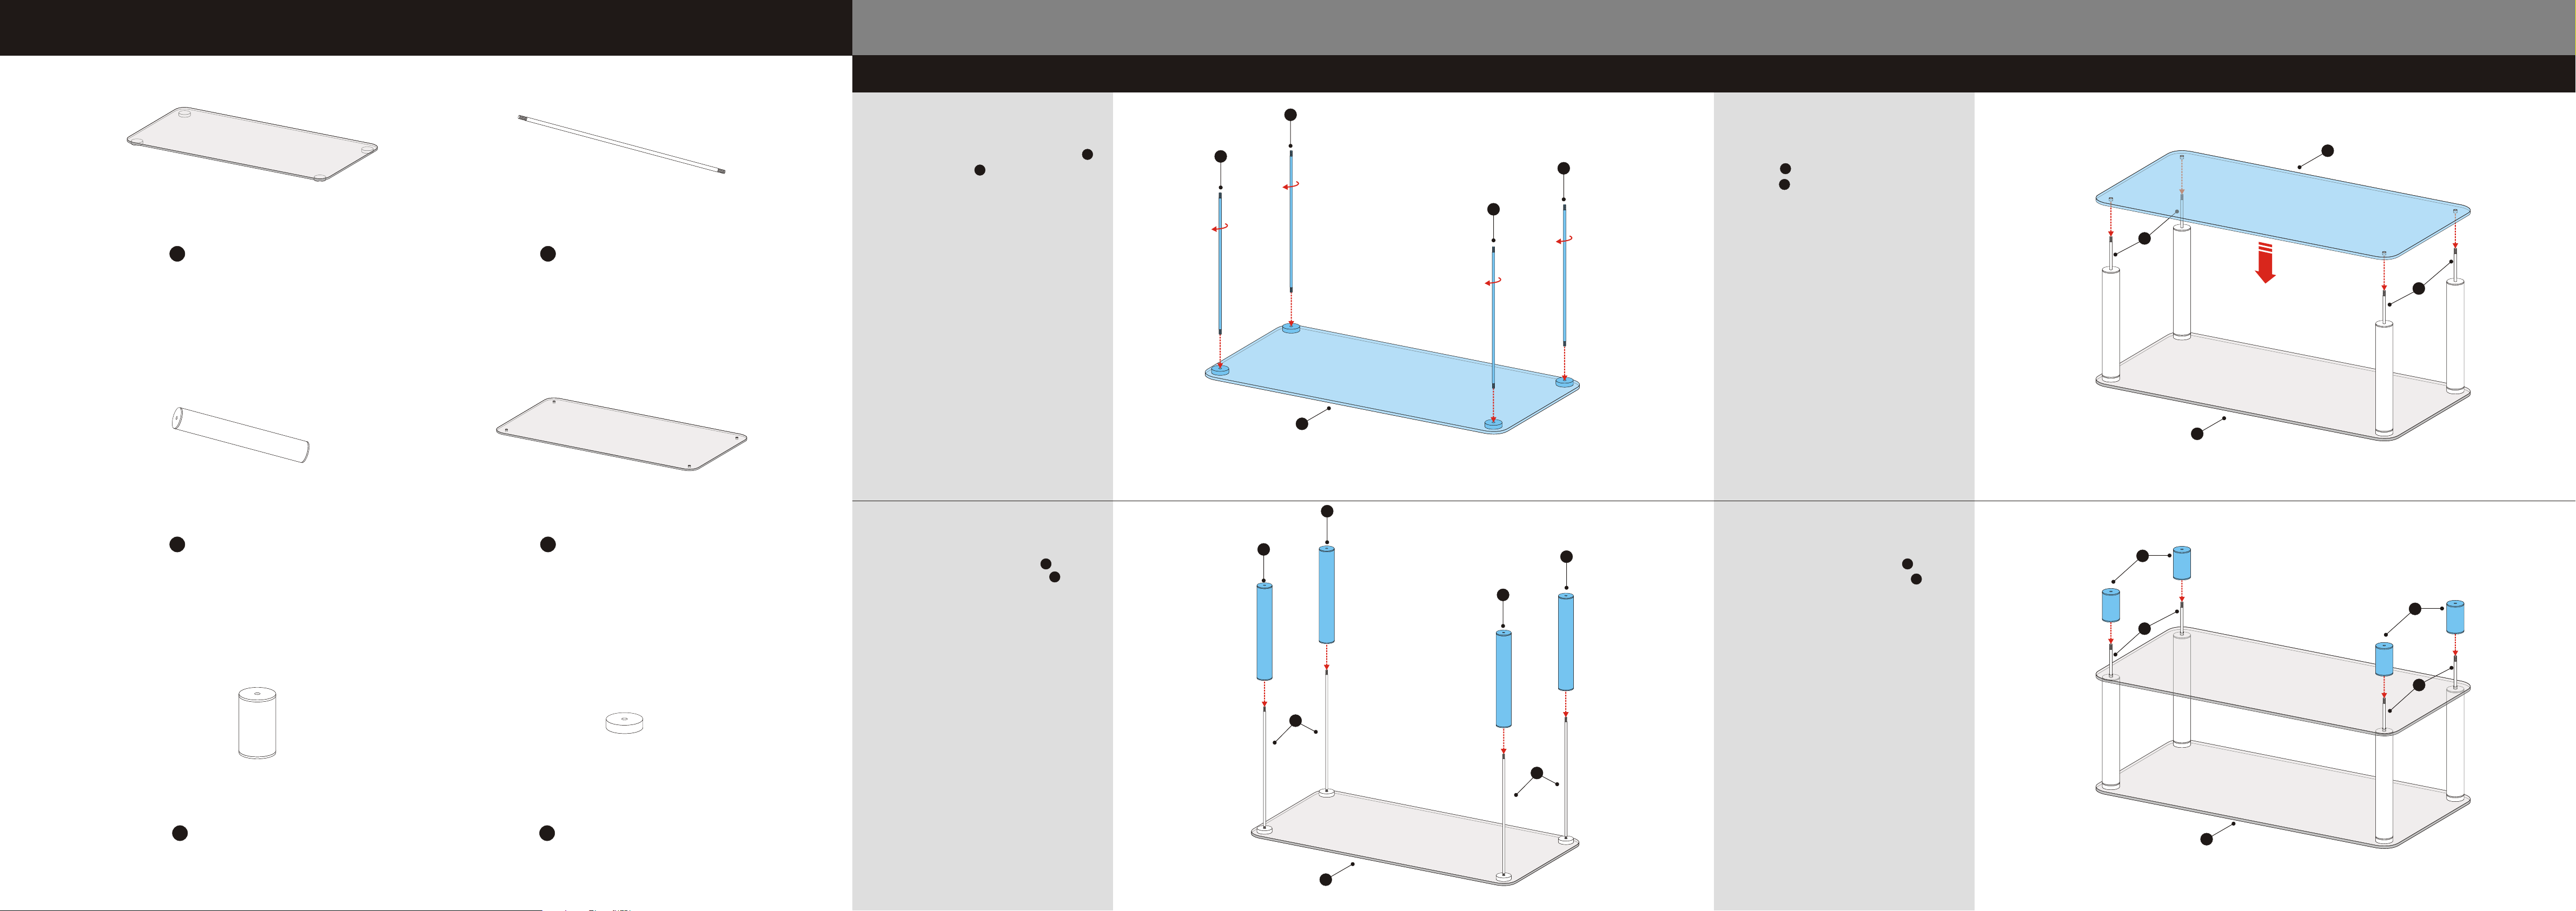
Stage 1 - Fitting Metal Rod B and Metal Tube C
B
fig 1
Finger tighten 4 pcs of Metal Rods
onto Glass Top as shown.
A
B
fig 1
B
Stage 2 - Fitting Glass Shelf D and Metal Tube E
fig 3
Please be careful to place Glass
B
B
Shelf through 4 pcs of Metal
Rods as shown.
D
B
fig 3
D
B
B
C
Metal Tube x 4
D
Glass Shelf x 1
fig 2
Attach 4 pcs of Metal Tube
through 4 pcs of Metal Rods
as shown.
C
B
fig 2
A
C
fig 4
C
C
B
C
Attach 4 pcs of Metal Tube
through 4 pcs of Metal Rods
as shown.
E
B
fig 4
E
B
A
E
B
E
Metal Tube x 4
F
Feet x 4
B
A
A
Page 2
Assembly Instructions
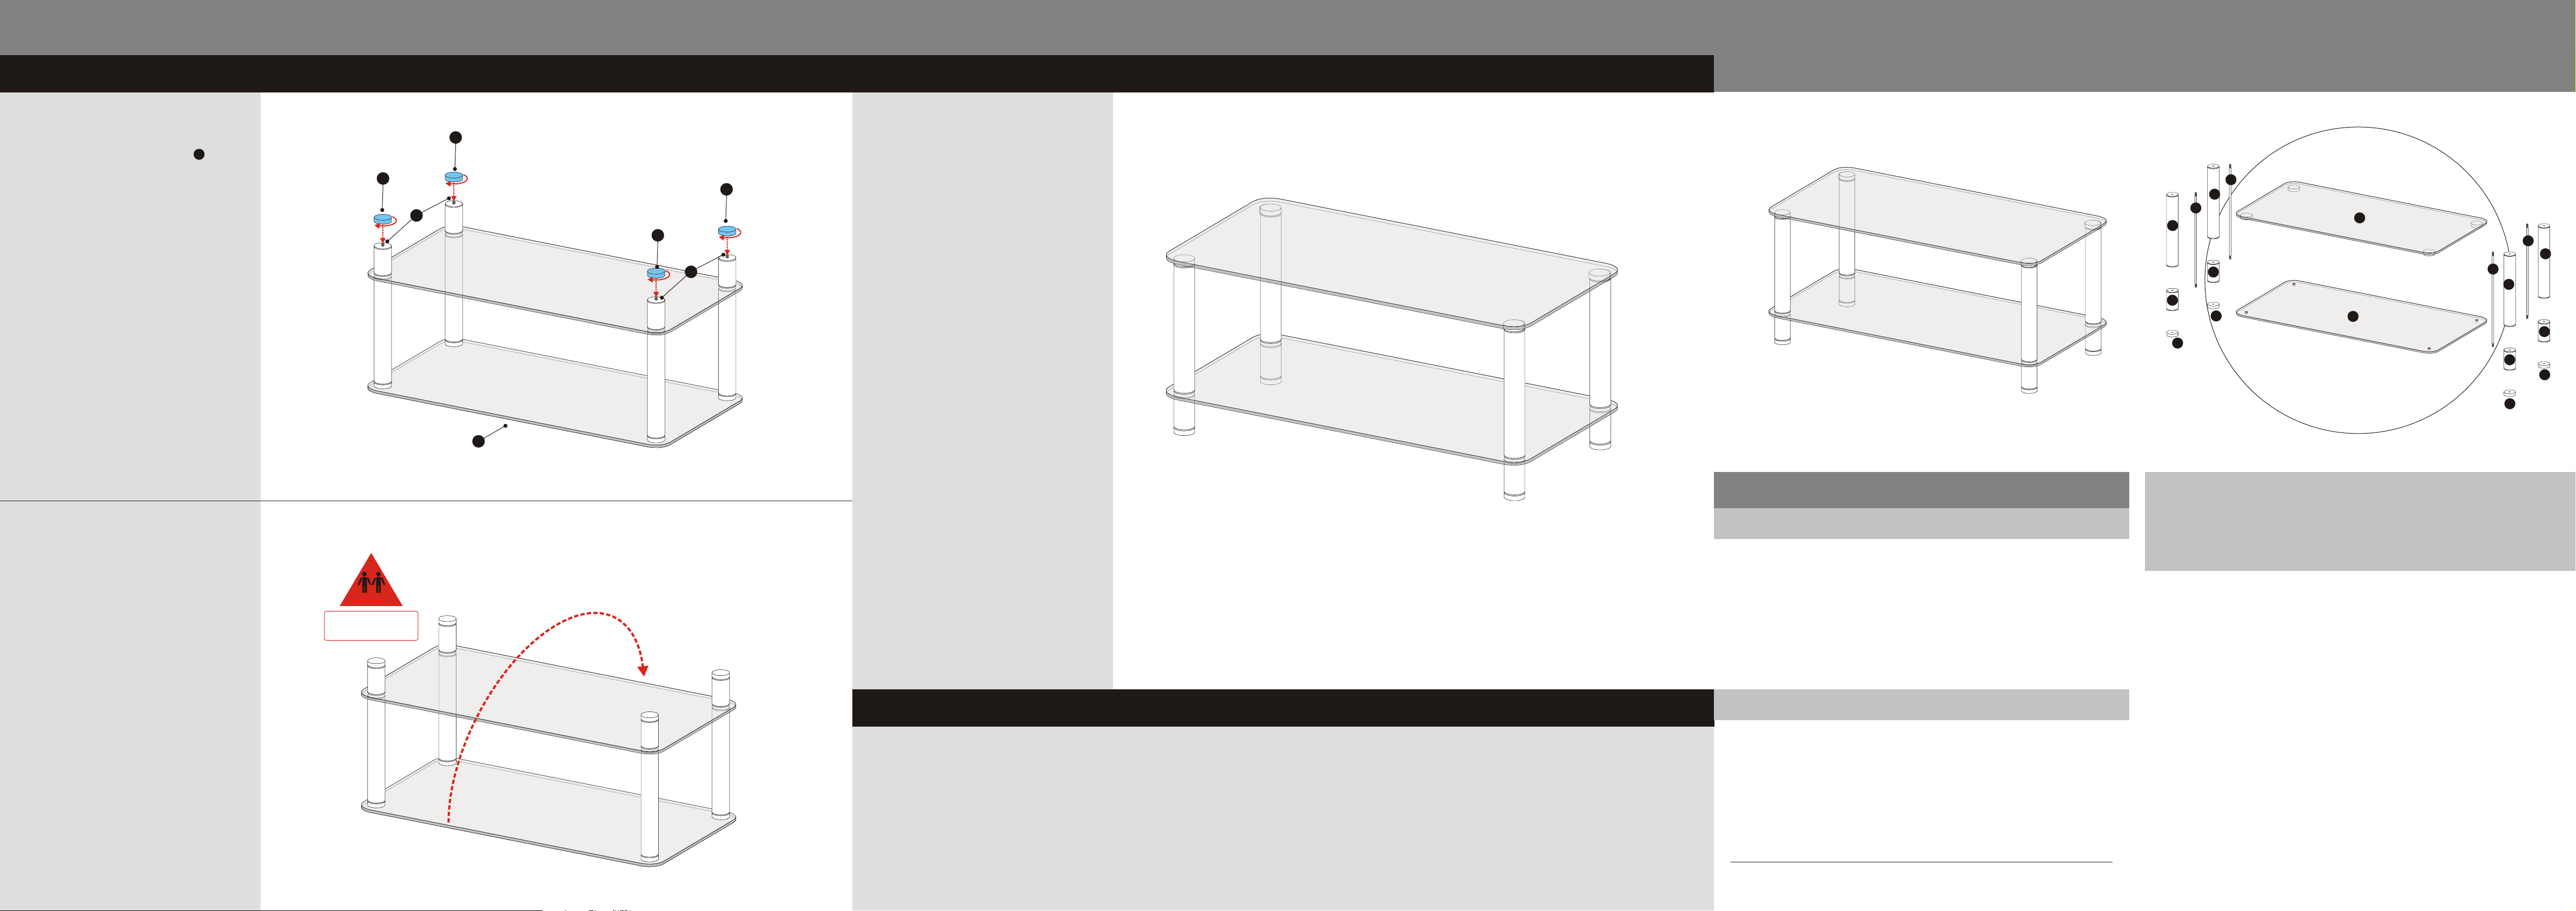
Stage 3 - Fitting Feet F
Assembly Instructions
Matrix Glass Coffee Table
Stage 4 - Completed
Finger tighten 4 pcs of Feet
onto the unit as shown.
F
fig 5
fig 7
F
Completed.
F
F
B
F
B
fig 7fig 5
B
C
B
C
E
E
F
F
A
B
C
B
C
D
E
E
F
F
fig 6
Please check carefully if all parts are
tightened before turn the unit over.
fig 6
2 PEOPLE LIFT THE
ASSEMBLY UNIT.
TURN THE
UNIT UPRIGHT
A
SAFETY WARNING INFORMATION
Instructions for BS 7376 : 2004
for products (tables or trolleys)
which include glass
Catalogue Number: 6108267(Clear Glass) / 6090708(Black Glass)
Batch Number / Date of Manufacture: September 2007
Retailer: Argos
Retailer address: 489-499 Avebury Boulevard
Saxon Gate West
Central Milton Keynes
Mk9 2NW
If the glass is chipped or broken , stop using the product
and consult the manufacturer or supplier
Completed.
Care and Maintenance
Cleaning
Clean all surfaces with a damp cloth and mild detergent. Please do not use bleach or
abrasive products.
Keep these instructions for future use:
IMPORTANT
1. Read these instructions carefully and yourself with the
procedures the unit.
2. Check that you have all the component Follow the list on the back
cover and familiarise each part before proceeding.
yourself with
3. Take all the fittings out of the plastic bag and separate them into their groups.
4. Ensure you have enough space to lay out all parts before assembly.
5. To avoid scratches. It is recommended that you assemble the unit on a soft
leveled surface.
before assembling
familiarise
parts.
WARNINGS
-Do not place very hot or cold items on the glass surface(s) unless adequately
thick table mats are used to prevent such items from coming into contact with
the glass.
-Do not sit or stand upon the glass surface(s).
-Do not use the glass as a chopping surface. Do not strike the glass with hard
or pointed items.
Fitting
From time to time check to ensure the screws and legs remain rigid.
-When cleaning glass panels use a damp cloth or leather with washing up liquid
or soft soap if necessary: do not use washing powders or any other substances
containing abrasives since these substances scratch glass.
Marking BS 7376:2004 on or in relation to a product represents a manufacture's declaration of conformity
, i.e. a claim by or on behalf of the manufacturer that the product meets the requirements of the standard.
The accuracy of the claim is therefore solely the responsibility of the person making the claim. Such a
declaration is not to be confused with third party certification of conformity, which may also be desirable.
Page 3
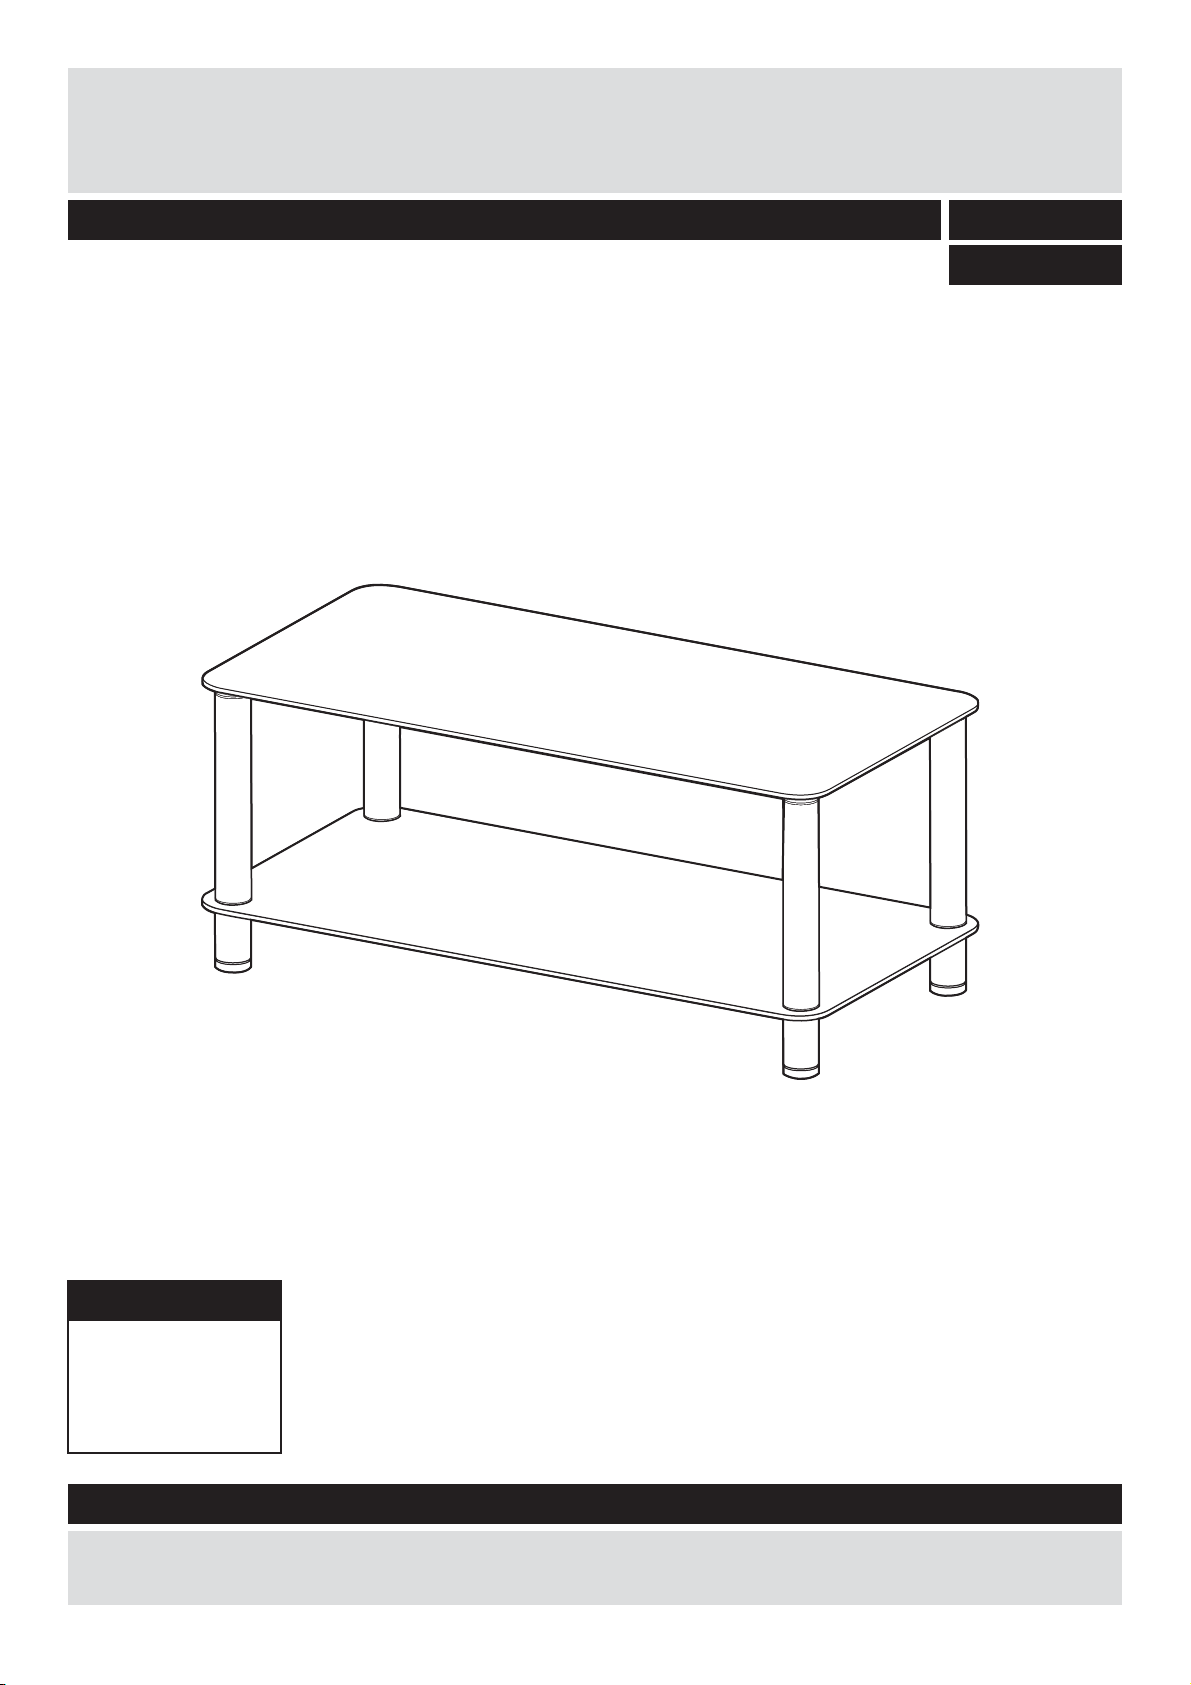
Matrix - Glass Coffee Table
Assembly Instructions - Please keep for future reference
610/8267
609/0708
Dimensions
Width - 100cm
Depth - 50cm
Height - 45cm
Important - Please read these instruction fully before starting assembly
If you need help or have damaged or missing parts, call the Customer Helpline: 08456 400800
Issue 1 - 11/01/09
Page 4
Safety and Care Advice
Important -Please read these instructions fully before starting assembly
Do not stand on the product,
components and tools listed on
pages 2.
plastic bags and separate them
into their groups.
this could cause damage.
room) as possible.
as this could damage the unit.
Only use hand screwdrivers.
recommend the
use of power
drill/drivers for
inserting screws,
away from the work area, small
parts could choke if swallowed.
space to layout the parts before
starting.
surface to avoid damaging the
easier with 2 people.
Care and maintenance
and mild detergent, do not use
bleach or abrasive cleaners.
there are no loose screws on
this unit.
Keep These Instructions For Future Reference
This product complies with
BS 7376:2004
Argos plc
489-499 Avebury Boulevard
Central Milton Keynes
MK9 2NW
carefully and responsibly.
discarded with household
waste. Take to your local
authority waste disposal centre.
Batch No./Date of manufacture:
Warning
Do not place very hot or very
cold items against or in close
proximity to glass surfaces
unless an adequately thick
insulating material is used to
prevent such items from coming
into contact with the glass.
1
Do not sit or stand upon the
glass surface(s).
If a glass component is chipped
or broken, stop using the product
and consult the manufacturer or
supplier.
Do not use the glass as a
chopping surface. Do not strike
the glass with hard or pointed
items.
Page 5
Components - Panels
Please check you have all the panels listed below
Glass top (100 x50cm)
1
Glass shelf
4
(100 x 50 cm)
Metal rod x 4 (43.5 x 0.8 cm)
2
Metal tube x 4 (5.08 x 8cm)
5
3
Metal tube x 4 (32.5 x 5.08cm)
Feet x 4 (5.2x 1.4cm)
6
Ruler - Use this ruler to help correctly identify the screws
0 5 10 15 20 25 30 35 40 45 50 55 60 65 70 75 80 85 90 95 100 110 120105 115 125 130 135 140 145 150 155 160 165 170
2
Page 6

Assembly Instructions
Step 1
Attaching rods
Finger tighten 4 pcs of
metal rods onto
glass top as shown.
2
1
2
2
2
2
1
Step 2
Attaching tubes
Attach 4 pcs of metal
tube through 4 pcs
of metal rods as
shown.
3
2
3
3
3
3
2
2
2
2
1
3
Page 7

Assembly Instructions
Assembly Instructions
Step 3
Attaching shelf
Please be careful to
place glass shelf
4
through 4 pcs of metal
rods as shown.
2
Matt surface
2
2
4
2
2
1
Step 4
Attaching rods
Attach 4 pcs of metal
tube through 4 pcs
of metal rods as
shown.
5
2
5
5
2
5
2
4
2
1
5
2
4
Page 8

Assembly Instructions
Step 5
Attaching feet
Finger tighten 4 pcs of
6
feet onto the unit as
shown.
6
5
6
6
6
6
4
1
Step 6
Assembly is
completed.
If you need help or have damaged or missing parts, call the Customer Helpline:
5
08456 400800
Page 9

Matrix - Glass Coffee Table
Assembly Instructions - Please keep for future reference
610/8267
609/0708
609/2847
43928
Dimensions
Width - 100cm
Depth - 50cm
Height - 45cm
Important - Please read these instructions fully before starting assembly
If you need help or have damaged or missing parts, call the Customer Helpline: 08456 400800
issu e 1 4/ 19 /11
Page 10

Safety and Care Advice
Important - Please read these instructions fully before starting assembly
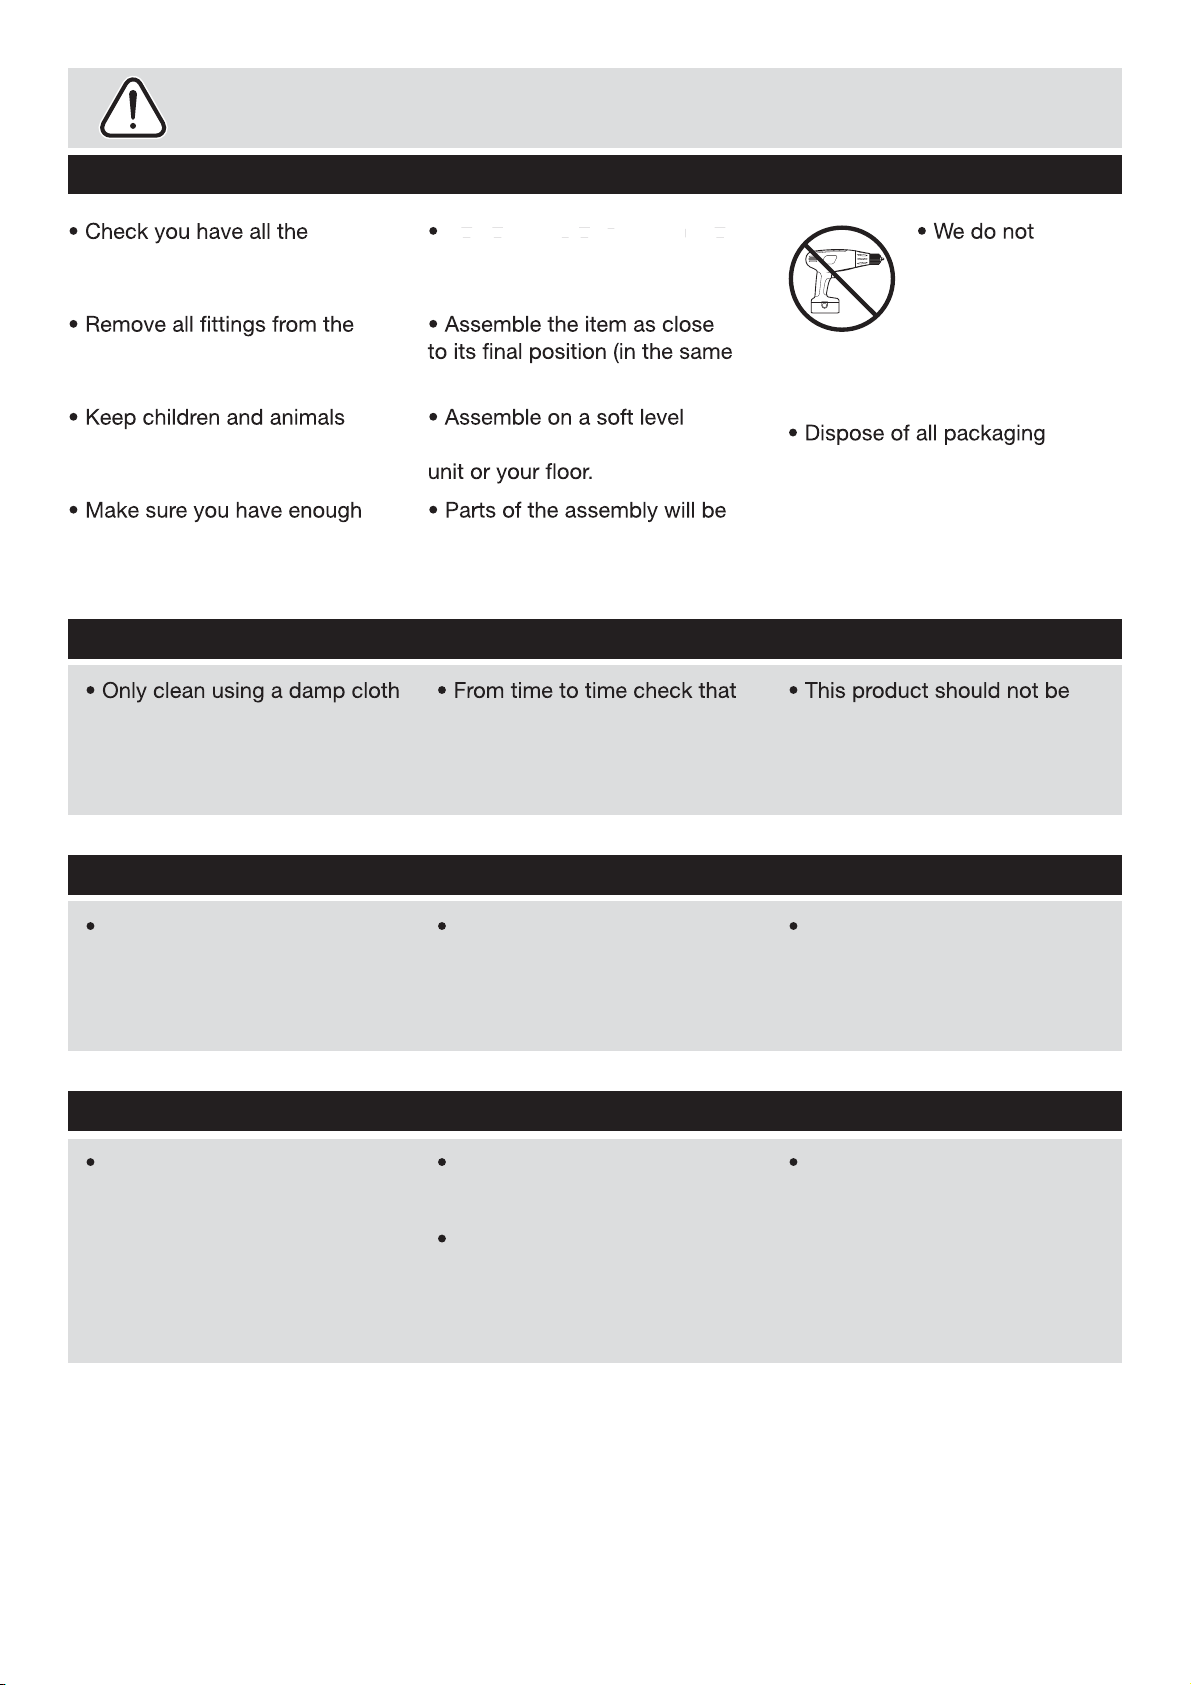
Check you have all the
components and tools listed on
pages 2.
Remove all fittings from the
plastic bags and separate them
into their groups.
Keep children and animals
away from the work area, small
parts could choke if swallowed.
Make sure you have enough
space to layout the parts before
starting.
Do not stand on the panels, this
could cause damage.
Assemble the unit as close to its
final position (in the same room)
as possible.
Assemble on a soft level
surface to avoid damaging the unit
or your floor.
Parts of the assembly will be
easier with 2 people.
Keep these instructions for future reference
This product complies with
BSEN14749.
Warning
Do not place very hot or very
cold items against or in close
proximity to glass surfaces unless
an adequately thick insulating
material is used to prevent such
items from coming into contact
with the glass.
Argos Ltd. MK9 2NW.
Do not strike the glass with hard
or pointed items.
We do not
recommend the use
of power drill/ drivers
for inserting screws,
as this could damage
the unit. Only use hand
screwdrivers.
Dispose of all packaging carefully
and responsibly.
Warning: The unit weighs
approximately 18.8kgs.
Please lift with care.
If a glass component is chipped
or broken, stop using the product
and consult the manufacturer
supplier.
When cleaning glass panels
use a damp cloth or leather with
washing up liquid or soft soap if
necessary; do not use washing
powders or any other substances
containing abrasives since these
substances scratch glass.
Care and maintenance
●Only clean using a damp cloth
and mild detergent, do no use
bleach or abrasive cleaners.
Assembly to be carried out by
the competent adult only.
1
●From time to time check that
there are no loose screws on this
unit.
During assembly children
should be kept away from the
product due to the potential risk of
injury.
●This product should not be
discarded with household waste.
Take to your local authority waste
disposal centre.
disposal centre.
Do not use this item if any
components are missing or
damaged.
Page 11

Components
Please check you have all the panels listed below
3
4
Top (100 x 50cm)
1
5
If you have damaged or missing components,
call the Customer Helpline:08456 400800
Metal tube L x 4 (5 x 32.5cm)
Metal tube M x 4 (5 x 8cm)
Metal rod x 4 (0.7 x 43.5cm)
Bottom (100 x 50cm)
2
Components - Fittings
Please check you have all the fittings listed below
Note: The quantities below are the correct amount to complete the assembly. In some cases more fittings
may be supplied than are required.
A
Foot x 4
Tools required
Ruler/tape
measure
Ruler - Use this ruler to help correctly identify the screws
Eye protection
0 5 10 15 20 25 30 35 40 45 50 55 60 65 70 75 80 85 90 95 100
105
110 115 120 125 130 135 140 145 150 155 160 165 170
2
Page 12

Assembly Instructions
Step 1
Step 1
Fitting the rods
a:
a: Screw in Metal rods
into Top .
1
5
5
1
b:
Note: It is recommended to
wear an eye protection.
b: Attach Metal tubes L
3 through Metal Rods
3
5 .
5
3
5
3
Page 13

Assembly Instructions
Step 2
Fitting shelf
Note: It would be useful to
ask someone to help you
at this stage.
a: With help, carefully
place Shelf onto the
unit.
Note: It is recommended to
wear an eye protection.
b: Attach Metal tubes M
4 through Metal Rods
4
5 .
5
2
a:
b:
Matt s urfac e
2
4
5
c: Use Feet to fix
Metal tubes M onto
the unit.
A
4
d: With help, carefully
turn the unit upright and
place to desired location.
Note: The maximum
loading of table top is
70kg.
Assembly is complete.
c:
A
4
d:
If you need help or have damaged or missing parts, call the
Customer Helpline : 08456 400800
4
Page 14

Matrix - Glass Coffee Table
Assembly Instructions - Please keep for future reference
610/8267
609/0708
609/ 847
Dimensions
Width - 100cm
Depth - 50cm
Height - 45cm
Important - Please read these instructions fully before starting assembly
If you need help or have damaged or missing parts, call the Customer Helpline: 08456 400800
issu e 1 4/ 19 /11
Page 15

Safety and Care Advice
Important - Please read these instructions fully before starting assembly
Check you have all the
components and tools listed on
pages 2.
Remove all fittings from the
plastic bags and separate them
into their groups.
Keep children and animals
away from the work area, small
parts could choke if swallowed.
Make sure you have enough
space to layout the parts before
starting.
Do not stand on the panels, this
could cause damage.
Assemble the unit as close to its
final position (in the same room)
as possible.
Assemble on a soft level
surface to avoid damaging the unit
or your floor.
Parts of the assembly will be
easier with 2 people.
Keep these instructions for future reference
This product complies with
BSEN14749.
Warning
Do not place very hot or very
cold items against or in close
proximity to glass surfaces unless
an adequately thick insulating
material is used to prevent such
items from coming into contact
with the glass.
Argos Ltd. MK9 2NW.
Do not strike the glass with hard
or pointed items.
We do not
recommend the use
of power drill/ drivers
for inserting screws,
as this could damage
the unit. Only use hand
screwdrivers.
Dispose of all packaging carefully
and responsibly.
Warning: The unit weighs
approximately 18.8kgs.
Please lift with care.
If a glass component is chipped
or broken, stop using the product
and consult the manufacturer
supplier.
When cleaning glass panels
use a damp cloth or leather with
washing up liquid or soft soap if
necessary; do not use washing
powders or any other substances
containing abrasives since these
substances scratch glass.
Care and maintenance
●Only clean using a damp cloth
and mild detergent, do no use
bleach or abrasive cleaners.
Assembly to be carried out by
the competent adult only.
1
●From time to time check that
there are no loose screws on this
unit.
During assembly children
should be kept away from the
product due to the potential risk of
injury.
●This product should not be
discarded with household waste.
Take to your local authority waste
disposal centre.
disposal centre.
Do not use this item if any
components are missing or
damaged.
Page 16

Components
call the Customer Helpline:08456 400800
Please check you have all the panels listed below
3
4
Top (100 x 50cm)
1
5
6
If you have damaged or missing components,
Metal tube L (5 x 34.5cm)
Metal tube M (5 x 8.5cm)
Metal rod (0.7 x 43.3cm)
Feet x 4
(5
x1.4 cm)
plastic pad
7
(5
x1.4 cm)
Bottom (100 x 50cm)
2
Ruler - Use this ruler to help correctly identify the screws
105
0 5 10 15 20 25 30 35 40 45 50 55 60 65 70 75 80 85 90 95 100
110 115 120 125 130 135 140 145 150 155 160 165 170
x
8
2
Page 17

Assembly Instructions
Step 1
Step 1
Fitting the rods
a:
Screw in Metal rods
into Top .
1
5
5
5
5
5
1
Note: It is recommended to
wear an eye protection.
b: Attach Metal tubes L
and
3
3
pad
4 pcs of
through
7
of metal rods
shown.
plastic
4 pcs
5
as
b:
7
3
7
7
3
5
5
7
3
3
5
5
3
Page 18

Assembly Instructions
Step 2
Fitting shelf
Note: It would be useful to
ask someone to help you
at this stage.
a: With help, carefully
place Shelf onto the
unit.
Note: It is recommended to
wear an eye protection.
b: Attach Metal tubes M
and
4
4
pad
7
of metal rods
shown.
2
4 pcs of
through
plastic
4 pcs
5
as
a:
b:
Matt s urfac e
2
4
4
7
5
7
5
4
7
5
4
7
5
c:
Finger tighten 4 pcs of
6
feet onto metal rods
as shown.
5
d: With help, carefully
turn the unit upright and
place to desired location.
Note: The maximum
loading of table top is
70kg.
Assembly is complete.
c:
d:
6
6
6
6
If you need help or have damaged or missing parts, call the
Customer Helpline : 08456 400800
4
 Loading...