

Page 1
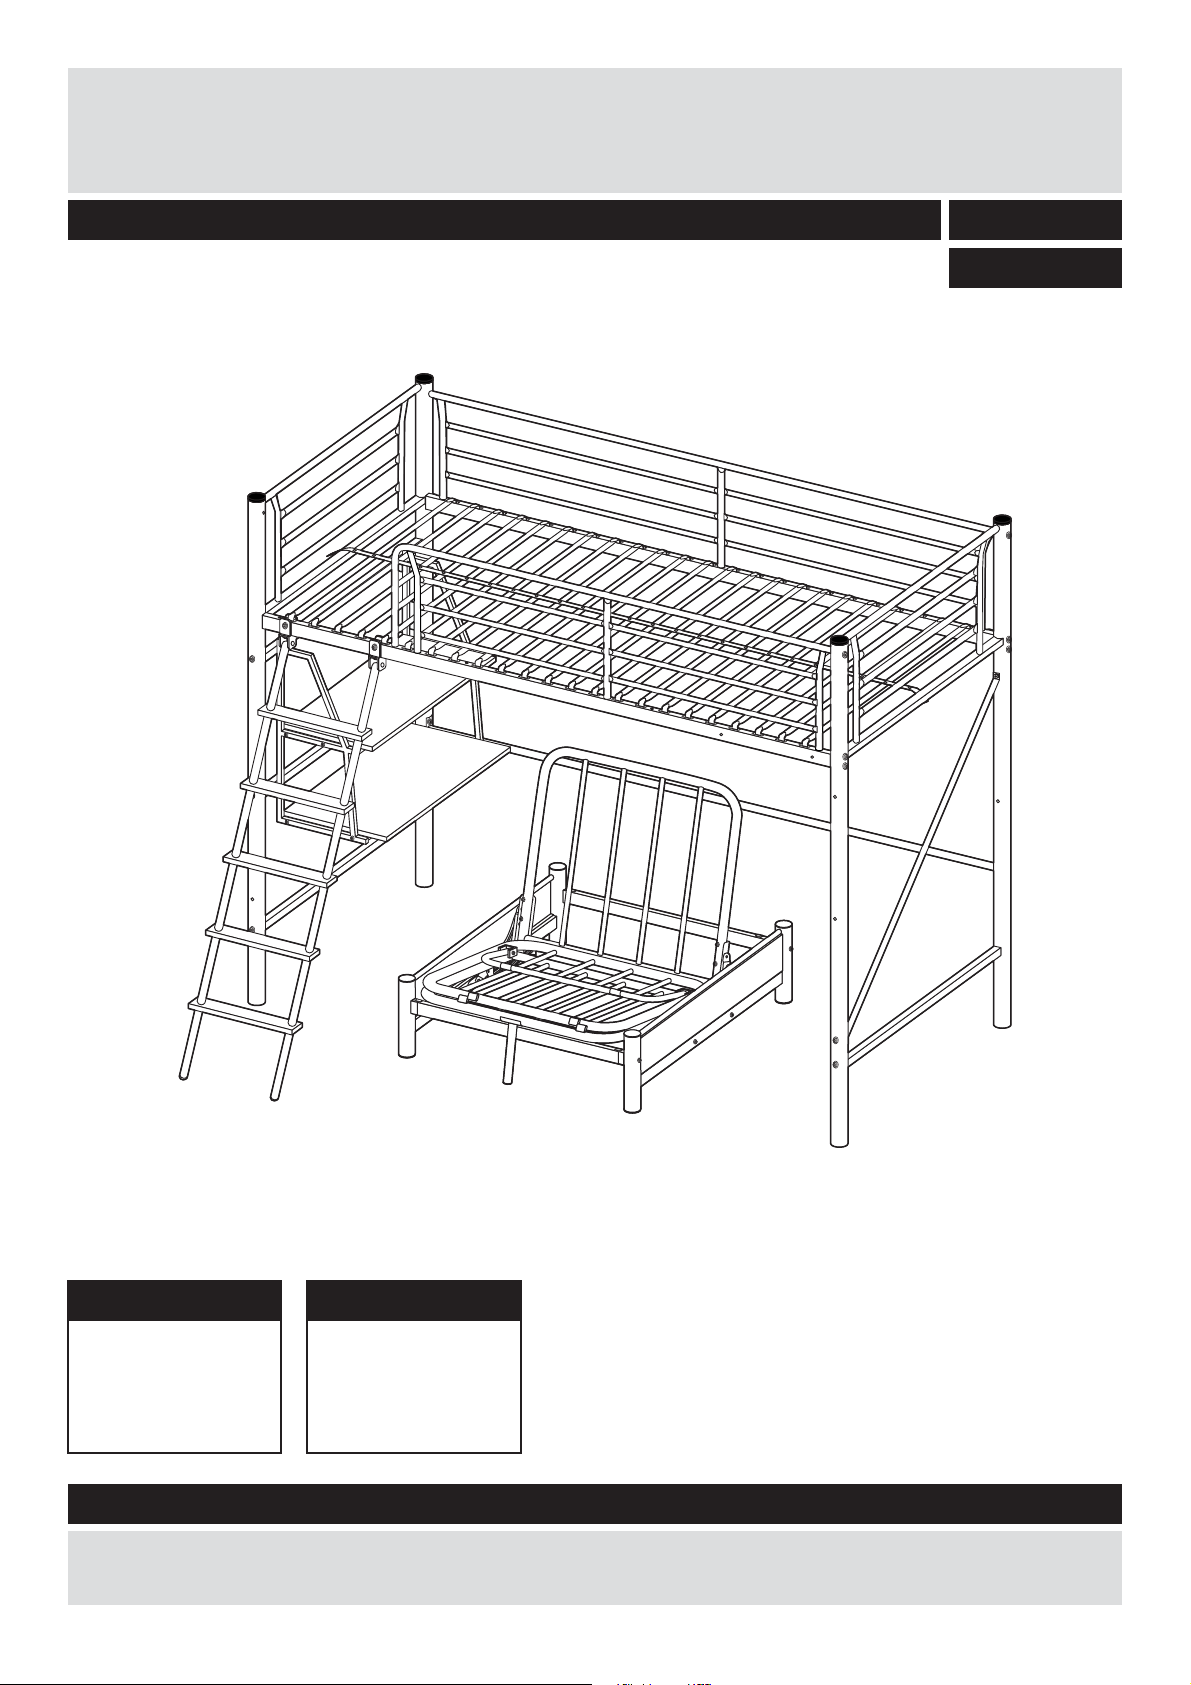
09 SITNSLEEP METAL HIGHSLEEPER FRAME
Assembly Instructions - Please keep for future reference
758/5401
758/5418
Bed unit dimensions
Width - 201cm
Depth - 154cm
Height - 179cm
Sofa unit dimensions
Width - 202cm
Depth - 85.5cm
Height - 25.5cm
Important - Please read these instruction fully before starting assembly
If you need help or have damaged or missing parts, call the Customer Helpline: 08456 400800
Issue 1 - 2/01/10
Page 2
Safety and Care Advice
IMPORTANT – READ CAREFULLY–RETAIN FOR FUTURE REFERENCE
Care and maintenance
and mild detergent, do not use
bleach or abrasive cleaners.
there are no loose screws on
this unit.
Keep These Instructions For Future Reference
This product complies with
EN 747-1:2007
Argos plc
489-499 Avebury Boulevard
Central Milton Keynes
MK9 2NW
discarded with household
waste. Take to your local
authority waste disposal centre.
if required the next
Note:
page can be cut out and used
as reference throughout the
assembly. Keep this page with
these instructions for future
reference.
1
Page 3
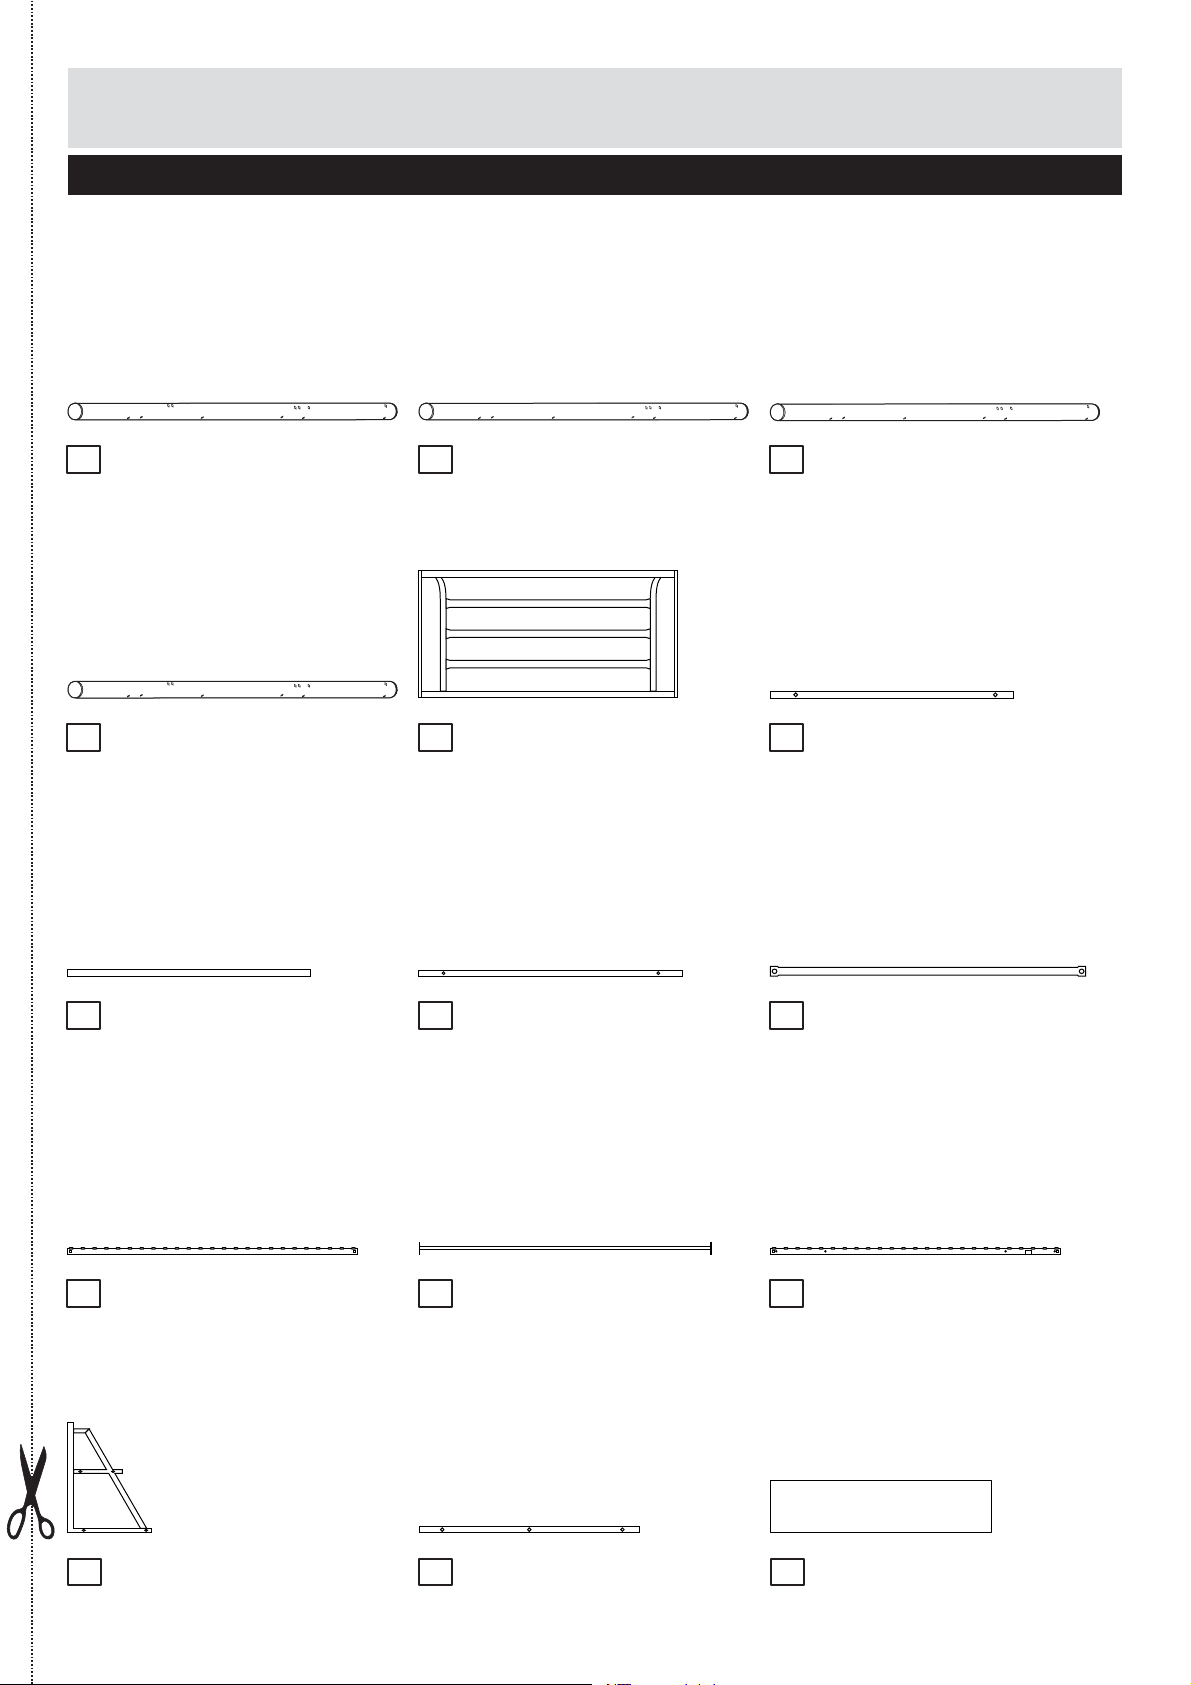
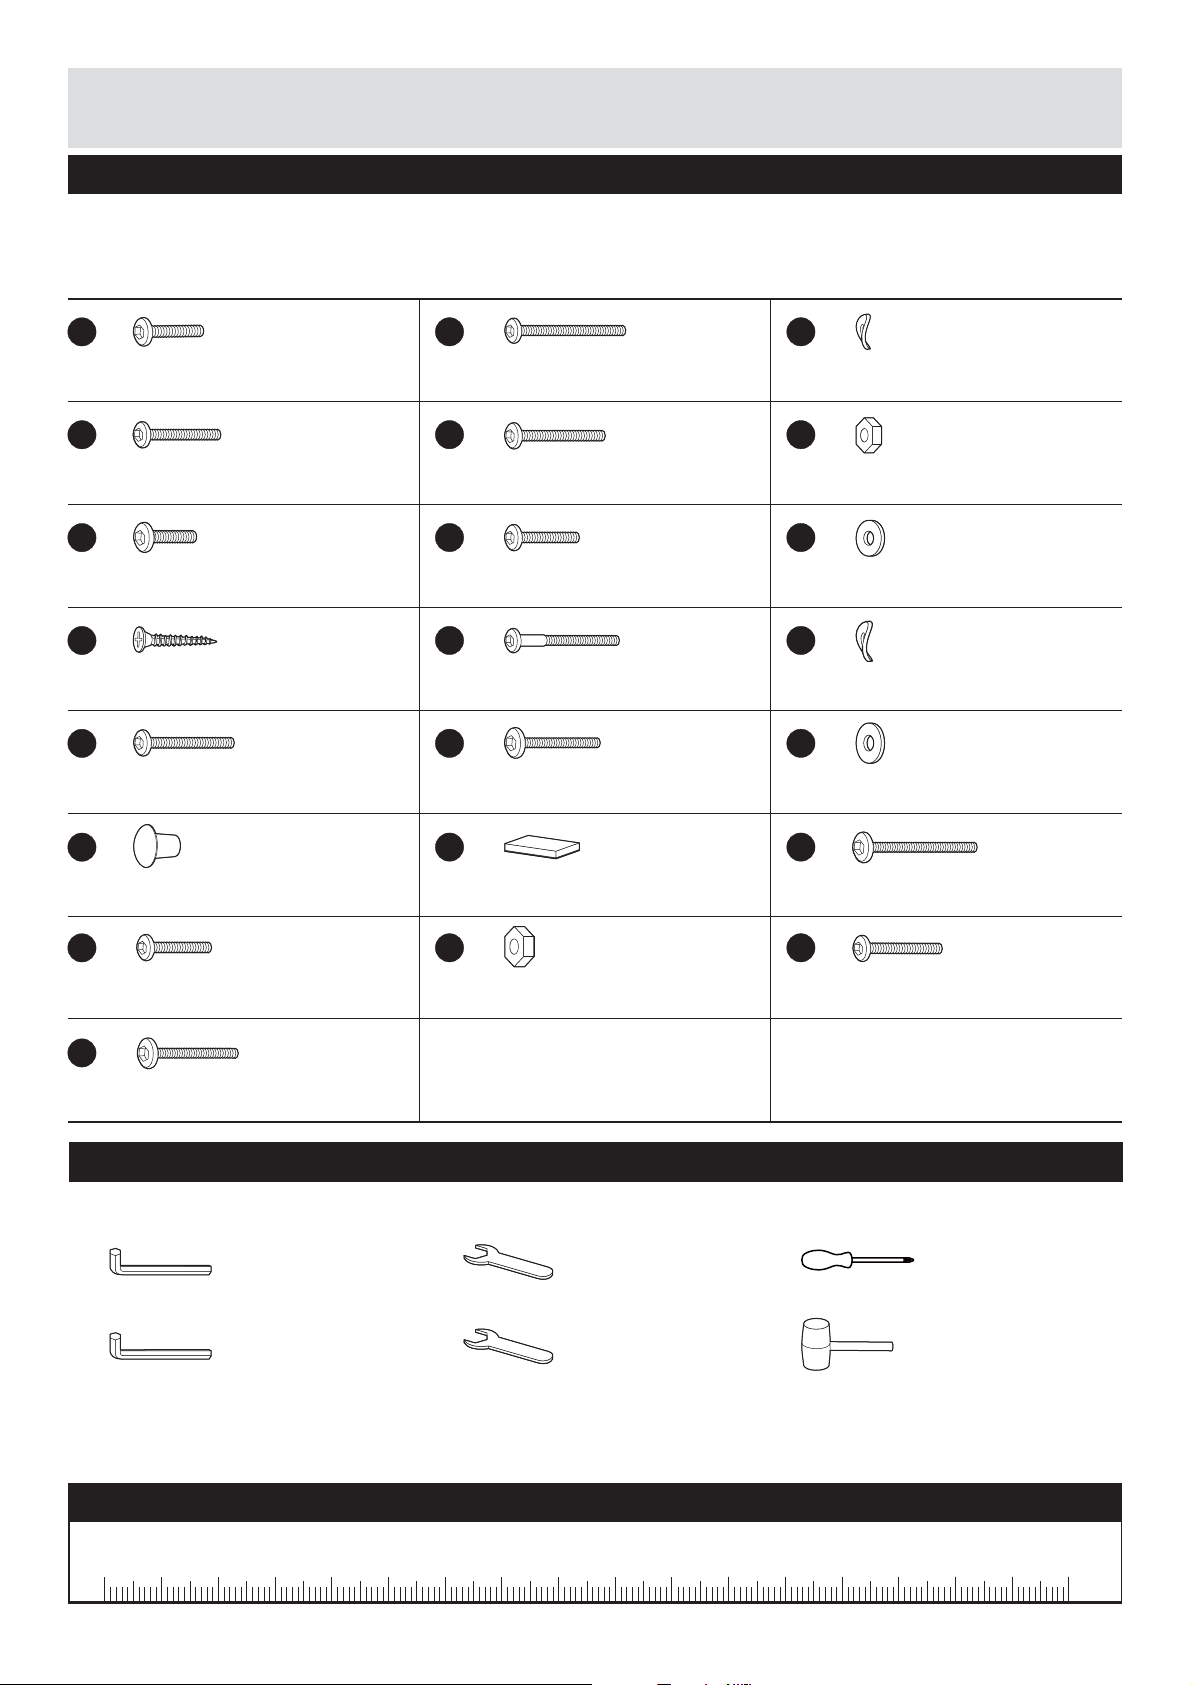
Components
Please check you have all the panels listed below
Metal leg
1
Metal legX1(179 x 4.8cm)
4
Base frame X 2(88.7x2cm) Base frameX1(129 x 3cm)
7
(179 x 4.8cm)X 1
Metal leg X 1(179 x 4.8cm)
2
HeadboardX2(89.9 x 39.4cm)
5
Filler barX2
8 9
(91x3cm)
Metal leg X 1(179 x 4.8cm)
3
Base frameX2(88.7 x 2cm)
6
Side rail (190.7x4cm)X 1
10
Desk frame X 2(57.3x30.8cm)
13 14
11
Side rail (191.3x1.9cm) liarediS1X (190.7x4cm)X 1
Base frame X 4(70.4 x 1.6cm)
12
Upper desk panelX1(70 x 28cm)
15
Argos
2
Page 4
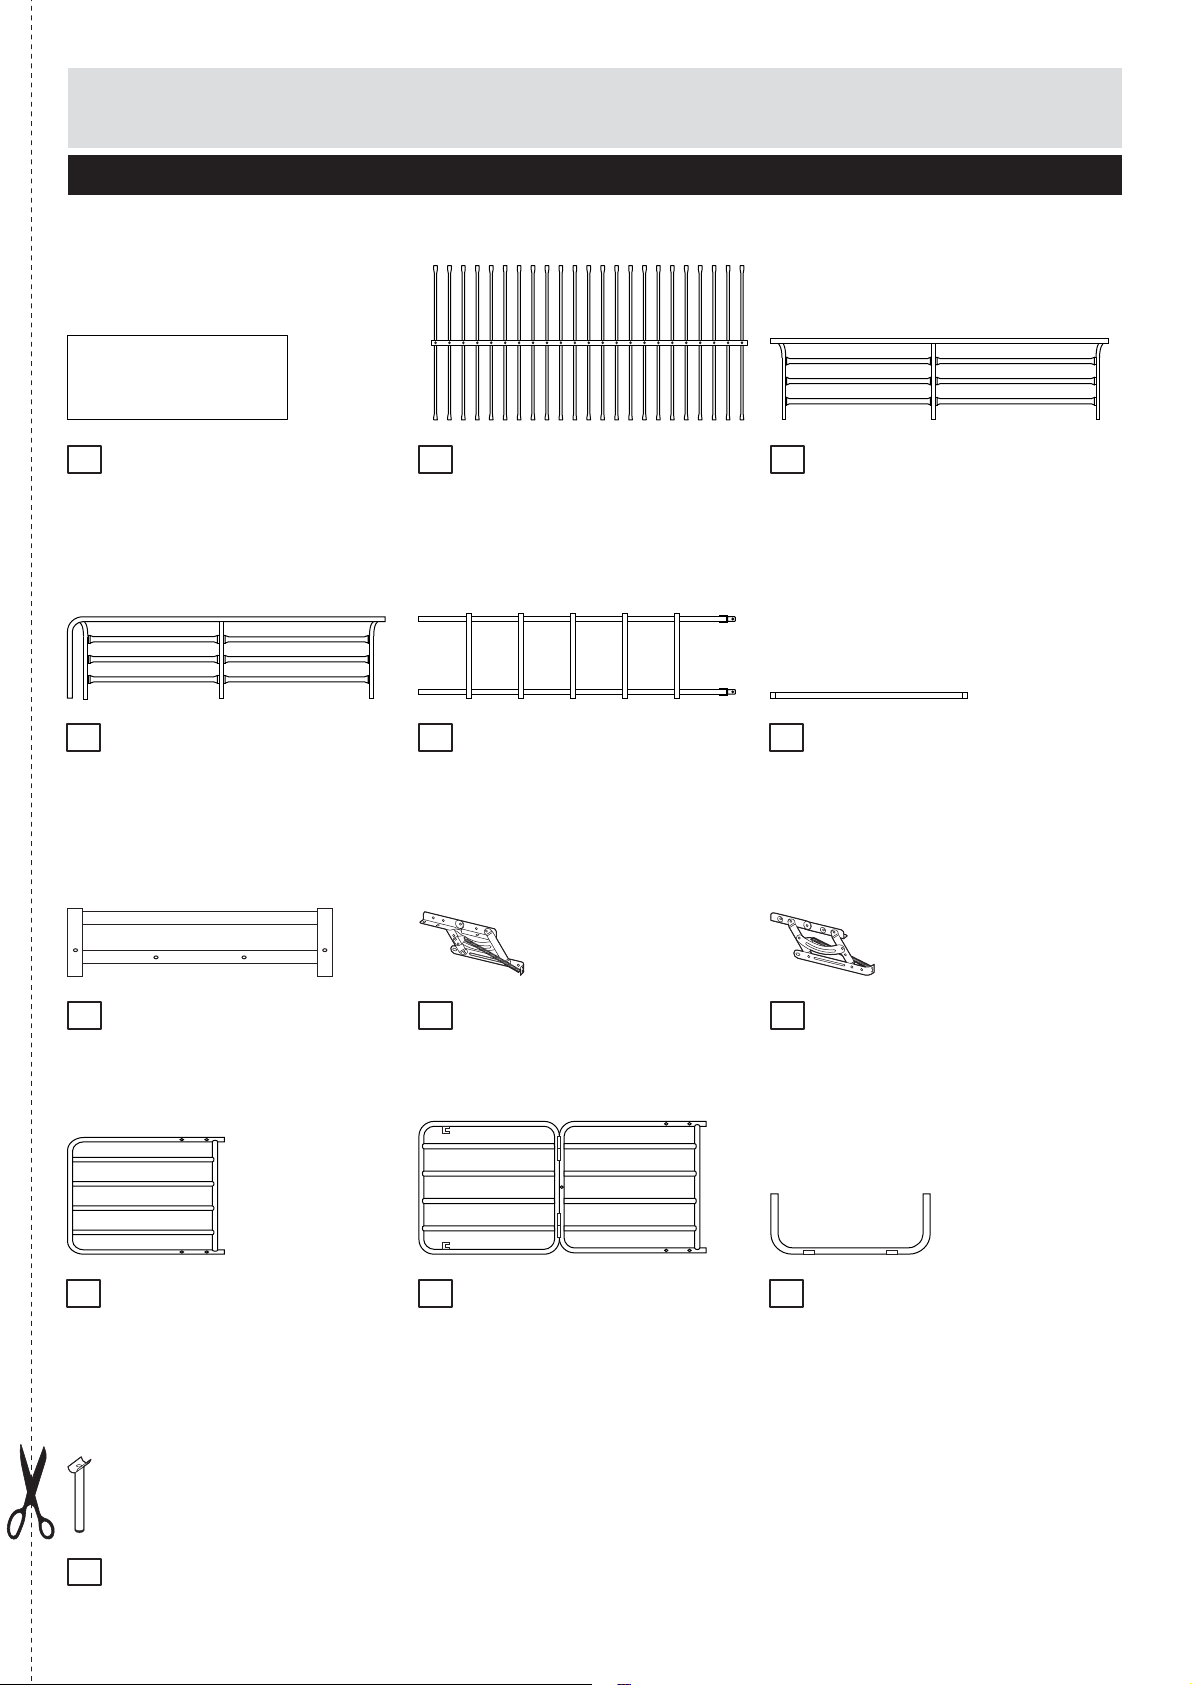
Components
Please check you have all the panels listed below
Lower desk panel X 1
16
Front safety barrierX1
19
(154x37cm)
Side frameX2(96.8x25cm)
22 23
(70x40cm)
17
20
Bed slatX1 (190.7x93.4cm)
LadderX1(152 x 37.5cm)
Spring hinge (46x16cm)X 1
Back safety barrierX1
18
(190.3x37cm)
Base frameX2(75.3 x 4cm)
21
Spring hinge (46x16cm)X 1
24
Sofa slat (71.5 x 64.5cm) talsafoS1X (130.9x71.5cm) leetstooF1X (64.6x23.5cm)X 1
25 26 27
28
3
Foot steel
(18.7 x 7cm)X 1
Page 5
If you have damaged or missing components,
Components - Fittings
call the Customer Helpline: 08456 400800
Please check you have all the fittings listed below
Note: The quantities below are the correct amount to complete the assembly. In some cases more
fittings may be supplied than are required.
A
M6 x 20mm Boltsx8
D
M6 x 45mm Boltsx6
G
M6 x 18mm Boltsx4 M6 x 35mm Boltsx14
J
25mm Self-tapping screw x 8
M
M6 x 55mm Boltsx5
P
Plastic coverx22
B
M6 x 70mm Boltsx16 Ø 216 Washersx2
E
H
K
M8 x 75mm Boltsx3
N
M8 x 55mm Boltsx1
Q
Sticky padx4
C
F
M6 Nutsx4M6 x 61mm Boltsx2
I
Ø18 Washersx19
L
Ø19 Washersx3
O
Ø 0 20Washersx2
R
M8x70mm Boltsx4
S
M8 x 32mm Boltsx4
V
M8 x 45mm Boltsx1
T
M8 Nutsx12
Tools required
Allen key M4
(included)
Allen key M5
(included)
Spanner M6
(included)
Spanner M8
(included)
Ruler - Use this ruler to help correctly identify the screws
U
M8x38mm Boltsx10
Screwdriver
(not included)
Rubber mallet
(not included)
0 5 10 15 20 25 30 35 40 45 50 55 60 65 70 75 80 85 90 95 100 110 120105 115 125 130 135 140 145 150 155 160 165 170
4
Page 6
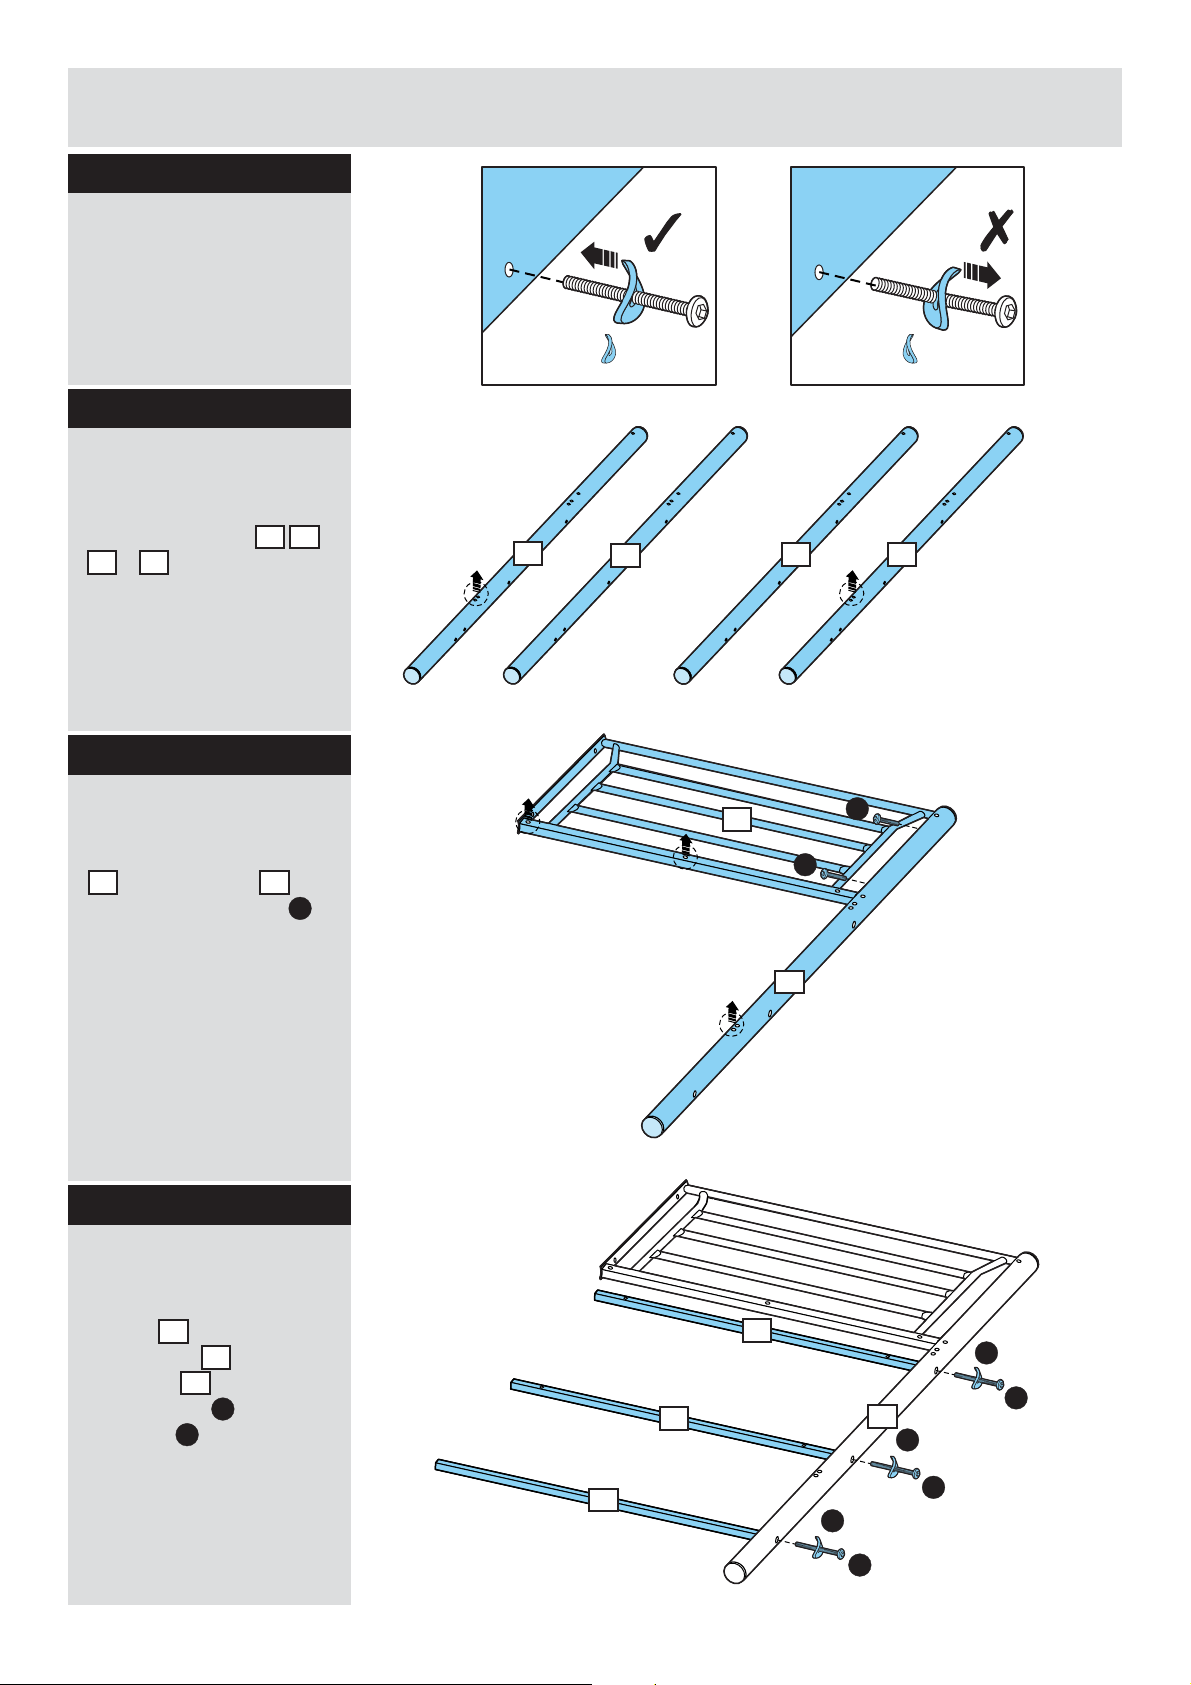
Assembly I nstructions
Step 1
Note : Pleas e ensure
theWASHER is curving
in facing the hole
befo r e assemblin g.
Step 2 - Bed unit
Preparing metal leg
Please be c areful to
select metal leg , ,
& for assmbling.
3 4
1 2
Step 3
Attaching headboard
Attach 1 pc of me tal leg
to headboard by
1 5
using 2 pcs of bolt s .
A
The washer curving in
facing the hole is correct.
1
2
The washer curving out
facing the hole is incorrect.
3
5
A
4
A
Step 4
Attaching base frame
Attach 2 pcs of base
frames and 1pc of
base fram e to the
metal leg by using 3
pcs of bolt s and
washers
6
7
1
B
.
C
1
6
C
6
7
1
C
B
C
B
B
5
Page 7

Assembly Instructions
Step 5
Attaching metal leg
Two people are required
here.
Attach metal leg to
2
the unit b y using 2 pcs
of bolts and 3 pcs of
bolts and washers
A
B
C
Step 6
Attaching filler bar
Attach filler bar to
headboard by using
3 pcs of bolts .
8
5
D
A
C
B
C
B
.
C
B
2
7
D
2
A
6
5
6
1
D
D
5
8
Step 7
Attaching headboard
Attach 1 pc of metal leg
to headboard by
3 5
using 2 pcs of bolts .
A
1
5
A
A
3
6
Page 8

Assembly Instructions
Step 8
Attaching base frame
Two people are required
here.
Attach 1 pc of base
a:
frame to metal leg
by using 1 pc of bolt
and washer .
b:
frame to metal leg
by using 1 pc of bolt ,
washer and nut .
7
C
Attach 1 pc of base
9
C F
3
B
3
E
Step 9
Attaching metal leg
Two people are required
here.
a:
b:
9
3
7
E
C
4
F
A
F
C
E
C
B
A
F
5
C
E
C
B
Attach metal leg to
4
the unit b y using 2 pcs
of bolts and 1pc of
bolt , washer and
nut and 1 pc of bolt
and washer from top
A
E
F B
C
C
to the end.
Step 10
Attaching filler bar
Attach filler bar to
headboard by using
3 pcs of bolts .
8
5
D
B
C
7
D
4
9
D
5
8
3
D
3
7
Page 9

Assembly Instructions
Step 11
Fitting side rail
Two people are required
here.
Fix side rail to the
10
unit by using4pcs of
bolts and washers
B
C
.
C
B
4
10
5
1
3
C
B
2
C
B
5
Step 12
Fitting side rail
Two people are required
here.
Fix side rail to the
unit by using4pcs of
bolts and washers
G
C
.
11
4
GC
11
1
C
G
3
2
8
Page 10

Assembly Instructions
Step 13
C
Fitting side rail
Two people are required
here.
Fix side rail to the
12
unit by using4pcs of
bolts and washers
B
C
.
B
4
3
10
12
C
B
2
1
Step 14
Attaching base frame
Attach 4 pcs of base
frames to the desk
frame by using4pcs
of bolts and washers
14
13
H
I
.
Step 15
Attaching desk frame
Attach the desk frame
to the unit by using 4
pcs of bolts and
washers .
H
I
13
14
13
I
H
I
H
14
13
14
14
14
13
14
14
I
H
14
9
Page 11

Assembly Instructions
Step 16
Fitting upper desk
panel
13
Fix the upper desk panel
to the unit by using 4
15
pcs of screws .
J
Step 17
Fitting lower desk
panel
Fix the lower desk panel
to the unit by using 4
16
pcs of screws .
J
13
J
15
J
14
16
J
13
J
14
J
Step 18
Attaching bookshelf
Two people are required
here.
Attach the bookshelf
unit to the bedframe by
using 4 pcs of bolts
and washers .
I
H
14
13
J
12
3
4
10
15
13
16
I
I
H
2
H
1
10
Page 12

Assembly Instructions
Step 19
Preparing bed slat
Spread out the bed slat
, each hook should
17
be pointed downwards
as shown.
Step 20
Attaching bed slat
17
Two people are required
here.
Insert each hook of bed
slat into the
17
corresponding holes of
the side rails and .
10 12
Step 21
Attaching side frame
Two people are required
here.
Attach back barrier
to the unit by using 2
pcs of b and
washers .
olts
L
K
18
10
17
12
2
L
K
1
4
3
18
L
K
11
2
1
3
4
Page 13

Assembly Instructions
Step 22
Fixing back safety
barrier
Fix back barrier to
18
the unit b y using 3 pcs
of bolts and washers
I
M
.
18
2
1
18
3
4
Step 23
Fixing front safety
barrier
Two people are required
here.
Fix front barrier to the
unit by using1pc of bolt
and washer and 2
K L
pcs of bolts and
washers and 1 pc of
bolt and washer
I
N O
from right side to left
side.
19
M
M
19
I
I
M
3
L
K
4
O
N
2
1
O
N
I
M
12
Page 14

Assembly Instructions
Step 24
Inserting plastic
cover
P
Insert 22 pcs of plastic
covers into unit by
hand.
P
2
P
P
10
12
4
P
P
1
3
P
P
Step 25
Attaching ladder
Two people are required
here.
Attach ladder to
a:
the side rail
Attach ladder to
b:
the unit b y using 2 pcs
of bolts , washers
and nuts .
H
F
12
20
.
20
I
a:
2
1
20
12
3
4
b:
F
I
H
13
20
Page 15

Assembly Instructions
Step 26
Assembly is complete
for the bed unit.
There are two option to
choose for assembling
the ladder and
bookshelf.
Warning:
Top of the
mattress shall
not come above
the line marked
on the bed.
OPTION 1
MAX:200mm
M
a
x
.
t
h
e
h
i
g
o
f
m
a
t
t
s
r
e
s
OPTION 2
MAX:200mm
M
a
x
.
t
h
e
h
i
g
o
f
m
a
t
t
s
r
e
s
14
Page 16

Assembly Instructions
Step 27 - Sofa unit
Attaching sticky pad
Q
Attach the sticky pad
onto both end of base
frames against the
21
friction between metal
frame.
Q
Q
Q
21 21
Q
Q
Step 28
Attaching base frame
Two people are required
here.
Fix the base frames
to the side frames by
using4pcs of bolts
and washers .
O
21
22
R
Step 29
Attaching spring
hinge
R
O
R
22
21
21
O
R
22
O
R
S
O
O
O
S
Two people are required
here.
Attach the spring hinge
to the unit by using 2
23
pcs of bolts , washers
and nuts .
O
S
T
15
21
22
23
T
T
22
21
Page 17

Assembly Instructions
Step 30
Attaching spring
hinge
Two people are required
here.
Attach the spring hinge
to the unit by using 2
24
pcs of bolts , washers
and nuts .
O
S
T
Step 31
Attaching sofa slat
21
22
22
21
24
T
O
S
U
O
Attach the sofa slat
25
onto the spring hinge on
the unit b y using 4 pcs
of bolts , washers
and nuts .
U
T
O
Step 32
Attaching foot steel
Fix the foot steel to
the sofa slat by using
2 pcs of bolts and
washers .
O
27
26
U
27
22
21
25
T
21
O
U
U
O
26
16
Page 18

Assembly Instructions
Step 33
Attaching foot steel
Two people are required
here.
Fix the foot steel to
28
the unit b y using 1 pc of
bolt and washer .
V
O
Step 34
Attaching sofa slat
V
26
O
28
U
O
Two people are required
here.
Attach the sofa slat
26
onto the spring hinge on
the unit b y using 4 pcs
of bolts , washers
and nuts .
T
OU
26
T
U
O
26
T
25
22
17
Page 19

Assembly Instructions
Step 35
Adjusting sofa seat
a: Fold sofa slat as
shown.
b: Lift sofa slat as
shown.
26
26
a:
26
25
22
b:
26
25
22
c: Lift sofa slat as
shown.
25
d: Move simultaneously
sections and to
adjust the sofa seat.
25 26
c:
26
25
21
22
d:
25
26
21
22
18
Page 20

Assembly Instructions
Step 36
Assembly is complete
for the sofa seat unit.
Step 37
Assembly is complete.
If you need help or have damaged or missing parts, call the Customer Helpline:
19
08456 400800
 Loading...