

Page 1
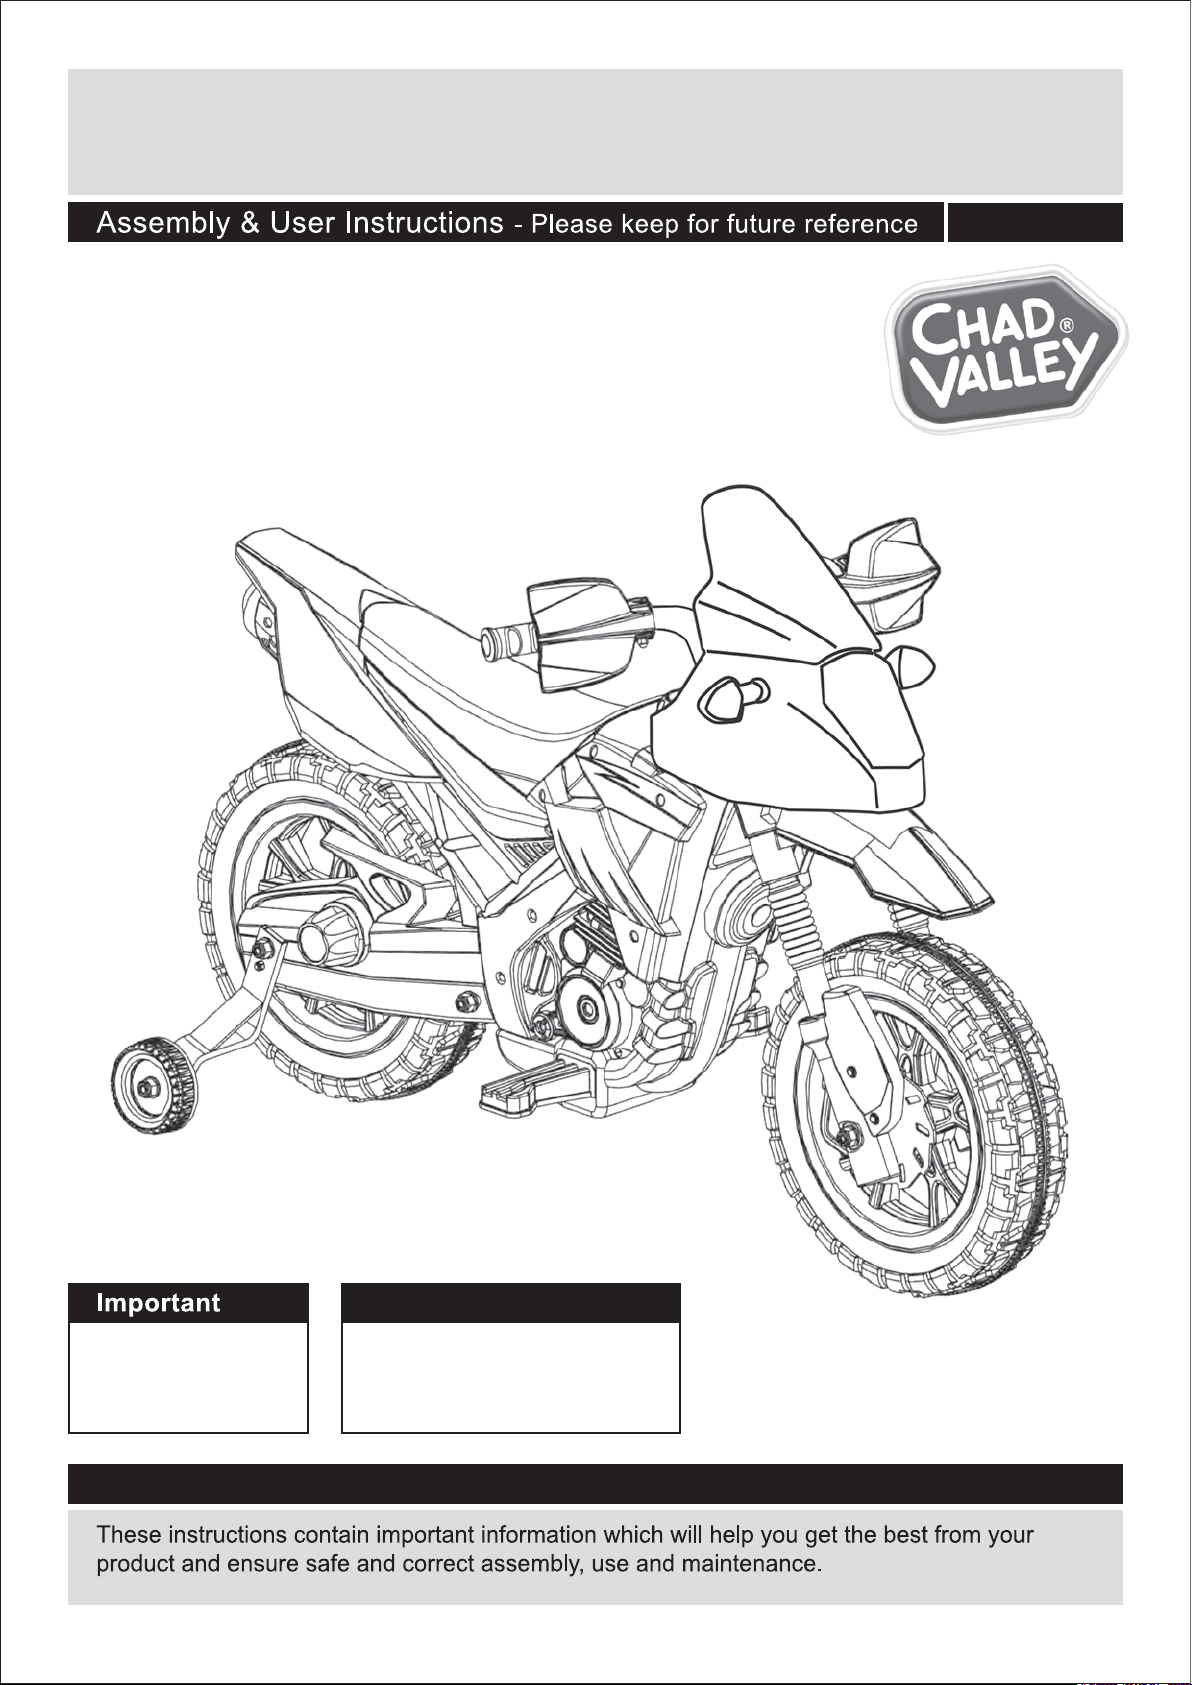
6V Ride On Motorbike
483/8797
Age: 3 Years +
Maximum user
weight: 30kg
Important
– Please read these instructions fully before assembly or use
Warning!
1. For domestic use only
2. Not to be used in traffic
3. Adult assembly required
4. Protective equipment should be worn
Page 2
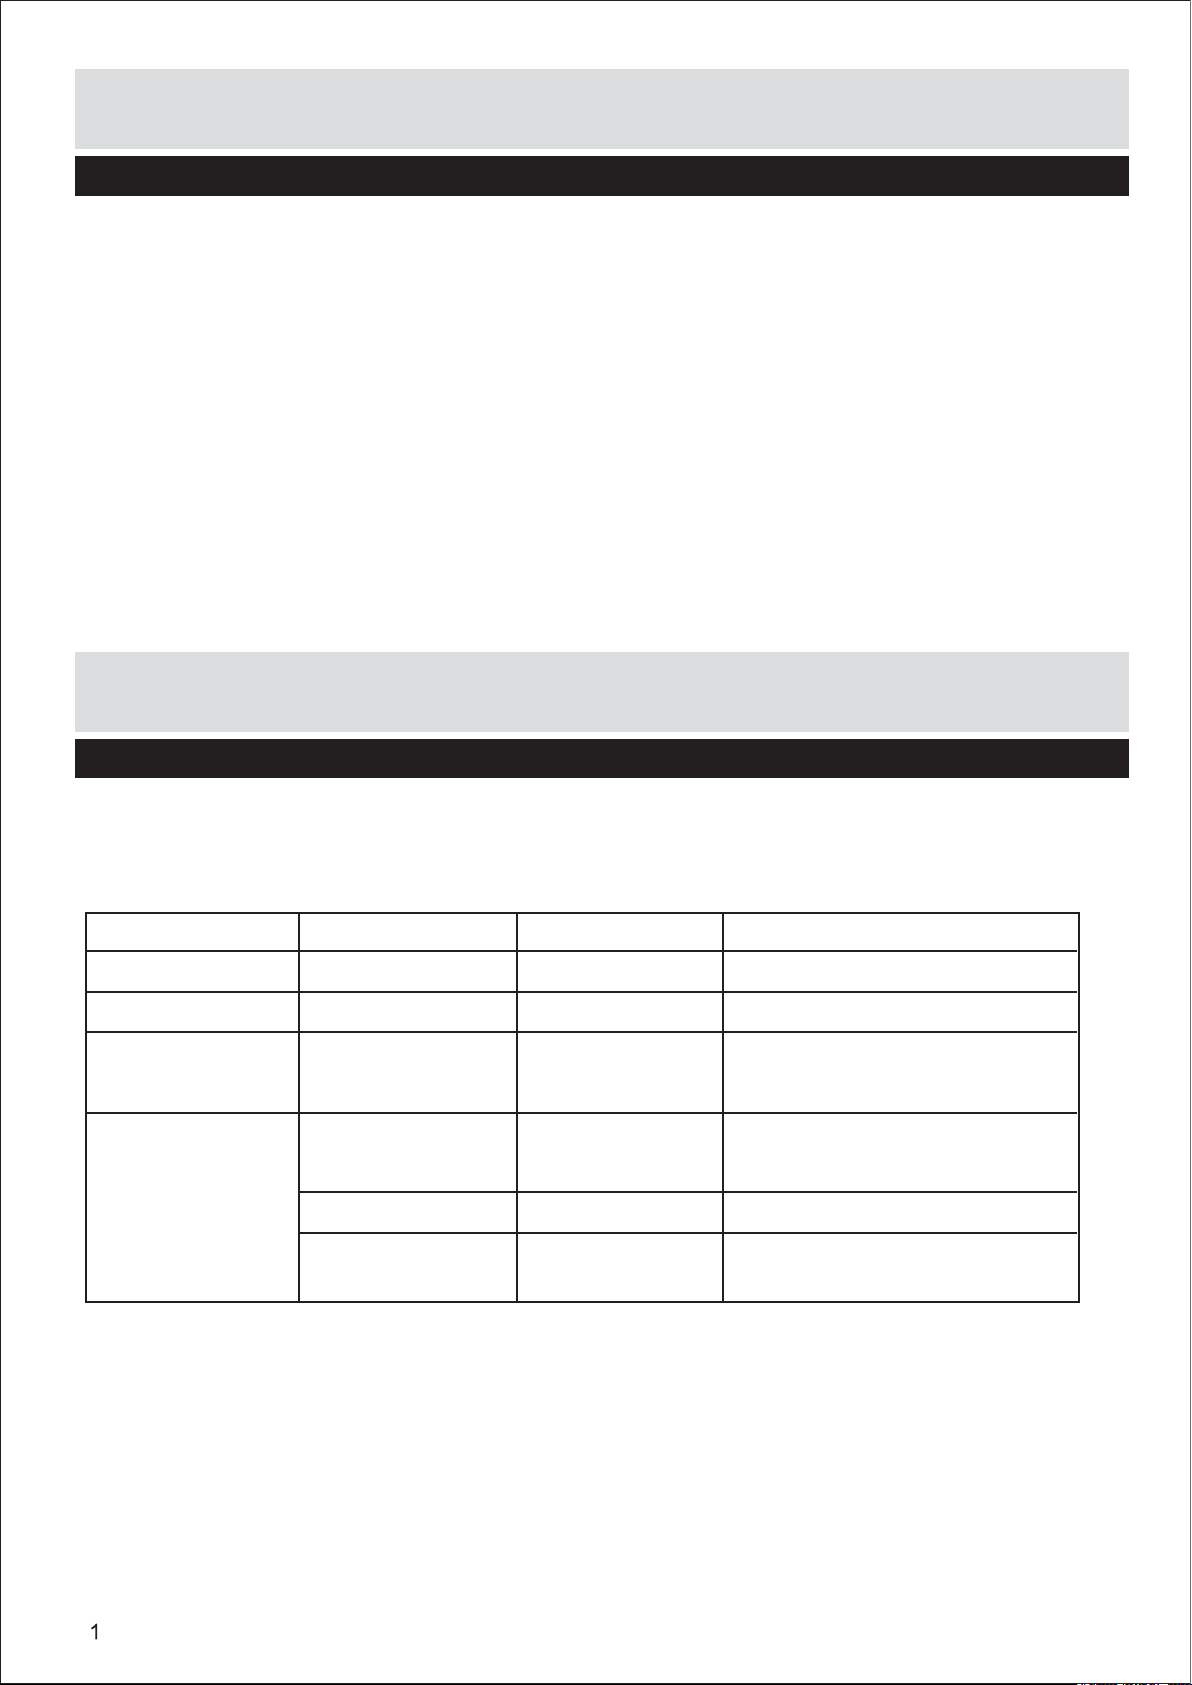
Table of Contents
Page
About Your Motorcycle 1
Safety Information 2, 3
Parts 4
Parts Layout 5
Assembly Instructions 6, 7, 8, 9, 10
User Instructions 11
Charging the Battery 12
Trouble Shooting 13
Disposal of Battery 14
Care and Maintenance 15
Contact Information 15
About Your New Motorcycle
Thank you for your purchasing one of our products, we would like your child to enjoy this product for
years to come. Keep this point in mind as you read this guide:
Suitable age: 3+ years Battery: DC 6V 4 AH x 1
Load Capacity: Under 30Kg Size of car: 1100 x 565 x 710 mm
Speed: 3Km/h Carton size: 800 x 320 x 520 mm
Material: PP Optimum Below 40°C
Temperature:
Charger: Input: shown on Charging time : 8-12 hours, at most 20 hours
the charger
Output: DC 6V Fuse: F5A, Self-resetting
Current: DC 0.5A Operating life: 12 to 18 months
(Performance may vary.)
Page 3
Assembly & User Instructions - Please keep for future reference
General safety
• Where products need assembly they must
always be assembled by an adult.
An adult should review the product prior to use to
ensure there are no loose, broken or damaged
parts. If the product becomes damaged/ broken
stop using immediately.
• Remove protective material and poly bags and
dispose of them responsibly before giving the
assembled product to your child.
• Remember to retain these instructions for future
reference.
• Please contact your retailer for information
about end-of-life recycling under the
EU WEEE regulations.
Positioning
Before use
• Important Information. You must charged and
connect the battery before first use. Please refer
to 'charging the battery' page 12.
During use
• The toy should be used with caution since skill
is required to avoid falls or collisions causing
injury to the user or third parties.
• The maximum rider weight capacity for this
product is 30Kg do not overload.
• Adult supervision is highly recommended when
children play with wheeled toys. Safety is your
concern.
• Do not allow the child to ride with bare feet or
without suitable footwear.
• Do not allow your child to ride at night or in
poor light conditions.
• Do not let your child play near steps, swimming
pools / spas or other sources of water, on slopes,
on streets or around cars, even if parked on
your own property.
• It is prohibited to drive/use this product on the
public highway.
• This product is designed to be used on smooth
surfaces and should not be used on soft ground
or in the rain or snow.
• Ensure the child keeps clothing, hands, hair,
fingers and feet away from moving parts.
• The use of protective gear including approved
helmets, gloves and pad is recommended.
• Store this product at room temperature; do not
leave it outside.
• Never let any child play with the battery or
charger at any time, or let them charge the
product.
• Do not use if product is faulty or damaged.
• Do not tamper with the battery or electrical
parts inside the product.
Page 4

Assembly & User Instructions - Please keep for future reference
Charging the 6v battery
• All charging and re-charging must be carried
out by an adult.
• Do not attempt to use the product while it is
being charged.
• Charging should be carried out under cover
and in a well-ventilated area.
• Always ensure the charger is switched off
before connecting it to the product/battery.
• Always ensure the charger is plugged into a
wall outlet. Do not use an extension.
• Do not charge near sources of potential
sparks, fires or flames or where flammable
gases, liquids and materials are stored.
• During charging the battery and the charger
may get hot.
• Only charge the battery for a maximum time
of 8 - 12 hours.
Charging the 6v battery (contd)
• Battery chargers used with the toy are to be
regularly examined for damage to the cord, plug,
enclosure and other parts, and in the event of
such damage, hey must be replaced
immediately.
• Only use the battery supplied with this product.
The use of other batteries may cause damage
to the motor, charger and subsequent wiring,
which could lead to fire and/or explosion.
• Exhausted batteries are to be removed from
the toy.
• Always ensure that you connect the battery
with the correct polarity.
• Never short-circuit the terminals of the battery,
or any subsequent wiring.
• Never bypass or bridge a broken/blown fuse
or circuit breaker and always replace with the
same type/value and model.
• Do not leave the charger plugged into an outlet
or connected to the product/battery once
charging is completed.
• Never attempt to recharge a fully charged or
partially used battery for an extra boost.
• Do not over-charge; this action will significantly
shorten battery life.
• Always ensure that once the battery becomes
discharged/flat that you re-charge for the
recommended time. Failing to do so will
significantly shorten battery life.
• Charging the product below 4oC (40oF) or
above 40oC (104oF) will decrease the battery
life significantly.
• Only use the charger supplied with the product.
The use of other chargers may cause damage
to the battery and/or cause explosion.
Page 5
Parts
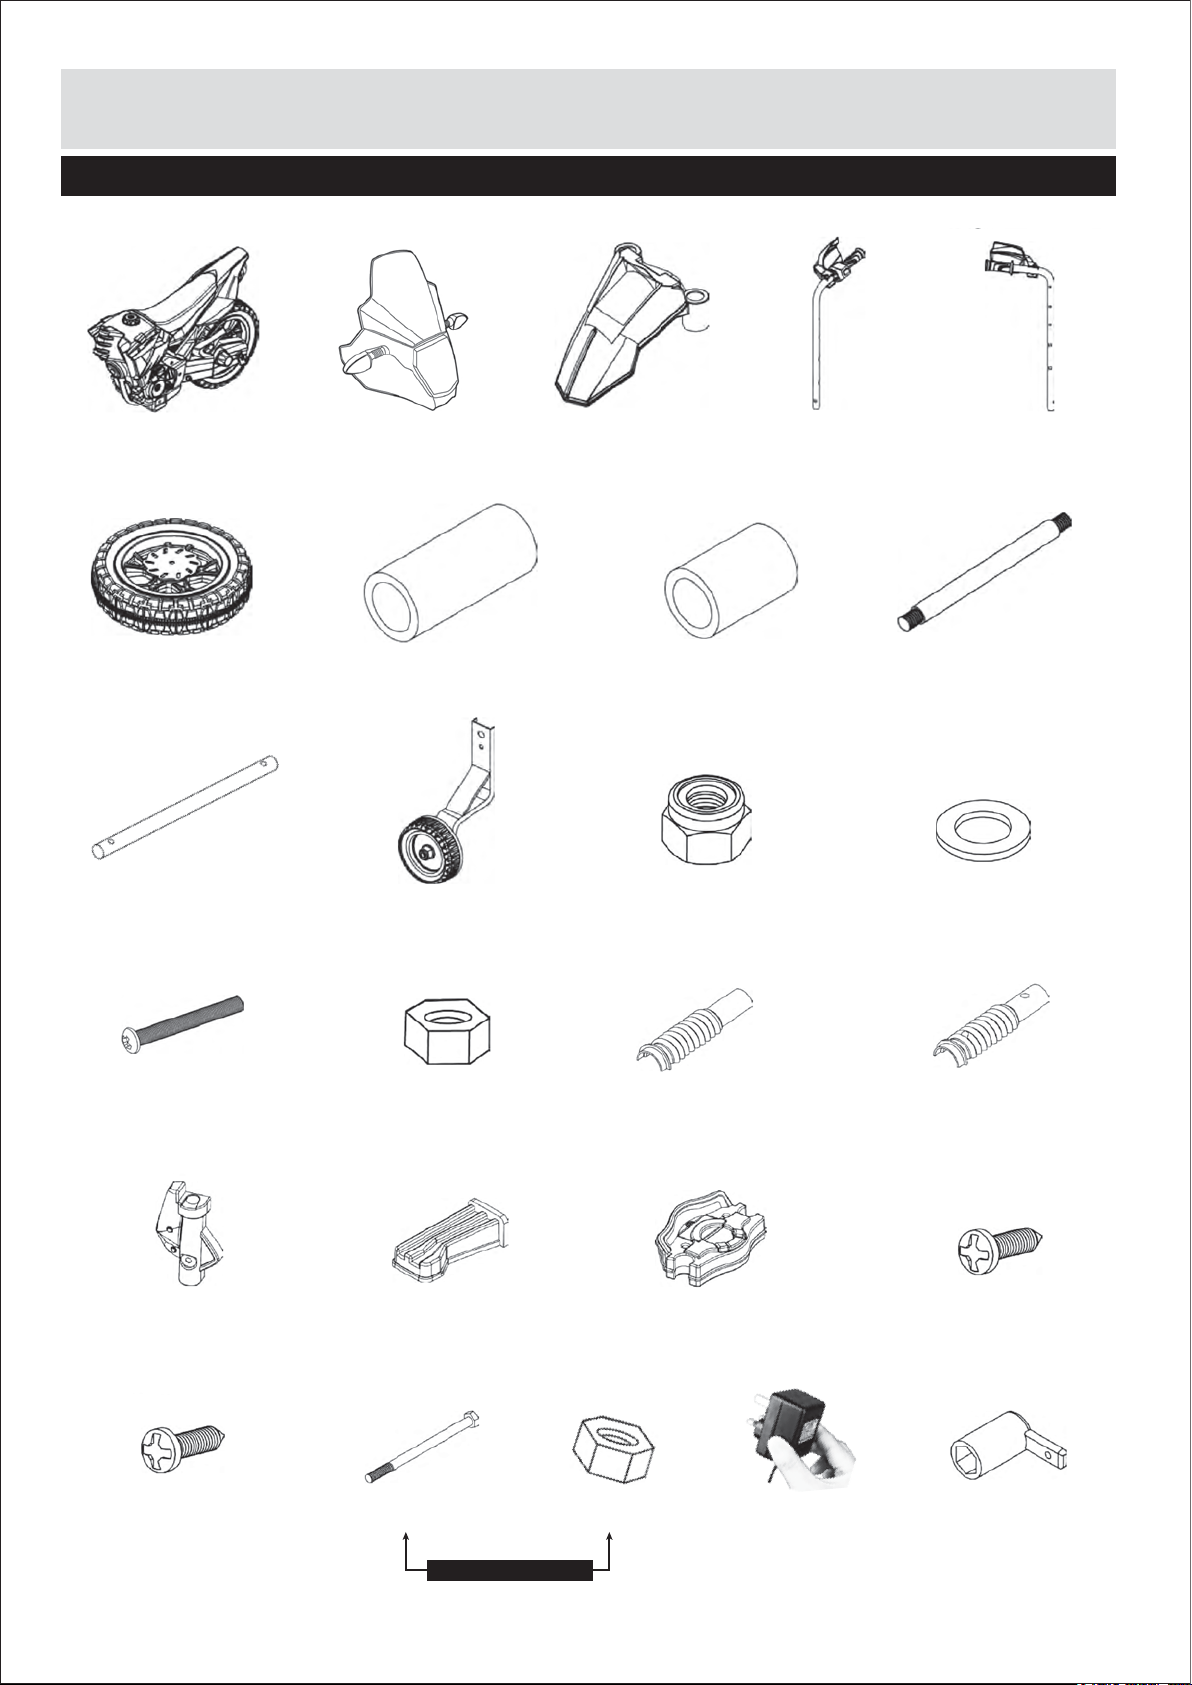
Please check you have all the parts and fittings listed below
1. Vehicle body 2. Head cover 3. Mudguard 4. Right handle
6. Wheel 8. Short shaft sleeve
10. Central axis 11. Training wheel (2)
7. Long shaft sleeve
(on front axle)
(on front axle)
12. M8 Nut (4)
(on front axle)
5. Left handle
9. Front axle
(on vehicle body)
13. M10 Washer (6)
(4 on front axle,
2 on rear axle)
14. M5X30 Bolt (6)
(4 on head cover,
2 on rear axle)
18. Decorative cover (2) 19. Pedal (2) 20. Sound effect box
22. M4X16 screw (2)
15. M5 Nut (6)
(4 on head cover,
2 on rear axle)
23. M8X122 Bolt
Assemble together
16. Front shockproof
sleeve (2)
24. M8 Nut 25. Charger 26. Spanner (2)
4
17. Back shockproof
sleeve (2)
21. M4X12 screw (6)
Page 6
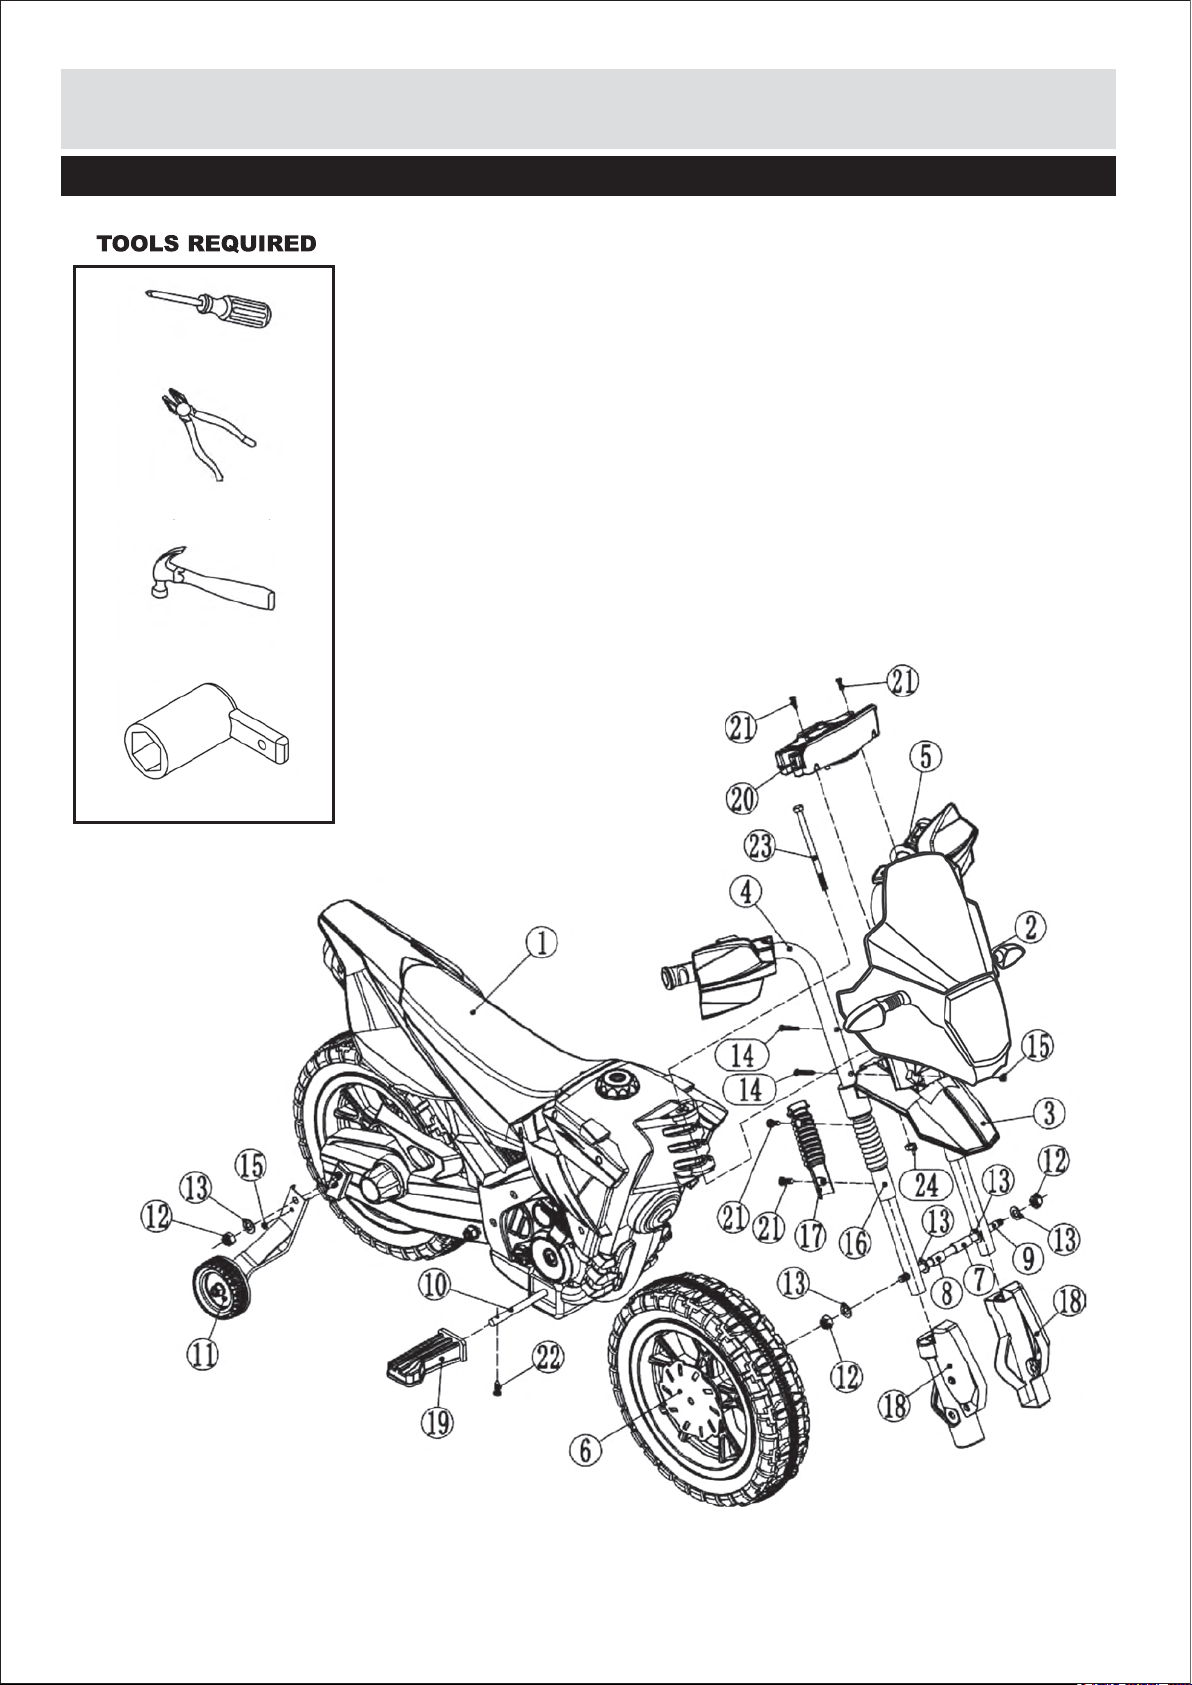
Parts Layout
Please check you have all the parts and fittings listed below
Screwdriver (not included)
Pliers (not included)
Hammer (not included)
Spanner
5
Page 7
Assembly Instructions
• Your new motorcycle requires adult assembly. Please set aside at least 50 minutes for assembly.
• Please identify all parts before assembly and save all packaging material until assembly is
complete to ensure that no parts are discarded.
• Assembly tools required: screwdriver (not included), pliers (not included), hammer (not included)
and spanner.
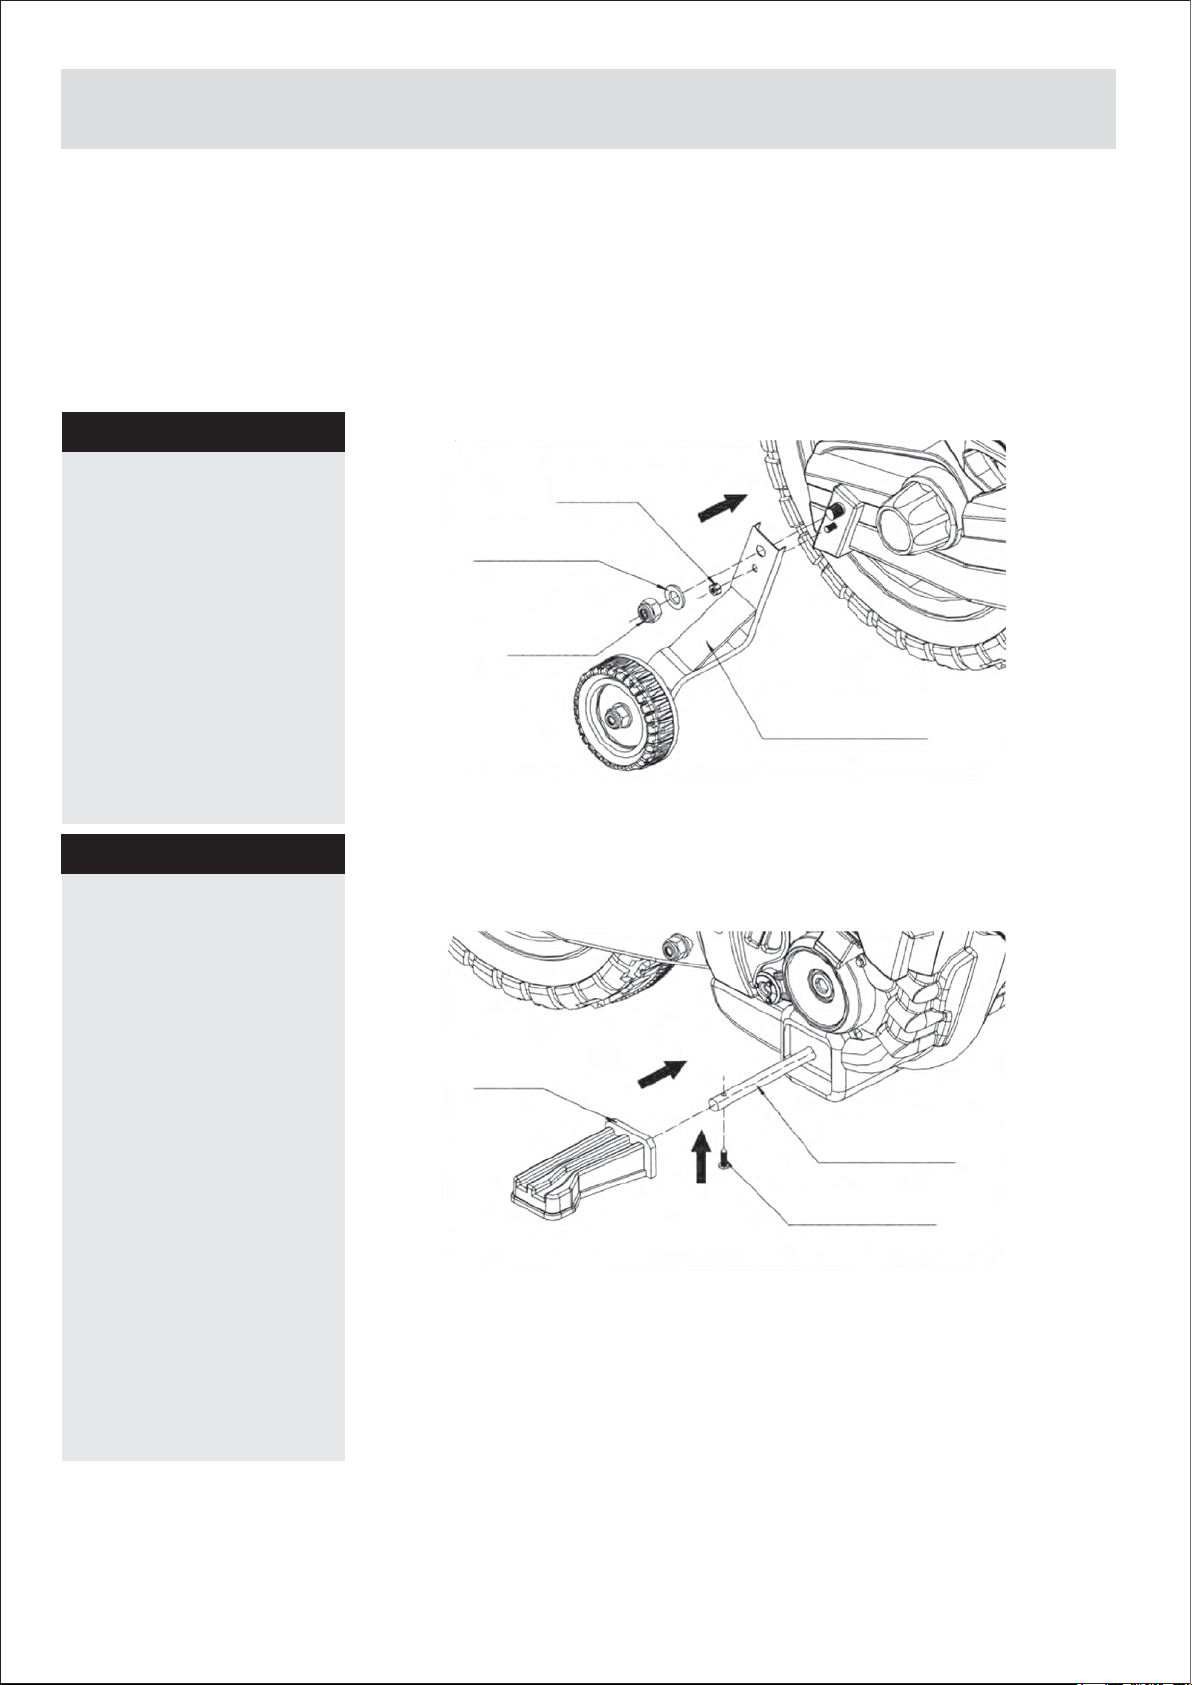
Step 1
Remove nuts (15) and
nuts (12) and one washer
(13) from the side of
the rear axle.
Install the training wheel
(11), and then loaded on
the washer (13), tighten
the nut (12).
Fix another wheel on
the other side
Step 2
As shown in the picture,
pass the axel through
the body.
Install the pedal (19),
and fasten with the
screws (22). Repeat this
action for both pedals.
15. M5 Nut
13. M10 Washer
12. M8 Nut
11. Training wheel
19. Pedal
10. Central axis
22. M4X16 screw
6
Page 8
Assembly Instructions
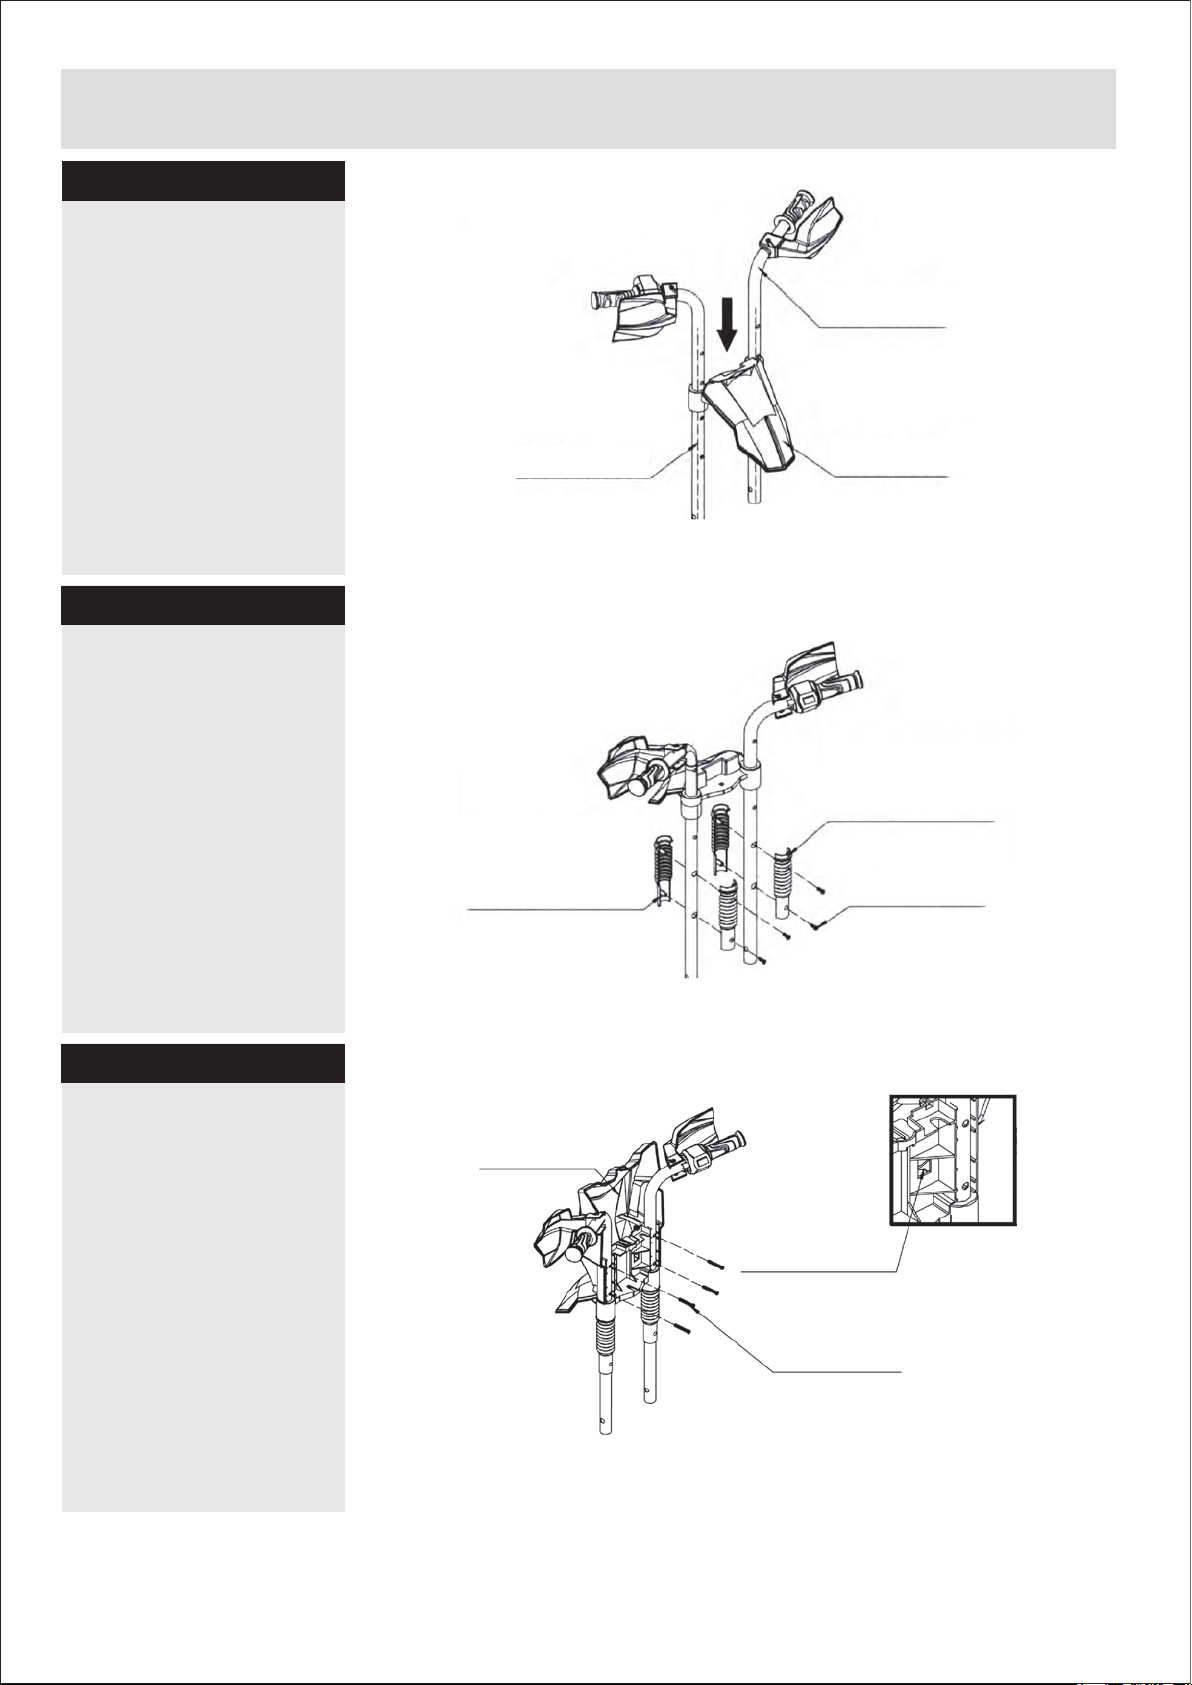
Step 3
Insert the left hand (5)
and the right handle (4)
in to the mudguard (3)
as show in the image.
5. Left handle
Step 4
As shown in the
picture, install the
front (16) and back
shockproof sleeves (17)
and then fasten together
with the screws (21)
as shown.
4. Right handle
16. Front shockproof
sleeve
3. Mudguard
17. Back shockproof
sleeve
21. M4X12 screw
Step 5
Remove the bolt
from the head cover (2).
Install the head cover (2)
to the corresponding
place,and fasten
with the bolts (14).
Put the wire plug
through the
threadingholes.
7
2. Head cover
Threading hole
14. M5X30 Bolt
Page 9
Assembly Instructions
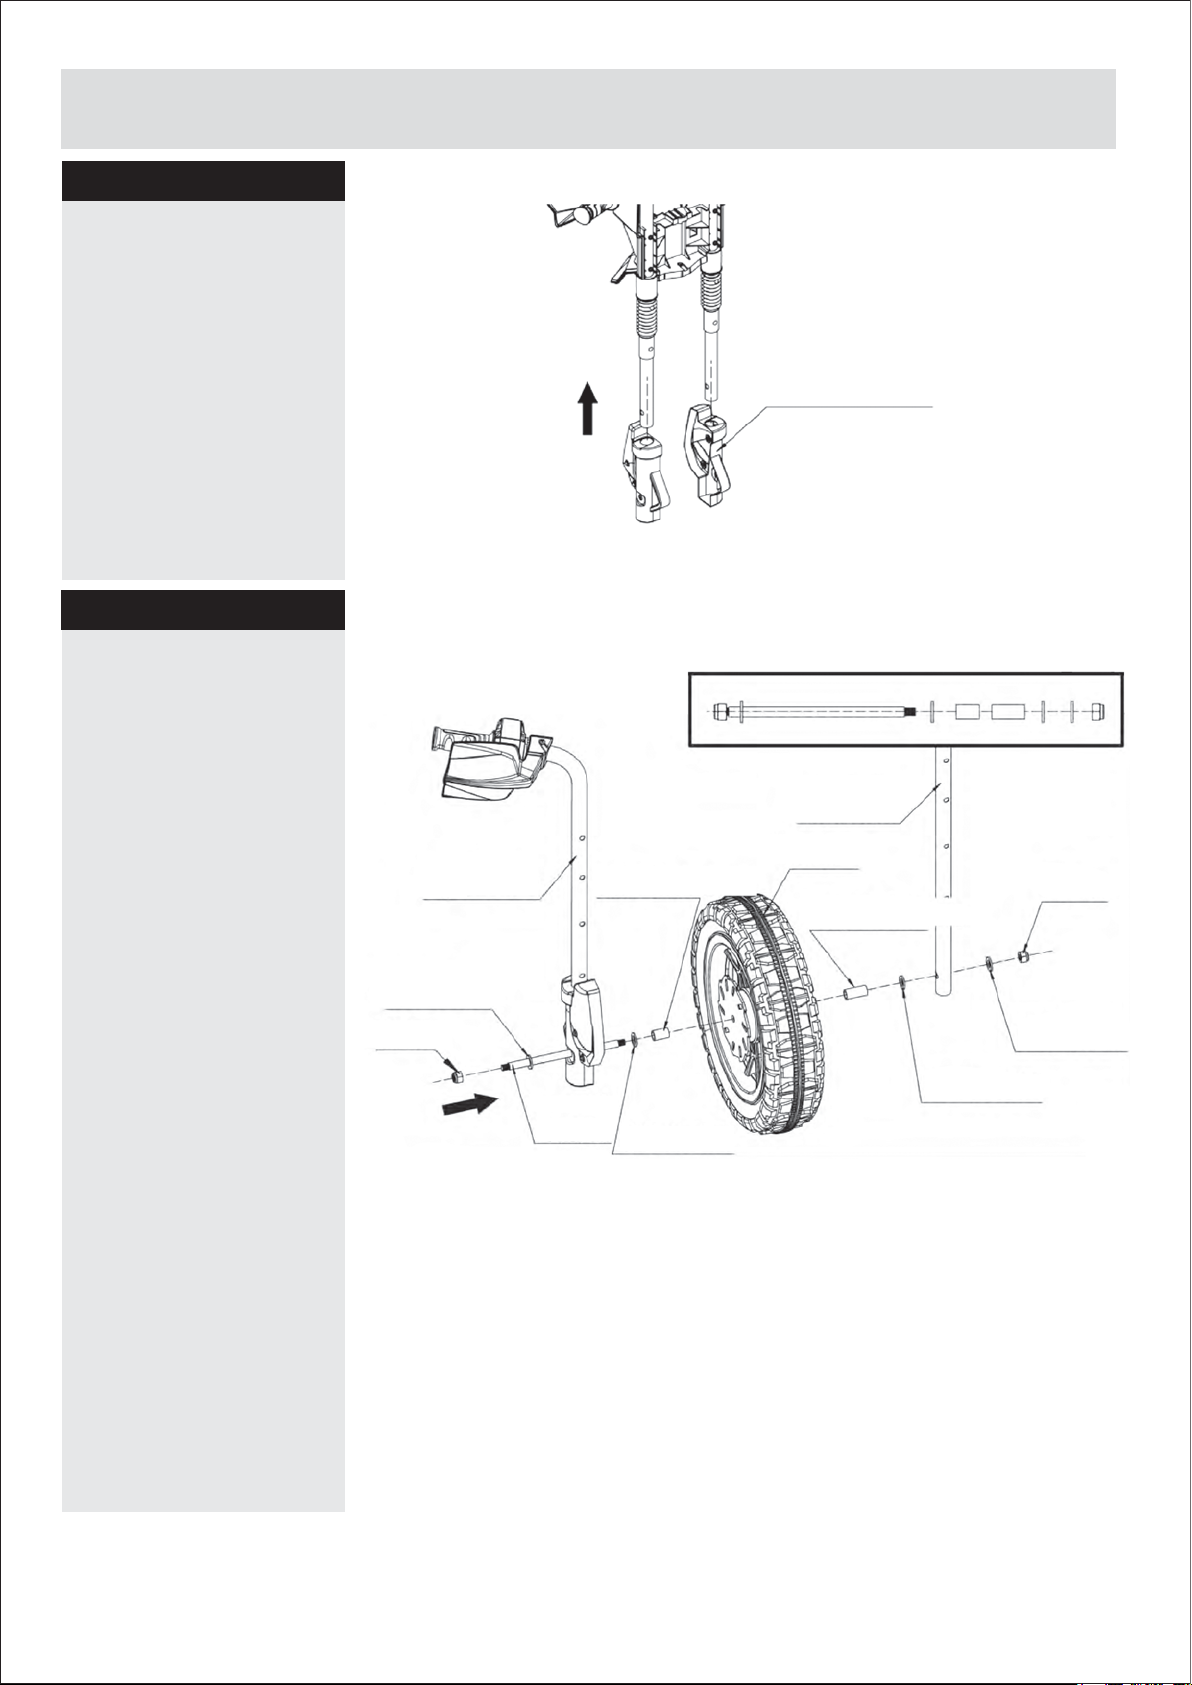
Step 6
Install the decorative
cover (18) as shown.
Step 7
Disconnect the front
axle parts.
18. Decorative cover
Assemble the wheel (6)
and handle bars (5) as
shown.
Ensure the posision
of the washers (13)
and shaft sleeve (7,8)
follow the illustration.
4. Right handle
13. M10 Washer
12. M8 Nut
9. Front
axle
5. Left handle
6. Wheel
8. Short shaft sleeve
7. Long shaft sleeve
13. M10 Washer
12. M8 Nut
13. M10 Washer
13. M10 Washer
8
Page 10
Assembly Instructions
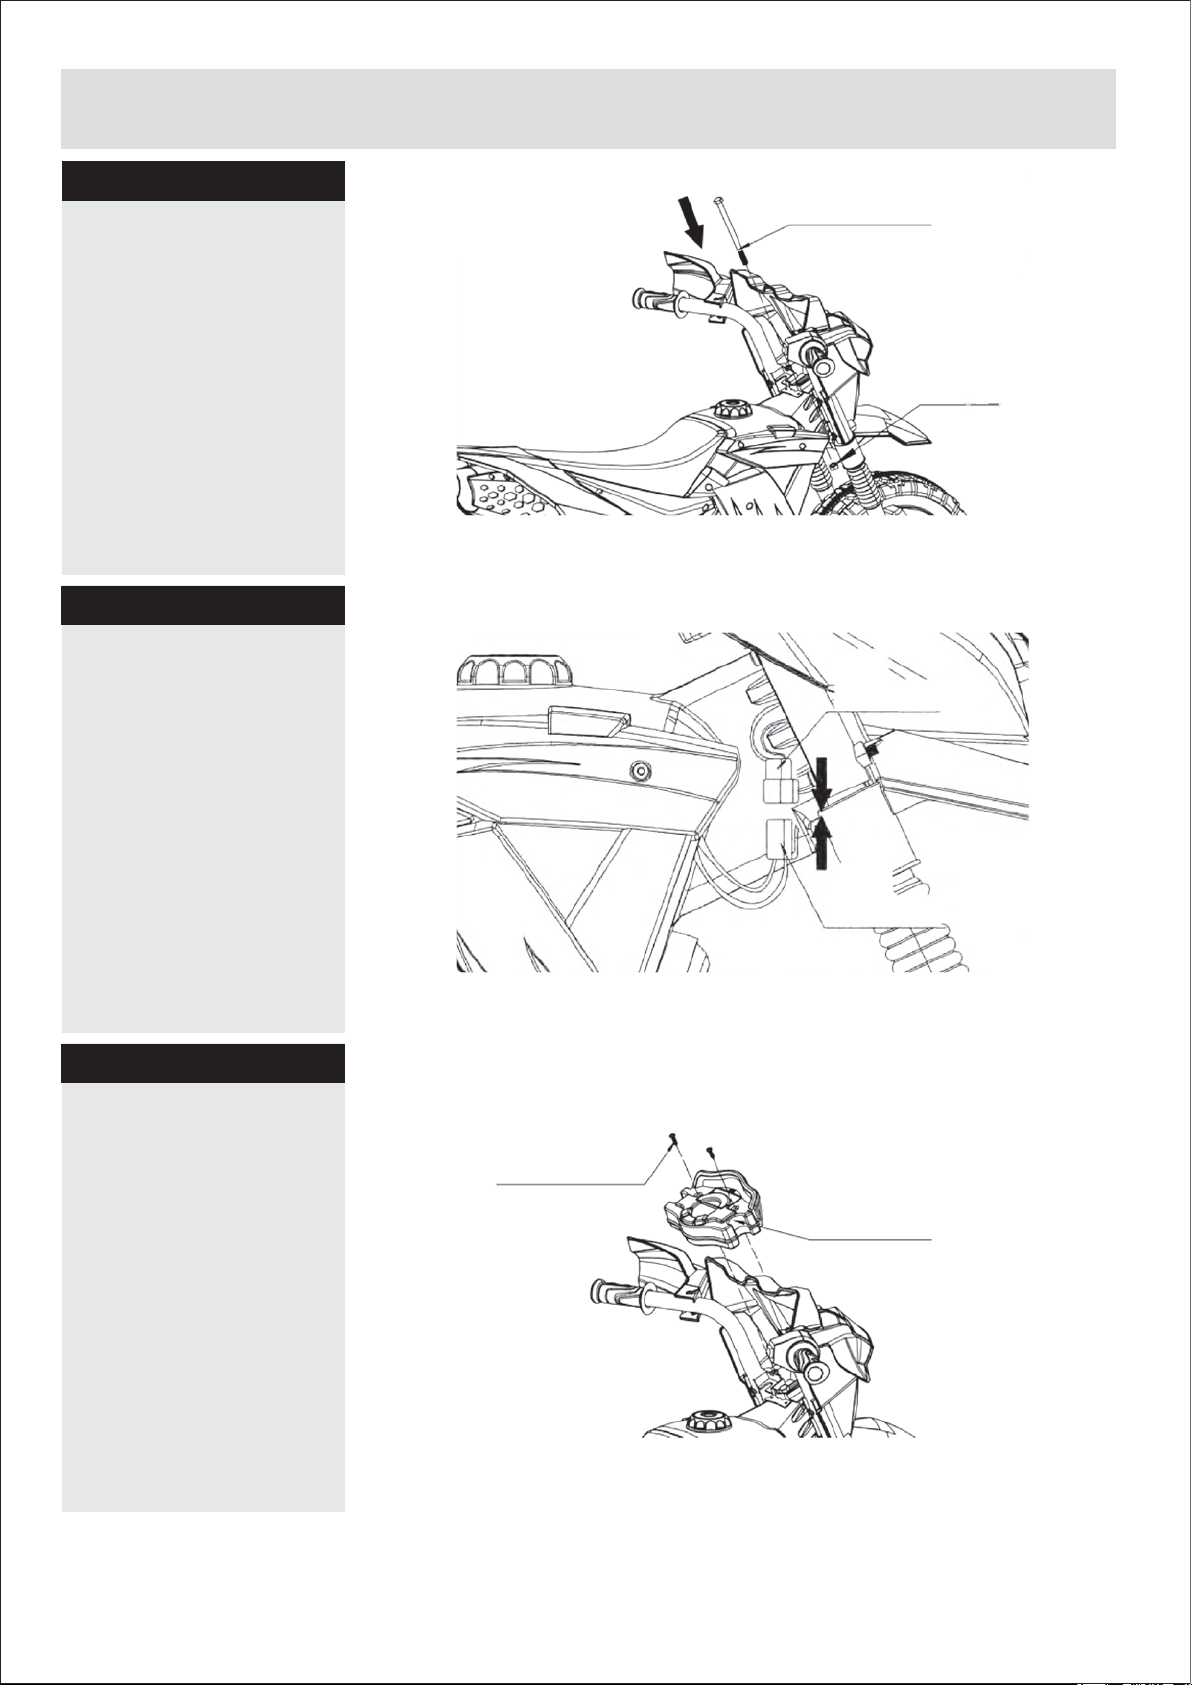
Step 8
Put the bolt through
the headstock, as
shown in the image,
and tighten the nut (12).
Step 9
23. M8X122 Bolt
12. M8 Nut
Plug the wire
connector
into the motor
connector.
Step 10
Install the sound
effect box (20) to the
corresponding
connection point.
Secure in place with
the screws (21),
as shown.
Wire
connector
Motor
connector
21. M4X12 screw
20. Sound effect box
9
Page 11
Assembly Instructions
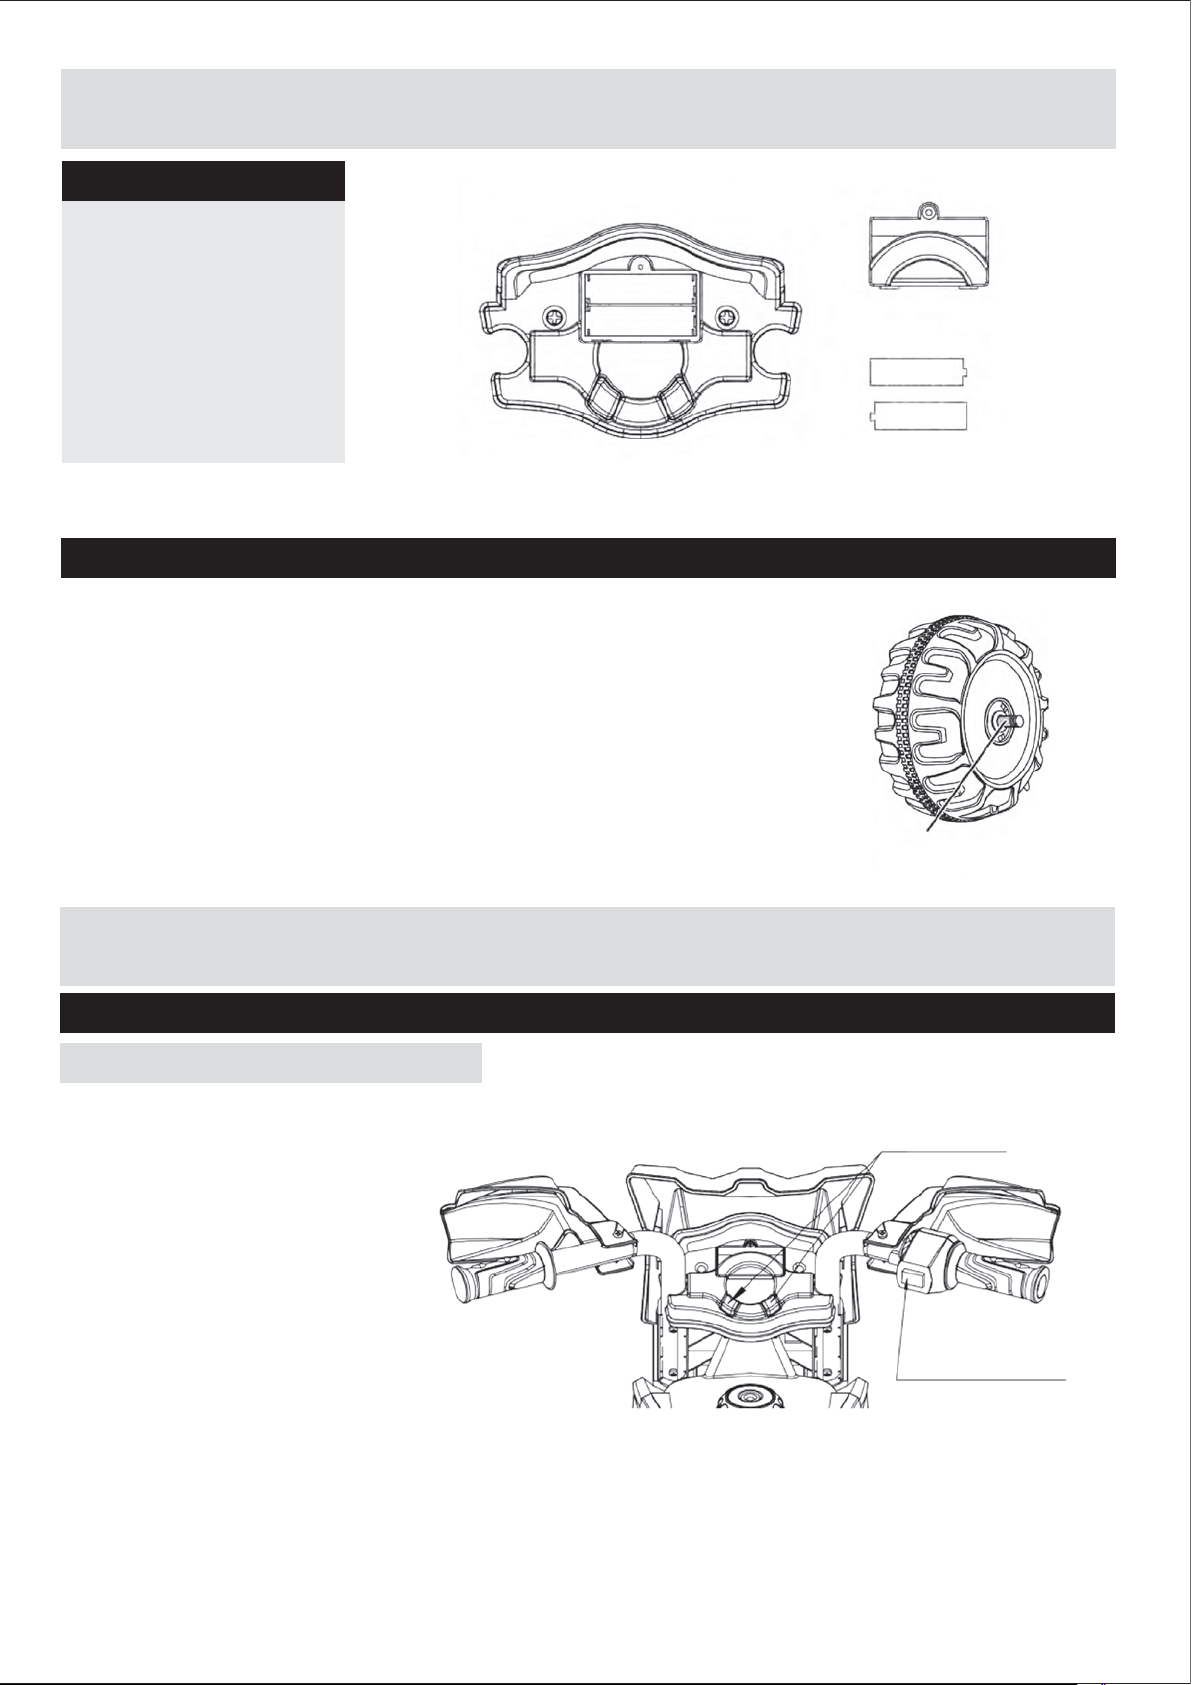
Step 11
Install the Batteries
into sound effect box.
IMPORTANT SUPPLEMENT TO INSTRUCTION MANUAL
If wheels do not run smoothly addional washers
can be added to the axel either side of the wheel.
activate
-
AA1.5V
AA1.5V
+
GAP
+
-
User Instructions
Using
How To Operate Your Motorcycle
IMPORTANT!
Always stop vehicle when
changing the speed
or direction to avoid damage to
the gear box and motor.
(1) Press the "Forward Button" ,
to move the vehicle forwards.
(2) Release "Forward Button" ,
to move the vehicle stops.
(3) Press one of the buttons on
the sounds box to activate
sounds
Music Button
Forward Button
10
Page 12
Troubleshooting
PROBLEM: The vehicle does not ren
PROBLEMCAUSE: The battery may low on power.
After each use, or once a month minimum, charge the battery for 8-12 hours. Do not leave the
battery on the charger for more than 20 hours.
POSSIBLE CAUSE: Thermal fuse has tripped.
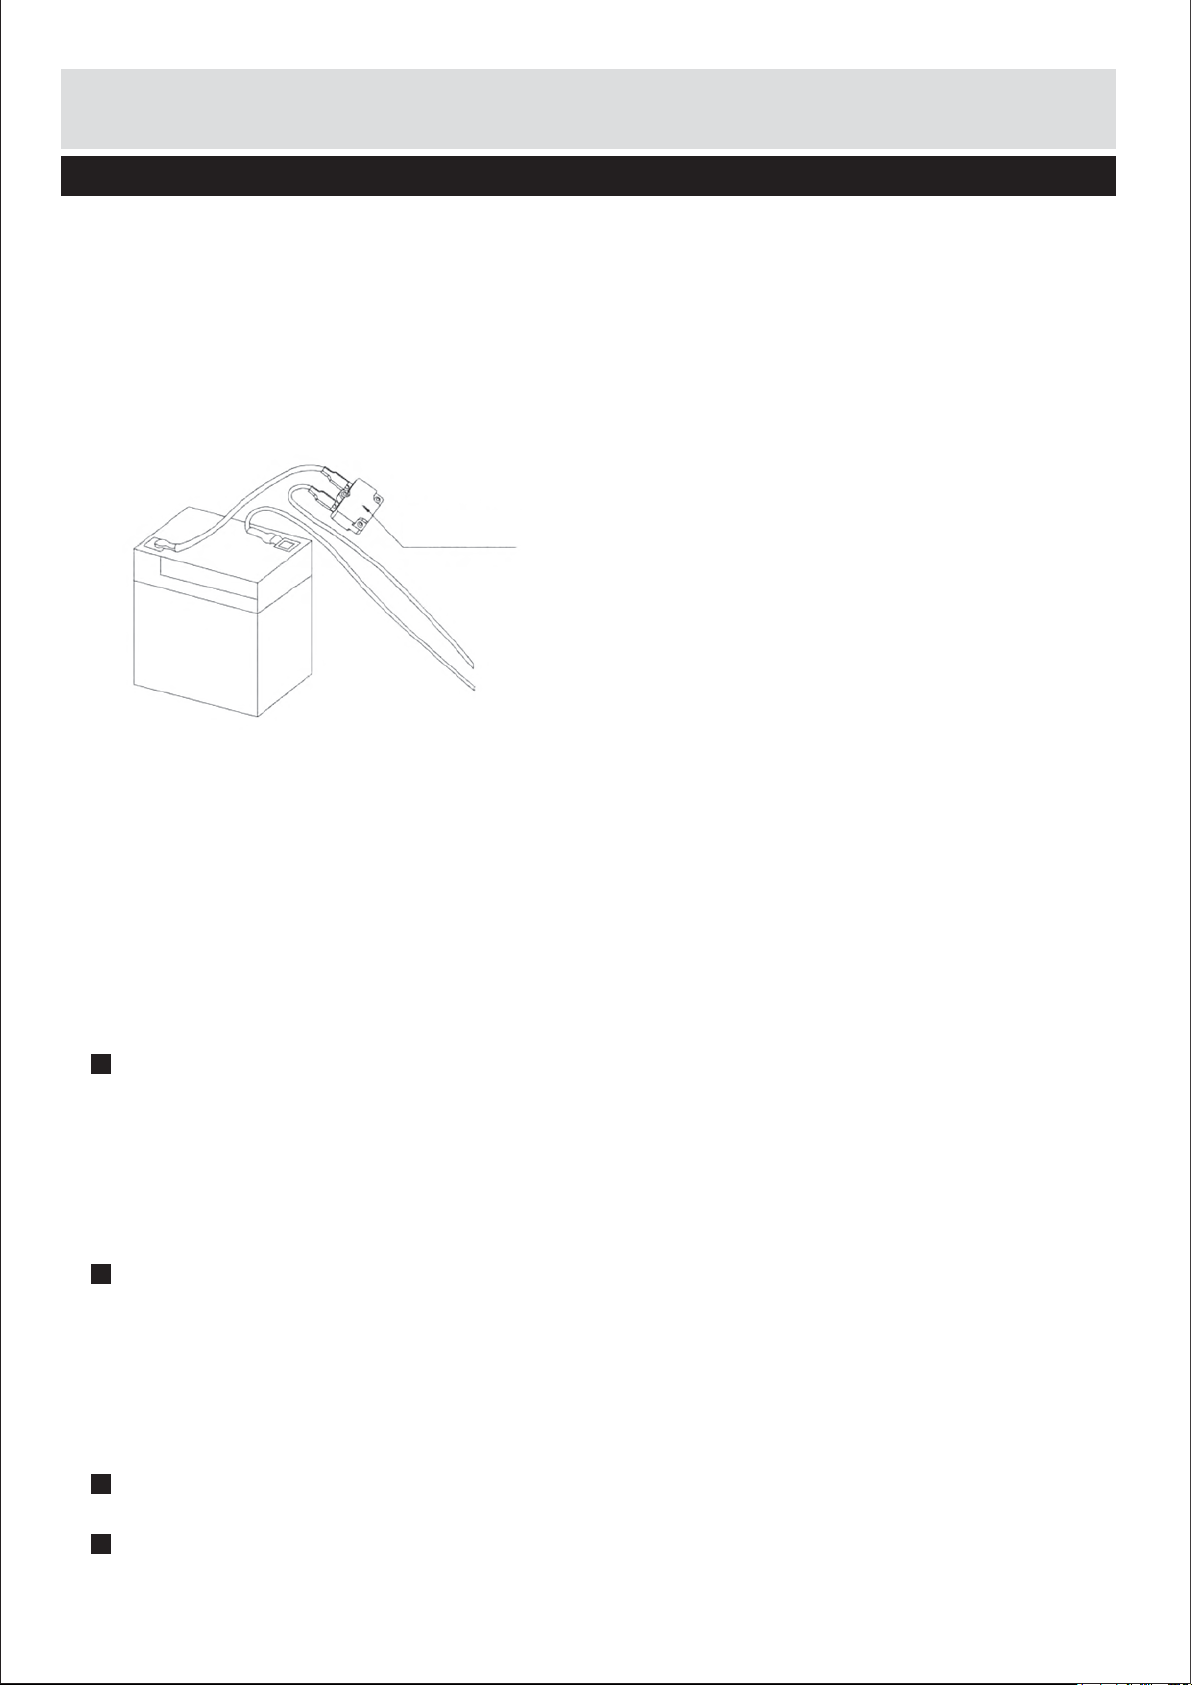
The Vehicle is equipped with a self-resetting fuse. When the Vehicle is overloaded or operated
incorrectly; the self-resetting fuse will be cut off for 5-20seconds before becoming operational
again.
To avoid the fuse cut off the power,
follow these guidelines:
DO NOT overload the vehicle, Maximum Weight
Fuse: 5A
Battery
POSSIBLE CAUSE: Wheel nuts are loo
If the nuts are not tight, the wheels will not engage the forward gears. Tighten the nut with the nut wrench.
POSSIBLE CAUSE: Battery connector or wires are loose.
Make Sure the battery connectors are firmly plugged in to each other.
POSSIBLE CAUSE: Battery is dead.
Have you properly maintained the battery according to the directions? Is the battery old? Your battery
may need to be replaced.
POSSIBLE CAUSE: Electric system is damaged.
Water may have corroded the system, or loose dirt, gravel or sand might have jammed the switch.
POSSIBLE CAUSE: Motor is damaged.
The motor needs professional repair.
allowed:30kg
DO NOT tow anything behind the vehicle.
DO NOT drive up steep slopes.
DO NOT drive into fixed objects, which may cause
the wheels to spin, causing the motor to overheat.
DO NOT drive in very hot weather, components
may overheat.
DO NOT tamper with the electric system, Doing
so may create a short circuit, causing the fuse to
trip.
PROBLEM: The battery will not recharge.
POSSIBLE CAUSE: Battery connector or adapter connector is loose.
Make sure the battery connector and adapter connector are firmly plugged together.
POSSIBLE CAUSE: Charger is not plugged in.
Make sure the charger is plugged into the wall outlet and the power flow to the outlet is on.
POSSIBLE CAUSE: Charger is not Working.
ls the charger warm while charging? If not, the charger may be broken and may need to be replaced.
PROBLEM: The vehicle does not run very long
POSSIBLE CAUSE: Battery may be undercharged.
You may not be charging the battery long enough. After each use, or once a month minimum, charge
the battery for 8 to 12 hours. Do not leave the battery on the charger for more than 20 hours.
POSSIBLE CAUSE: Battery is old.
The battery will eventually lose the ability to hold a charge. Depending on the amount of use, and
varying conditions, the battery should operate for one to three years.
PROBLEM Battery buzzes or gurgles when charging.
This is normal and not a cause for concern. It may also be silent when charging, which is also normal.
PROBLEM: Charger feels warm when recharging battery.
This is normal and not a cause for concern.
11
Page 13
Charging the 6v battery
WARNING!
Prevent fire and electric shock:Prevent fire and electric shock:
• Use the only rechargeable battery and charger
supplied with your vehicle. NEVER substitute the
battery or the charger with another brand. Using
another battery or charger my cause a fire or
explosion.
• Do not use the battery or charger for any other
product. Overheating, fire or explosion could
occur.
• NEVER modify the electric circuit system.
Tampering with the electric system may cause a
shock, fire or explosion or my permanenty
damage the system.
• Do not allow direct contact between battery
terminals. Fire or explosion can occur.
• Do not allow any type of liquid on the battery or
its components.
• Explosive gasses are created during charging.
Do not charge near heat of flammable materials.
Charge the battery in a well-ventilated area
ONLY.
• NEVER pick up the battery by the wires or
charger. Damage can occur to the battery and
may cause a fire. Pick up the battery by the case
ONLY.
• Charge the battery in a dry area ONLY.
• Battery posts, terminals and related accessories
contain lead and lead compounds, chemicals
known to the State of California to cause cancer
and reproductive harm. Wash hamds after
handling.
• Do not open the battery. Battery contains lead
acid and other materials that are toxic and
corrosive.
• Do not open the charger. Exposed and circuitry
inside case may cause electric shock. Only
adults may handle or charge the battery.
NEVER allow child to handle or charge the
battery. Battery is heavy and contains lead
acid (electrolyte).
• Do not drop the battery. Pemanent damage to
the battery could occur or cause serious injury.
• Before charging the battery, check for wear or
damage to the battery, charger, its supply cord
and the connectors. DO NOT charge the battery
if any damage to parts has occurred.
• Do not allow the battery to drain completely.
Recharge the batteryafter each use or once a
month if not used regularly.
• Do not charge battery upside down.
• Always secure the battery with the bracket.
Battery can fall out and injure a child if vehicle
tips over.
• A recommendation for adult supervision of
young children.
• The toy should be used with caution since skill
is required to avoid falls or collisions causing
injury to the user or third parties.
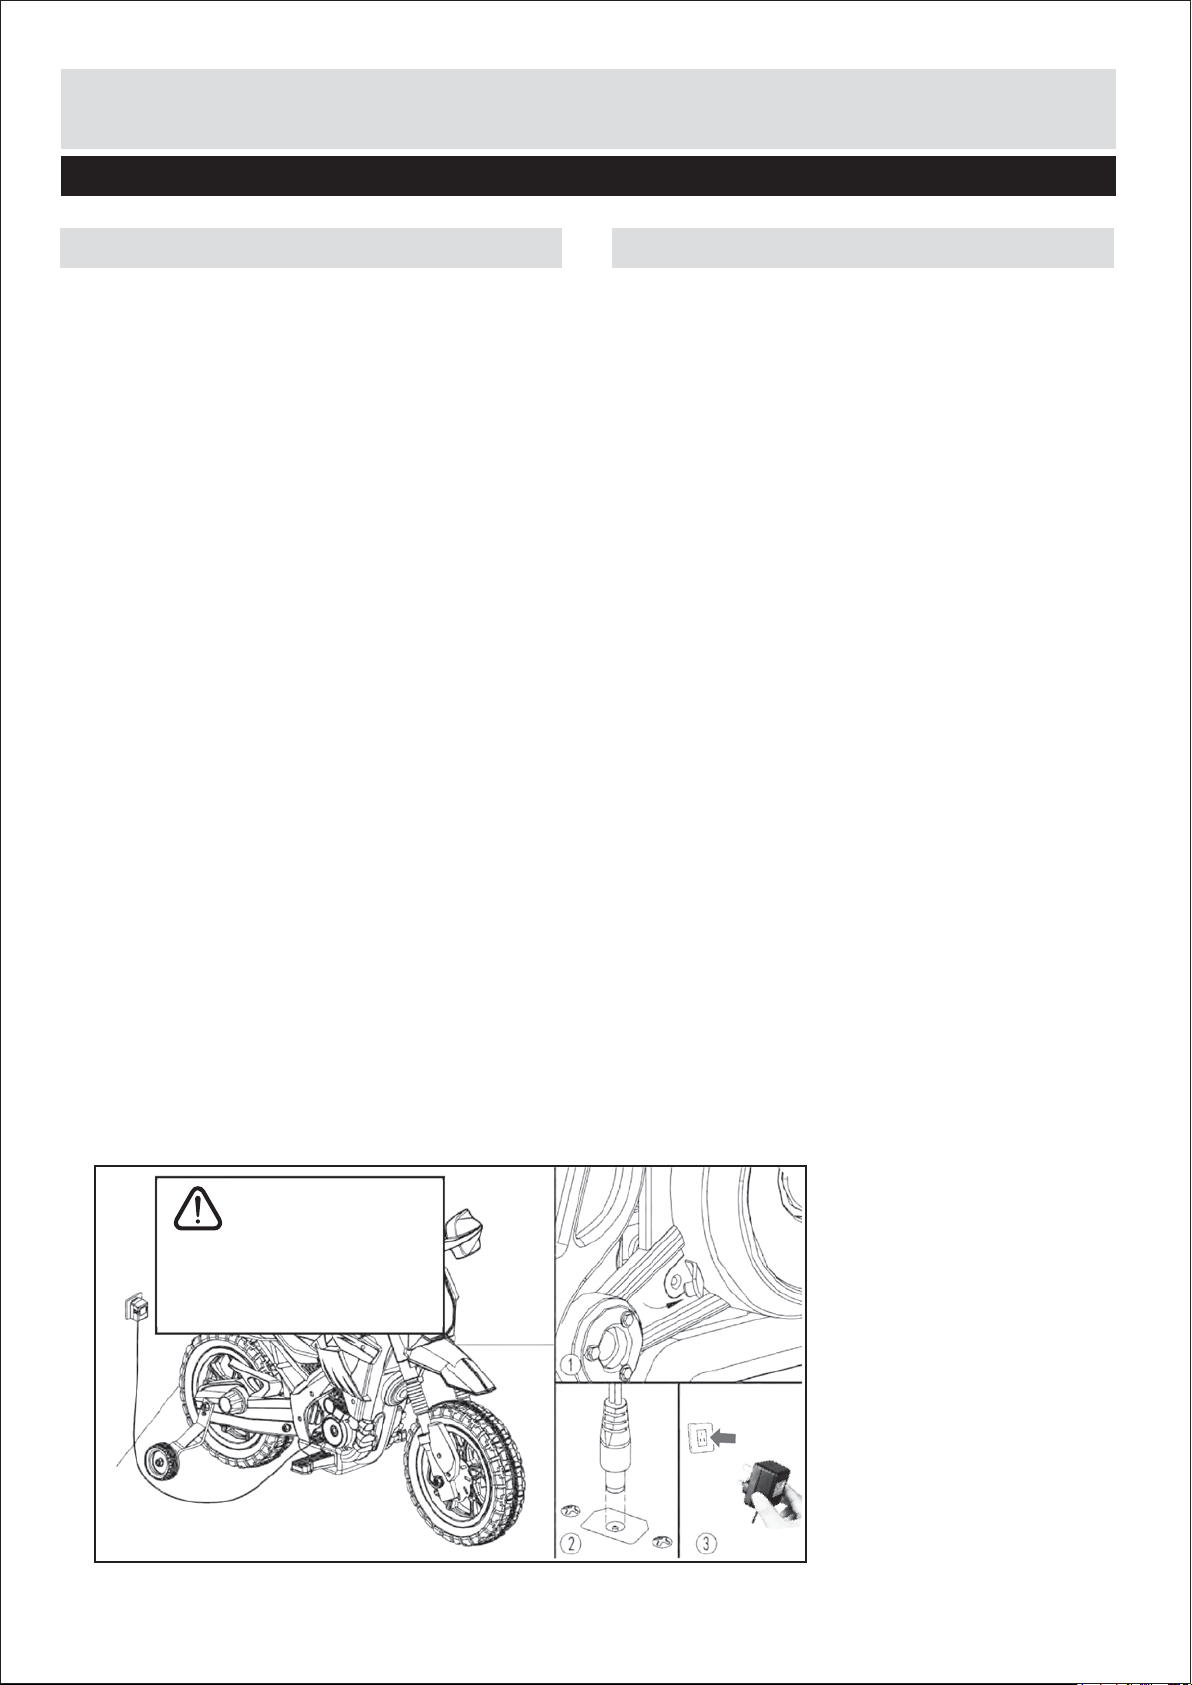
• The charging input socket is BLOW THE SEAT.
• Before the first use, you should charge the
battery for 8-12 hours. Do not recharge the
battery for more than 20 hours to avoid
overheating the charger.
• When the vehicle begins to run slowly, recharge
the battery.
• After each use or once a month minimum
recharge time as 8 to 12 hours, no more the 20
hours.
WARNING!
This product with CHARGING
PROTECTION:
When charging, all the functions
will be cut off!
12
1. Find The charging input
socket below the seat;
2. Plug the charger port into
the input socket;
1. Plug the charger plug into a
wall outlet. The battery will
begin charging.
Page 14
Care and Maintenance
General
• Make sure the plastic parts of the vehicle are not cracked or broken.
• Occasionally use a lightWeight oil to lubricate moving parts Such as Wheels.
• Park the vehicle indoors or cover it with a tarp to protect it from Wet Weather.
• Keep the vehicle away from Sources of heat, such as stoves and heaters. Plastic parts may melt.
• Recharge the battery after each use. Only an adult can handle the battery. Recharge the battery at least
once a month when the vehicle Raider is not being used.
• Do not wash the vehicle with a hose. Do not Wash the vehicle with soap and Water. Do not drive the
vehicle in rainy or snowy weather. Water will damage the motor, electric system and battery.
• Clean the vehicle with a soft, dry cloth. To restore shine to plastic parts, use a non-Wax furniture polish. Do
not use car wax. DO not use abrasive cleaners.
• Do not drive the vehicle in loose dirt, sand or fine gravel which could damage moving parts, motors or the
electric system.
• When not using, all the electrical source should be turn off. Turn of the power switch and disconnect the
battery
Battery Information
Loosen the battery cover of the sound effect box and remove the cover.
Insert two AA 1.5V Batteries (see above photo). Replace battery cover.
• Non-rechargeable batteries are not to be recharged.
• Different types of batteries or new and used batteries are not to be mixed.
• Batteries are to be inserted with the correct polarity.
• Exhausted batteries are to be removed from the toy.
• The supple terminals are not to be short –circuited.
• Rechargeable batteries are only to be charged under adult supervision.
• Rechargeable batteries are to be removed from the toy before being charged.
• Only batteries of the same of equivalent type as recommended are to be used. Do not dispose of
batteries in fire; batteries may leak or explode Batteries should be replaced by an adult
• The transformers or battery charger used with the toy are to be regularly examined for damage
to the cord, plug, enclosure and other parts, and in the event of such damage, they must not be
used until that damage has been repaired.
Disposal and Recycling
Electrical product waste should not be discarded with household waste. Please actively
support us in conserving resources and protecting the environment by returning the
non-working electrical products to an appropriate disposable/ recycling centre (if available).
Moving the Bike
Care should be taken when moving the bike. Do Not Lift using rear tool box / carrier.
Do not attempt to push the bike at any time it is designed to only move under it's own power.
If you need help or have damaged or missing parts, call the Customer Helpline:
Produced for Chad Valley Toys. Country of origin: Made in China
Address: 489 - 499 Avebury Boulevard, Central Milton Keynes, MK9 2NW.
www.argos.co.uk/chadvalley
13
+44(0)1253775570
 Loading...