

Page 1
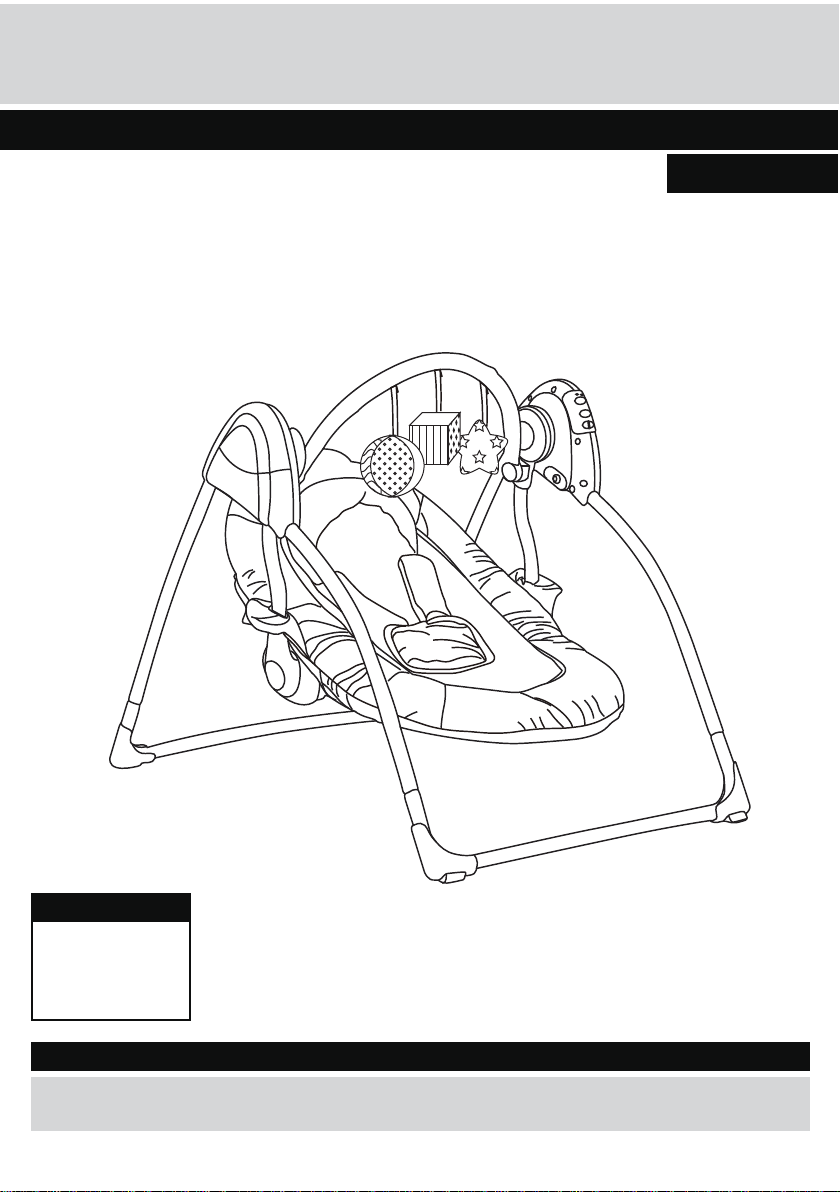
CHAD VALLEY BABY DELUXE SWING
Assembly Instructions - IMPORTANT! Keep for future reference
450/6177
Dimensions
Width - 72cm
Depth - 61cm
Height - 57cm
Suitable from birth to 9kg
Important – Please read these instructions fully before starting assembly
If you need help or have damaged or missing parts, call the Customer Helpline: 03456 400 800
Page 2
Safety and Care Advice
IMPORTANT! – KEEP FOR FUTURE REFERENCE
!
WARNINGS:
TO PREVENT SERIOUS INJURY OR DEATH FROM
CHILDREN FALLING OR BEING STRANGLED IN STRAPS:
IMPORTANT! Read the instructions carefully before use and keep
them for future reference.This product should be assembled by an adult
• Always use the seat belt provided.
• Never leave infant unattended in swing.
• Do not use this product once your child can sit up unaided or weights
more than 9KG.
• This product is not intended for prolonged periods of sleeping.
• It is dangerous to use this product on an elevated surface (e.g.table).
• Always use the restraint system.
• To avoid injury ensure that children are kept away when unfolding and
folding this product.
• Do not let children play with this product.
• Do not move or lift this product with the baby inside it.
• The carrying handles shall be used to move the product only when the
child has been taken off the product.
• Never use the toy bar to lift or move this product.
• When the product is connected to a music player, ensure that the volume
of the music player is set to a low value.
.
Battery
-The recommended battery sizes for this unit is 1.5V size AA.
-Do not mix new & used batteries.
-Do not mix batteries of different types.
-Only the recommended batteries or equivalent are to be used, volts and size.
-Batteries should be inserted with the correct polarity.
-Remove batteries when unit is stored for a long period of time or when the batteries are exhausted
-Dispose exhausted battery properly
-Do not short-circuit supply terminals.
-Do not attempt to recharge a non-rechargeable battery.
-Rechargeable batteries are to be removed from the toy before being charged.
-Rechargeable batteries are only to be charged under adult supervision.
WASTE ELECTRICAL PRODUCTS SHOULD NOT BE
DISPOSED OF WITH HOUSEHOLD WASTE. PLEASE
RECYCLE WHERE FACILITIES EXIST. CHECK WITH
YOUR LOCAL AUTHORITY FOR RECYCLING ADVICE.
Page 3
1.Parts List
If you have damaged or missing components,
call the
Customer Helpline:
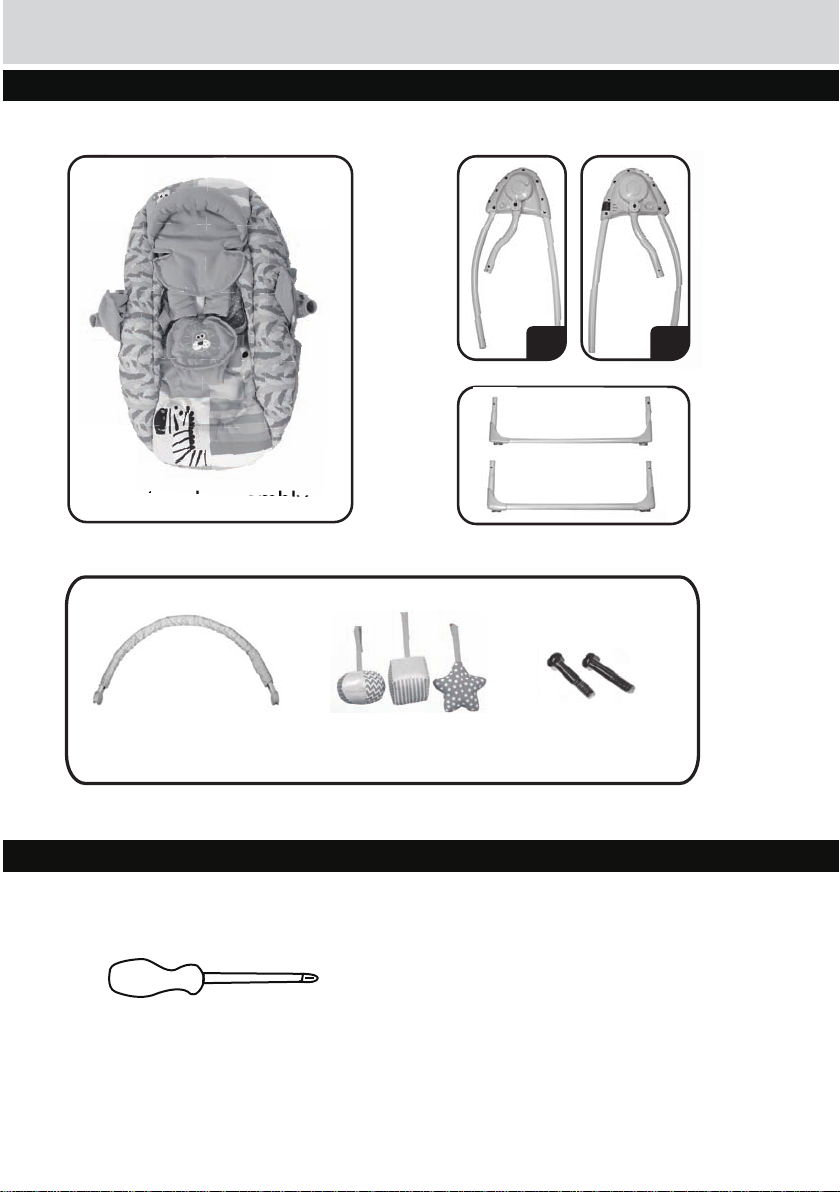
Please check you have all the parts listed below
L R
legs (2)
seat pad assembly
03456 400 800
toybar toys (3) screws (2)
Tools required(not included)
T
Phillips Screwdriver
Page 4
2. Assembly Instruction
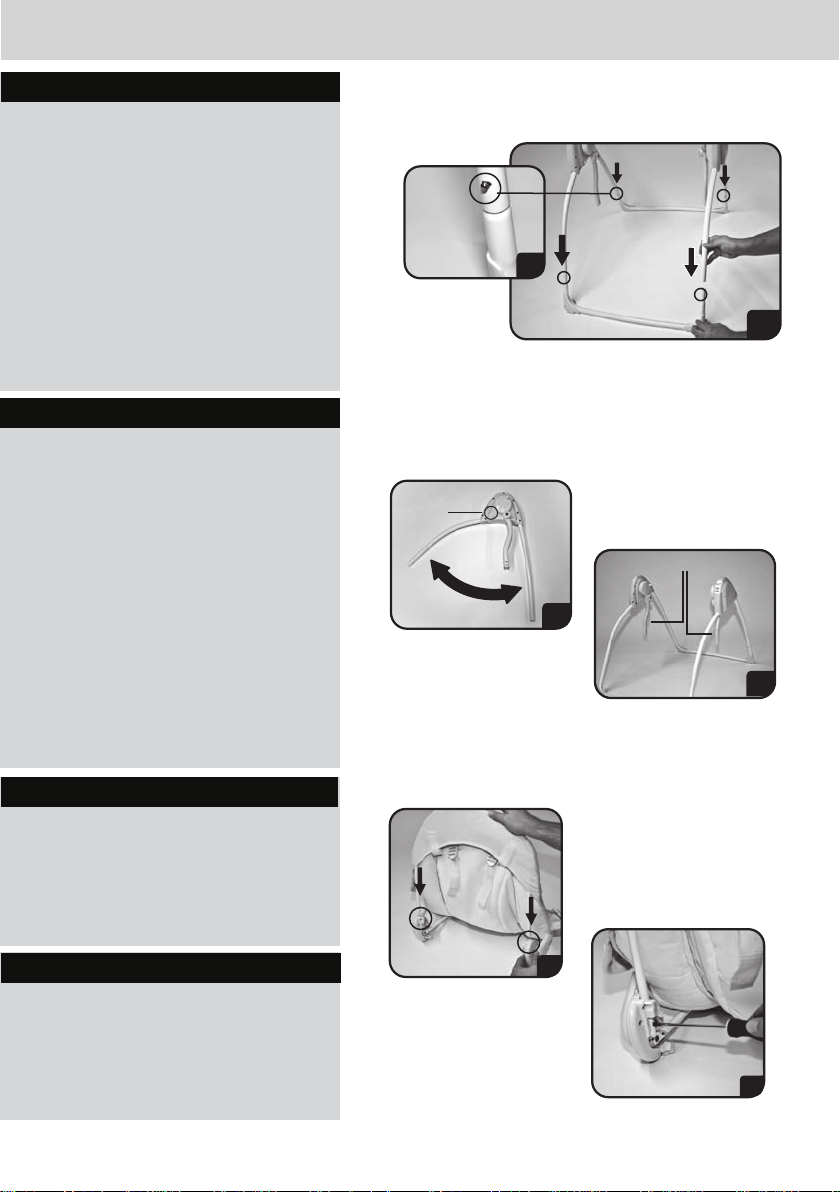
Step1
Assembly 2 legs until
metal spring buttons lock
into place (Figures A &
A1).
Note: Swing arms should
be on the inside of the
frame when assembled
correctly. (see CORRECT
view).
Step2
Pull apart tubes on both
frame assemblies until
button pops out (Figure B
& B1).
Metal
Spring
Button
Button
A1
A
swing arms
B
Step3
Take headrest bar and
slide into each side of
swing arm connectors
(Figures C).
Step4
Fasten headrest bar into
swing arm connector with
screws on both sides
(Figure D).
CORRECT
C
B
1
D
Page 5
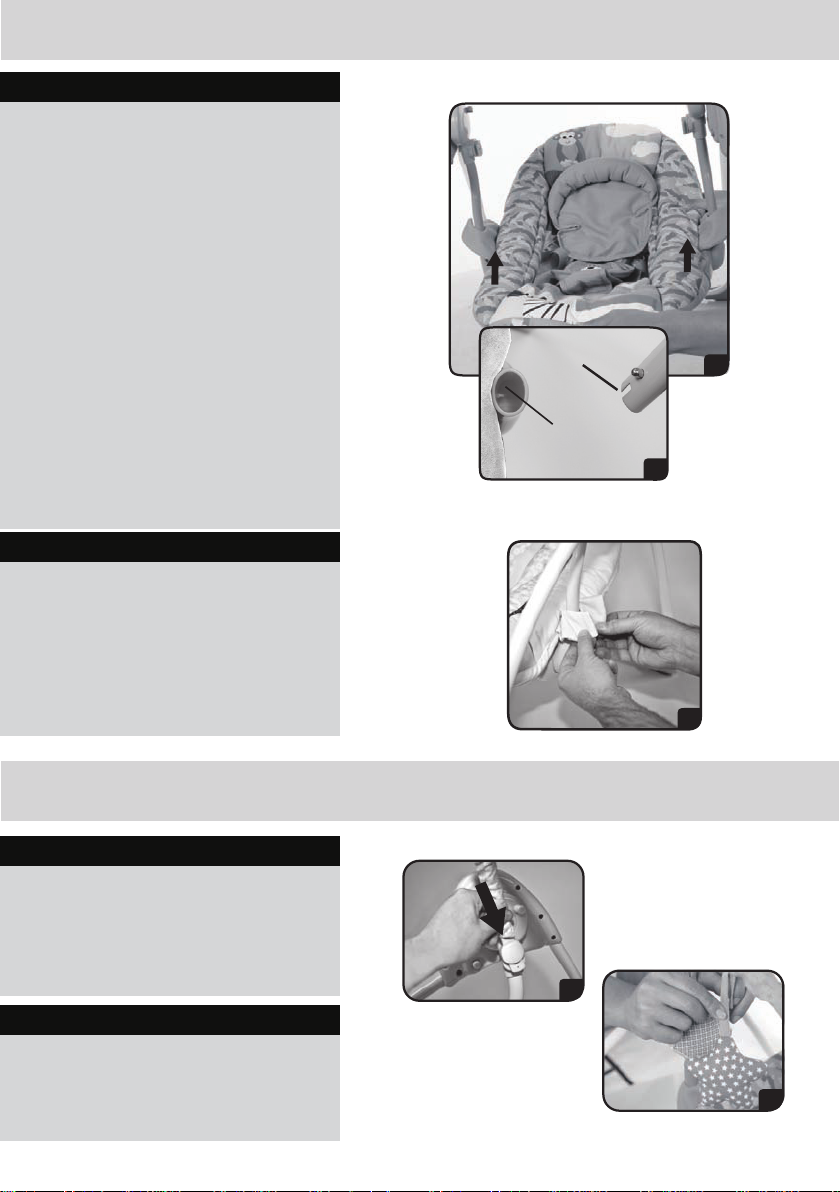
2. Assembly Instruction
Step5
Assembling Seat to swing:
Press swing arm connectors
onto swing arms until spring
button pops into place.
(Figure E).
Note: One side of swing arm
has a notch (Figure E1)
which goes into swing arm
connector with corresponing
groove. It is important to
insert this way to ensure the
swing seat is properly
oriented and will function
correctly.
Step6
Wrap flaps around swing
arms and fasten on both
sides (Figure F).
notch
groove
E
E
1
3.Toybar Set Up:
Step1
Insert toybar ends into slots
on each side of swing arms
until they click into place
(Figure G).
Step2
Attach toys onto toybar
(Figure H).
F
G
H
Page 6
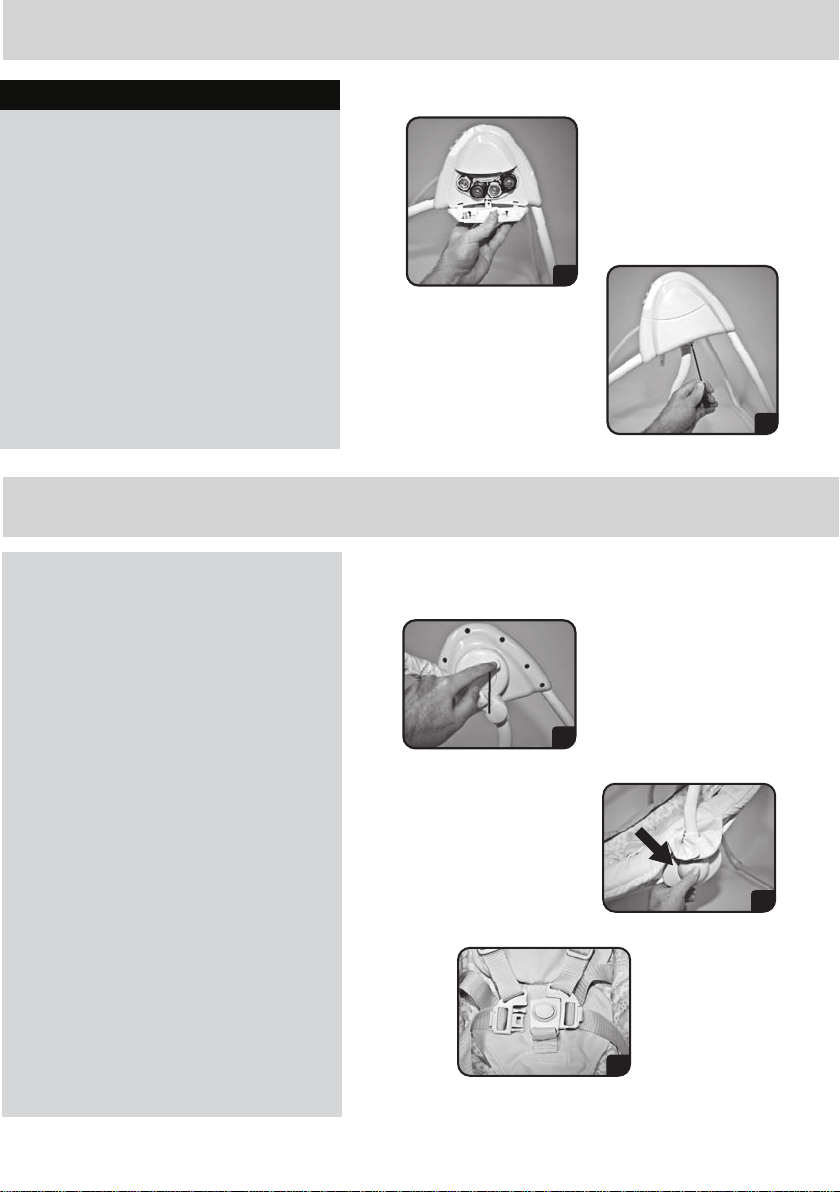
4. Battery Installation:
Step1
Swing Motion & Sound
Unit Battery Installation:
Unlatch battery door using
a Phillips head screwdriver.
Insert 4 “C” batteries
making sure the + and - are
facing the correct way. The
battery compartment is
engraved for clarity.
Re-attach the battery door.
(Figures I & J).
5. To Use Swing:
IMPORTANT NOTE:
Before placing child in swing,
make sure swing arm motion
lock is engaged(Figure K).
To stop swing from swing
motion, push locking lever
on swing arm. (Figure K)
Motion Lock
Lever
I
J
K
To Use Recline Position:
There are 2 recline positions.
Press both side buttons and
rotate seat into position.
Release buttons and lock
into position (Figure L).
To Use Shoulder Straps:
Place child in swing, wrap
shoulder strap over child’s
shoulder and clip shoulder
strap buckle into restraint
clip (Figure M).
L
M
Page 7
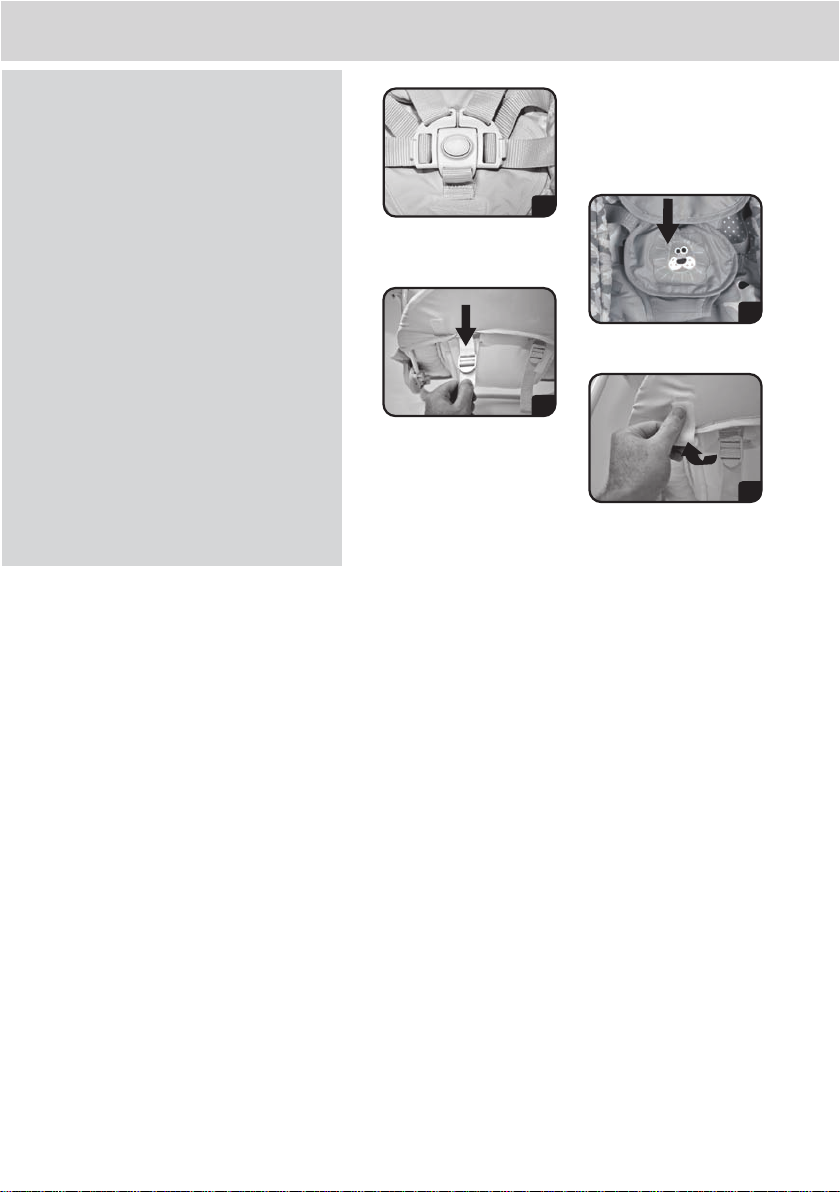
5. To Use Swing:
Repeat for other shoulder
strap (Figure N).
Fold over lap pad cover and
fasten to cover restraint
system (Figure O).
To Adjust Shoulder Straps
on Seat Pad:
To adjust shoulder strap,
feed shoulder strap through
buckle on back side of seat
pad and pull tightly to
secure (Figure P). Repeat for
buckle on opposite end.
N
O
P
Secure hook and loop pads
on both sides (Figure Q).
Q
Page 8
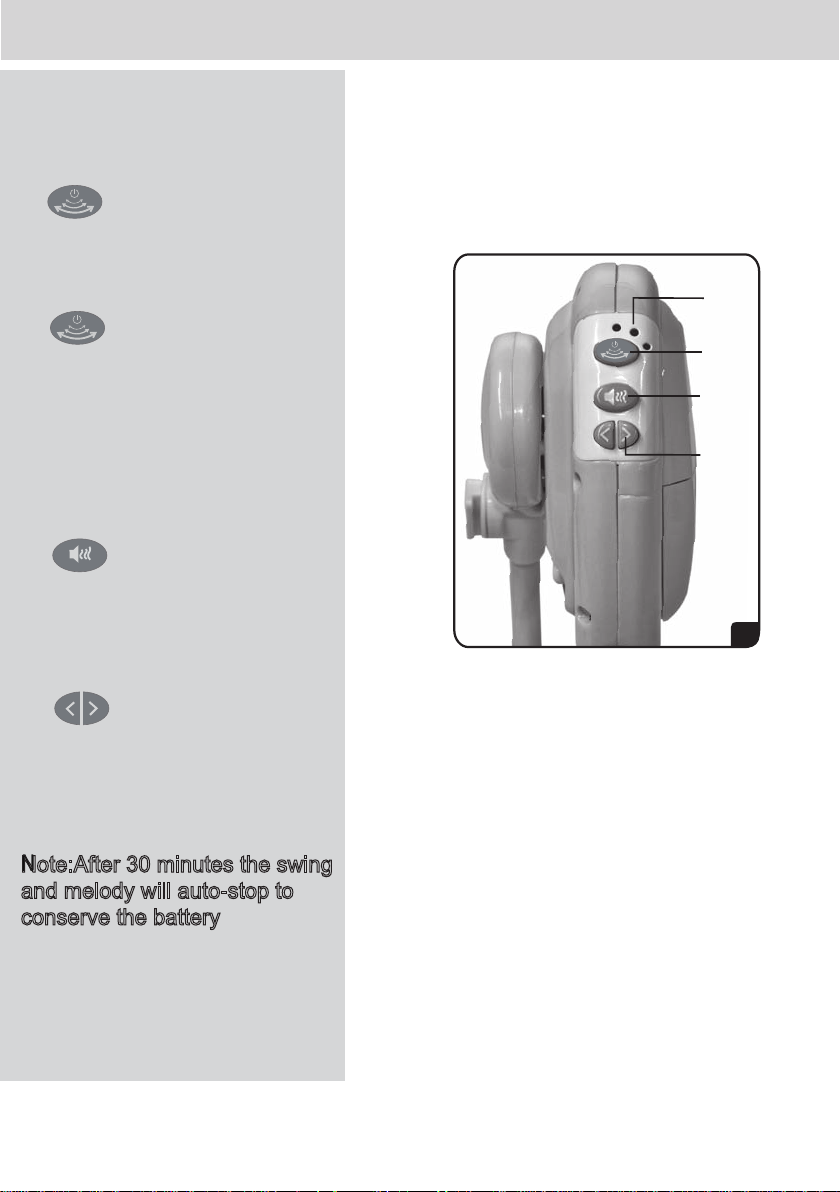
5. To Use Swing :
Swing & Sound
1. Press the button to turn
on/turn off the swing & music
function
2. Press the button
consecutively to select the three
different speed setting.
There are 3 LED indicators sit
side to show the 3 different wing
speeds.
3. Press the button
consecutively to turn on/turn off
the music and select the seven
different melodies setting.
3 LED
Display
Swing
Speed
Button
Music
Button
Volume
Control
T
4. Music volume control,
left button for lower, right for
higher.
Note:After 30 minutes the swing
and melody will auto-stop to
conserve the battery
Page 9
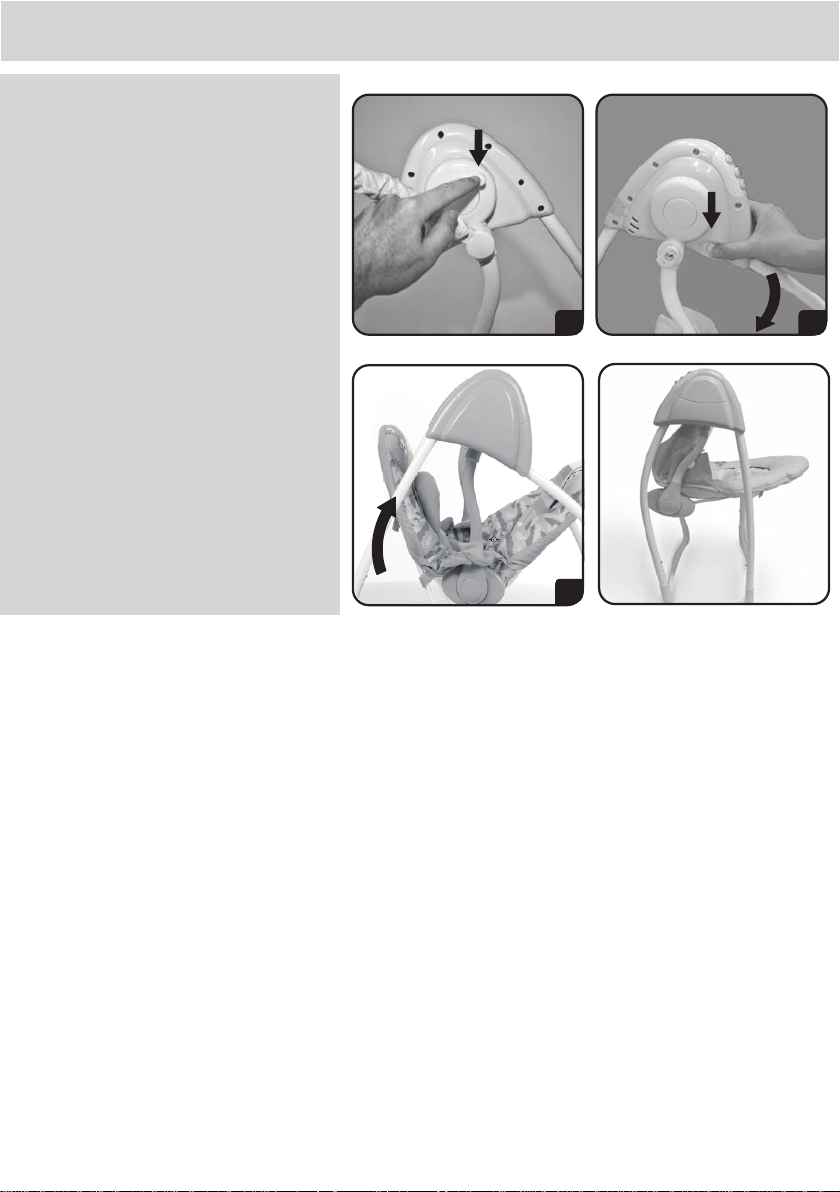
6. To Fold:
Press swing motion
lock button (Figure R).
Press both side
buttons and push in
both front legs to fold.
(Figure S).
Fold up footrest
(Figure T).
press
lock button
press both
side buttons
R S
T
TO CLEAN:
Headrest
Remove headrest from seat pad.
Machine wash in cold water - gentle cycle. Do not bleach. Hang to dry.
Seat Pad
Remove seat pad from swing frame.
Step 1: Fold up footrest and slide seat pad bottom flap off seat frame.
Disconnect shoulder straps from back of pad.
Step 2: Slide seat pad top flap off seat frame.Machine wash in cold
water - gentle cycle.
Do not bleach. Hang to dry.
Page 10

Care and Maintenance
This product was designed and manufactured
with quality materials and craftsmanship.
1. Inspect regularly for:
Worn parts, torn materials or stitching.
Loose screws, bent or broken frame parts.
Broken, damaged or missing parts.
Do not use the reclined cradle if any components are broken or missing.
2. Fabric parts may be cleaned in accordance with
the fabric care labels. Do not machine wash.
Hand wash only.
3. Do not store the product while wet and
never store a damp environment as this can
cause mildew to form.
Page 11

Page 12

Argos
Avebury, 489-499 Avebury Boulevard, Milton Keynes, MK9 2NW
www.argos.co.uk
Customer Helpline: 03456 400 800
 Loading...