

Page 1

Boltzero Midisleeper
Assembly Instructions - Please keep for future reference
432/8104
Dimensions
Width - 1980mm
Depth - 960mm
Height - 1150mm
Important
If you need help or have damaged or missing parts, call the Customer Helpline:
Argos = 0345 640 0800
- Please read these instructions fully before starting assembly
Issue 1 - 24/08/15
Page 2

Safety and Care Advice
Important - Please read these instructions fully before starting assembly
• Check you have all the
components and tools listed on
the following pages.
• Remove all fittings from the
plastic bags and separate them
into their groups.
• Keep children and animals
away from the work area, small
parts could choke if swallowed.
Warnings
• READ CAREFULLY - RETAIN
FOR FUTURE REFERENCE
• WARNING: High beds and
upper bed of bunk beds are not
suitable for children under six
years due to the risk of injury
from falls.
• WARNING: Bunk beds and
high beds can present a serious
risk of injury from strangulation if
not used correctly. Never attach
or hang items to any part of the
bunk bed that are not designed
to be used with the bed, for
example, but not limited to
ropes, strings, cords, hooks,
belts and bags.
• WARNING: Children can
become trapped between the
bed and the wall, a roof pitch,
• Make sure you have enough
space to layout the parts before
starting.
• During assembly do not stand
or put weight on the product, this
could cause damage.
• Assemble the item as close to
its final position (in the same
room) as possible.
the ceiling, adjoining pieces of
furniture (e.g. cupboards) and
the like. To avoid risk of serious
injury the distance between the
top safety barrier and the
adjoining structure shall not
exceed 75mm or shall be more
than 230mm.
• WARNING: Do not use the
bunk bed/high bed if any
structural part is broken or
missing.
• Always follow the
manufacturer’s instructions.
• The recommended size of the
mattress is L1900 x W900mm.
• Ventilation of the room is
necessary in order to keep the
humidity low and to prevent
mould in and around the bed.
• Assemble on a soft level
surface to avoid damaging the
unit or your floor.
• Parts of the assembly will be
easier with 2 people.
• Unit weight: 24kgs.
• Assembly instructions
including a list of the parts
supplied and details of any tools
required to assemble the bed
are included in the pack.
• The maximum thickness of the
mattress is 190mm. Mattress
maximum thickness marking on
the product are found on the
post.
• Check regularly that all
assembly fastenings are
properly tightened.
• THIS BED COMPLIES WITH
EN747-1:2012+EN747-2:2012
Manufacturer:
BL Packaging Pte Ltd
Care and maintenance
• Only clean using a damp cloth
and mild detergent, do no use
bleach or abrasive cleaners.
1
• From time to time check that
there are no loose screws on
this unit.
• This product should not be
discarded with household
waste. Take to your local
authority waste disposal centre.
Page 3
If you have damaged or missing components, call the
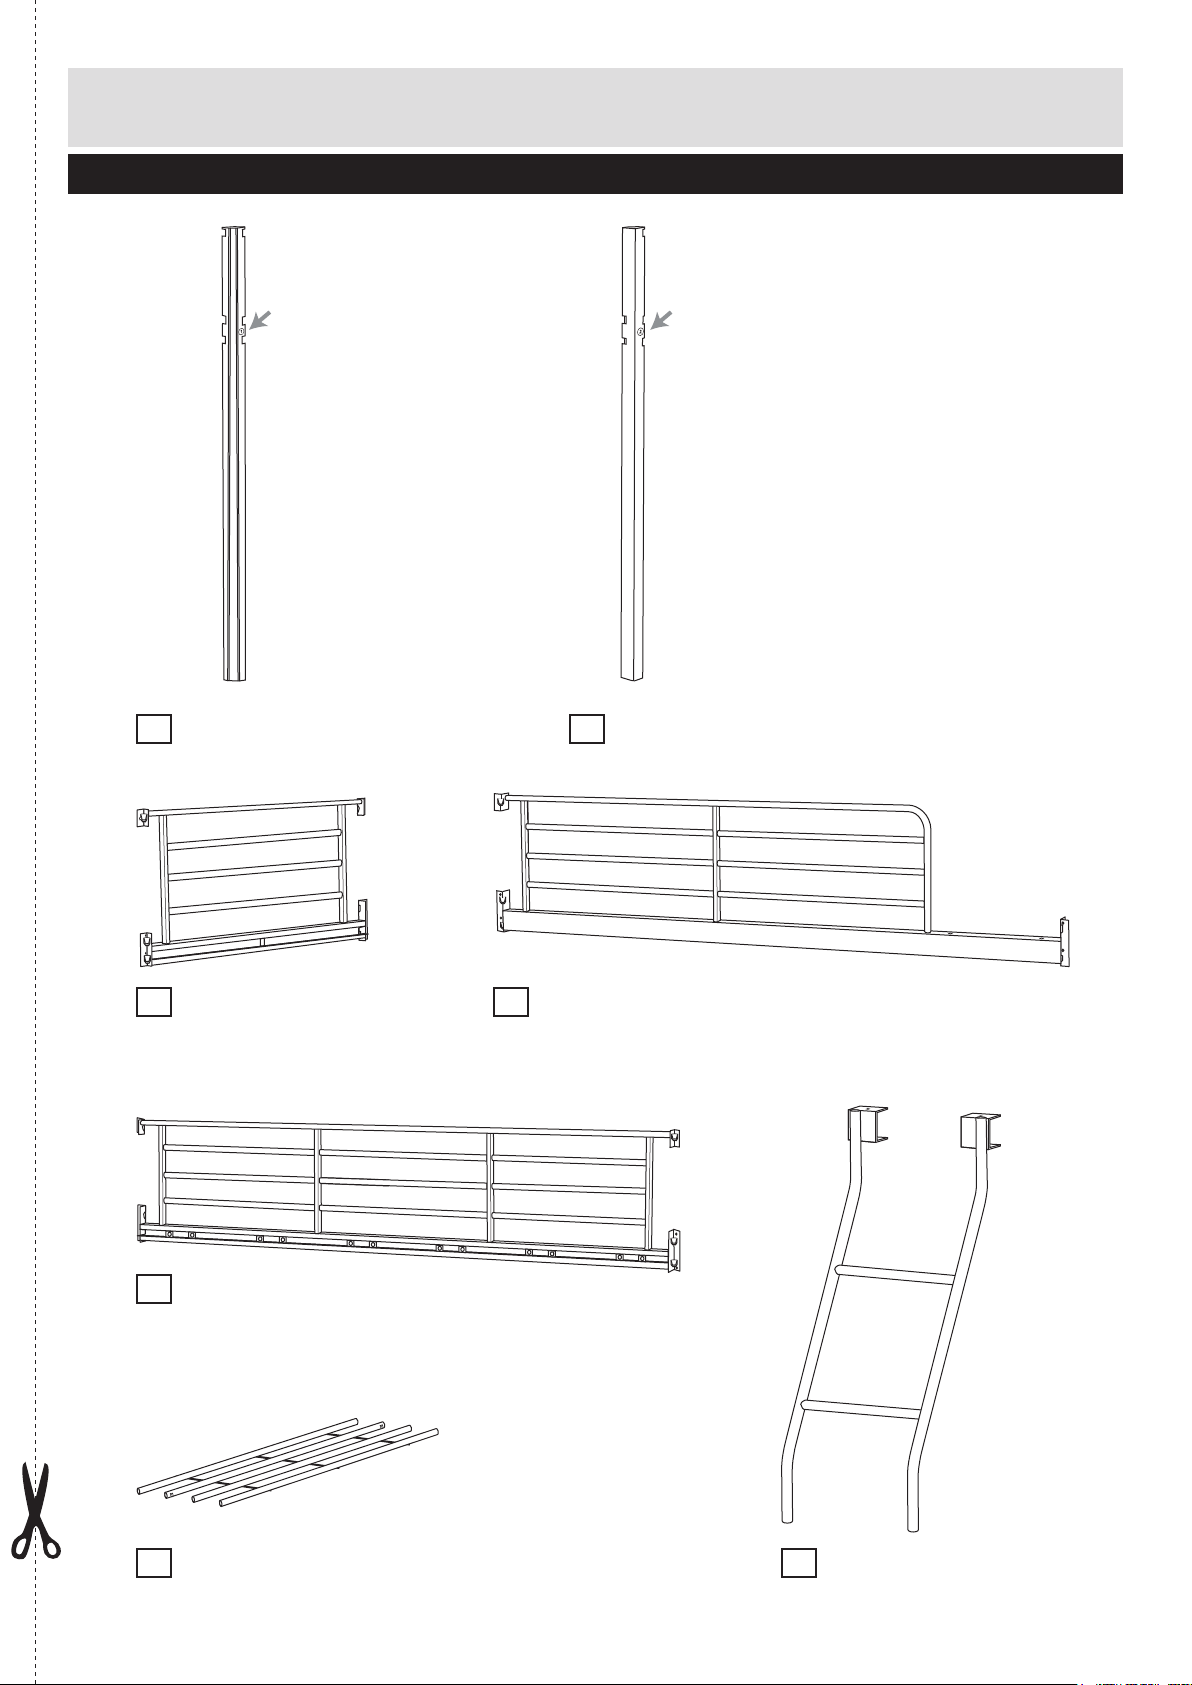
Components - Parts
Customer Helpline: Argos = 0345 640 0800
Please check you have all the parts listed below
sticker (1) sticker (2)
End Post x 3
1
(115 x 5 x 5cm)
Side Rail x 2
3
(90 x 39.5 x 4.5cm)
Back Safety Rail
5
(192.2 x 40 x 3cm)
Front Right End Post
2
(115 x 5 x 5cm)
Front Safety Rail
4
(192.2 x 40 x 3cm)
Slat x 6
6
(92.5 x 26 x 2.5cm)
Ladder
7
(87 x 37 x 8cm)
2
Page 4

Components - Fittings
Please check you have all the fittings listed below
Note: The quantities below are the correct amount to complete the assembly. In some cases more fittings
may be supplied than are required.
A
Footing x 4
D
Wall Strap x1
Tools required
B
Long Cap x 8
E
Slats Remover Tool x 1
Rubber Mallet (Not Provided)
C
Short Cap x 11
3
Page 5

Assembly Instructions
Step 1
Attaching footings
Attach footings to end
posts and as
1 2
A
shown.
sticker (1)
1
A
sticker (1)
1
A
sticker (1)
sticker (2)
1
1
2
A
A
A
Step 2
Attaching side rails
With the help of an
assistant holding the end
posts, attach the side
3
rails to the end posts
as shown. Insert into
holes on the end posts
first then push down the
siderails to lock.
3 3
1
1
3
1
1
2
4
Page 6

Assembly Instructions
Step 3
Attaching back safety
rail
Attach the back safety
5
rail to the end posts
1
as shown. Insert into
holes on the end posts
first then push down the
rails to lock.
5
1
1
Step 4
Attaching front safety
rail
Attach the front safety
4
rail to the end posts
and as shown.
Insert into holes on the
end posts first then push
down the rails to lock.
21
5
1
4
1
2
1
4
5
Page 7

Assembly Instructions
Step 5
Attaching slats
Note: Before
attaching the
slats ,
6
carefully make
adjustments to
ensure the bed
frame is straight.
Note: Position
the horizontal rail
below when
attaching the
slats onto the
bed.
Starting on one end,
attach the slats into
upper rails and .
6
4 5
Push to insert the button
on the slats into the hole
on the rails as shown.
Make sure it is lock when
you hear the ‘click’
sound. Insert one end of
the slats first before
inserting and locking the
other end.
6
x6
Insert button
to hole to lock
5
6
5
4
6
position flat rail
to bottom
Step 6
Attaching ladder
Attach the top of the
ladder by hooking it
on the front safety rail
as shown.
7
4
4
7
4
7
6
Page 8

Assembly Instructions
Step 7
Attaching caps
Attach long caps and
short caps into holes
C
B
on the end posts as
shown. Insert and lock it
carefully into holes by
using a rubber mallet.
C
C
4
C
7
C
C
B
B
C
3
B
C
B
4
C
5
5
C
C
C
C
B
B
C
3
B
B
5
C
C
B
B
7
7
Page 9

Assembly Instructions
Step 8
Fixing to wall
This unit must be fixed to
a wall.
Move the bunk bed into
position on the wall.
Position the wall strap
to the top post of upper
back safety rail to
mark fixing holes on the
wall. Remove the wall
strap then drill holes and
insert appropriate wall
plugs. Reposition wall
strap and fix using
appropriate screws.
Warning:
Before drilling,
check wall for
hidden pipes and
cables. Consult a
qualified
specialist if
unsure.
5
D
Wall
Wall
D
5
D
5
Assembly is complete.
If you need help or have damaged or missing parts, call the Customer Helpline:
Argos = 0345 640 0800
8
Page 10

Guide to Disassembling the Slats
Tools required
Slats Remover Tool (Provided)
Please keep this tool for future use.
Use the slats remover tool to remove the slats as shown in the diagram. Insert it into the
front/back/safety rails then pull it until the slats are detached.
5
E
6
4
5
E
6
5
6
 Loading...