

Page 1
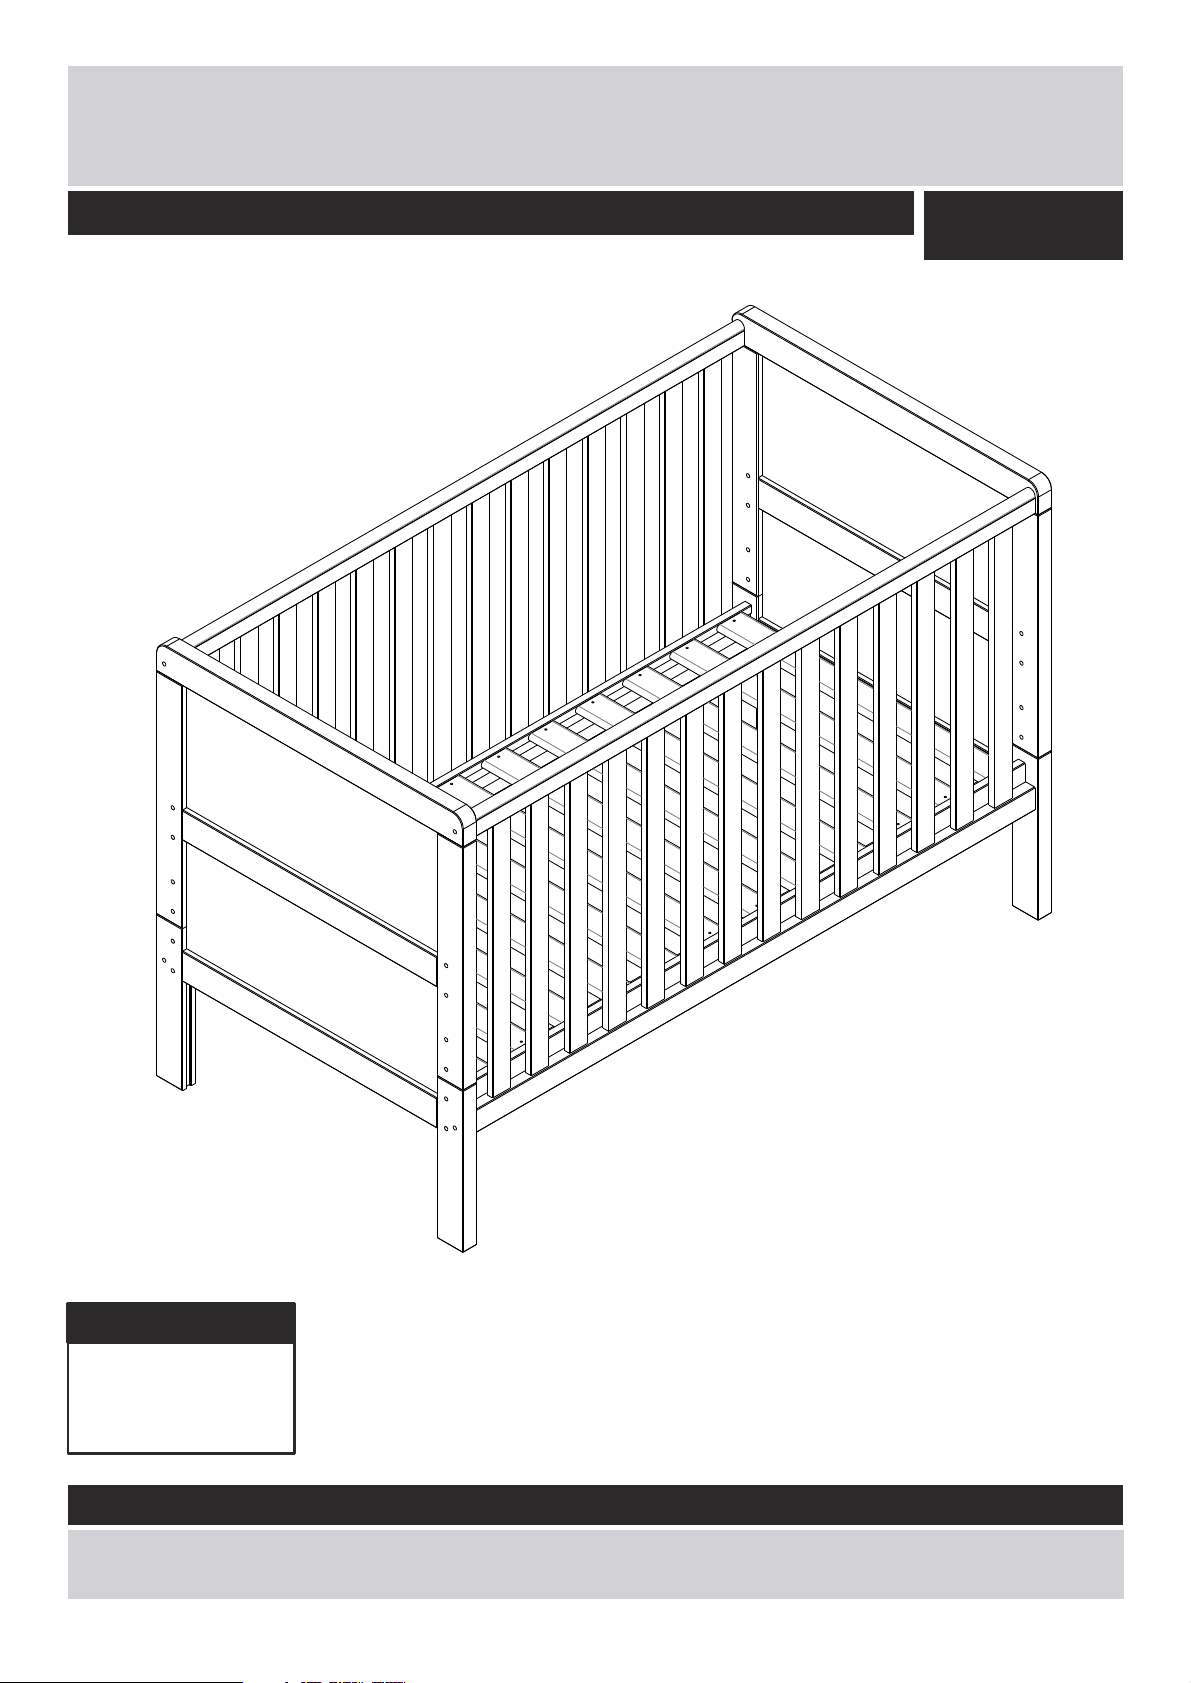
Babystart Delfina - Cot Bed
Assembly Instructions
- Please keep for future reference
377/4467
377/4474
Dimensions
Width - 145cm
Depth - 76.5cm
Height - 94cm
Important – Please read these instructions fully before starting assembly
If you need help or have damaged or missing parts, call the Customer Helpline: 08456 400 800
Issue 1 - 30/01/13
Page 2

Safety and Care Advice
Important – Please read these instructions fully before starting assembly
.
Check you have all the
components and tools listed on
pages 2 and 3.
.
Remove all fittings from the
plastic bags and separate them
into their groups.
.
Keep children and animals
away from the work area, small
parts could choke if swallowed.
.
Make sure you have enough
space to layout the parts before
starting.
Care and maintenance
.
Use an appropriate furniture
polish for natural wood
furniture and a dry cloth to
clean the product.
.
This product contain
Natural timber; you may
notice some variation in the grain
and colour of different component
parts which is normal for furniture
produced using natural wood and
is not the result of any
manufacturing fault.
.
Do not stand or put weight on
the product, this could cause
damage.
.
Assemble the item as close
to its final position (in the same
room) as possible.
.
From time to time check
that there are no loose
screws on this unit.
.
Avoid placing the furniture in
direct sunlight as this will cause
the timber to prematurely age.
recommend the
use of power
drill/drivers for
inserting screws,
as this could damage the unit.
Only use hand screwdrivers.
.
Parts of the assembly will be
easier with 2 people.
.
Dispose of all packaging
carefully and responsibly.
.
Assemble on a soft level
surface to avoid damaging the
unit or your floor.
.
This product should not be
discarded with household
waste. Take to your local
authority waste disposal
centre.
.
We do not
Warning !
IMPORTANT KEEP IT FOR FUTURE REFERENCE, READ IT CAREFULLY.
· In cot mode, three base height positions are possible. The lowest position is the safest and should
always be used once the child can sit unaided.
· The thickness of the mattress should be such that the distance between the top of the mattress and the
top of the sides should be no less than 500mm with the base in its lowest position and no less than
200mm with the base in its highest position (indicated by printed line on cot frame).
· Do not leave anything (large toys etc.) in the cot which could provide a foo
suffocation or strangulation.
· The cot is suitable for a mattress of 1400mm in lenght and 700mm in width.
minimum mattress size to be used in this cot must be 1380mm in length and 680mm in
· Do not position too close to strong sources of heat e.g. open fires, electric fires or gas fires.
· Regularly check the secu
the body, or clothing (e.g. strings, necklaces or ribbons for dummies) which would pose a risk of
strangulation.
· Do not use the cot if any part is broken, torn or missing and us
manufacturer
· Do not use more than one mattress in the cot
· The cot shall no longer be used when the child is able to climb out of the cot to prevent injury from falls
· Designed and manufactured to BS EN 716 -
1
rity of fittings and ensure there are no loose screws which could trap parts of
e only spare parts approved by the
1: 2008
Note: if required the next page
can be cut out and used as
reference throughout the
assembly. Keep this page with
these instructions for future
reference.
thold or present a danger of
For safety reasons, the
width.
Page 3
Components - Panels
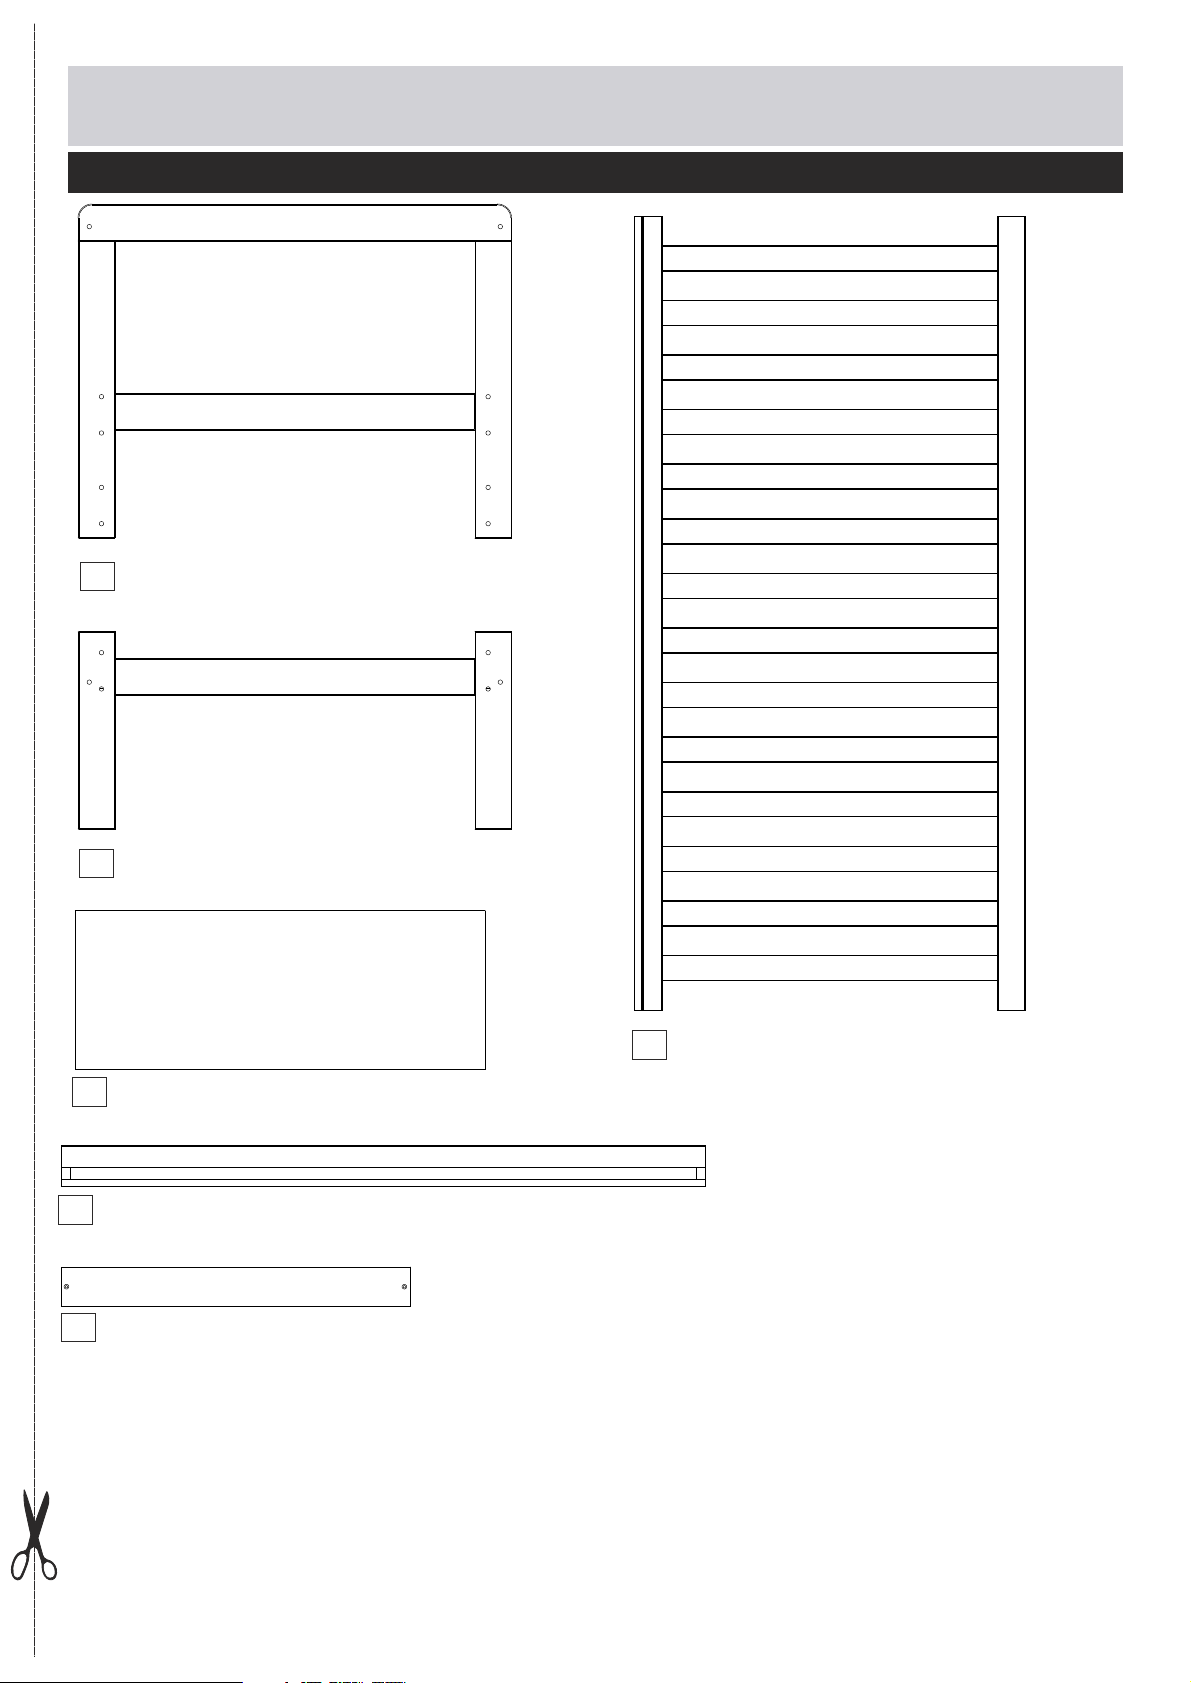
Please check you have all the panels listed below
Headboard x 2-top (59 x 76.5cm)
01
Headboard x 2-bottom (35 x 76.5cm)
02
Headboard Panel
03
(64.5 x 25cm)
x 2
Side frame (140 x 69cm) x 2
04
Side rail x 2 (140 x 9cm)
05
Slat x 12 (66.4 x 6,7cm)
06
2
Page 4
If you have damaged or missing components,
Components - Fittings
call the Customer Helpline: 08456 400 800
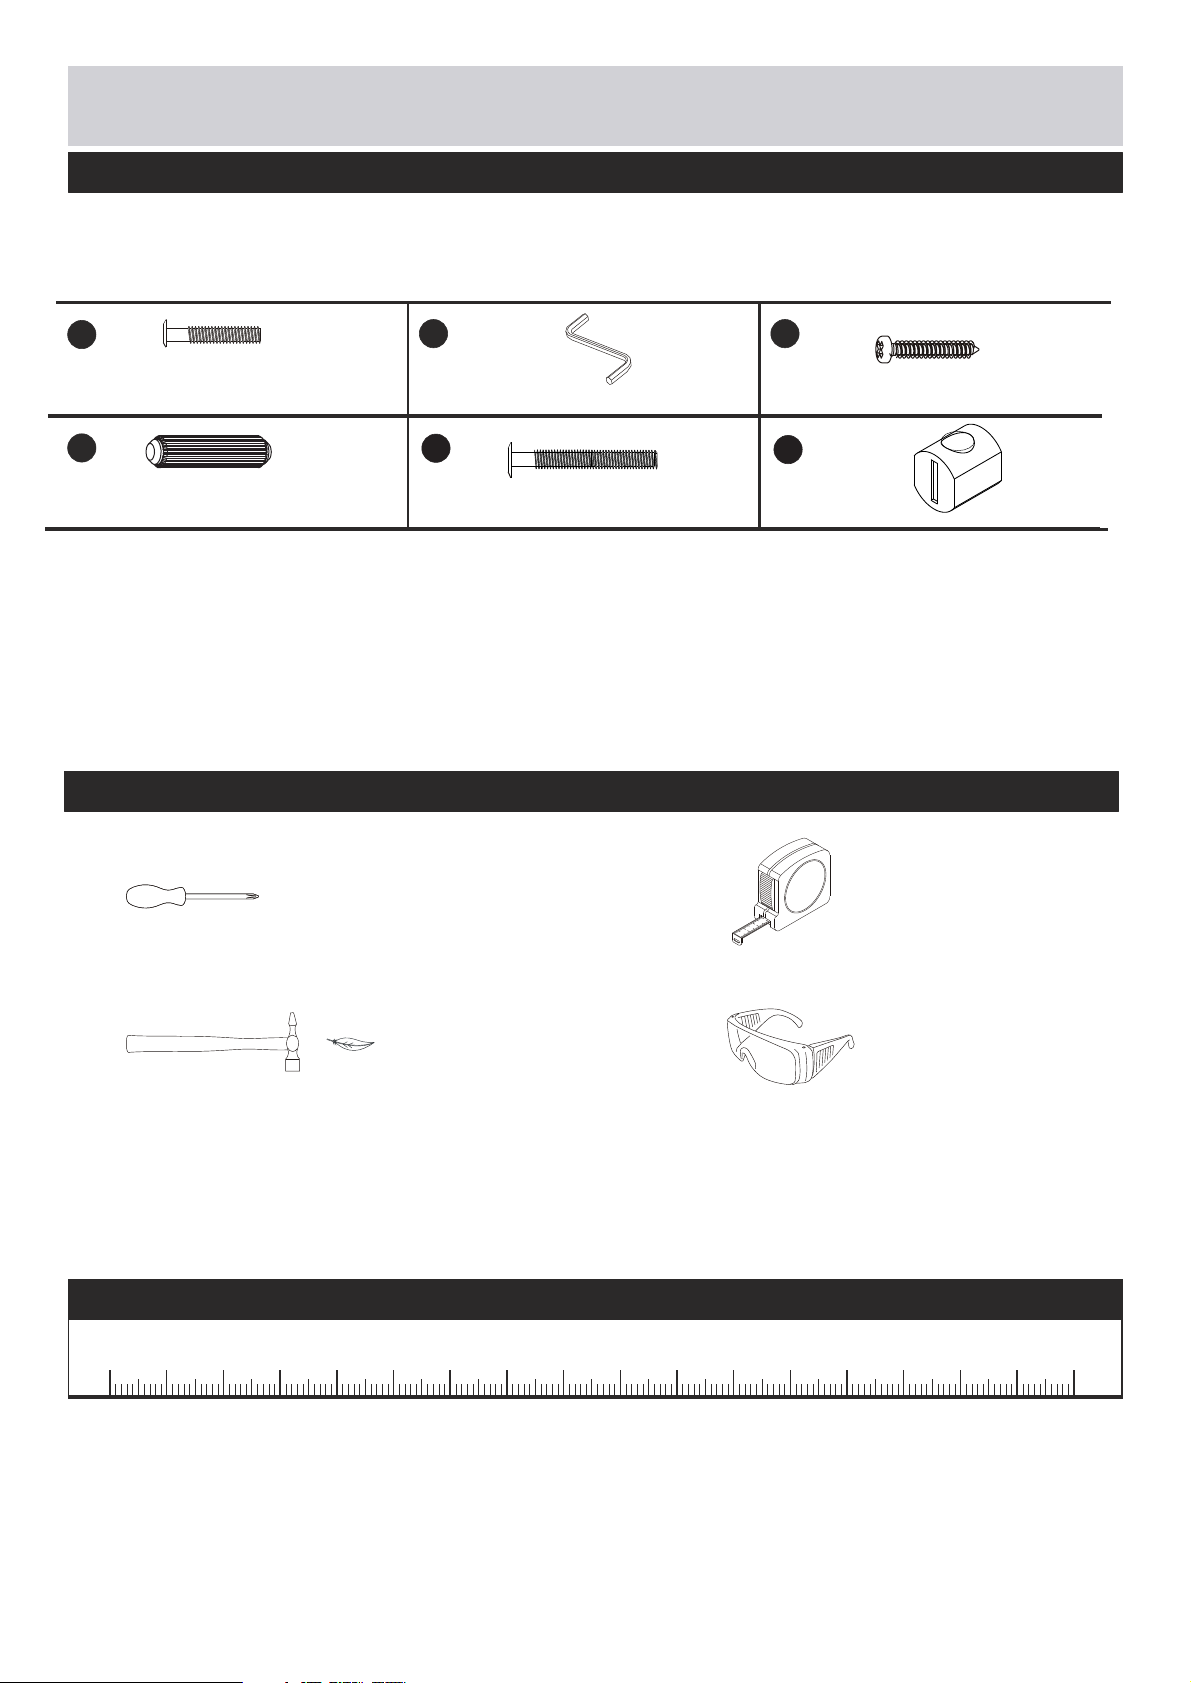
Please check you have all the fittings listed below
Note: The quantities below are the correct amount to complete the assembly. In some cases more
fittings may be supplied than are required.
A
1/4" x 40mm Bolt X 8
D
8,0 x 30mm Wooden dowel
Tools required
Phillips screwdriver
(medium & large)
X 8
B C
Allen key X 1
E
1/4” x 60mm Bolt X 8
3,5 x 25mm Screw
F
Barrel Nut x 8
m
2
Ruler/tape
measure
X 24
Small
hammer
Ruler - Use this ruler to help correctly identify the screws
5
0
10 15 20 25 30 35 40
55
45
50
60 65 70
75
80 85 90 95 100 105 110 115 120 125 130 135 140 145 150 155 160 165 170
Eye protection
(when using a
hammer or glue)
3
Page 5
Assembly Instructions
COT
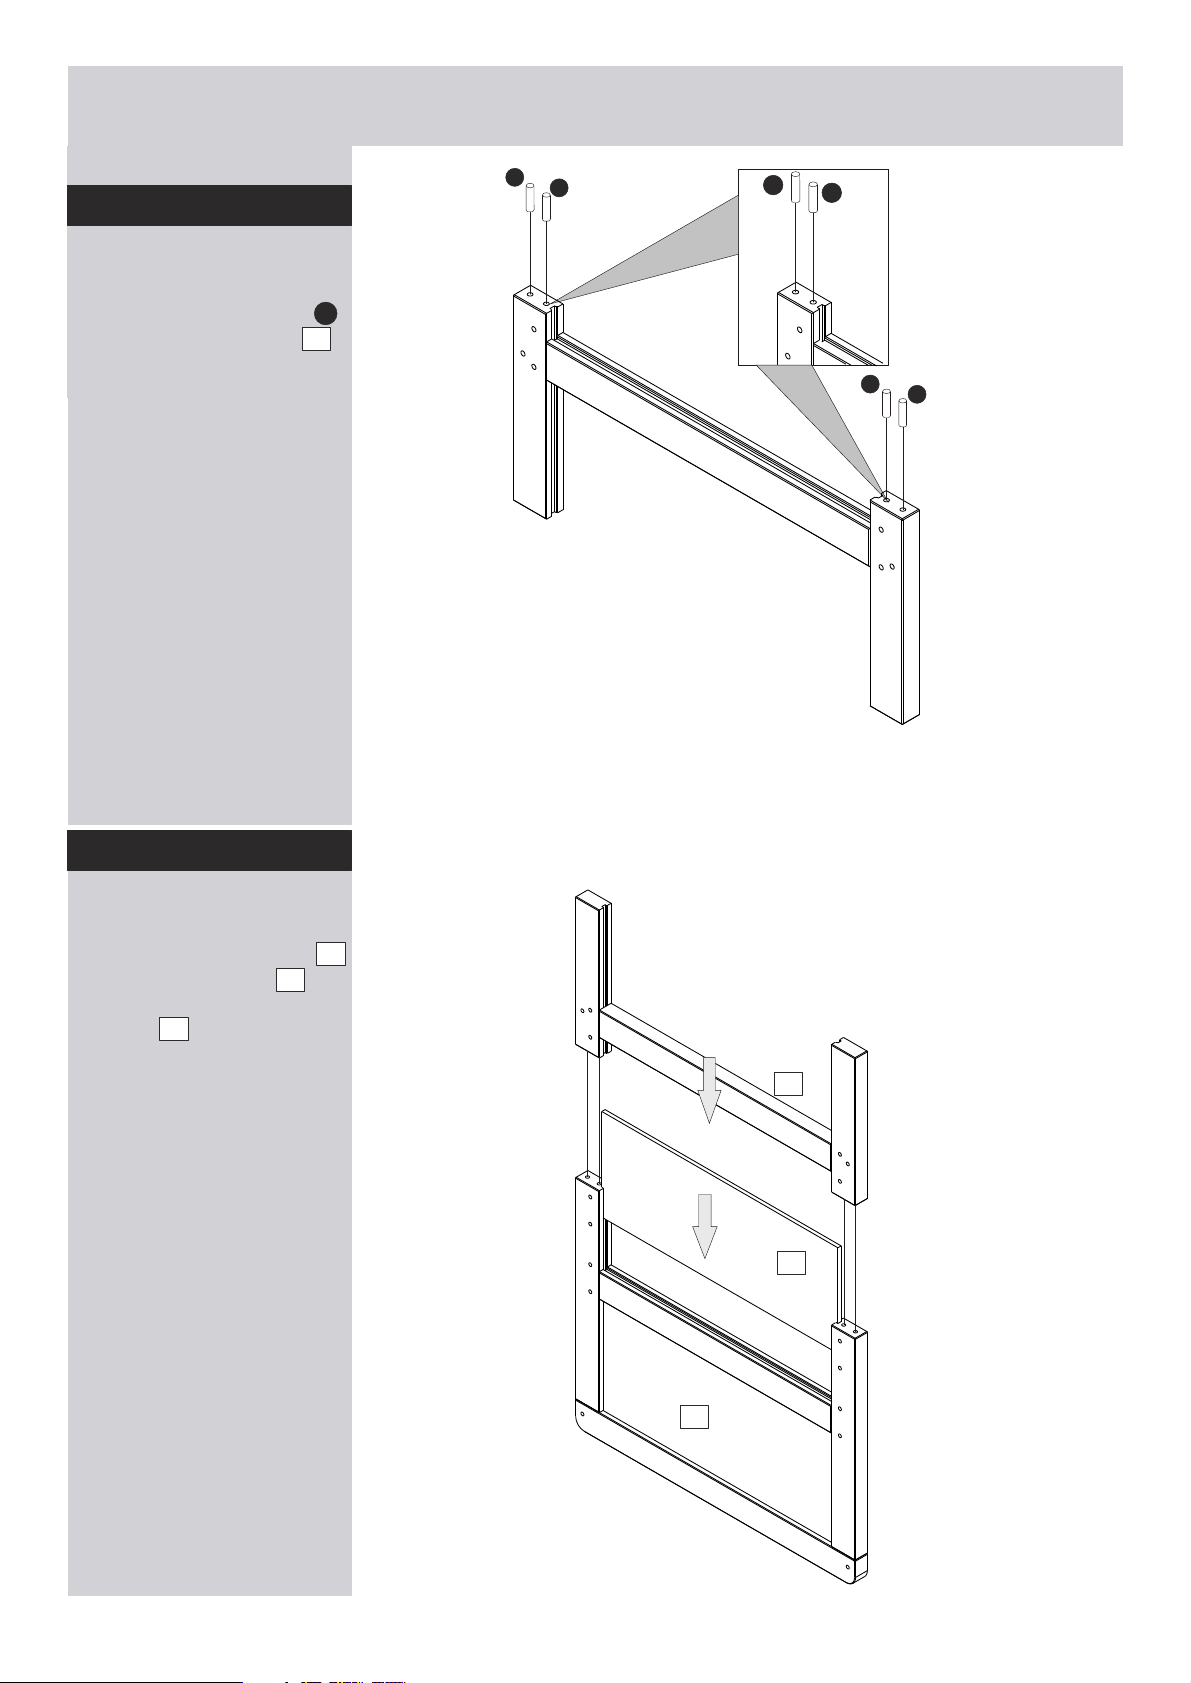
Step 1
Fitting dowels
Insert 4 wooden dowels
Into headboard-bottom
02
D
D
D
D
D
D
D
X 2
Step 2
Assembling headboards
Insert headboard panel ,
into headboard top .
Then attach headboard
bottom as shown.
02
03
01
02
03
X 2
01
4
Page 6
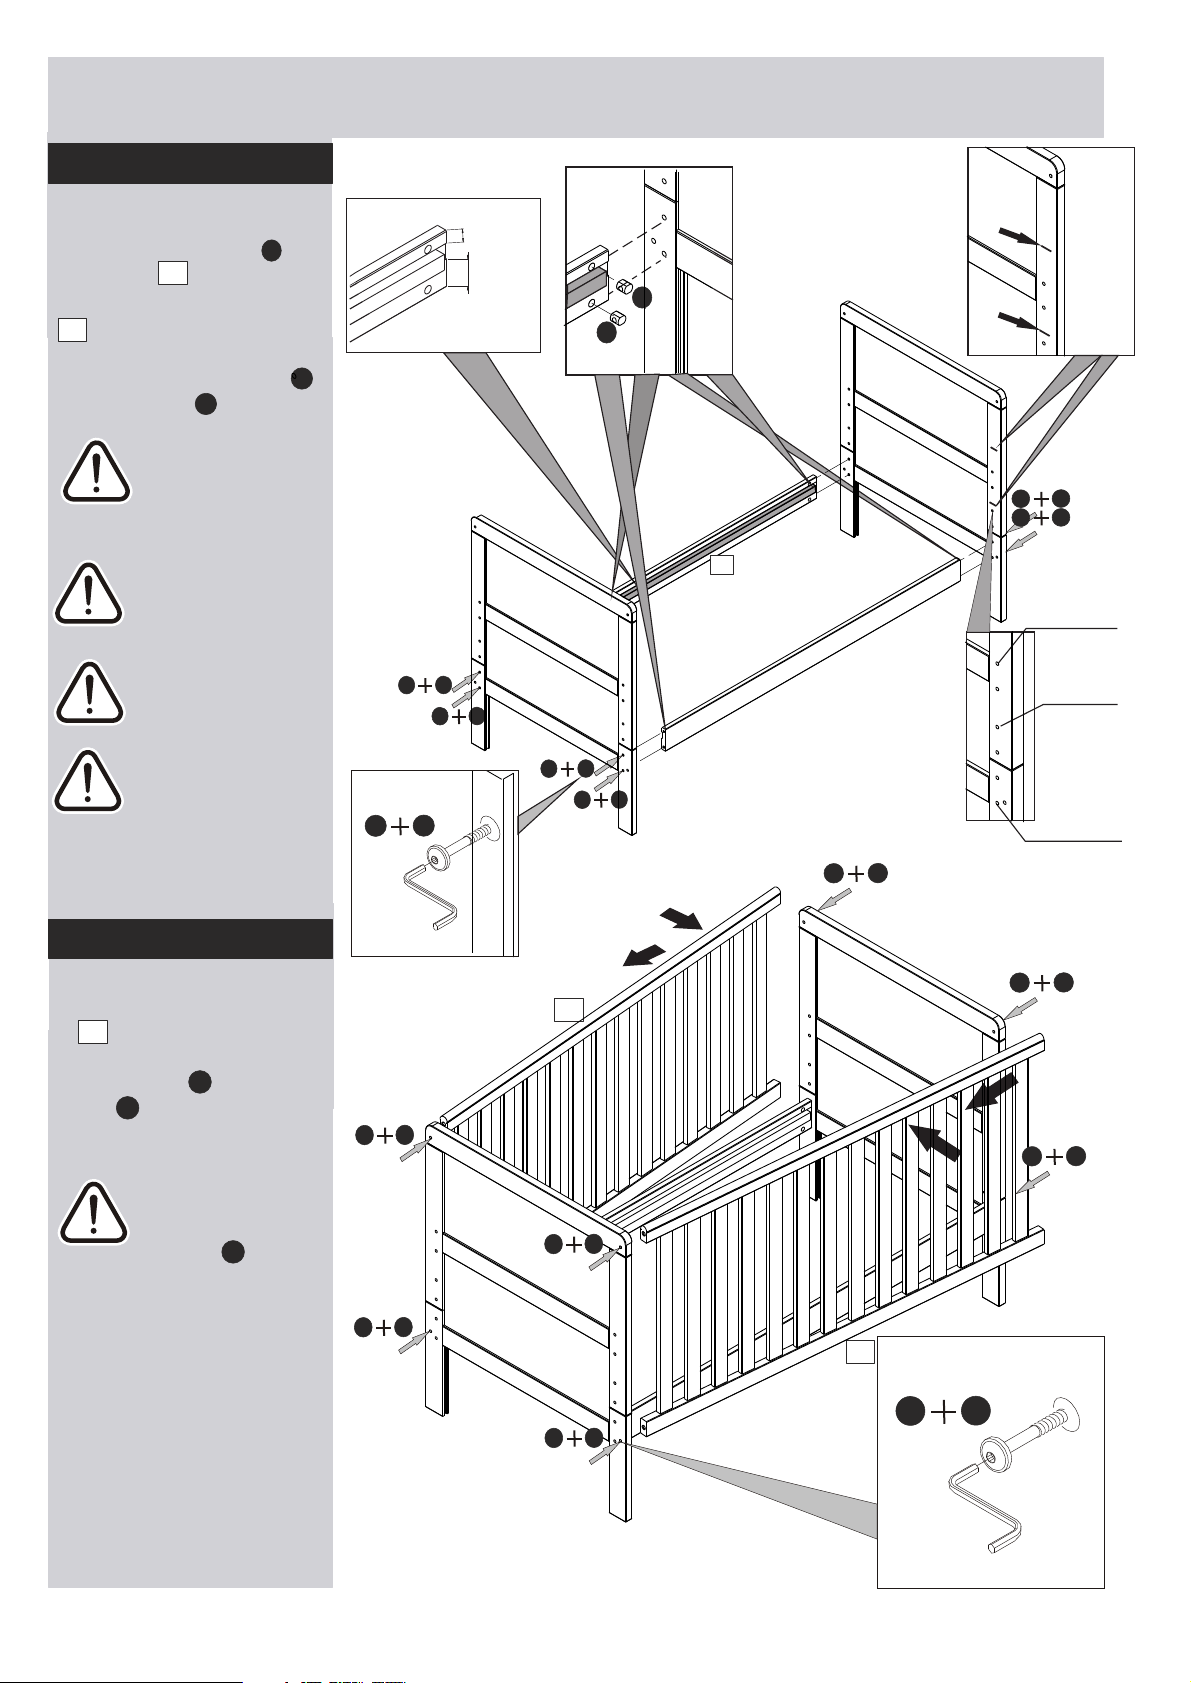
Assembly Instructions
Step 3
Assembling cot bed
a) Insert barrel nuts into
side rails as shown.
05
b) With help fix side rails
05
to the desired height
position in the assembled
headboards using bolts
and allen key .
B
Attention!
To the correct
position of the side
rails before fixing.
Attention!
Ensure mattress
marks on headboard
are facing inward.
Note: Do not fully
tight bolts.
F
E
20mm
45mm
Attention
E
B
B
E
a)
Attention
E
F
F
E
B
E
B
05
Highest
position
Middle
position
Important:Note there
are three height
positions for the base.
The lowest position is the
safest.Please refer to the
first page, warning section
for more information.
Step 4
Carefully fit side frames
04
to the headboards as
shown, then fix them
using bolts and allen
key .
B
A
Finish tighten bolts
on side rails using
allen key .
B
b)
A
A
B
E
B
E
B
E
B
A
04
B
B
A
B
04
Lowest
position
A
A
B
B
A
B
A
B
5
Page 7
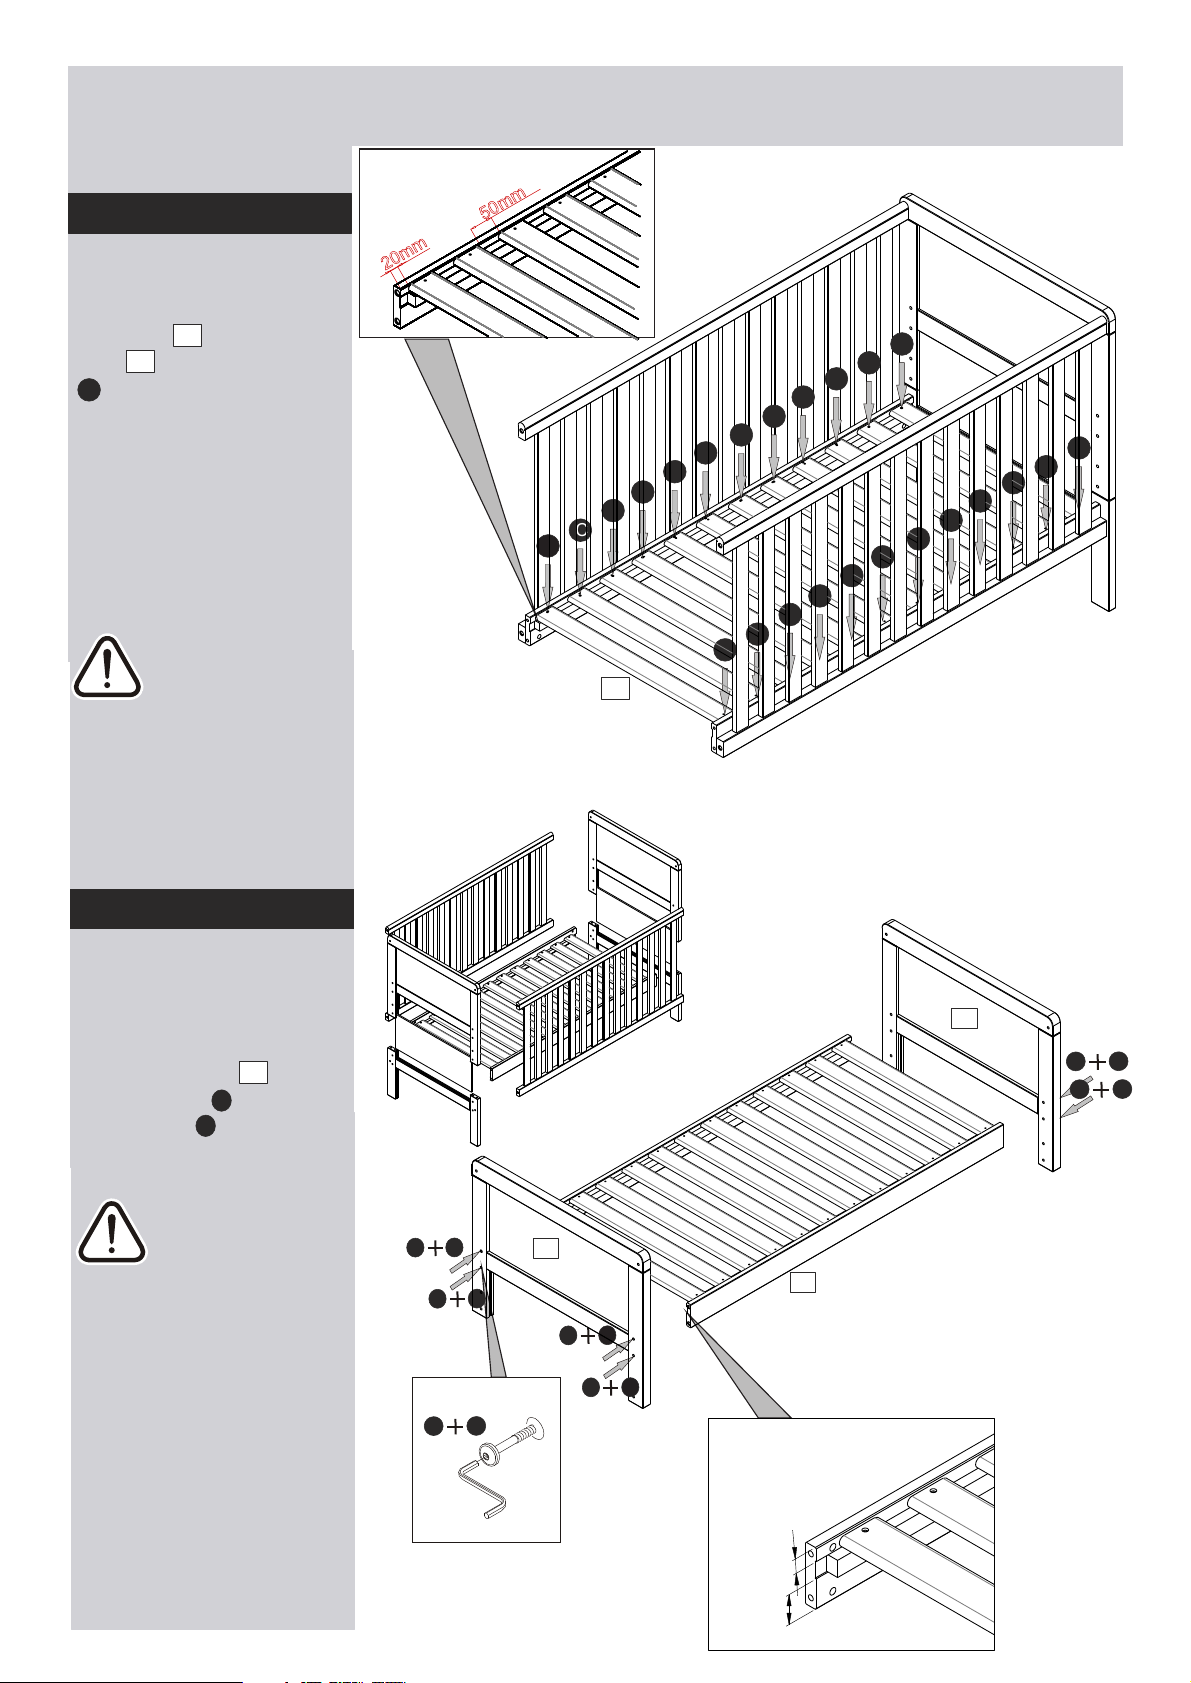
Assembly Instructions
Step 5
Assembling cot base
Fix slats to the side
rails using screws
C
.
06
05
Fix first slats at 20mm from
the side rails ends, then
work towards to the middle
leaving a space of 50 mm
in between each adjacent
slat, as shown.
Make sure slats are
fully pushed to the
sides of the side
rails before fixing. And
countersunk holes are
facing up.
JUNIOR BED
Step 1
C
C
C
C
C
C
C
C
C
C
C
C
C
C
C
C
06
C
C
C
C
C
C
C
C
Assembling junior bed
Fix cot base to the
headboard top
using bolts and
allen key .
01
E
B
Attention to the
correct position of
the side rails before
fixing
01
B
E
E
B
E
B
E
B
E
B
01
05
E
B
E
B
20mm
Assemble is complete.
45mm
6
 Loading...