

Page 1
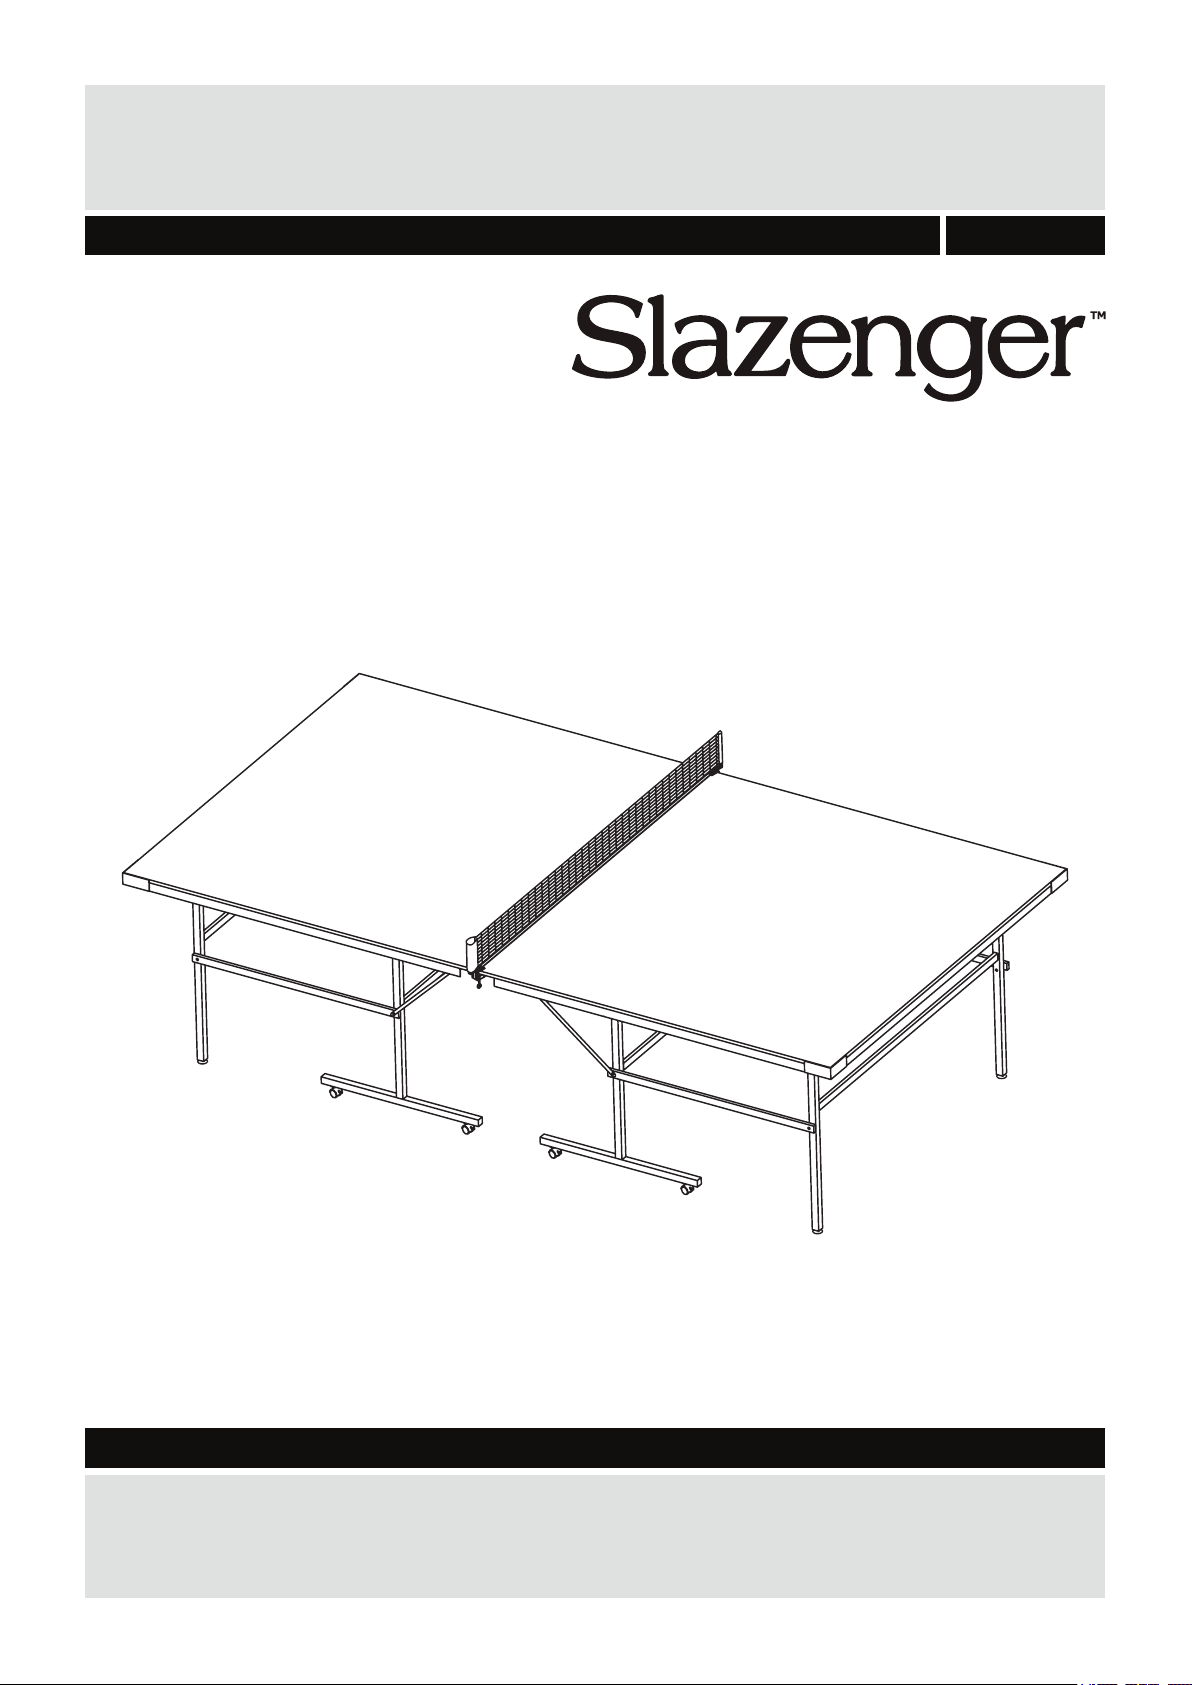
Slazenger Indoor / Outdoor Table Tennis Table Manual
Assembly & User Instructions - Please keep for future reference
335/8663
Important – Please read these instructions fully before assembly or using
These instructions contain important information which will help you get the best from your equipment and ensure
safe and correct assembly, use and maintenance.
If you need help or have damaged or missing parts, call the Customer Helpline: 0845 6000 464
14/09/11
Page 2
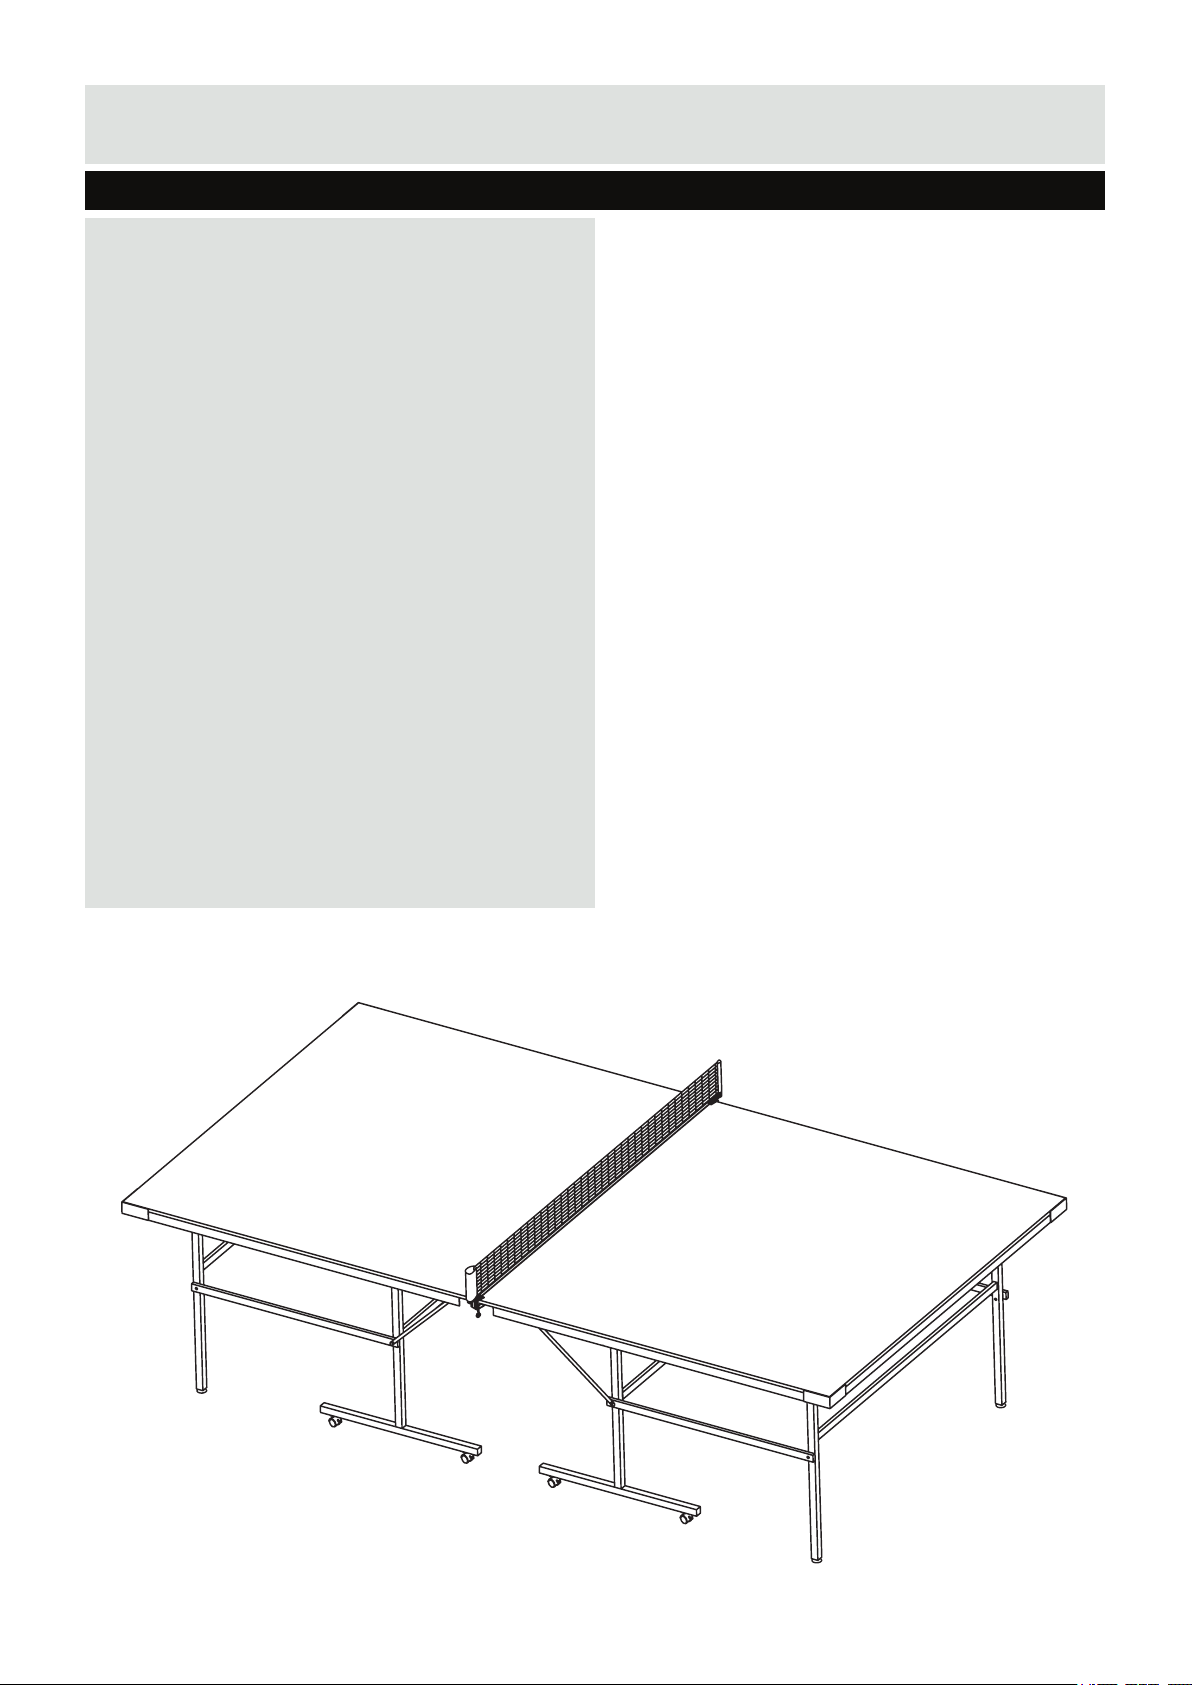
Contents
Safety Information 3
Components - Parts 4
Components - Fixings 5
Assembly Instructions 6-9
Storage 10
Self - Play 11
2
Page 3
Safety Information
Important – Please read fully before assembly or using
To reduce the risk of serious injury, read the entire manual before you assemble or operate the Slazenger Table
Tennis Table. In particular, note the following safety precautions:
Assembly
• Check you have all the components and tools listed,
bearing in mind that, for ease of assembly, some
components are pre-assembled.
• Keep children and animals away from the work area,
small parts could choke if swallowed.
• Make sure you have enough space to layout the
parts before starting.
• Assemble the item as close to its final position as
possible.
• Position the equipment on a clear, level surface.
• Dispose of all packaging carefully and responsibly.
• This item is heavy and requires two adults to
assemble, lift or manoeuvre.
Using
• This table is suitable for indoor and outdoor use, but
must be stored indoors when not in use.
• It is the responsibility of the owner to ensure that all
users of this product are properly informed of how to
use it safely.
• This product is intended for domestic use only. Do
not use in any commercial, rental, or institutional
setting.
• Before using the equipment to exercise, always do
stretching exercises to properly warm up.
• If the user experiences dizziness, nausea, chest
pain, or other abnormal symptoms stop the workout
and seek immediate medical attention.
• Keep hands away from all moving parts.
• Always wear appropriate workout clothing when
exercising. Do not wear loose or baggy clothing,
since it may get caught in the equipment. Wear
athletic shoes to protect your feet while exercising.
• Do not place any sharp objects around the
equipment.
• This product conforms to BS EN 14468.
WARNING
DO NOT LET CHILDREN PLAY
ON OR NEAR THE TABLE WHEN
THE TABLE IS IN THE VERICAL
IMPORTANT
BE VERY CAREFUL WHEN
MOVING THE TABLE ON A
SLOPED SURFACE
STORAGE POSITION
DO NOT LET CHILDREN FOLD OR UNFOLD THIS TABLE, THIS SHOULD ONLY BE PERFORMED BY
AN ADULT. WHEN UNFOLDING, NEVER LET THE TABLE DROP UNSUPPORTED, HOLD THE TABLE
SECURELY AND LOWER SLOWLY UNTIL SECURE.
Warning: Before beginning any exercise program, consult your Doctor. This is especially important for
persons over the age of 35 or persons with pre-existing health problems. You MUST read all instructions before
using this equipment. Argos and its associates assumes no responsibility for personal injury or property damage
sustained by or through the use of this product.
3
Page 4
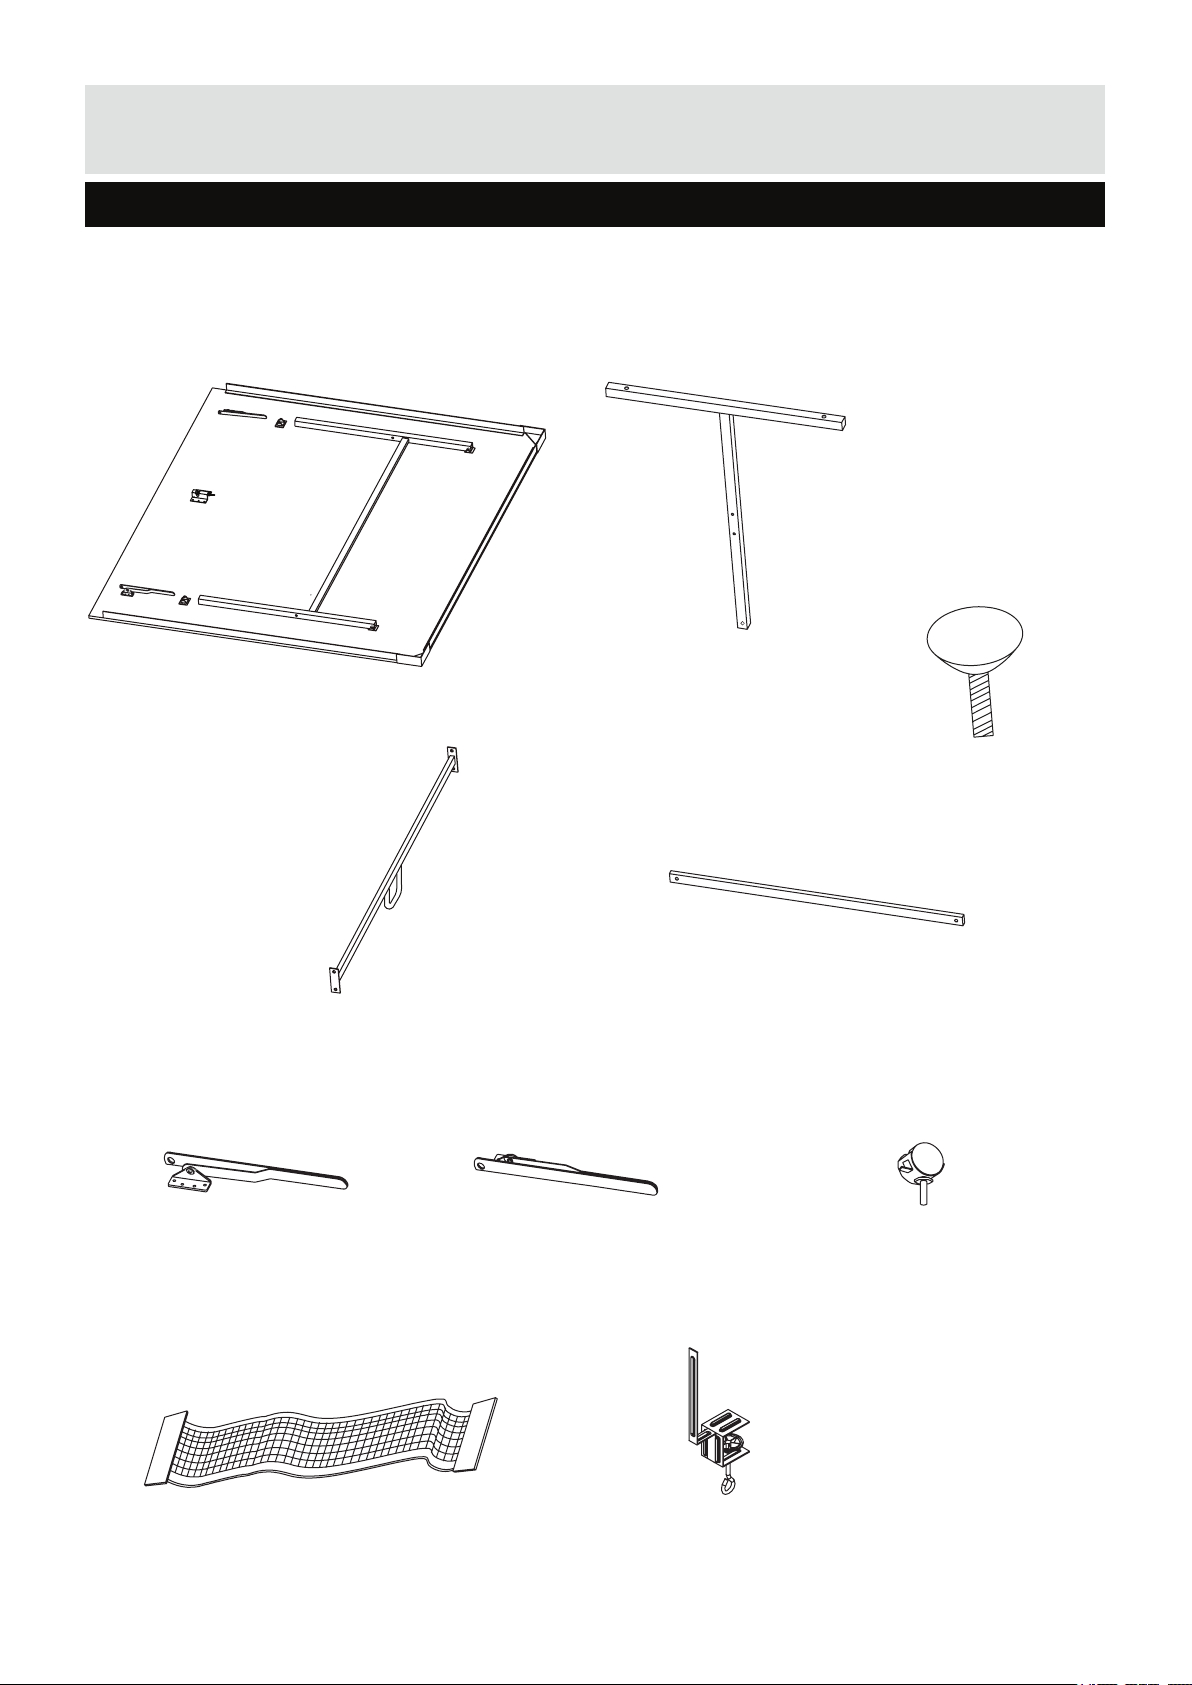
Components - Parts
Please check you have all the parts listed below
Note: Some of the smaller components may be pre-fitted to larger components. Please check carefully before
contacting Argos regarding any missing components.
2. INNER LEG X 4
1. PLAYFIELD X 2
4. INNER LEG SUPPORT BAR X 2
6. FOLDING LEG
SUPPORT BRACKET RIGHT X 2 (PRE-FITTED)
7. FOLDING LEG
SUPPORT BRACKET LEFT X 2 (PRE-FITTED)
3. Leveller X 4
5. LINKAGE TUBE X 4
8. LOCKING CASTOR X 8
9. NET X 1
4
10. NET POST X 2
Page 5
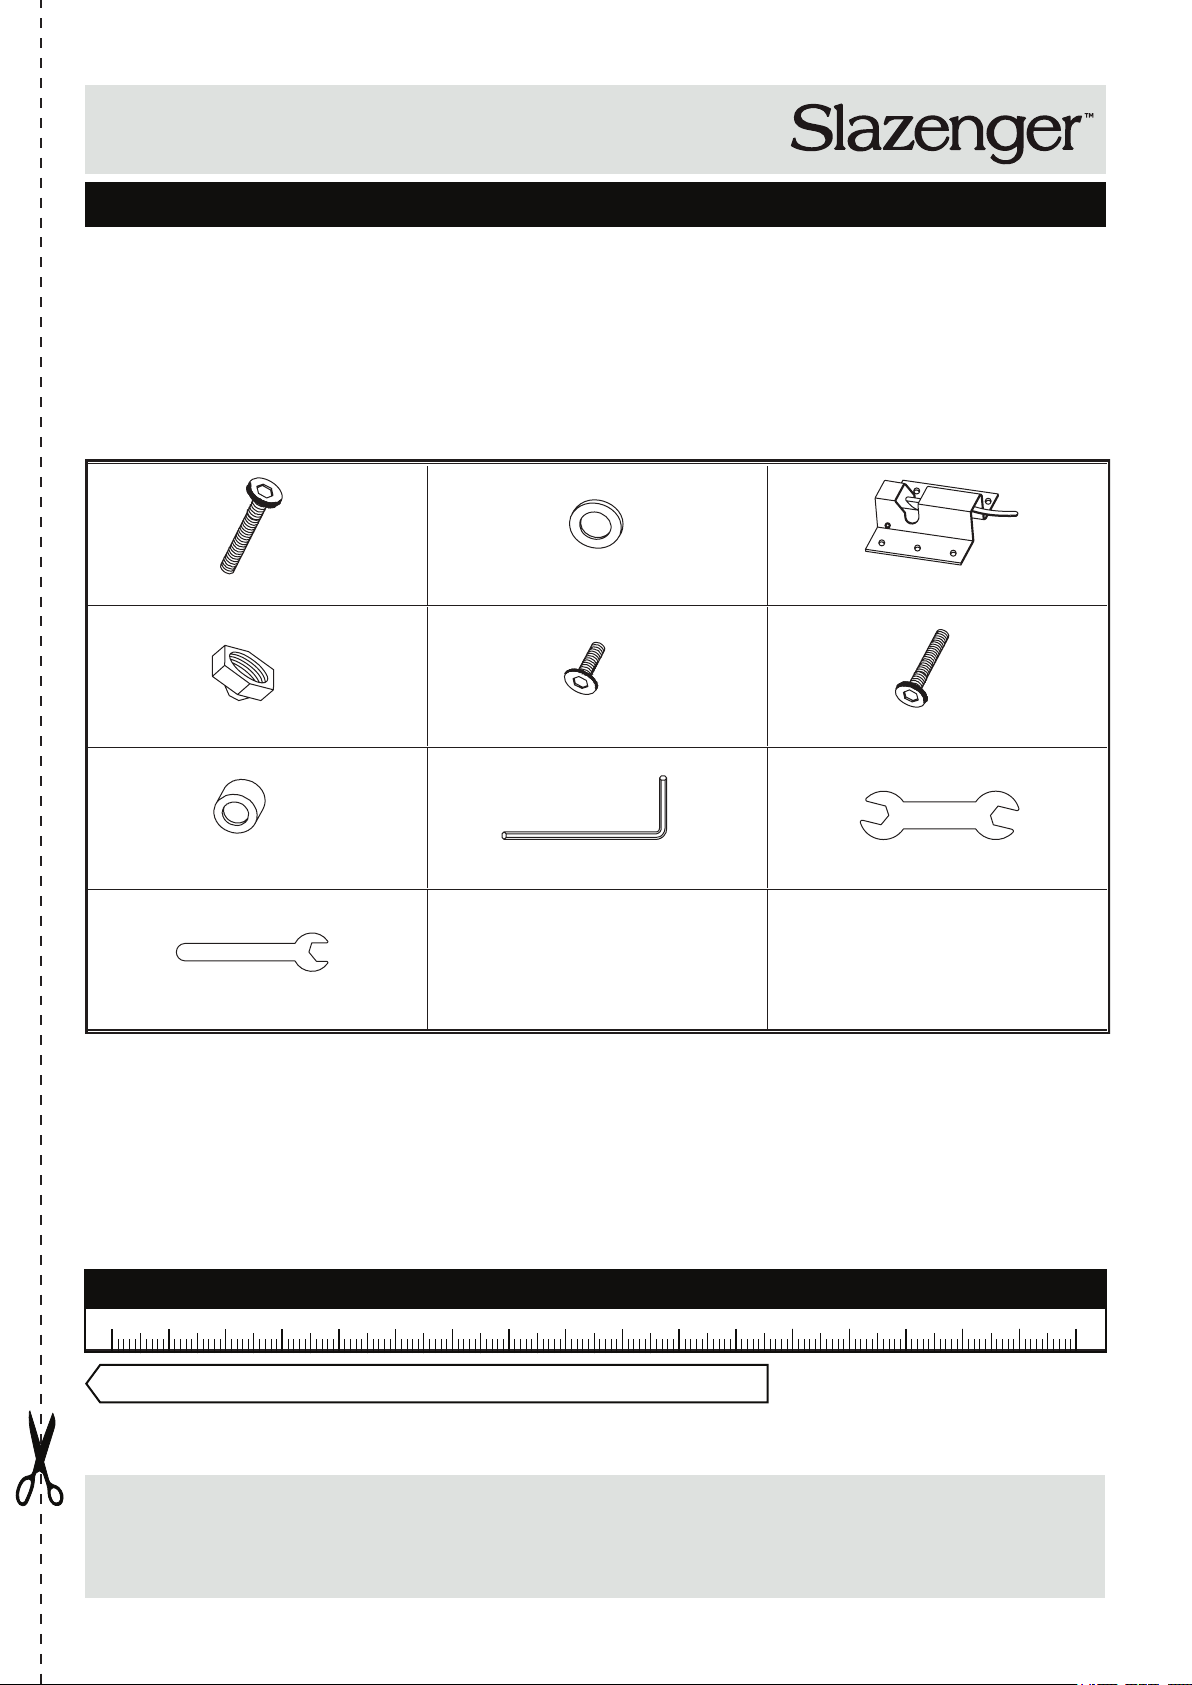
Components - Fixings
Please check you have all the fixings listed below
Note: Some of the fixings are pre-fitted to the larger components. Please check carefully before contacting Argos
regarding any missing fixings.
11
Allen Bolt
6mm x 45mm x 8
14 15
Nylock Nut 6mm x 16 (PRE-FITTED x 8)
17
16mm Bush x 8
20
Spanner 19 mm x 1
(PRE-FITTED x 4)
12 13
6mm Washer x 32
Allen Bolt
6mm x 15 mm x 12
18 19
(PRE-FITTED x 12)
(PRE-FITTED x 4)
4mm Allen Key x 1 Spanner 11 mm & 13 mm x 1
Safety lock x 2 (PRE-FITTED)
16
Allen Bolt 6mm x 70 mm x 8
Ruler - Use this ruler to help correctly identify the hardware
0 5
10 15 20 25 30 35 40 45 50 55 60 65 70 75 80 85 90 95 100
Note: Cut out this page to help fixing identification during assembly.
If you have damaged or missing components, call the
Customer Helpline: 0845 6000 464
105
110 115 120 125 130 135 140 145 150 155 160 165 170
5
Page 6
Assembly Instructions
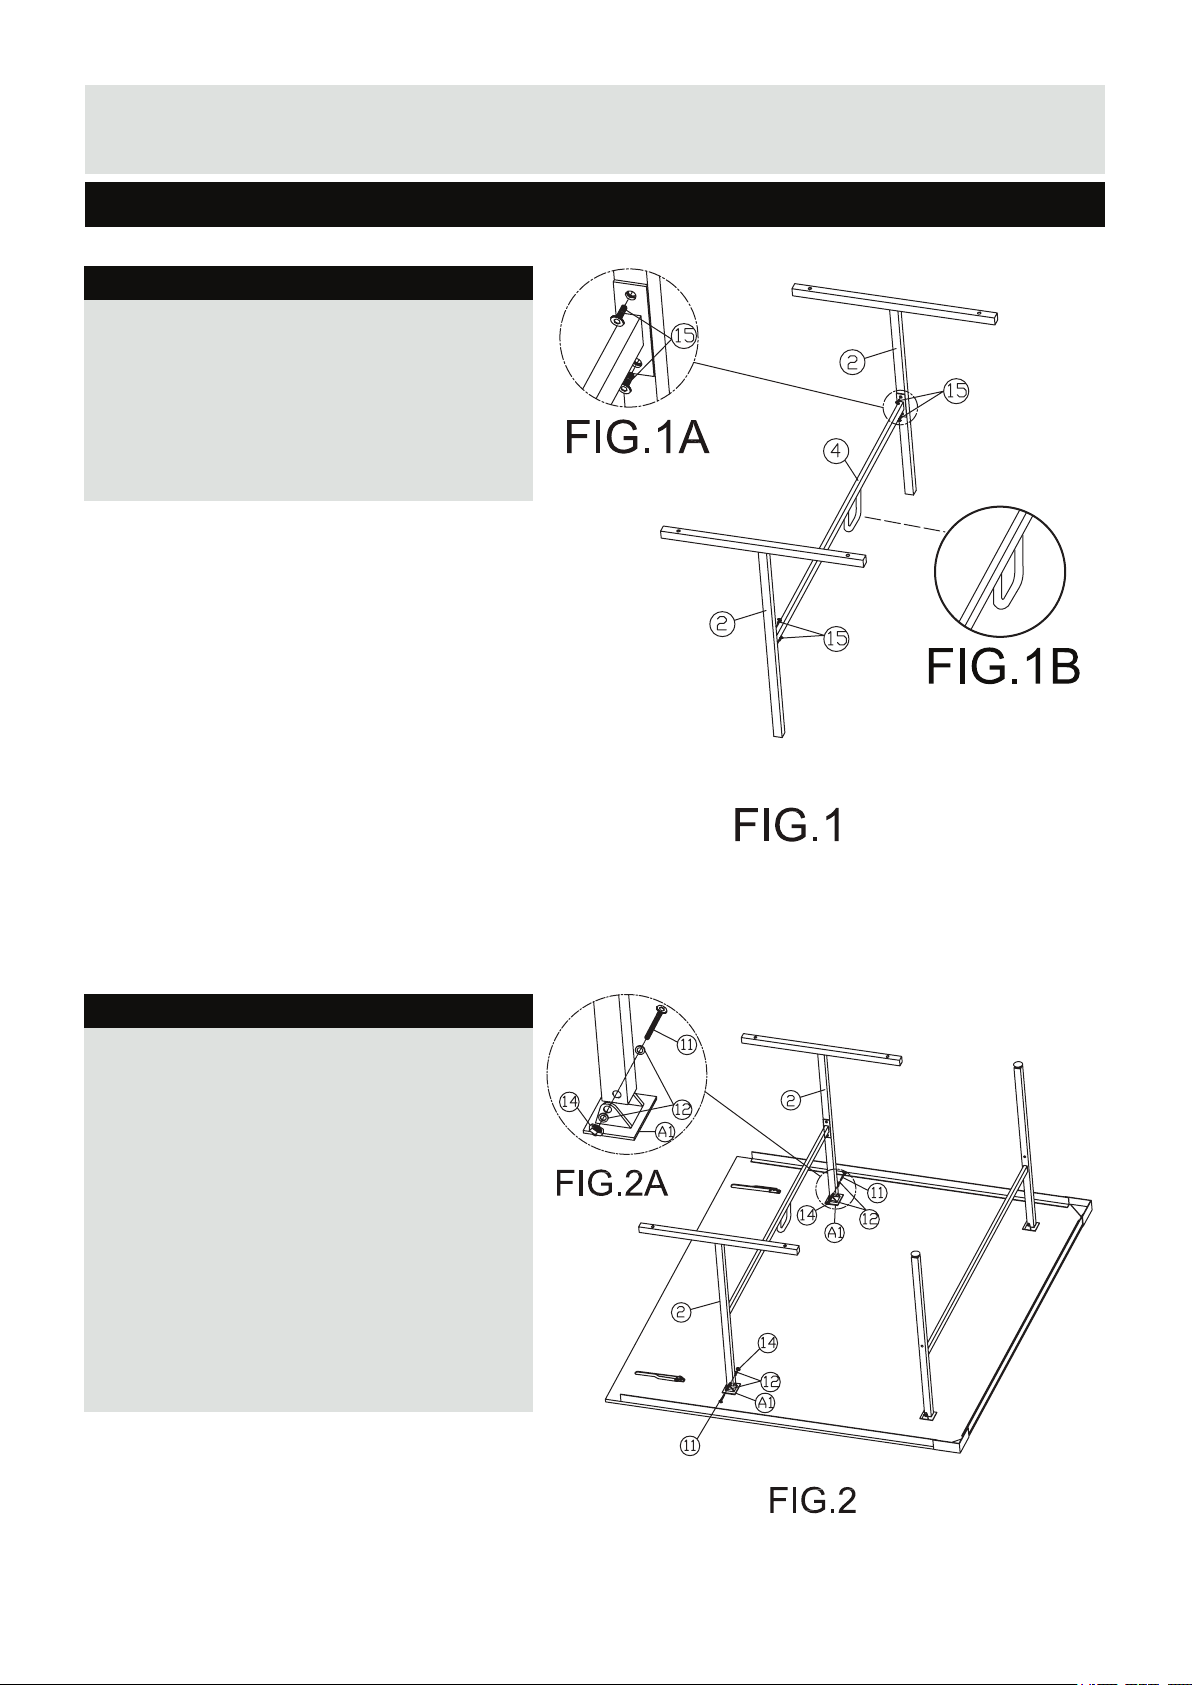
Step 1
Attach the Support Bar (4) to the Inner Legs (2)
using four bolts (15). See Fig.1/1A.
Note: Orientation of safety lock loop on part 4.
See Fig.1/1B.
Step 2
Attach the Inner Legs (2) to the per-installed
Bracket (A1) using one Bolt (11), two
Washers(12) and one Nylock Nut (14) per leg.
See Fig. 2/2A.
NOTE: The bolt goes through the washer,
through bracket, through the inner leg, through
the bracket, through the washer, before
attaching the nylock nut. Repeat Steps 1 & 2 for
the other table half.
DO NOT OVER TIGHTEN.
6
Page 7
Assembly Instructions
FIG.3
FIG.3A
A
FIG.3B
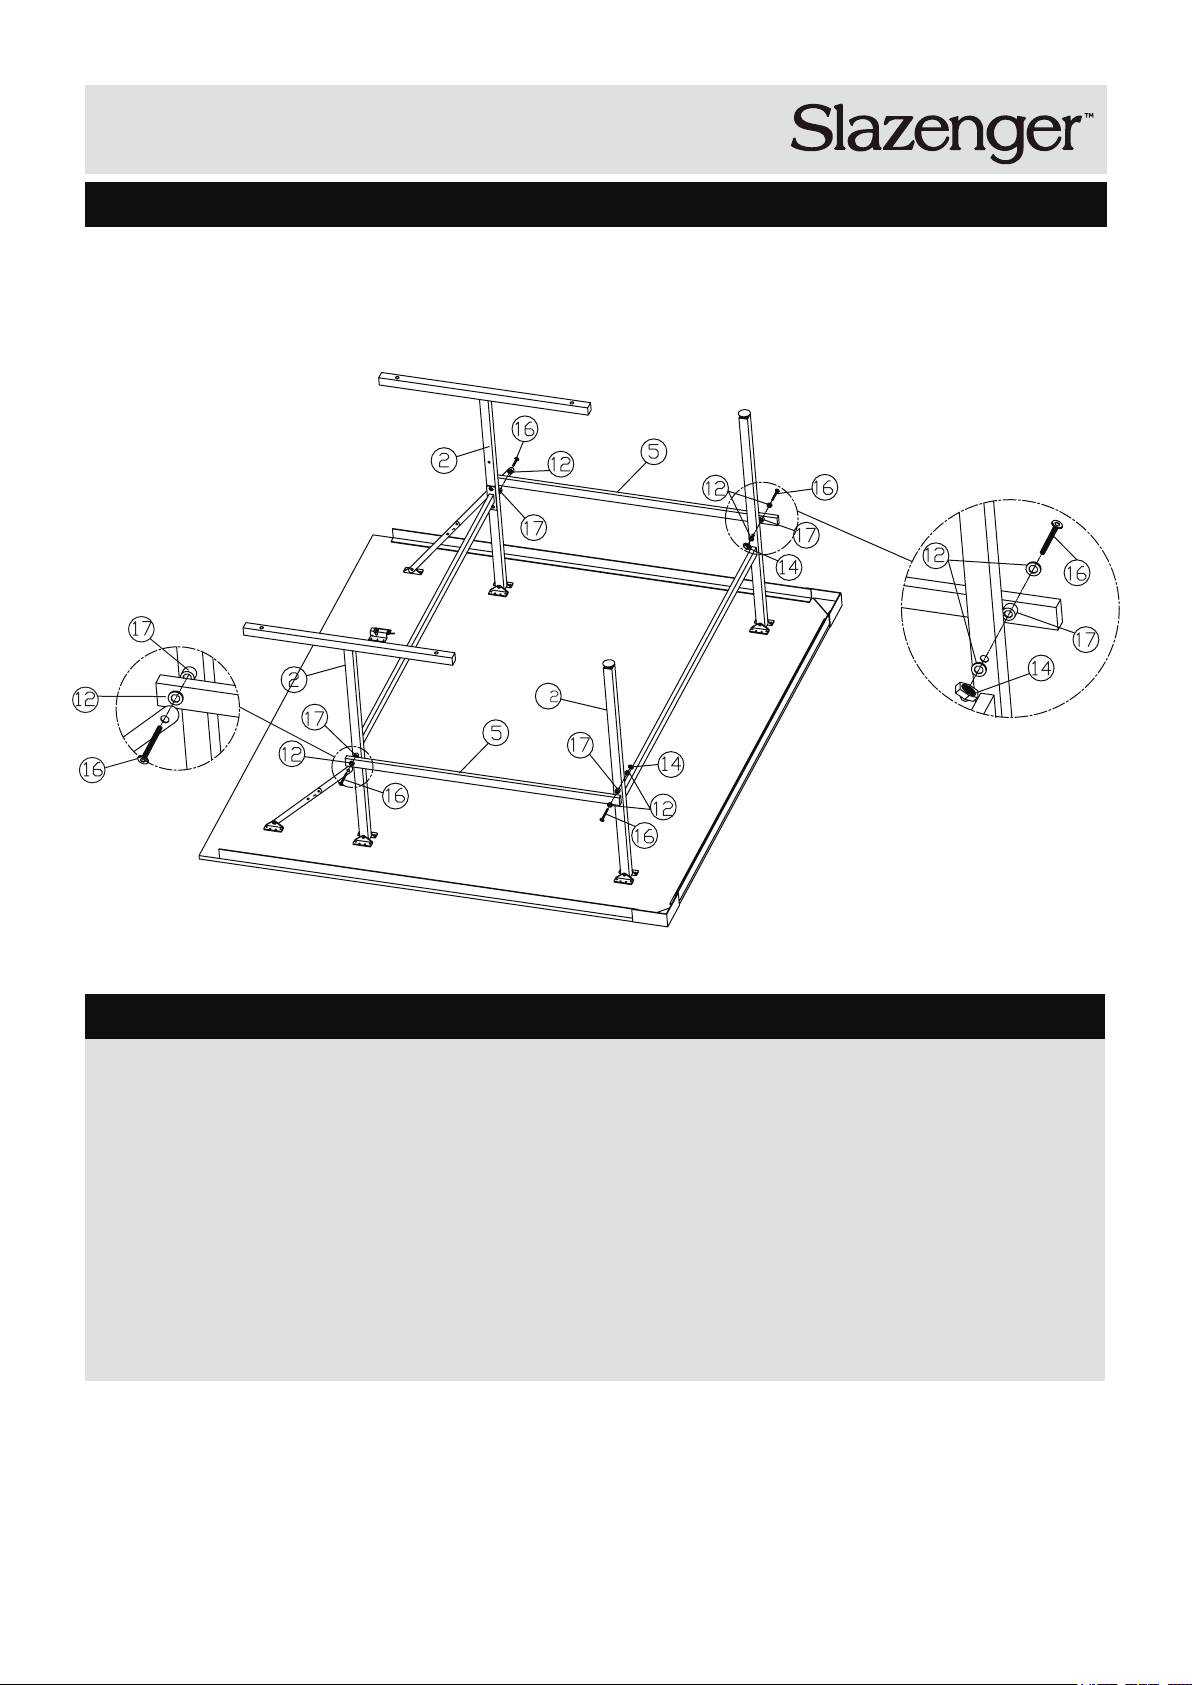
Step 3
a) Attach Linkage tubes (5) to the
outside face of the inner legs (2),
using 1 x bolt (16), 1 x Washer (12)
& 1 x Bush (17) per linkage tube.
See Fig.3/3A.
Note: The bolt passes through the
support bracket, through the washer,
through the Linkage tube, through
the bush, through the leg before
screwing into the support bar.
b) Attach the other ends of Linkage
tubes (5) to the outside face of outer
legs (A2) using 1 x Bolt (16), 2 x
Washers (12) & 1 x Bush (17) & 1
Nylock nut (14) per linkage tube See
Fig.3/3B.
Note: The bolt passes through the
washer, through the linkage tube,
through the bush, through the outer
leg, through the 2nd washer, before
attaching nylock nut.
c) Repeat for other table half
7
Page 8
Assembly Instructions
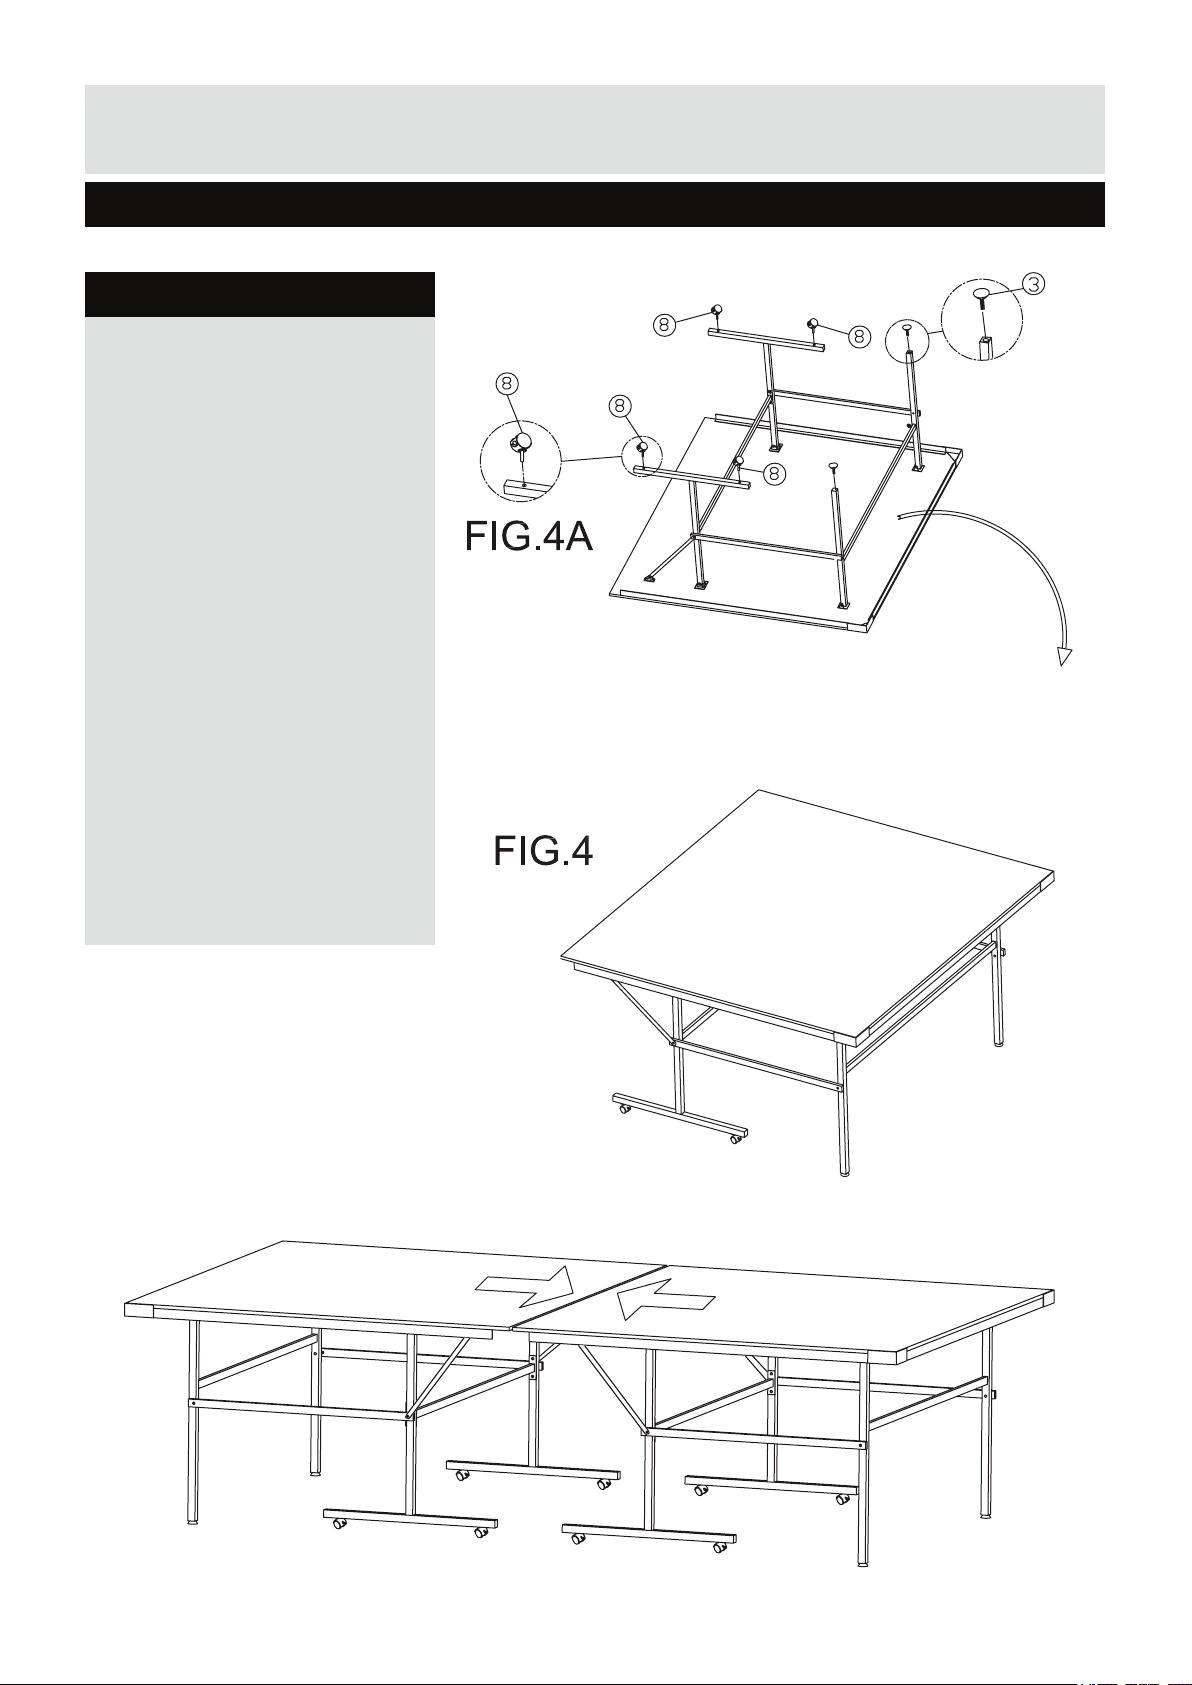
Step 4
a) Fix 4 x Locking Castors (8)
into inner legs and tighten with
Spanner(20). See Fig.4/4A
b) Fix 2 x levellers (3) to outer legs.
c) Using at least 2 Adults, stand
table upright grasping only the table
top and not any of the leg parts. Do
not allow it rest on leg sides or table
edges or damage may result.
d) Repeat for other half of table and
position both halves of table in
playing position.
8
Page 9
Assembly Instructions
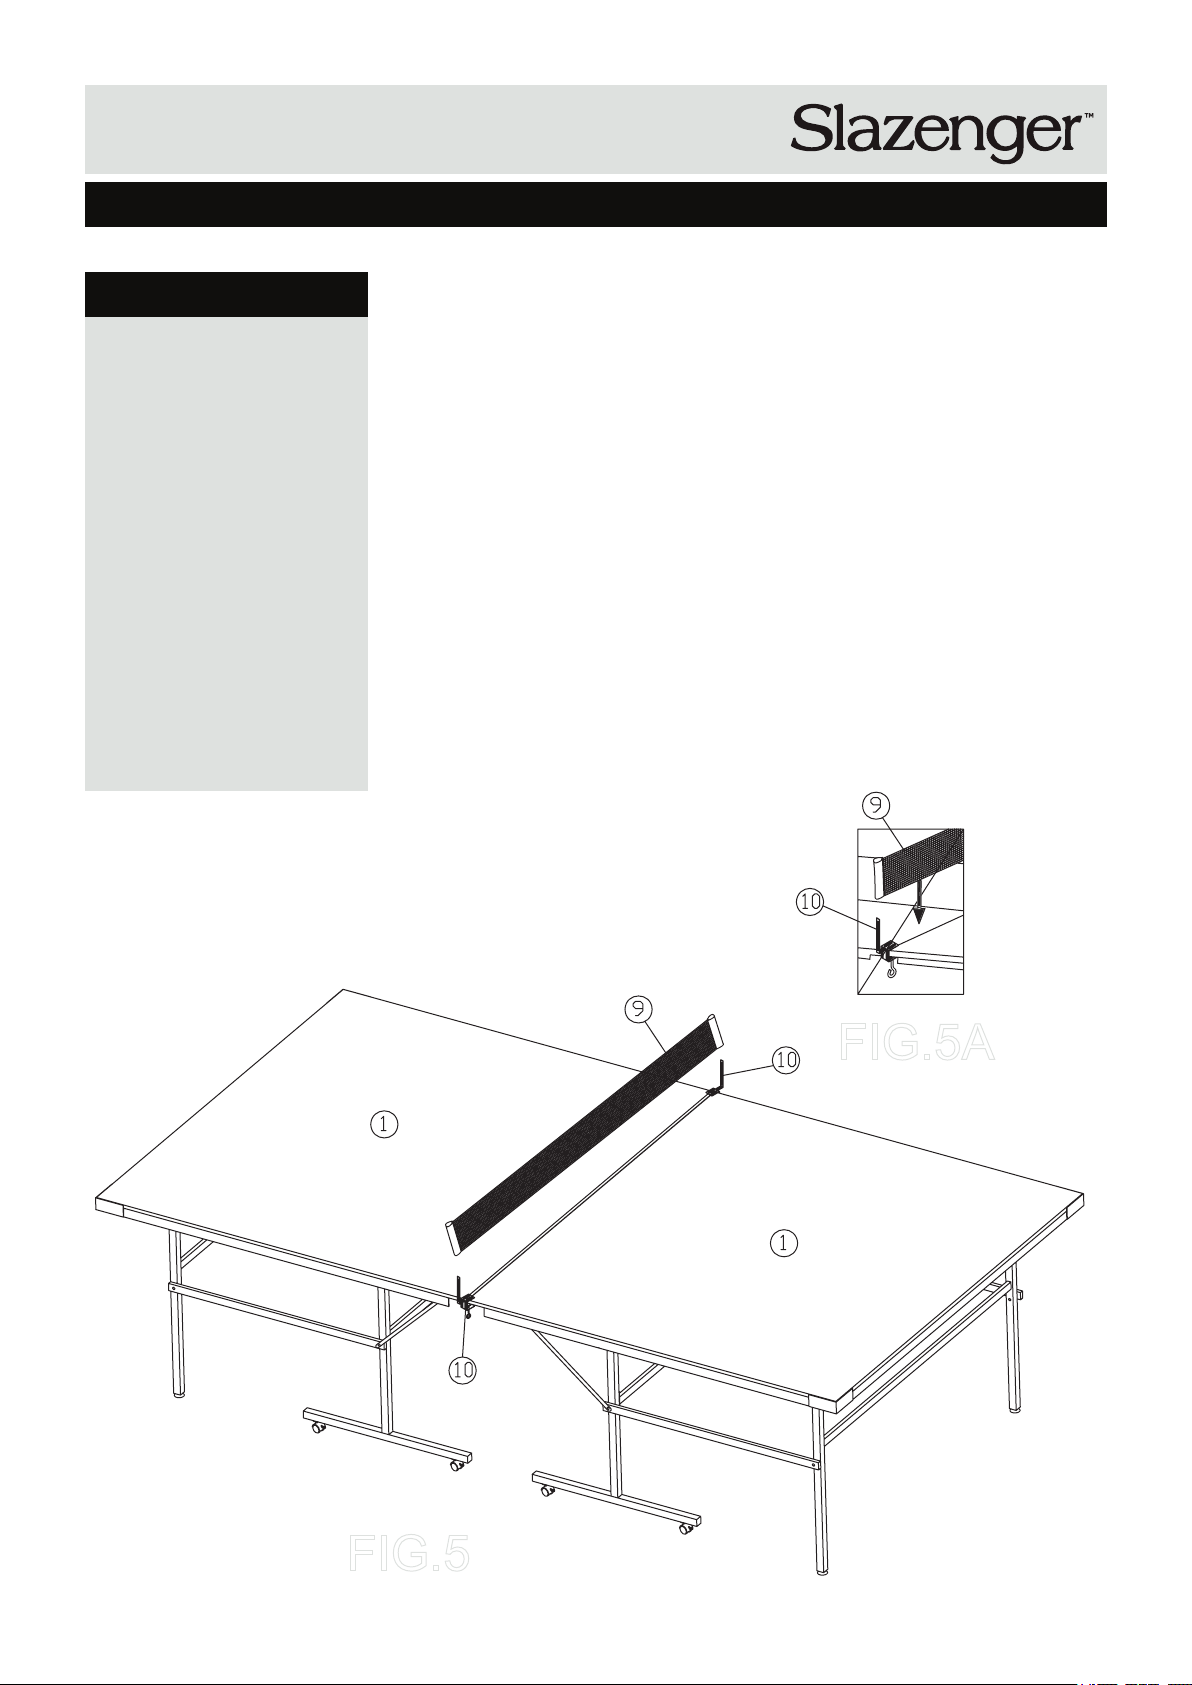
Step 5
a) Place the Net Post Sets
(10) onto both sides of the
same table half .See Fig 5.
b) Slide Net (9) over one of
the posts, stretch to the other
side of table and slide over
the second post. See Fig .5A
FIG.5
FIG.5A
9
Page 10
Storage
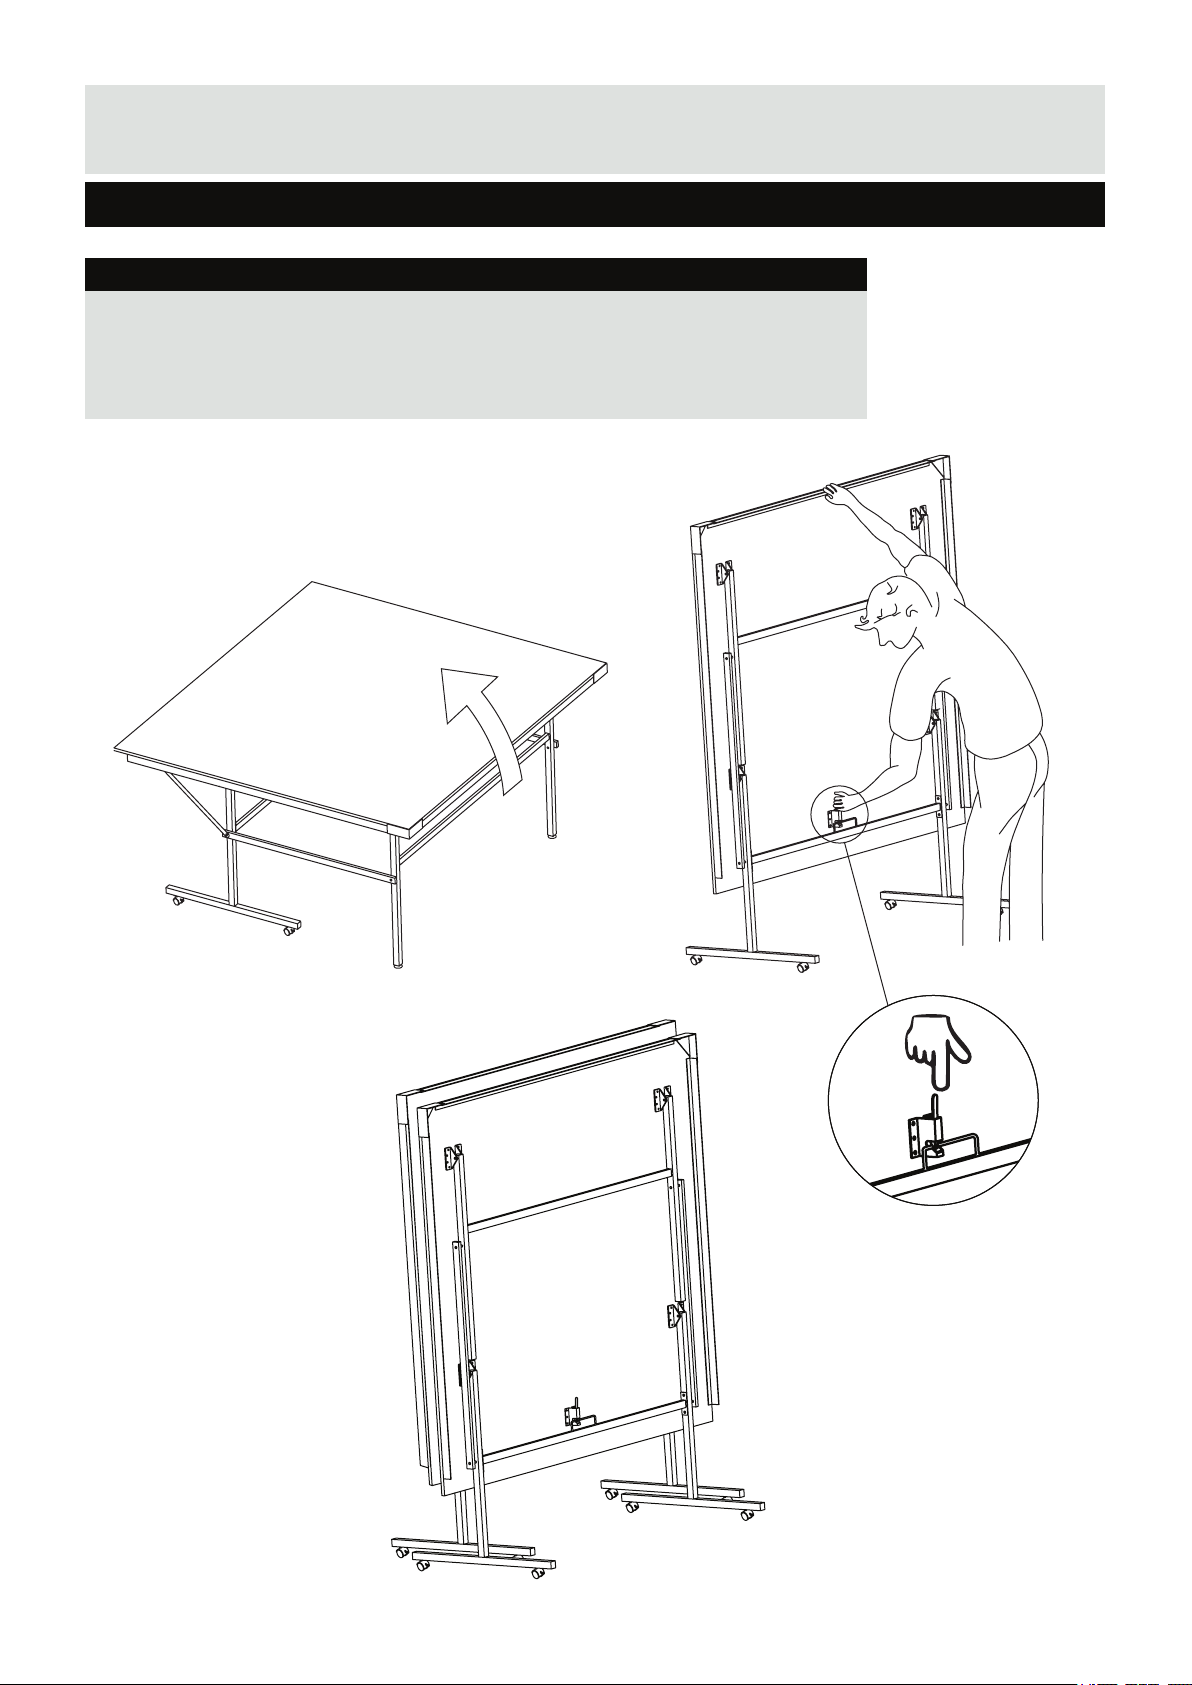
When not in use, your table should be folded up ensuring that the safety catches
are fully engaged. See Fig.6 Whilst the table can be used indoors and outdoors, it
must always be stored indoors.
10
Fig.6
Page 11
Self Play
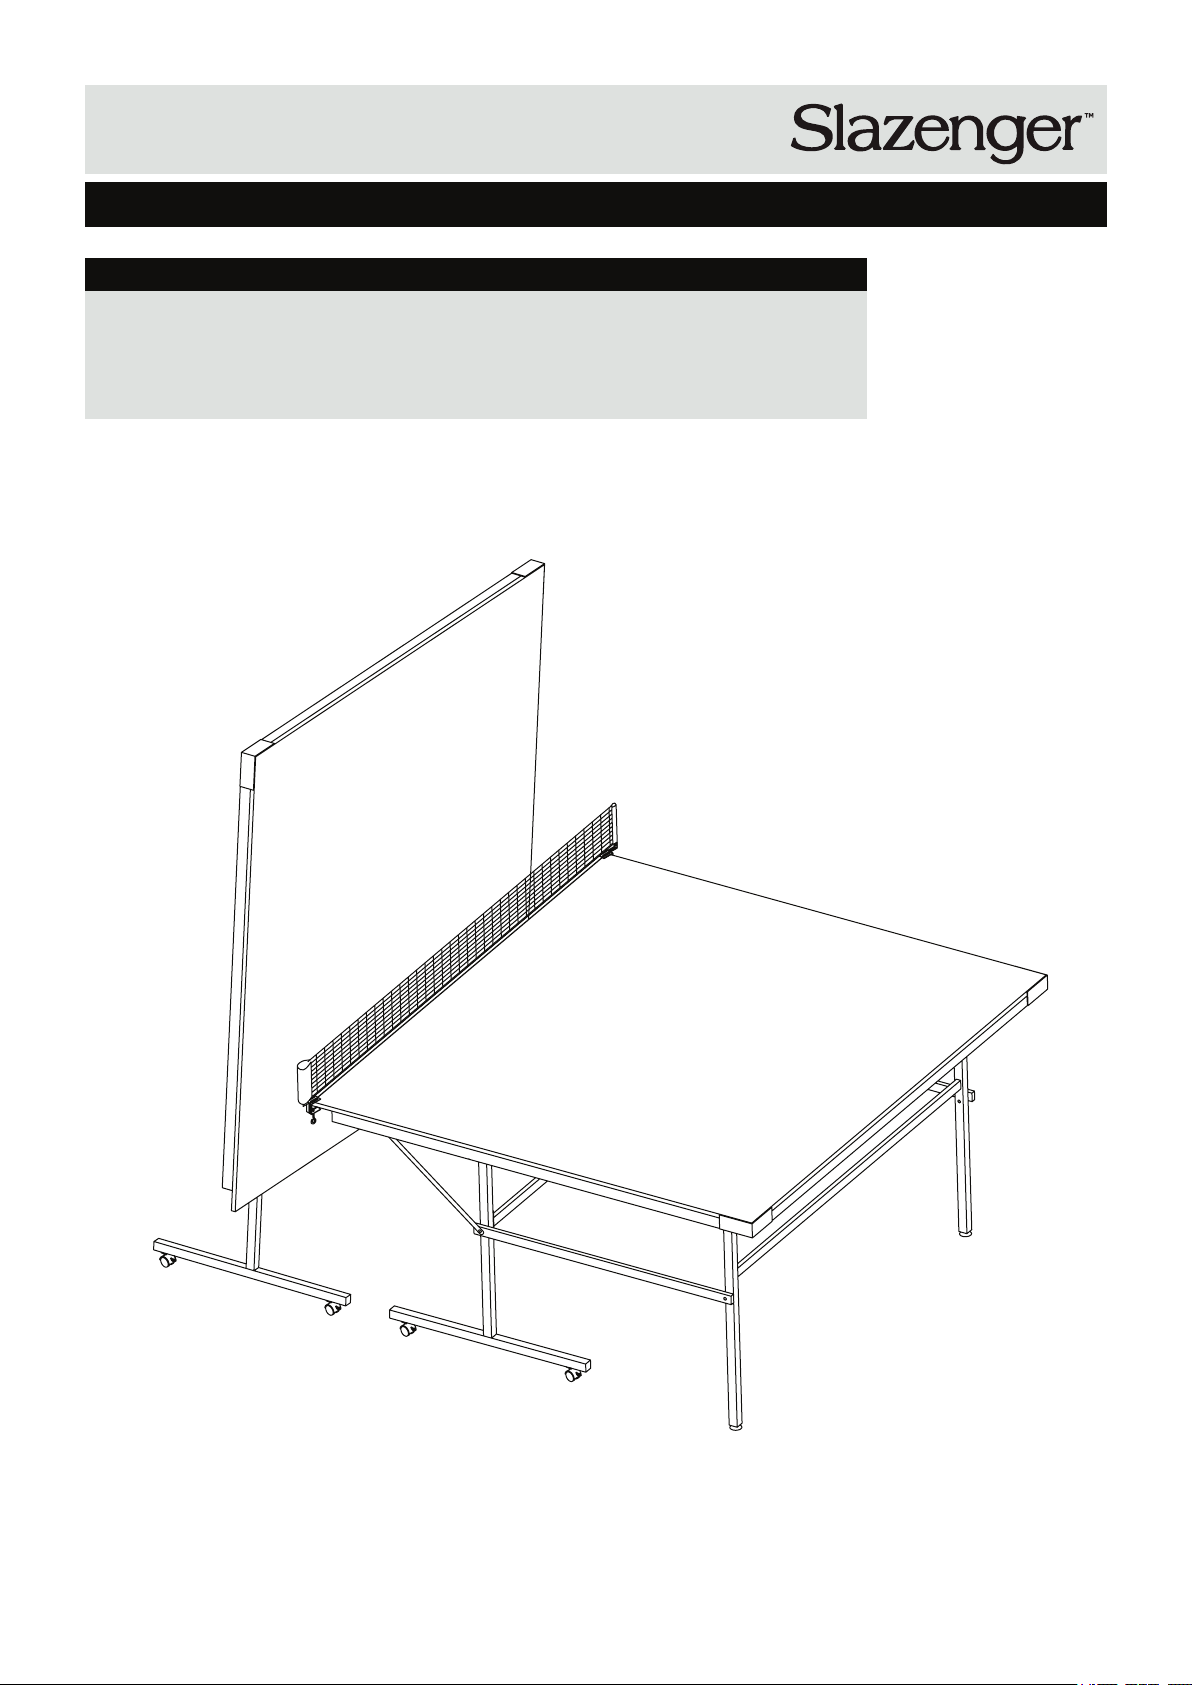
This Slazenger Table Tennis Table can be used in a “self play” set up. To do this,
reposition the net onto one half of the table, fold up the other half, engage the safely
catch and position the table halves accordingly.
11
Page 12

AN AUTHORISED LICENCEE OF EVERLAST WORLD WIDE INC. FCSI LTD
CUSTOMER HELPLINE : 0845 6000 464
 Loading...