

Page 1
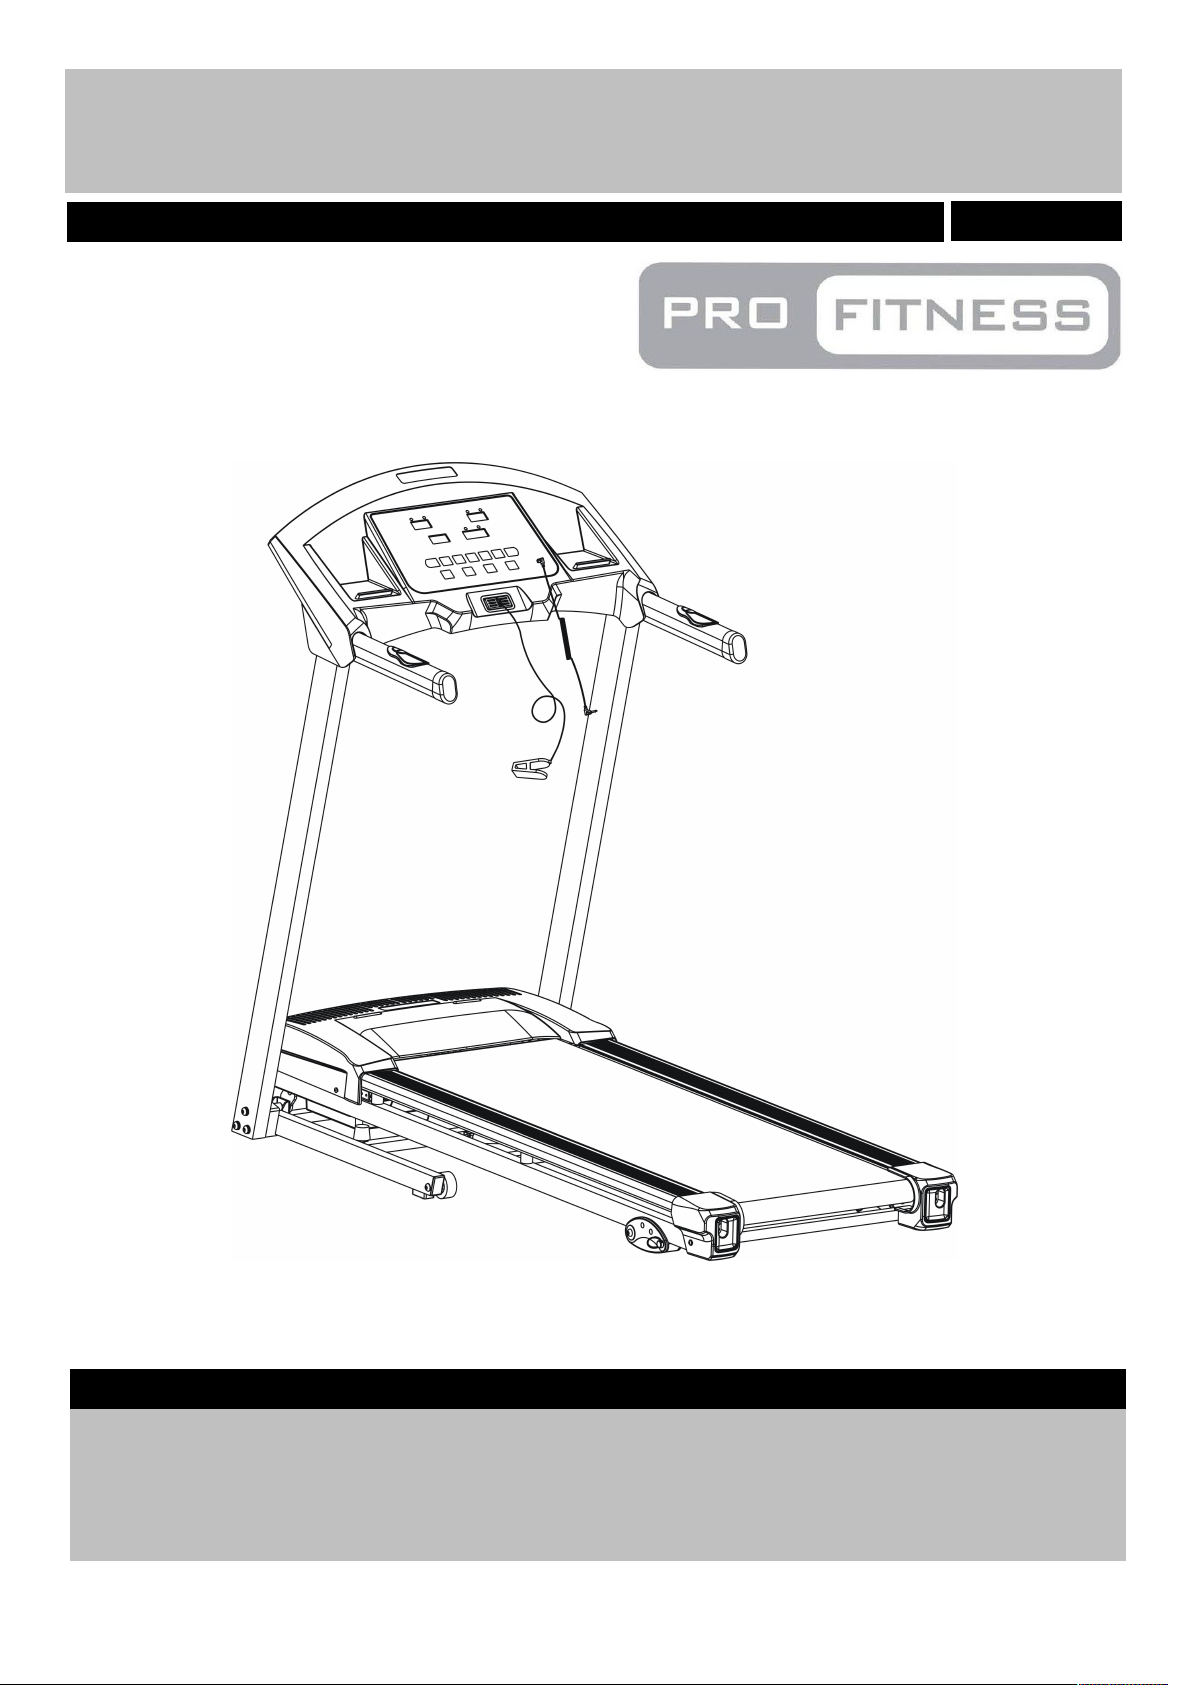
Assembly & User Instructions- Please keep for future reference
Important – Please read these instructions fully before assembly or using
Pro Fitness Treadmill W Speaker
These Instructions contain important information which will help you get best from your
equipment and ensure safe and correct assembly, use and maintenance.
If you need help or have damaged or missing parts, call the Customer Helpline: 03456040105
www.argoshelpdesk.co.uk
331/7226
Issue 1 -10/4/14
Page 2
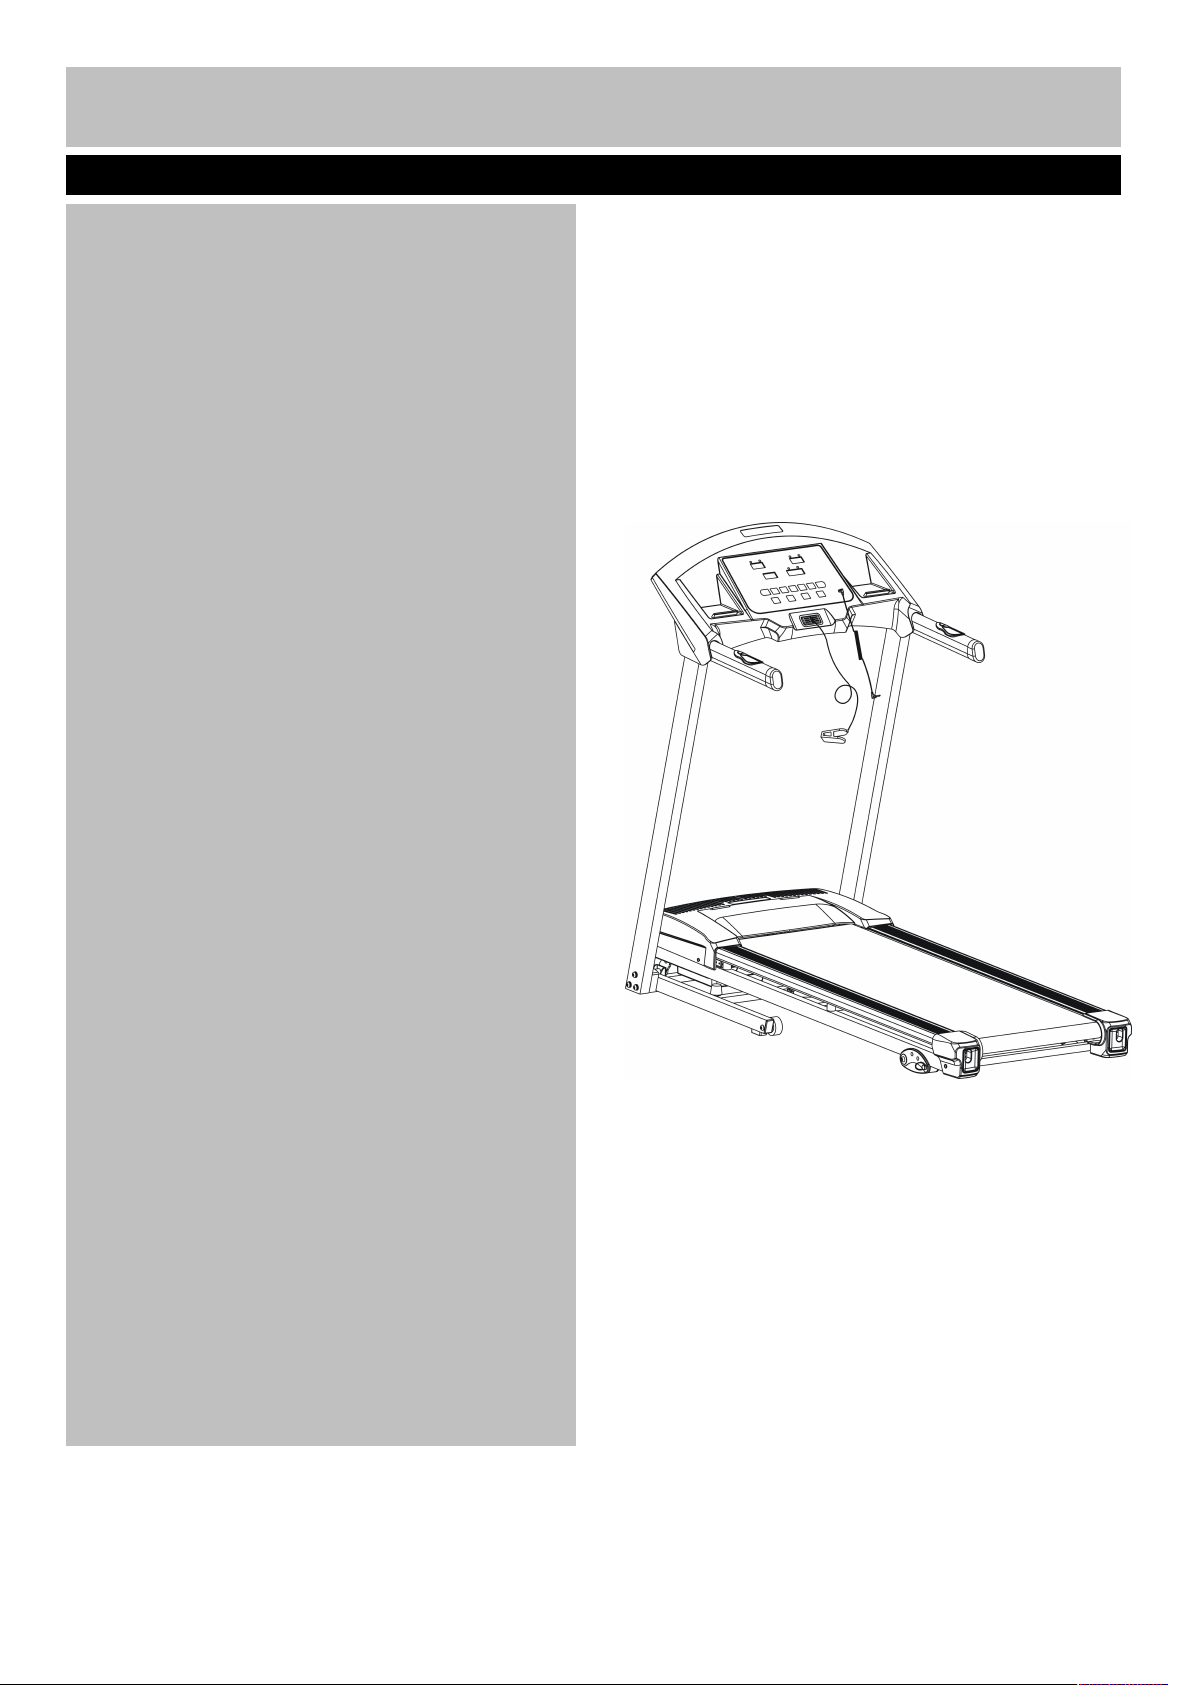
Contents
Before you Begin
2
General Safety Information
3
Safety Information
4
Components-Parts
5
Components-Fixings
6
Before Assembly
7
Assembly Instructions
8-11
How to Start
12
Computer Instruction
13
Computer Operation
14-20
Limited Warranty
21
Maintenance
22-26
Exercising Information
27-30
Care and Maintenance
31
Exploded Parts Diagram
32
Exploded Parts List
33-34
1
Page 3

Congratulations for selecting the 3317226
Treadmill from Roger Black. Whether you are an
accomplished athlete seeking to maintain peak
performance or a beginner realizing the benefits of
exercise for the first time, the 3317226 Treadmill
will help you to achieve your goals.
In the meantime, remember that the benefits of
exercise are many and varied including higher
energy levels, reduced stress, improved
self-esteem, clearer and more radiant skin, greater
cardiovascular efficiency, higher metabolic rate,
and improved body posture – all of which can
result in a longer and more enjoyable life.
While purchasing the 3317226 Treadmill will not
do all of this alone, it is an important step towards
understanding and achieving the benefits of
exercise.
When you open the carton, please DO NOT
hold the handle grip to carry the treadmill from
the carton. Assemble the treadmill and take
out from the carton, failure to do this will
damage the treadmill console .
Do not under any circumstance turn the
machine on its side unless in the fold up
position. Failure to follow this instruction could
lead to serious injury from base frame being
sprung open with considerable force.
Before you Begin
2
Precautions
All Roger Black products are manufactured to the highest specifications and this instruction manual
should enable you to assemble the 3317226 Treadmill and commence your workout program. If, however,
you have any additional questions, please call out UK Customer Service:03456040105 or go to
www.argoshelpdesk.co.uk. .To help us assist you, please quote the product model number and serial
number when calling. The model number is 3317226. The serial number can be found on a sticker
attached to the rear of main treadmill body (located on the right hand side of the treadmill base next to the
mains power cord inlet).
Page 4

1. It is the responsibility of the owner to ensure
that all users of this treadmill are adequately
informed of all warnings and precautions.
2. Use the treadmill only as described in this
manual.
3. Place on a level surface, clear safety area of
at least 2000 mm in length and at least as
wide as the treadmill shall be provided behind
the equipment when in use. Do not place the
treadmill on any surface that blocks air
openings. To protect the floor or carpet from
damage, place a mat under the treadmill.
4. When choosing a location for the treadmill
make sure that the location and position
permit access to a plug.
5. Keep the treadmill indoors, away from
moisture and dust. Do not put the treadmill in
a garage, outbuilding, covered patio, or near
water.
6. Do not operate the treadmill where aerosol
products are used or where oxygen is being
administered.
7. Keep children under the age of 12 and pets
away from the treadmill at all times.
8. The treadmill should not be used by persons
weighing more than 100kgs.
9. Never allow more than one person on the
treadmill at a time.
10. Wear appropriate exercise clothing when
using the treadmill. Do not wear loose clothing
that could become caught in the treadmill.
Athletic support clothes are recommended for
both men and women. Always wear athletic
shoes. Never use the treadmill with bare feet,
wearing only stockings, or in sandals.
11. When connecting the power cord, plug the
power cord into a grounded circuit. When
replacing the fuse, an ASTA approved BS
1362 type should be fitted to the fuse carrier,
A13 amp fuse should be used, no other
appliance should be on the same circuit.
12. Keep the power cord away from any heated
surface.
13. Never move the running belt while the power
is turned on. Do not operate the treadmill if the
power cord or plug is damaged, or if the
treadmill is not working properly.
14. Never start the treadmill when you are
standing on the walking belt. Stand on the
side rail, hold the handrails, start with low
speed and then step on the unit. When
comfortable increase the speed to one that
you are comfortable with.
15. The treadmill is capable of high speed. Adjust
the speed in small increments to avoid sudden
jumps in speed.
16. The pulse sensor is not a medical device,
various factors, including the user’s
movement, may affect the accuracy of the
heart rate readings. The pulse sensor is
intended only as exercise aid in determining
heart rate trends in general. WARNING! Heart
rate monitoring systems may be inaccurate.
Over exercising may result in serious injury or
death. If you feel faint stop exercising
immediately.
17. Never leave the treadmill unattended while it
is running. Always remove the safety key
when the treadmill is not in use.
18. Always examine your treadmill before using to
ensure all parts are in working order.
19. Never insert any object or body parts into any
opening.
20. Inspect and tighten all parts of the treadmill
regularly. ( see maintenance page )
21. Always unplug the treadmill before cleaning
and/or servicing. Service to your treadmill
should only be performed by an authorized
service representative, unless authorized
and/or instructed by the manufacturer. Failure
to follow these instructions will void the
treadmill warranty.
22. This appliance is not intended for use by
person (including children) with reduced
physical, sensory or mental capabilities, or
lack of experience and knowledge, unless
they have been given supervision and
instruction concerning use of the appliance by
person responsible for their safety.Keep
unsupervised children away from the
equipment.Injuries to health may result from
incorrect or excessive training.
General Safety Information
3
Page 5
To reduce the risk of serious injury, read the entire manual before you assemble or operate the Roger Black
Assembly
• Keep children and animals away from the work
area, small parts could cause choke if swallowed.
• Make sure you have enough space to layout the
parts before starting.
• Assemble the item as close to its final position
(in the same room) as possible.
• Position the equipment on a clear, level surface.
• Dispose of all packaging carefully and
responsibly.
Using
• It is the responsibility of the owner to ensure that
all users of this product are properly informed as to
how to use this product safely.
• This product is intended for domestic use only.
Do not use in any commercial, rental, or
institutional setting.
• Before using the equipment to exercise, always
do stretching exercises to properly warm up.
• If the user experiences dizziness, nausea, chest
pain, or other abnormal symptoms stop the
workout and seek immediate medical
attention.
• Only one person at a time should use the
equipment.
• Keep hands away from all moving parts.
• Always wear appropriate workout clothing when
exercising. Do not wear loose or baggy clothing,
since it may get caught in the equipment. Wear
athletic shoes to protect your feet while
exercising.
• Do not place any sharp objects around
the equipment.
• Disabled persons should not use the
equipment without a qualified person or doctor
in attendance.
• This product is suitable for user’s weight of:
100kgs.
•This product conforms to ISO 20957-1 and EN
957-6. Class (H) - Home Use - Class (C)
•This exercise product has been designed and
manufactured to comply with the latest (BS EN
957) British and European Safety Standards.
Important – Please read fully before assembly or using
Safety Information
4
Platinum Treadmill, In particular, note the following safety precautions.
Page 6
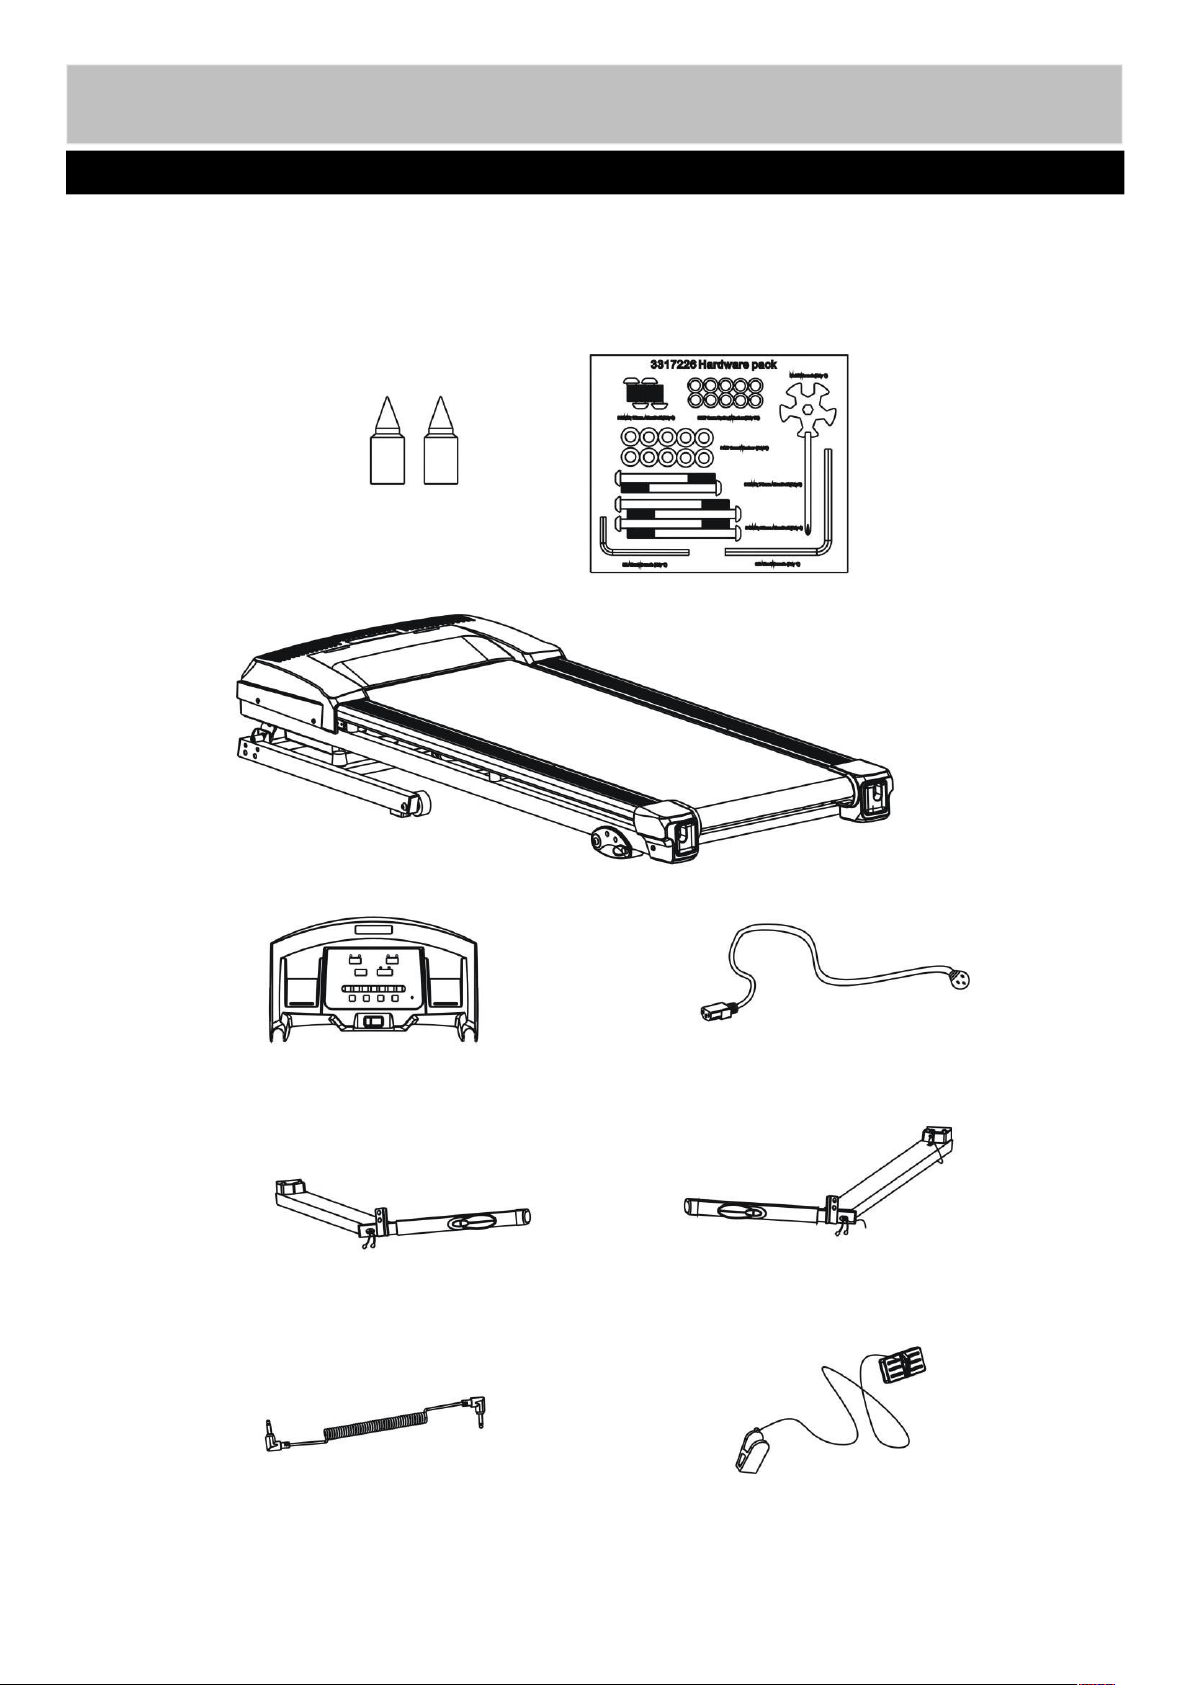
Note: Some of the smaller components may be pre-fitted to larger components. Please check carefully
Components - Parts
If you have damaged or missing parts, please calll
the Customer Helpline: 03456040105
www.argoshelpdesk.co.uk
Please check you have all parts listing below
Lubricating Oil
57. Mp3 Link
45. Safety Key
5
3. Left Console Mast
4. Right Console Mast
Main Frame
Hardware pack
15.Console
52. Power cord
before contacting Argos regarding any missing components.
Total mass of the product is 51 kg.Foot print of the product is 158 * 71.8 cm.
The free standing equipment shall be installed on a stable and leveled base.
Page 7
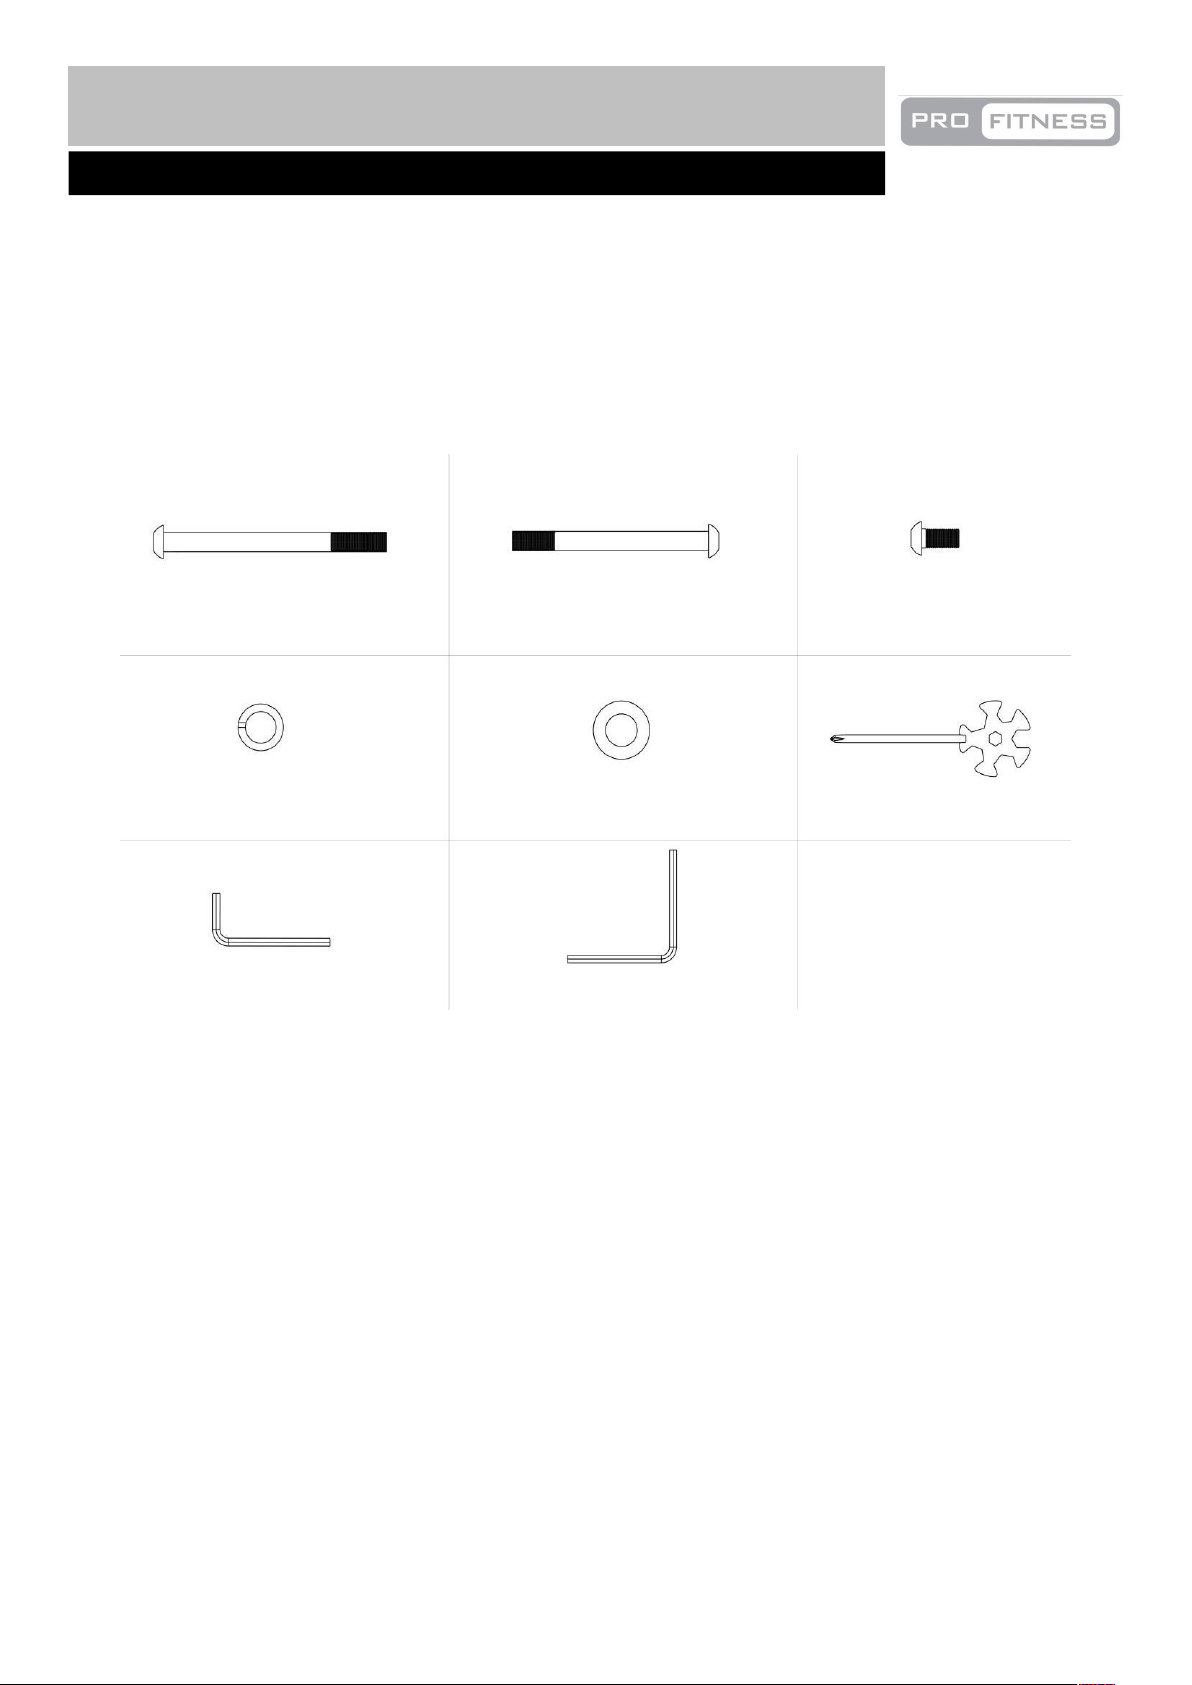
Note: Some of the fixings are pre-fitted to the larger components. Please check carefully before contacting
Argos regarding any missing fixings.
Components - Fixings
Please check you have all parts listing below
6
54
85mm Allen Bolt × 4
84
87
68
66
75mm Allen Bolt × 2
8mm Spring Washer × 10
15mm Allen Bolt × 4
5# Allen Wrench × 1
6# Allen Wrench × 1
Multi Wrench × 1
8mm Washer × 10
Page 8
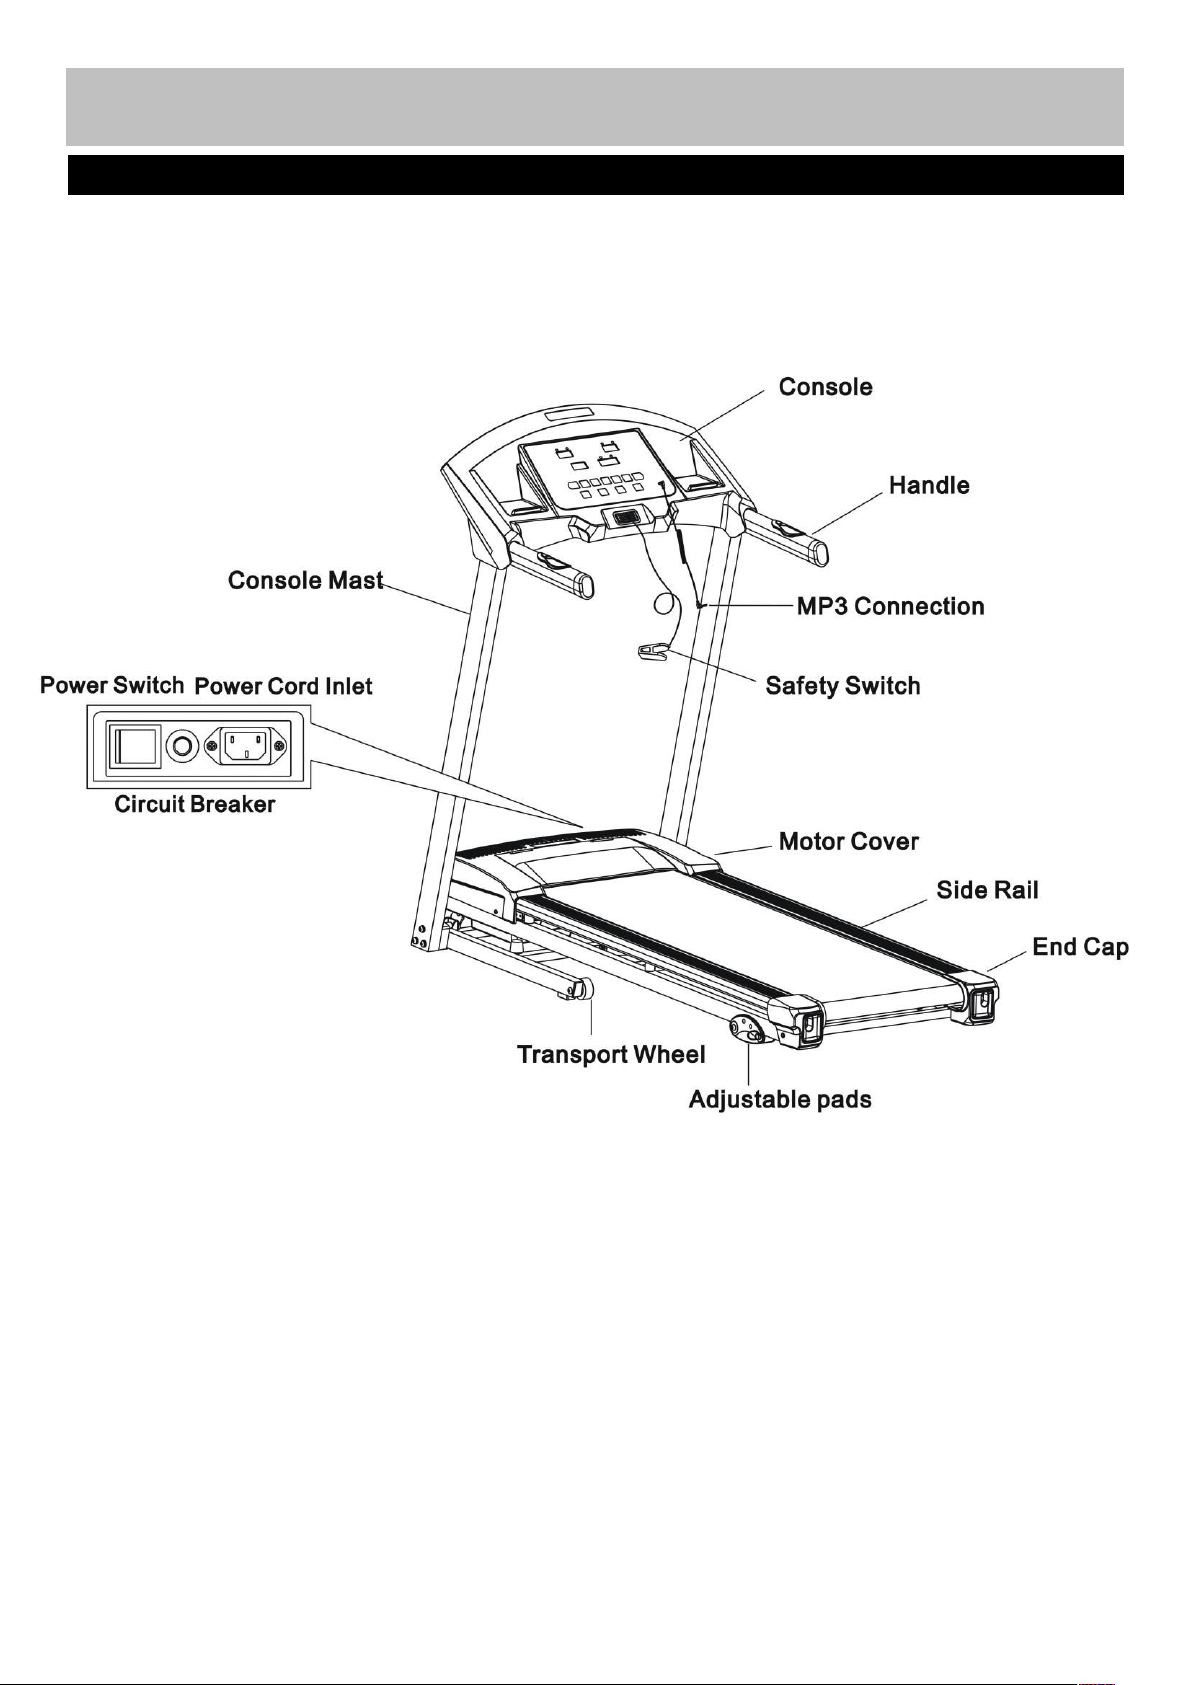
Before Assembly
Overview Drawing
7
Overview Drawing
Page 9
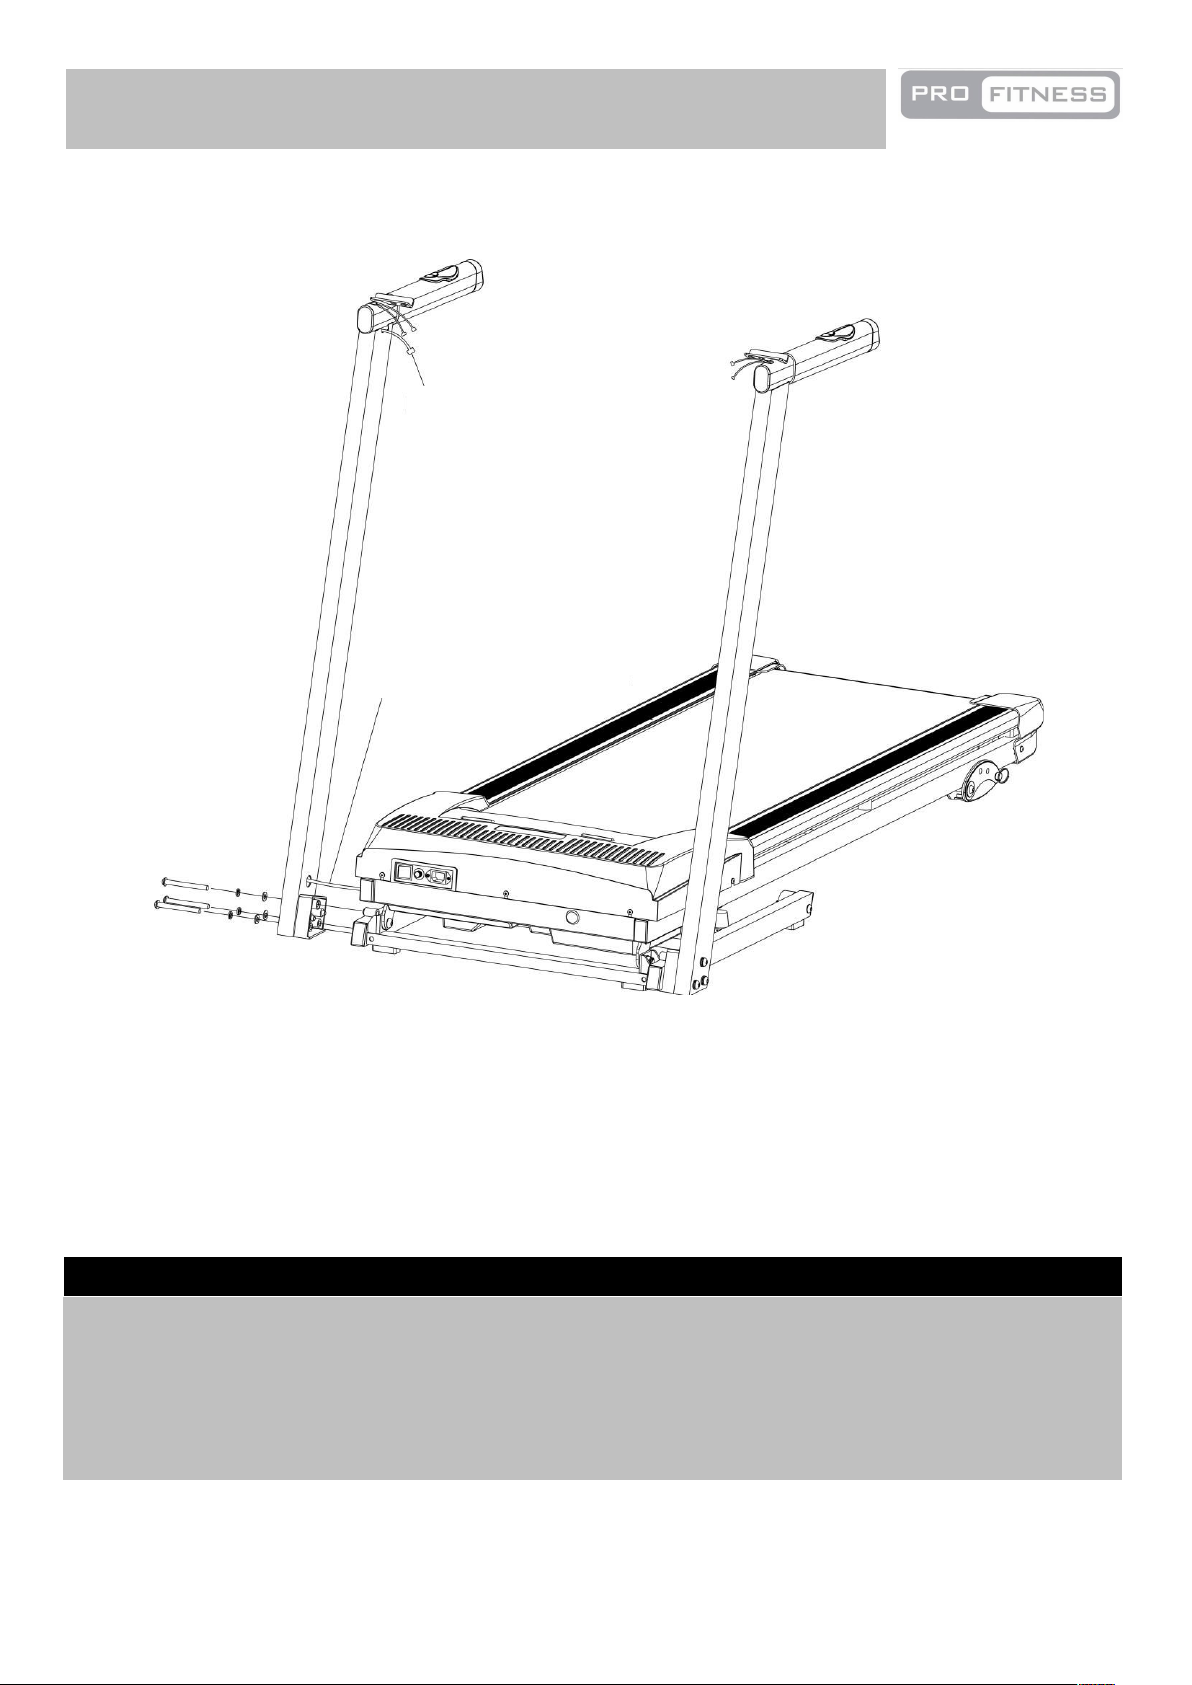
a. Thread the Main wire from the bottom of the Console Mast (4) to the upper opening.
b. Fix each Console Mast (3&4) to the Base Frame (1) using 6 x 85mm Allen Bolts (66), 6 x 8mm Spring
Washers (87) and 6 x 8mm Washers (84).
Assembly Instructions
Step 1
8
4
3
66
87
84
Main wire
Main wire
Page 10
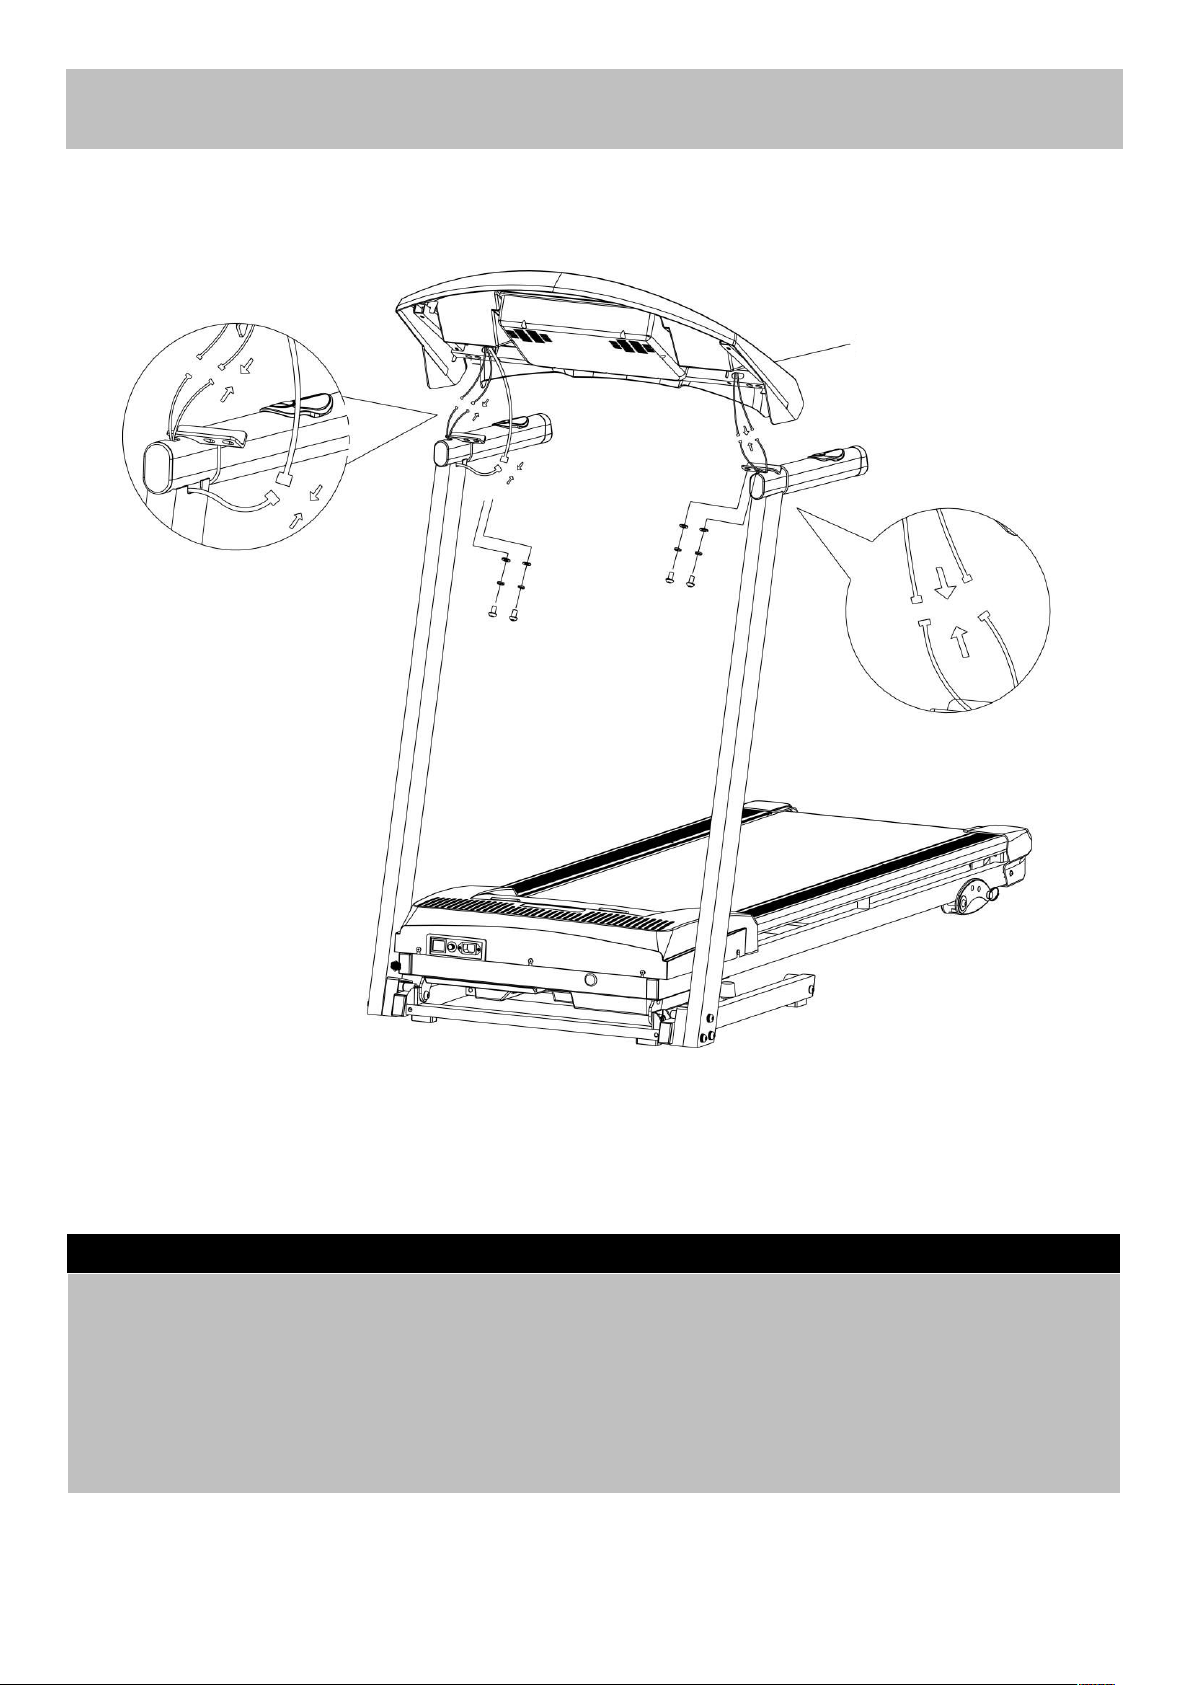
a. Connect the wires as the diagram showing,insert the wires into the handles holes;
b. Fix each side of the Console to the two Console Mast (3&4) by using 4 x 15mm Allen Bolts (68), 4 x
8mm Spring Washes (87) and 4 x8mm Washers (84).
9
Console
C
3
4
Step 2
A
A’
C’
Assembly Instructions
B
B’
87
84
68
68
87
84
Page 11
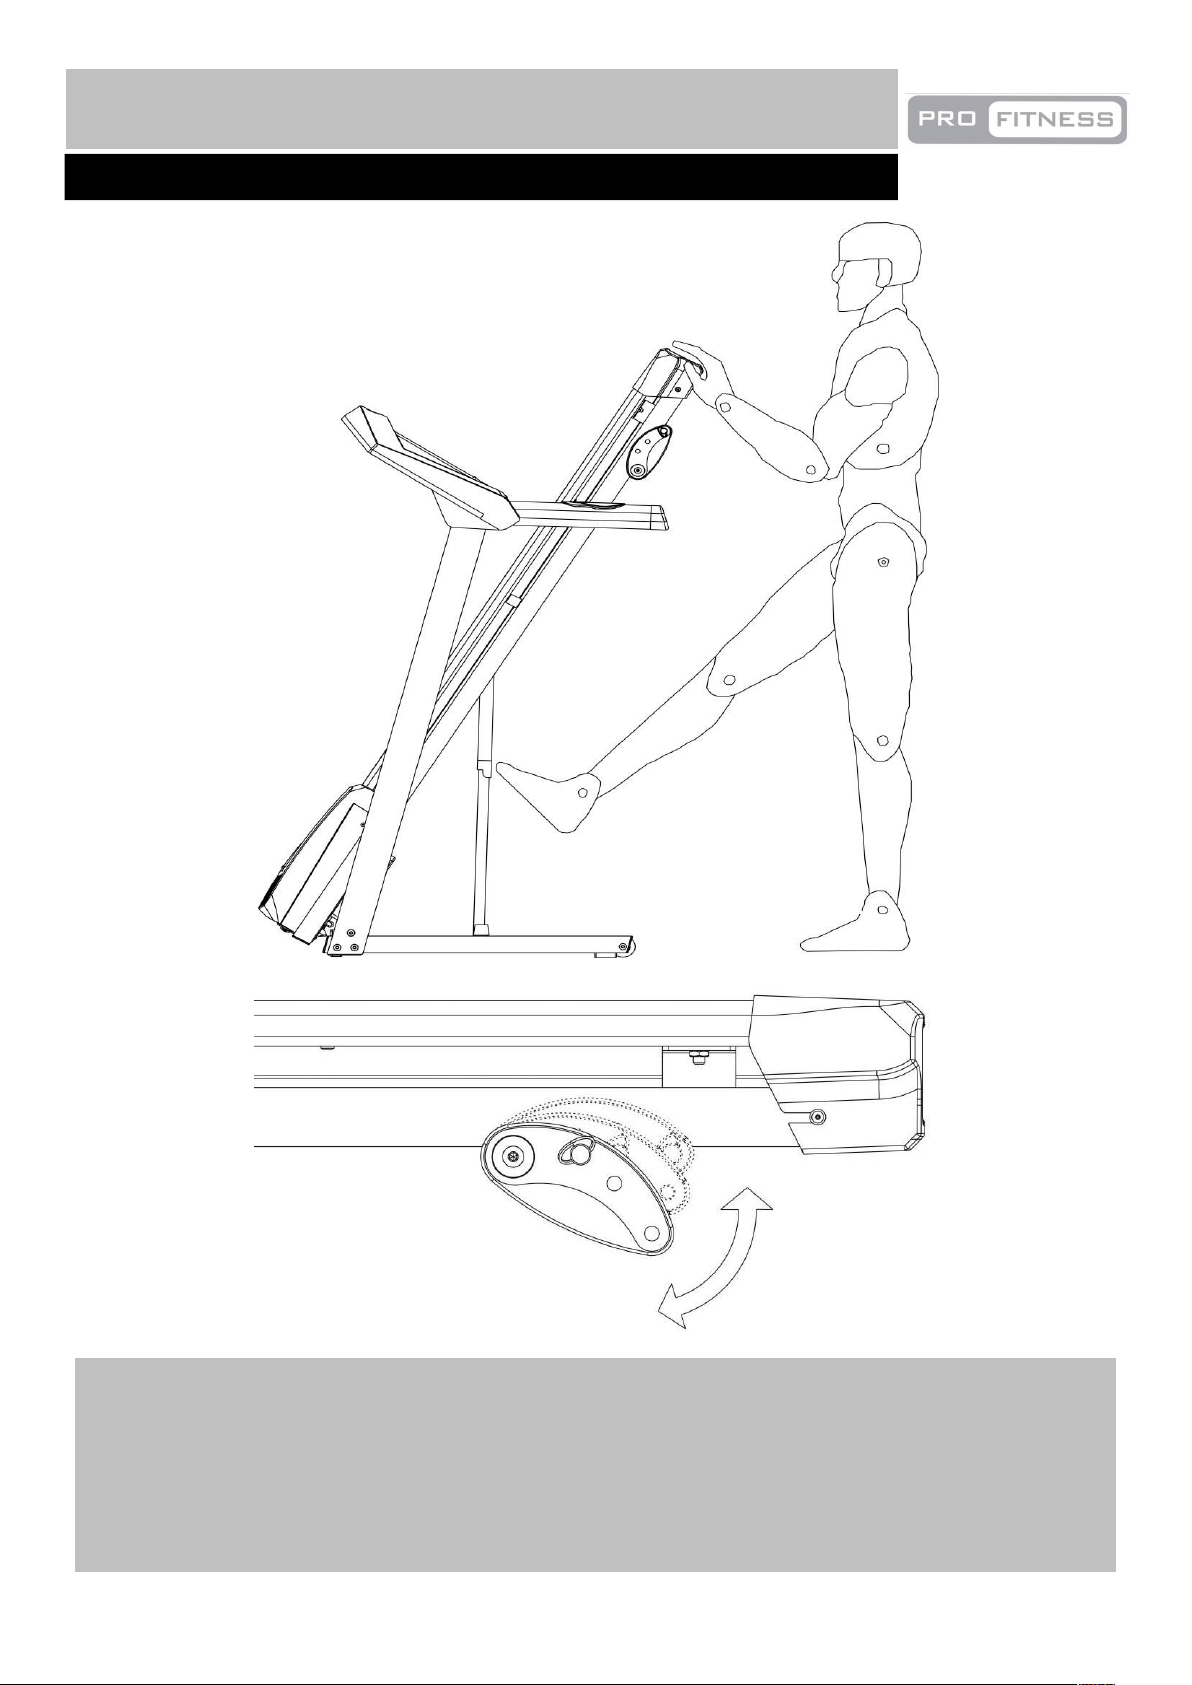
Assembly Instructions
Fold/Unfold the treadmill and adjust incline
1. Hold the End caps to lift the running deck, make sure you hear the sound of the deck locking into
position.
2. Hold the End caps,touch the joint with your tiptoes to unfold it.
3. The treadmill has three manual incline positions.Lift up the running deck as shown in Step 1. and
adjust the Bracket to the desired incline and then return the running deck back to the floor.
End caps
Joint
Bracket
10
Page 12
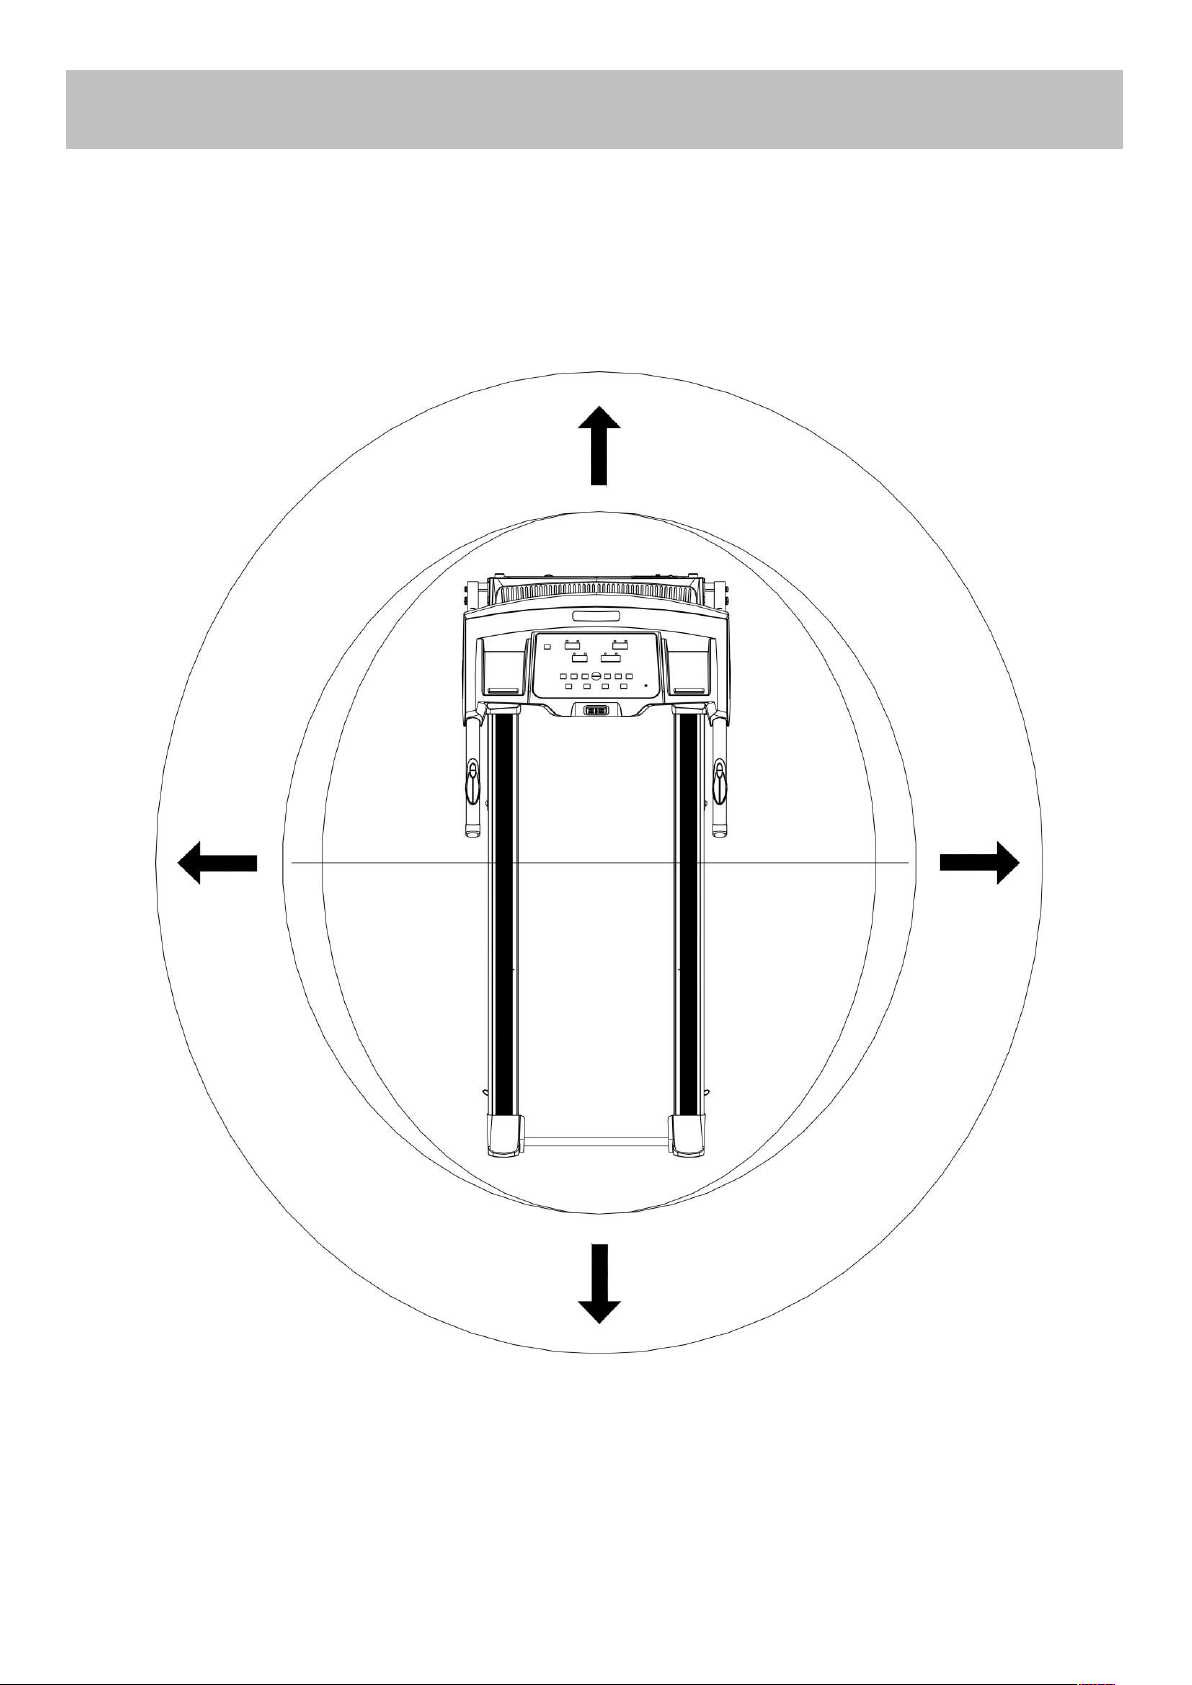
Free area and training area.
Assembly Instructions
0.6m
(Free area)
0.6m
(Free area)
0.6m
(Free area)
0.6m
(Free area)
Training
area
1.7m
11
The free area shall be not less than 0.6m greater than the training area in the directions from which
the equipment is accessed. The free area must also include the area for emergency dismount.
Where equipment is positioned adjacent to each other the value of the free area may be shared.
Page 13
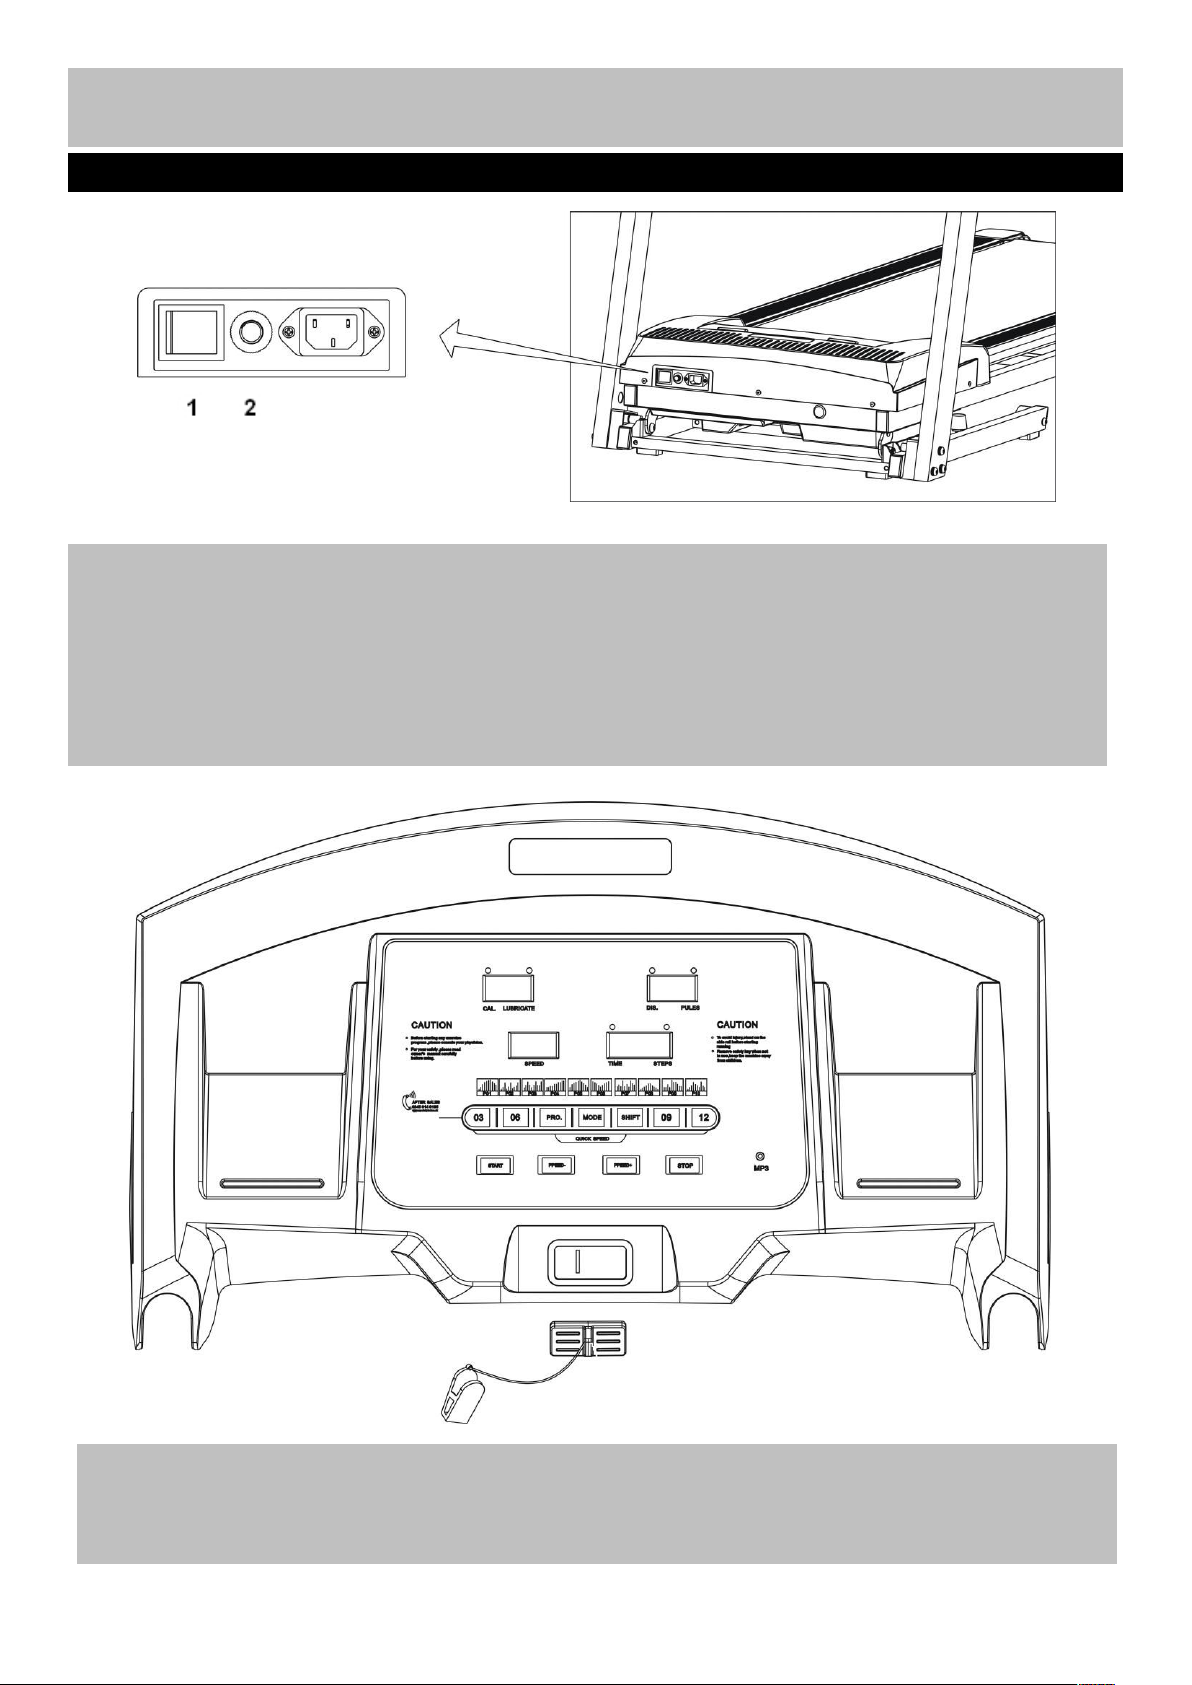
How to Start
Turning on the treadmill
SAFETY KEY:
The treadmill will only work if the safety key (45) is properly locked in the provided notch of the console.
Insert the safety key (45) and attach the clip onto the waist part of your clothes. If it is necessary to turn
off the motor immediately, just pull the safety key (45) out of the console.
Plug in the mains power and turn on the switch (1).
You will hear a signal tone and the screen of the Computer will light up.
OVER-CURRENT PROTECTOR:
There is an over-current protector (2) located on the right side of the switch (1) (see above picture); in
case of short circuit or over-current, the Button of the over current protector will pop up and the treadmill
will power off; please unplug the power source and push down the button, and then turn on the switch to
restart your workout. If the button pops up again, please contact Argos.
12
Turning on the treadmill
45
Page 14
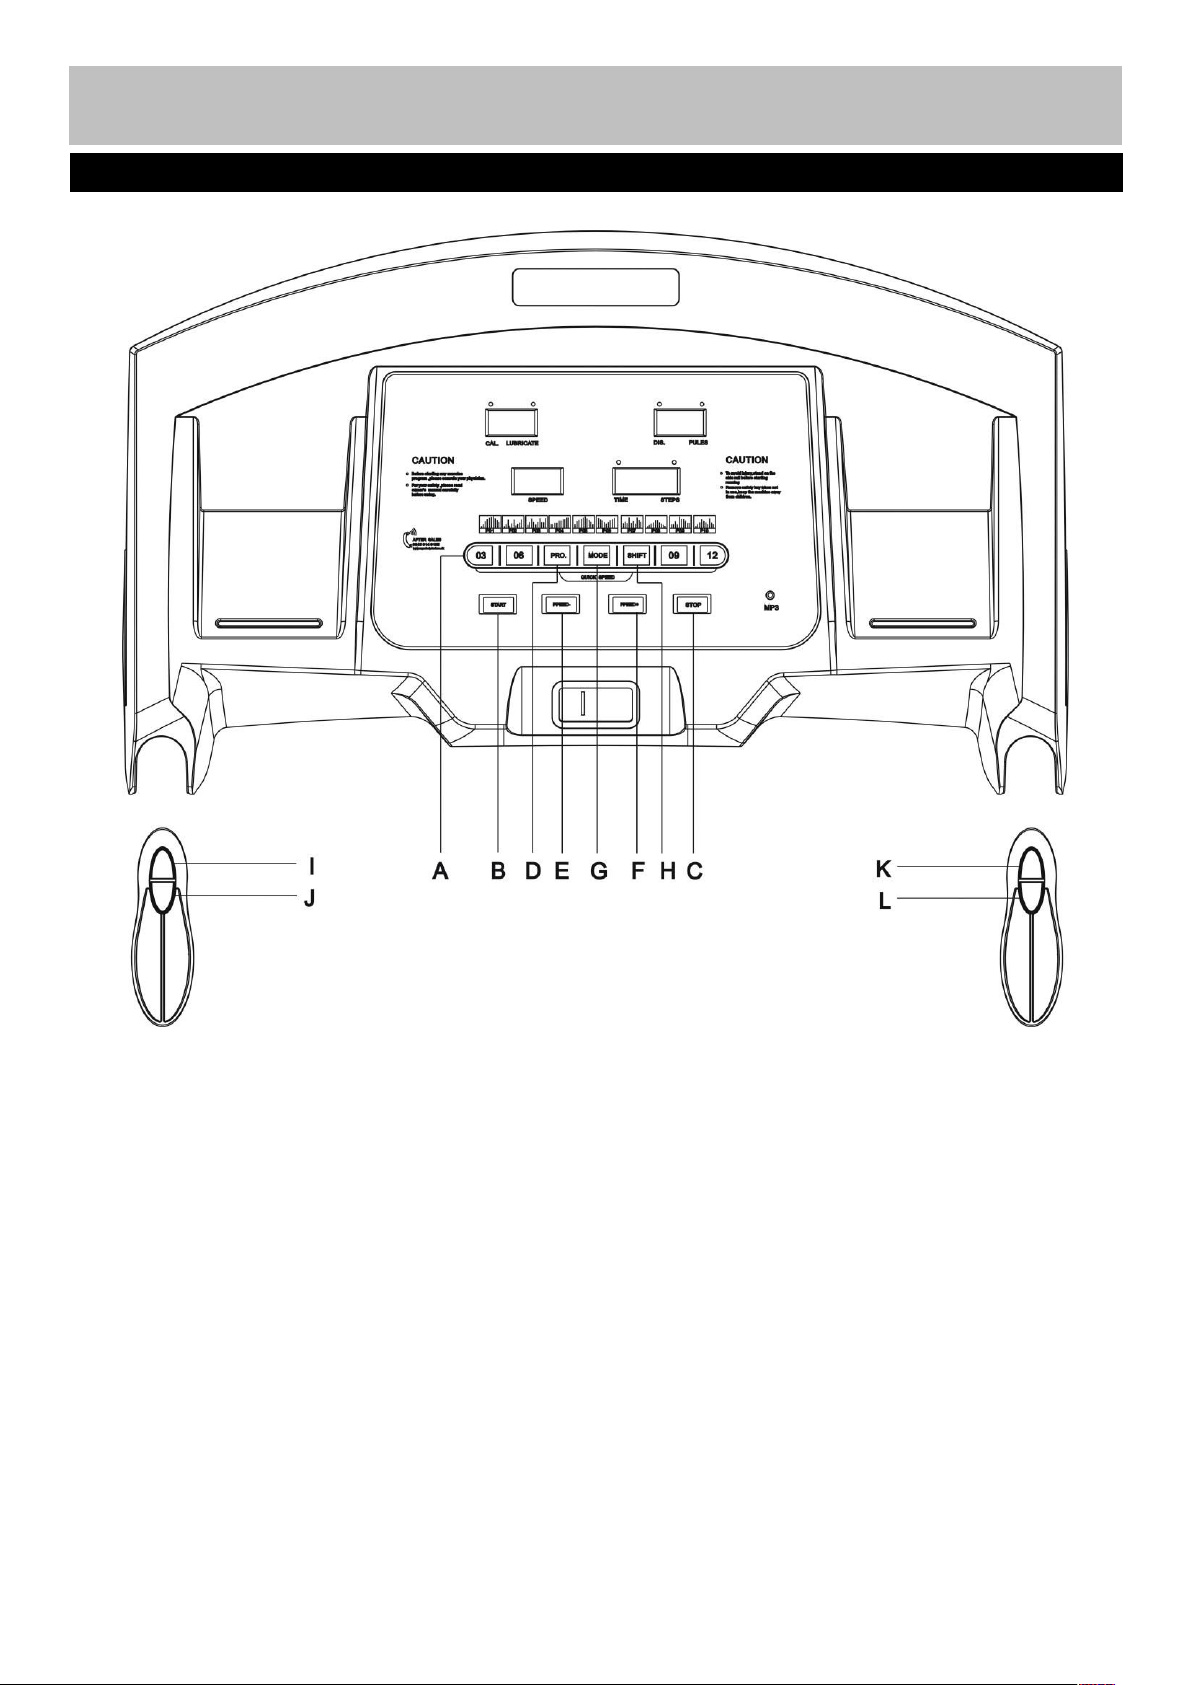
A Quick Speed Select
Computer Instruction
13
Front view of the Computer
Front view of the Computer
B Start
C Stop
D Program
E Speed-
F Speed+
G Mode
H Shift
I Volume+
J Volume-
K Speed+
L Speed-
Page 15

TECHNICAL SPECIFICATION
Press during workout, and the treadmill will stop by gradually reducing the speed and incline.
Press again all display window will be cleaned to zero.
Press to increase/decrease exercise speed by 0.1km/km
Press to select training time under program workout model
Press to choose the desired training target (Time, Distance, Calorie) under training target control workout
After 100KM running,the console “LUBRICATE” window will flash to remind to lubricate the running belt.
Press Prog/Mode key 3 seconds to turnoff the flash when treadmill on standby.
Computer Operation
14
Functions and Operations
Functions and Operations
Time---------------------------------0:00--99:59 Min
Speed-------------------------------0.8--12.0 km/h
Distance----------------------------0.0--99.9 km
Calorie------------------------------0.0--999Kcal
Pulse--------------------------------50--200 Times/ Min
Noise emission under load is higher than without load.
START
Press to start exercise at initial speed 0.8km/h
STOP
QUICK SPEED SELECT
Press to select your desired running speed with 3, 6, 9, 12km/h.
SPEED UP/DOWN
model
PROGRAME
Press to select workout program (P01—P10).
LUBRICATION REMINDERS
Page 16

IMPORTANT
1. The console will turn off automatically about
ten minutes after the belt has stopped.
2. The pulse function is for reference only, and
not to be used for medical purpose.
SAFETY KEY
1. The safety key must be placed into the
magnetic recess on the console in order to
operate the treadmill. Always place the safety
key on its position and attach the clip to your
clothing at your waist before beginning your
workout.
2. If you should encounter problems and need to
stop the motor immediately, simply pull the
safety key away from the console; to continue
operation, simply turn the power switch to off,
set the speed controller to stop and then
reinsert the safety key into the console.
GENERAL OPERATION
1.Turn on the Power Switch at the front of your
Treadmill. This switch is located next to the
Mains Power Cord inlet.
2.Place the Safety Key into the magnetic recess
on the middle front of the Computer
Console.
The console will give an audible signal and all
console window displays will function with a start
display value of 0.
Note: If the Safety Key is not placed correctly or is
faulty, the “Distance” window will display "E00",
which indicates that the treadmill will not operate.
If the Safety Key falls off during exercise, the
console will give an audible signal and “Distance”
window will display “E00” and the treadmill will
stop.
To stop the treadmill in an emergency, simply pull
the safety key off its mount in the console front or
simply press the red STOP button in the center of
the console. It is important that you connect the
clothing clip to your shirt or other suitable clothing
during exercise to ensure that this safety system
can operate easily.
To get a pre-exercise pulse rate, simply hold both
Hand Pulse Sensors on either side of the
Handlebar Supports for 5 seconds. The Pulse
Range is between 50 ~ 200 Beats per Minute.
Note: The readings displayed by the computer
should not be used for therapeutic purposes as
they can vary due to the sensitivity of the
equipment and the available pulse signal put out
by individuals’ palms. To get the best accurate
readings, keep the hands placed flat and firm on
the PULSE PADS for 10 to 20 seconds, as this will
allow the pulse reading to average and then settle.
Computer Operation
15
Functions and Operations
Page 17
STARTING YOUR TREADMILL
1. Turn on the treadmill, and press “Start” button on the console.
2. Press “Speed +” or “Speed -” button to adjust speed or press handle “Speed + or Speed -” button to
adjust speed. Press the key once, and the speed changes 0.1Km/H.
3. Also the user can press the “Quick Speed Select” button to select desired running speed and incline.
STOPPING YOUR TREADMILL
4. Press the “Speed -” button on the console, adjust or press handle “Speed -” button to reduce the speed,
5. Pull away the Safe Key and the treadmill will stop itself, and then “Distance” window will display “E00”.
TRAINING TIME CONTROL WORKOUT MODE
1. Turn on the treadmill,press the “MODE” button one time, and the “Time” window flashes and displays
2. Press “Start” button to start your workout, the time data will reduce gradually during your training and the
TRAINING DISTANCE CONTROL WORKOUT MODEL
1. Turn on the treadmill, press the “Mode” key two times, and the “Dis” (Distance) window flashes and
2. Press “Speed +” / “Speed -” button to select your desired training distance (the range is 0.5—99.9).
3. Press “Start” button to start your workout, the time data will reduce gradually during your training and the
BURNING CALORIE CONTROL WORKOUT MODEL
4. Turn on the treadmill,press the “Mode” button three times continuously, the “Cal” (Calorie) window
5. Press “Start” button to start your workout, the calories data reduce gradually during your training, and the
SPEED AND INCLINE ADJUSTMENT
6. In any training target control workout model, press “Speed +” /“Speed -” button or press the “Quick
16
Computer Operation
Functions and Operations
Functions and Operations
then press the “Stop” key on the Console, and the treadmill will stop; turn off the switch if you intend to
finish workout.
“15:00”, which is the pre-set training time of the treadmill. Press “Speed +” / “Speed -” button to select
your desired training time, (the range is 5:00—99:00).
treadmill will stop automatically when the “Time” window displays “0:00”.
displays “1.0”, which is the pre-set training distance of the treadmill.
treadmill will stop automatically when the “Dis” (Distance) window displays “0.0”.
flashes and displays “50.0”, which is the pre-set burning calories of the treadmill. Press “Speed +” /
“Speed -” button to select target burning calories (the range is 10.0---999).
treadmill will stop automatically when the “Cal” (Calorie) window display “0.0”.
Speed Select” button to choose your desired running speed.
Page 18
1. Program Workout Model (P01—P10)
In this mode, the user has a choice of Program
P01 – Program P10.
2. Press the “Prog. ” button one time, the
“Program” window will display “P01-P10” and
the “Time” window will display “10:00”, which is
the preset time of the treadmill for each
program. Press “Speed +” / “Speed -” button to
select your desired training time, (the range is
5:00—99:00).
3. Press “Start” button and the treadmill will
countdown three and start operation. The start
speed depends on the program you have
chosen.
4. For all preset values, please refer to following
table and diagrams.
Any of the training program levels has 10 segments,
and each segment time is 1/10 of total setting time;
during any training segments, press the “Speed +” /
“Speed -” button to adjust training speed.
Starting speed for each program
Program
Start Speed
P01
1.5Km/h
P02
3.0Km/h
P03
4.5Km/h
P04
3.0Km/h
P05
3.0Km/h
P06
7.5Km/h
P07
3.0Km/h
P08
1.5Km/h
P09
3.0Km/h
P10
1.5Km/h
Computer Operation
17
Functions and Operations
Page 19
1. PULSE CONTROL WORKOUT MODE
Turn on the treadmill, press “Prog.” button
until the “Cal.” window display “HP1”. “Time”
window displays “10:00” which is the treadmill
pre set workout time for pulse control workout
mode.
Press “Speed +” or “Speed -” button to choose
your desired training time.
Press the “Mode” button, the “Speed” window
is displaying “120” - which is the treadmill pre
set pulse value (85-195). Press “Speed +” or
“Speed -” button to choose your desire value.
Press “Mode” key to enter your setting
information when starting your workout, the
treadmill will run with the speed 1.0km/h for
about 1mins warm up, grasp the two handle
pulse sensors with your two hands, then the
treadmill will run automatically according to
user’s heart beat rate, every 10 seconds
increasing by 0.5Km/h. Once the treadmill
speed is on 8Km/h, but the heart rate is lower
than the setting data, then the treadmill will
increase incline by 1% every 10 seconds to
reach your setting heart rate.
When your heart rate is over your setting heart
rate, then the treadmill will decrease incline by
1% every 10 seconds, if user’s heart is still
over your setting heart rate, then the treadmill
will decrease running speed by 0.5Km/h until
our heart rate is lower than your setting heart
beat rate.
The treadmill has three pulse control workout
modes, press “Prog.” button to select “HP1”
“HP2 “ or “HP3”.
Note: HP1 Pulse Control Workout Mode, the
treadmill default Max running speed is
8Km/h, HP2 and HP3 Max running speed is
9/10Km/h. We recommend you to read
target heart rate zone table on page 20
carefully before you starting Pulse Control
Workout.
Computer Operation
18
Functions and Operations
Page 20
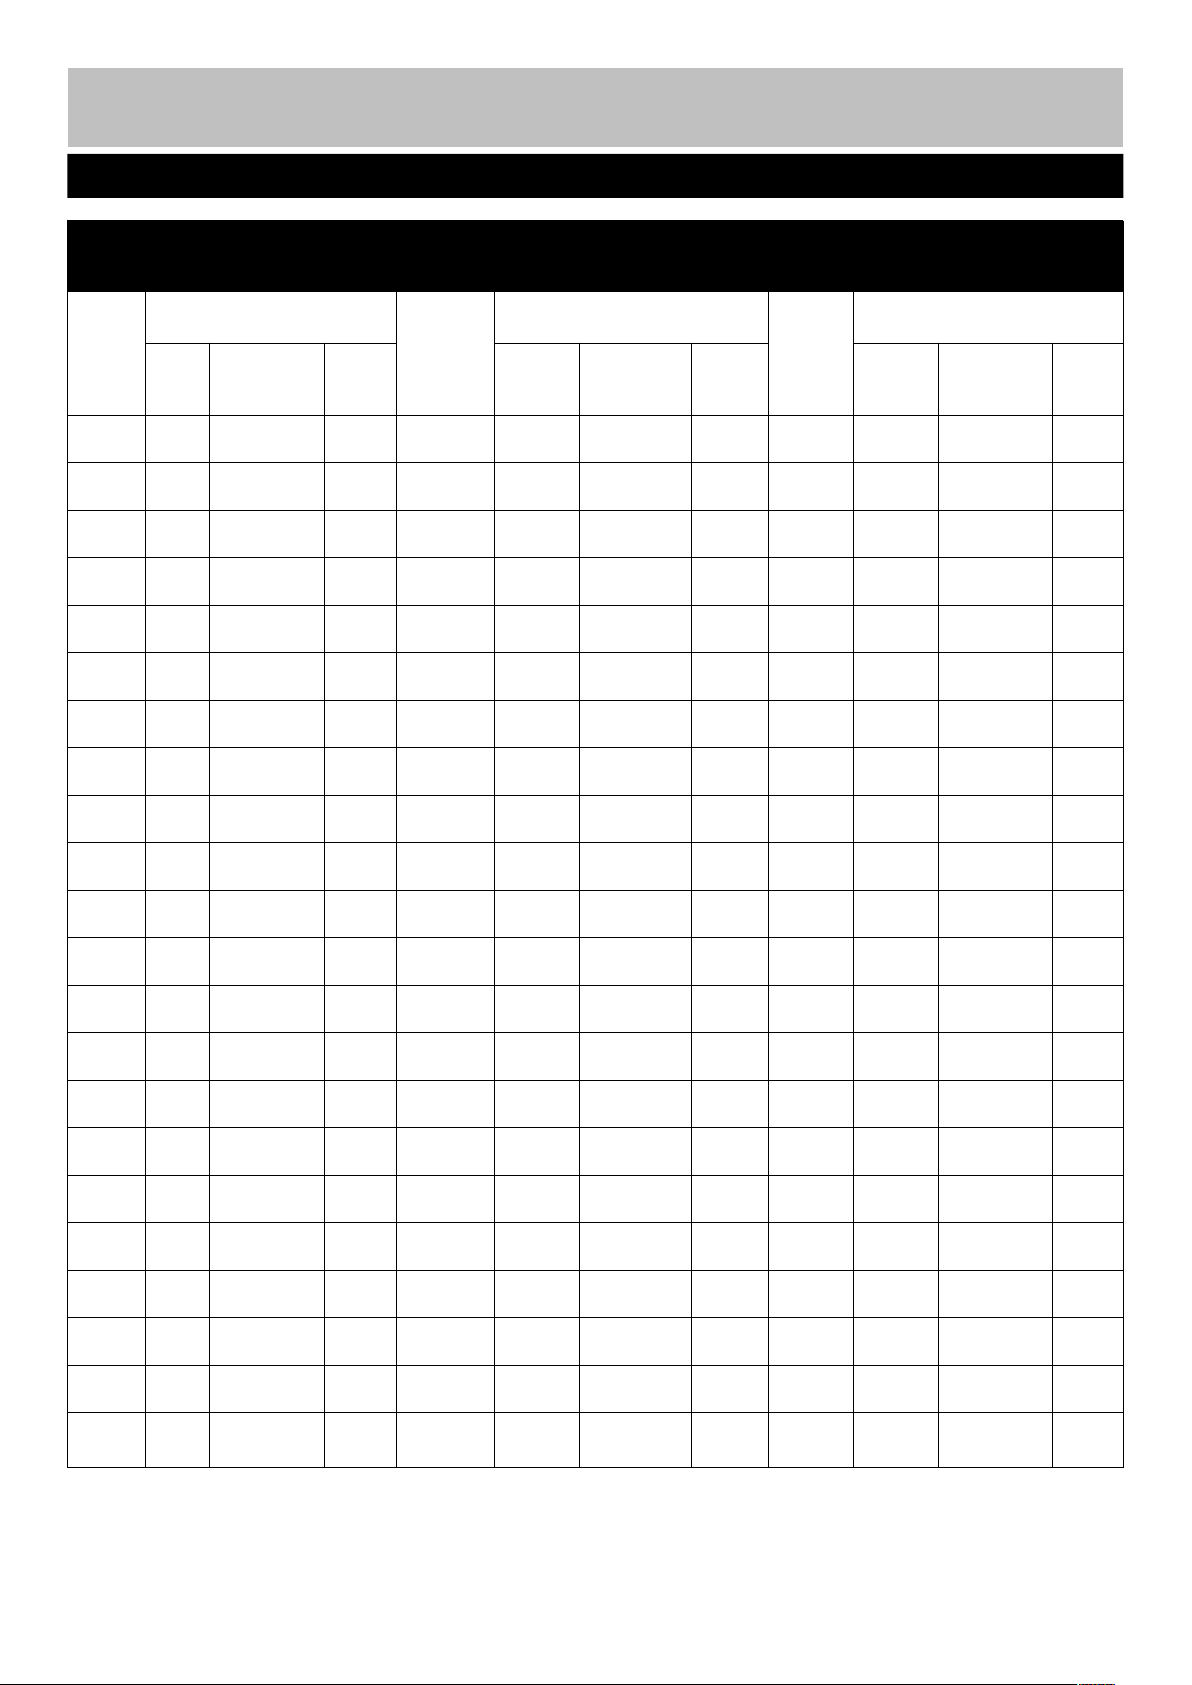
User’s Target Heart Rate Table
Heart Beat
Computer Operation
Workout at Your Target Heart Rate
19
Workout at Your Target Heart Rate
(Times/Mins)
AGE
H Default L H Default L H Default L
15 195 123 123 37 174 110 110 59 153 97 97
16 194 122 122 38 173 109 109 60 152 96 96
17 193 122 122 39 172 109 109 61 151 95 95
18 192 121 121 40 171 108 108 62 150 95 95
19 191 121 121 41 170 107 107 63 149 94 94
20 190 120 120 42 169 107 107 64 148 94 94
21 189 119 119 43 168 106 106 65 147 93 93
22 188 119 119 44 167 106 106 66 146 92 92
23 187 118 118 45 166 105 105 67 145 92 92
24 186 118 118 46 165 104 104 68 144 91 91
AGE
Heart Beat (Times/Mins)
AGE
Heart Beat
(Times/Mins)
25 185 117 117 47 164 103 103 69 143 91 91
26 184 116 116 48 163 103 103 70 143 90 90
27 183 116 116 49 162 103 103 71 142 90 89
28 182 115 115 50 162 102 102 72 141 90 89
29 181 115 115 51 161 101 101 73 140 90 88
30 181 114 114 52 160 101 101 74 139 90 88
31 180 113 113 53 159 100 100 75 138 90 87
32 179 113 113 54 158 100 100 76 137 90 86
33 178 112 112 55 157 99 99 77 136 90 86
34 177 112 112 56 156 98 98 78 135 90 85
35 176 111 111 57 155 98 98 79 134 90 85
36 175 110 110 58 154 97 97 80 133 90 84
Page 21
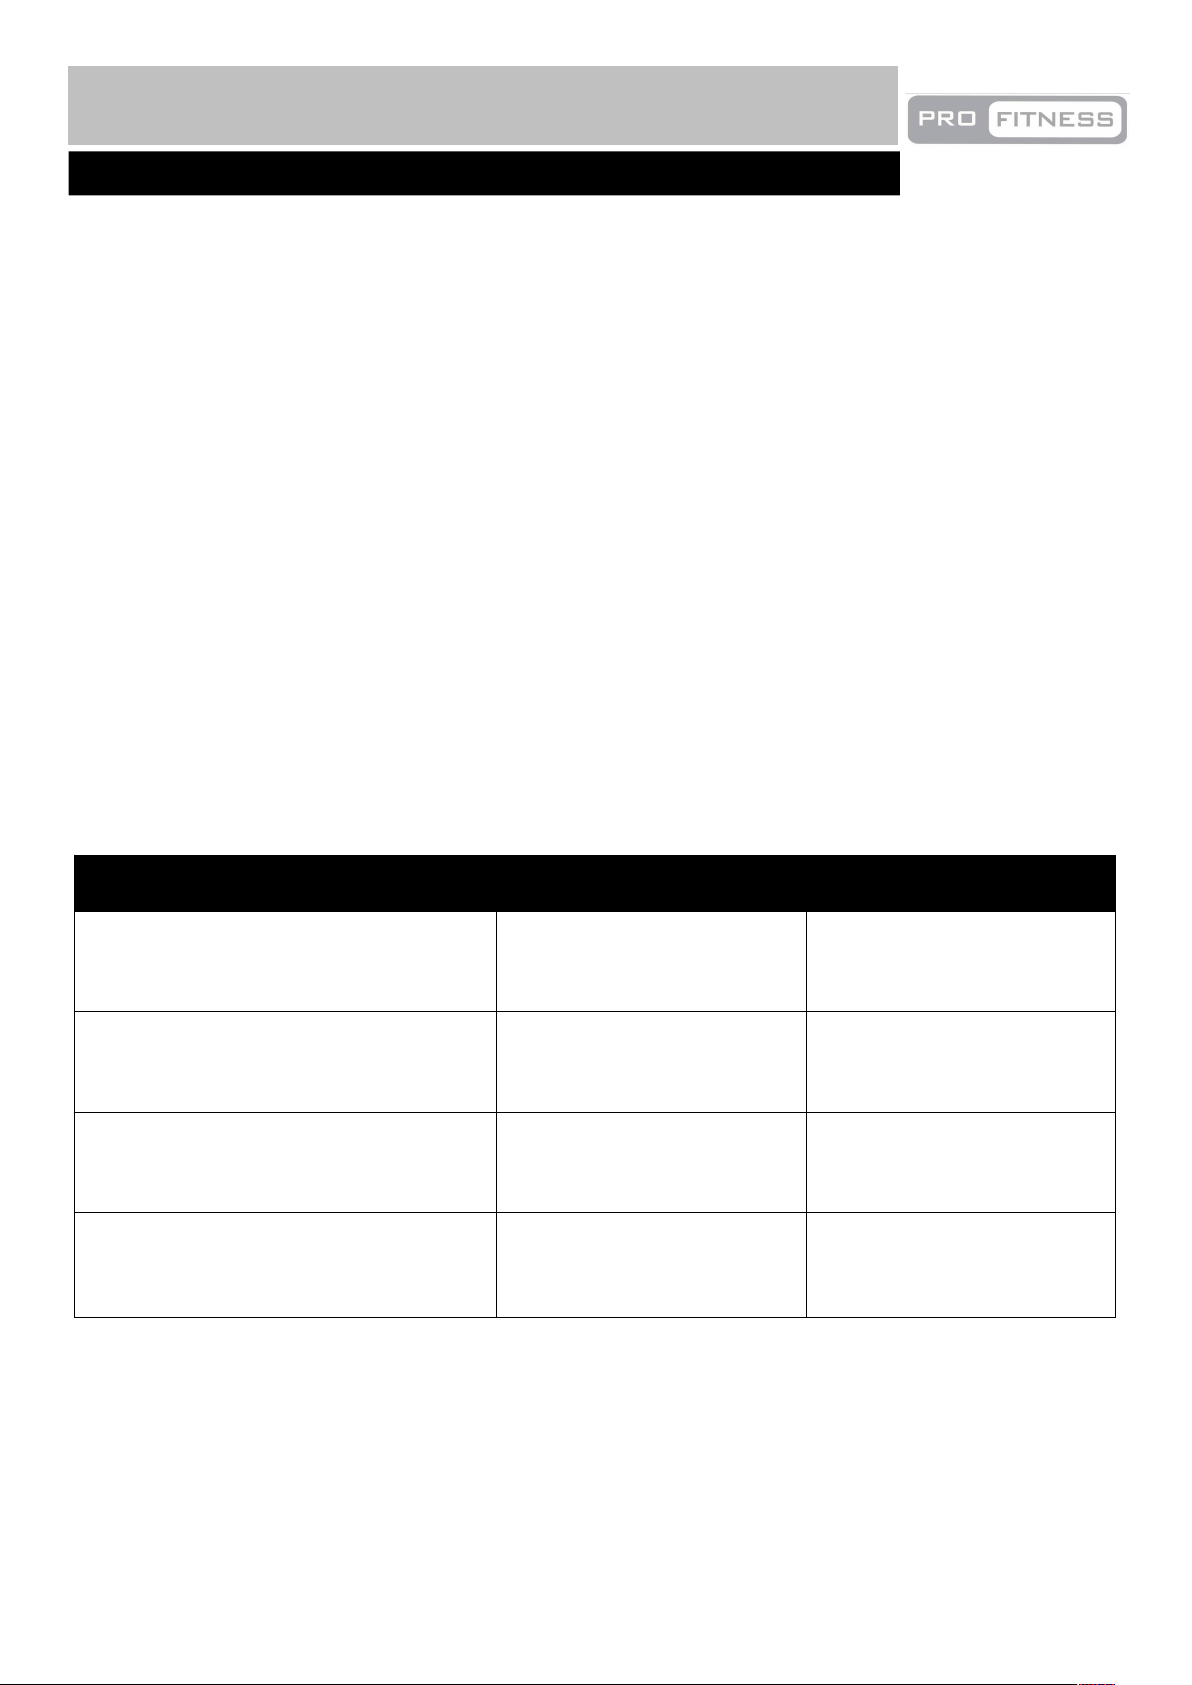
BODY FAT ANALYSIS
Turn on the treadmill, press “PROG” button,
the “CAL.” window displays “FAT”.
Press the “MODE” button again, the “DIS.”
window is displaying “01”, the “CAL.” window
displays “F-1”.Press “Speed +” or “Speed -”
Key , then the “Speed” Window will change
to“ 01” or “0 2 ”, Please select your sexual
distinction, “ 01” – Male, “02” – Female.
Press the “MODE” key again, the “DIS”
window displays: “25” – Which is the treadmill
preset user’s age, the “CAL.” window displays
“F-2”. Press “Speed +” or “Speed -” button to
select your correct age. (Range is: 10 – 99).
Press the “MODE” button again, the “DIS”
window displays “170” – Which is the treadmill
preset user’s body height 170cm,the “CAL.”
window displays “F-3” . Press “Speed +” or
“Speed -” button to select your correct body
height. (Range is: 100 – 200cm).
Press the “MODE” button again, the “DIS”
Window displays: “70” ,Which is the treadmill
preset user’s body weight 70kg.,the “CAL.”
window displays “F-4”. Press “Speed +” or
“Speed -” button or press “Incline +” or “Incline
-” key to select your correct body weight.
(Range is: 20 – 100kg).
Press “MODE” key again, the “CAL ” window is
displaying “F - 5” and the “DIS” window is
displaying: “ --- “ . Grasp the two handle pulse
sensor with your two hands and hold for about
3 seconds, the “Pulse” window will display your
desired body fat rate, refer to below table for
your body fat date.
Body Fat Scale Parameter Table
Computer Operation
20
Functions and Operations
Body Fat ≤18.5 Under Weight
Body Fat =( 20—25) Ideal Weight
Body Fat =( 25—29) Over Weight
Body Fat ≥30 Obesity
Page 22

This product is warranted to be free from defects in
workmanship and material, under normal use and
service conditions, for a period (1) one years from
the date of purchase. This warranty only applies to
the original purchaser, and is limited to replacing
or repairing. All repairs for which warranty claims
are made must be pre-authorized by the
manufacturer. This warranty does not apply to any
product or damage to the product caused by or
attributed to freight damage, abuse, misuse,
improper or abnormal usage or repairs not
provided by an authorized service center, products
used for commercial or rental purpose, or products
used as store display models. No other warranty
beyond that specifically set from above is
authorized.
The Manufacturer is not responsible or liable for
indirect, special or consequential damages arising
out of or in connection with the use of the product
or damages with respect to any economic,
property, revenues or profits, and enjoyment loss
or use, costs of removal.
The warranty extended hereunder is in lieu of any
and all other warranties of merchantability or
fitness for a particular purpose is limited in its
scope and duration to the terms set forth within.
This warranty gives your specific legal rights.
HOW TO ORDER
REPLACEMENT PARTS
If you encounter any problem with the product, or
need to order replacement parts, call UK
Customer Service:0345 604 0105 or visit
www.argoshelpdesk.co.uk. To help us assist you,
please be prepared to give us the following
information:
The Model Number of the product (3317226).
The name of the product (Pro Fitness Treadmill)
The Serial Number/Manufacturing Date of the
product/the description of the part(s),the purchase
date and order number also required.
Limited Warranty
UK Only
21
UK Only
Page 23
Proper maintenance is very important to ensure a
faultless and operational condition of the treadmill.
Improper maintenance can cause damage to the
treadmill or shorten the life of the product and
exceed the LIMITED WARRANTY coverage.
Important: Never use abrasives or solvents to
clean the treadmill. To prevent damage to the
computer, keep liquids away and keep it out of
direct sunlight.
All parts of the treadmill must be checked and
tightened regularly. Worn out parts must be
replaced immediately.
BELT ADJUSTMENT
You may need to adjust the running belt during the
first few weeks of use. All running belts are
properly set at the factory. It may stretch off the
center after use. Stretching is normal during the
break-in period.
ADJUSTING THE BELT TENSION
If the running belt feels as though it is “slipping” or
hesitating when you plant your foot during a run,
the tension on the running belt may have to be
increased.
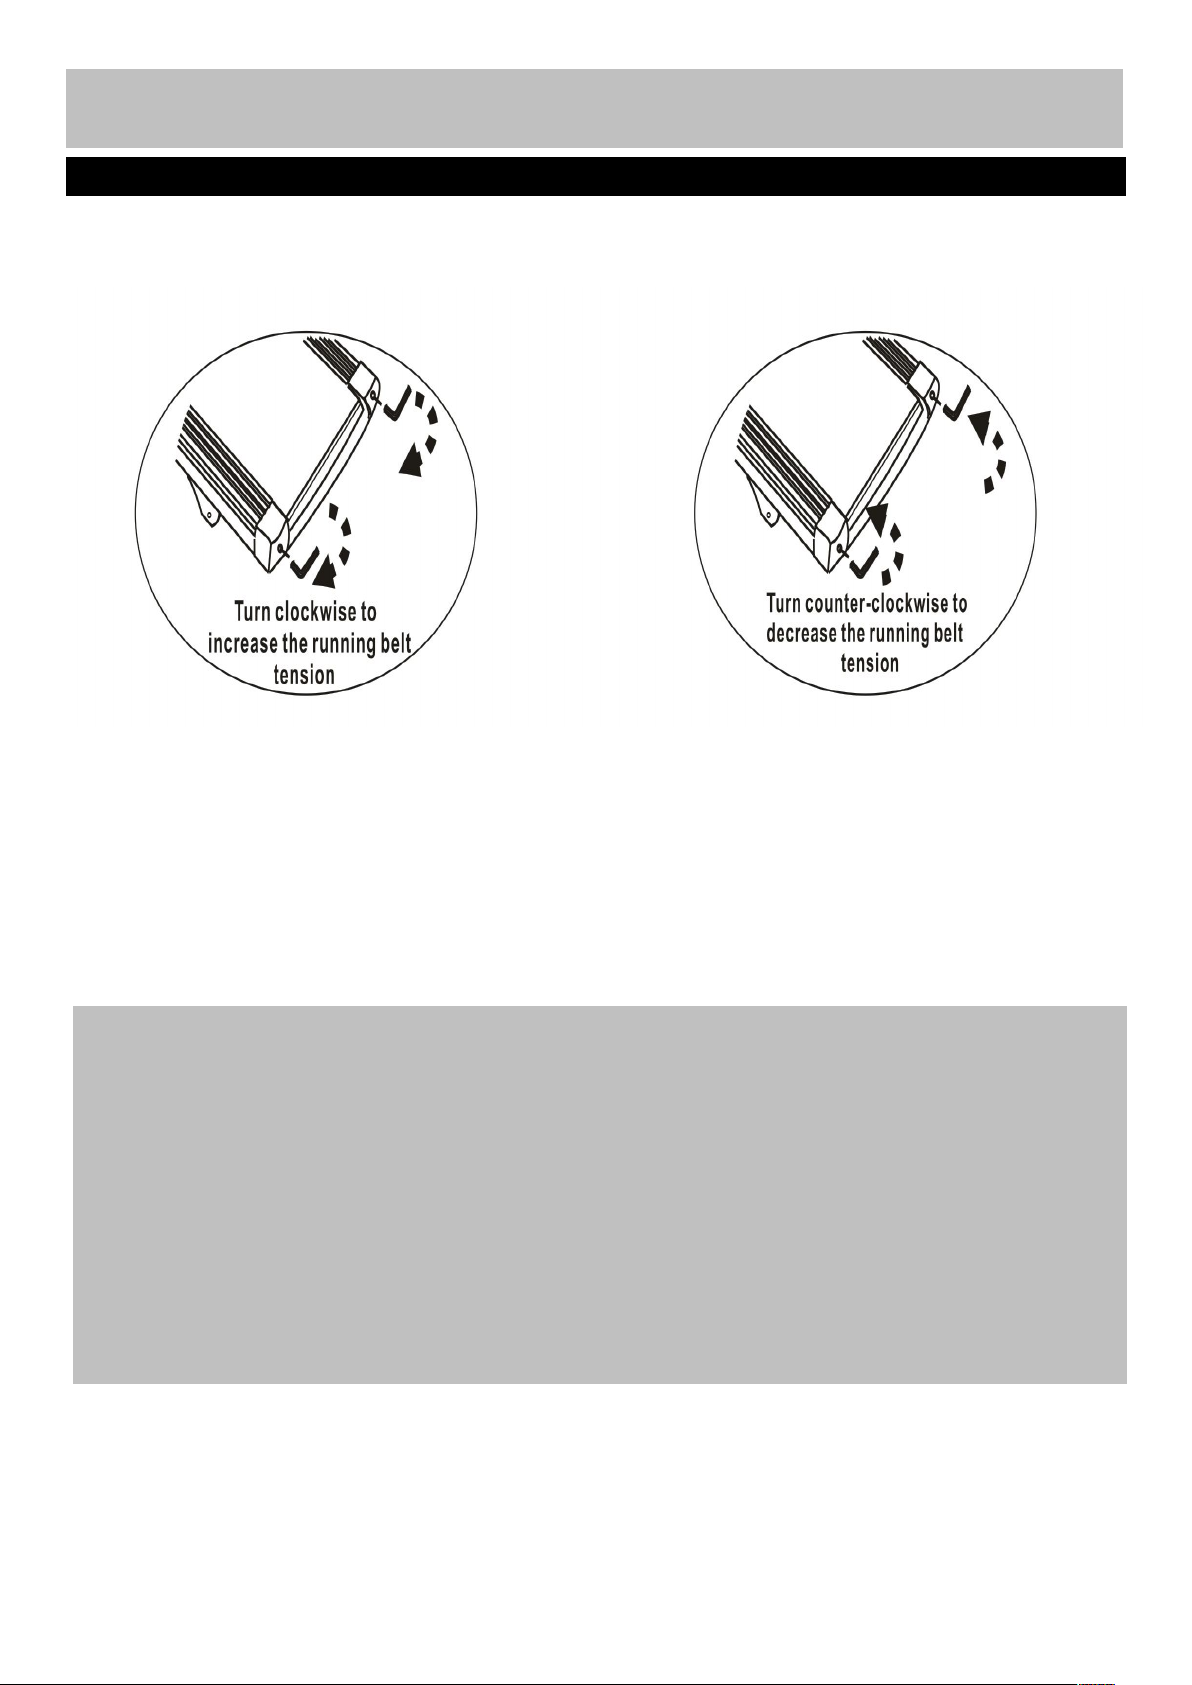
TO INCREASE THE RUNNING BELT TENSION
STEP 1: Place 6# Allen wrench on the left belt
tension bolt. Turn the wrench clockwise 1/4 turn to
draw the rear roller and increase the belt tension.
STEP 2: Repeat STEP 1 for the right belt tension
bolt. You must be sure to turn both bolts the same
number of turns, so the rear roller will stay square
relative to the frame.
Repeat STEP 1 and STEP 2 until the slipping
is eliminated.
Be careful not to tighten the running belt
tension too much as you can create excessive
pressure on the front and rear roller bearings.
An excessively tightened running belt may
damage the roller bearings that would result in
bearing noise from the front and rear rollers.
TO DECREASE THE TENSION ON THE
RUNNING BELT, TURN BOTH BOLTS
COUNTER-CLOCKWISE THE SAME NUMBER
OF TURNS.
CENTERING THE RUNNING BELT
When you run, you may push off harder with one
foot than with the other. The severity of the
deflection depends on the amount of force that
one foot exerts in the relation to the other. This
deflection can cause the belt to move off-center.
This deflection is normal and the running belt will
center when nobody is on the running belt. If the
running belt remains consistently off-center, you
will need to center the running belt manually.
Maintenance
Belt Adjustment
22
Belt Adjustment
Page 24
Maintenance
Centering the Running Belt
23
1. Start the treadmill without anyone on the running belt, press “Speed+” button until speed reaches
6Km/h.
2. Observe whether the running belt is toward the right or left side of the deck.
a) If toward the left side of the deck, using 6# Allen Wrench, turn the left adjustment bolt clockwise 1/4
turn and let the running belt will find its new position; if it’s still moving toward left side, turn the bolt
further for 1/4 turn.
b) If toward the right side of the deck, using 6# Allen Wrench, turn the right adjustment bolt clockwise
1/4 turn and let the running belt will find its new position; if it’s still moving toward right side, turn the
bolt further for 1/4 turn.
c) If the belt is still not center, repeat the above steps until the running belt is centered.
3. After the belt is centered, increase the speed to 12km/h and verify that it is running smoothly. Repeat
the above steps if it is necessary. If the above procedure is unsuccessful in resolving the off-center,
you may need to increase the belt tension.
Centering the Running Belt
Page 25
Maintenance
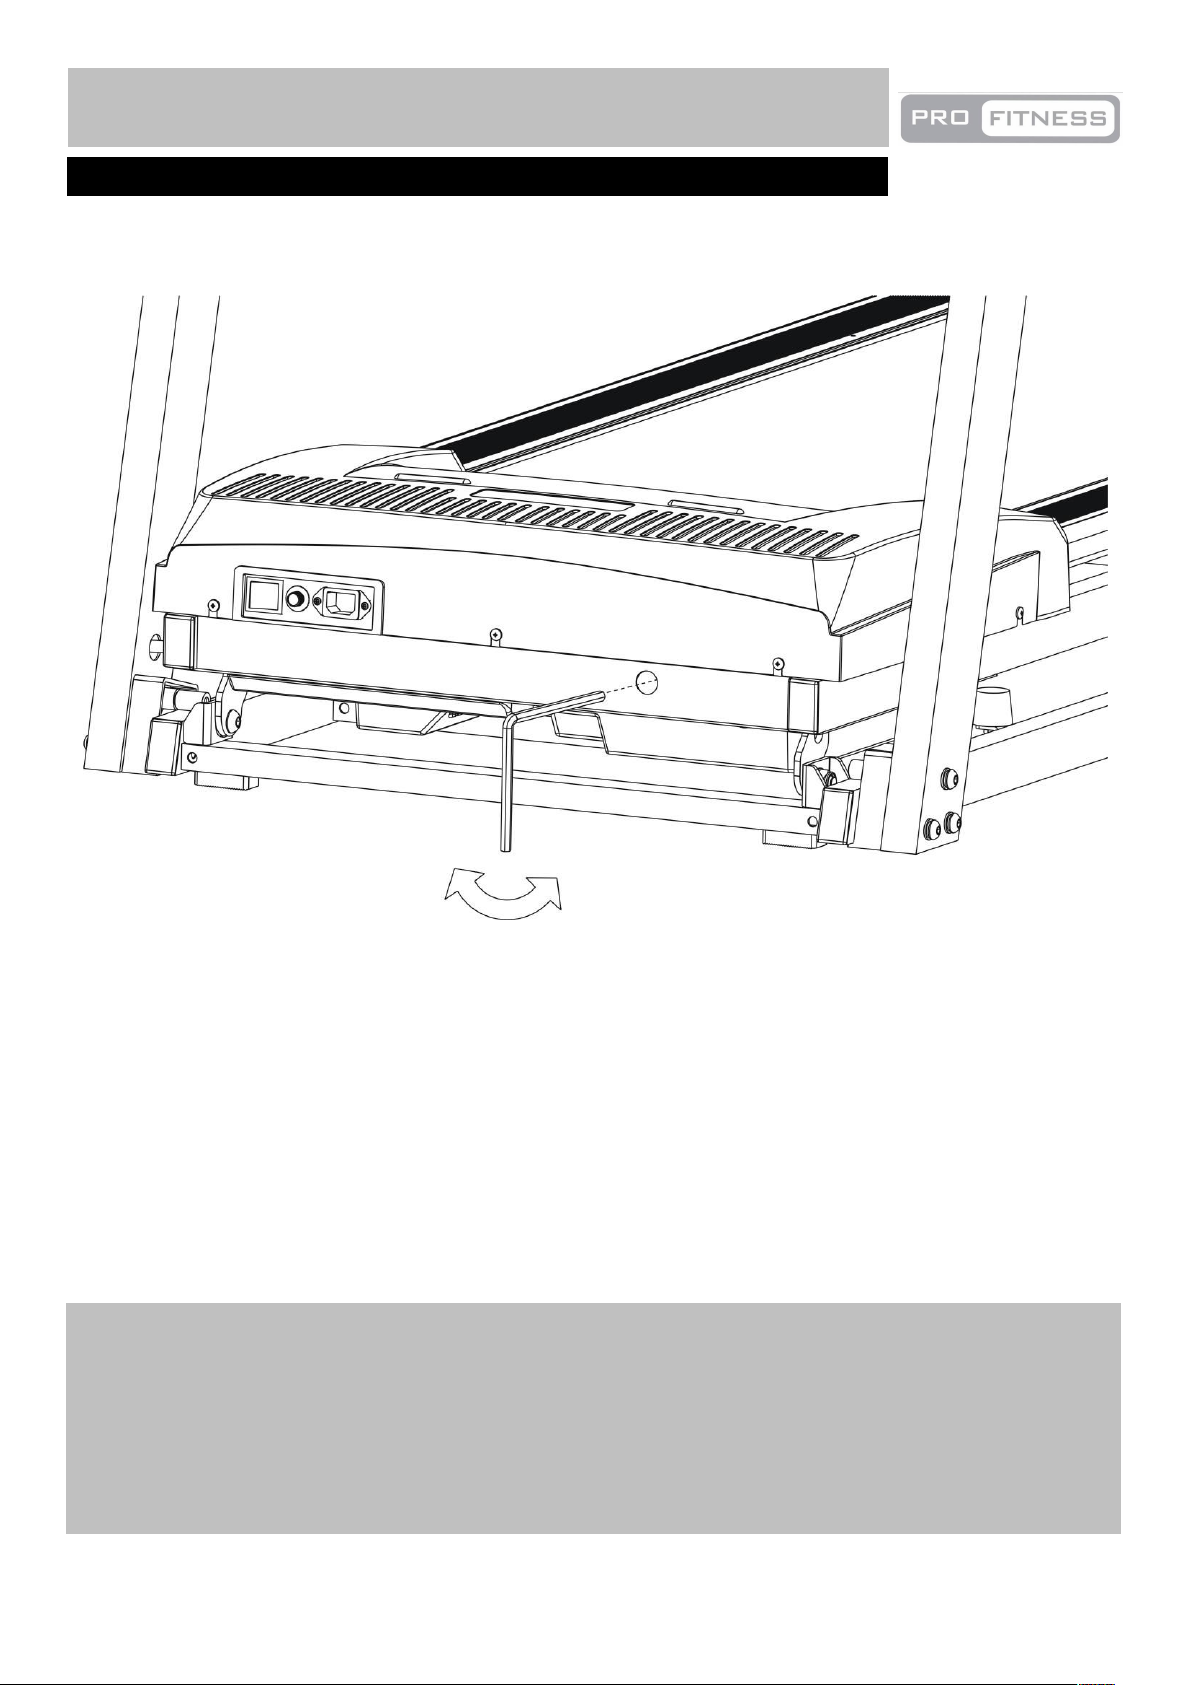
During your workout, if you find the running belt is not running smoothly, that means the motor belt is
loose, please follow the below steps to adjust the motor belt tension:
1. Turn the motor belt adjustment bolt using an M8 Allen wrench 1/4 turn in clockwise direction.
2. Re-Start the treadmill and run on the treadmill; if the running belt is still not working properly, repeat
above step.
3. Please do not make the motor belt too tight; if the belt is over tightened, it will cause the treadmill over
loading and reduce the motor life.
Motor Belt Tension Adjustment
24
Motor Belt Tension Adjustment
Page 26

The treadmill is pre-lubricated. However, it is
recommended to check the lubrication of the
treadmill regularly, to ensure an optimal operation
of the treadmill.
After every 2 months of operation, lift the sides of
the treadmill and feel the surface of the belt, as far
as possible. If traces of silicon spray are found,
lubrication is not necessary. In case of a dry
surface, refer to the instructions below.
Only use 100% silicon oil to lubricate your
treadmill deck.
To apply lubricant on the belt
Position the belt so that the seam is located in
the middle of the plate.
Lift the belt at one side and hold the spray
valve at a distance of approximately 15cm to
the front end of belt and plate.Then spray from
front to the end. Repeat this process on the
other side of the belt. Spray each side for
about 4 seconds.
Wait 1 minute to let the silicon spray spread,
before starting the machine.
CLEANING
Regular cleaning of the belt ensures a long
product life.
Warning: The treadmill must be turned off to
avoid electric shocks. The power cord must be
pulled out of the socket, before starting the
cleaning or maintenance.
Caution: Do not use any abrasives or
solvents. To avoid damage to the computer,
keep any liquids away. Do not expose the
computer to direct sunlight.
After each training: Wipe the console and
other surfaces with a clean soft and damp
cloth to remove sweat residues.
Weekly: To make cleaning easier, it is
recommended to use a mat under the
treadmill. Shoes can leave dirt on the belt that
can fall beneath the treadmill. Clean the mat
under the treadmill once a week.
STORAGE
Store your treadmill in a clean and dry
environment. Ensure the master power switch is
off and is un-plugged from the electrical wall outlet.
Maintenance
25
Deck Lubrication
Deck Lubrication
Page 27
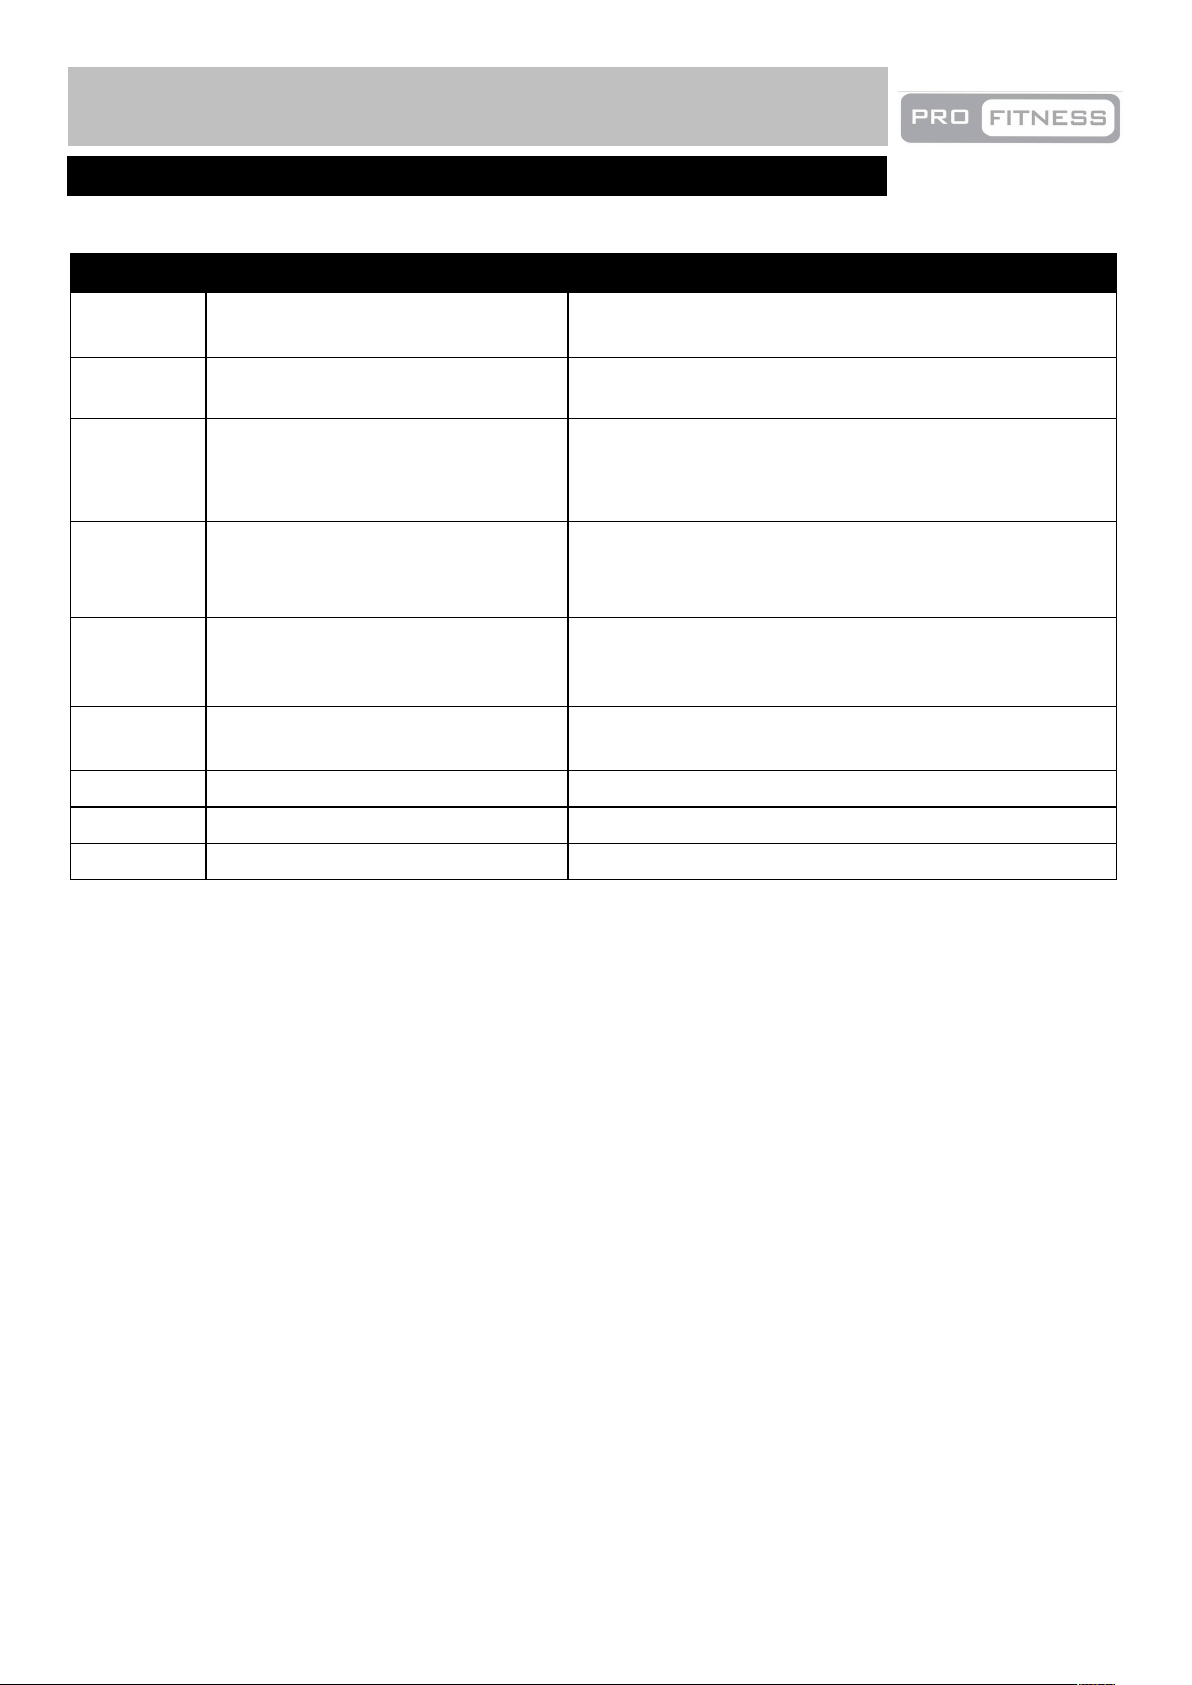
Symptom Cause And Check Solution
E00 Safety Key not in the position Re-locate the safety key in the correct position
E01 Controller communication error
A: Check the Main Controller Wire
B: Replace the controller
E02 Motor communication error
A: Check the wire from motor to controller
B: Replace the controller
C: Check the power voltage if 50% lower than rate
voltage
E03 No speed signal
A: Check speed signal wire if connected properly
B: Replace the speed signal wire
C: Replace the controller
E04 Incline Motor communication error A: Check the wire from incline motor to controller
B: Replace the incline motor
C: Replace the controller
E05 Over current protector A: Over loading or over resistance
B: Replace controller
E06 Motor Open Circuit Connect the Motor link
E08 Driver Error Replace the driver
E09 Treadmill is folded Unfold the treadmill, then press start key.
Maintenance
Trouble Shooting
26
Page 28
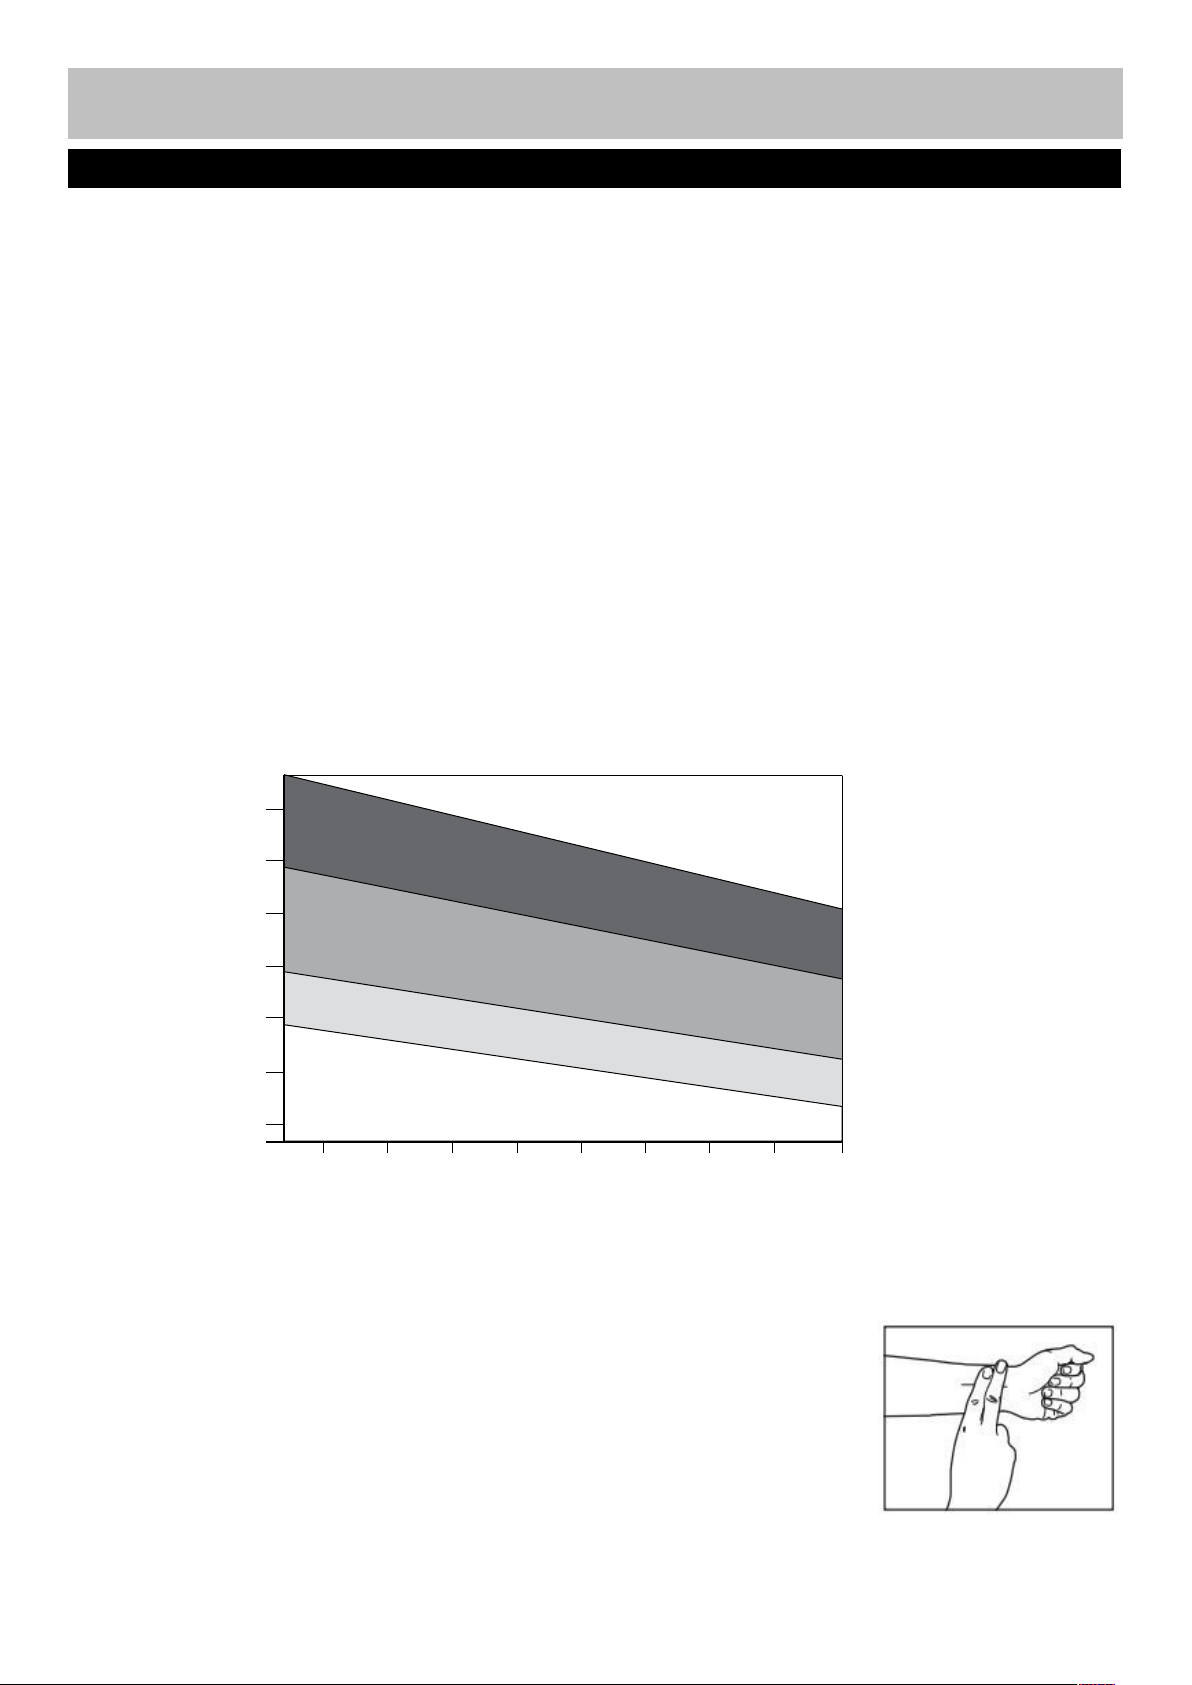
85% to Max
65% to 85%
55% to 65%
Up to 55%
How you begin your exercise program depends on your physical condition. If you have been inactive for
Exercise intensity
200
180
160
140
120
100
80
Age
During the first few months of your exercise program, keep your heart rate near the low end of your target zone
Exercising Information
Cardiovascular
performance
Intermediate aerobic
Effective fat burning
Beats per minutes (bpm)
Before starting to exercise
27
Before starting to exercise
several years, or are severely overweight, you must start slowly and increase your time on the equipment;
a few minutes per workout.
Initially, you may be able to exercise only for a few minutes in your target zone, however, your aerobic fitness
will improve over the next six to eight weeks. Don’t be discouraged if it takes longer. It’s important to work
at your own pace. Ultimately, you’ll be able to exercise continuously for 30 minutes. The better your aerobic
fitness, the harder you will have to work to stay in your target zone.
Please remember these essentials:
• Have your doctor review your training and diet programs to advise you of a workout routine you should adopt.
• Begin your training program slowly with realistic goals that have been set by you and your doctor.
• Monitor your pulse frequently. Establish your target heart rate based on your age and condition.
• Set up your equipment on a flat even surface at least 3 feet from walls and furniture.
To maximize the benefits of exercising, it is important to exercise with the proper intensity. The proper intensity
level can be found by using your heart rate as a guide. For effective aerobic exercise, your heart rate should
be maintained at a level between 65% and 85% of your maximum heart rate as you exercise. This is known as
your target zone. You can find your target zone in the table below.
25 30 35 40 45 50 55 60 70
as you exercise. After a few months, your heart rate can be increased gradually until it is near the middle of
your target zone as you exercise.
To measure your heart rate, stop exercising but continue moving your legs or
walking around and place two fingers on your wrist. Take a six-second heartbeat
count and multiply the results by 10 to find your heart rate. For example, if your
six-second heartbeat count is 14, your head rate is 140 beats per minute.
(A six-seconds count is used because your heart rate will drop rapidly when you
stop exercising.) Adjust the intensity of your exercise until your heart rate is at the
proper level.
Page 29
Aerobic Exercise
Aerobic exercise improves the fitness of your lungs and heart - your body’s most important muscle. Aerobic
Weight Training
Targeted Muscle Groups
Exercising Information
Muscle Chart
28
Muscle Chart
exercise fitness is promoted by any activity that uses your large muscles (arms, legs, or buttock, for example).
Your heart beats quickly and you breathe deeply. An aerobic exercise should be part of your entire exercise
routine.
Along with aerobic exercising which helps get rid of and keep off the excess fat that our bodies can store,
weight training is an essential part of the exercise routine process. Weight training helps tone, build and
strengthen muscle. If you are working above your target zone, you may want to do a lesser amount of reps.
As always, consult your doctor before beginning any exercise program.
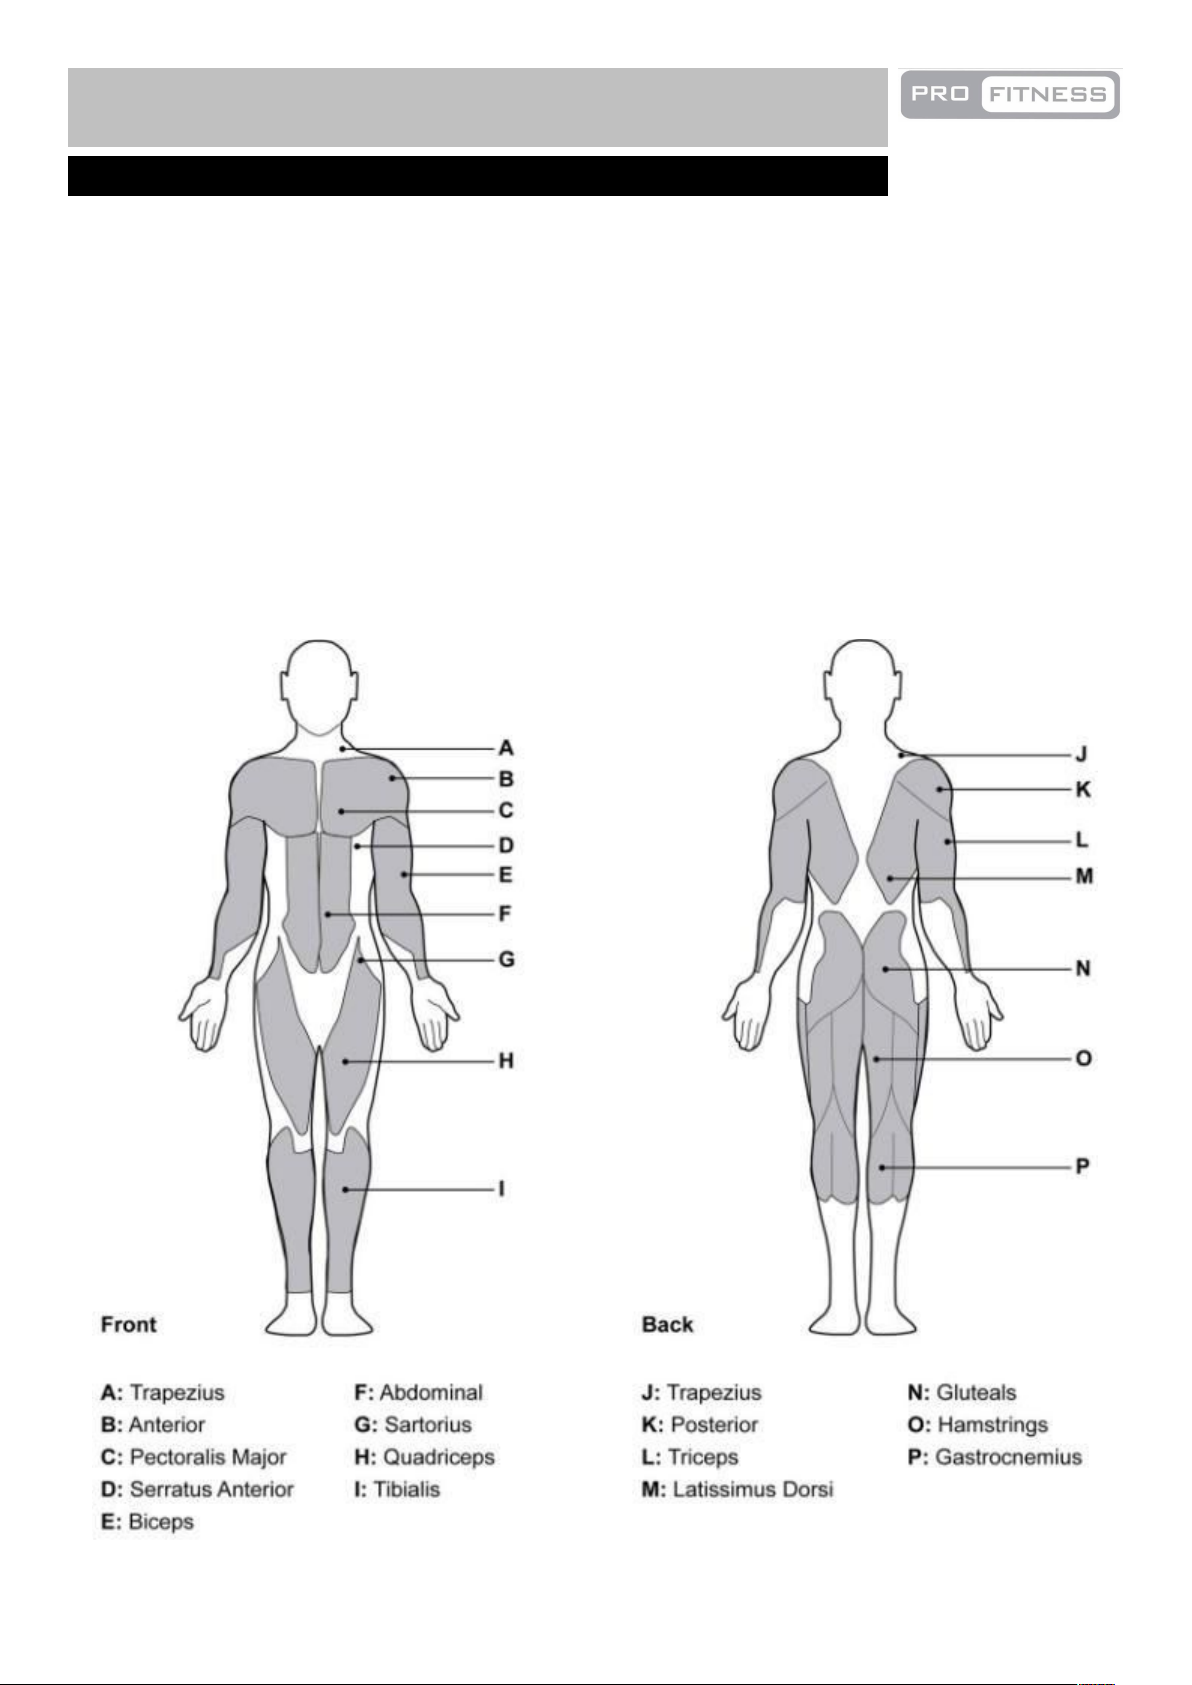
The exercise routine that is performed on the Treadmill will develop the upper and lower body muscle
groups. These muscle groups are highlighted on the muscle chart below.
Page 30
Each workout should include the following three parts:
Exercise Frequency
Toe touch stretch
Hamstring stretch
Exercising Information
29
Warming up and Cooling down exercises
Warming up and Cooling down exercises
1. A warm up, consisting of 5 to 10 minutes of stretching and light exercise. A proper warm up increases
your body temperature, heart rate and circulation in preparation for exercise.
2. Training zone exercise consisting of 20 to 30 minutes of exercising with your heart rate in your training
zone. (Note: During the first few weeks of your exercise programmer, do not keep your heart rate in your
training zone for longer than 20 minutes.)
3. A cool down, with 5 to 10 minutes of stretching. This will increase the flexibility of your muscles and will help
to prevent post-exercise problems.
To maintain or improve your condition, plan three workouts each week with at least one day of rest
between workouts. After a few months of regular exercise, you may complete up to five workouts each
week, if desired. Remember, the key to success is to make exercise a regular and enjoyable part of your
everyday life.
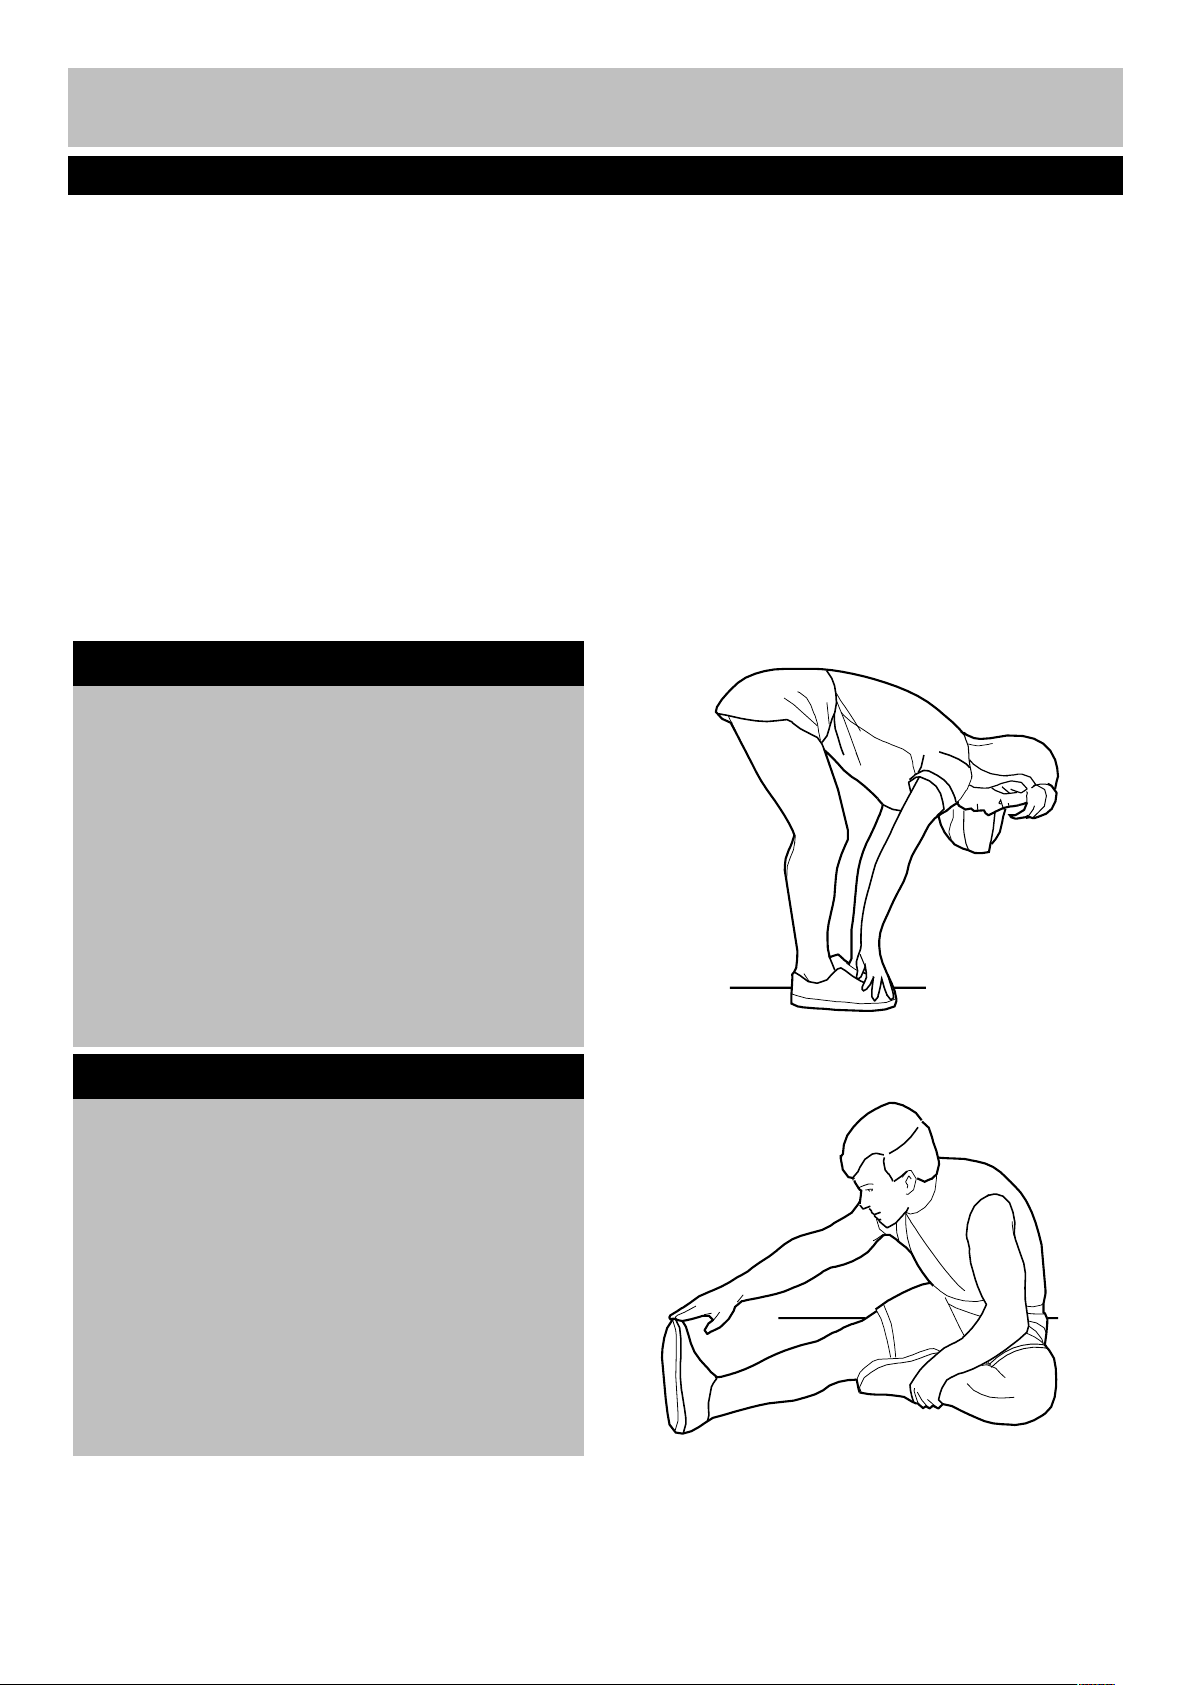
Stand with your knees bent slightly and
slowly bend forward from your hips. Allow
your back and shoulders to relax as you
reach down toward your toes as far as
possible.
Hold 15 counts, and then relax.
Repeat 3 times.
Stretches: Hamstrings, back of knees and back.
Sit with one leg extended. Bring the sole
of the opposite foot toward you and rest it
against the inner thigh of your extended
leg. Reach toward your toes as far as
possible.
Hold for 15 counts, and then relax.
Repeat 3 times for each leg.
Stretches: Hamstrings, lower back and groin.
Page 31
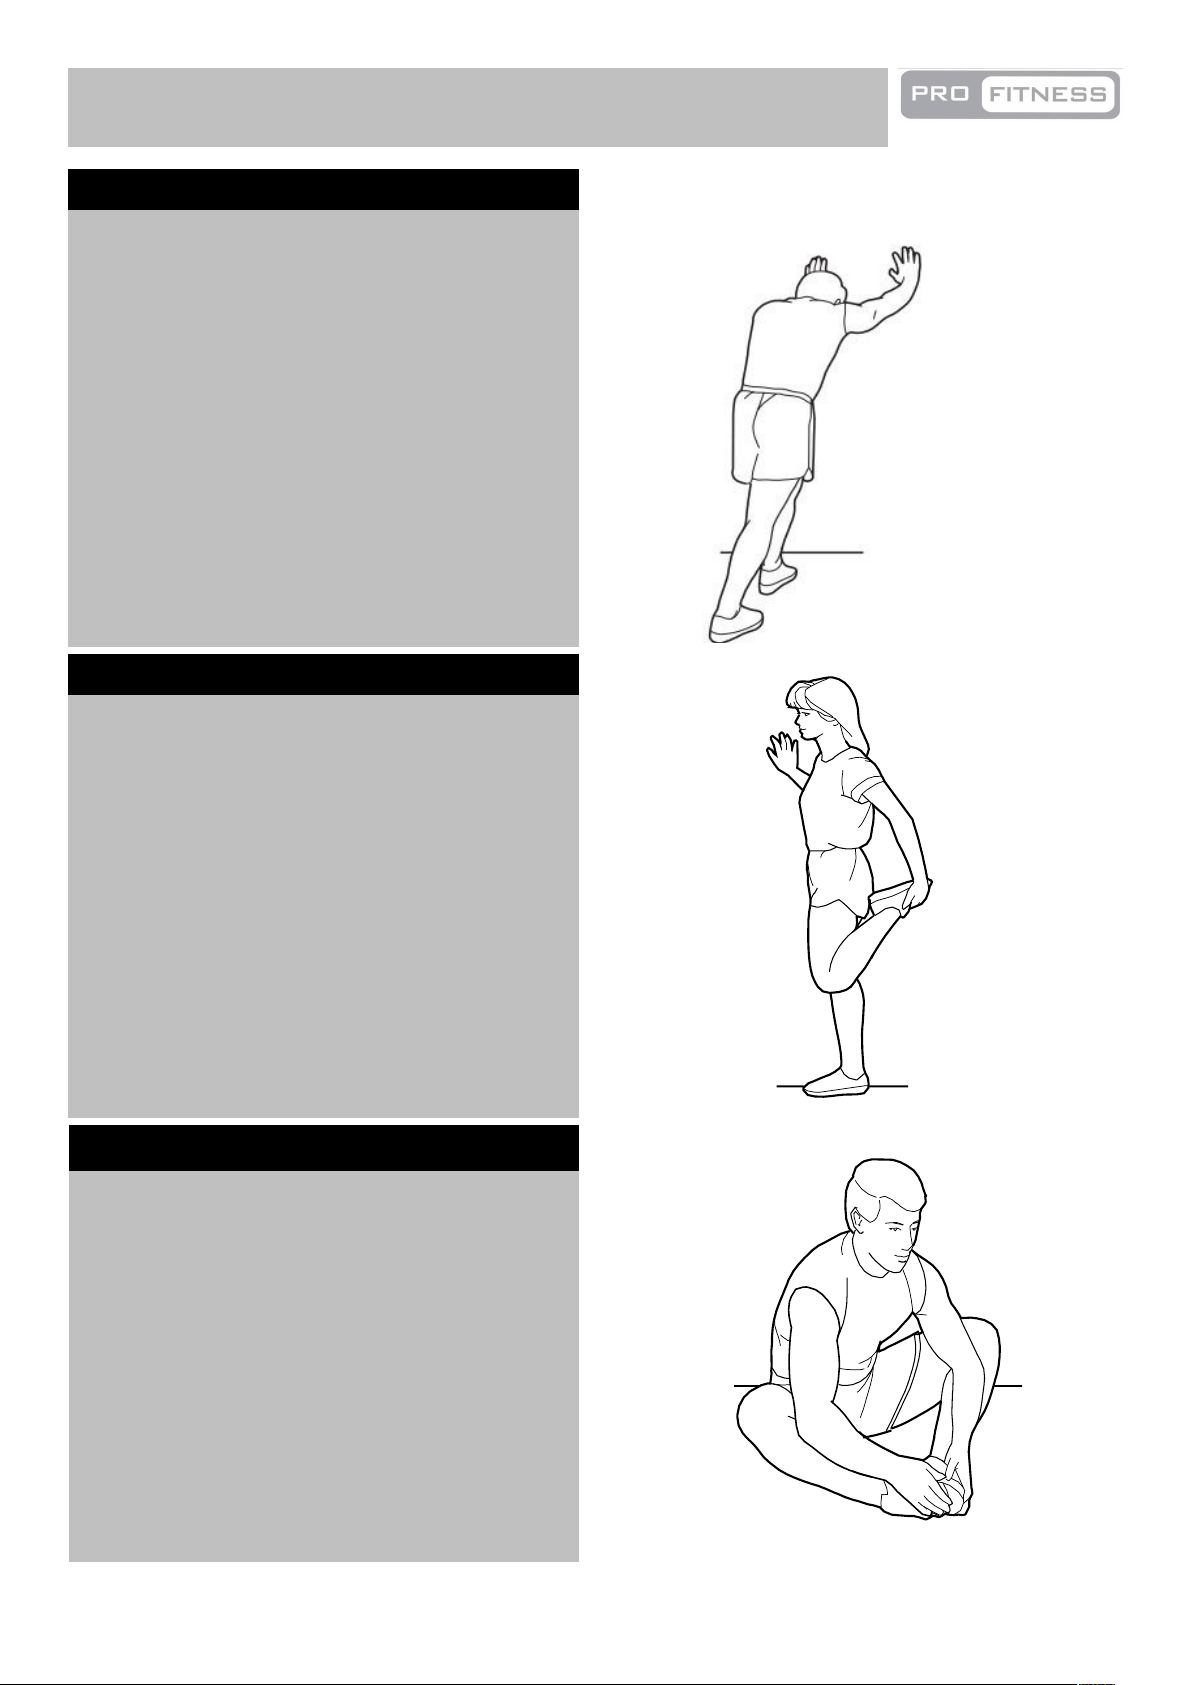
Inner thigh stretch
Calf / Achilles stretch
Quadriceps stretch
Stretches: Quadriceps and Hip muscles.
Sit with the soles of your feet together
and your knees outward. Pull your feet
toward your groin area as far as possible.
Stretches: Quadriceps and Hip muscles.
Exercising Information
30
With one leg in front of the other, reach
forward and place your hands against a
wall. Keep your back leg straight and
your back foot flat on the floor. Bend your
front leg, lean forward and move your
hips toward the wall.
Hold for 15 counts, and then relax.
Repeat 3 times for each leg. To cause
further stretching of the Achilles tendons,
bend your back leg as well.
Stretches: Calves, Achilles Tendons and Ankles.
With one hand against the wall for balance,
reach back and grasp one foot with your
other hand. Keeping your bent knee pointing
directly downward towards the floor, gently
pull your heel towards your buttock until you
feel a gentle stretch in the target area.
Hold for 15 counts, and then relax.
Repeat 3 times for each leg.
Hold for 15 counts, and then relax.
Repeat 3 times.
Page 32

1. Examine the equipment
periodically in order to detect
any damage or wear which
may have been
produced.The safety level of
the equipment can be
maintained only if it is
examined regularly for
damage and wear, e.g. belt,
connection points.
2.
Lubricate moving parts with
light oil periodically to
prevent premature wear.
3. Replace defective
components immediately
and/or keep the equipment
out of use until repair.
Special attention to
components most
susceptible to wear.
4. The equipment can be
cleaned using a damp cloth
and mild non-abrasive
detergent. Do not use
solvents.
5. Do not attempt to repair this
equipment yourself. Should
you have any difficulty with
assembly, operation or use
of your exercise product or
if you think that you may
have parts missing, contact
the manufacturer,their
approved service agent or
the Customer Helpline:
0345 604 0105.
www.argoshelpdesk.co.uk
Guarantee:
For guarantee purposes,
please retain your purchase
receipt.
Care and Maintenance
31
Page 33
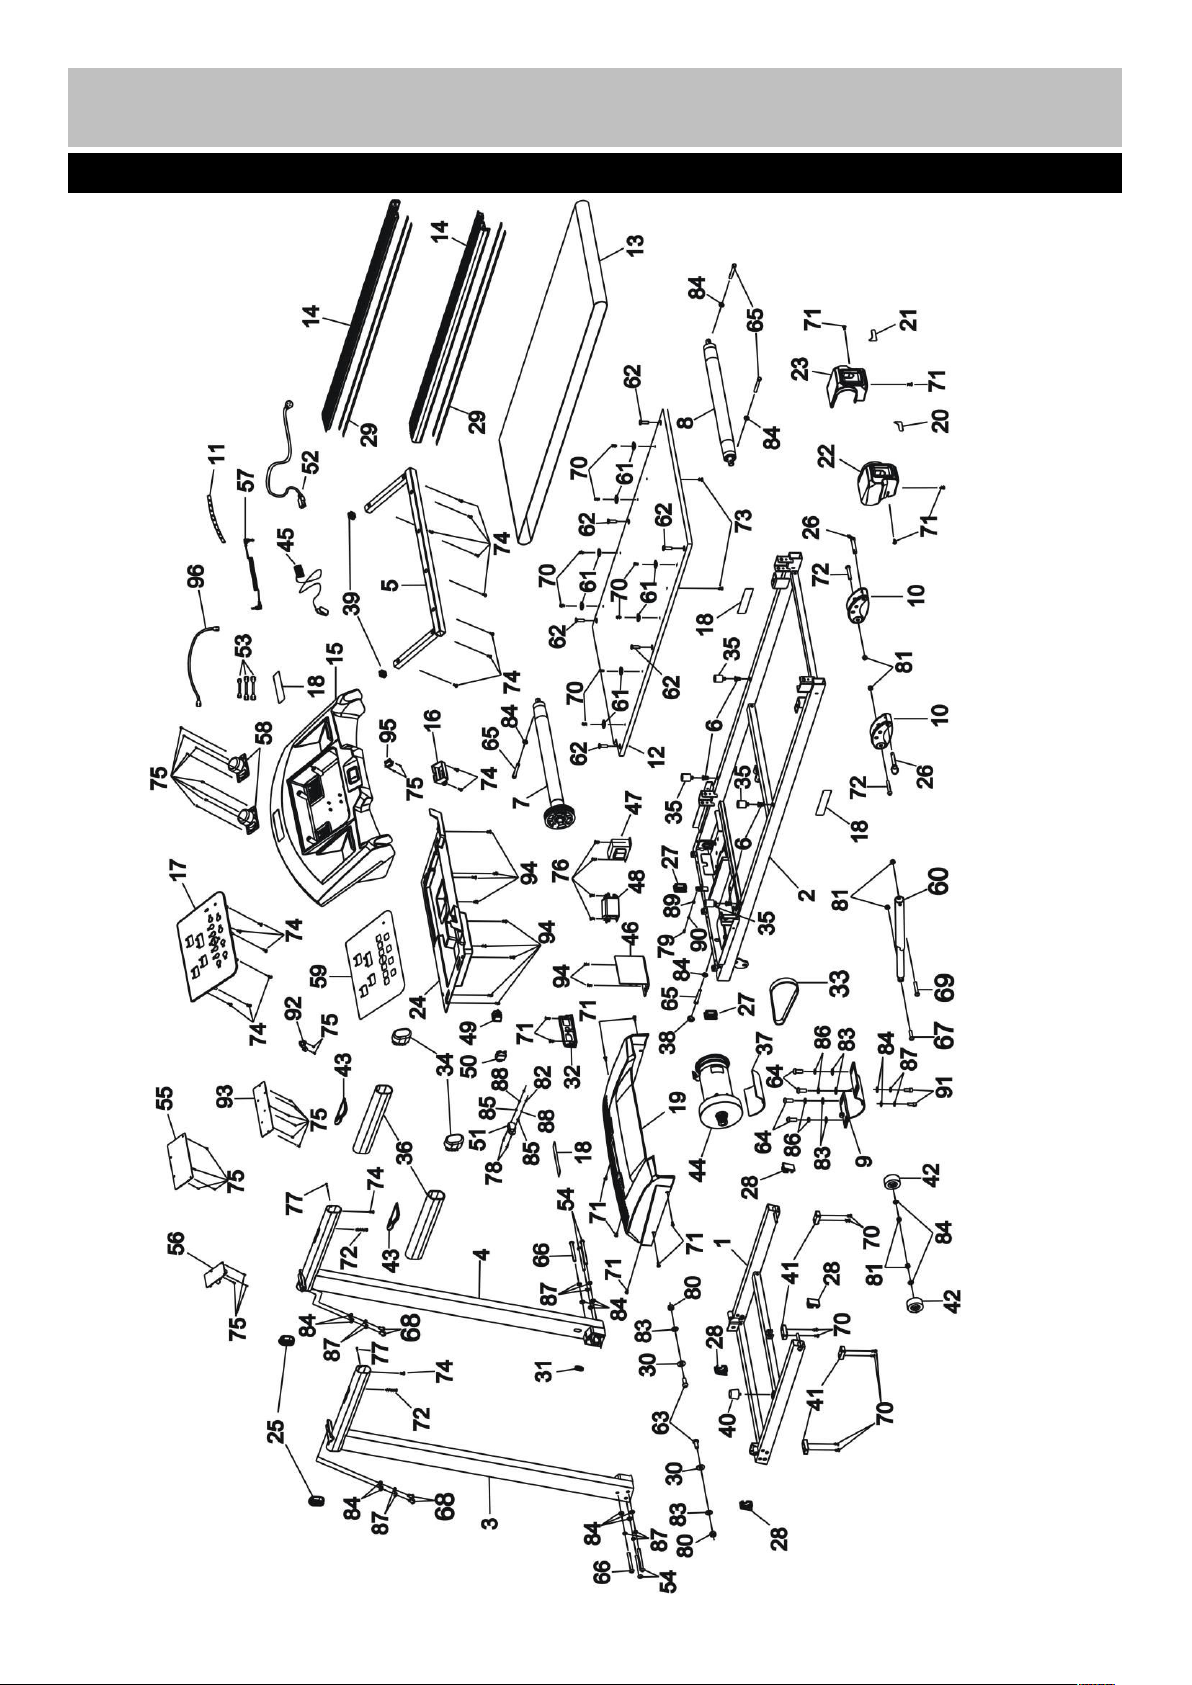
Exploded Parts Diagram
32
Page 34

Key No. Description QTY
Key No.
Description QTY
1 Base frame 1 28 End Cap 4
2 Running stage 1 29 End Cap 2
3 Left console mast 1 30 φ40×φ10×2mm Washer 4
4 Right console mast 1 31 Flinger 3
5 Console frame 1 32 Switch box 1
6 M8 Aircraft nut 4 33 190J Motor belt 1
7 Front roller 1 34 End cap 2
8 Rear roller 1 35 Cushion 4
9 Motor support 1 36 Handle grip 2
10 Adjustable bracket 2 37 Rubber Cushion 1
11 Protective pipe 2 38 End cap 1
12 Running deck 1 39 End cap 2
13
2580×420×1.6mm Running
belt
1 40 Cushion 1
14 Side rail 2 41 Shock pad 4
15 Console housing 1 42 Roller 2
16 Safety key cover 1 43 Pulse sensor 2
17 Display screen 1 44 Motor 1
18 Logo sticker 4 45 Safety key 1
19 Motor cover 1 46 Controller 1
20 Left mast cover Sticker 1 47 Inductor 1
21 Right mast cover sticker 1 48 Filter 1
22 Left end cap 1 49 Switch 1
23 Right end cap 1 50 Over current Protector 1
24 Motor bottom cover 1 51 Power Socket 1
25 End cap 2 52 Power cord 1
26 Pin 2 53 Short cords (Connectors of 47/48/49) 1
27 End Cap 2 54 M8×85mm Allen bolt 4
Exploded Parts List
33
Page 35

Key No. Description QTY Key No. Description QTY
55 PC Board 1 77 ST2.9×10mm Dome Head Philips Screw 2
56 Amplifier module 1 78 M3×12mm Philips Screw 2
57 MP3 Link 1 79 M4×10mm Philips Screw 1
58 Speaker 2 80 M10 Aircraft Nut 2
59 Sticker 1 81 M8 Aircraft Nut 6
60 Air spring 1 82 M3 Hex Nut 2
61 Ф25×Ф15×5mm Washer 8 83 Ф10mm Washer 6
62 M8×24mm Philips Screw 6 84 Ф8mm Washer 18
63 M10×25mm Philips Screw 2 85 Ф
3mm Washer
2
64 M10×20mm Philips Screw 4 86 Ф10mm Spring Washer 4
65 M8×60mm Allen Bolt 4 87 Ф
8mm Spring Washer
12
66 M8×75mm Allen Bolt 2 88 Ф3mm Spring Washer 2
67 M8×30mm Allen Bolt 1 89 Ф4mm Washer 1
68 M8×15mm Allen Bolt 4 90 Ф
4mm Spring Washer
1
69 M8×45mm Allen Bolt 1 91 M8×15mm Allen bolt 2
70
ST4.8×15mm Philips Screw
16 92 MP3 Module 1
71
ST4.8×15mm Dome Head
Philips Screw
13 93 PCB Module 1
72
ST4.2×50mm Dome Head
Philips Screw
2 94 ST4.8×12mm Dome Head Philips Screw 11
73
ST4.2×25mm Dome Head
Philips Screw
2 95 Safety key plug 1
74
ST4.2×15mm Dome Head
Philips Screw
19 96 Main wire (Console-MCB cables) 1
75
ST2.9×8mm Dome Head
Philips Screw
26
76
ST4.2×12mm Dome Head
Philips Screw
4
Exploded Parts List
34
Page 36
Guarantee
Product Guarantee
This product is guaranteed against manufacturing defects from a period of
This product is guaranteed for twelve months from the date of original
purchase. Any defect that arises due to faulty materials or workmanship
will either be replaced, refunded or repaired free of charge where possible
during this period by the dealer from whom you purchased the unit.
The guarantee is subject to the following provisions:
• The guarantee does not cover accidental damage, misuse, cabinet parts,
knobs or consumable items.
• The product must be correctly installed and operated in accordance with
the instructions contained in this manual.
• It must be used solely for domestic purpose.
• The guarantee will rendered invalided if the products is re-sold or has been
damaged by inexpert repair.
• Specifications are subject to change without notice.
• The manufacturer disclaims any liability for the incidental or consequential
damages.
• The guarantee is in addition to, and does not diminish your statutory or
legal right.
• In the event of problem with the product with in the guarantee period call
Customer Helpline: 03456040105 www.argoshelpdesk.co.uk
Guarantor: Argos Ltd
489 – 499 Avebury Boulevard
Central Milton Keynes
MK9 2NW
Year
 Loading...