

Page 1
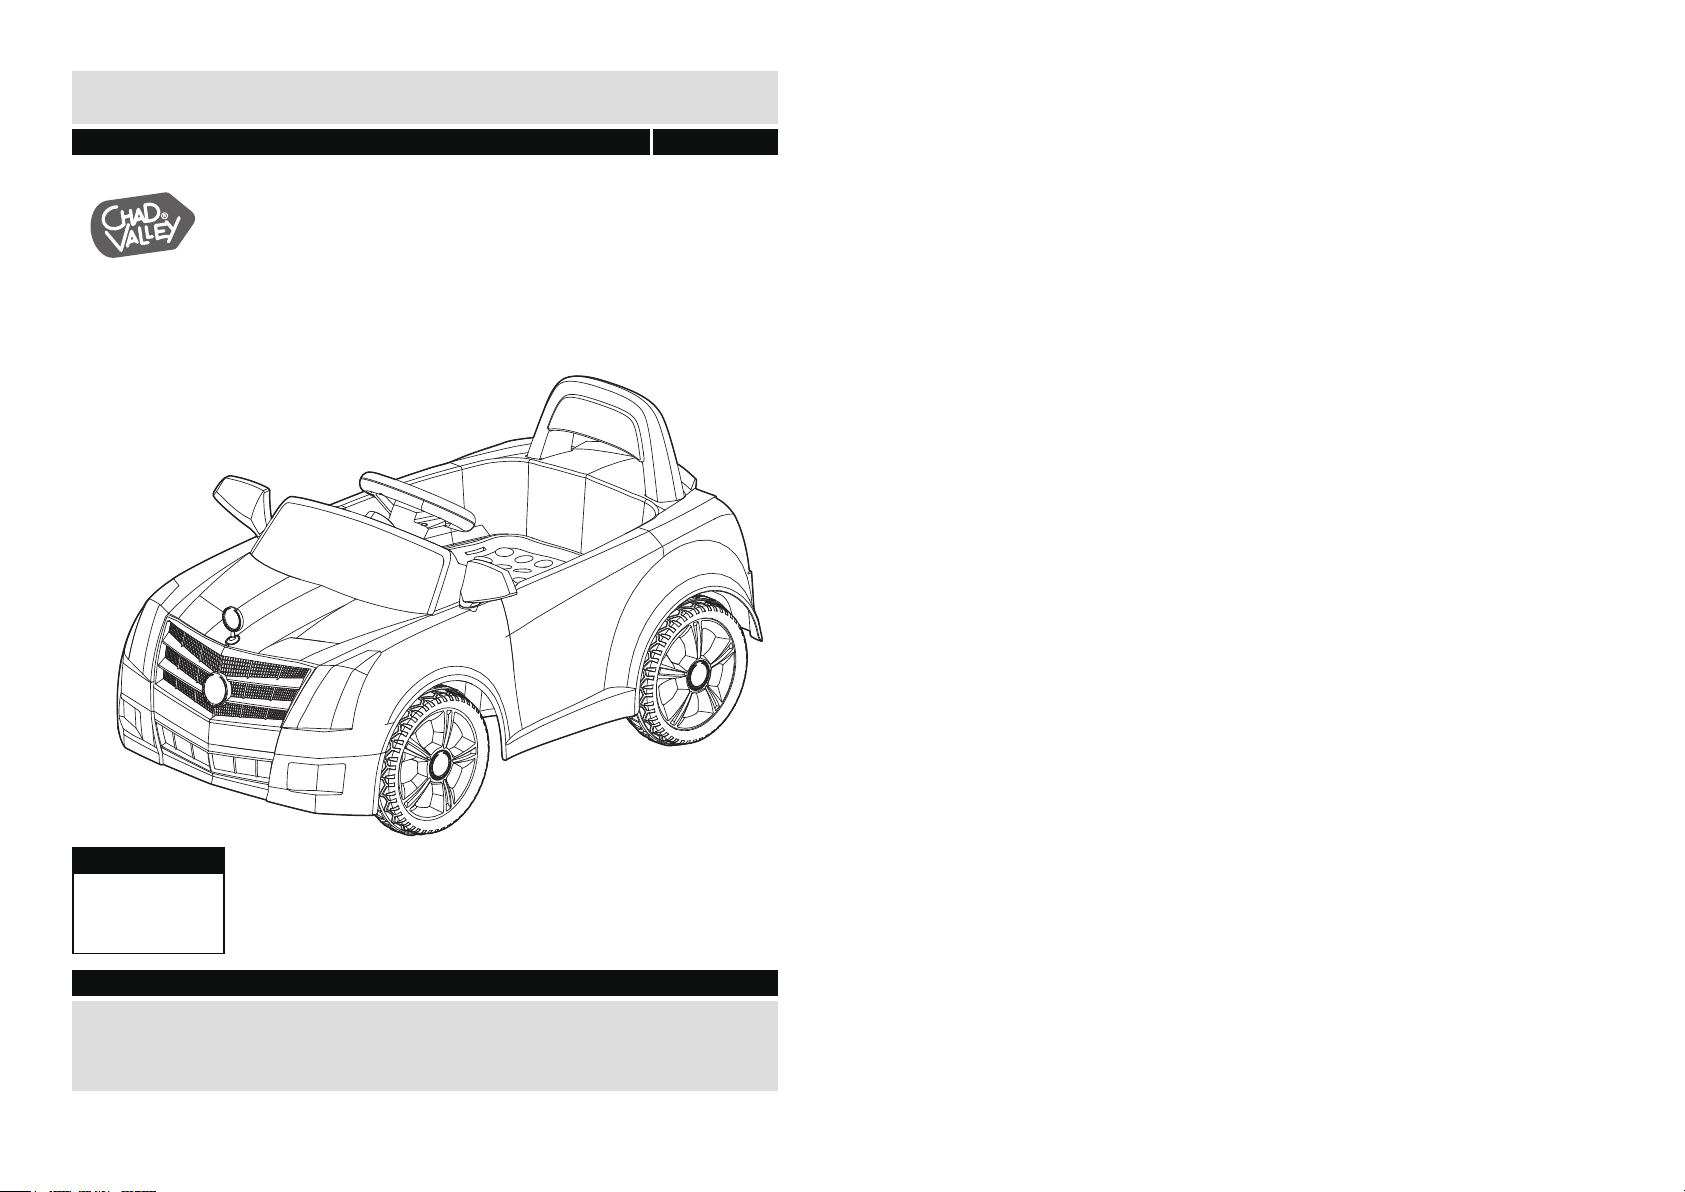
WHITE 6V SPORTS CAR
Assembly &User Instructions - Please Keep for future reference
298/9057(D)
Important
Age: 3 + years
Maximum load
weight: 35kg
Important – Please read these instructions fully before starting assembly
These instructions contain important information which will help you get the best from your
product and ensure safe and correct assembly, use and maintenance.
If you need help or have damaged or missing parts, call the
or visit www.argos.co.uk
Customer Helpline:0345 640 0800
Page 2
Safety Information
Parts
If you have damaged or missing parts,
call the Customer Helpline: 08456 400 800
Important – Please read these instructions fully before assembly or use
Driving attention
● Must not ride on the street,highway,slope,sand,or
any dangerous places.
● Must ride on even ground.
● Must ride without overload.
● Charging cell must be by done adults.
● Children's riding must be guided by adults.
● Please do not change the circuit of the vehicle or
it's attaching electric eqwuipments.
● Please do not ride in water, or other fluid to the
vehicle.
● Do not push Backward/Forward when riding.
● When meeting barriers,just loosen the pedal
switch,turn away from the barriers,march on.
● Please charge in time when the vehicle runs
slowly or life-span of battery will be reduced,
● Please chang the battery fully,before keep it for
long time then recharge it per 3 months to prolong
life-span of battery.
● You had better not ride on a rainy day.
● Battery, charger, electric wire, plug, enclosure and
other parts of periodical check if damage, if have
damage, and need to repair good empress, can
continue to use.
● "Transformers used with the toy are to be
regularly examined for damage to the cord, plug,
enclosure and other parts, and that, in the event of
such damage, the toy must not be used with this
transformer until the damage has been
repaired."
● The toy is not intended for children under 3 years
old;
● The toy must only be used with the recommended
charger;
● The charger is not a toy;
● Toys liable to be cleaned with liquid are to be
disconnected from the charger before cleaning.
● Check the equipped Charger periodically and
carefully.
● Check the Harness,Socket,Accessories,and other
Components all in good condition or not, repair or
replace them if any problem found.
The cautions of charge
● Before your first driving,charge the battery for 18
hours before the vehicles first used.
● The socket for charge is just in the afterbody. Put
the charge's DC plug into the socket, and then put
the charger into the 220V power sourcer's socket.
● Please charge 8-12hrs, after driving 1-2hrs, the
charge time can not exceed 20 hrs.
● When the marching speed is slower than the
normal level, recharge right now for 8-12 hrs.
● If the car has a long time not being used, please
chargh full the cell, then charge once per 3 months,
to extend the cell's life.
● If the charger is hot(under 71ƒ)while charging,
that's normal.
● The socket of the charger can't have waterr, or
may happen short circuit.
● The car must use the special charger furnished
with it, to avoid damage the charger storage cell or
circuit.
● Charging cell must be by adults.
● Non-rechargeable batteries are not to be
recharged.
● Only batteries of the same or equivalent type as
recommended are to be used.
● Batteries are to be inserted with the correct
polarity.
● Exhausted batteries are to be removed from the
boy.
● The supply teminals are not to be short -circuited.
● Batteries are to be inserted with the correct
polarity.
● Do not mix old and new batteries.
Warning
● Adult assemble only!
●Don’t give the tool to child in order to avoid open
the protector on the top of the battery.
● Not suitable for children under 36 months.
● Choking hazard due to small parts.
● Not to be used in traffic.
● This toy is unsuitable for children under 3 years
due to its maximum speed.
● The toy shall be used with caution since skill is
required to avoid falls or collisions causing injury to
the user and third parties.
● There are additional hazards of using the toy in
areas other than private grounds.
● Keep children away when charging.
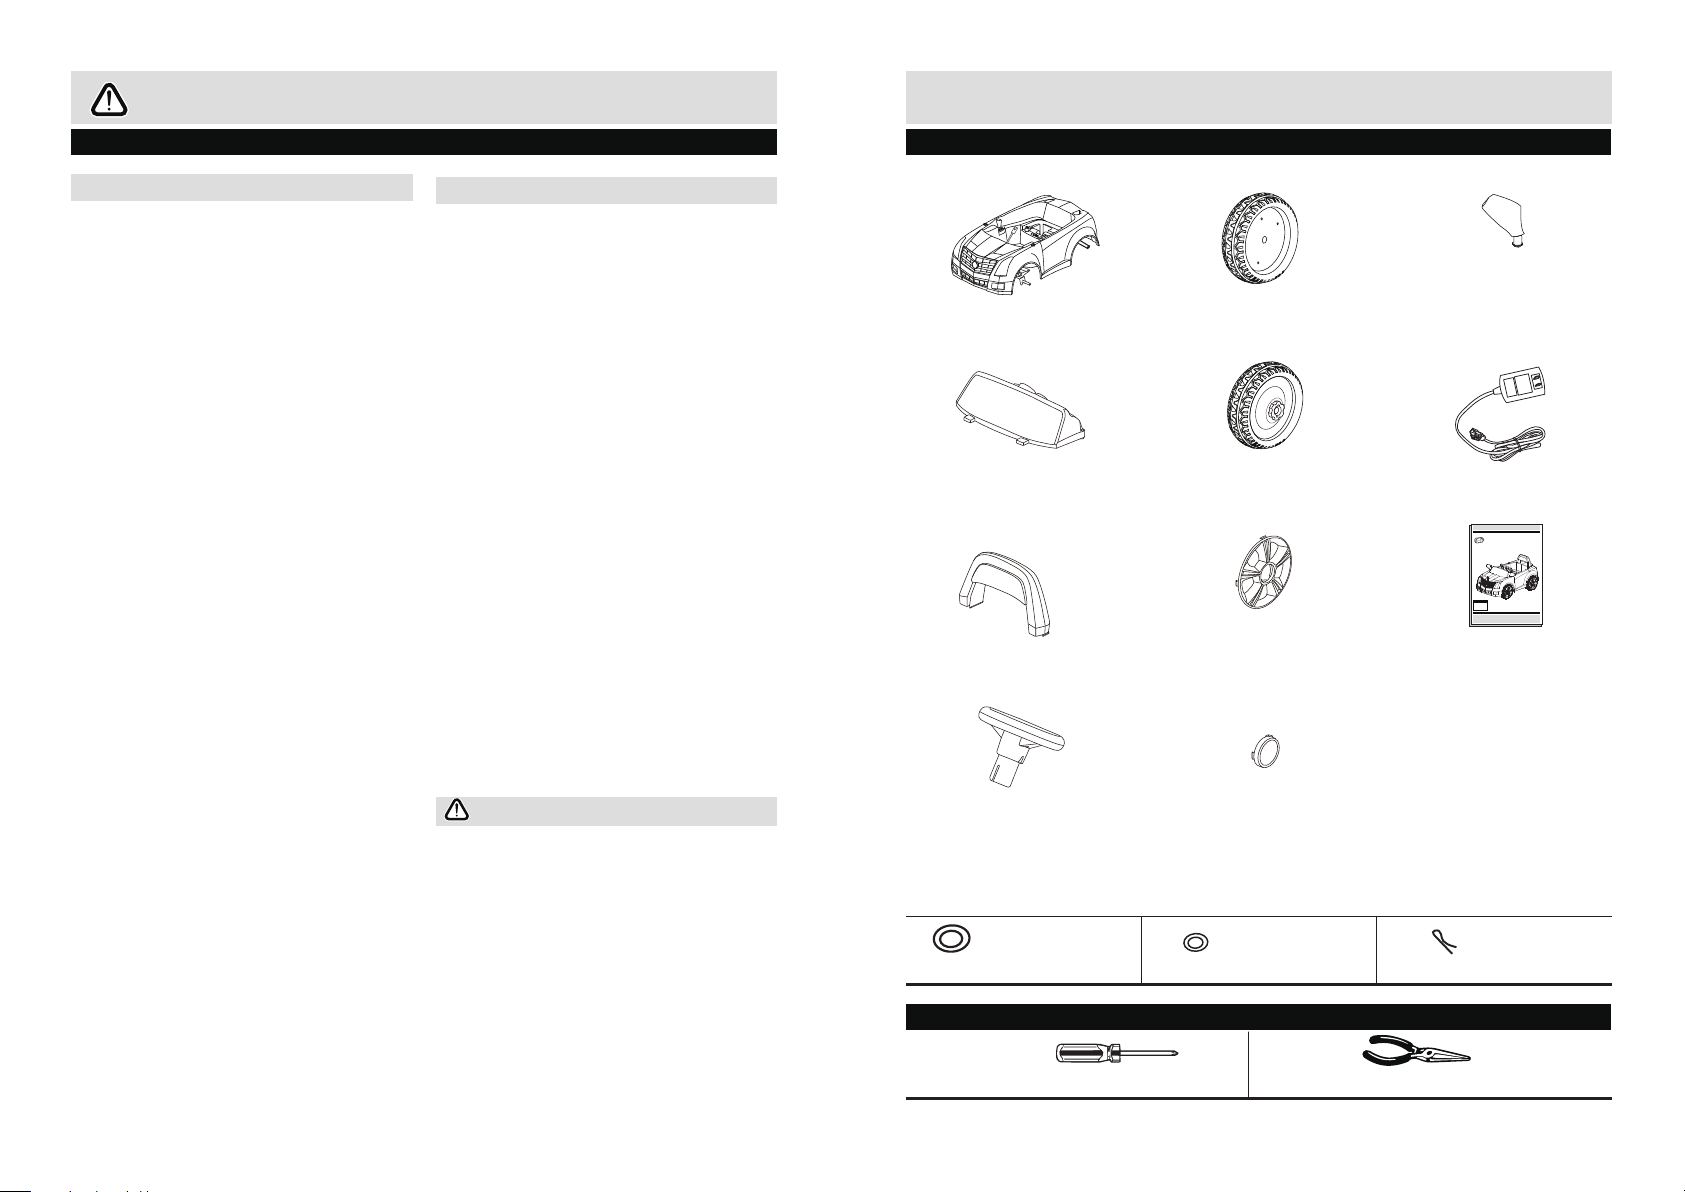
Please check you have all the parts and fittings listed below
C
Pin x 4
9 Mirror X2
10 Charger X1
WHITE 6V SPORTS CAR
Assembly &User Instructions - Please Keep for future reference 298/9057(D)
Important
Age: 3 + years
Maximum load
weight: 35kg
Important – Please read these instructions fully before starting assembly
These instructions contain important information which will help you get the best from your
product and ensure safe and correct assembly, use and maintenance.
If you need help or have damaged or missing parts, call the
Customer Helpline:0345 640 0800
or visit www.argos.co.uk
11 Manual X1
1 Car Body X1
2 Dashboard X1
3 Backrest X1
4 Steering Wheel X1
5 Front Wheel X2
6 Rear Wheel X2
7 Wheel Cover X4
8 Hub Cap X4
Note:The quantities below are the correct amount to complete the assembly. In some cases more fittings
may be supplied than are required.
A
Big washer x 3
B
Small washer x 4
Tools required
D
Cross screwdriver
E
Needle nose pliers
Page 3
Use Instructions
Assembly Instructions
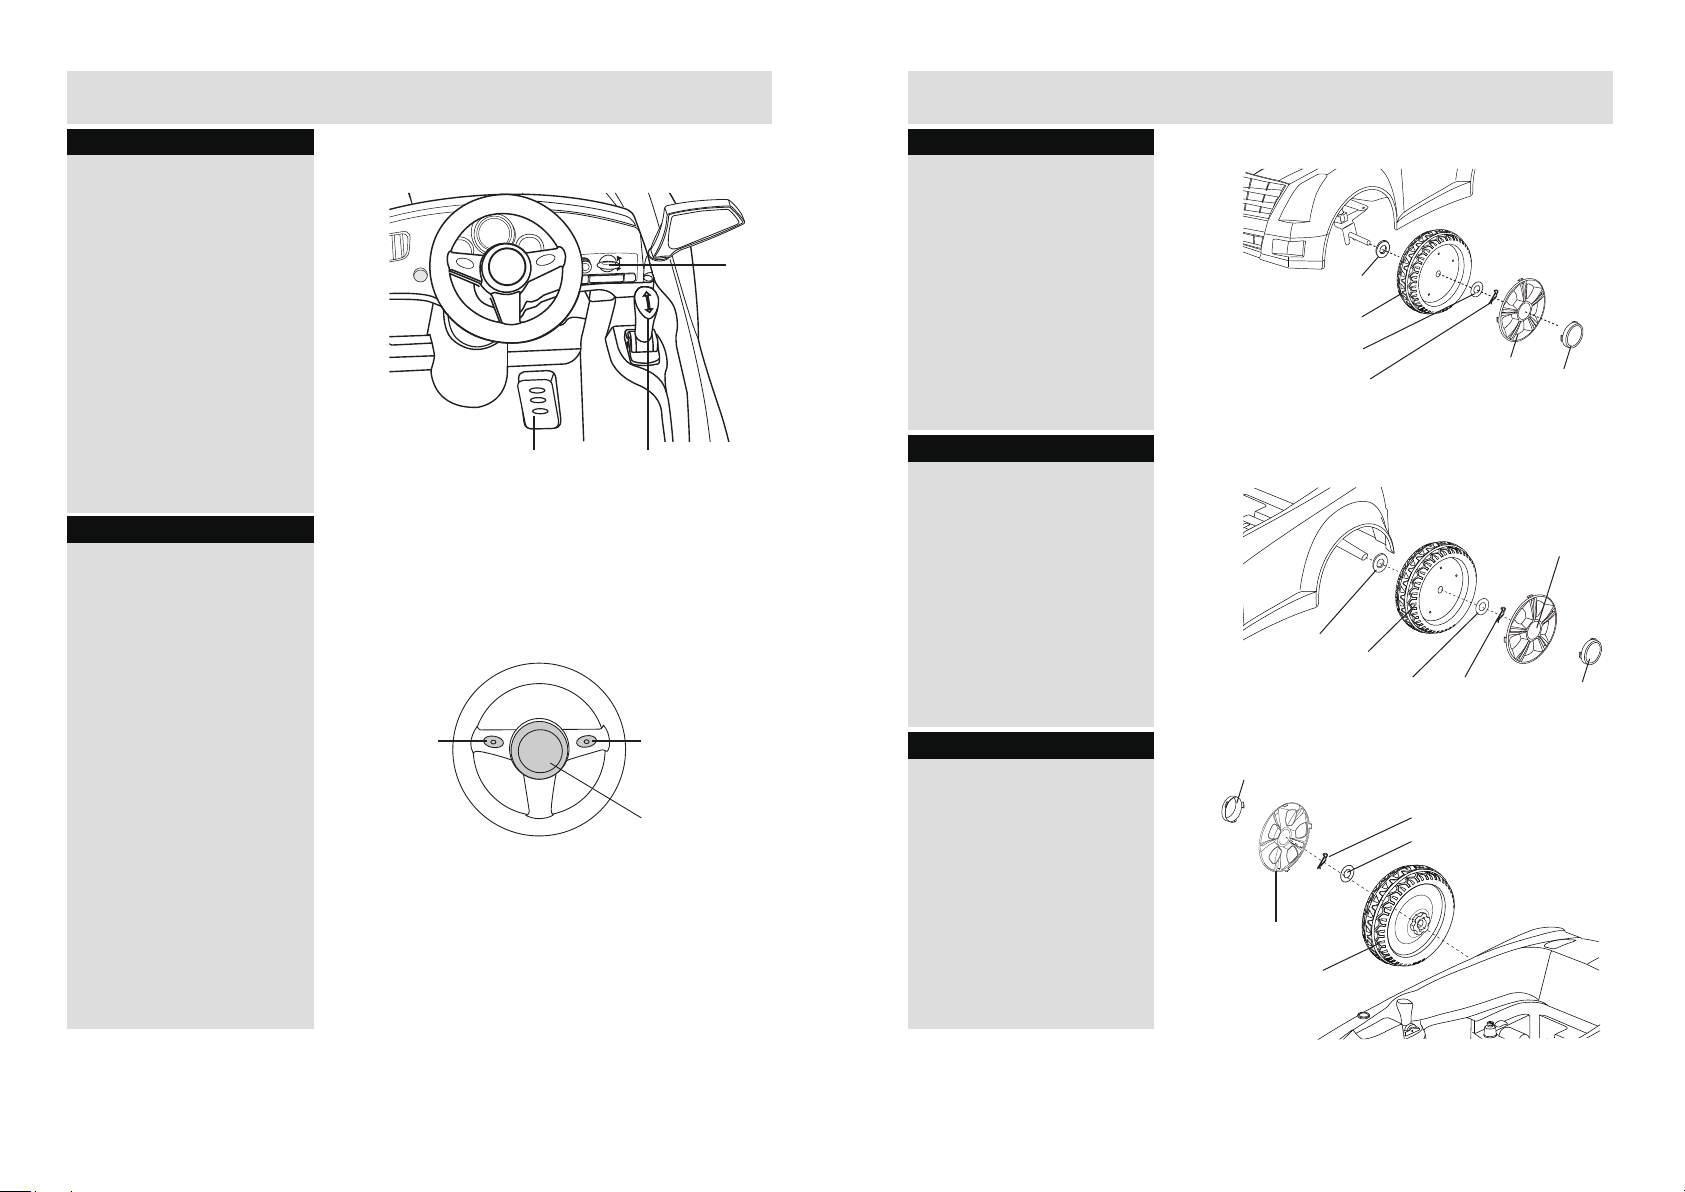
Step 1
Forward/Backward
Sitting in the car, make the power
switch to “ I ” status, and
shift
to “forward” status, step on
the pedal, the car move forward,
the headlight is on; loose the
pedal the car stop,the headlight is
gear shift to “backward”,
off;
step on the pedal, the car move
backward, loose the pedal the car
stop.
gear
Step 2
Steering wheel function
There is horn and music function
in the steering wheel.
pedal switch
gear shift
power switch
Step 4
Assemble the front wheels
Insert the big washer ,front wheel
and small washer into the front
axle in order, lock the snap-pin
into the hole, then cover the
wheel cover ,finally fix the hub
cap to complete the wheel
assembly.
Step 5
Assemble the left rear wheel
Insert the big washer, rear wheel
and small washer into the front
axle in order, lock the snap-pin
into the hole, then cover the
wheel cover, finally fix the hub
cap to complete the wheel
assembly. (The embossment of
rear wheel inward)
big washer
front wheel
small washer
snap pin hub cap
Wheel Cover
big washer
left rear wheel
small washer snap pin
Wheel Cover
hub cap
music alarm
horn button
Step 6
Assemble the right rear wheel
Insert the rear wheel and small
washer into the axle, lock the
snap-pin into the hole, then cover
the wheel cover .Finally fix the
hub cap to complete the wheel
assembly. (The embossment of
rear wheel inward)
hub cap
snap pin
small washer
snap pin
right rear wheel
Page 4
Assembly Instructions
Assembly Instructions
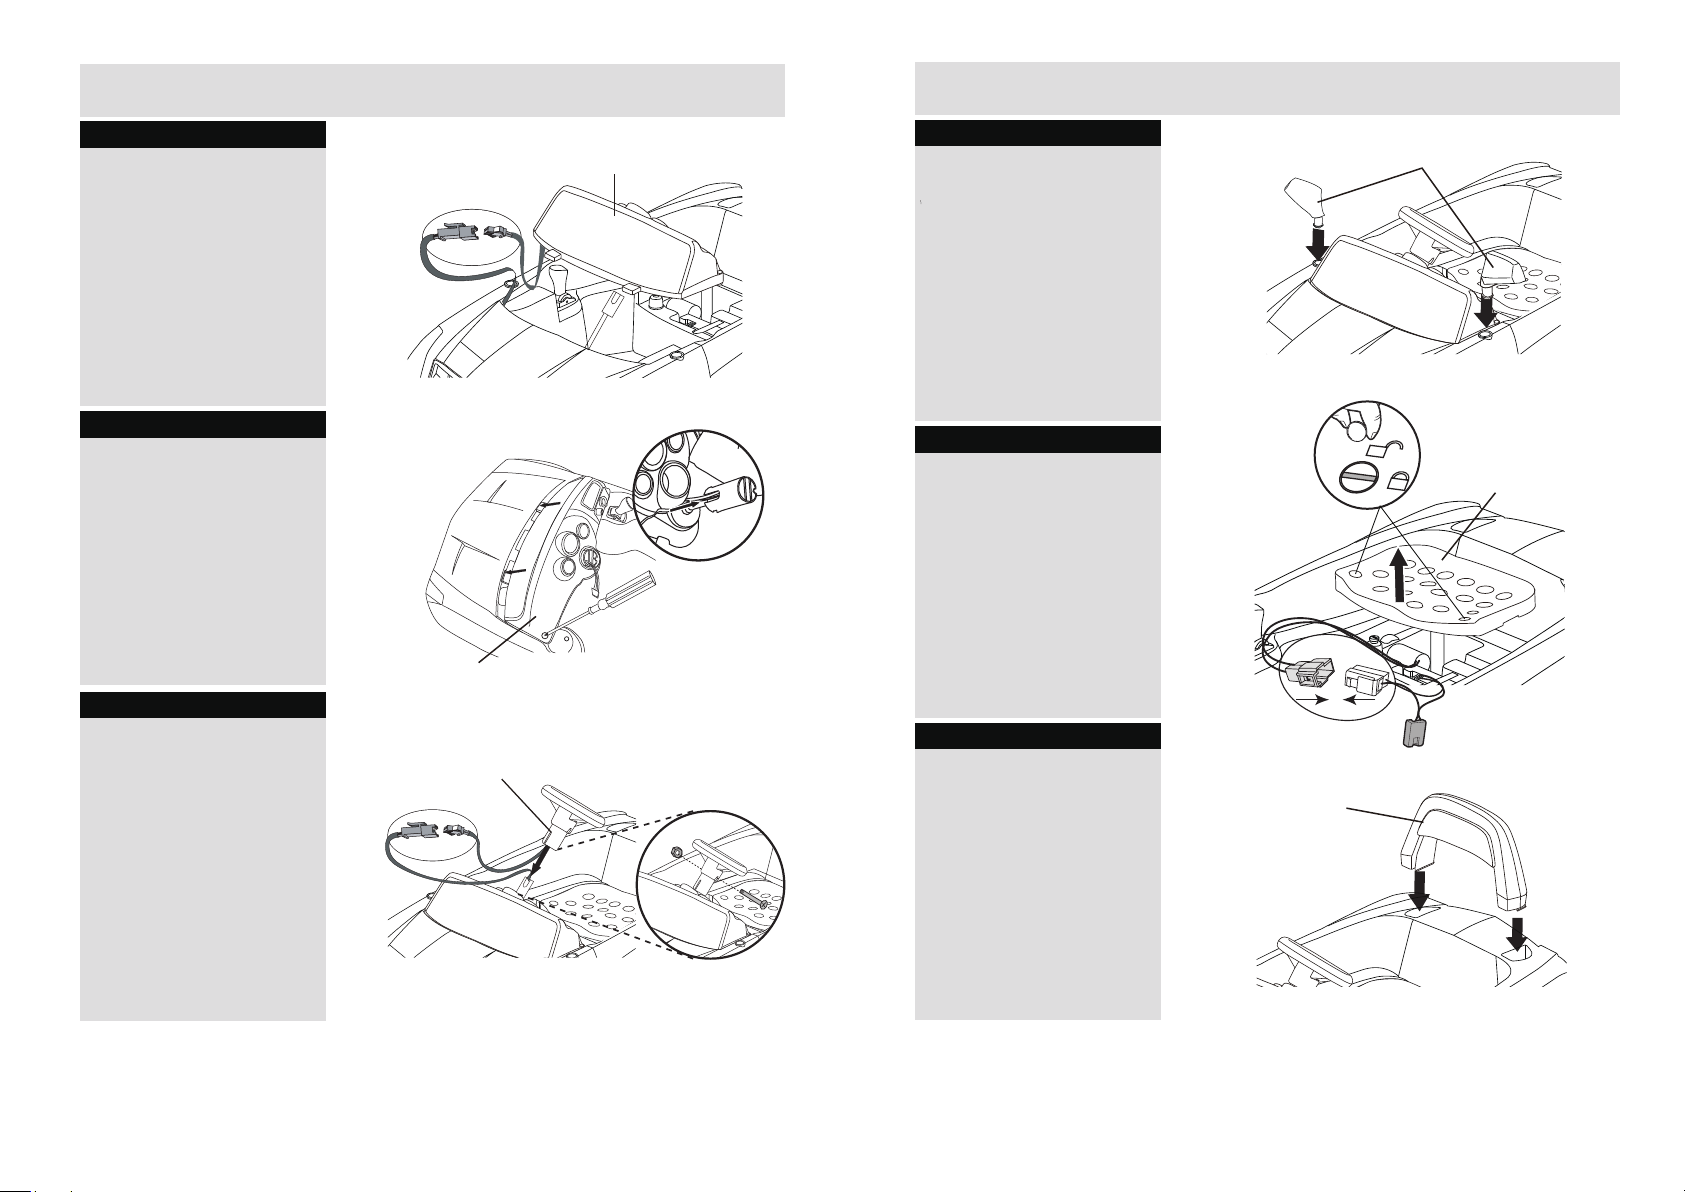
Step 7
Assemble the dashboard
Step A. Connect the right side
connector of dashboard with the
connector of the right body.
Step 8
Step B: Insert the connector of
the dashboard through the
steering pole. Then insert the
hole of the dashboard into the
connecting part. And push the
slots of the dashboard into the
slots of the body. Note:When
push the dashboard, do not
damage the connector. Finally fix
the bolts of the dashboard.
Step 9
Assemble the steering wheel
Connect the connector of the
steering wheel with the connector
of the connecting part. Then align
the steering wheel with the
connecting pole of the steering
wheel, insert the wires into the
connecting part by the
screwdriver. Align the hole of the
steeing wheel with the hole of the
steering pole, uplift the
steering wheel slightly if
necessary. And fix it by the screw.
Do not hit the buttons on the
steering wheel hardly while
assembly.
dashboard
Steering Wheel
dashboard
Step 10
Assemble the rear view mirrors
Insert the rear view mirror into the
slot of the rear view mirror, and
press the rear view mirror into the
slot until hear the click sound to
complete the assembly. Note:The
left and right rear view mirror is
different.
Step 11
Assemble the seat cover.
Using the screwdriver to open the
seat and you will find the battery
compartment, connect two battery
connectors. Then use the
screwdriver to fix the seat.
Step 12
Assemble the backrest
Insert the backrest into the slots
of the backrest, press it until hear
the click sound.
rear view mirror
seat cover
backrest
Page 5
Assembly Instructions
Care and Maintenance
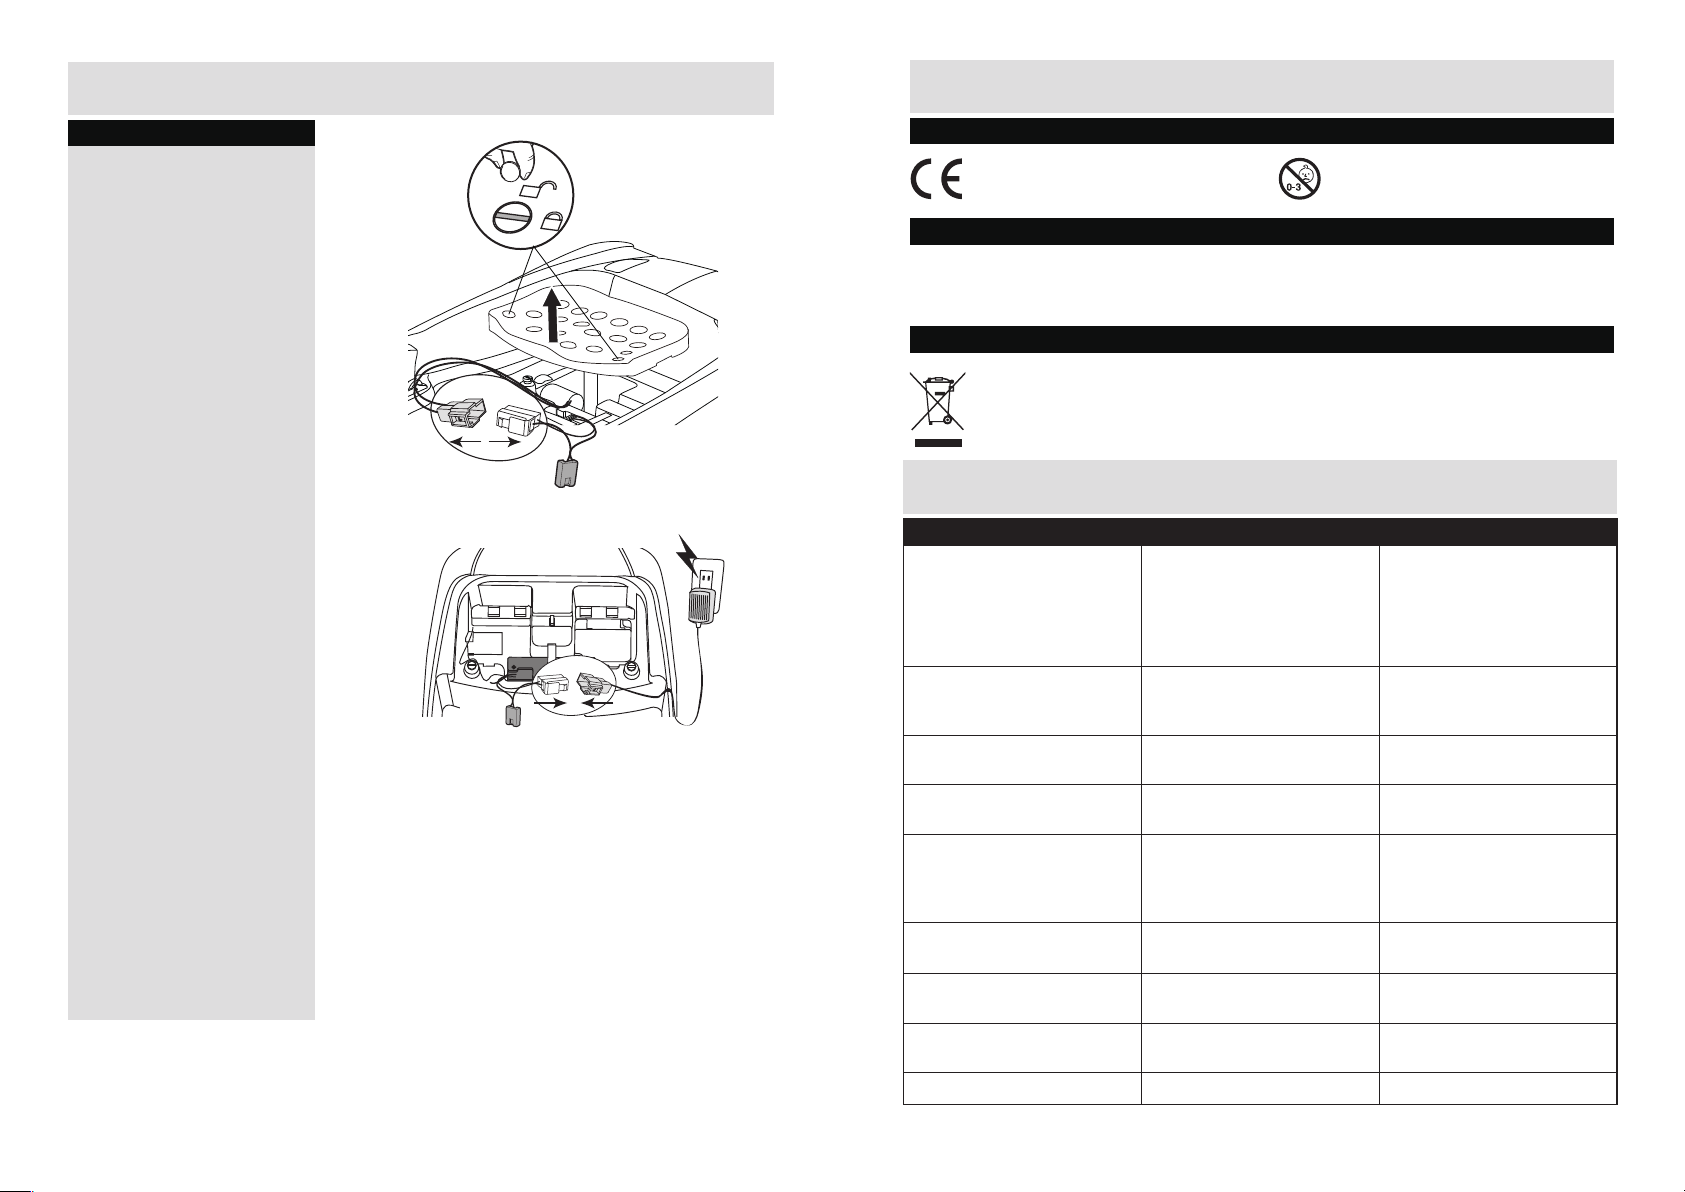
Step 10
Charge the battery.
Step A:
Using the screwdriver to
open the seat and you will find the
battery compartment, unplug two
battery connectors.
Step B: Connect the battery
connector with the connector of
the charger, slide connectors into
locked position, and then
charging.
Before your first driving, charge
the battery for 18 hours before the
vehicles first used.
General
Not suitable for children under 3 years
due to small parts, chocking hazard.
Changing battery
When the battery use out and need to change the old battery open the battery cover under the rear part
of body ,by release the bolt release the connector of battery.Then replace the old battery with a new
one,connect the battery connector with wire,and close the cover.
Disposal and Recycling
Electrical product waste should not be discarded with household waste. Please actively support
us in conserving resources and protecting the enviroment by returing the non-working electrical
products to an appropriate disposable/ recycling center(if available)
TROUBLE SHOOTING
Trouble types
The car not move
Battery could not charge in
Short time usage
Little sound or reflection
when charging
Analyse Tactics
● Low battery
● Screws on the wheel lost
● The battery connector broken
● Battery broken
● Motor broken
● Connector off
● Charger is not connected
● Charger broken
● Not charge completely
● Old battery
● Chemical reflection Common
Charge the battery
Tighten the screws
Re-insert the connector
Change battery
Repair at the repair center
Re-insert the connector
Reconnected the charger
Change charger
Re-charge the battery
Change battery
● Old battery
Low speed
Noise in gear box
Twittering when driving
Without sound and light
or without some sound
Could not stop normally Change the switch spring● Pedal switch Ok?
● No power in the battery
● Overload
● Uneven street
● Gear broken
● Motor broken
● Motor was not connected well
● Some parts broken on the Motor
● The IC is not connected well
● The ic broken
Change battery
Recharge the battery
Reduce weight in the car
Drive on the even ground
Repair at the repair centre
Repair at the repair centre
Reconnected the Motor
Repair at the the repair centre
Reconnected the IC
Repair at the repair centre
Page 6
Technical Specifications
Battery
Motor
Age
Maximum load
Dimension
Speed
Running time
Charger
6V 7AH chargeable battery
6V 15W
3+ years
35kg
1060x600x535 mm
2-3km/h
Charge 8-12 hours, use1-2hours
Output DC7.0V
If you need help or have damaged or missing parts, call the Customer Helpline: 0345 640 0800
Produced for Chad Valley Toys Argos Ltd. Country of origin: China
Address: 489 - 499 Avebury Boulevard, Central Milton Keynes, MK9 2NW. www.argos.co.uk
 Loading...