

Page 1
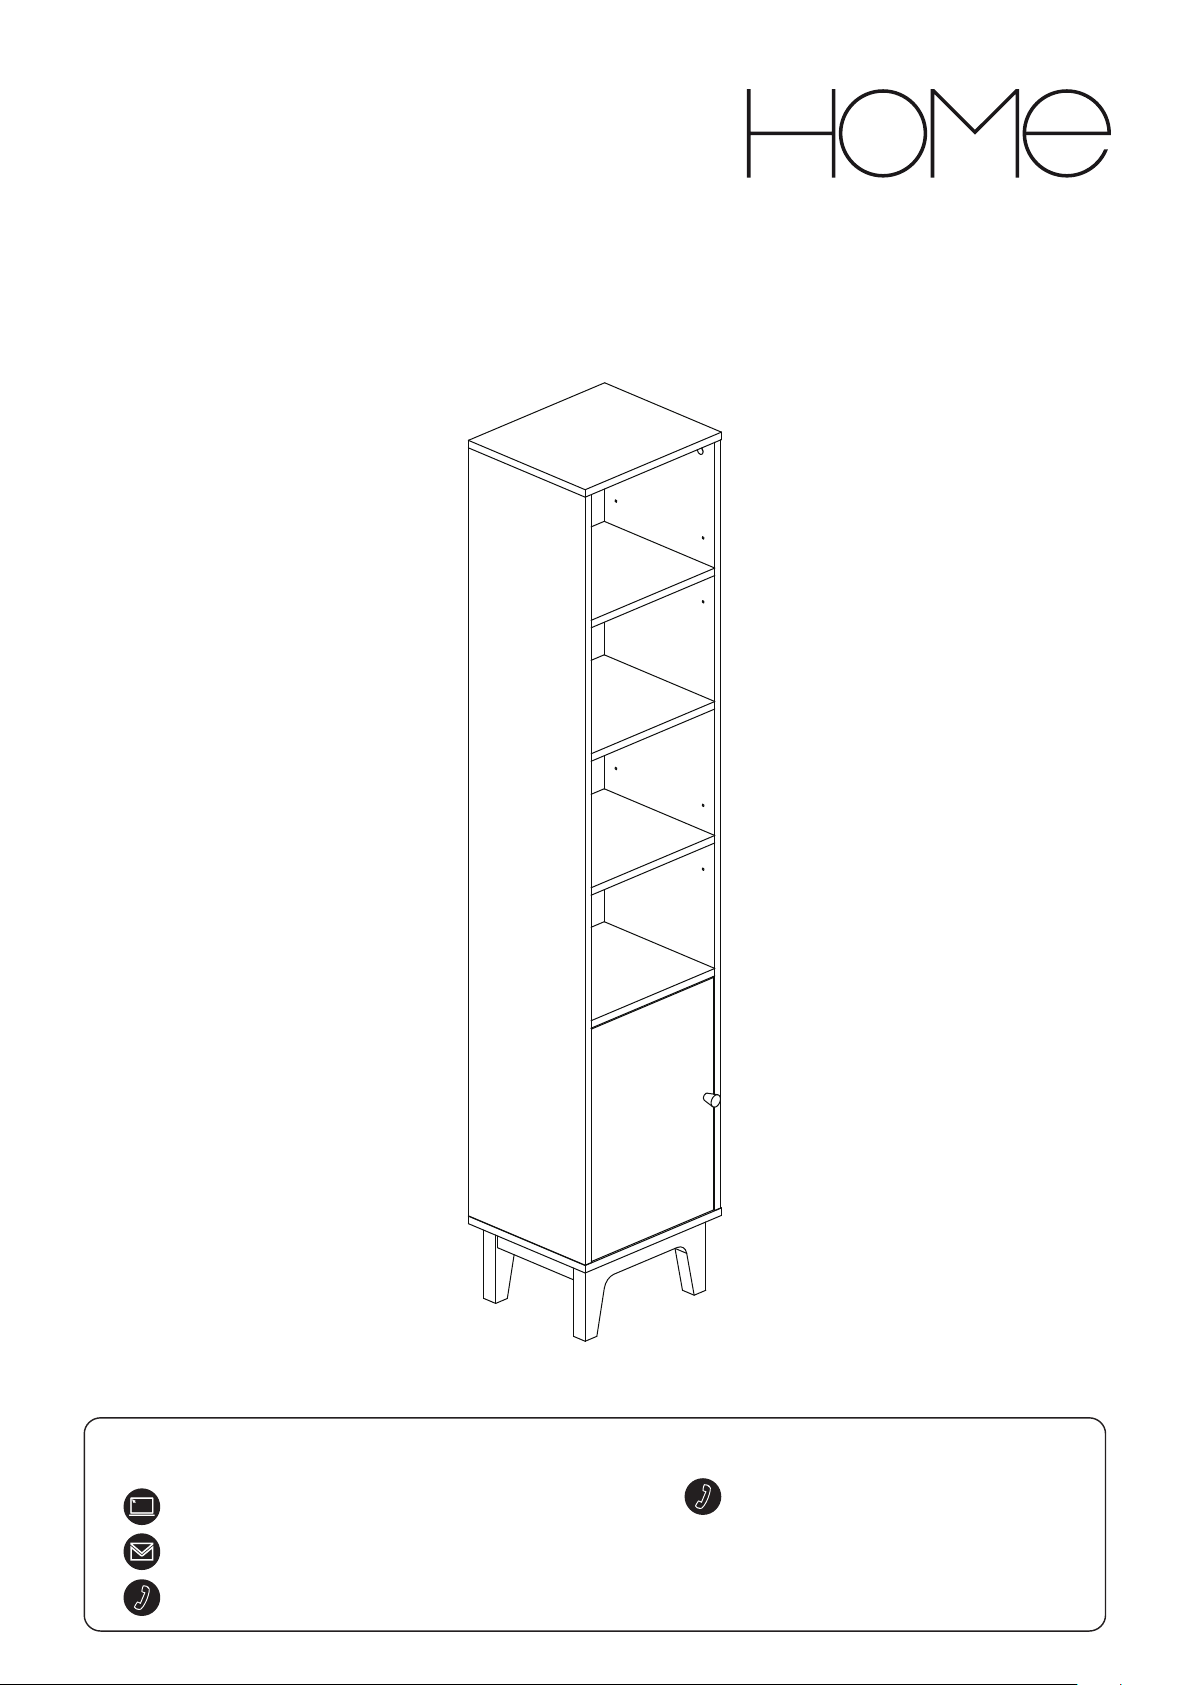
Apartment
Tall Boy
Spare Parts
www.argos-support.co.uk
0370 112 1928
Customer Support
0345 640 2020
Issue 2 - 09/11/19
Page 2
Safety and Care Advice
Product Details
272/1813
IMPORTANT, RETAIN FOR FUTURE REFERENCE: READ CAREFULLY.
Keep children and animals
away from the work area, small
parts could choke if swallowed.
Make sure you have enough space
to layout the parts before
starting.
• This product has been
constructed to be used in the
domestic environment only and
not for commercial purposes.
Care and maintenance
Only clean using a damp cloth
and mild detergent. Do not use
abrasive cleaners.
Use a dry cloth to clean the
product, furniture polish is
not recommended.
Assemble the item as close
room) as possible.
Assemble on a soft level
surface to avoid damaging the
• From time to time check that there
are no loose screws, nuts or bolts.
If there are please re-tighten.
We do not
recommend the
use of power
drill/drivers for
inserting screws
as this could damage the unit.
Only use hand screwdrivers.
Parts of the assembly will be
easier with 2 people.
Dispose of all packaging
carefully and responsibly.
This product should not be
discarded with household
waste. Take to your local
authority waste disposal
centre.
2
Page 3
Fittings
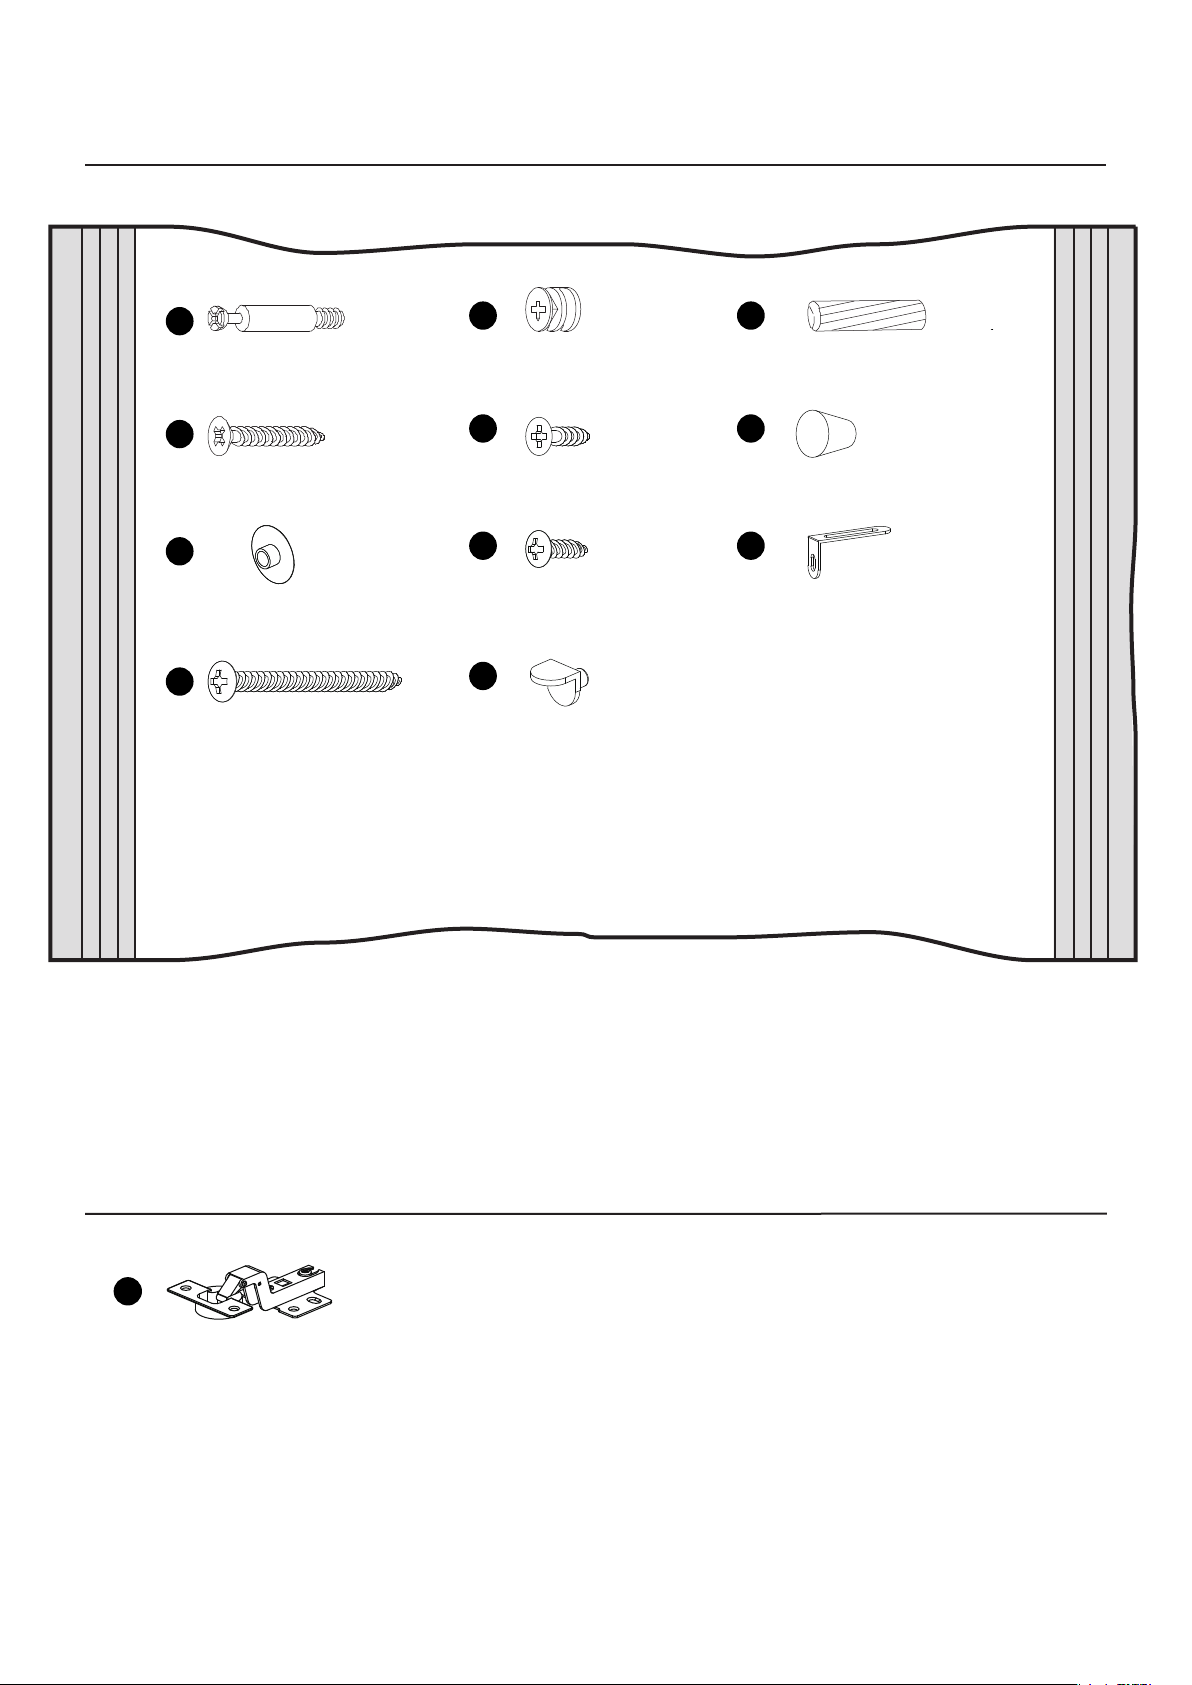
A
Metal Dowel x 20
D
30 mm Screw x 1
G
Cam Cap x 8
J
45 mm Screw x 6
B
Locking Nut x 20
E F
14mm Screw x12
H
14mm Screw x 2
K
Metal Support x 12
Handle x 1
C
8x30mm Wooden Dowel x 20
I
Hanger Bracket x 2
Hardware
L
Hinge ×2
3
Page 4
Tools required
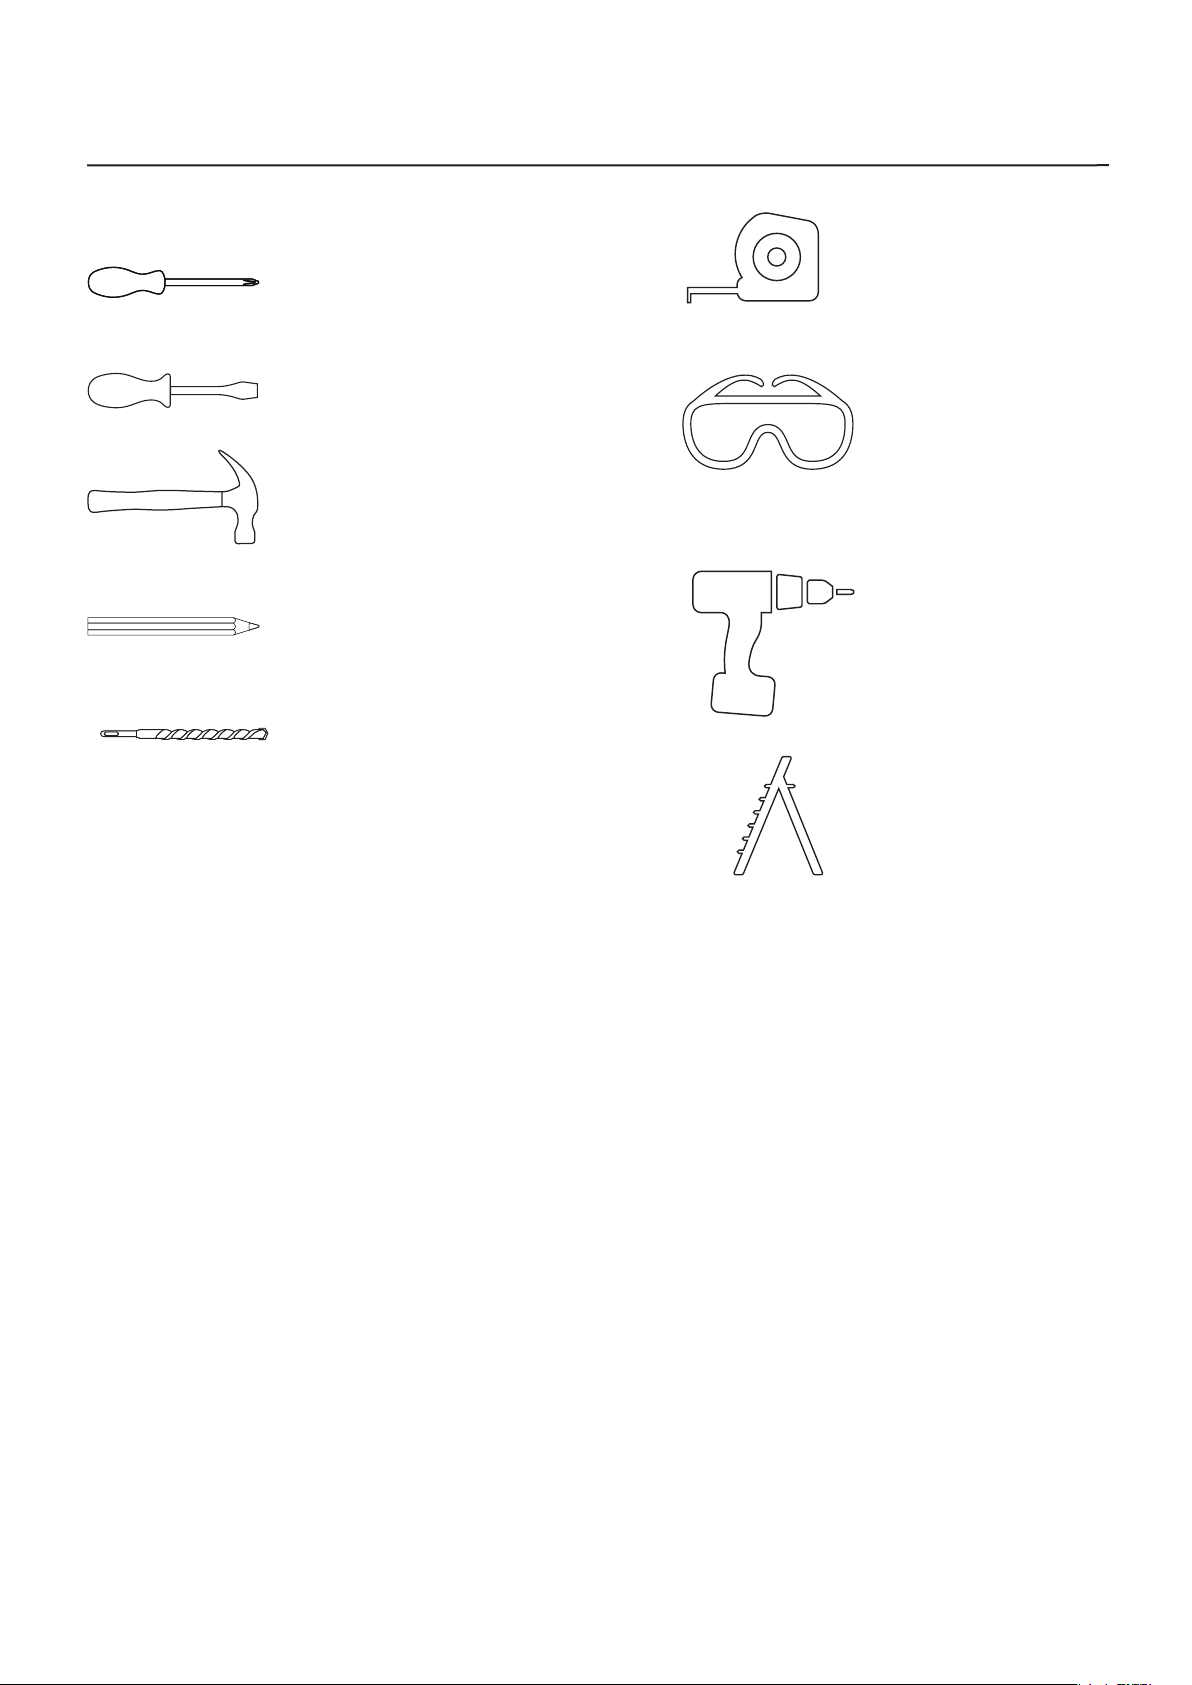
Phillips screwdriver
(small & medium)
Phillips screwdriver
(small & medium)
Large hammer
Pencil
Drill Heads
Ruler/tape
measure
Eye protection
(when using a
hammer or glue)
Power Drill
Ladder
4
Page 5
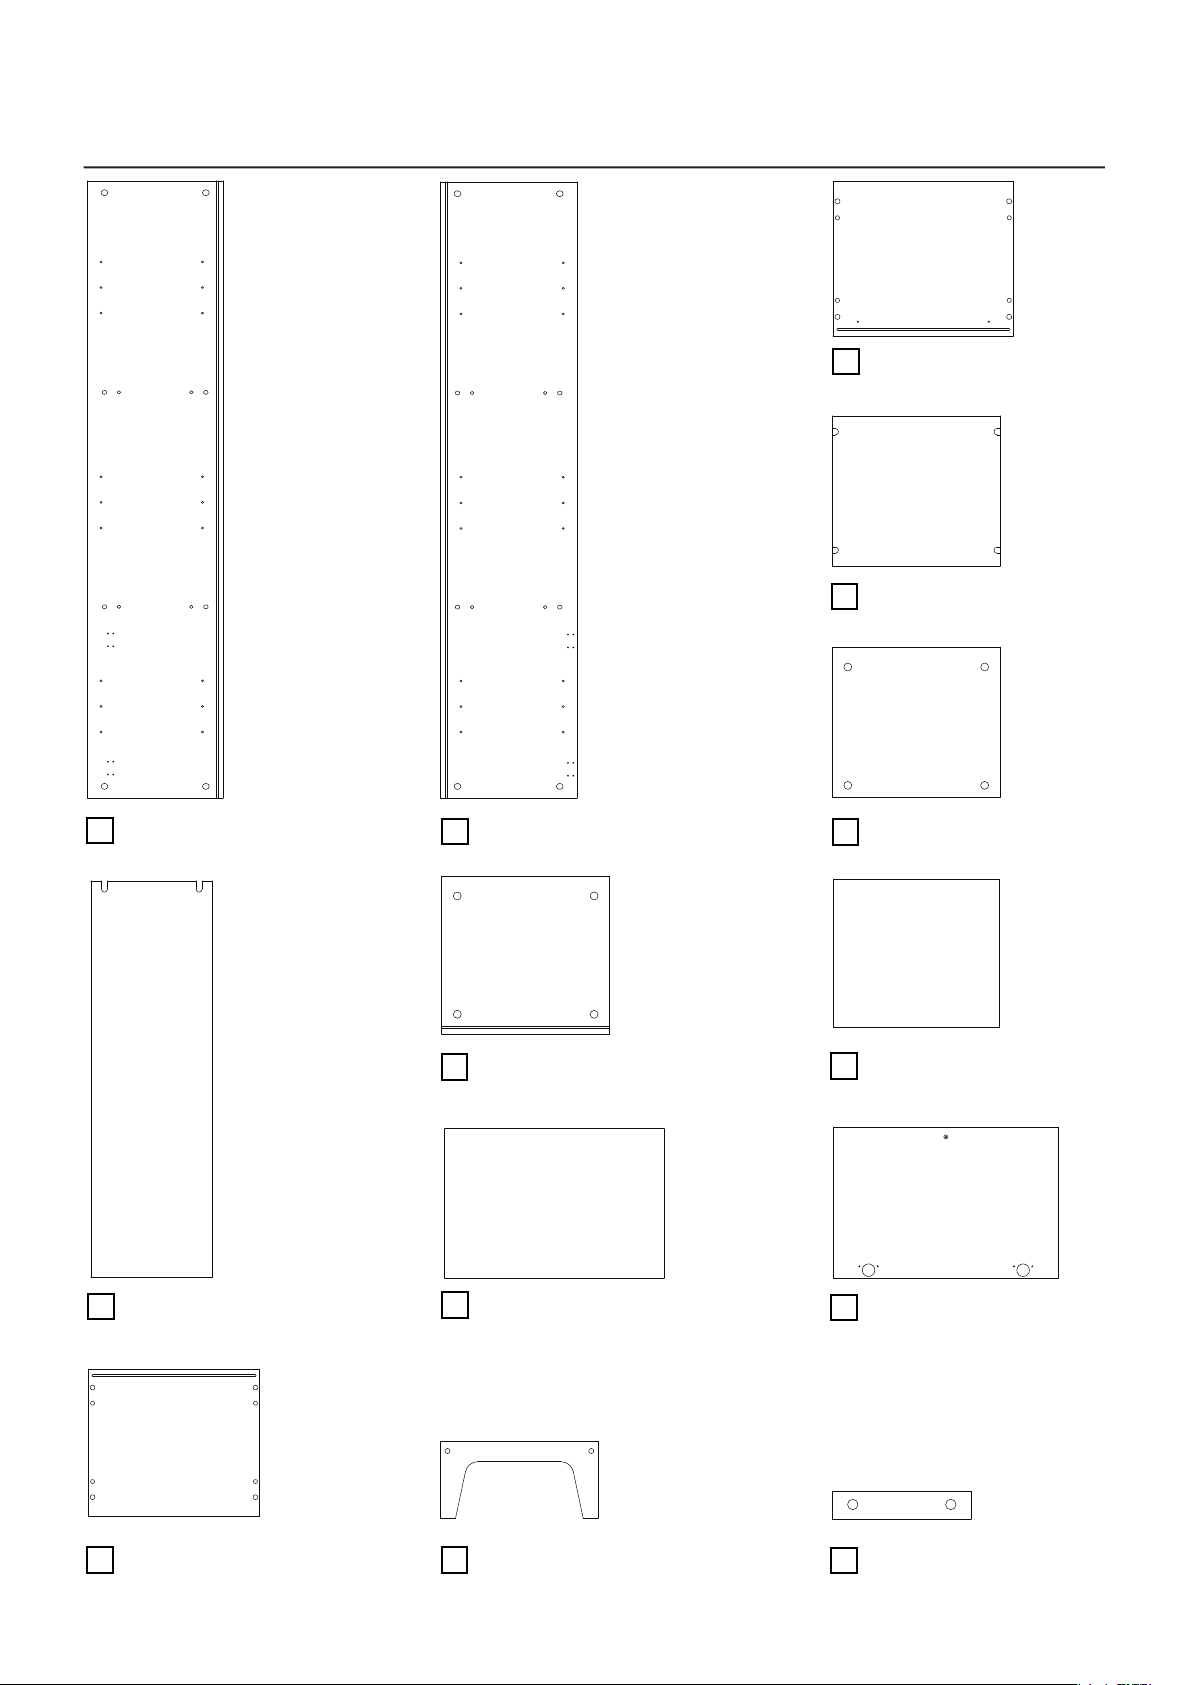
Panels
3
Top panel
(350 x 300mm)
Upper adjustable shelf x 2
4
(318 x 284mm)
1
Left side panel
(1540 x 299mm)
6
Upper back panel
(1064 x 327mm)
Right side panel
2
(1540 x 299mm)
7
Lower shelf
(318 x299mm)
8
Lower back panel
(479 x 327mm)
Upper shelf
5
(318 x 284mm)
Lower adjustable shelf
9
(318 x 265mm)
10
Door panel
(466 x314mm)
Bottom panel
11
(350 x 300mm)
12
Leg ×2
(310 x 150mm)
13
Side rail ×2
(200 x 40mm)
5
Page 6
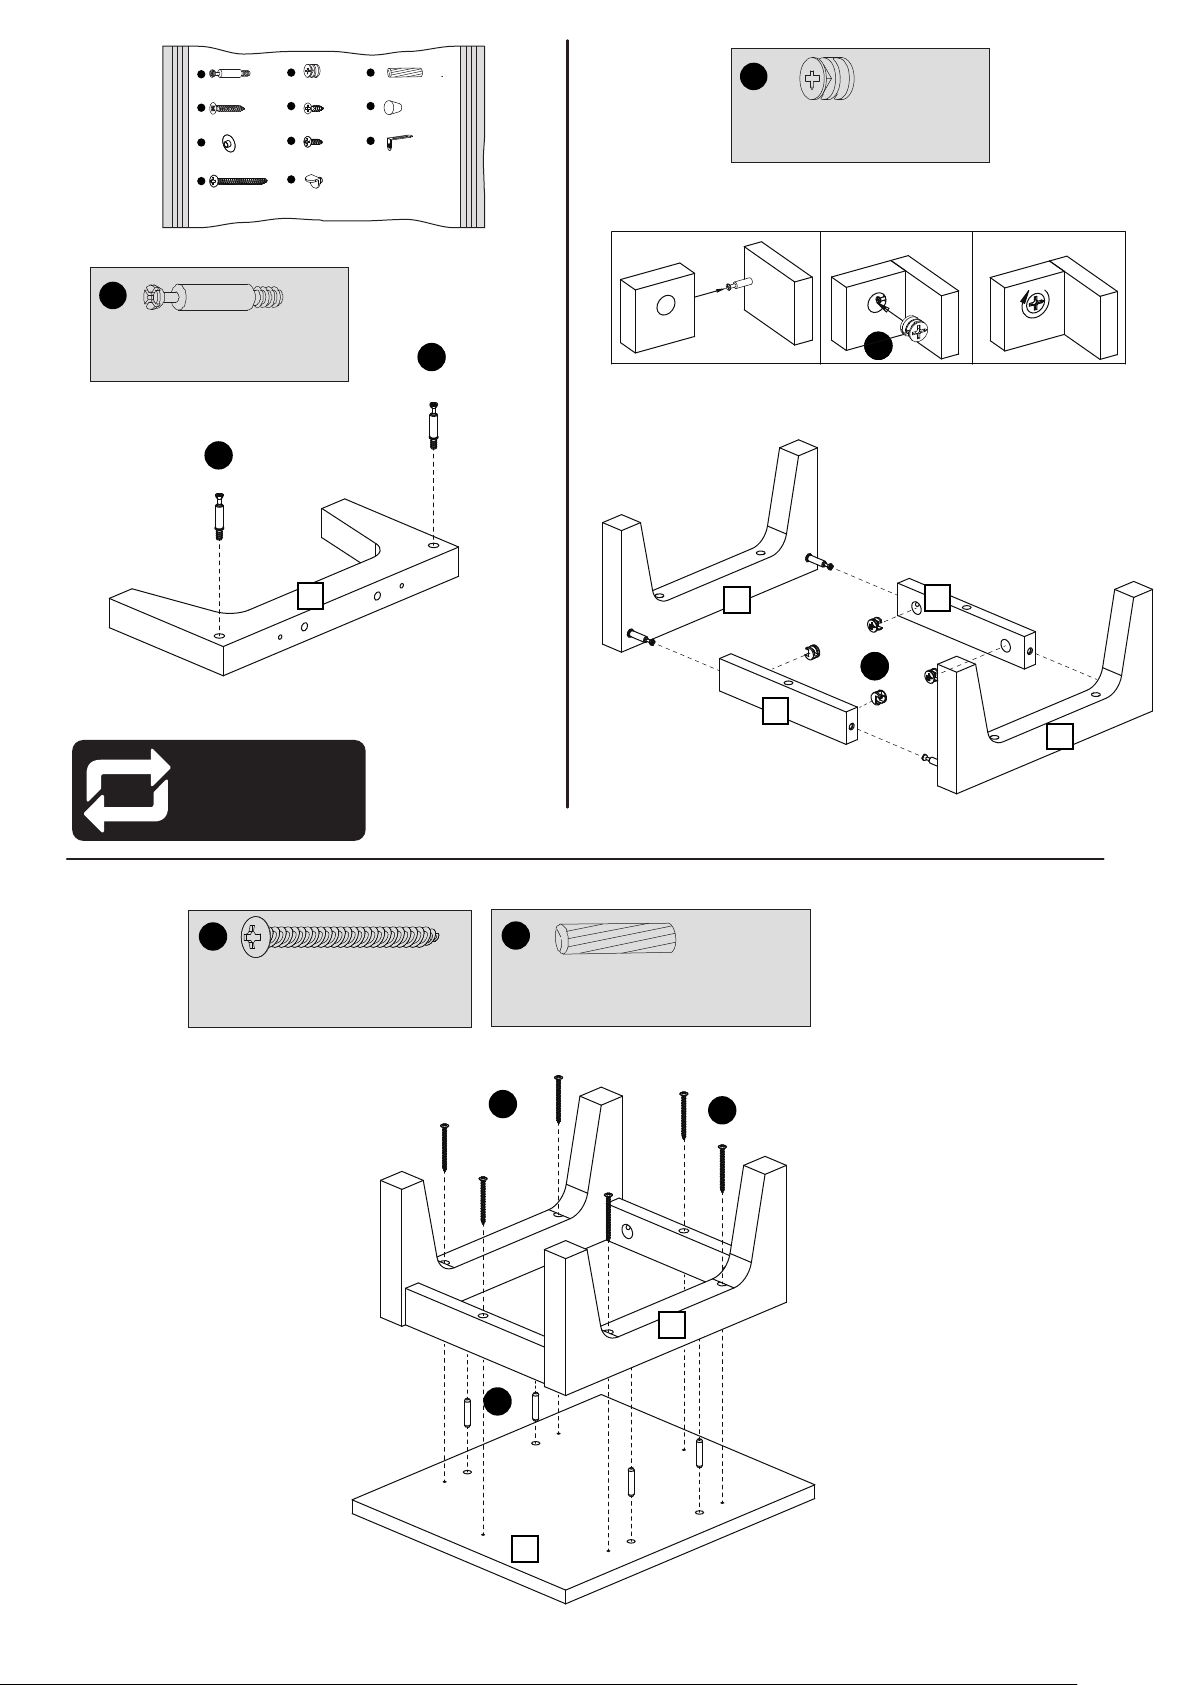
1
A
Metal Dowel x 20
D
30 mm Screw x 1
G
Cam Cap x 8
J
45 mm Screw x 6
Locking Nut x 20B8x30mm Wooden Dowel x 20
E F
14mm Screw x12
14mm Screw x 2HHanger Bracket x 2
K
Metal Support x 12
C
Handle x 1
I
B
Locking Nut x4
2
A
Metal Dowel x 4
A
Repeat
x2
12
A
a b
12
13
c
BB
13
BB
12
3
J
45 mm Screw x 6
C
8x30mm Wooden Dowel x 4
J
C
J
12
11
6
Page 7
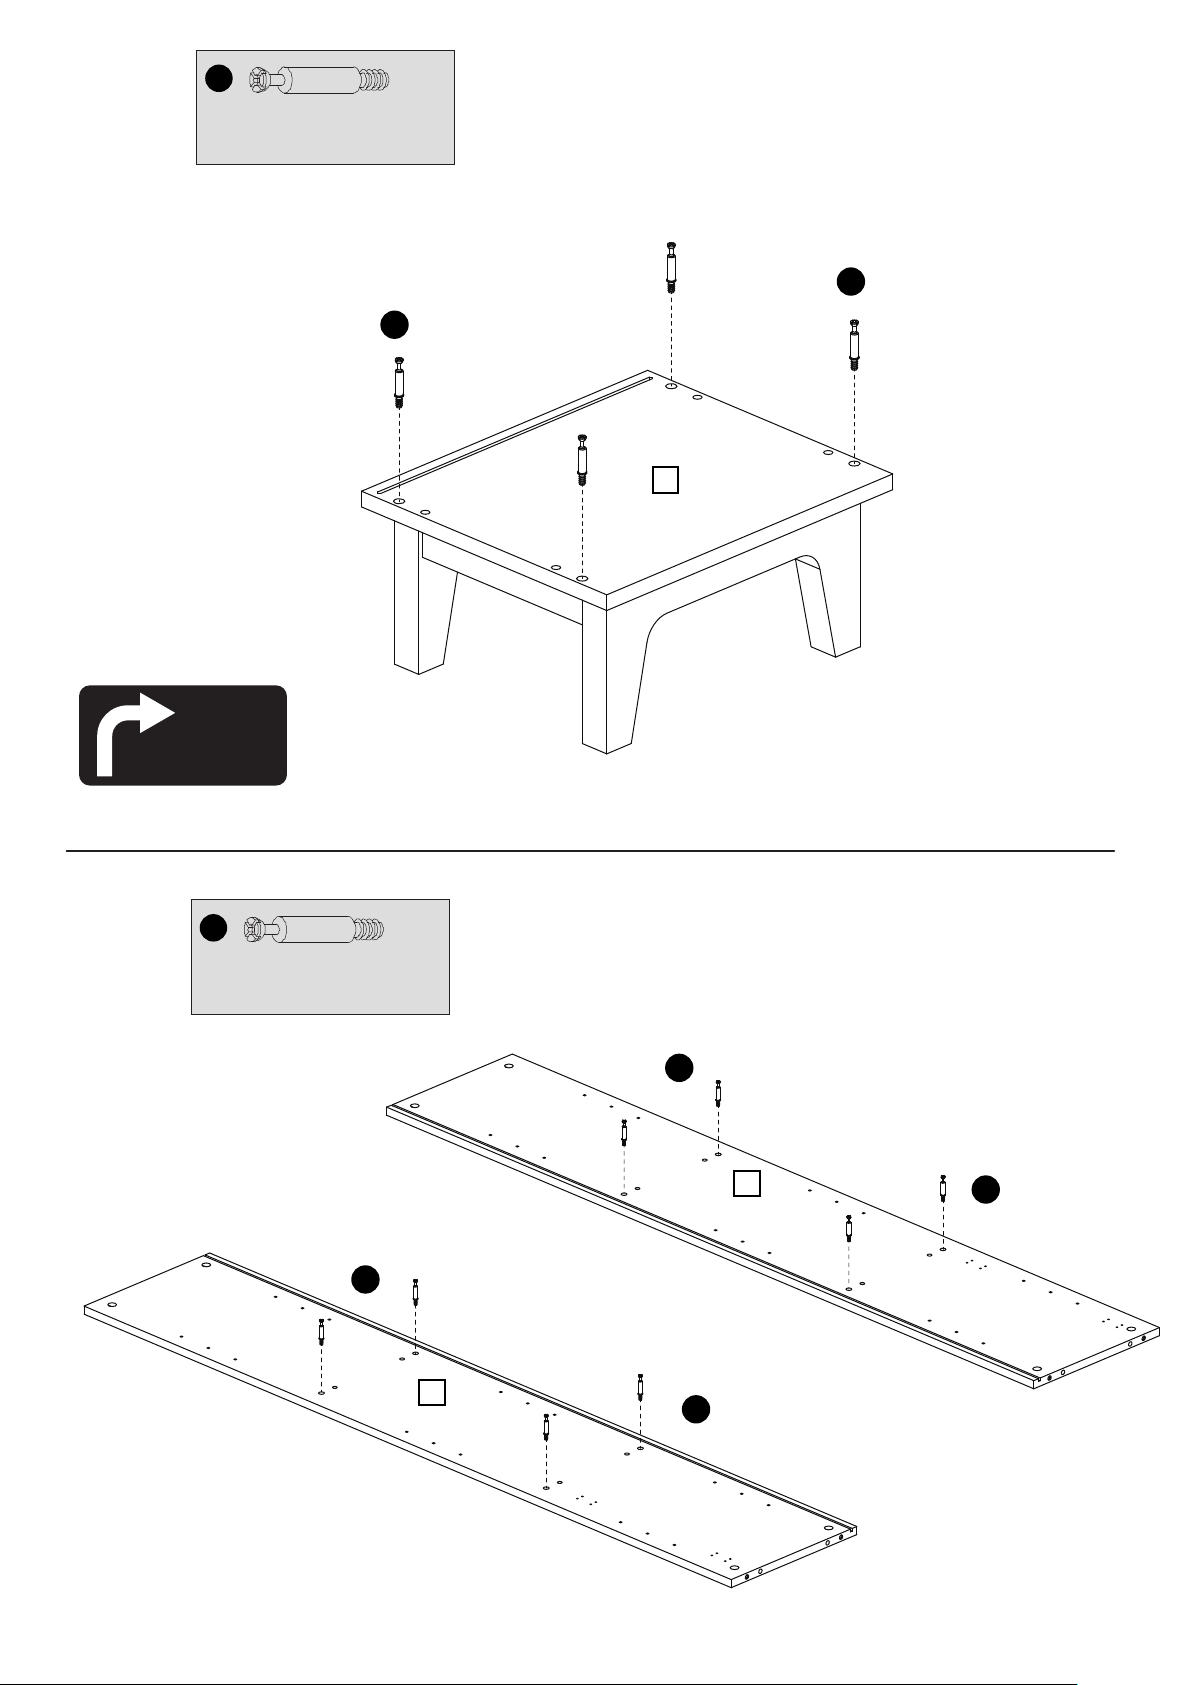
4
A
Metal Dowel x 4
A
A
11
5
Turn
Product
A
Metal Dowel x 8
A
A
2
A
1
A
7
Page 8
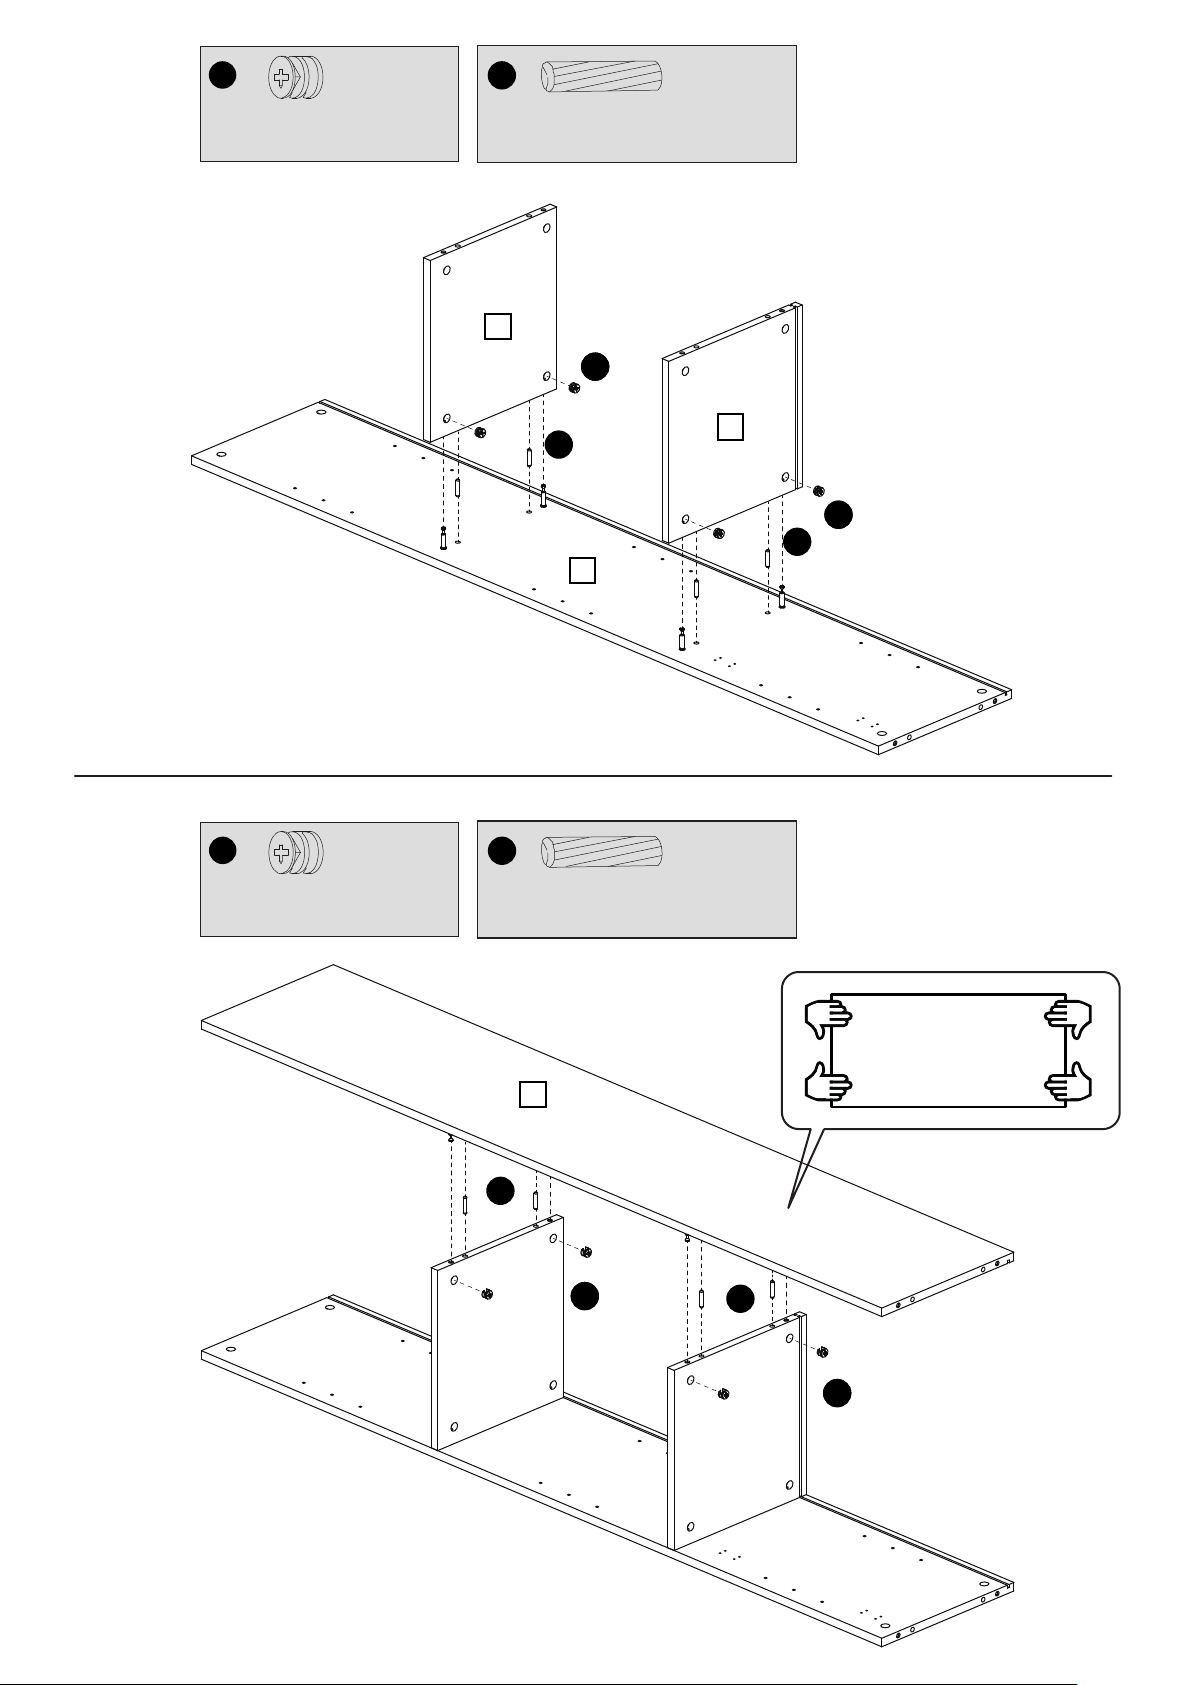
A
B
C
6
Locking Nut x4
8 x30mm Wooden Dowel x 4
5
BB
C
1
7
BB
C
7
A
B
Locking Nut x4
C
8x30mm Wooden Dowel x 4
2
C
BB
C
BB
8
Page 9
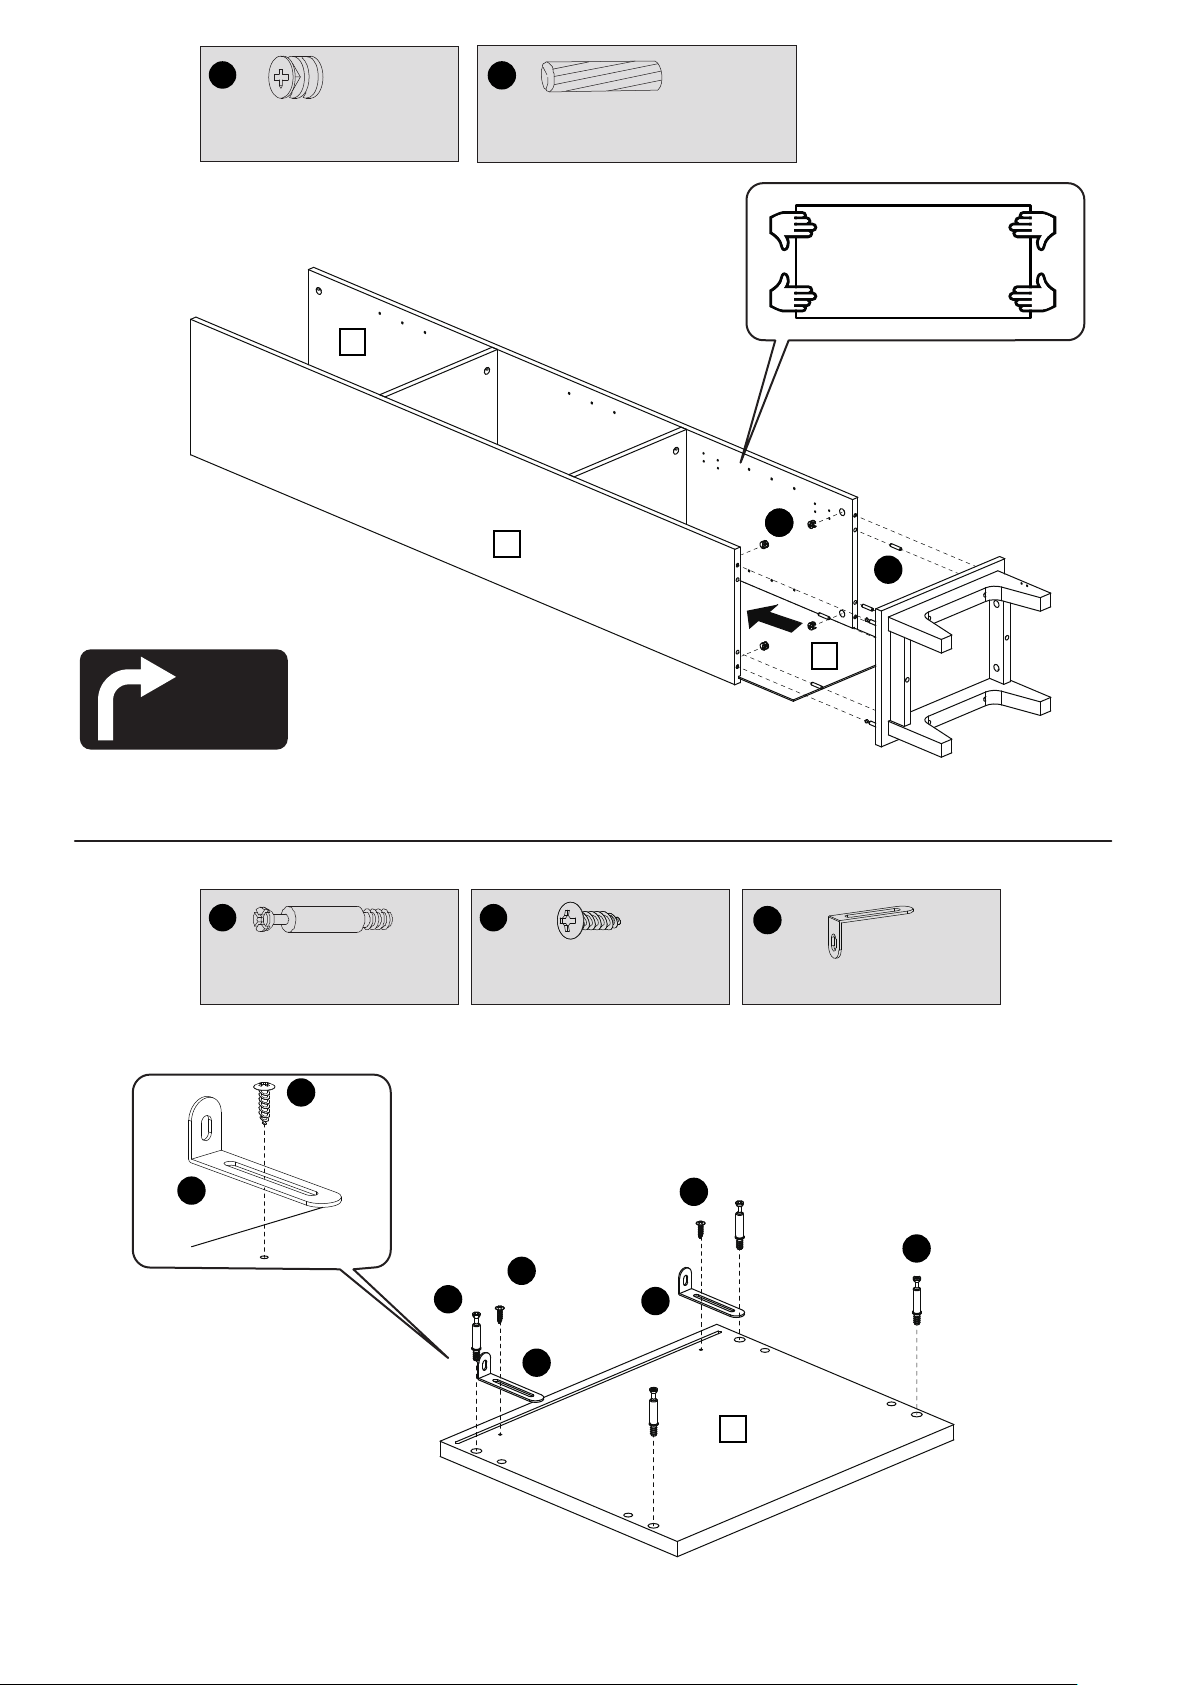
A
B
C
8
Locking Nut x4
Turn
Product
8 x30mm Wooden Dowel x 4
2
BB
1
C
8
9
A H
Metal Dowel x 4
H
I
14mm Screw x 2
H
A
I
Hanger Bracket x 2
H
A
I
I
3
9
Page 10
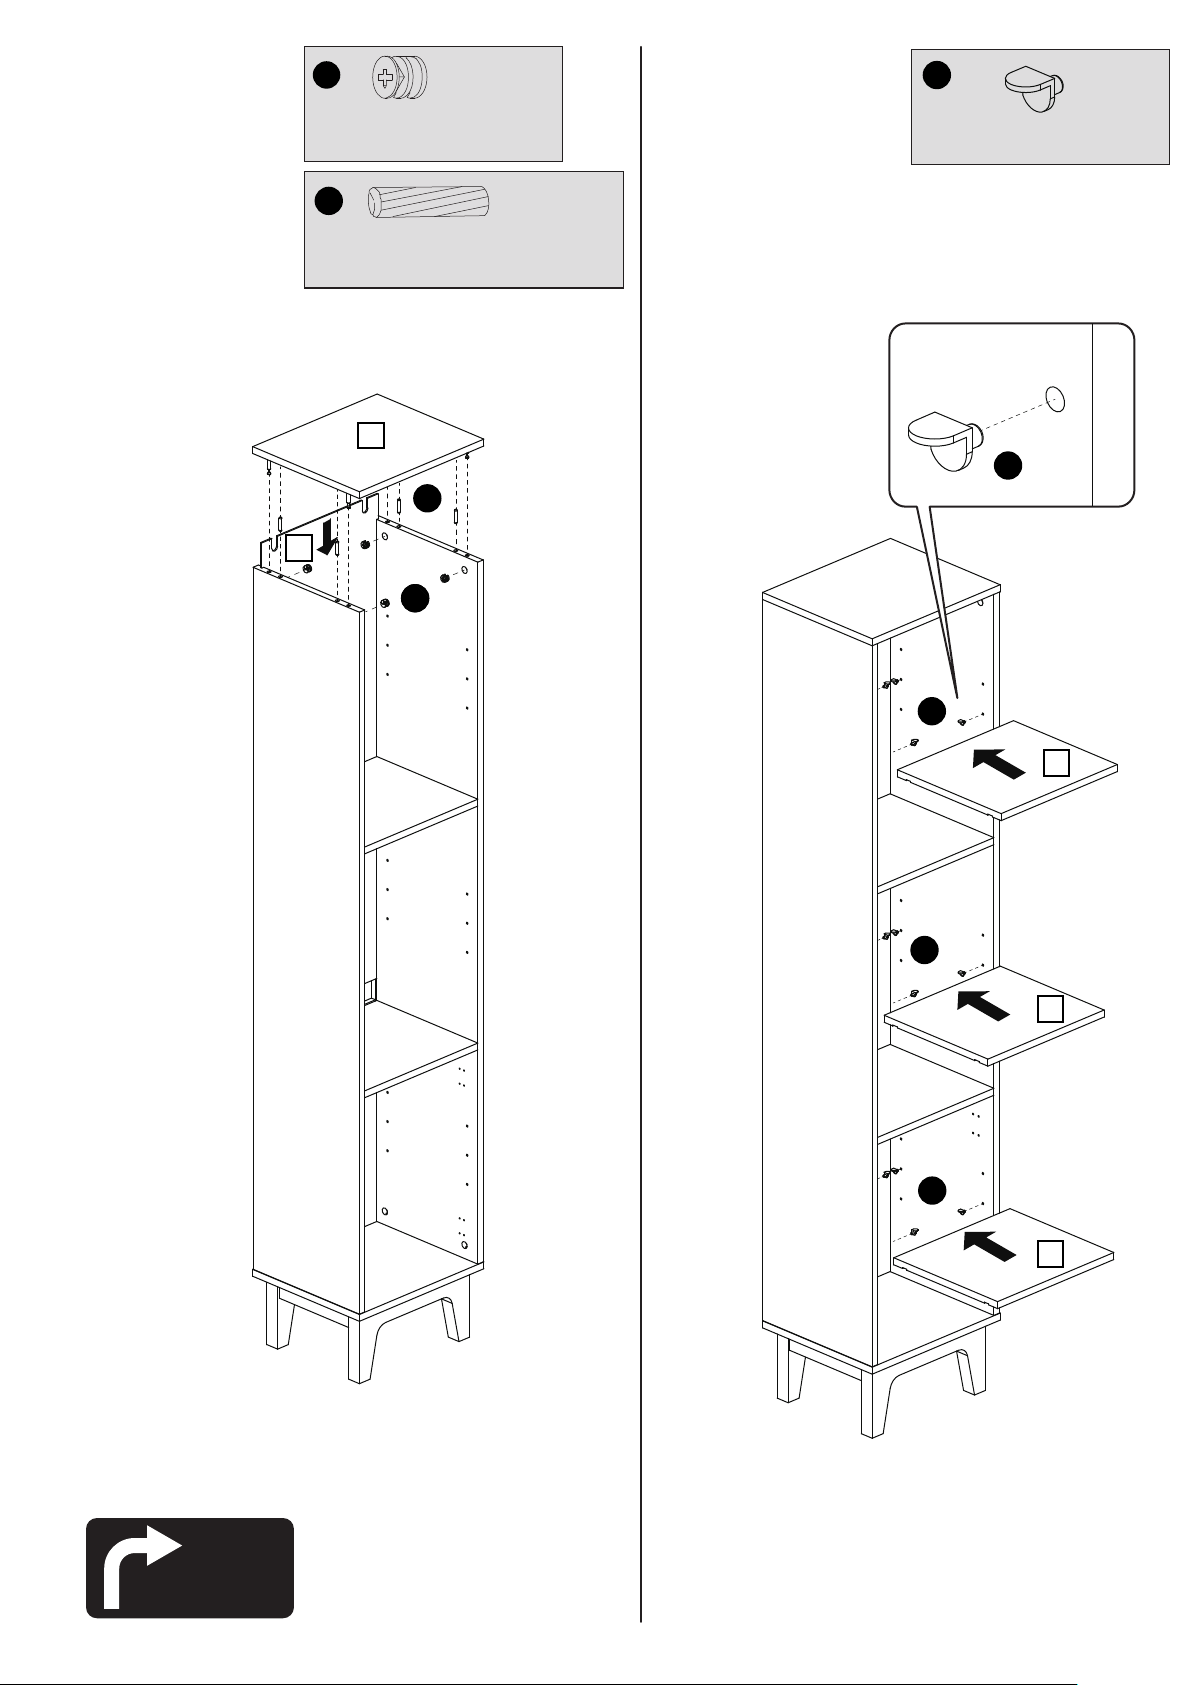
A
B
K
10
Locking Nut x4
C
8 x30mm Wooden Dowel x 4
3
C
6
BB
11
Metal Support x 12
K
K
K
4
4
K
9
Turn
Product
10
Page 11
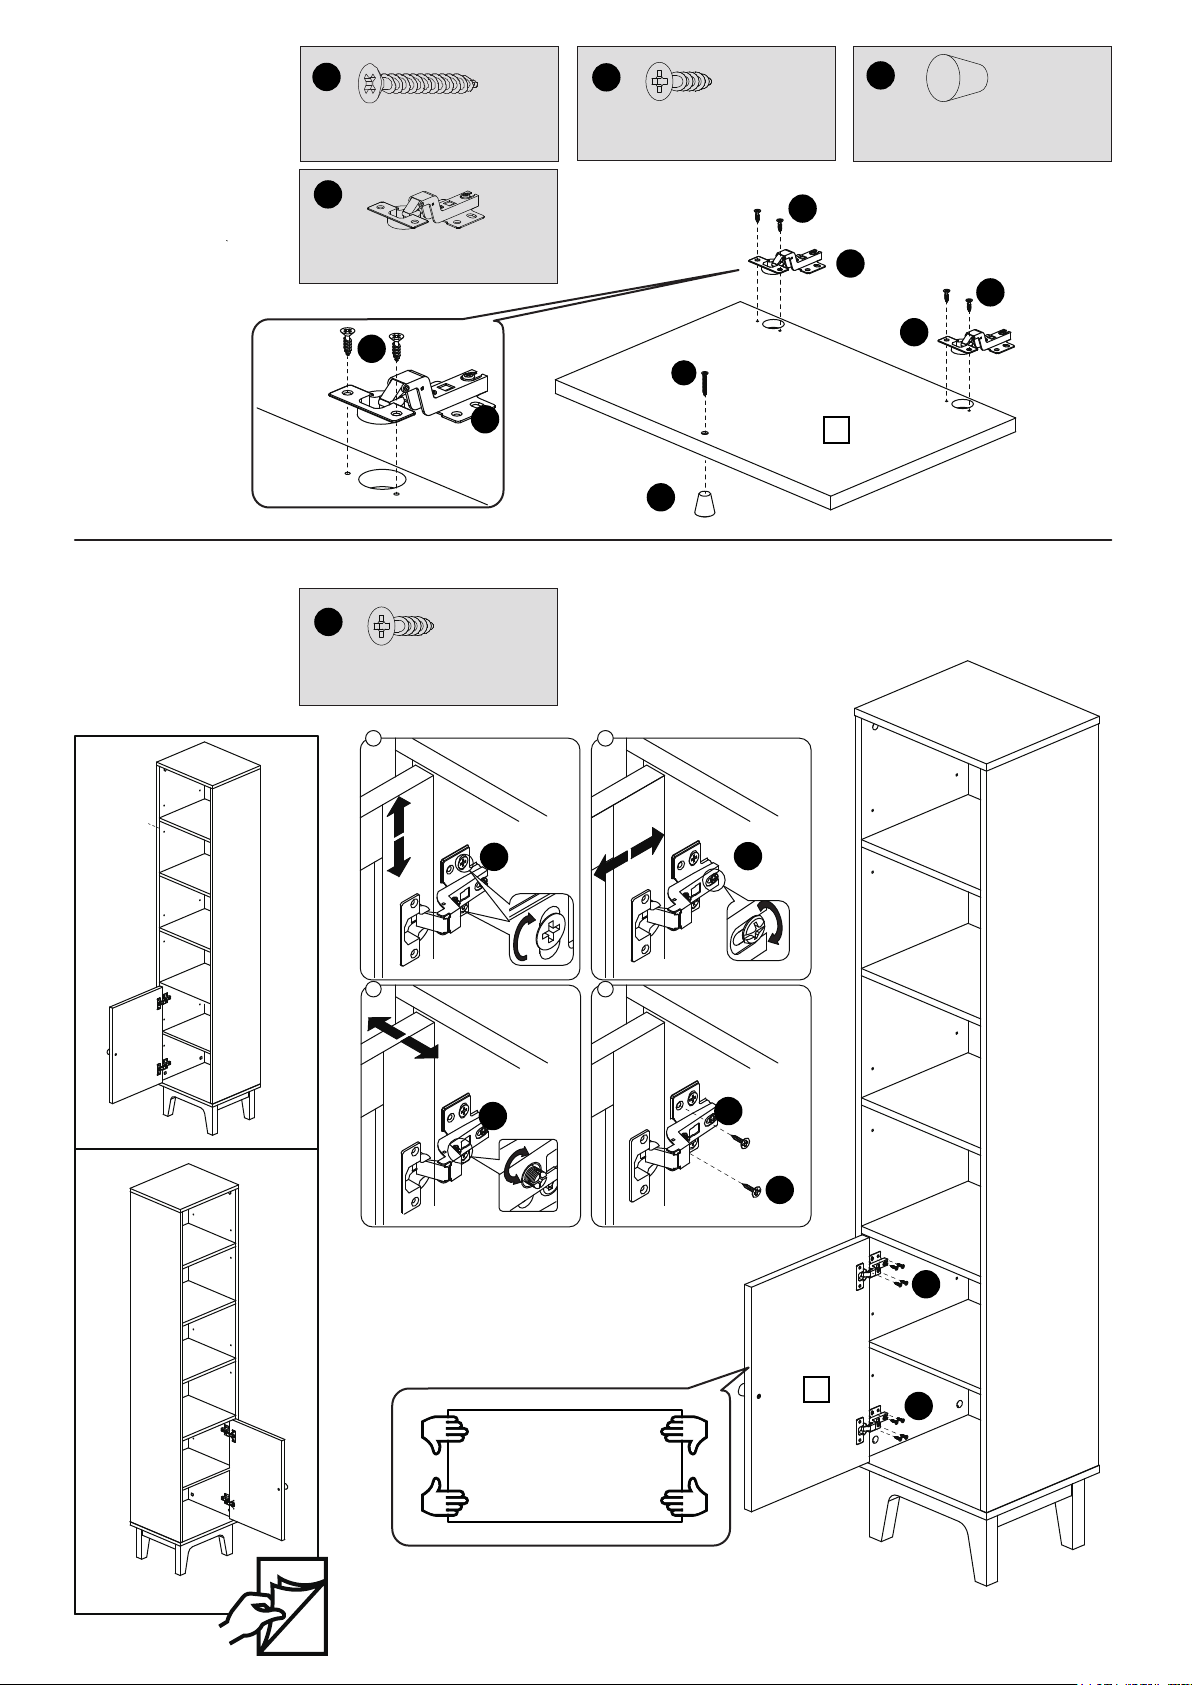
A A
B
D
C
E
F
12
13
30 mm Screw x 1
A
L
Hinge x 2
E
C
E
14mm Screw x8
14mm Screw x4
E
D
L
F
Handle x 1
L
E
L
10
Left Hand Opening
a
L
c
L
b
L
d
L
E
E
12
10
E
11
Page 12
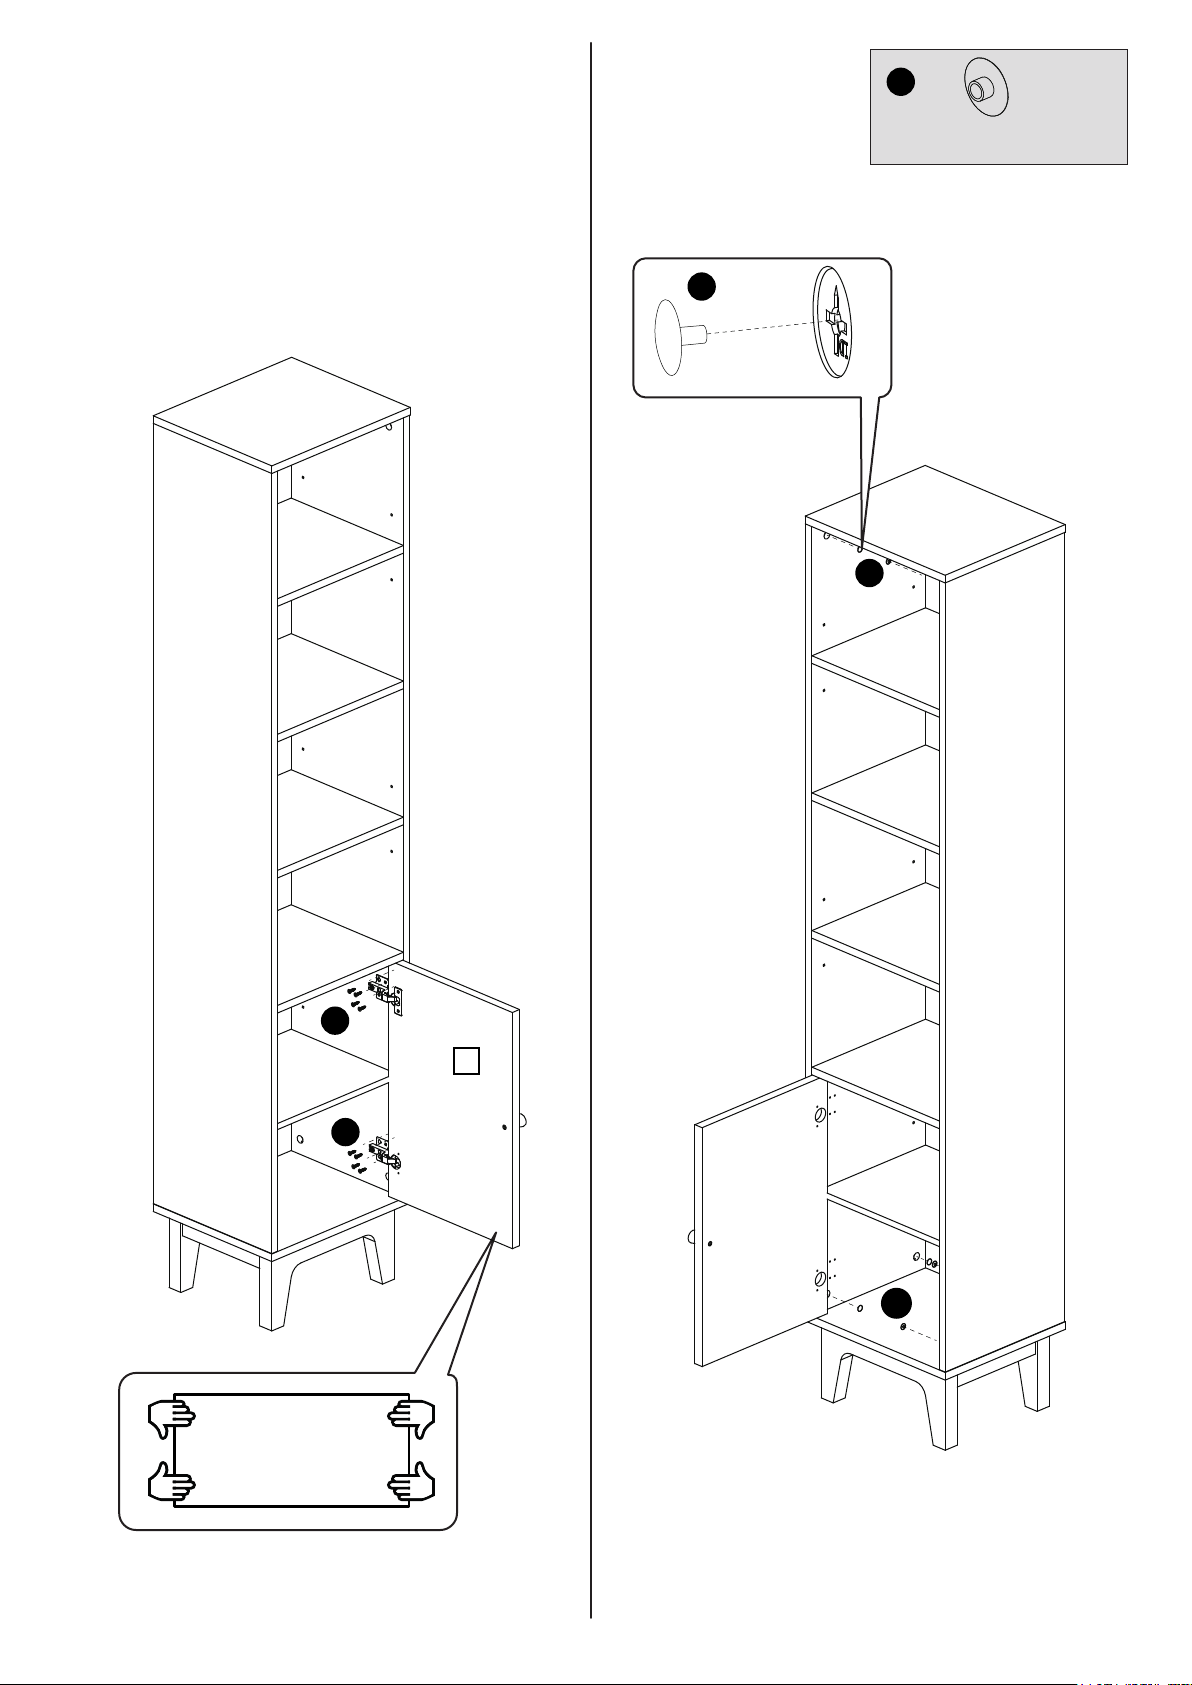
14
A
G
Cam Cap x 8
15
Right Hand Opening
G
F
G
E
10
E
G
12
Page 13
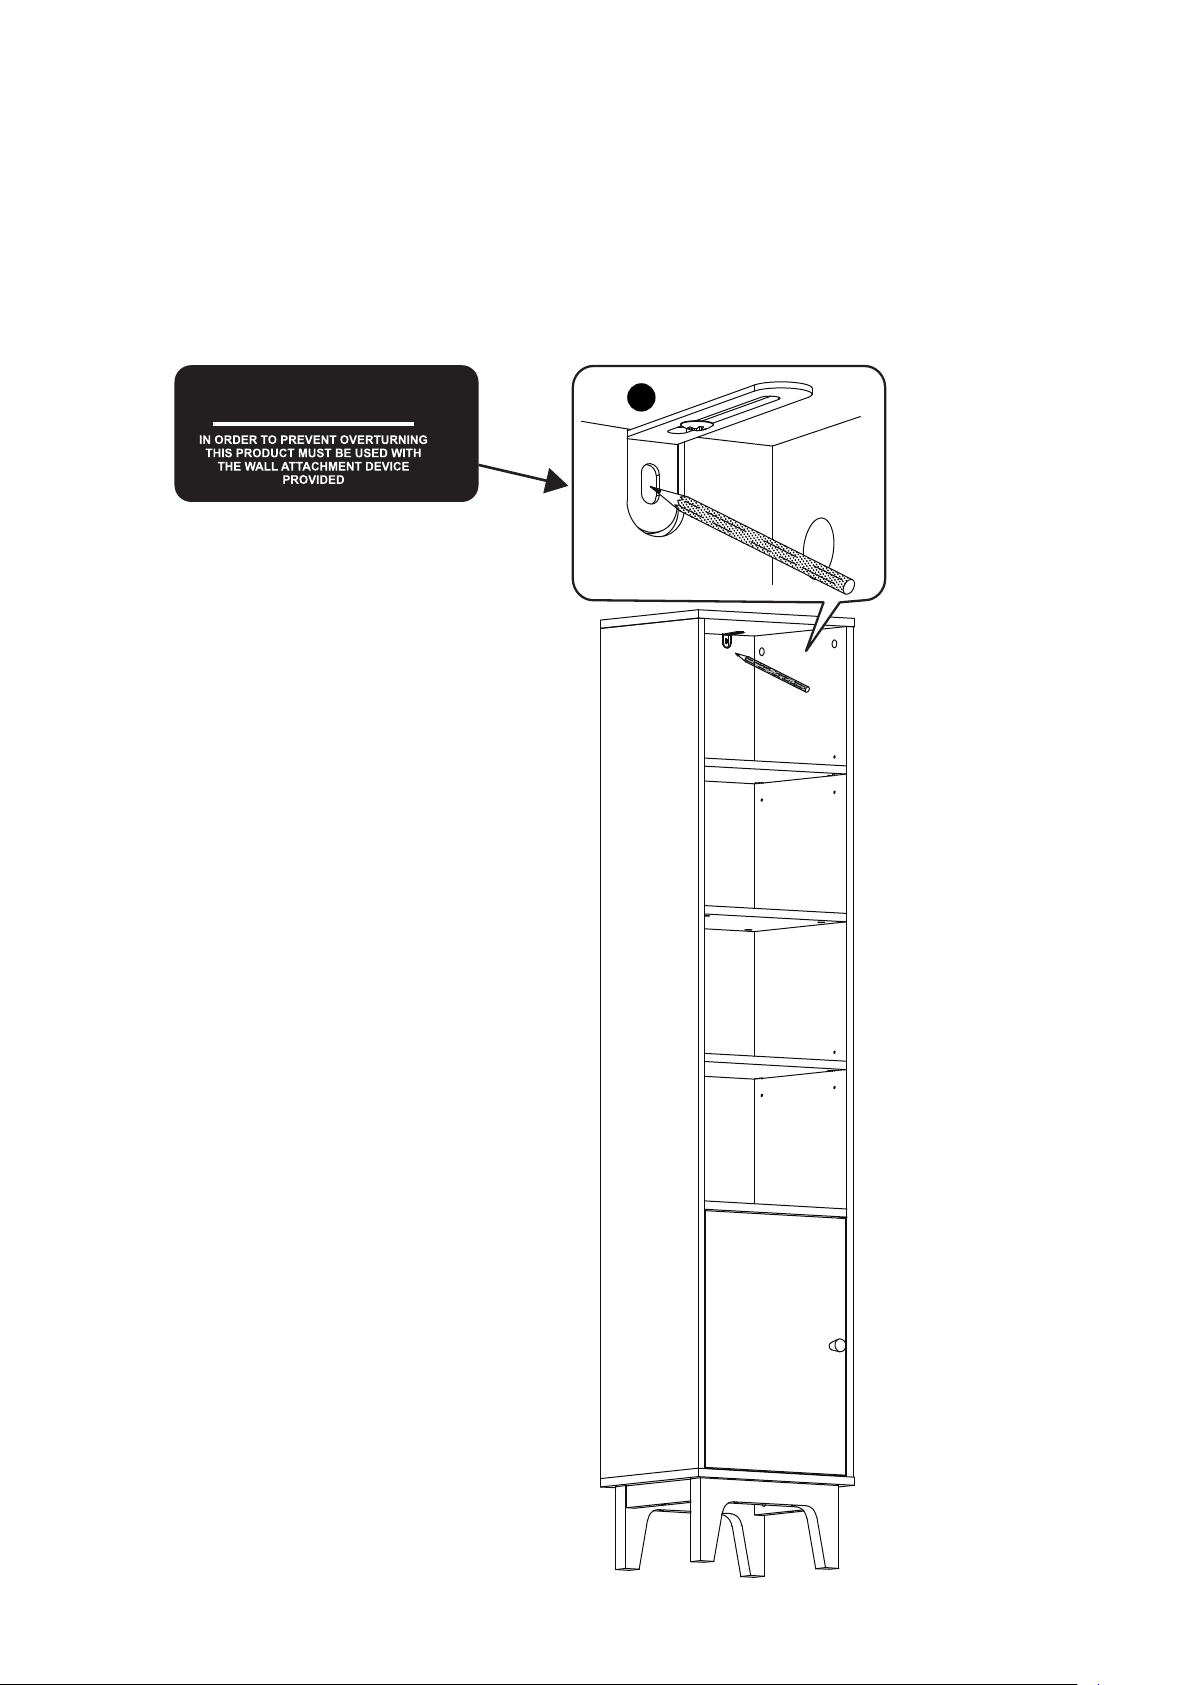
16
Wall fixings are not supplied.
Please refer to A Guide To Wall Mounting & Fixings, page 14.
WARNING!
I
13
Page 14
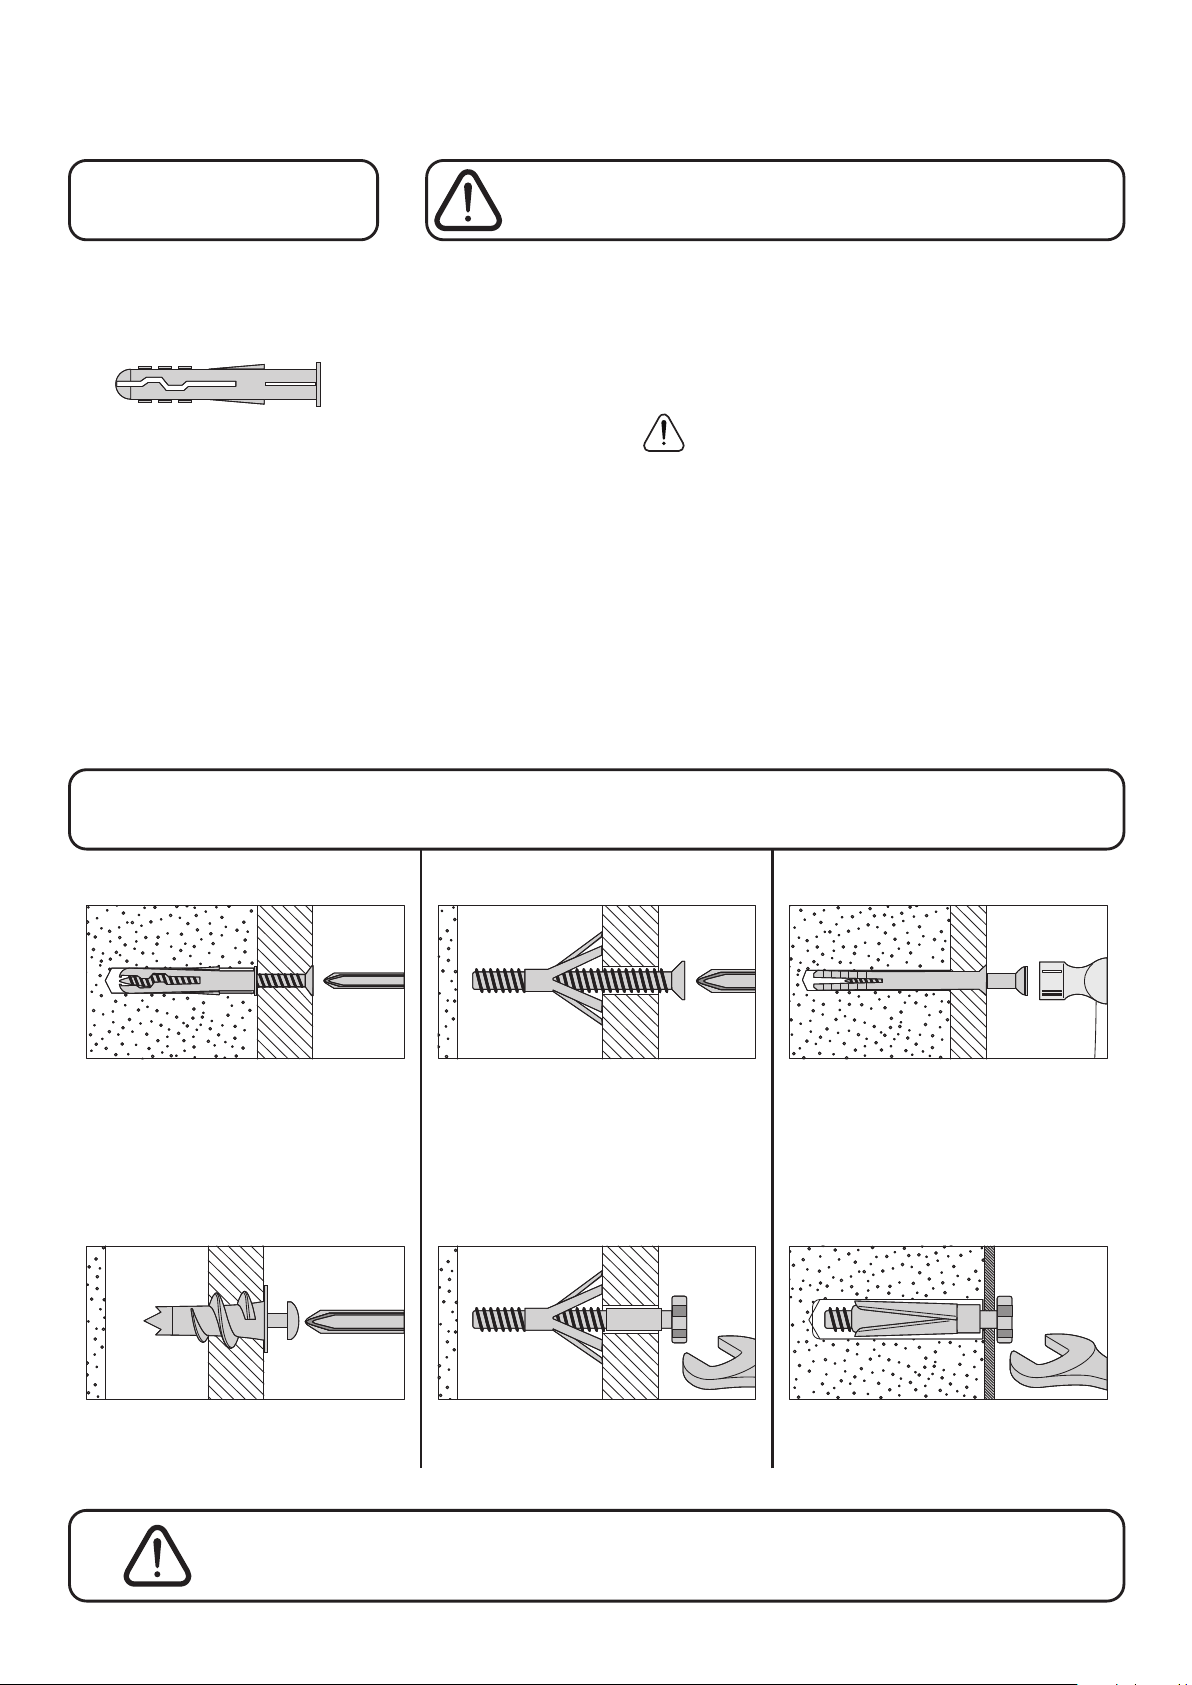
A Guide to Wall Mounting & Fixings
Important note:
If plastic wall plugs
are supplied with your
product:
- these are only suitable for
use in masonry walls.
If you are in any doubt about
the correct wall plugs for
your wall, seek professional
advice.
Failure of the product due to
using incorrect fixings is the
responsibility of the installer.
Important: When drilling into walls always
check that there are no hidden wires or pipes etc.
Make sure that the screws and wall plugs being used
are suitable for supporting your unit. Consult a qualifed
tradesperson if you are unsure.
Hints:
1: General rule: Always use a larger screw and wall plug
if you are not sure.
2: Ensure you use the recommended drill bit to match the wall
plug and hole size.
3: Ensure you drill the hole horizontally, do not force the drill or
enlarge the hole.
4: Take extra care when drilling high walls, ceilings and ceramic
tiles. Ensure wall plugs are inserted beyond the thickness of
the ceramic tiles to avoid the tiles splitting or cracking.
5: Ensure wall plugs are well fitted and are a tight fit in the
drilled hole.
Types of walls
No.1 “General Purpose” wall plug No.3 “Cavity Fixing” wall plug No.5 “Hammer Fixing” wall plug
Generally aerated blocks should not
be used to support heavy loads, use
a specialist fitting in this case. For light
loads, general purpose wall plugs can
be used.
No.2 “Plasterboard” wall plug
You can use one of the following types of wall plug if your
walls are made of brick, breeze block, concrete, stone or wood.
For use with plasterboard partitions or
hollow wooden doors.
No.4 “Cavity Fixing-Heavy Duty”
wall plug
For use with walls stuck with
plasterboard. The hammer fixing allows
it to be fixed to the wall rather than the
plasterboard. Always check the fixing
is secure to the retaining wall.
No.6 “Shield Anchor” wall plug
Heavy loads
For use when attaching light loads on
to plasterboard partitions.
Care &
Maintenance
For use when fitting or supporting
heavy loads such as shelving, wall
cabinets and coat racks.
Safety: Always check the fitting
and location to ensure your safety
in and around the home.
For use with heavier loads such as TV
& HiFi speakers and satelite dishes etc.
Fitting: From time to time check
the fitting to ensure the wall plugs
or screws do not become loose.
14
 Loading...