

Page 1
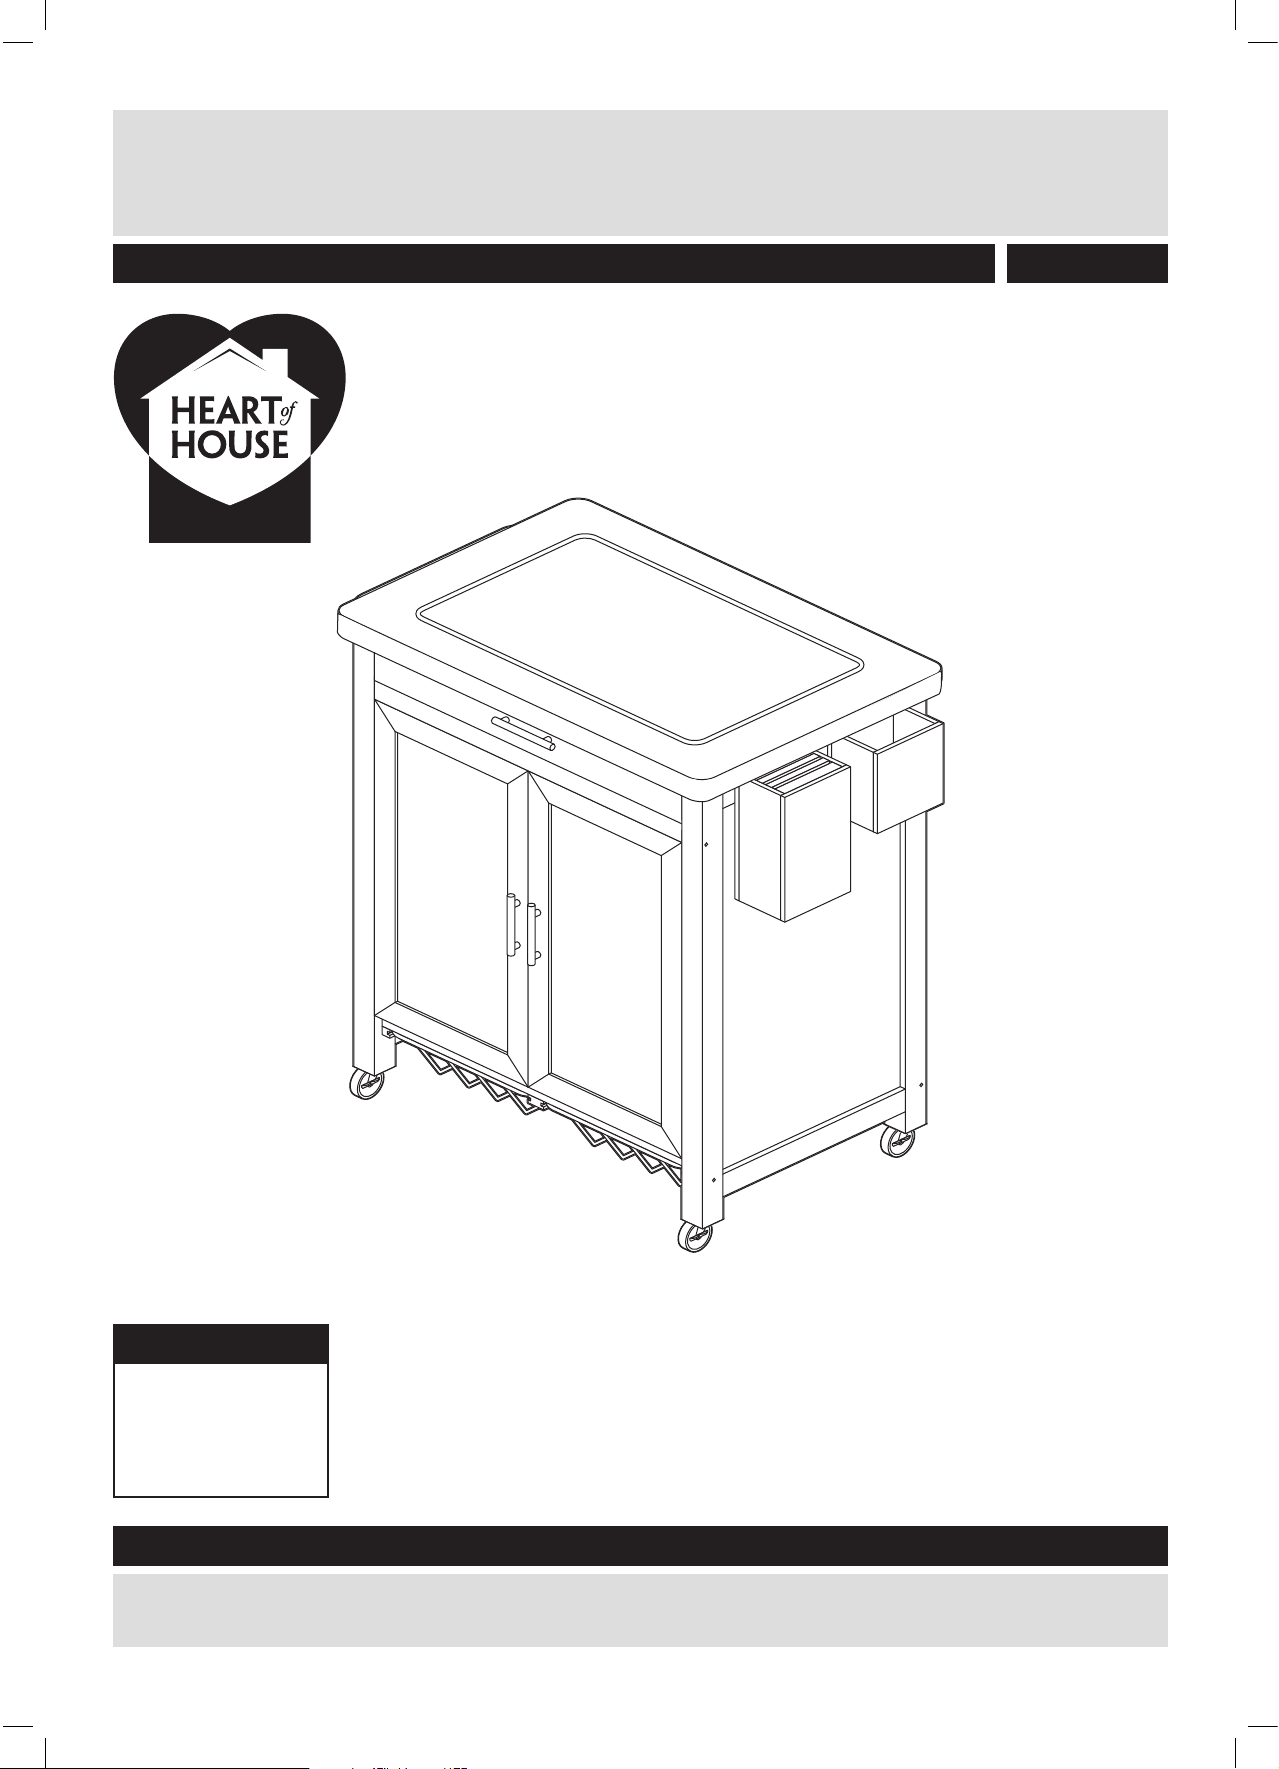
HOH TOLLERTON WOODEN KITCHEN TROLLEY
Assembly Instructions - please keep for future reference
266/3304
Dimensions
Width - 83cm
Depth - 48cm
Height - 89cm
Important – Please read these instructions fully before starting assembly
If you need help or have damaged or missing parts, call the Customer Helpline: 03456 400 800
Issue 3 - 09/05/14
Page 2
Safety and Care Advice
Important – Please read these instructions fully before starting assembly
• Check you have all the
components and tools listed
opposite.
• Remove all ttings from the
plastic bags and separate them
into their groups.
• Keep children and animals
away from the work area, small
parts could choke if swallowed.
• Make sure you have enough
space to layout the parts before
starting.
Care and maintenance
• Only clean using a damp
cloth and mild detergent, do
not use bleach or abrasive
cleaners.
• Do not stand or put weight on
the product, this could cause
damage.
• Assemble the item as close
to its nal position (in the same
room) as possible.
• Assemble on a soft level
surface to avoid damaging the
unit or your oor.
• Parts of the assembly will be
easier with 2 people.
• From time to time check that
there are no loose screws on
this unit.
• We do not
recommend the
use of power
drill/drivers for
inserting screws,
as this could damage the unit.
Only use hand screwdrivers.
• Dispose of all packaging
carefully and responsibly.
• This product should not be
discarded with household
waste. Take to your local
authority waste disposal
centre.
Page 3
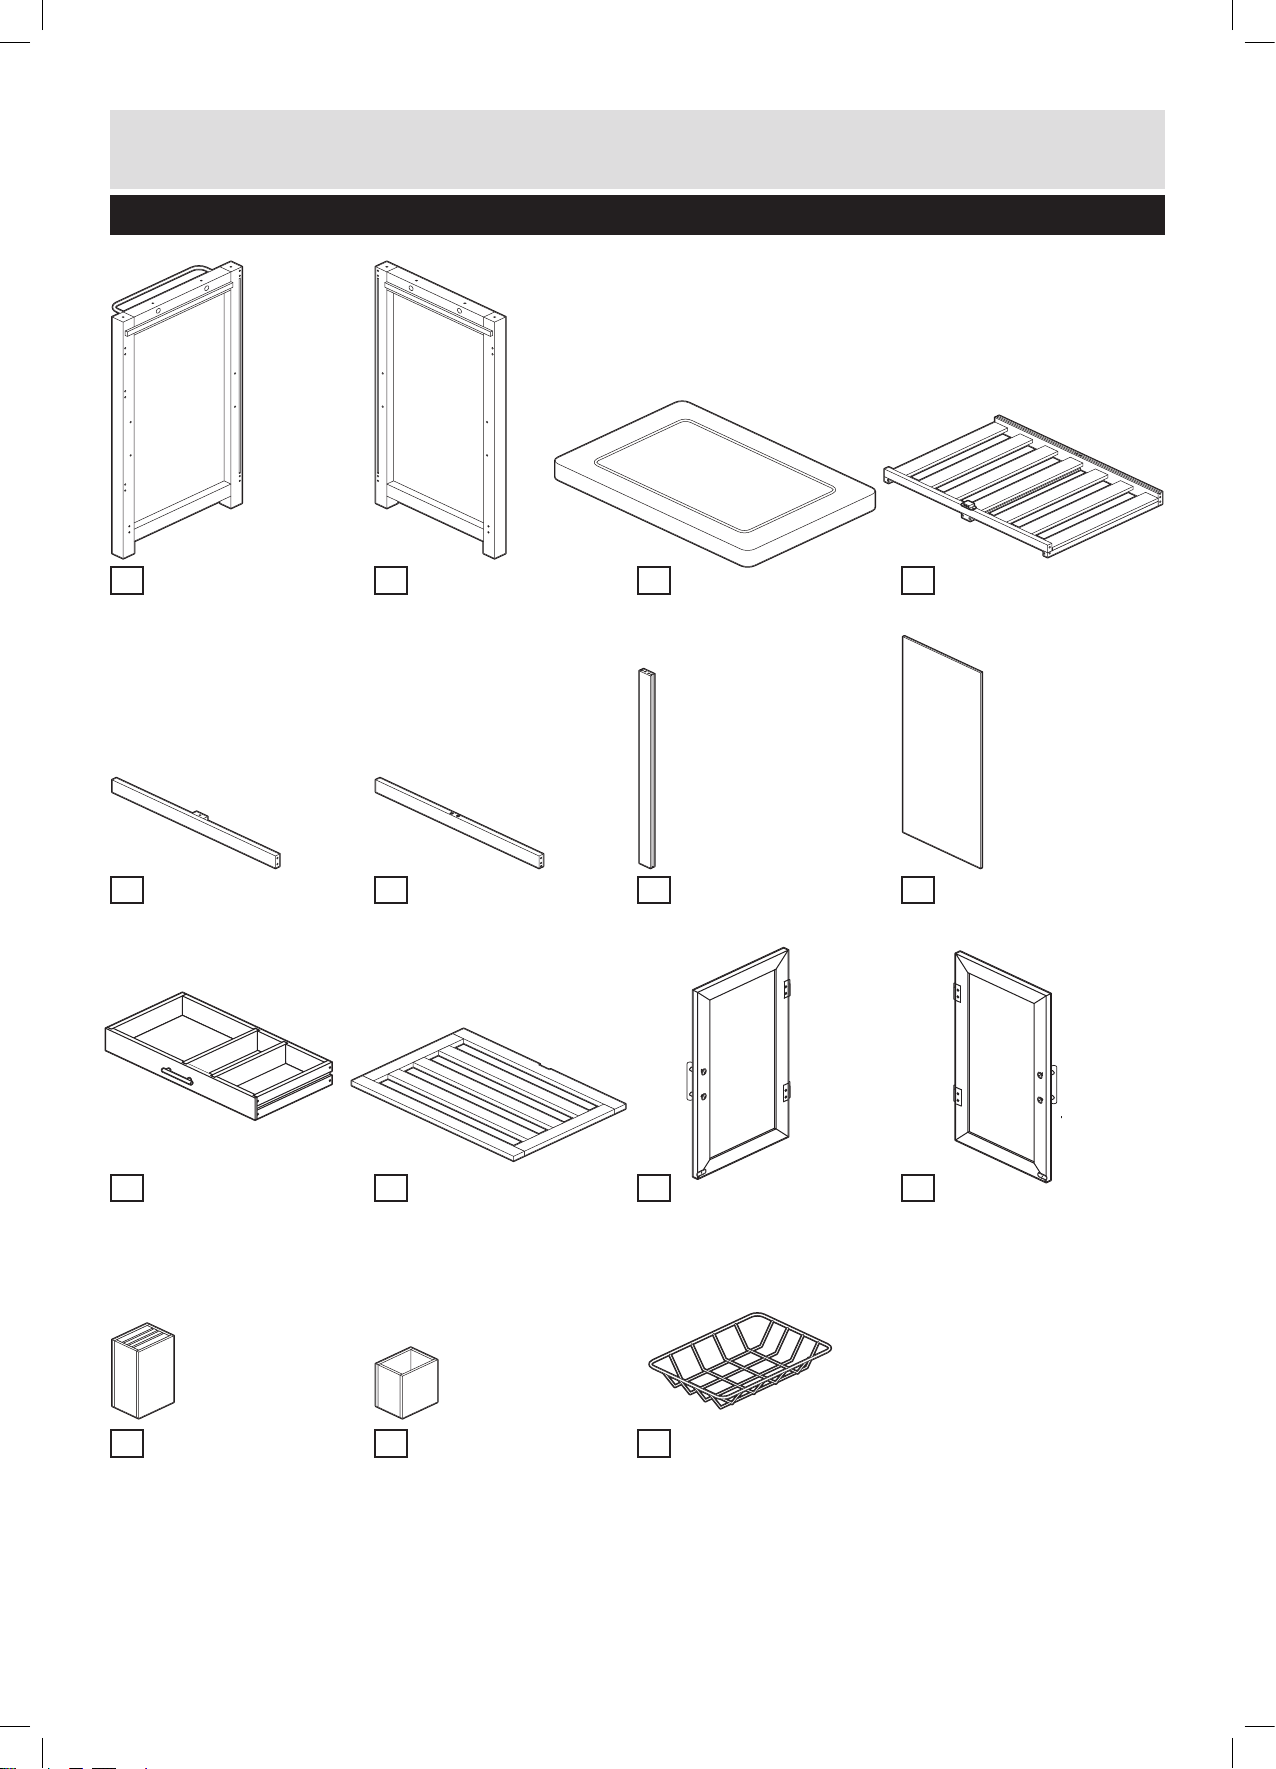
Components - Panels
Please check you have all the panels listed below
Left side x 1
1
(78.5(h) x 43.5(w)cm)
Front rail x 1
5
(4(h) x 59.8(w)cm)
Right side x 1
2
(78.5(h) x 43.5(w)cm)
Back rail x 1
6
(4(h) x 59.8(w)cm)
Top x 1
3
(72(w) x 48(d)cm)
Back upright x 1
7
(60.7(h) x 4(h)cm)
Bottom shelf x 1
4
(59.8(w) x 42(d)cm)
Back panel x 2
8
(61.5(h) x 28.8(w)cm)
Drawer x 1
9
(59.6(w)cm) x 30(d)cm)
Knife block x 1
13
(22(h) x 12.8(w) x 9.7(d)cm)
10
Middle shelf x 1
(59.8(w) x 42(d)cm)
11
Left door x 1
(55.8(h) x 29.6(w)cm)
12
Right door x 1
(55.8(h) x 29.6(w)cm)
Storage box x 1
14
(14(h) x 12.8(w) x 9.7(d)cm)
Basket x 2
15
(29.5(w) x 27(d)cm)
1
Page 4
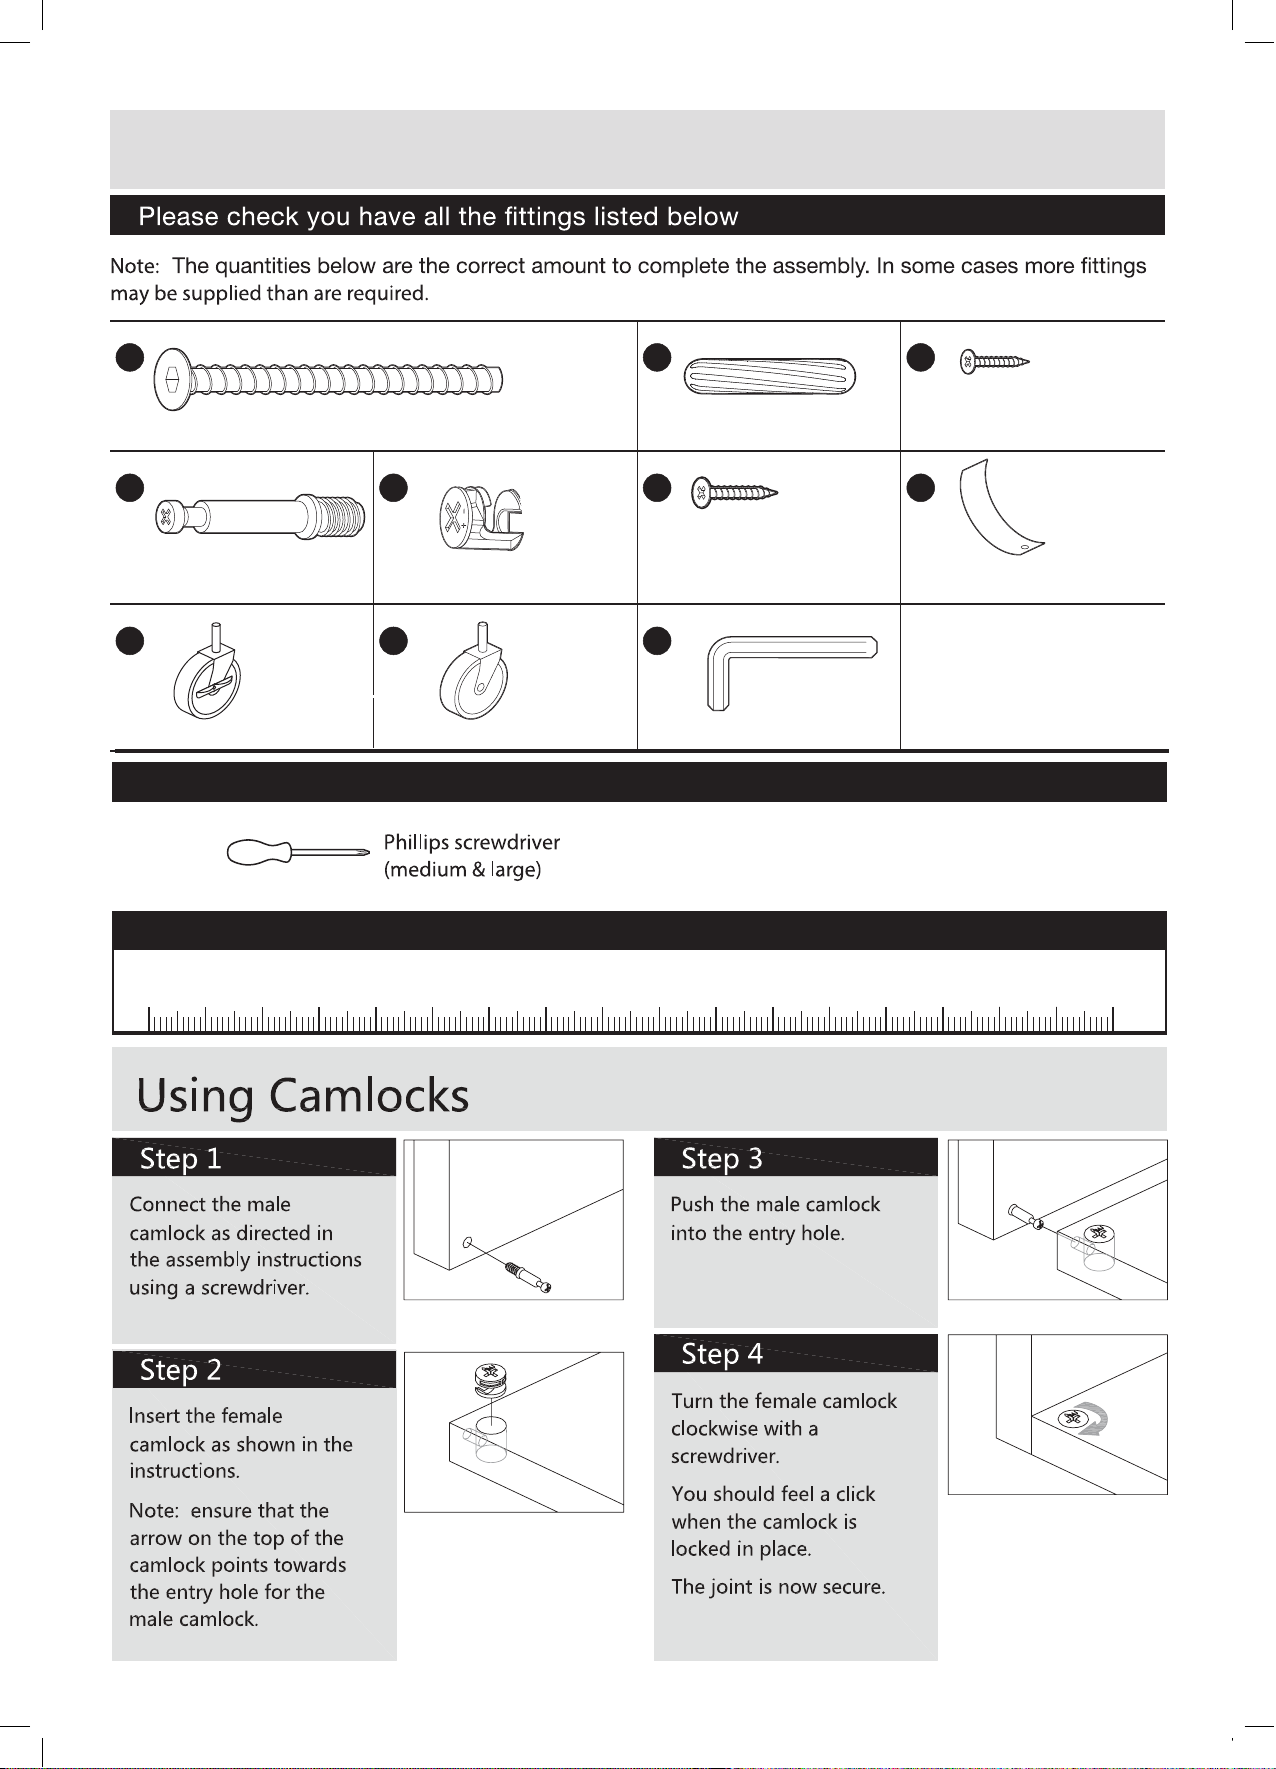
Components - Fittings
If you have damaged or missing components,
call the Customer Helpline:
03456 400 800
A
B
60mm Hex bolt x 8 Wooden dowel x 20
D
Male Camlock x 4
H
E
Female Camlock x 4
I
F
10mm Screw x 1 Drawer stopper x 1
J
Castor with brake x 2
Castor x 2
Hex key x 1
Tools required
Ruler – Use this ruler to help correctly identify the screws
C
12mm Screw x 9
G
K
0 5 10 15 20 25 30 35 40 45 50 55 60 65 70 75 80 85 90 95 100
105
110 115 120 125 130 135 140 145 150 155 160 165 170
2
Page 5
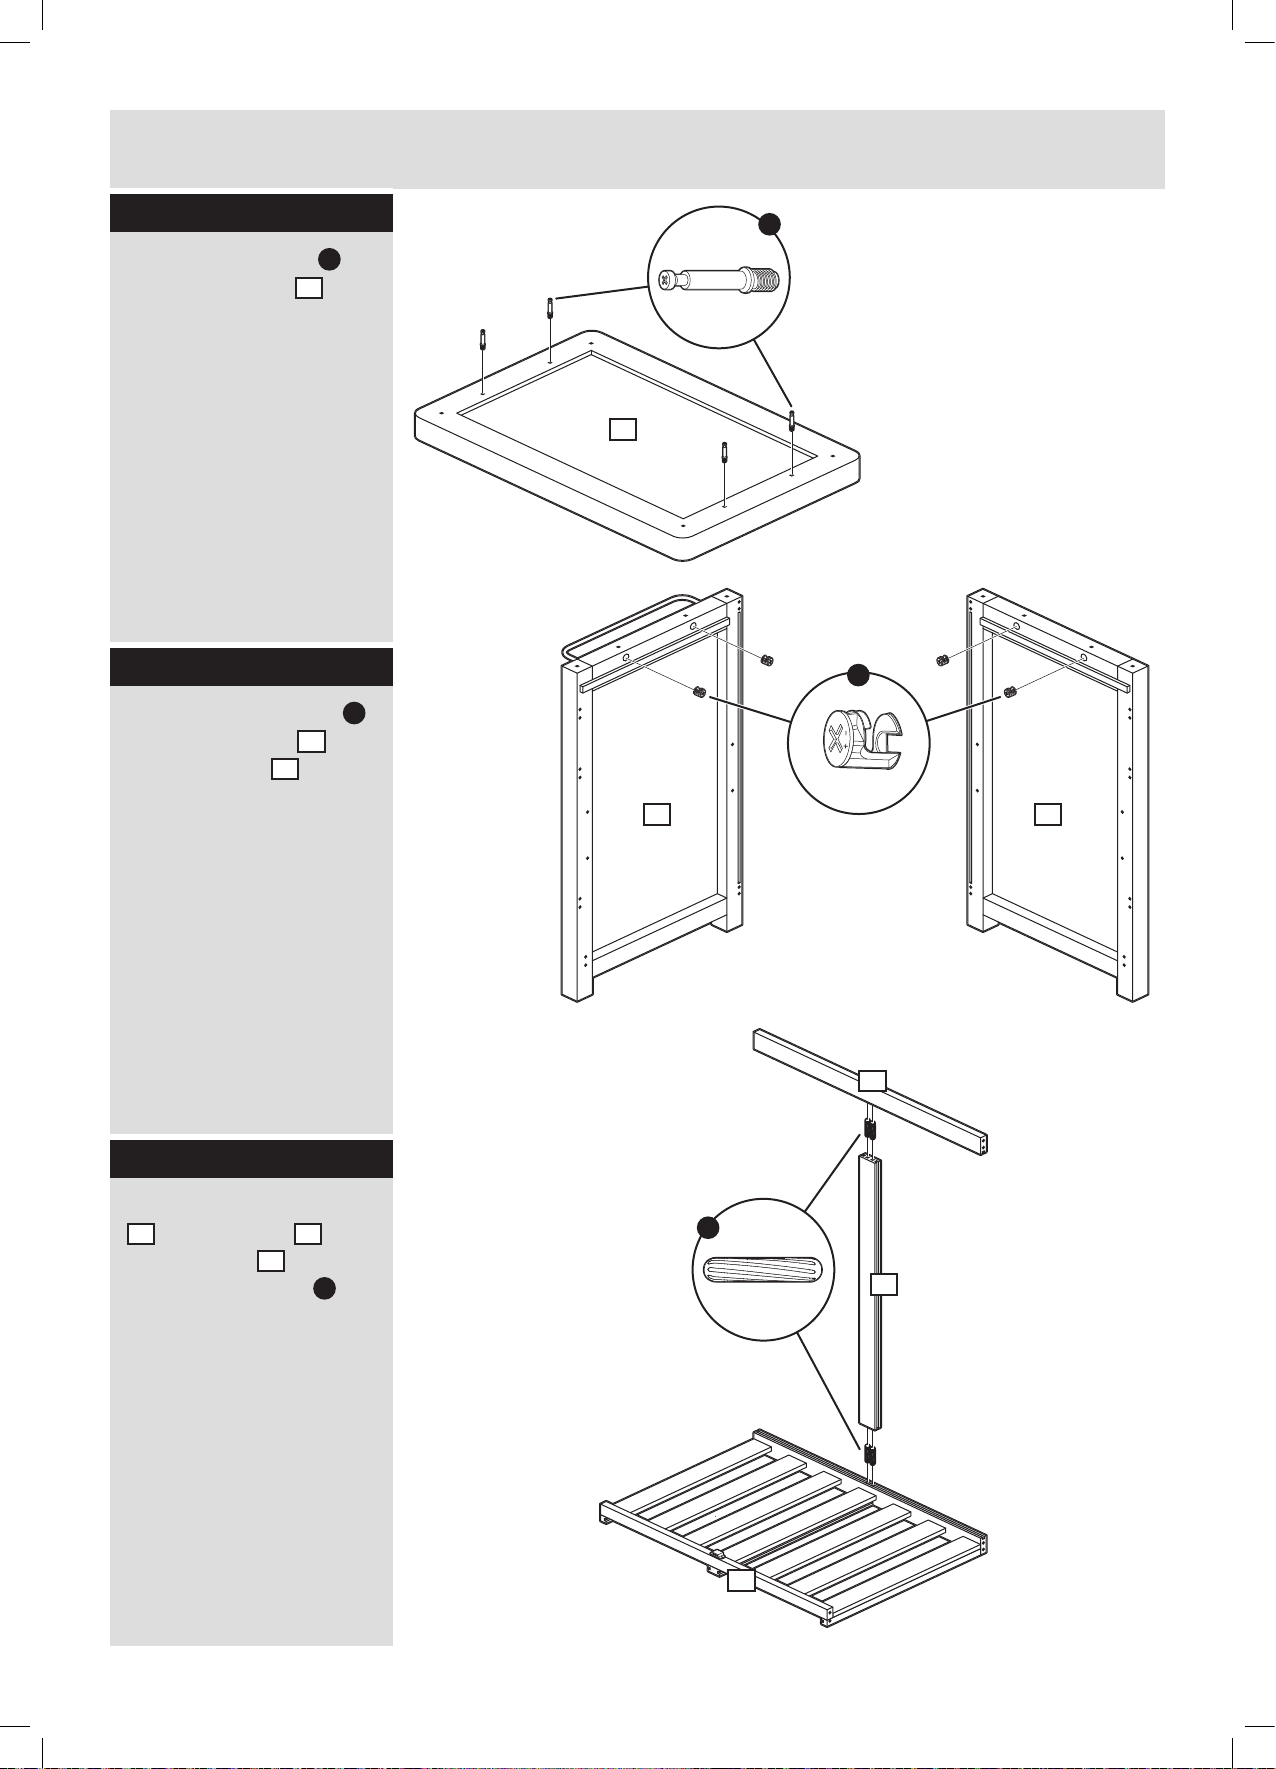
Assembly Instructions
Step 1
Fix 4 x Male camlockD into
underside of top
3
as shown using a Phillips
screwdriver.
Step 2
Fix 2 x Female camlock
into left side panel and
right side panel
2
as shown.
Note:
E
1
D
3
E
1 2
ensure that the arrow
on top of the camlock
points towards the
entry hole for the
male camlock.
Please refere to the “Using
Camlocks” section
for further assistance.
Step 3
Connect bottom shelf
4
and back rail
back upright
4 x wooden dowel
7
using
6
to
B
as shown.
6
B
7
4
3
Page 6
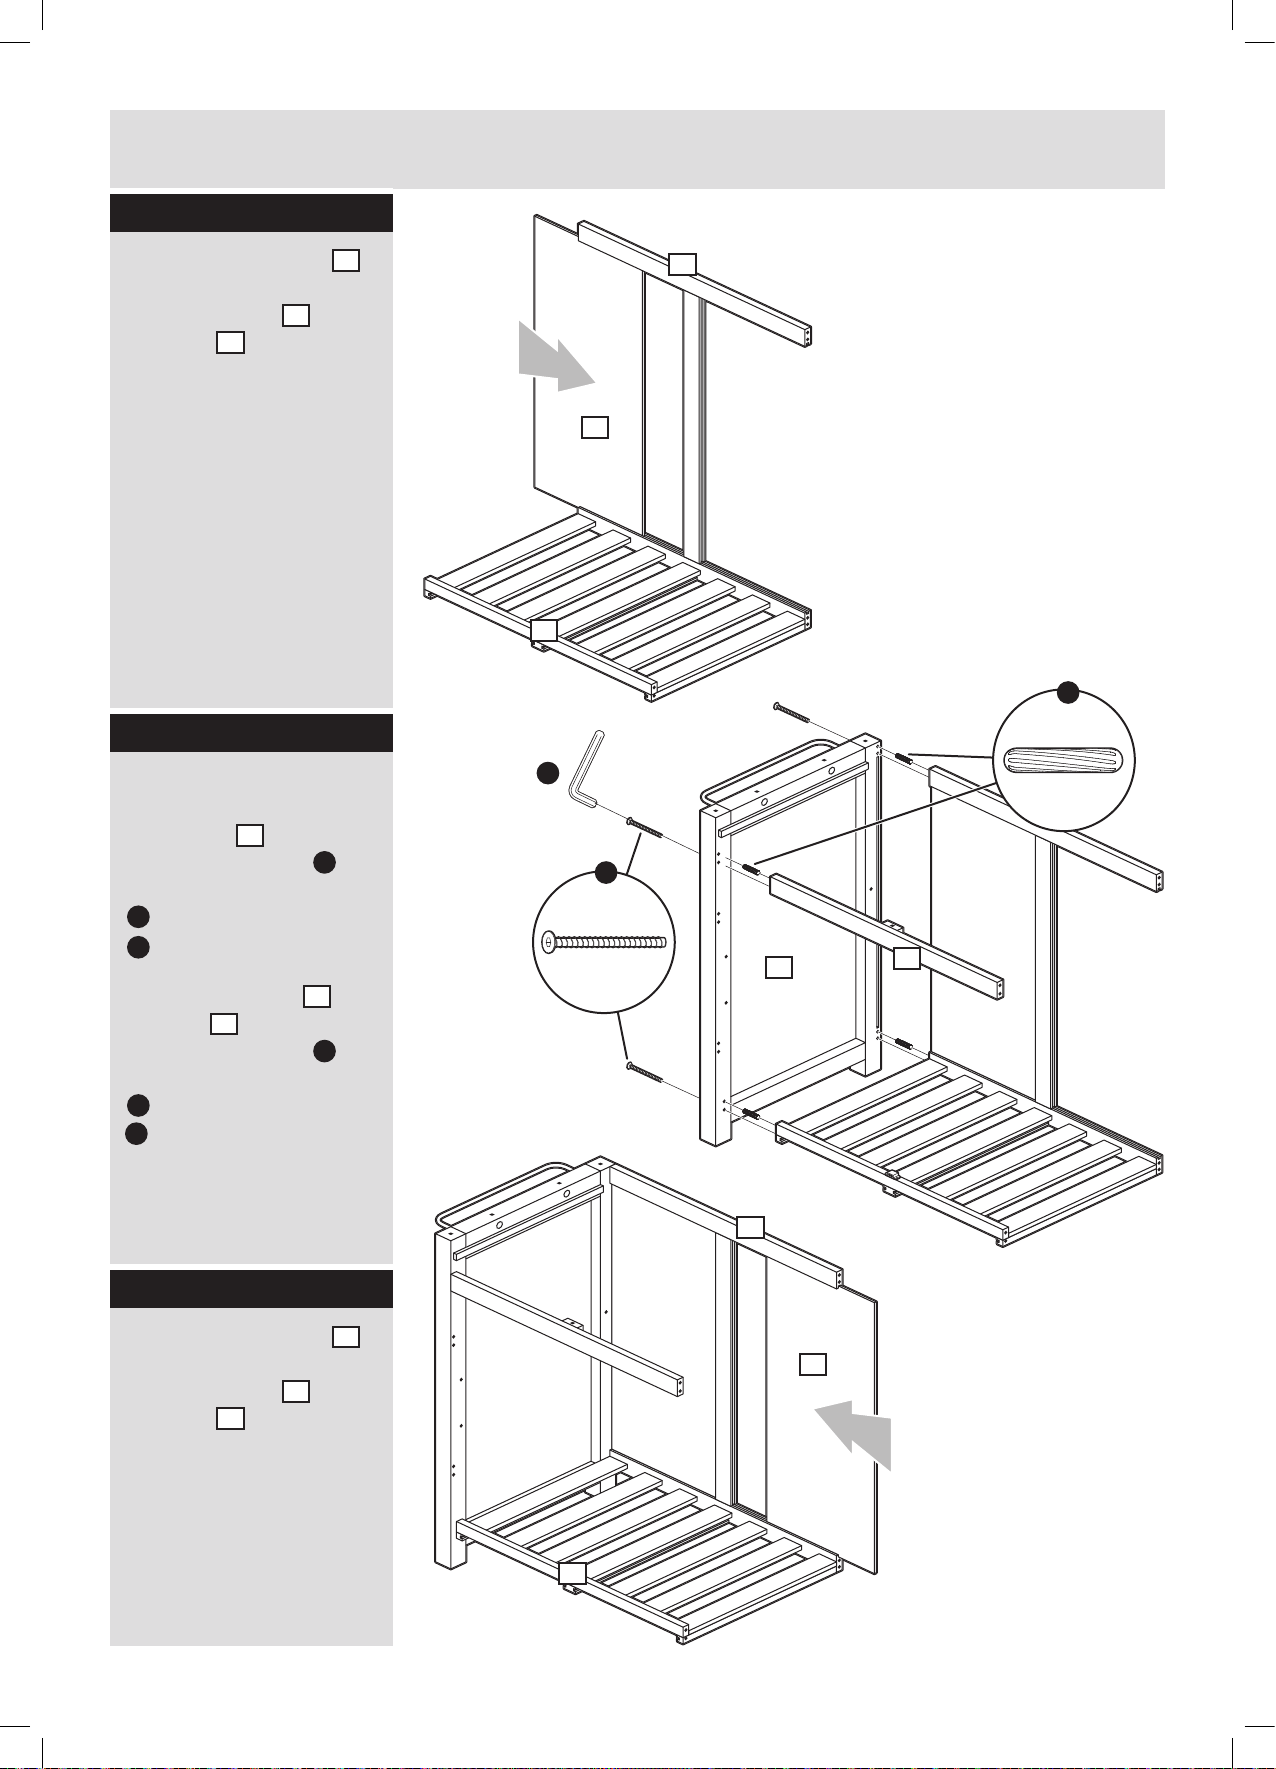
Assembly Instructions
Step 4
Slide 1 x back panel
into the left end slots
of bottom shelf
back rail
6
4
and
as shown.
Step 5
Connect assembly
completed at Step 4
to left side
3 x wooden dowel
and 3 x 60mm hex bolt
A
as shown. Use Hex Key
provided to do this
J
Connect front rail
left side
1 x wooden dowel
and 1 x 60mm hex bolt
A
as shown. Use Hex Key
provided to do this
J
1
1
using
using
B
5
B
8
to
8
4
J
A
6
B
1
5
Step 6
Slide 1 x back panel
into the right end slots
of bottom shelf
back rail
4
6
4
as shown.
and
6
8
8
4
Page 7
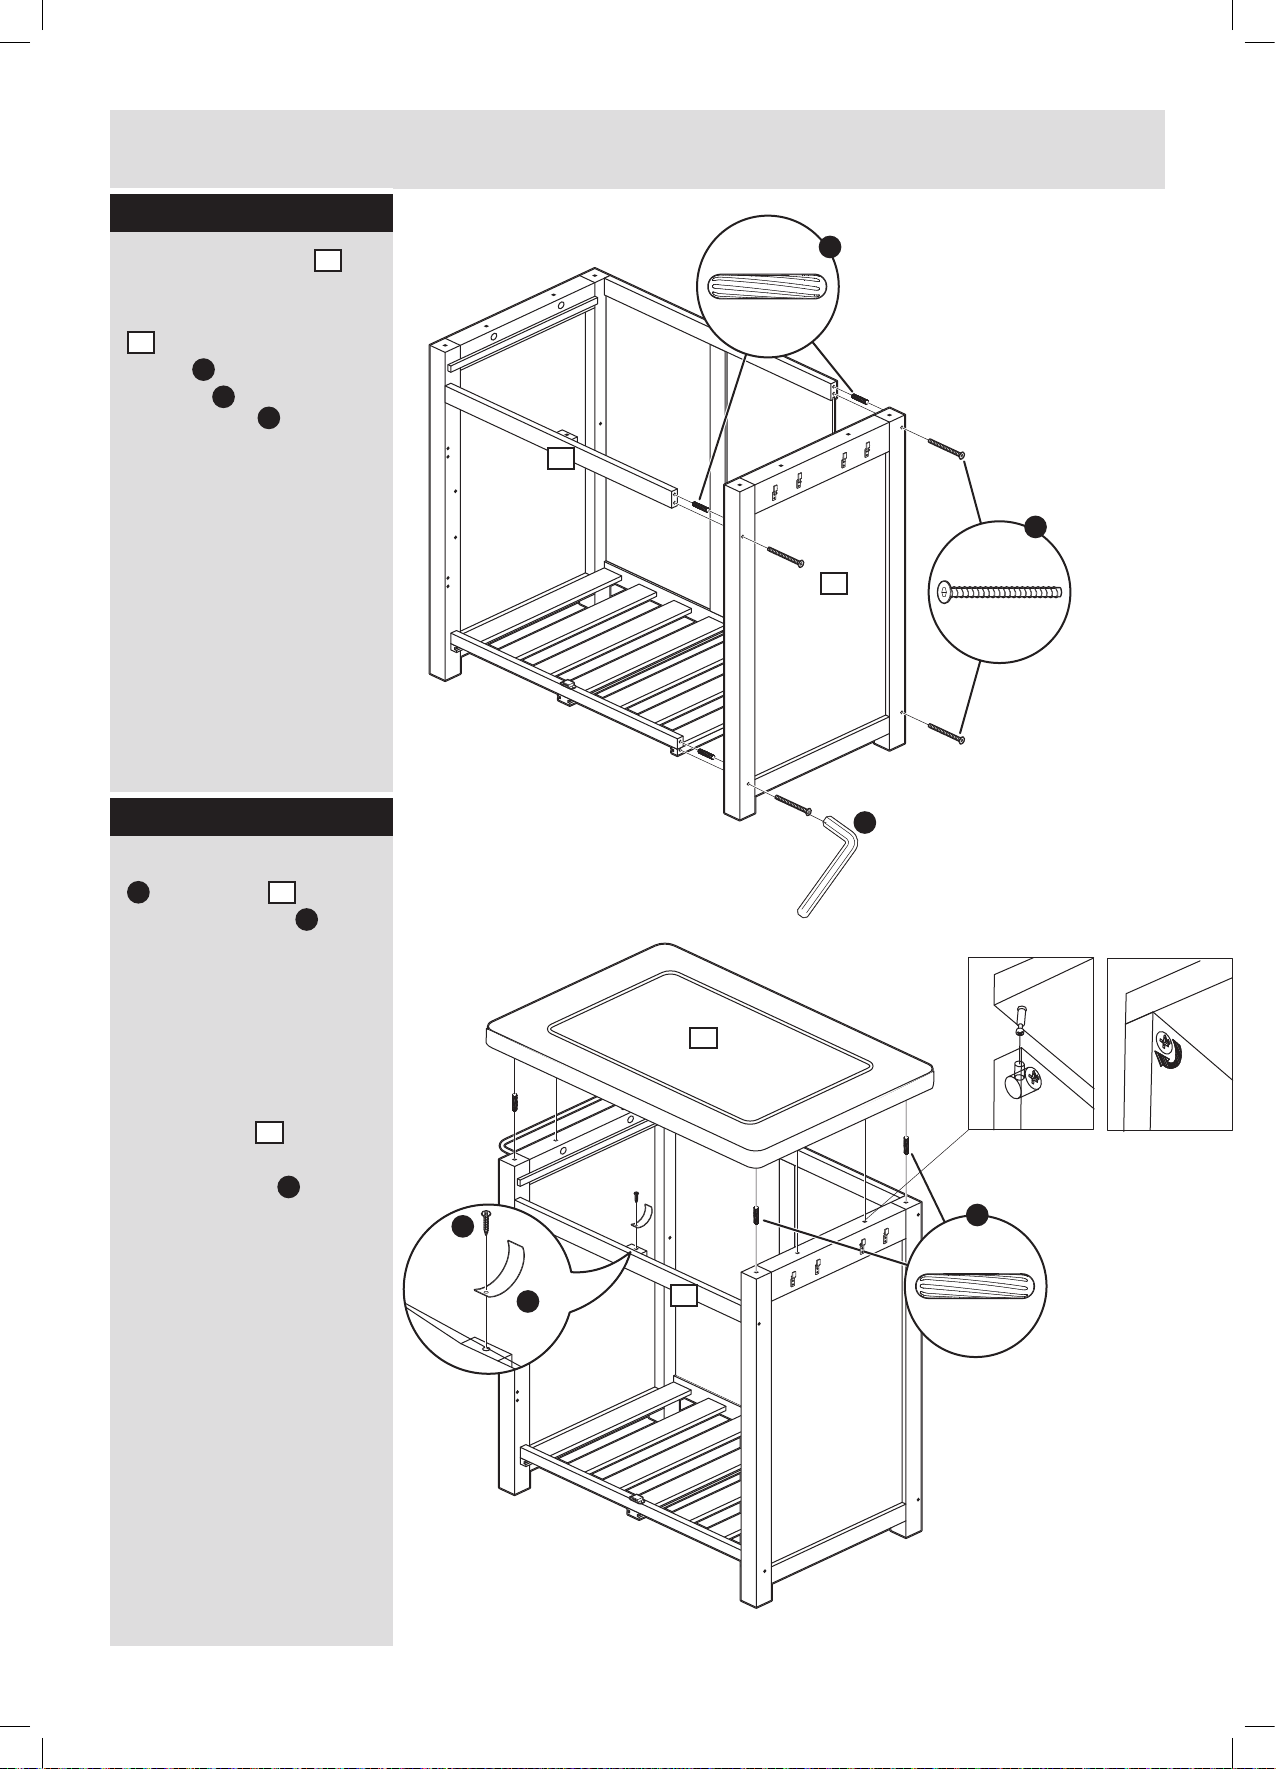
Assembly Instructions
Step 7
Connect right side
to exposed ends of
assembly and front rail
5
using 4 x wooden
dowel
hex bolt
B
and 4 x 60mm
A
as shown
using Hex Key supplied
2
J
5
B
A
2
Step 8
Connect drawer stopper
G
to front rail 5 using
1 x 10mm screw
shown (
a: ).
Note: the loose end
of the drawer stopper
must point upwards and
towards the back of the
unit.
Connect top
assembly using 4 x
wooden dowel
shown.
Push the male Camlock into
the the adjacent entry hole
Turn the femal camlock
clockwise with a screw
driver. You should feel a click
when the camlock is locked
in place
F
as
3
to
B
as
a:
J
3
F
G
5
B
The joint is now secure
5
Page 8
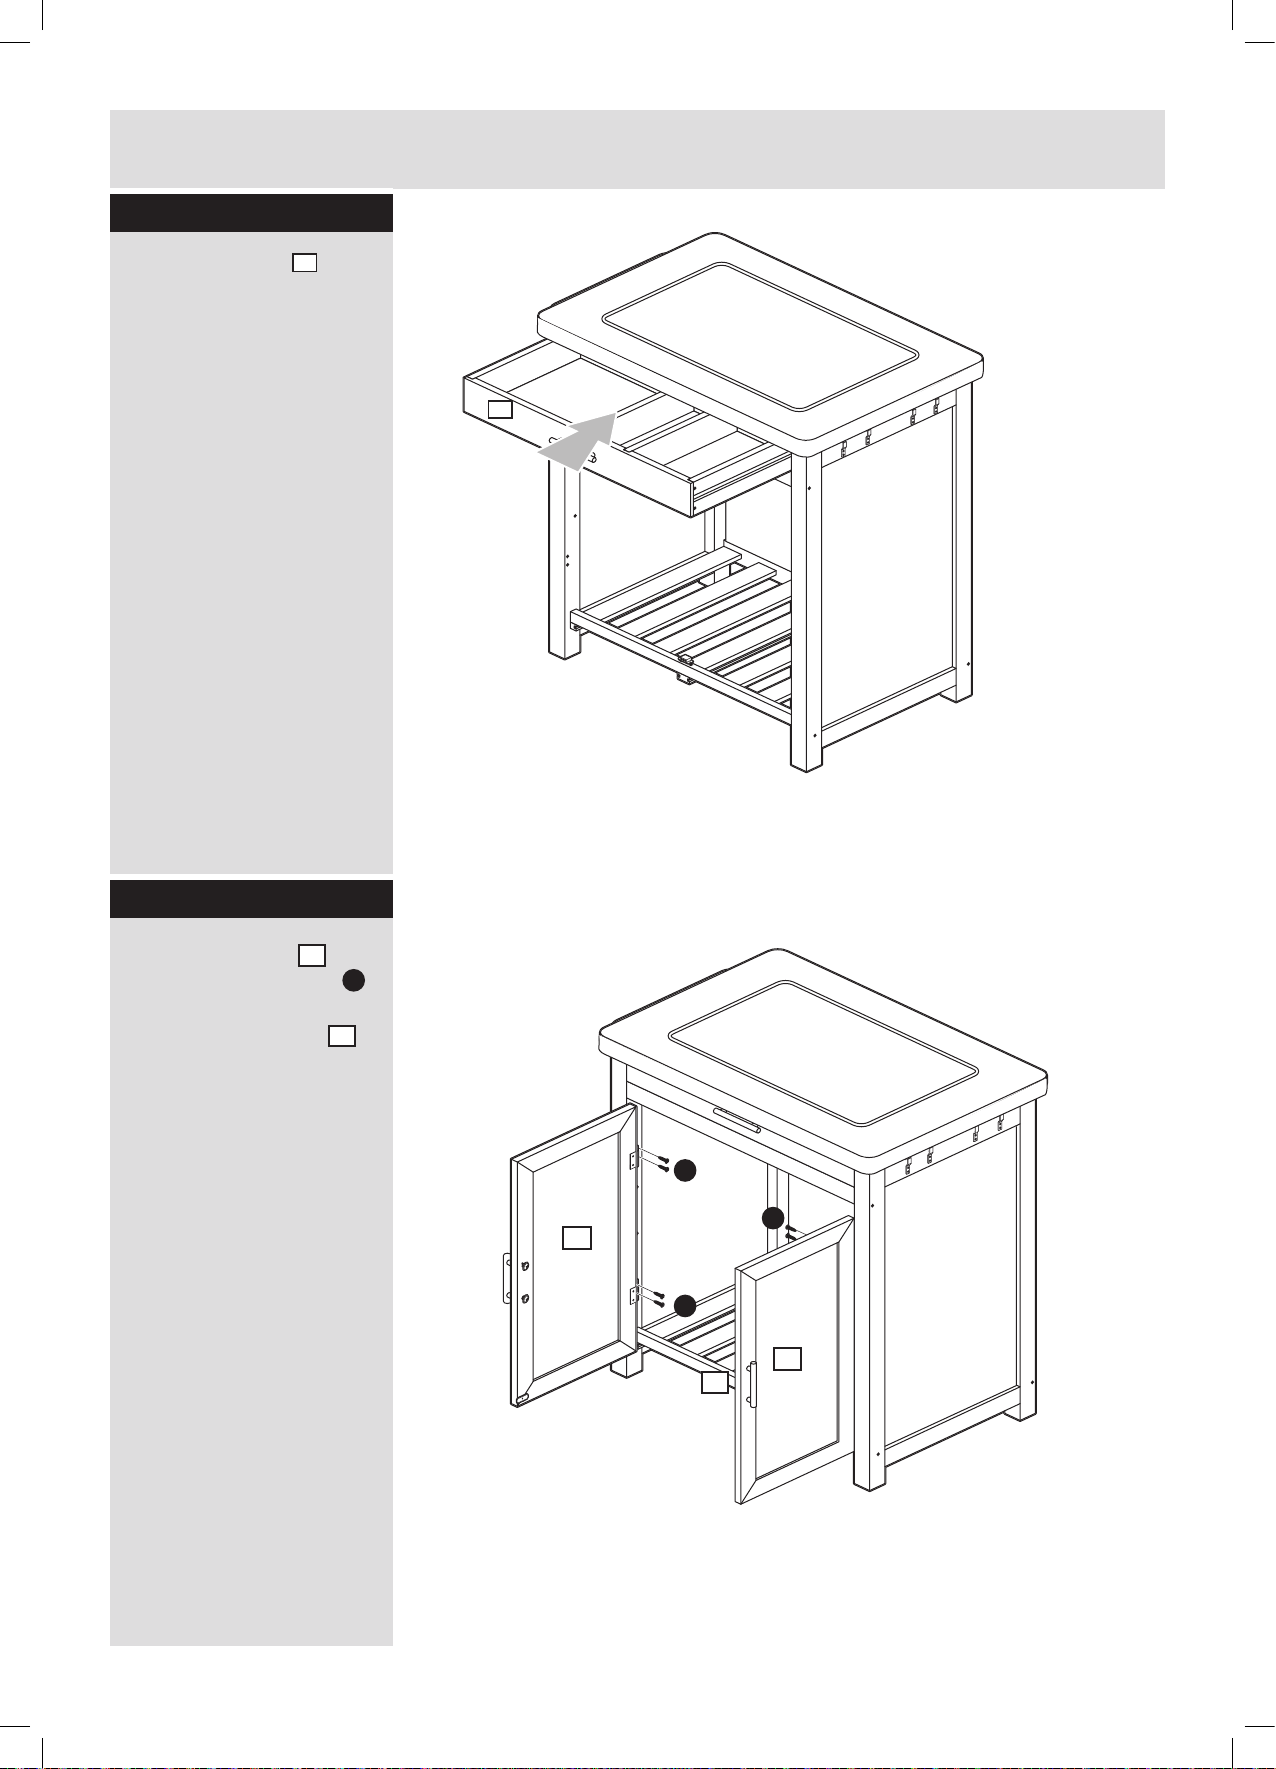
Assembly Instructions
Step 9
Insert the drawer
as shown.
9
9
Step 10
Connect left door
using 4 x 12mm screws
Repeat for right door
as shown.
11
12
C
.
C
C
11
C
12
4
6
Page 9
Assembly Instructions
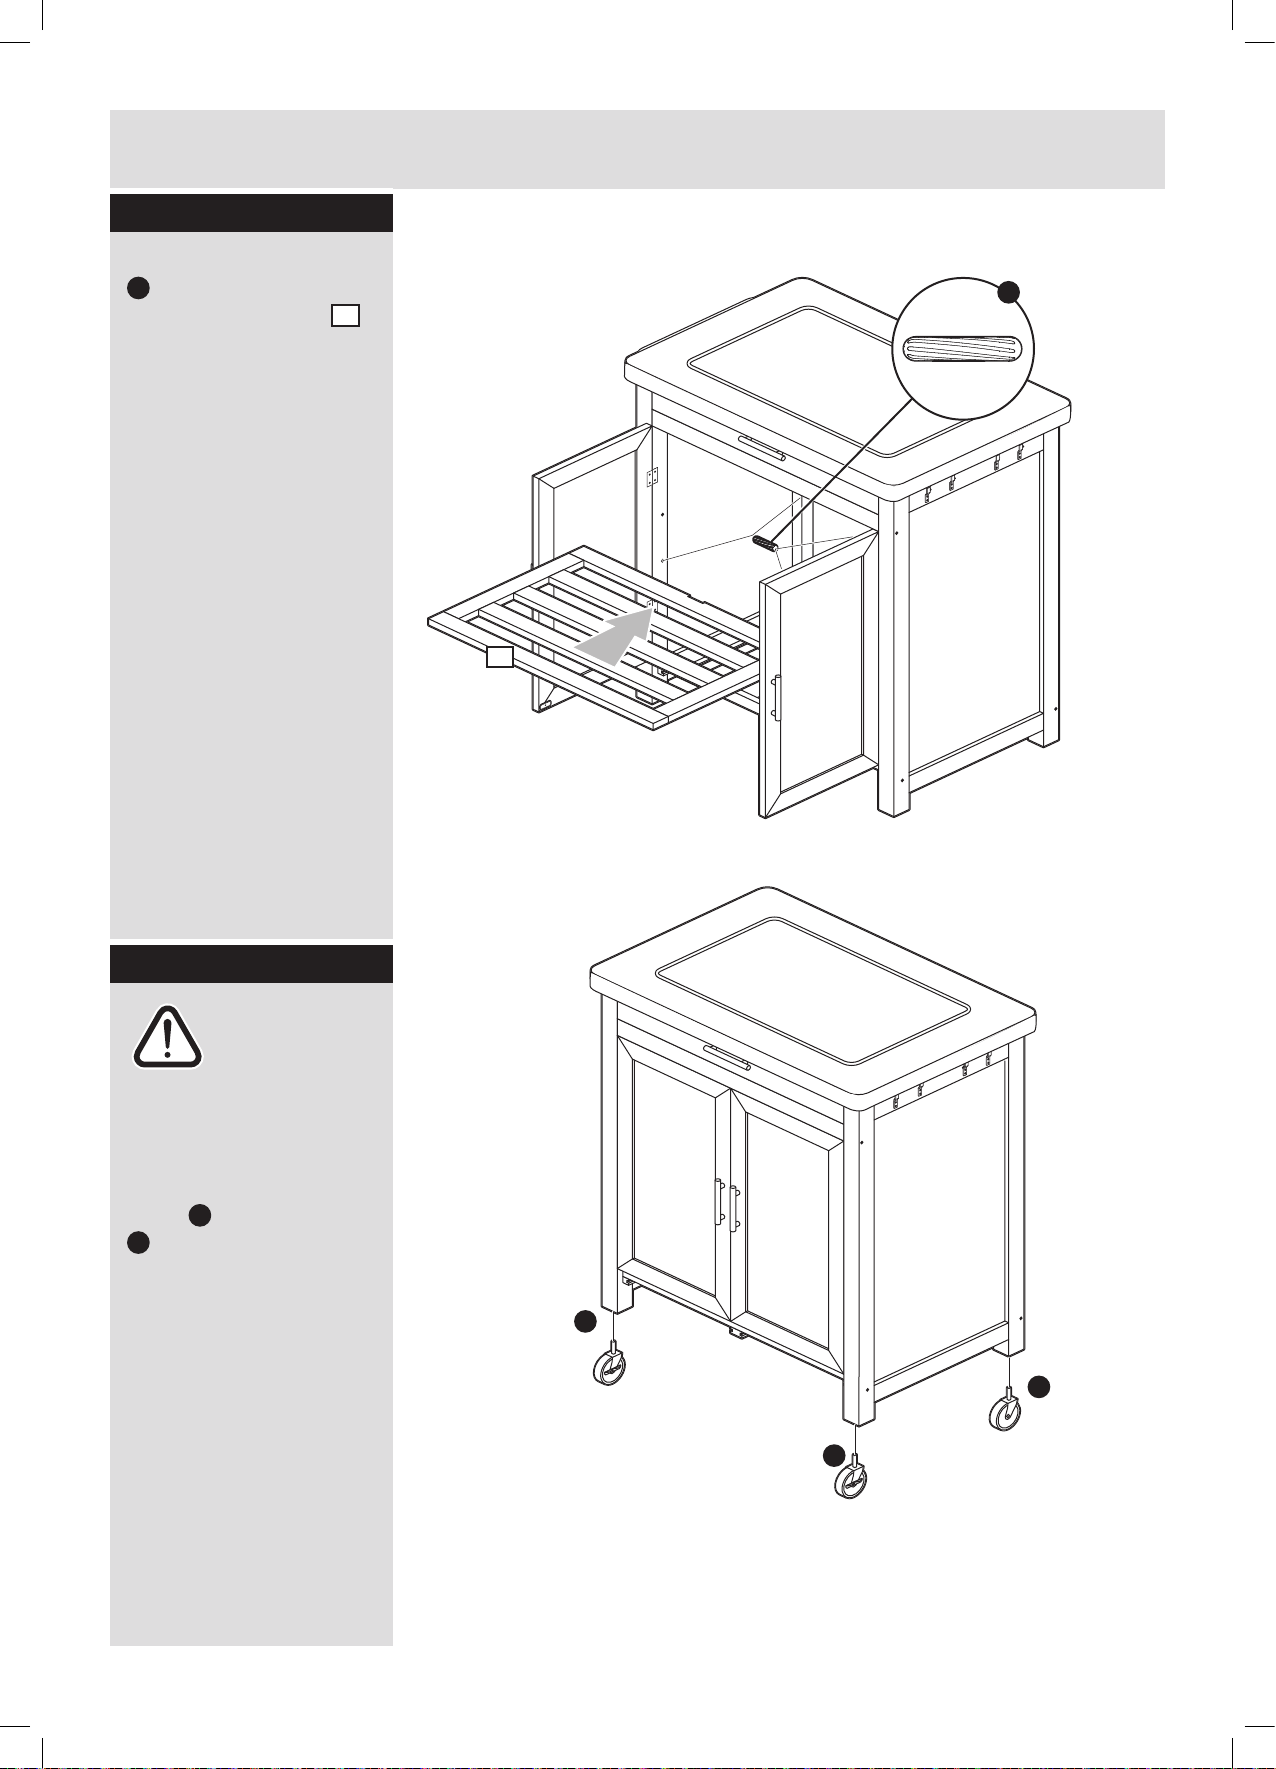
Step 11
Insert 4 x wooden dowel
B
into holes inside unit
and set middle shelf
on them as shown.
10
10
B
Step 12
Warning:
The unit is
heavy. Ask
someone to
help you with
this step.
Insert 2 x castor with
brake
I
shown.
H
and 2 x castor
into bottom of legs as
H
I
H
7
Page 10
Assembly Instructions
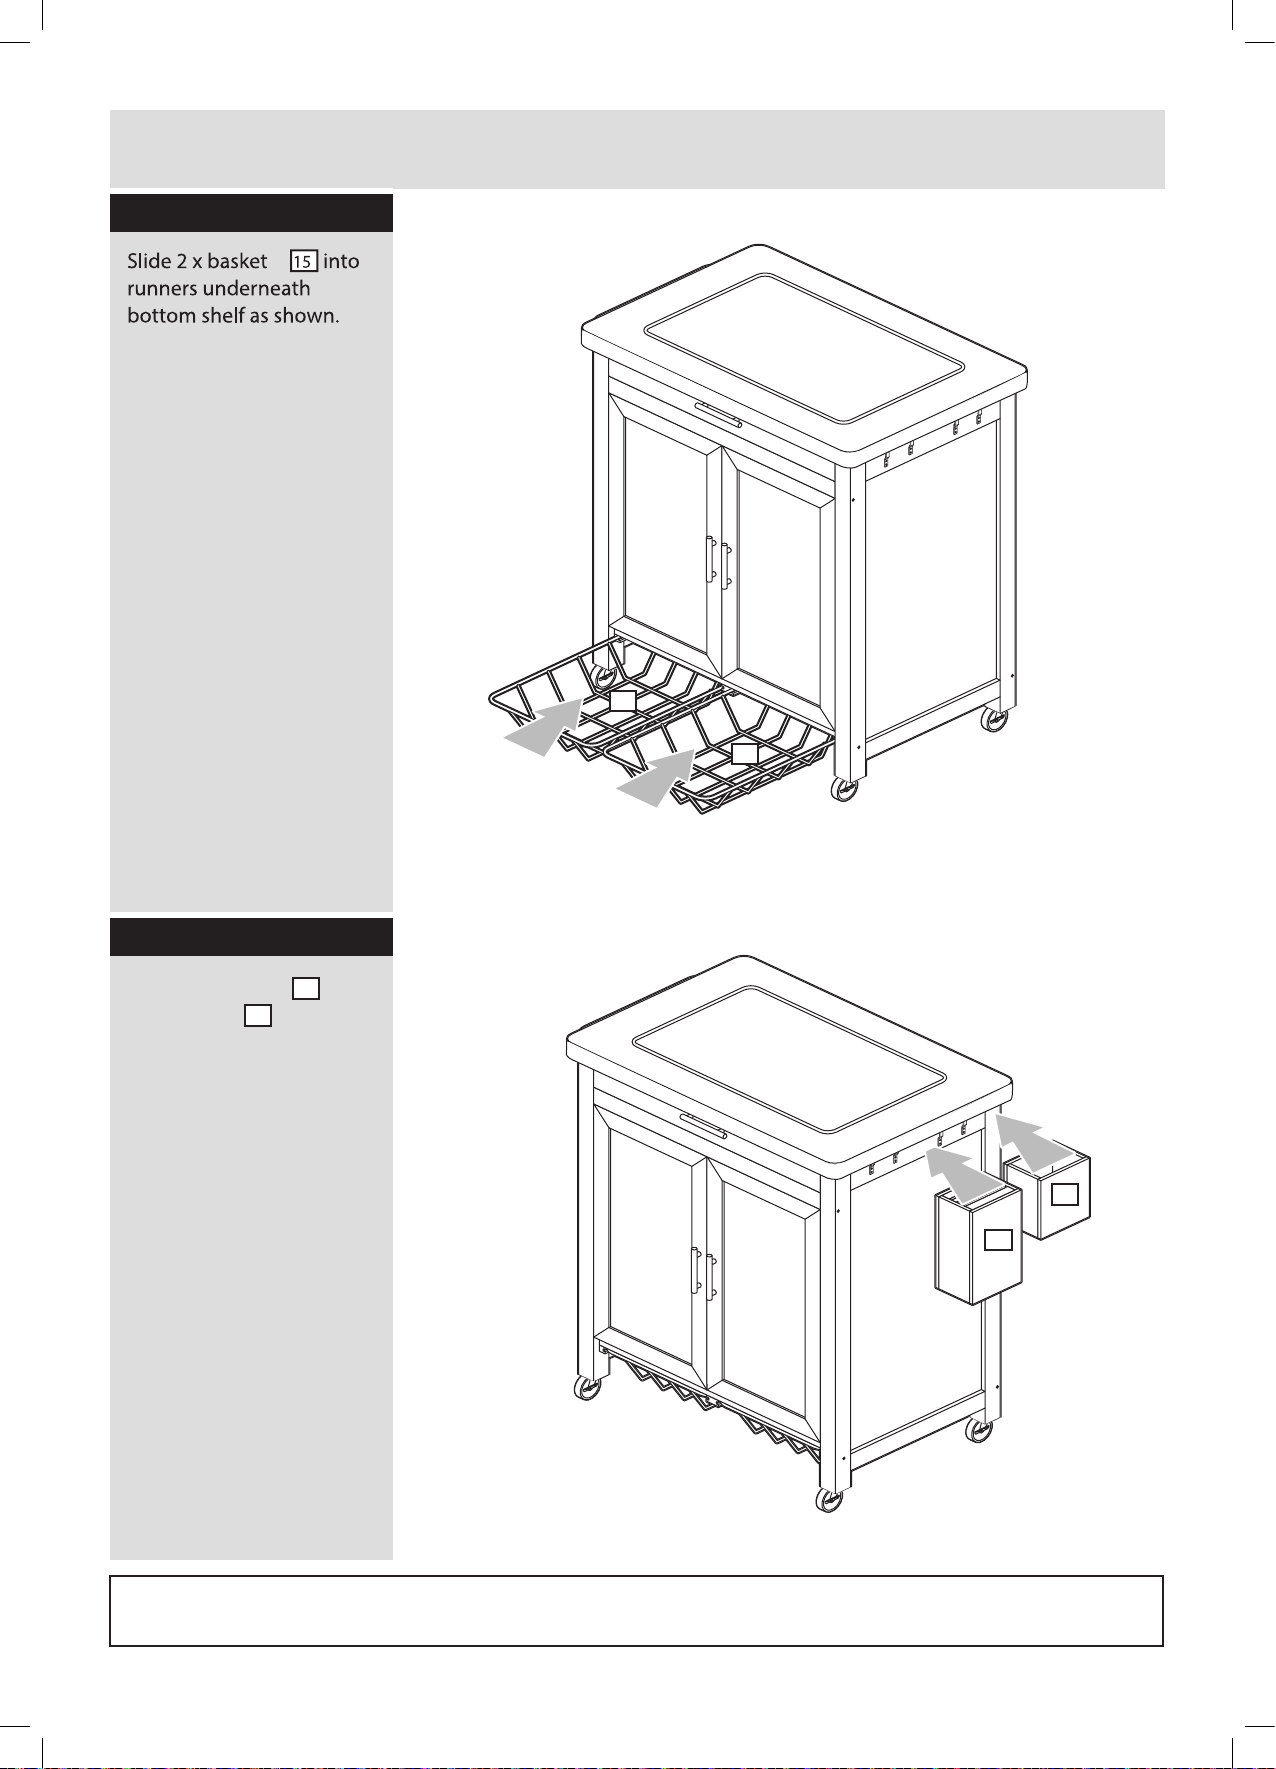
Step 13
15
Step 14
Hang knife block
storage box
hooks as shown
Assembly complete.
14
onto
13
15
and
14
13
If you need help or have damaged or missing parts, call the Customer Helpline: 03456 400 800
Home Retail G roup, 489-499 Avebury Bouleva rd, Saxon Gate West, Central Milton Keynes, Bucks, MK9 2NW
8
 Loading...