

Page 1
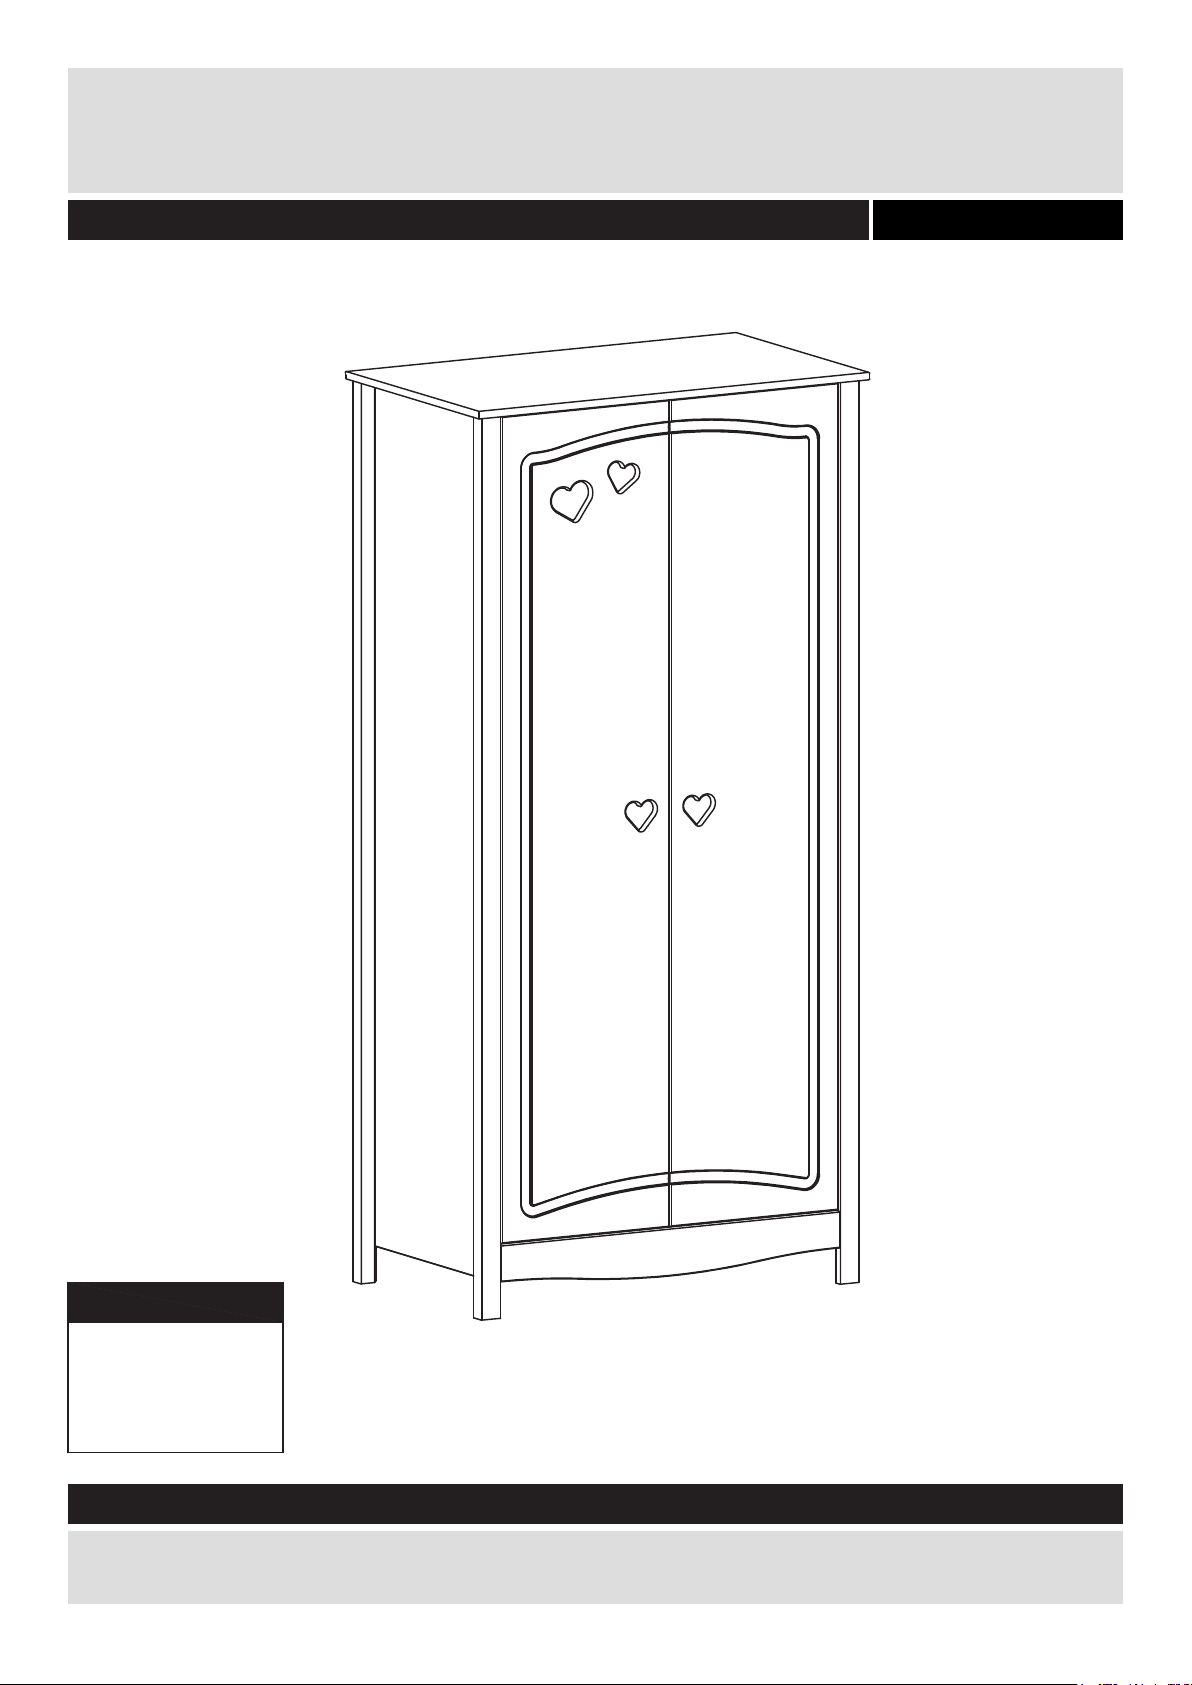
Mia 2 Door Wardrobe
Assembly Instructions - Please keep for future reference
White 2463834
Dimensions
:
Width
Depth
Height
88.5 cm
:
52.3 cm
:
181.2 cm
Assembly Instructions - Please keep for future reference
If you need help or have damaged or missing parts, call the Argos Customer Helpline: 0845 640 30 30
350269
Issue 1 - 25-05-2014
Page 2
Safety and Care Advice
!
Important - Please read these instructions fully before starting assembly
• Check you have all the
components and tools listed on
pages 2 and 3.
• Remove all fittings from the
plastic bags and separate them
into their groups.
• Keep children and animals
away from the work area, small
parts could choke if swallowed.
• Make sure you have enough
space to layout the parts before
starting.
Care and maintenance
• Only clean using a damp cloth
and mild detergent, do no use
bleach or abrasive cleaners.
• Do not stand or put weight on
the product, this could cause
damage.
• Assemble the item as close to
its final position (in the same
room) as possible.
• Assemble on a soft level
surface to avoid damaging the
unit or your floor.
• Parts of the assembly will be
easier with 2 people.
• From time to time check that
there are no loose screws on
this unit.
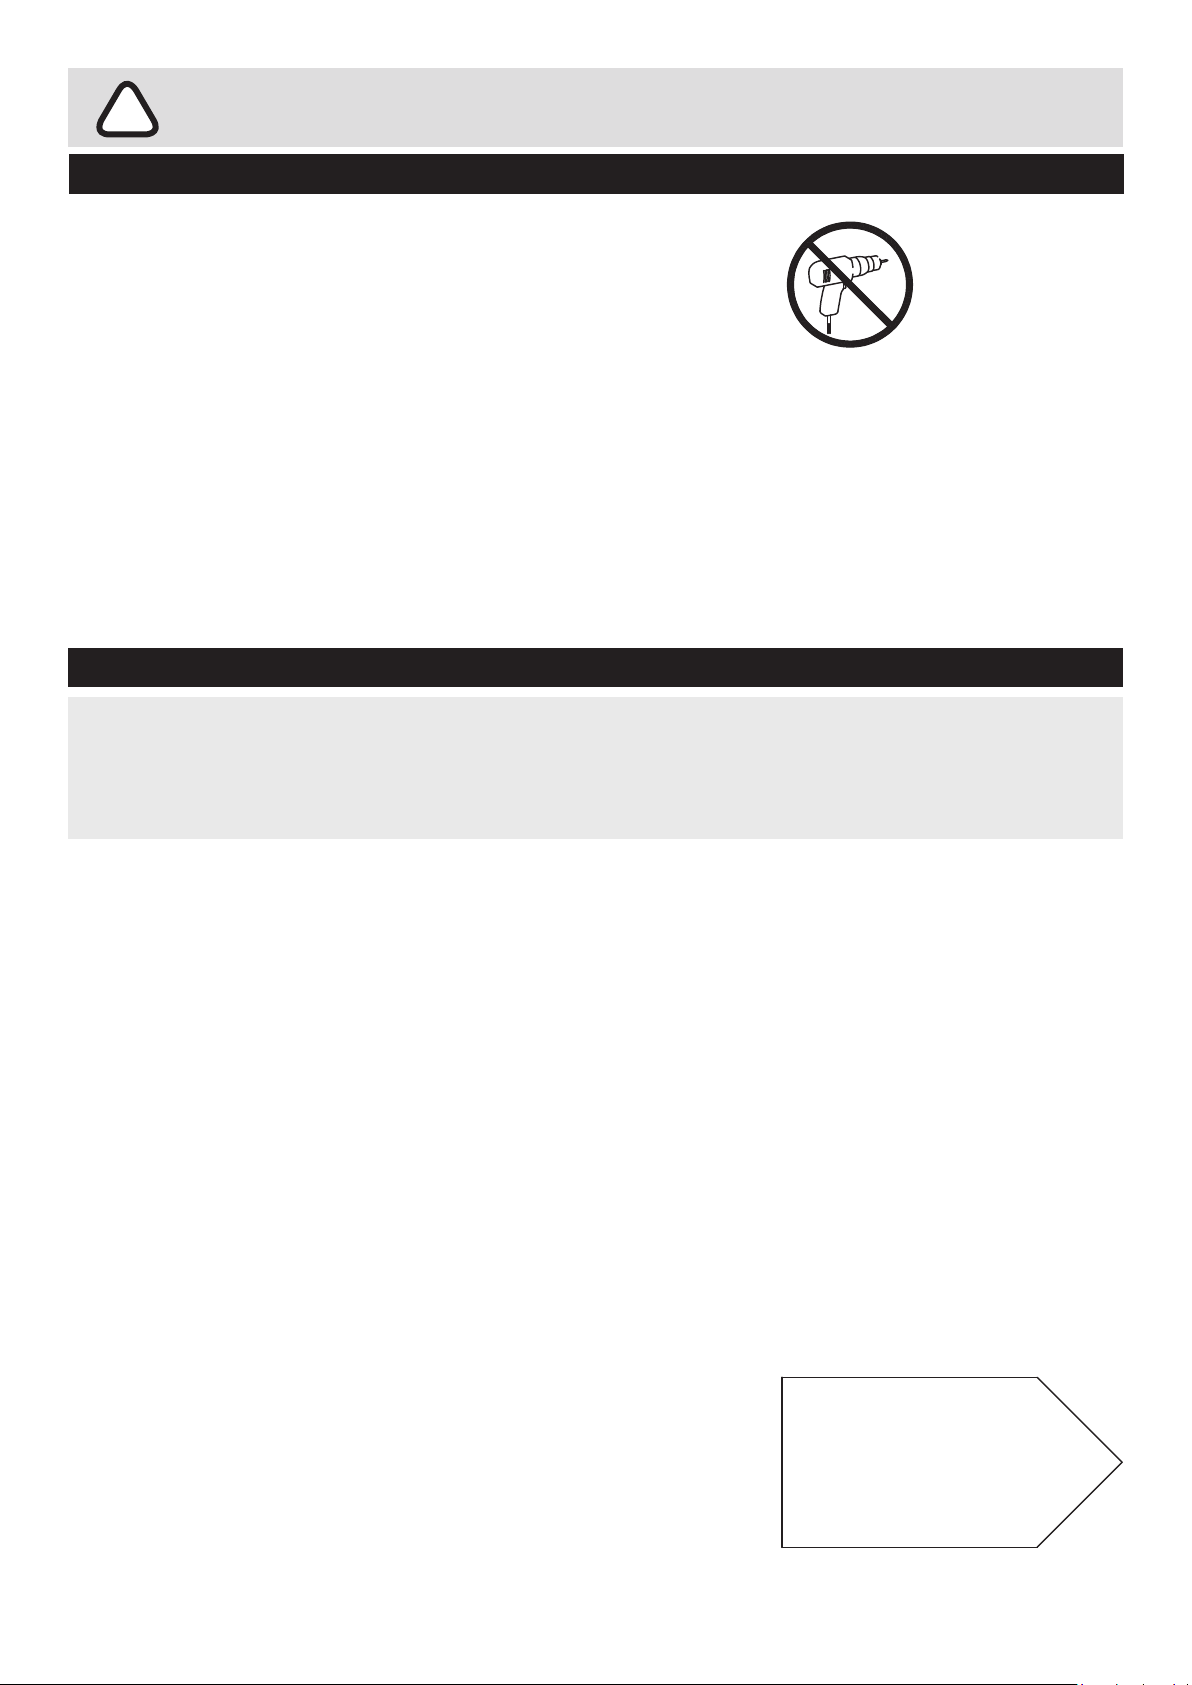
• We do not recommend the use
of power drill/drivers for
inserting screws, as this could
damage the unit. Only use hand
screwdrivers.
• Dispose of all packaging
carefully and responsibly
• This product should not be
discarded with household waste.
Take to your local authority
waste disposal centre.
.
Note: if required the next
page can be cut out and used
as reference throughout the
assembly. Keep this page
with these instructions for
future reference.
1
Page 3
If you have damaged or missing components, call
Components - Panels
the Argos Customer Helpline: 0845 640 30 30
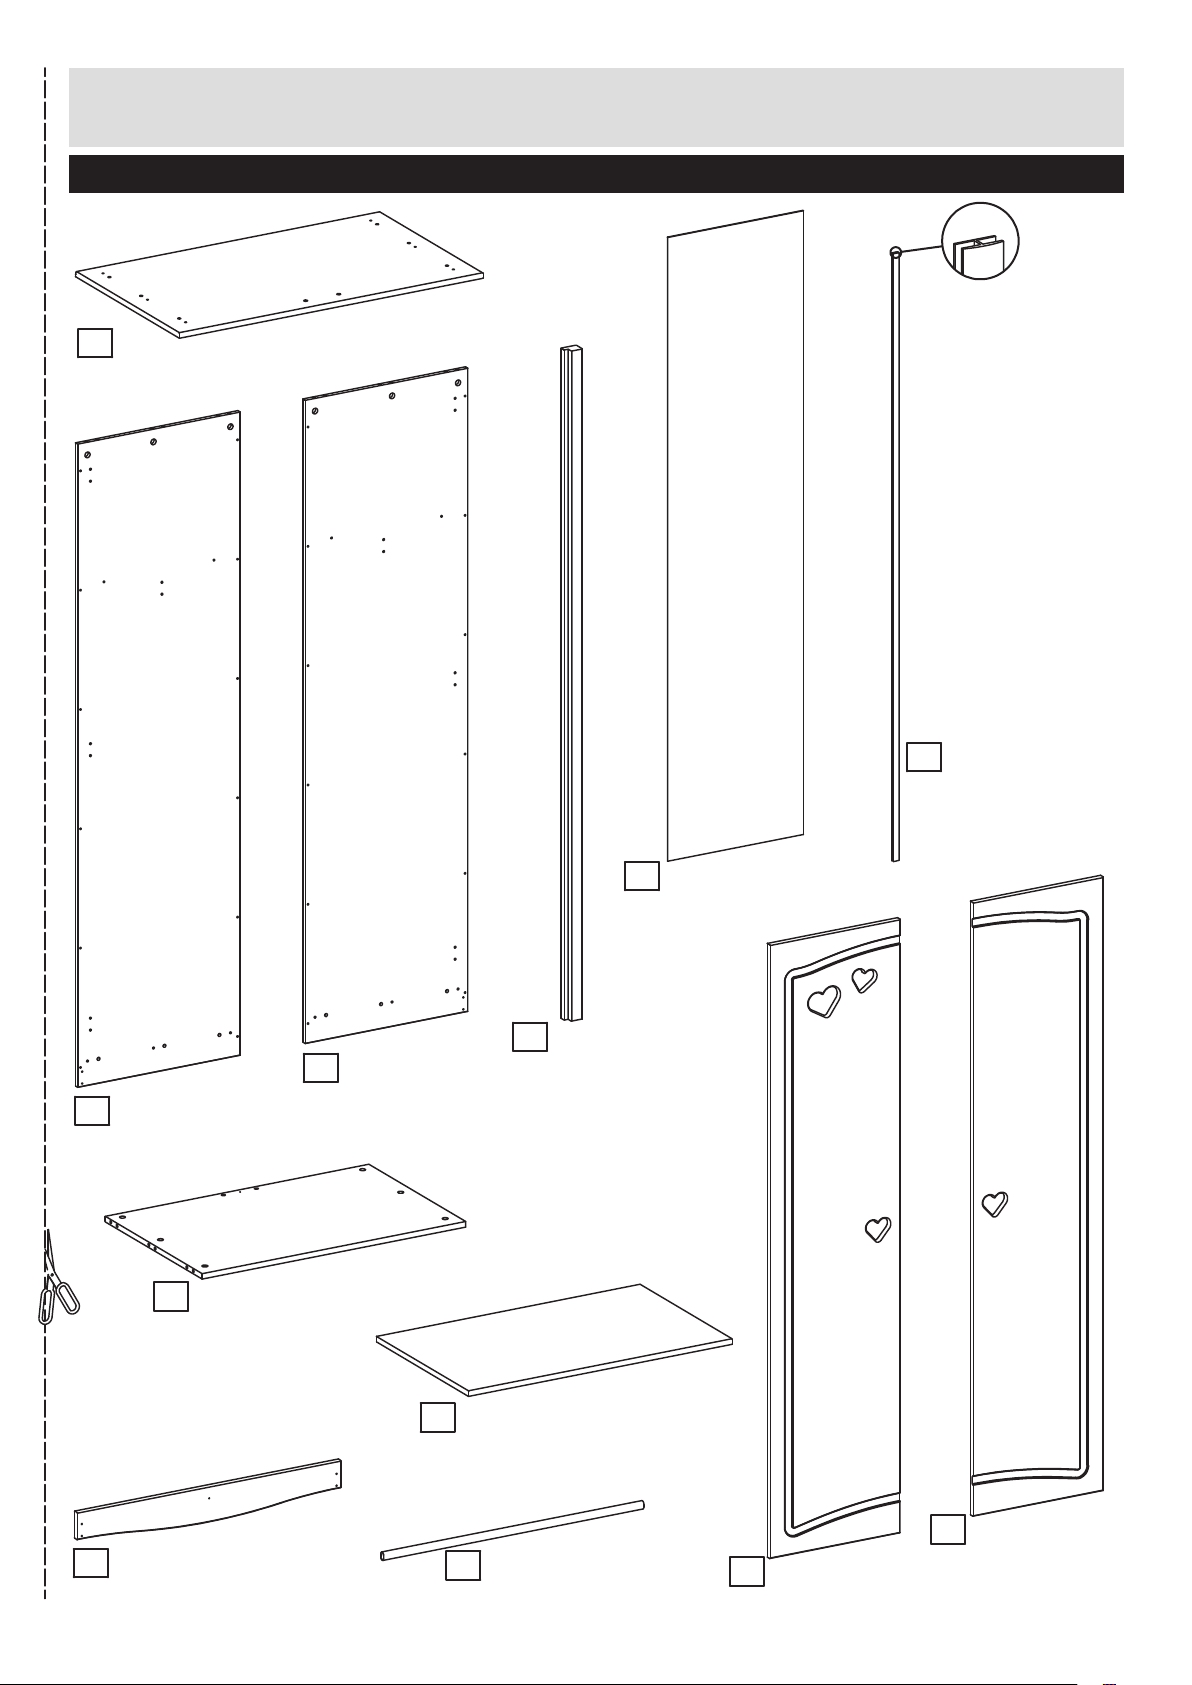
Please check you have all the panels listed below
Top
1
(88,5 cm x 52,3 cm)
2
Side, left
(172,5 cm x 47,3 cm)
7
Bottom
(76,7 cm x 48,9 cm)
3
Side, right
(172,5 cm x 47,3 cm)
4
Post
(179,7 cm x 4,4 cm)
4x
5
x
Back
(167,3 cm x 39,5 cm)
2
6
H-profile
(163 cm x 1,7 cm)
8
Front rail
(76,7 cm x 9,5 cm)
350269-03
9
Shelf
(76,7 cm x 46,5 cm)
10
Hanging rail
(75,7 cm x 2,2 cm)
11
Door, left
(164,6 cm x 37,9 cm)
Door, right
12
(164,6 cm x 37,9 cm)
2
Page 4
Components - Fittings
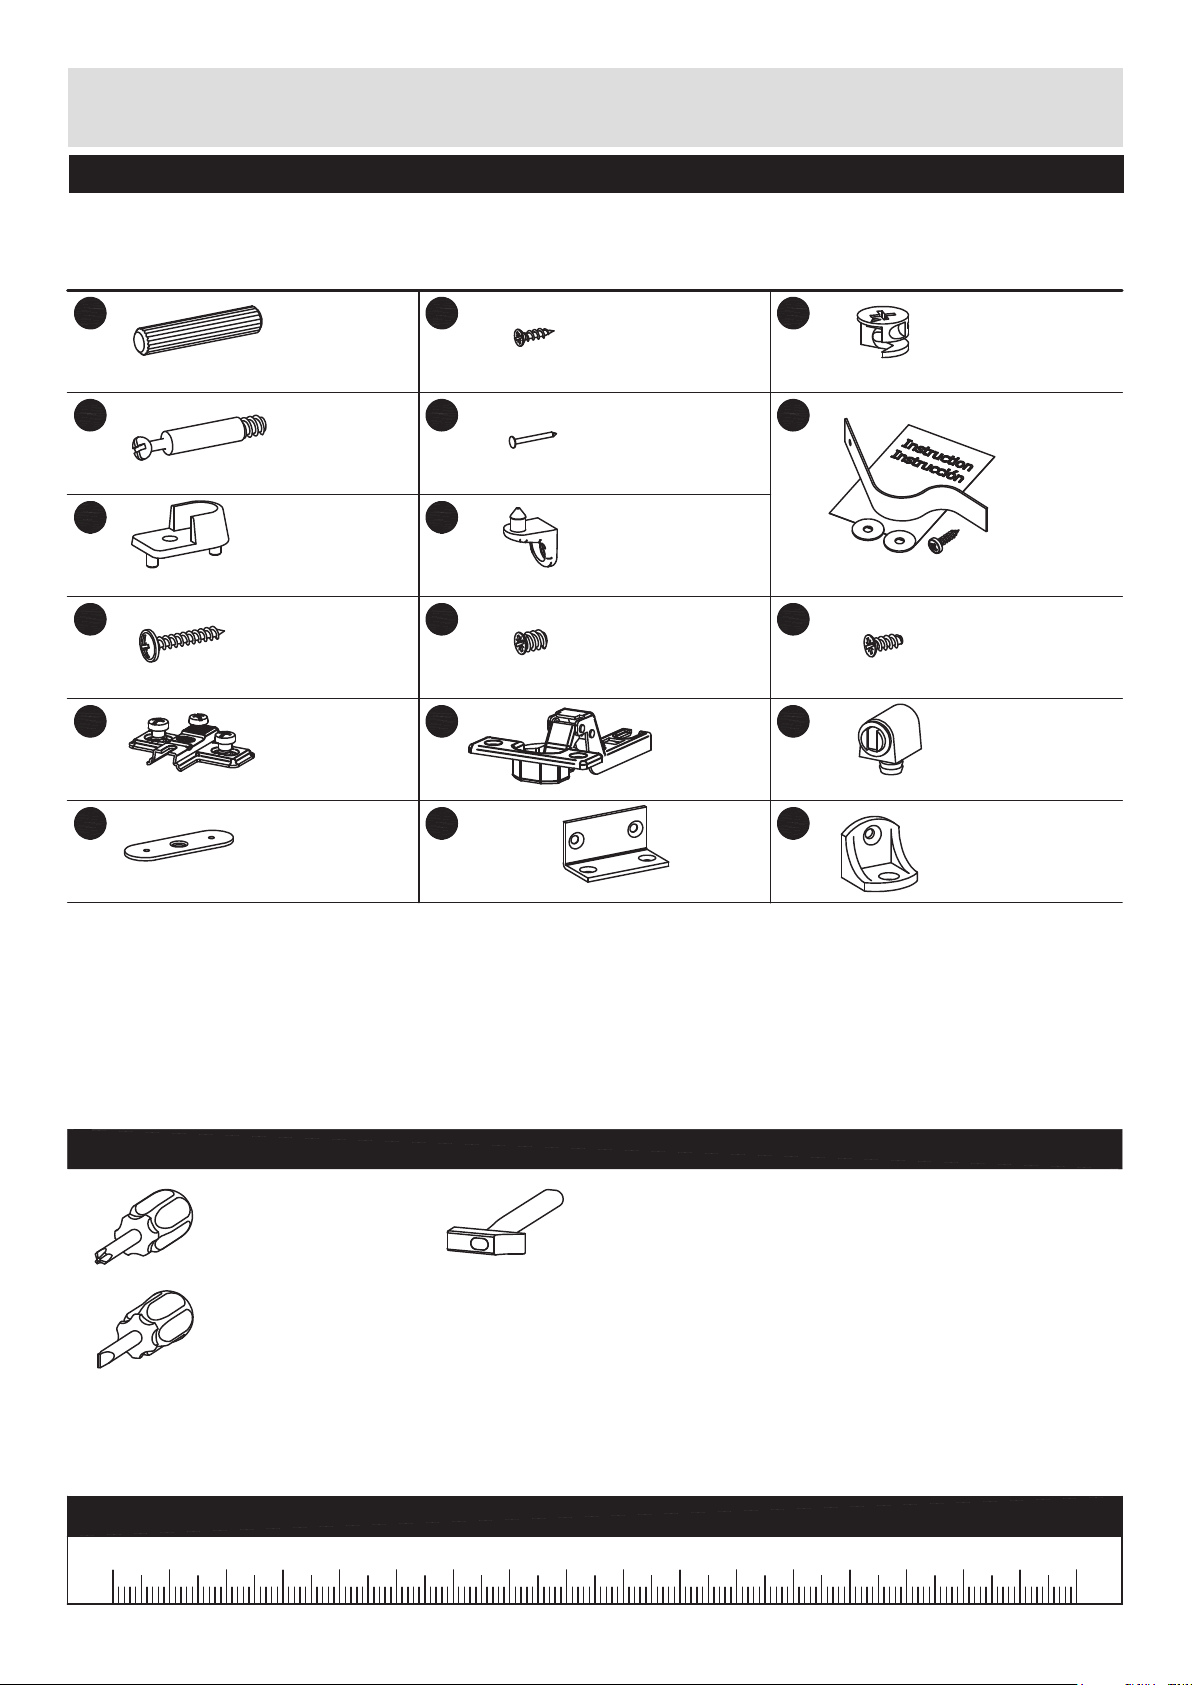
Please check you have all the panels listed below
Note: The quantities below are the correct amount to complete the assembly. In some cases more ttings
may be supplied than are required.
Aa
ø7.8 x 40mm Wooden dowel x
Cb
ø5 x 8, cc34mm Bolt x
Fl
Support for hanger rail - 15mm x
Jb
ø4 x 25mm Screw x
Mc
0mm Crossplate x
35 x 12 x 1mm Magnet catch xPd4
12
24
6
12
Bo
ø3 x 12mm Screw x
1.2 x 15mm Nail xDi50
Fr
2
Shelf support x
Kb
ø5.8 x 8mm Screw x
Mf
ø26mm Cup hinge x
Vl
44 x 23 x 23mm Angle x
20
4
4
6
2
Ca
ø15 x 10.5mm Cam x
Fh
Wall strap and instruction x 1
Ko
ø4,2 x 9,5mm Screw x
Magnet, adjustable x Pc4
Vn
Angle 23 x 23 x 24mm x
12
8
1
Tools required
Phillips screwdriver
(Medium & large)
Flatblade screwdriver
(Medium)
Hammer
Ruler - Use this ruler to help correctly identify the screws
3
17060 16040 90 15013070 120100 14011050 803020100
350269-04
Page 5
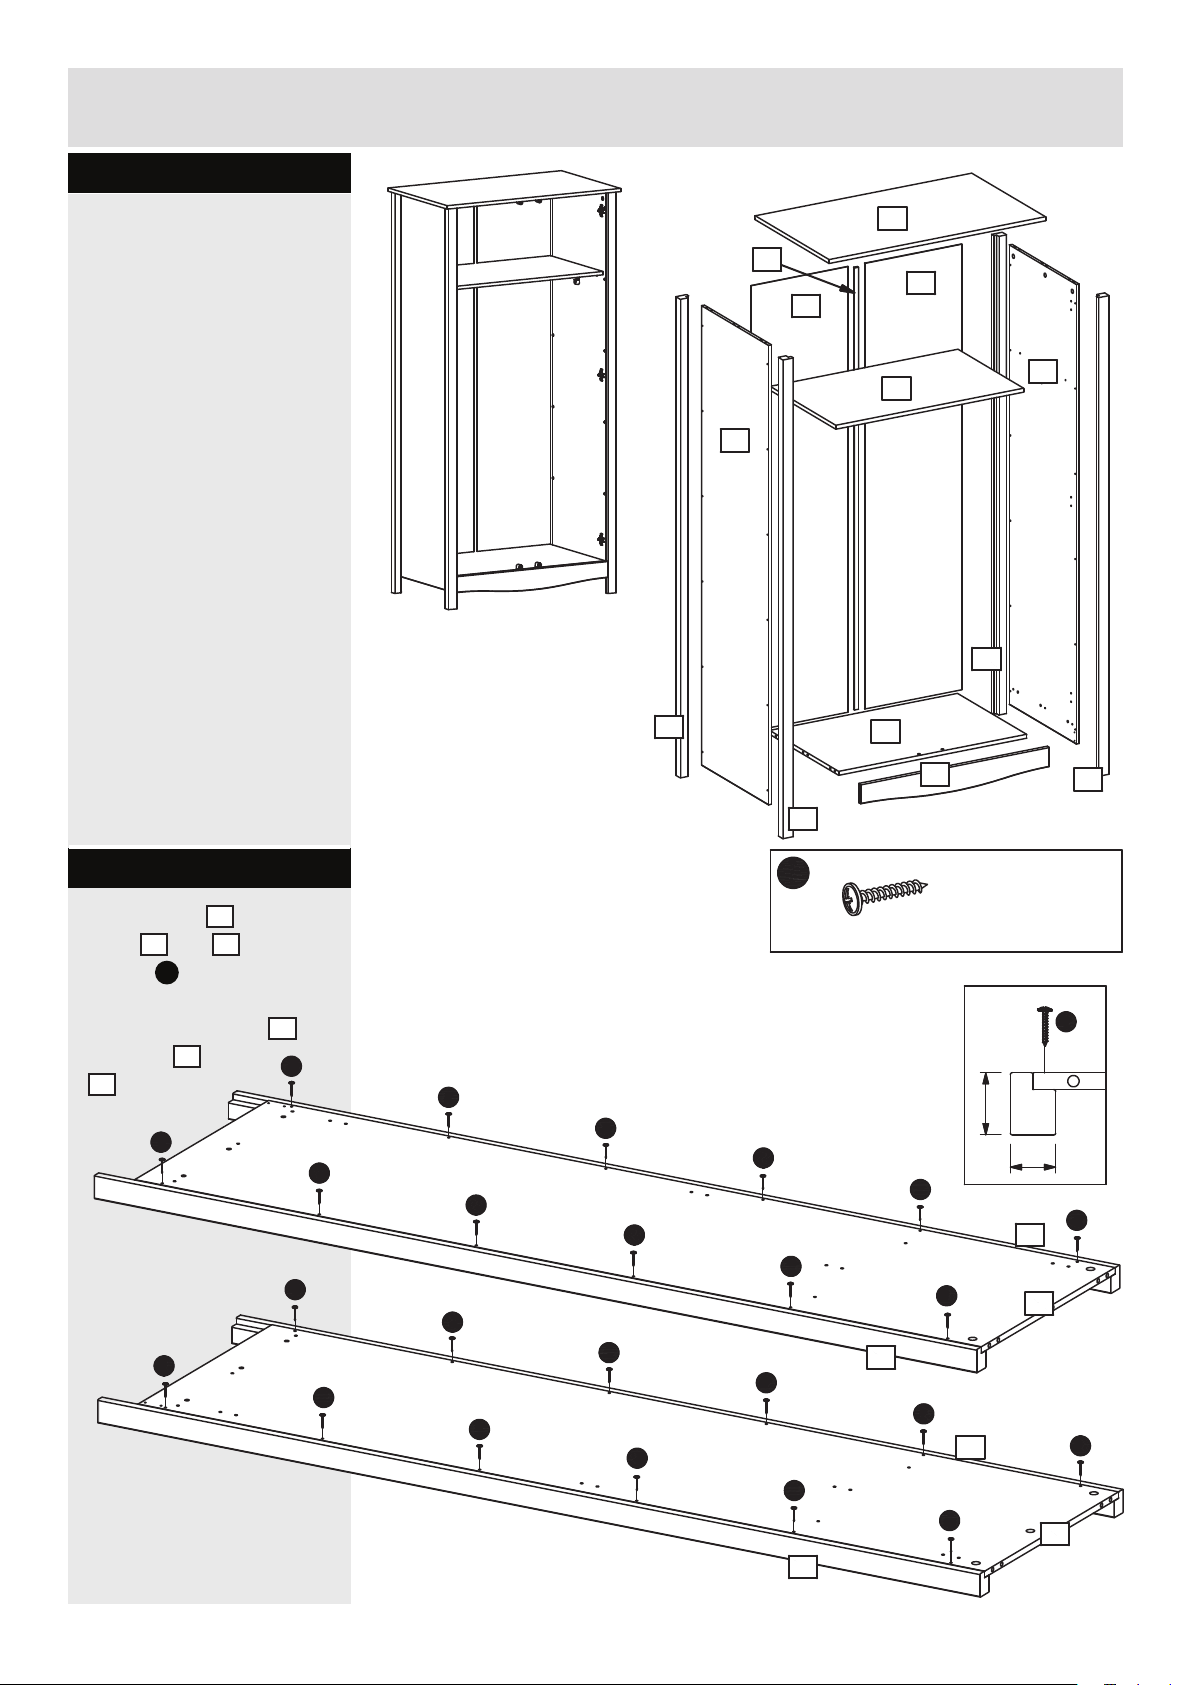
Assembly Instructions
Step 1
Assembly of the
wardrobe.
1
6
5
5
3
9
2
4
4
7
8
4
Step 1.1
Fix the posts 4 onto the
2
sides
screws
indicated.
The top of the posts
the sides
3
ush.
and 3 using
Jb
into the holes
2
must be
Jb
Jb
and
4
Jb
Jb
and
Jb
Jb
Jb
Jb
Jb
Jb
Jb
Jb
Jb
Jb
4
Jb
ø4 x 25mm Screw x
Jb
Jb
4
Jb
Jb
4
Jb
Jb
Jb
Jb
24
Jb
4
4
32
Jb
4
2
4
Jb
3
350263-05
4
Page 6
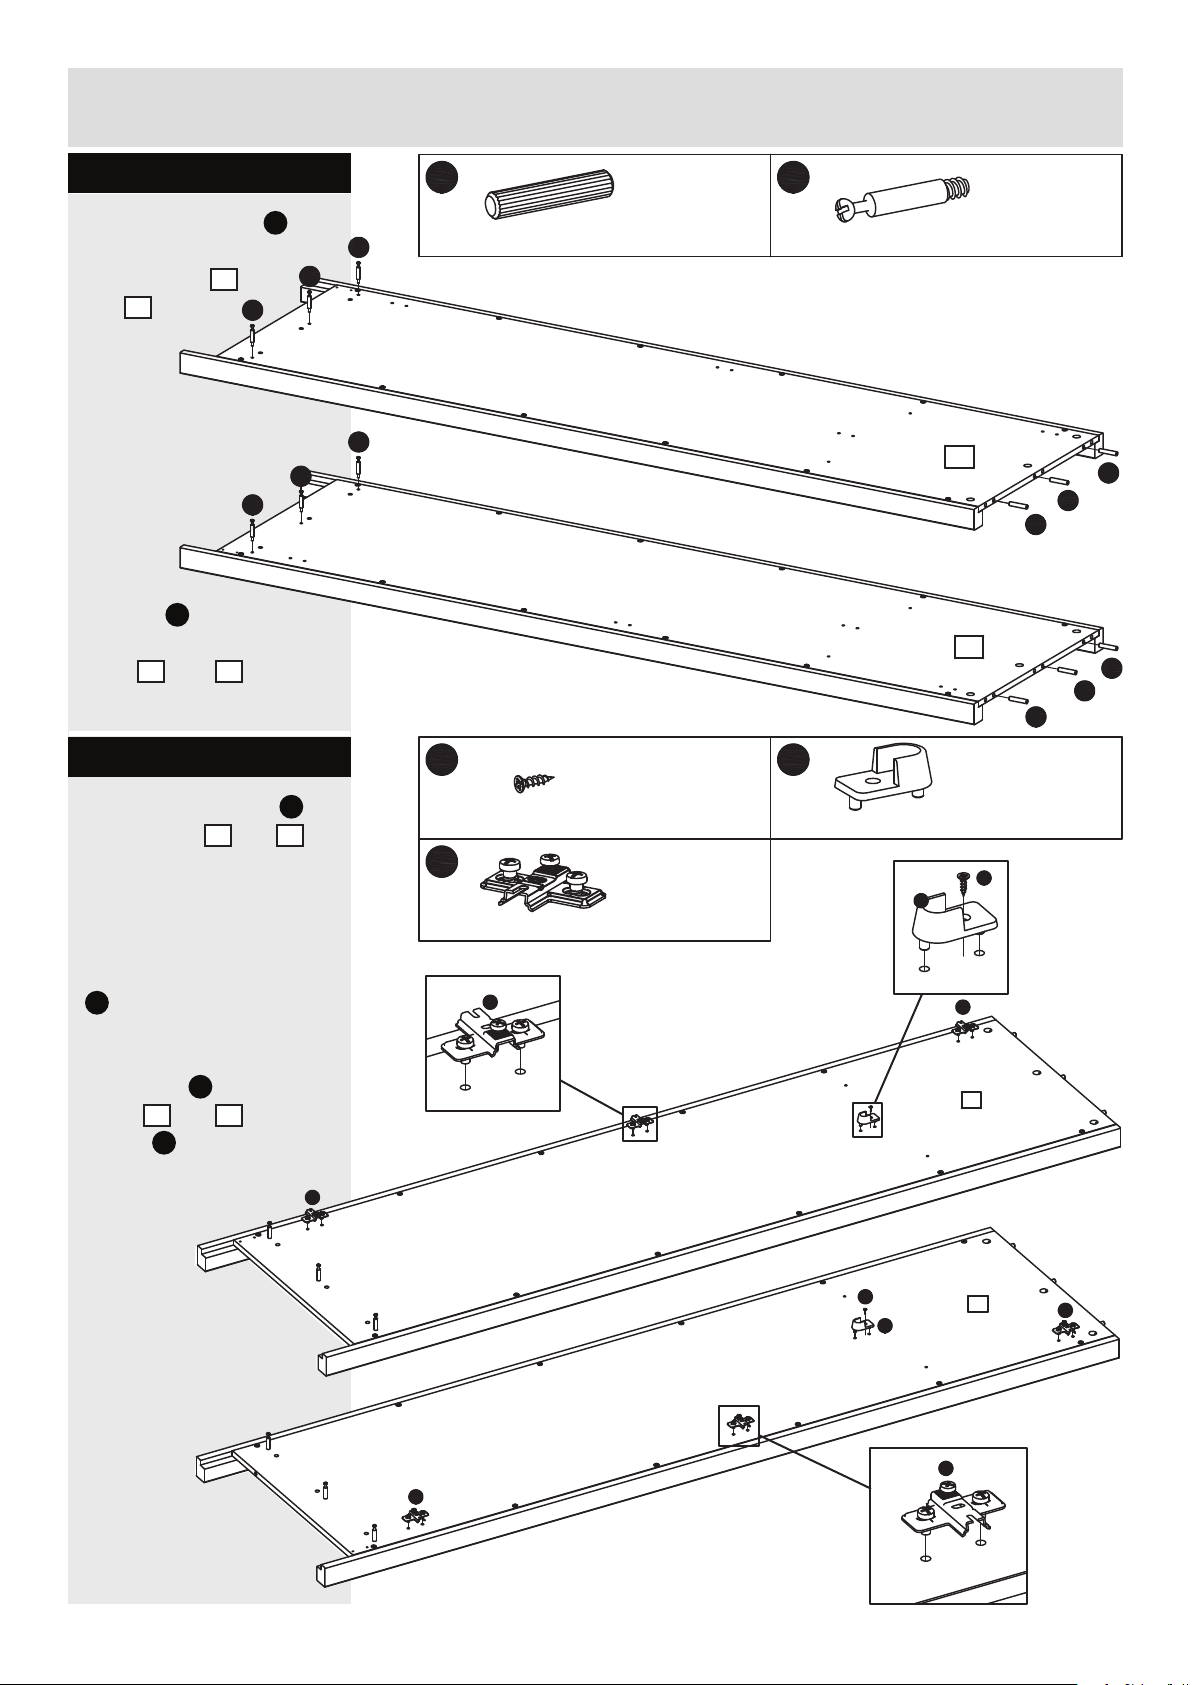
Assembly Instructions
Step 1.2
Knock the dowels Aa into
the holes indicated
2
on the sides
3
and
Use
.
a small
hammer.
Screw
Cb
the bolts
into
the holes indicated on the
2
sides
and 3.
Cb
Cb
Cb
Cb
Cb
Cb
Aa
ø7.8 x 40mm Wooden dowel x
Cb
6
ø5 x 8, cc34mm Bolt x
2
6
Aa
Aa
Aa
3
Aa
Aa
Aa
Step 1.3
Fix the Crossplates Mc
to the sides
2
using the pre-mounted
screws.
Note the details.
Position the Crossplates
Mc
exactly as shown.
Fix the supports for
Fl
hangerrails
onto the
sides 2 and 3 using
Bo
screws
.
and
3
Mc
Bo
ø3 x 12mm Screw x
Mc
0mm Crossplate x
Mc
Fl
2
Support for hanger rail - 15mm x
Bo
Fl
2
6
Mc
2
Bo
Fl
3
Mc
Mc
Mc
5
350269-06
Page 7
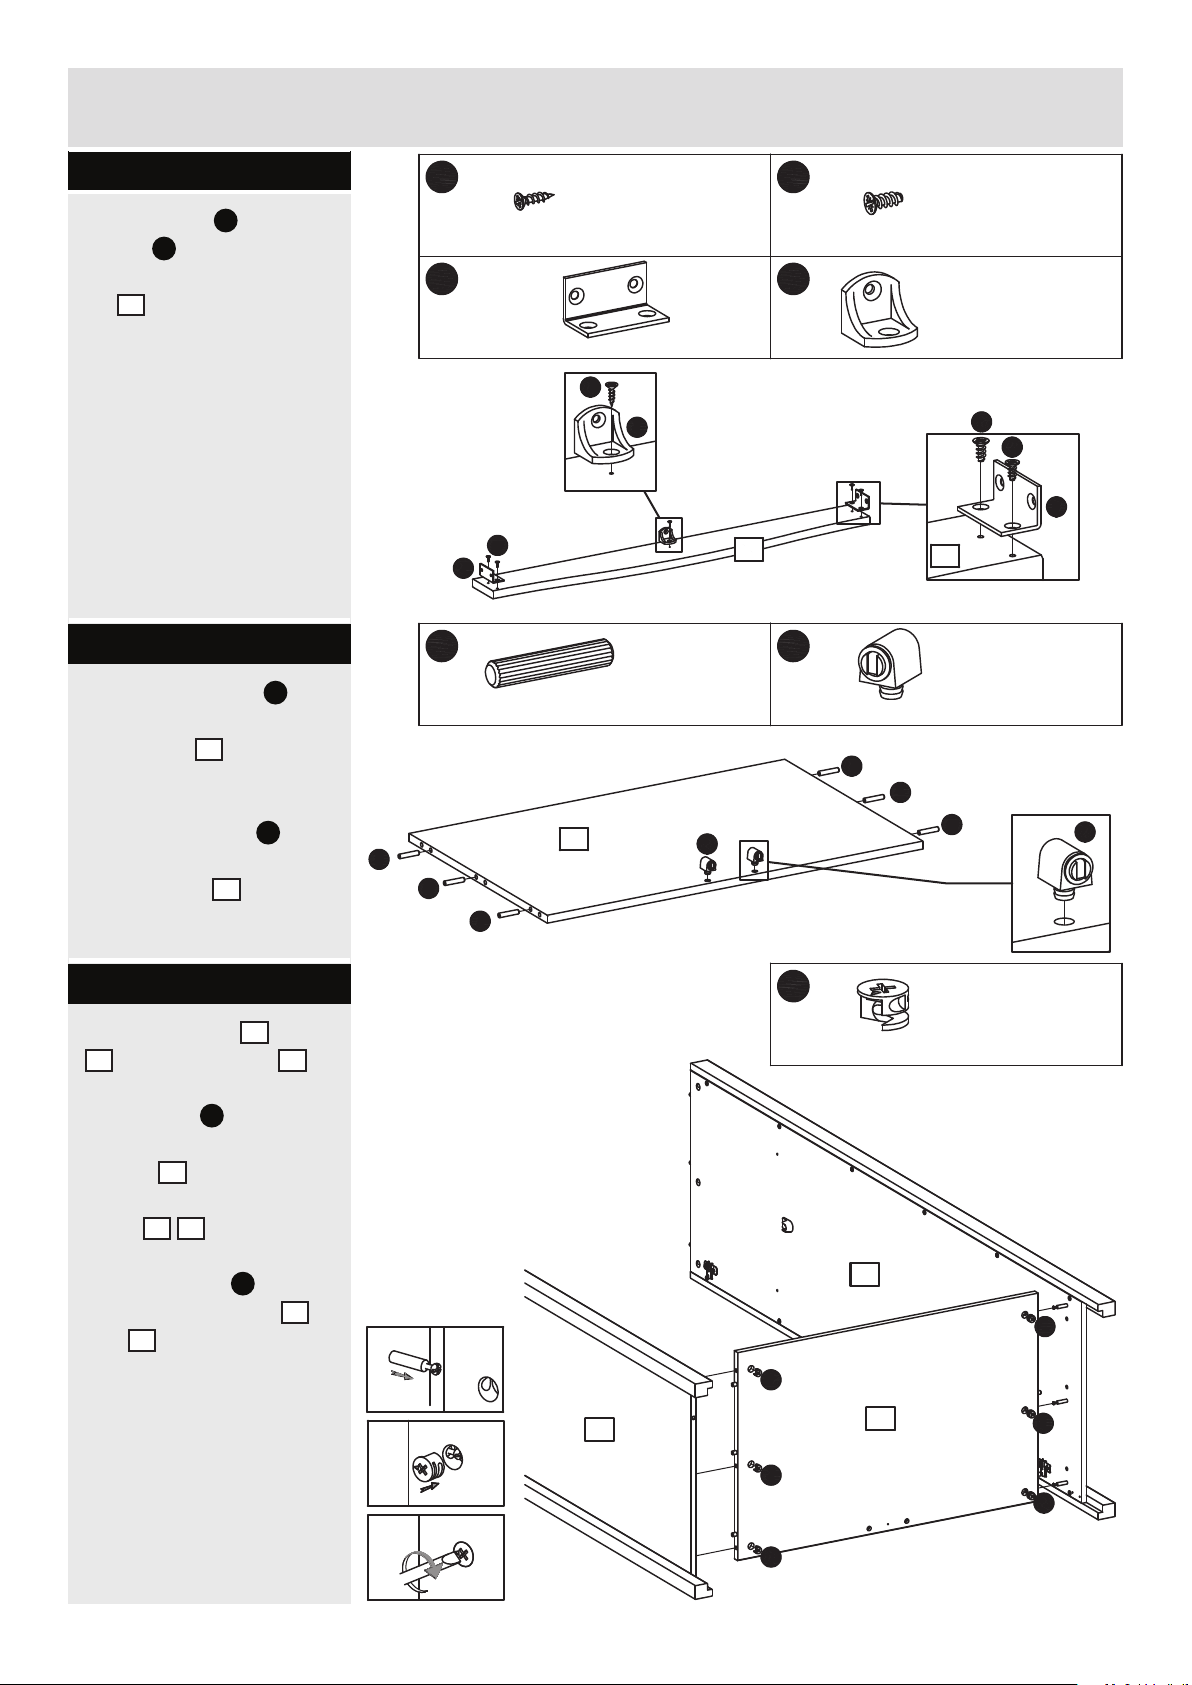
Assembly Instructions
Step 1.4
Fix the angles Vl using
Ko
screws
into the holes
indicated on the front
6
rail
.
Step 1.5
Knock the dowels Aa into
the holes indicated on
7
the bottom
small hammer.
Press the magnets
into the holes indicated
on the bottom
using a
Pc
7.
Bo
ø3 x 12mm Screw x
Vl
44 x 23 x 23mm Angle x
Ko
Vl
Aa
ø7.8 x 40mm Wooden dowel x
7
Aa
Aa
Aa
Bo
Ko
1
ø4,2 x 9,5mm Screw x
4
Vn
2
Vn
Angle 23 x 23 x 24mm x
Ko
8
8
Ko
1
Vl
Pc
6
Pc
Magnet, adjustable x
Aa
Aa
Aa
2
Pc
Step 1.6
Place the sides 2 and
3
onto the bottom 7.
7
2/3
.
Ca
into the
. Arrows
.
Ca
to the
2
Push cams
holes indicated on the
bottom
pointing towards the
sides
Turn the cams
right to x the sides
3
and
Ca
ø15 x 10.5mm Cam x
6
2
Ca
3
Ca
Ca
7
Ca
Ca
Ca
350269-07
6
Page 8
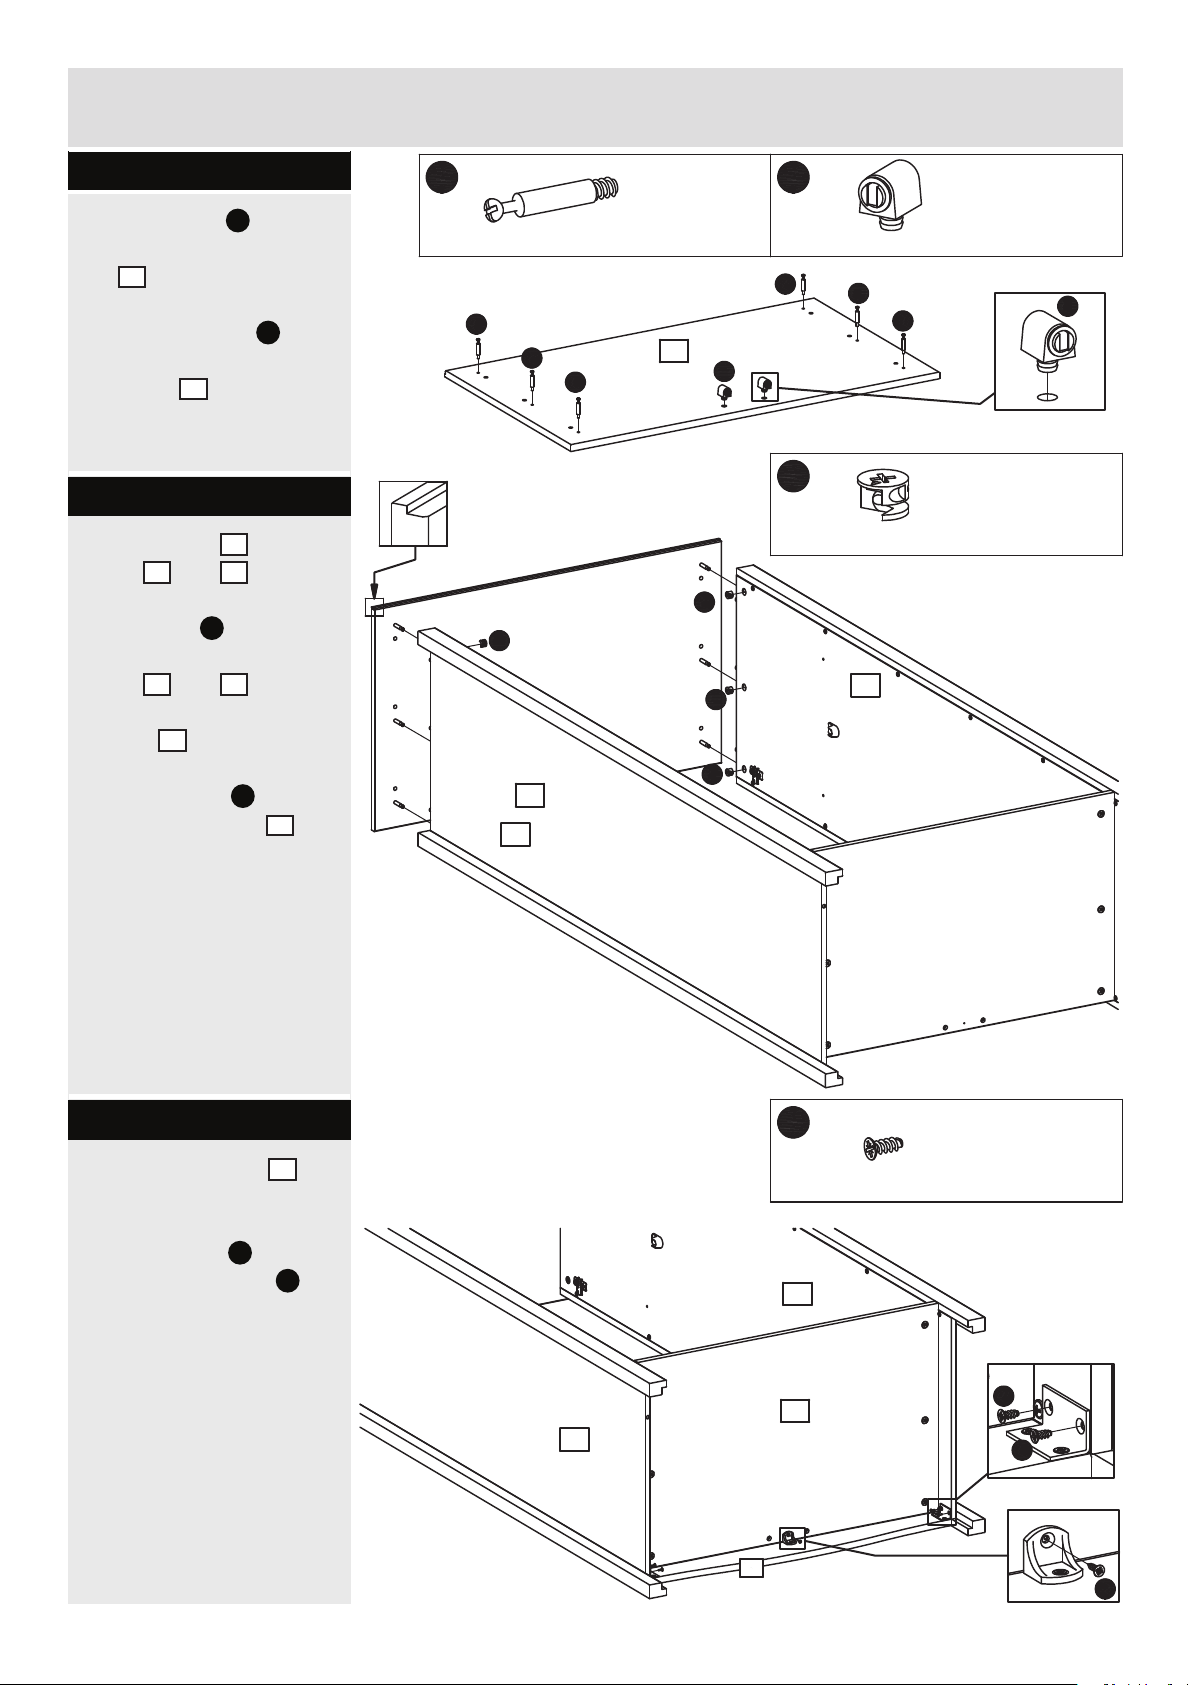
Assembly Instructions
Step 1.7
Screw the bolts Cb into
the holes indicated on the
1
top
Press the magnets
.
Pc
into the holes indicated
on the top
1.
Step 1.8
Place the top 1 onto the
2
sides
Push cams
holes indicated on the
sides
Arrows pointing towards
the top
Turn the cams
right to x the top
and 3.
2
and 3.
1
.
Ca
into the
Ca
to the
.
1
Cb
ø5 x 8, cc34mm Bolt x
Cb
Cb
Cb
Ca
1
3
6
1
Magnet, adjustable x Pc2
Cb
Pc
Cb
Cb
Pc
Ca
6
Ca
Ca
Ca
ø15 x 10.5mm Cam x
2
Step 1.9
Place the front rail
as shown.
Fix the angles
sides using screws
See detail.
7
Vl
to the
8
Ko
Ko
ø4,2 x 9,5mm Screw x
.
2
4
Ko
7
3
Ko
8
Bo
350269-08
Page 9
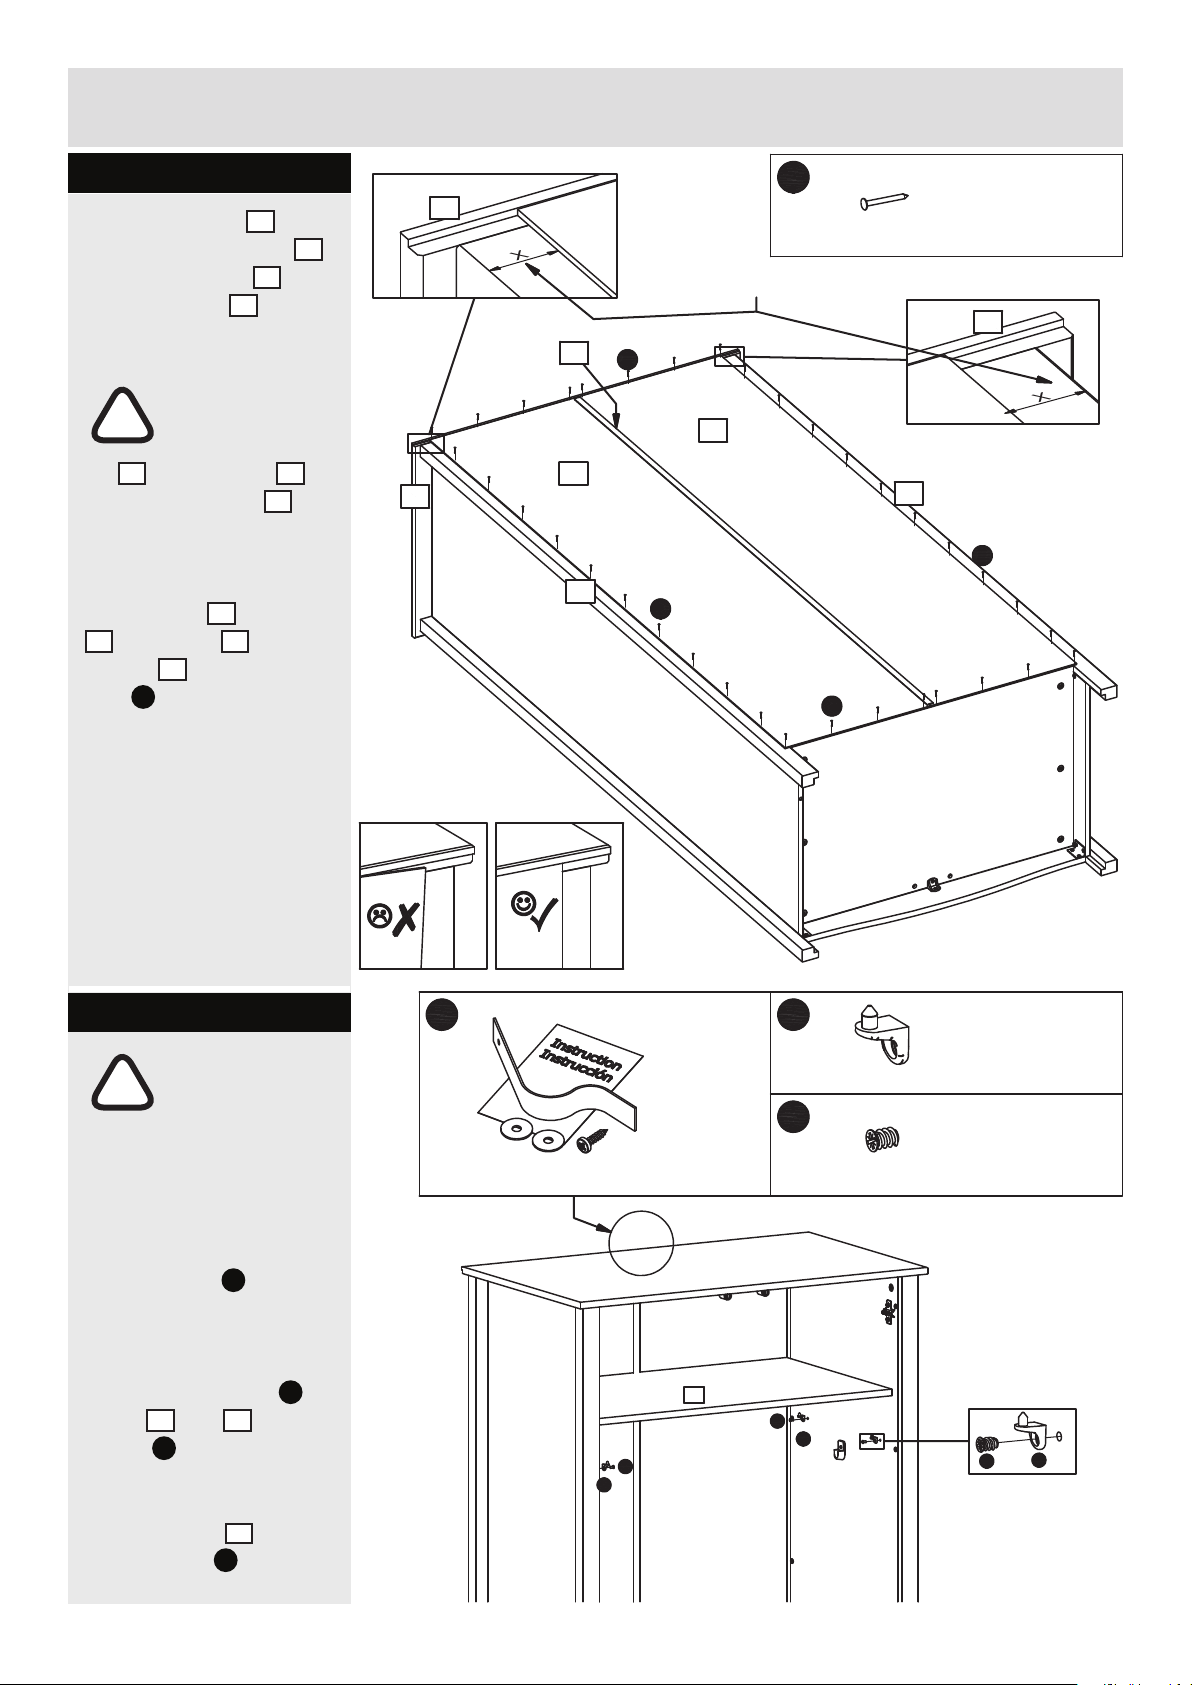
Assembly Instructions
Step 1.10
Place the backs 5 into
the rabbet on the top
1
into the H-prole 6 and
4
onto the posts
.
Important!
Make sure the
!
angle between the
1
top
90° when the backs
and the posts 4 is
5
is
attached.
1
6
5
1
Distribute equally !
Di
5
1.2 x 15mm Nail xDi36
1
4
Di
5
using
to
Fix the backs
1
, the posts 4 and the
bottom
nails
7
Di
.
Use a small hammer.
Step 1.11
Important!
The wardrobe is
!
heavy. Lift with
care.
the top
Fh
4
Di
Di
Fr
Shelf support x
4
Kb
Its recommended that the
wardrobe is xed to the wall.
Fh
Use the ttings
. Follow
the instructions included
with the ttings.
Fix the shelf supports
2 and 3
to the
Kb
screws
into the holes
Fr
using
indicated.
Lower the shelf
shelf supports
350269-09
9
Fr
.
onto the
Wall strap and instruction x 1
Kb
Fr
9
ø5.8 x 8mm Screw x
Kb
Fr
4
Fr
Kb
8
Page 10
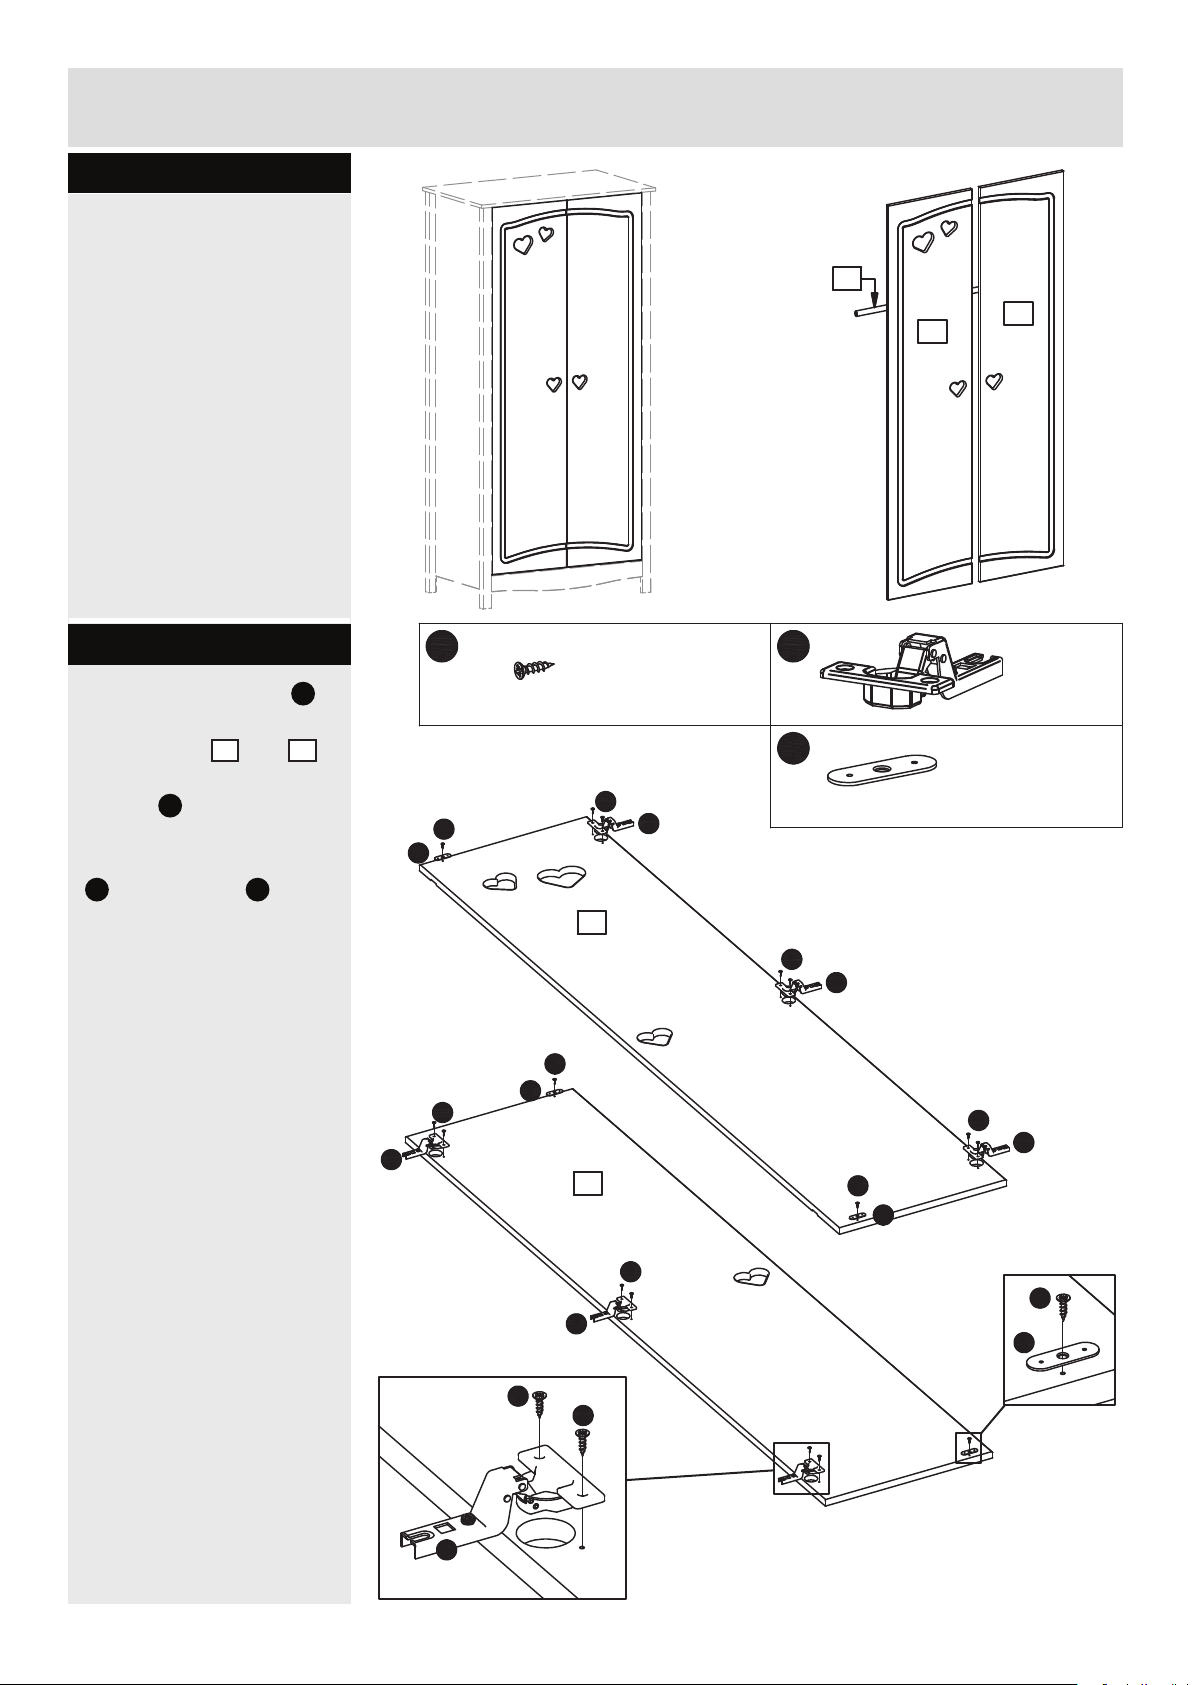
Assembly Instructions
Step 2
Assembly of the doors.
10
Step 2.1
Place the cup hinges Mf
into the holes indicated
on the doors
Fix the hinges using
screws
Fix the magnet catches
Pd
using screws
the holes indicated.
11 and 12.
Bo.
Bo into
Bo
ø3 x 12mm Screw x
Bo
Pd
11
Bo
16
Mf
11
12
Mf
ø26mm Cup hinge x
Pd
35 x 12 x 1mm Magnet catch x
6
4
Mf
Bo
Bo
Pd
Bo
Mf
12
Bo
Bo
Bo
Mf
Bo
Mf
Bo
Pd
Bo
Pd
Mf
9
350269-10
Page 11
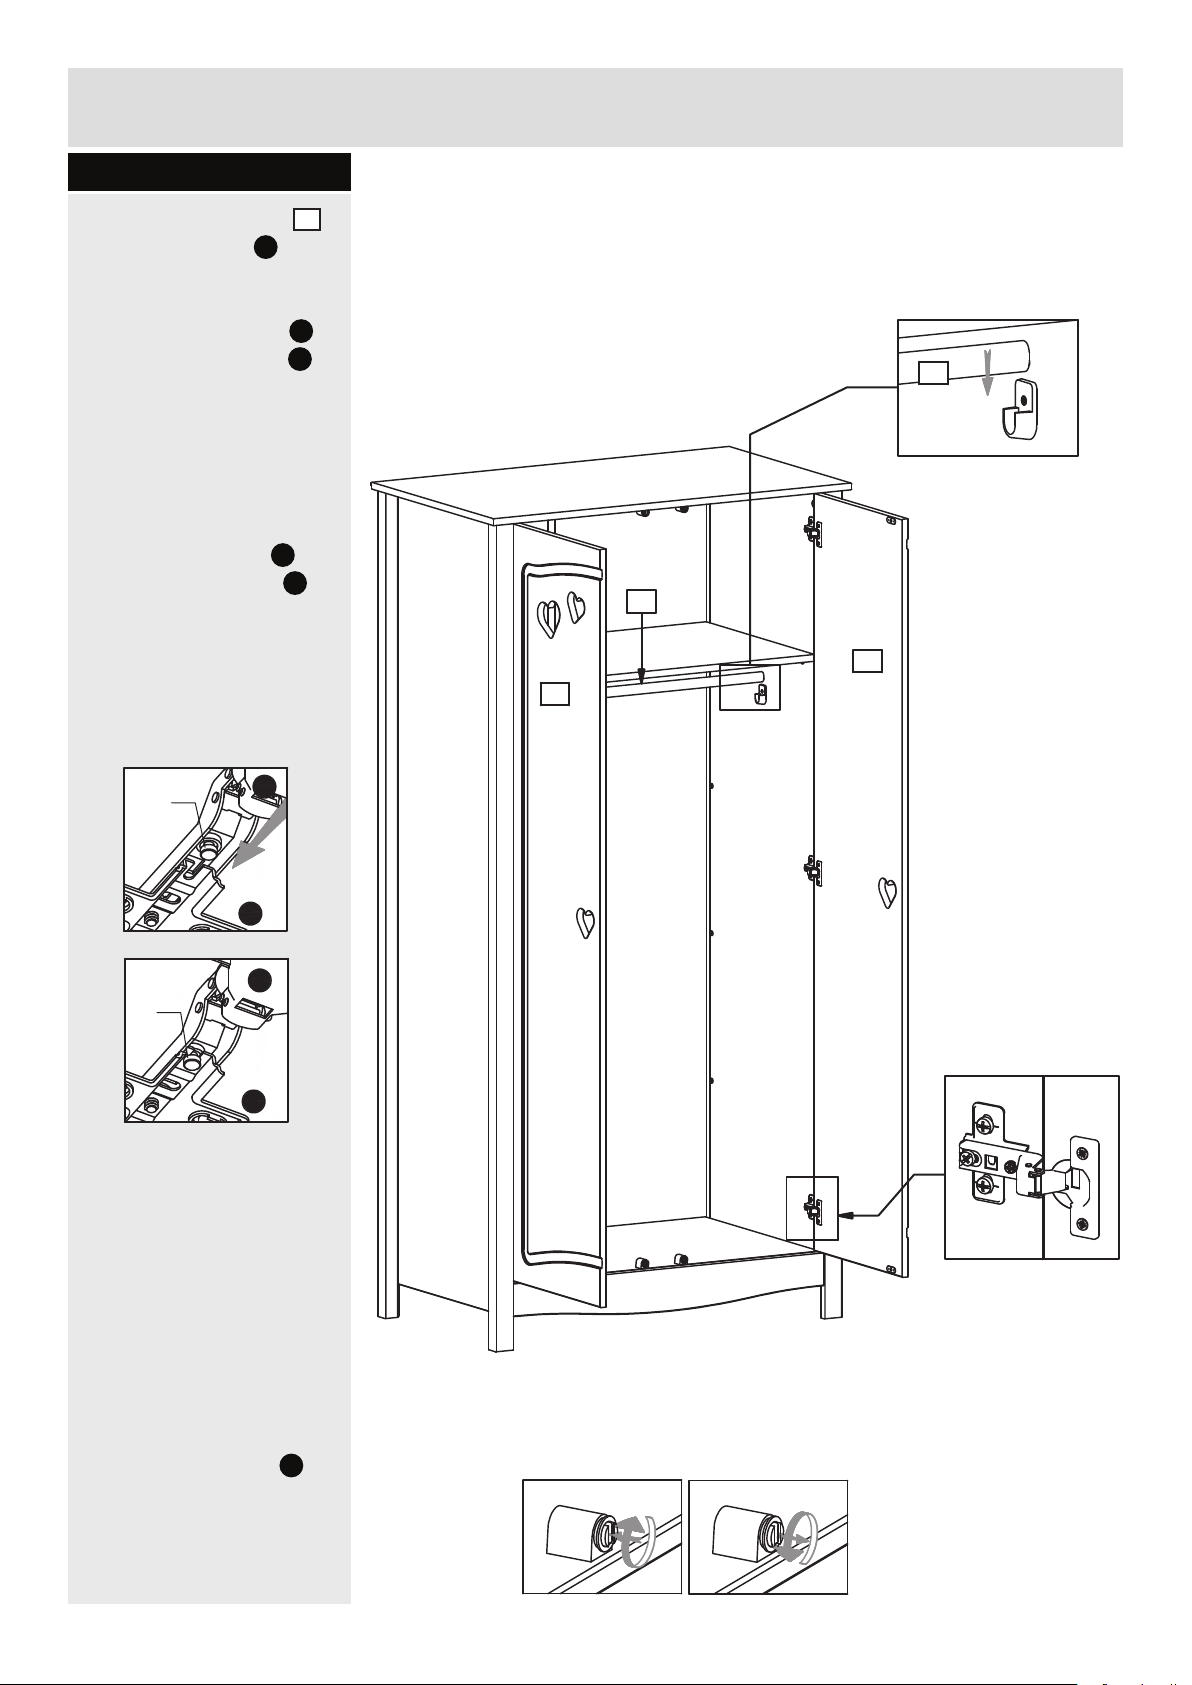
Assembly Instructions
Step 2.2
Place the hanger rail 10
Fl
into the supports
.
Slide the cup hinges
onto the crossplates Mc.
Fix the hinges using the
premounted screw in the
crossplates.
See details below on how
to t the cup hinge
onto the cross plate Mc.
Mf
Mf
Mf
!
10
10
12
11
Mc
Mf
!
Mc
Adjust the magnets
Pc
.
Pc
Pc
350269-11
10
Page 12
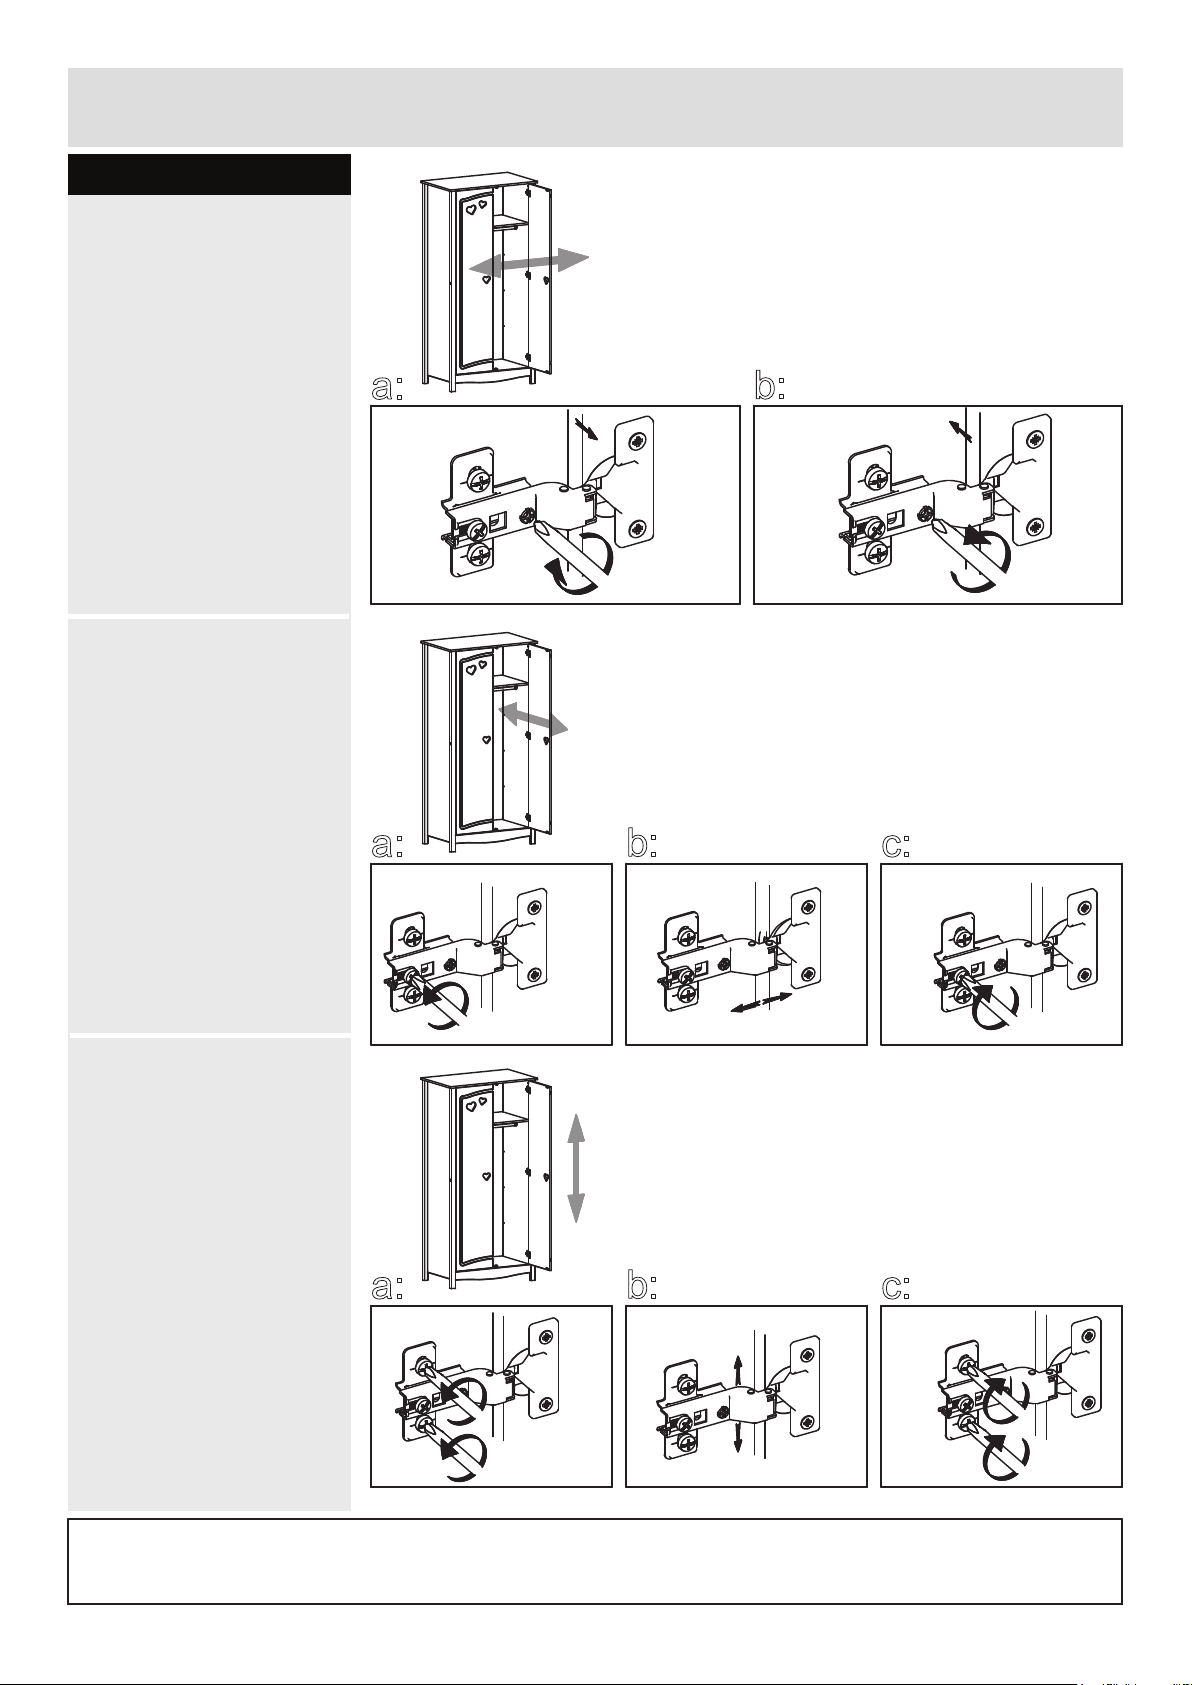
Assembly Instructions
Step 2.3
Adjusting the doors
left/right.
a:
To adjust the door
towards the left hand
side - turn the adjusting
screw to the right.
b:
To adjust the door
towards the right hand
side - turn the adjusting
screw to the left.
Adjusting the doors
forwards/backwards.
a:
b:
a:
Loosen the xing screw.
b:
Push the cup hinges /
the door forwards OR
backwards to adjust.
c:
Tighten the xing screws
of ALL the crossplates.
Adjusting the doors
up/down.
a:
Loosen the two pre-mounted
screws of each crossplate,
BUT ONLY as much as it
will allow the cross plate to
move up and down.
b:
Push the the door up OR
down to adjust.
a:
a:
b:
b:
c:
c:
c:
Tighten the pre-mounted
screws of ALL the
crossplates.
If you need help or have damaged or missing parts, call the
Home Retail Group - 489-499 Avebury Boulevard - Saxon Gate West - Central Milton Keynes MK9 2NW
11
Argos Customer Helpline: 0845 640 30 30
350269-12
 Loading...