

Page 1
Issue 2 - 16/06/14
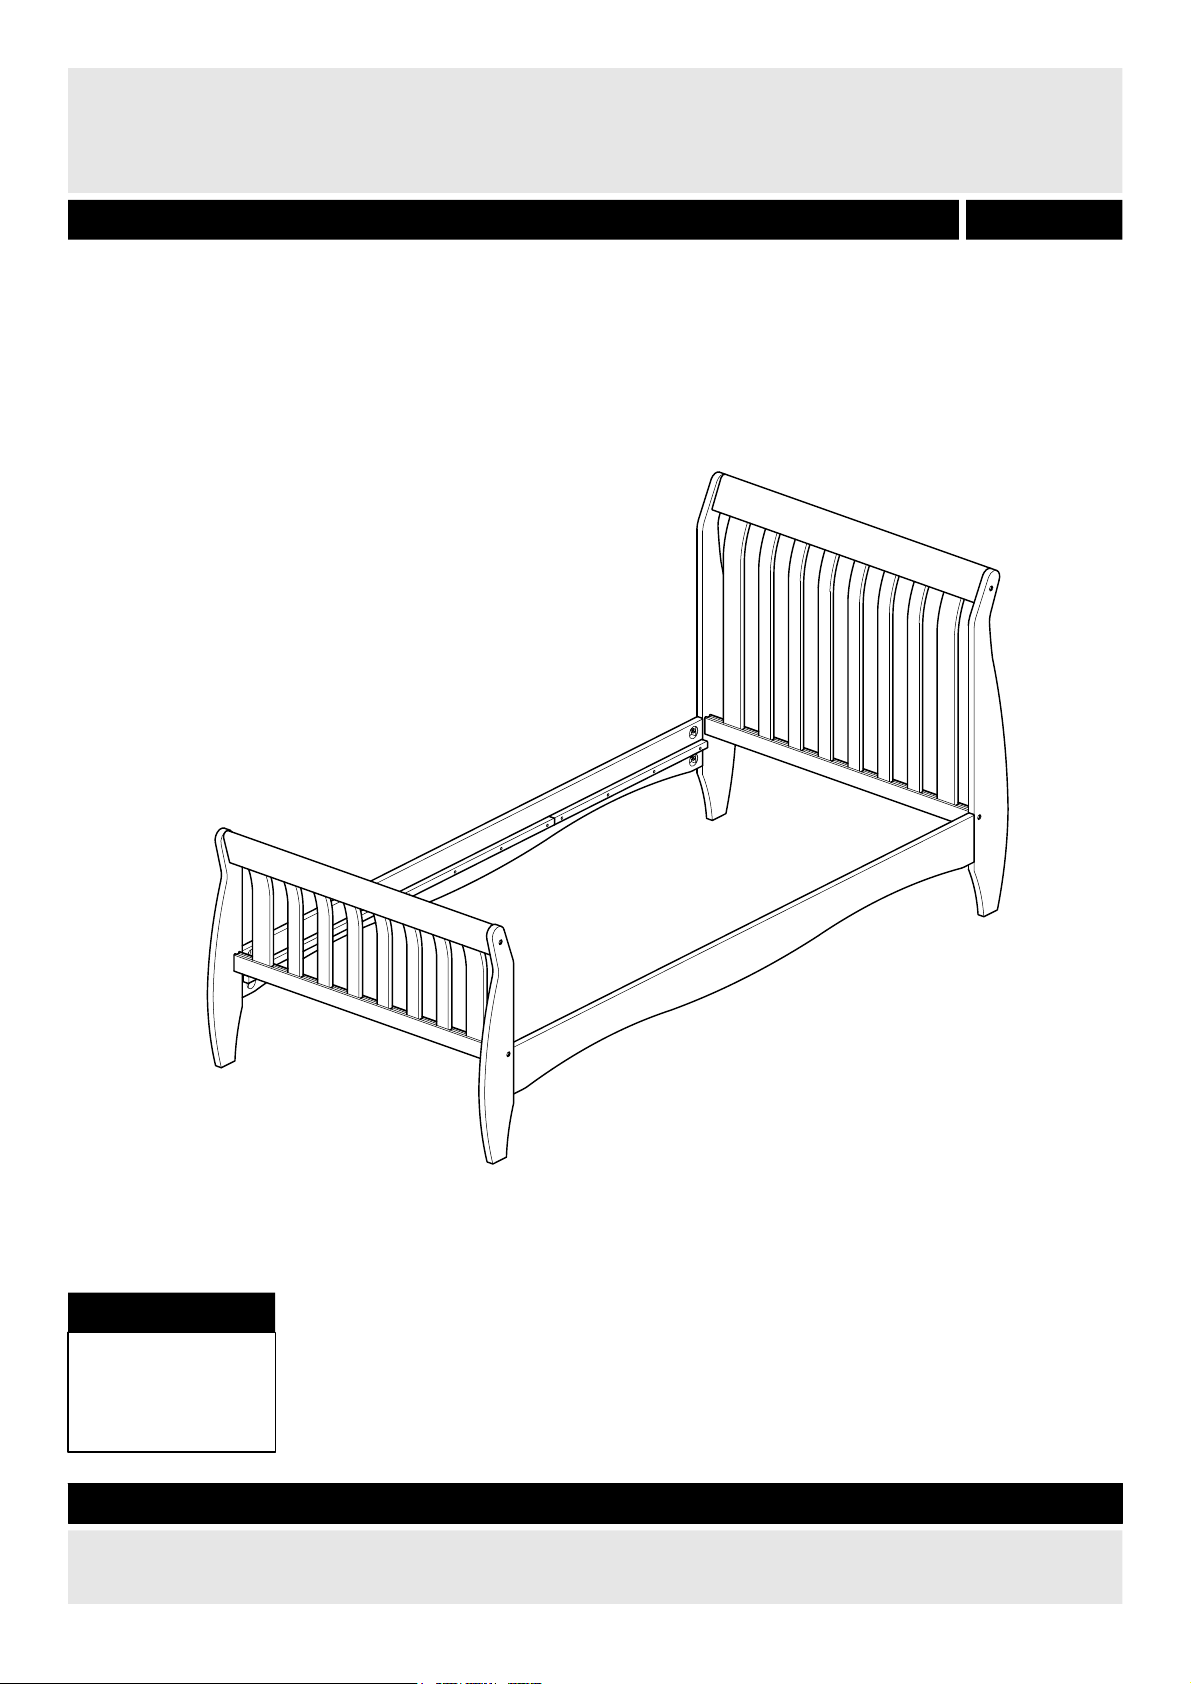
Width - 96cm
Depth - 216cm
Height - 99.5cm
Important - Please read these instructions fully before starting assembly
240/9568
Harry Sleigh Pine Frame
Dimensions
Assembly Instructions - Please keep for future reference
If you need help or have damaged or missing parts, call the Customer Helpline:
Argos = 0345 640 0800
Page 2
1
Note: if required the next
page can be cut out and used
as reference throughout the
assembly. Keep this page with
these instructions for future
reference.
Important - Please read these instructions fully before starting assembly
!
Safety and Care Advice
IMPORTANT!
KEEP FOR
FUTURE
REFERENCE
Keep children and animals
away from the work area, small
parts could choke if swallowed.
To reduce the
likelihood of
damaging your
product please
ensure that your
power drill is set on a low torque
setting.
Remove all fittings from the
plastic bags and separate them
into their groups.
Check you have all the
components and tools listed on
the following pages.
Make sure you have enough
space to layout the parts before
starting.
Assemble the item as close
to its final position (in the same
room) as possible.
During assembly do not stand
or put weight on the product,
this could cause damage.
Improper use of electrical tools
will crack the components.
Assemble on a soft level
surface to avoid damaging the
unit or your floor.
Parts of the assembly will be
easier with 2 people.
Care and maintenance
This product should not be
discarded with household
waste. Take to your local
authority waste disposal centre.
From time to time check that
there are no loose screws on
this unit.
Only clean using a damp cloth
and mild detergent, do no use
bleach or abrasive cleaners.
Warnings
Place the bed tight to any
wall or have a gap of 300mm
between the wall and the side
of the bed.
Not suitable for children under
4 years.
Regularly check and ensure
that all bolts and fittings are
tightened properly.
The recommended mattress
size is L1900 x W900 mm.
This product should only be
used on firm, level ground.
Make sure the legs remain in
contact with the ground.
This product is intended for
children in the age of 4 to 13
years old.
Prohibit your children from
bouncing and jumping on the
bed.
Do not place this child's bed
near heat sources, windows
(blind cords, curtain pulls or
other strings or cords) and other
furniture.
THIS BED COMPLIES WITH
BS8509:2008+A1:2011
Retailer: Argos Ltd. MK9 2NW
Handy Hints
Assemble all parts and bolts
loosely during assembly, only
once the product is complete
should you fully tighten the bolts.
Regularly check and
ensure that all bolts and
fittings are tightend
properly.
Do not use this child's bed if
any part is broken, torn or
missing.
Page 3
2
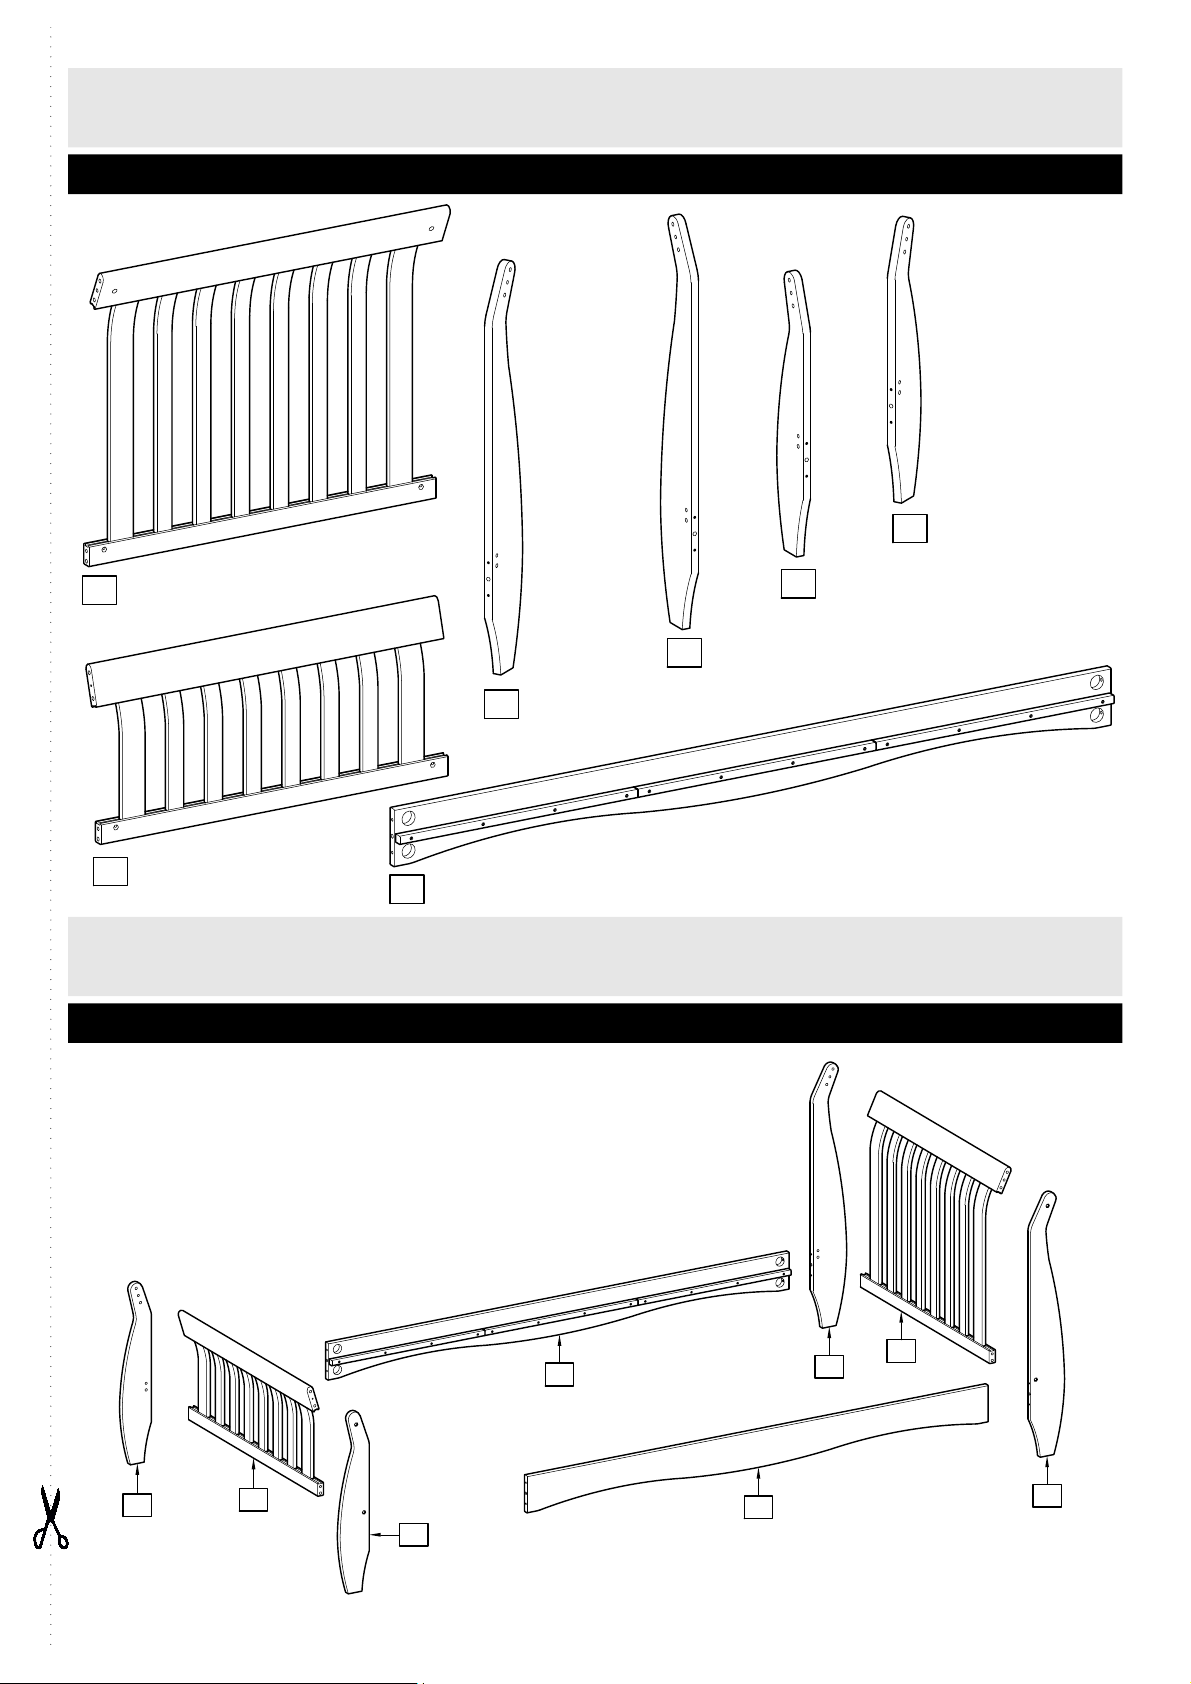
Please check you have all the panels listed below
Components - Panels
Components - Key Diagram
Headboard (92 x 74cm)
1
Footboard
(92 x 43cm)
2
Left headboard leg
(99.5 x 14cm)
3
Side x 2
(190 x 14cm)
7
Right headboard leg
(99.5 x 14cm)
4
Left footboard leg
(68.5 x 12cm)
5
Right footboard leg
(68.5 x 12cm)
6
1
2
3
4
5
6
7
7
If you have damaged or missing components, call the
Customer Helpline: Argos = 0345 640 0800
Page 4
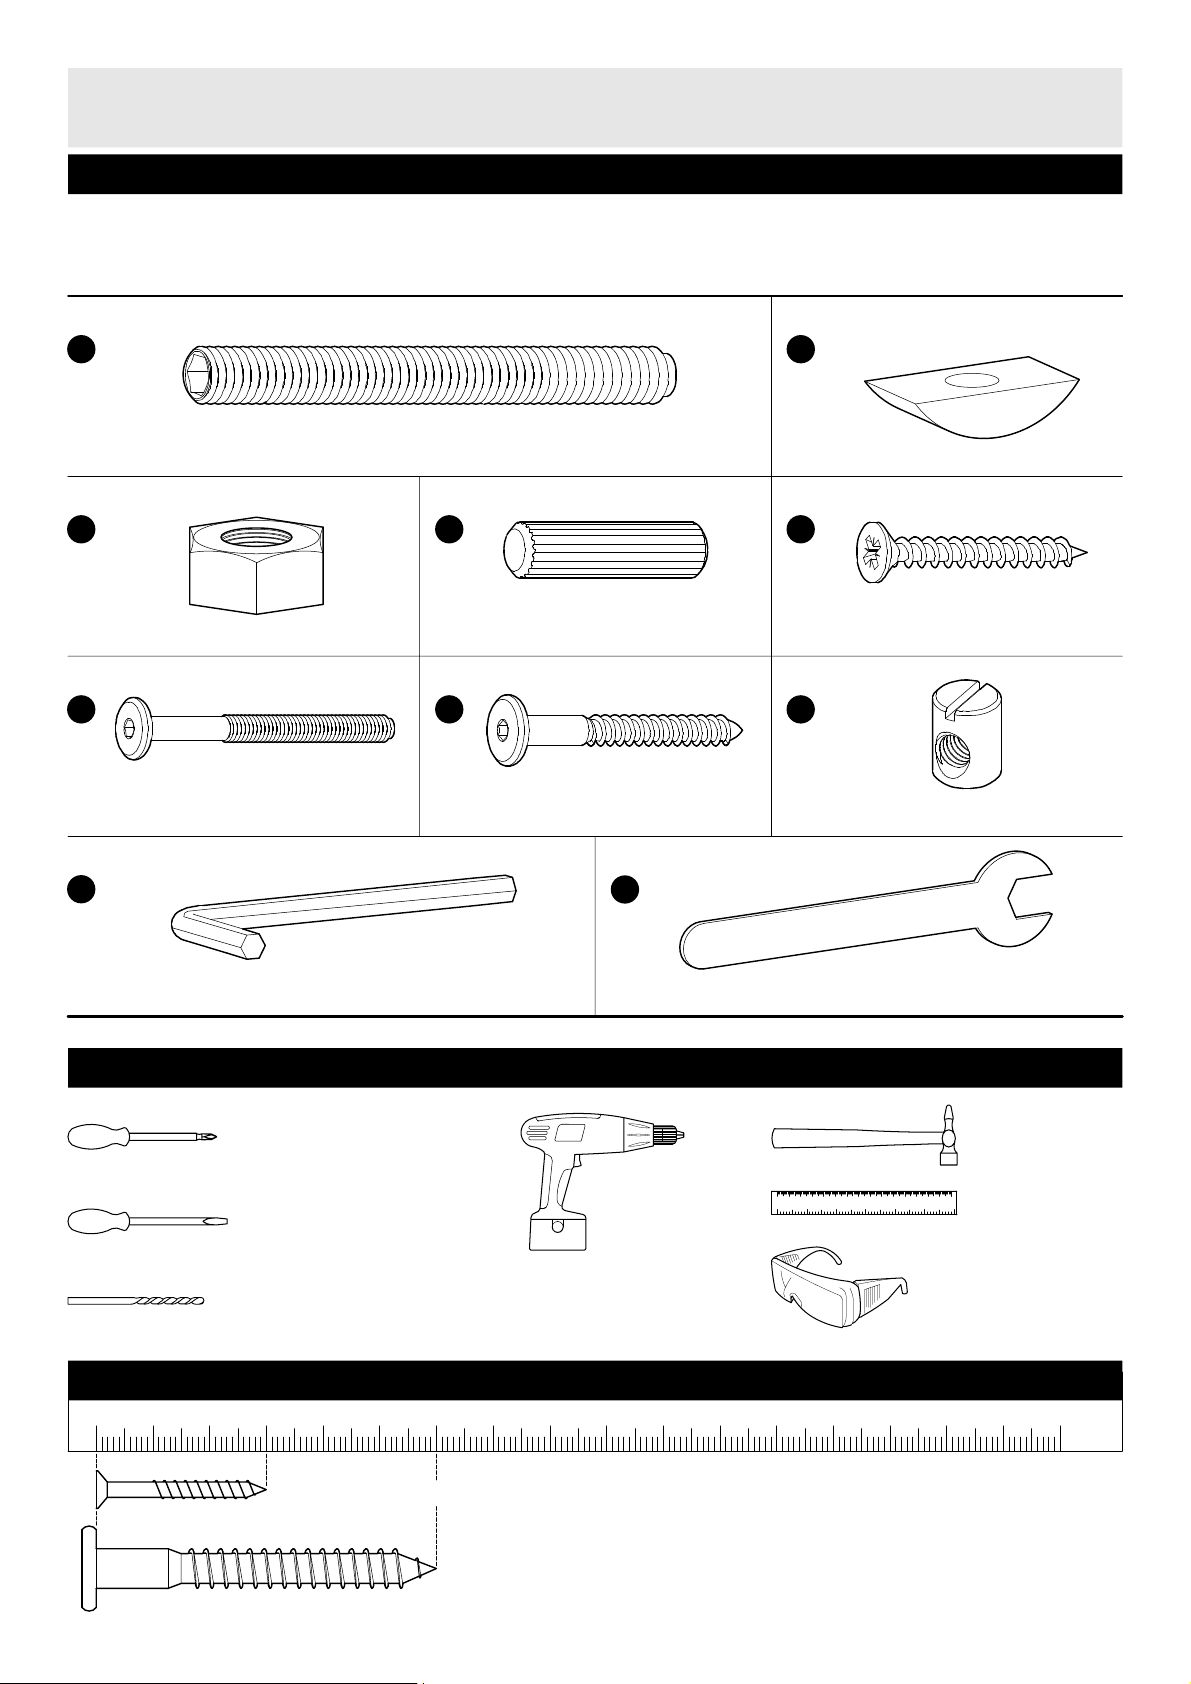
Note: The quantities below are correct amount to complete the assembly. In some cases more fittings
may be supplied than are required.
Please check you have all the fittings listed below
Tools required
A
B
70mm Screw x 8
Washer x 8
Nut x 8 40mm Dowel x 16
30mm Screw x 8
C
D
E
Allen key x 1
Spanner x 1
75mm Screw x 6
F
60mm Screw x 2
G
Barrel nut x 6
H
Drill
Eye protection
(when using a
hammer or glue)
Ruler/tape
measure
Small
hammer
Suitable drill bit
(for use with wall plug)
Flatblade screwdriver
(medium)
Philips screwdriver
(medium & large)
0
10
20
30
40
50
60
70
80
90
100 110 120 130
140
150
3
170
160
150
140
130
120
110
100
9080
70
60
50
40
30
20
10
0
5 15
25
35 45
55 65
75
85 95
105
115 125 135 145 155 165
Ruler - Use this ruler to help correctly identify the screws
The screws length is measured from the head to the point (30mm screw shown).
The bolts length is measured from inside of the head to the point
(60mm bolt shown).
I
J
Components - Fittings
Page 5

4
Assembly Instructions
Step 1
Side
7
Side
7
D
D
D
D
Step 3
Step 2
D
D
D
D
D
D
D
D
D
D
D
D
Headboard
1
Footboard
2
H
H
H
H
F
F
F
F
Headboard
1
I
Left headboard leg
3
Right headboard leg
4
Inserting the dowels to
the sides.
Insert the dowels
D into
the holes indicated on the
sides
7 .
Inserting the dowels to
the headboard and the
footboard.
Insert the dowels
D into
the holes indicated on the
headboard
1 and the
footboard
2 .
Mounting the headboard
legs to the headboard.
Place the barrel nuts
H
onto the holes indicated
on the headboard
1 and
using screws
F to fix the
right headboard leg
4
and the left headboard leg
3 onto the headboard
1 , using allen key I to
tighten it.
Note the holes of barrel
nuts pointing towards to
the screws.
Page 6
Step 4
5
Footboard
2
Right footboard leg
6
A
Headboard
1
Left footboard leg
5
A
A
A
A
A
A
Left headboard leg
3
Right headboard leg
4
Step 5
A
Right footboard leg
6
Left footboard leg
5
F
F
I
H
H
Footboard
2
G
G
I
Mounting the footboard
legs to the footboard.
Place the barrel nuts
H
onto the holes indicated
on the footboard
2 and
using screws
F and
screws
G to fix the left
footboard leg
5 and the
right footboard leg
6
onto the footboard 2 ,
using allen key
I to
tighten it.
Note the holes of barrel
nuts pointing towards to
the screws.
Mounting the screws to
the headboard legs and
the footboard legs.
Mounting the screws
A
into the holes indicated on
the headboard legs
3
and 4 and the footboard
legs
5 and 6 , using
the allen key
I .
Note: Please make sure
the length of screw
A
after tightening to the leg
should remain 47 - 49 mm
and the screw head is up
as shown diagram.
Assembly Instructions
A
3
47 - 49mm
A
A
I
A
Page 7
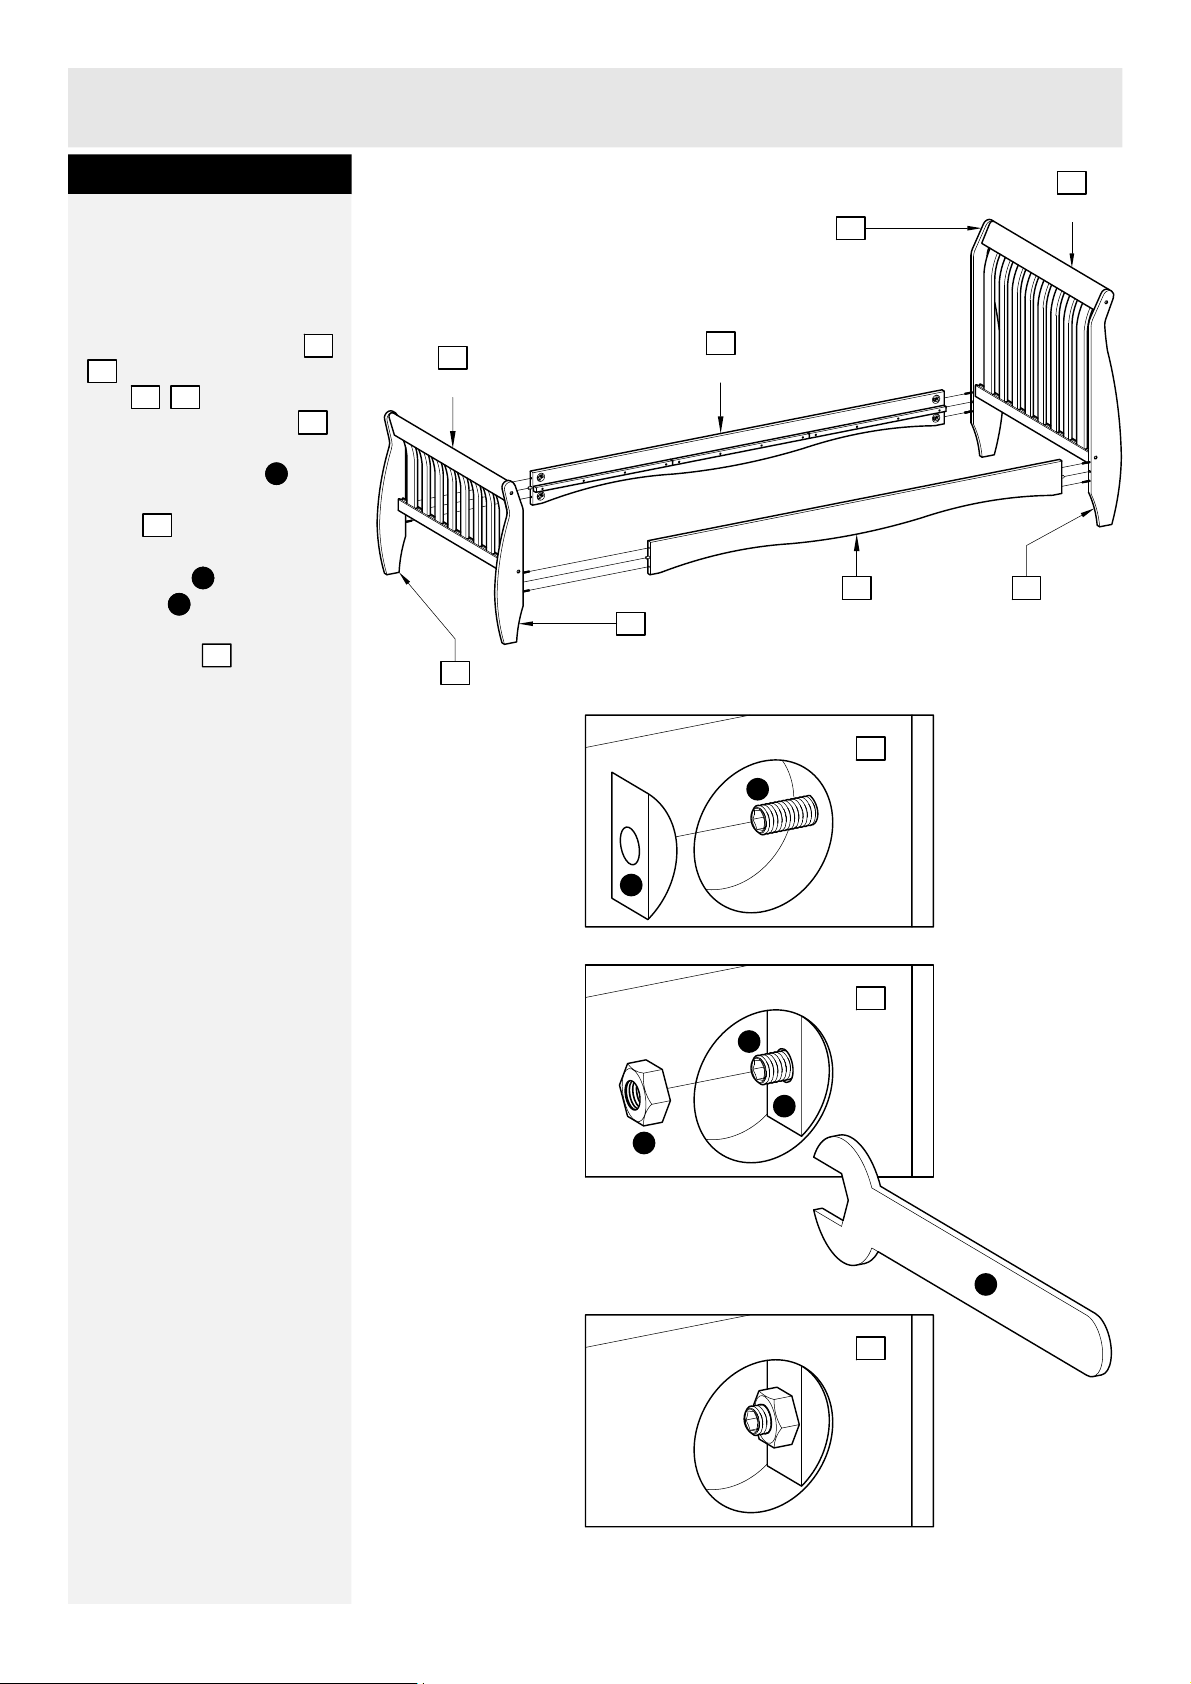
Step 6
Assembly Instructions
7
7
7
A
B
A
C
J
B
Side
7
Side
7
Left headboard leg
3
Right headboard leg
4
Headboard
1
Right footboard leg
6
Left footboard leg
5
Footboard
2
6
Assembly the
headboard legs and the
footboard legs to the
sides.
Fit the headboard legs
3 ,
4 and the footboard
legs
5 , 6 into the holes
indicated on the sides
7 .
Place the washers
B onto
the holes indicated on the
sides
7 .
Using nuts C and
spanner
J to fix the
headboard and footboard
to the sides
7 .
Again please note the
holes of nuts pointing
towards to the screws.
Page 8

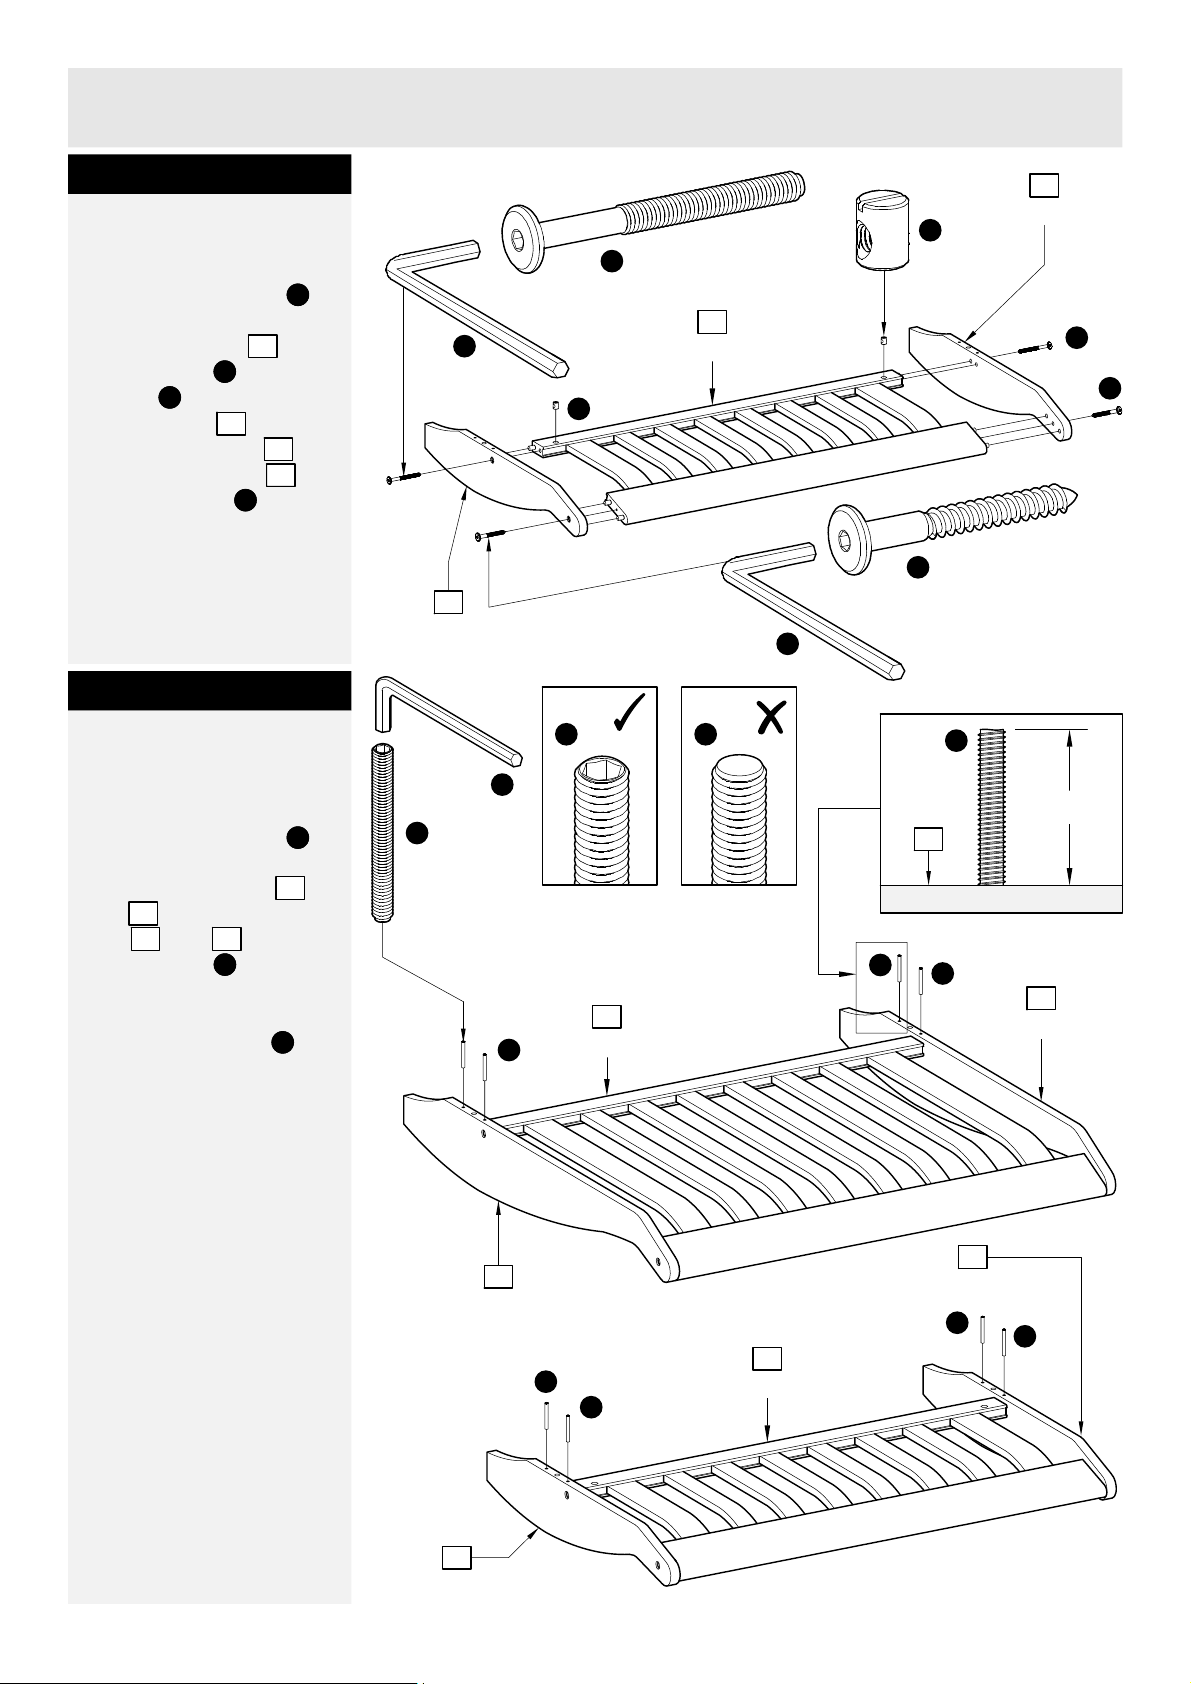
Step 7
Assembly Instructions
Watch out !
These screws must
never collide.
15mm
54.5mm
Distances are
approximate.
Additional step to fix the
slats.
Note: The slats are
supplied separately.
Spreading the slats evenly
onto the bed frame.
Fix the slats to the
slatholders using screws
E .
Watch out! The screws
attach the slatholders to
the sides never collide to
the screws that fix the
slats to the slatholders.
Assembly is complete.
7
E
E
E
Slats
8
If you need help or have damaged or missing parts, call the Customer Helpline:
Argos = 0345 640 0800
E
E
E
E
E
3.5mm
Page 9

Please note that the product you have purchased is a
natural living timber.
Just like nature itself, wood varies in shape and colour.
Knots, vein patterns, resin pockets and colour differences
contribute to giving the piece of furniture its beauty and
form - a natural part of solid wood.
Although the tree has been cut down and dried, it is still
alive and therefore will react to high and low
temperatures, light, humidity, drought and time.
In cold and dry periods, the wood contracts which may
lead to small cracks in the piece of furniture. The reverse
happens in warm and humid periods where the wood
expands and this may result in slight unevenness.
The colour of the wood also changes with time,
particularly if the furniture is place in a light place. This
is a natural process and part of owning a piece of
furniture made of solid wood.
Any flexing that has occurred during transport will
re-correct it self once this product is correctly assembled.
Tighten all joints of the furniture after six months.
Please keep these instructions in a safe place for future
use.
Dear Customer.
8
 Loading...