

Page 1

Quick-Start Guide (RTF & PTF)
Product specications are subject to change without notice.
Due to ongoing development, the actual product may vary from
images shown.
This product contains chemicals known to the State of California
to cause cancer, birth defects and other reproductive harm.
This product is not a toy! (14+) Recommended for ages 14 and
up. Adult supervision required for ages under 18 years old.
Contains small parts, keep out of reach of children 3 years of
age and younger.
Distributed in the US by:
Firelands Customer Service/Product Support
1133 Libra Drive, Lincoln, NE 68512
www.relandsgroup.com
1-800-205-6773
customerservice@relandsgroup.com
Distributed in the
UK by:
J Perkins Distribution Ltd,
Lenham,
Kent, UK
ME17 2DL.
www.jperkins.com
Part Number:
AZSA3200 SPAD S.XIII Ultra-Micro RTF
AZSA3200M1 SPAD S.XIII Ultra-Micro RTF Mode 1
AZSA3201 SPAD S.XIII Ultra-Micro PTF
To download the full Owner’s Manual &
Technical Information Guide, please visit
www.Ares-RC.com or scan the QR code with
your smart phone.
Distributed in Australia by:
Model Engines (Aust.) Pty. Ltd.,
PO BOX 828,
Noble Park 3174,
Australia.
www.modelengines.com.au
Ph (03) 8793 5555
[email protected]
Full manual available to download from: www.Ares-RC.com
MADE IN CHINA
Page 2
QUICK-START GUIDE
RTF
This rst half of the Quick Start Guide is written for the RTF (Ready to Fly) version of the
SPAD S.XIII. A full instruction manual is available to download from www.ares-rc.com.
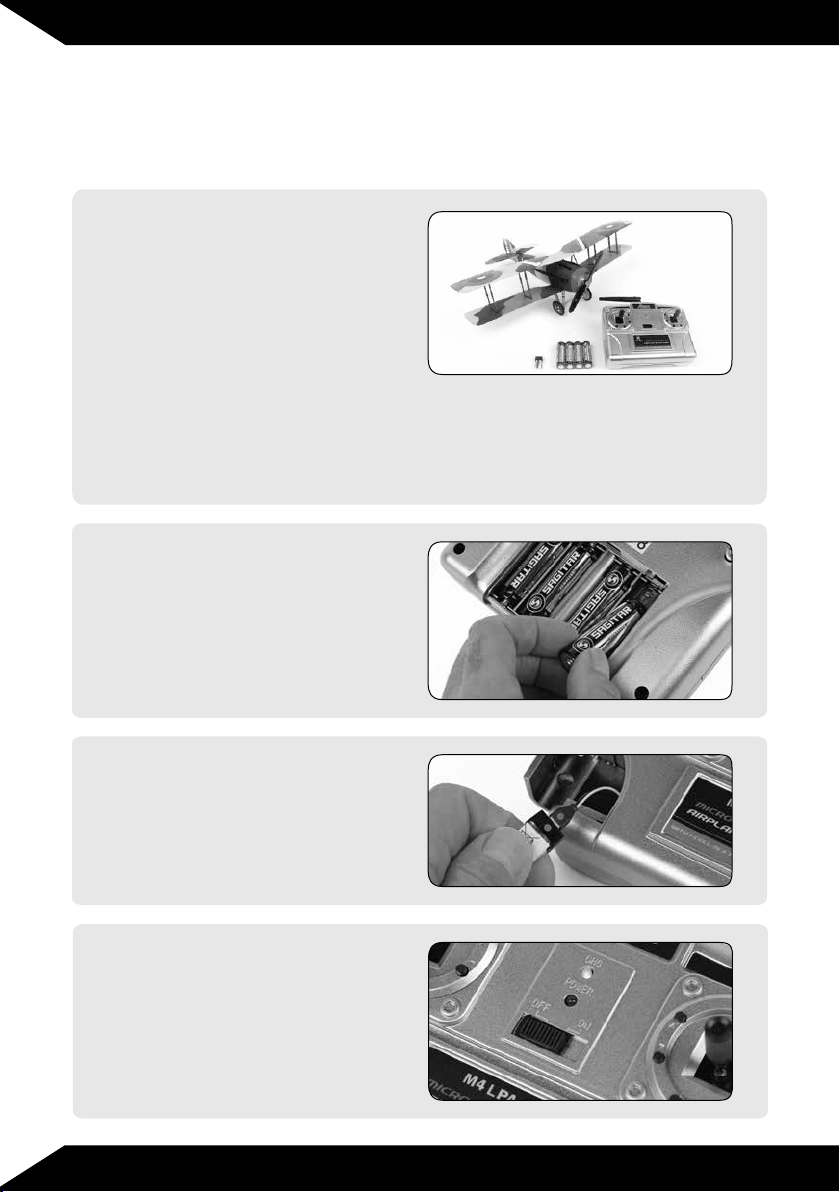
Carefully remove the transit tape
1
and the foam retainers, then gently
lift your SPAD S.XIII and the other
components from the box.
Ensure you have the following
parts:
• 100% Factory assembled SPAD S.XIII
• 4-channel transmitter with integral 100mA charger
• 70mAh 3.7V 1S Li-Po battery
• 4 x AA cells
Remove the transmitter battery
2
cover and insert the four AA cells.
Open the hatch on the lower left
3
corner of the transmitter, locate
the charge lead and connect it to
the 70mAh Li-Po, making sure to
align the red dots.
With the battery correctly
4
connected the CHG (charge) light
on the transmitter will glow solid
yellow indicating that the LiPo
is charging. Note that it is not
necessary to switch the transmitter
on to initiate charging.
Full manual available to download from: www.Ares-RC.com
Page 3

A fully discharged battery will be
5
charged in under an hour, at which
point the yellow light will stop
glowing. The battery is now ready to
use and can be disconnected from
the charge lead.
Pull the throttle stick back to its
6
lowest point and switch ON the
transmitter.
Remove the magnetic battery
7
hatch cover from the underside of
the model. Connect the lead to the
battery (making sure to align the
red dots as before) and use the
magnet retainer to clip the battery
in position. Replace the battery
hatch cover.
Having plugged in the Li-Po the rudder and
8
elevator control surfaces will move, indicating
that the 3-in-1 control unit has initialized and
that the motor is armed. Raising the throttle
stick will now start the motor. In the unlikely
event that the initialization process fails,
please see the pairing instructions that follow
these steps.
You should now check the control surfaces, as detailed overleaf, noting that instructions
for servo reversing are available in the full online instruction manual at www.ares-rc.com.
On this 3 channel airplane the rudder function is controlled by the aileron stick on the
transmitter.
Full manual available to download from: www.Ares-RC.com
Page 4
QUICK-START GUIDE
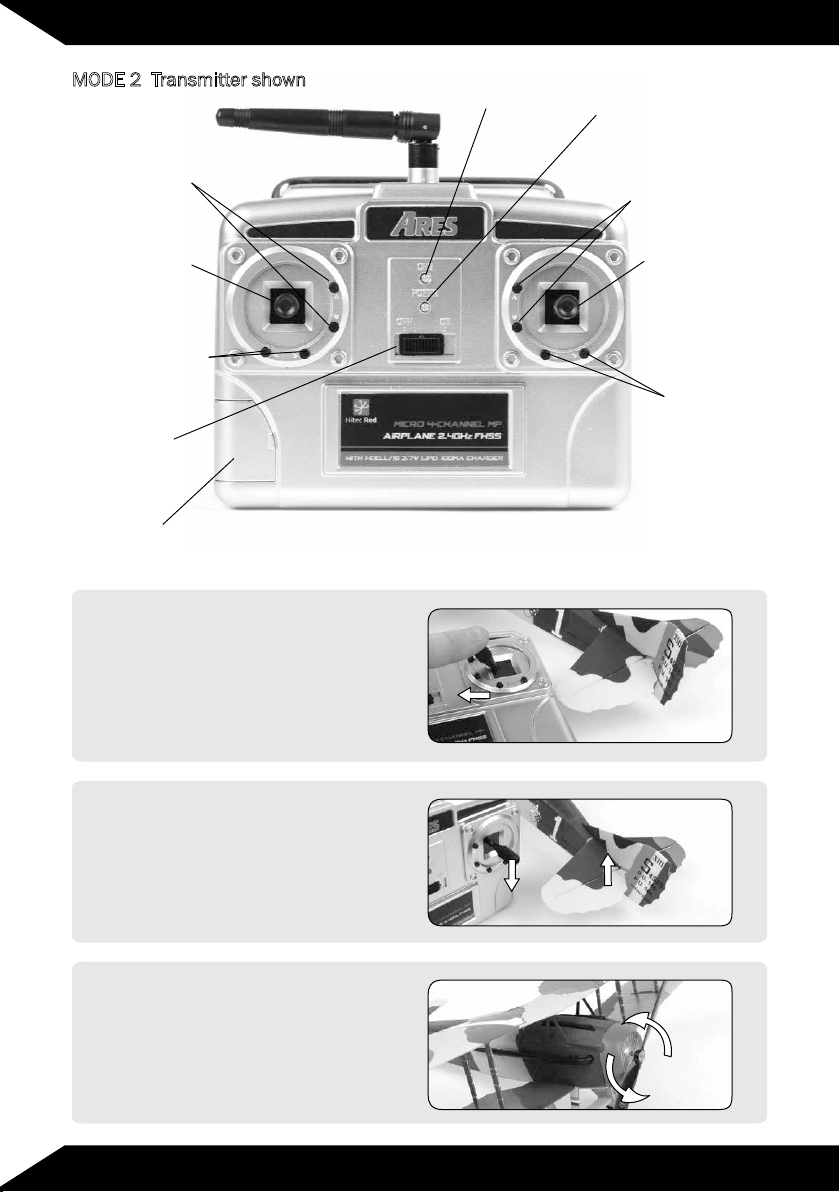
MODE 2 Transmitter shown
Throttle Trim
Buttons
Throttle/Rudder
stick
Rudder trim buttons
(used only for transmitter
programming)
ON/OFF switch
Hinged cover for ight
battery charge cord
With the model in front of you,
9
facing away, move the aileron
stick to the left and check that the
rudder moves left in response.
Right aileron stick will move the
rudder to the right.
LED charge
indicator
Power indicator
LED
Elevator trim
button
Elevator/Aileron
stick
(The Spad’s rudder
is controlled by the
aileron stick)
Aileron trim
buttons
Pull the elevator stick back and
10
check that the elevator moves in an
upward direction. Push the elevator
stick forward and check that the
elevator moves in a downward
direction.
With the propeller clear of
11
obstructions and the model
restrained, open the throttle
slowly and check that it turns in
an anticlockwise direction when
viewed from the front.
Full manual available to download from: www.Ares-RC.com
Page 5
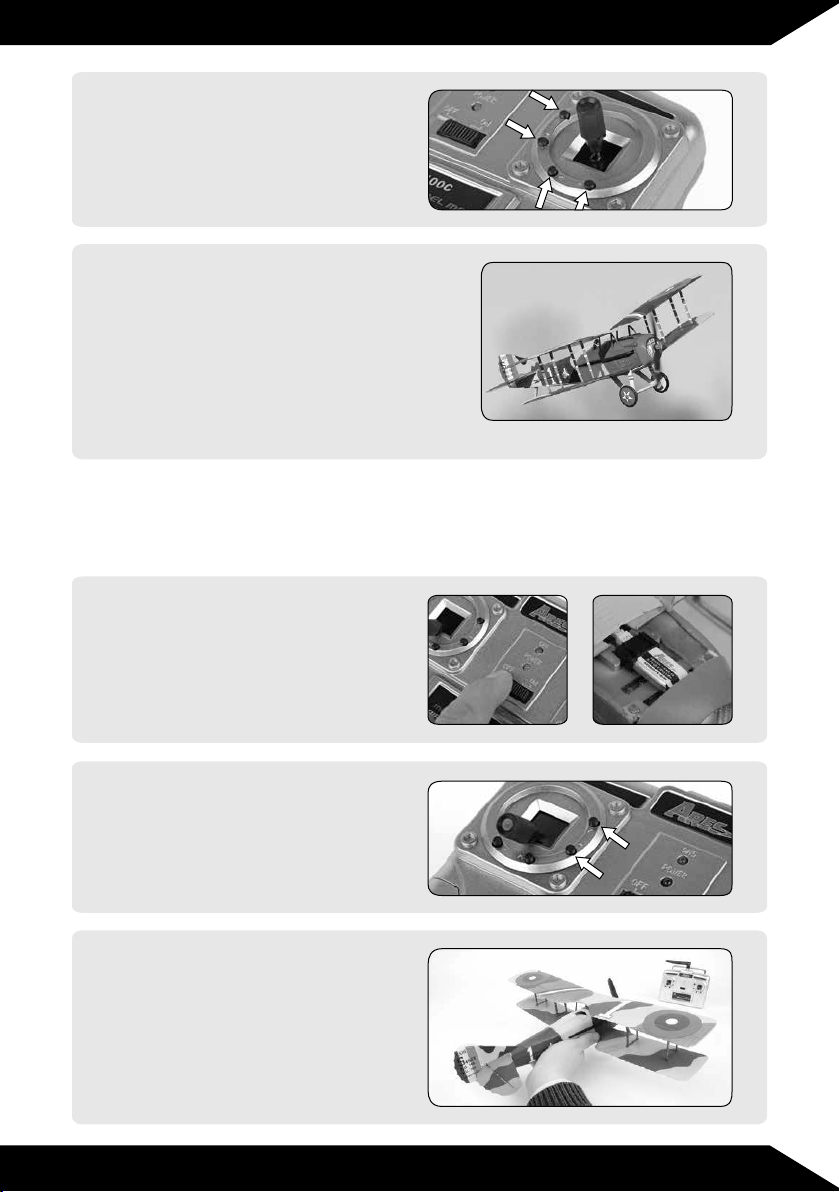
Check that the elevator and
12
rudder are centered and adjust as
necessary using the transmitter’s
trim buttons.
Your SPAD S.XIII is now ready to y. Choose
13
a at-calm day for the rst ight or use
a suitable indoor venue (a sports hall is
ideal) that’s free of obstructions. Note that
it’s not necessary to y the SPAD at full
throttle, indeed scale ight and extended
duration are performed at much lower
throttle settings. We hope you have many
enjoyable ights with with your model.
Transmitter Pairing
Having followed Steps 1 to 8, in the unlikely event that your SPAD does not operate please
follow the 3 stage pairing process detailed here:
Switch the transmitter ON and
1
connect the ight battery as
detailed in Step 7.
Simultaneously press the
2
two throttle trim buttons. The
transmitter will emit a series of
beeps/tones indicating that it has
entered pairing mode. Release
the buttons.
The pairing process is complete
3
when the servos (and the rudder/
elevator) move back and forth
briey and the transmitter stops
emitting the beeps/tones. You
should now have full control of
the airplane. Return to Step 9 to
complete the set-up of your model.
Full manual available to download from: www.Ares-RC.com
Page 6
QUICK-START GUIDE
PTF
This half of the Quick Start Guide is written for the PTF (Pair to Fly) version of the SPAD
S.XIII. A full instruction manual is available to download from www.ares-rc.com.
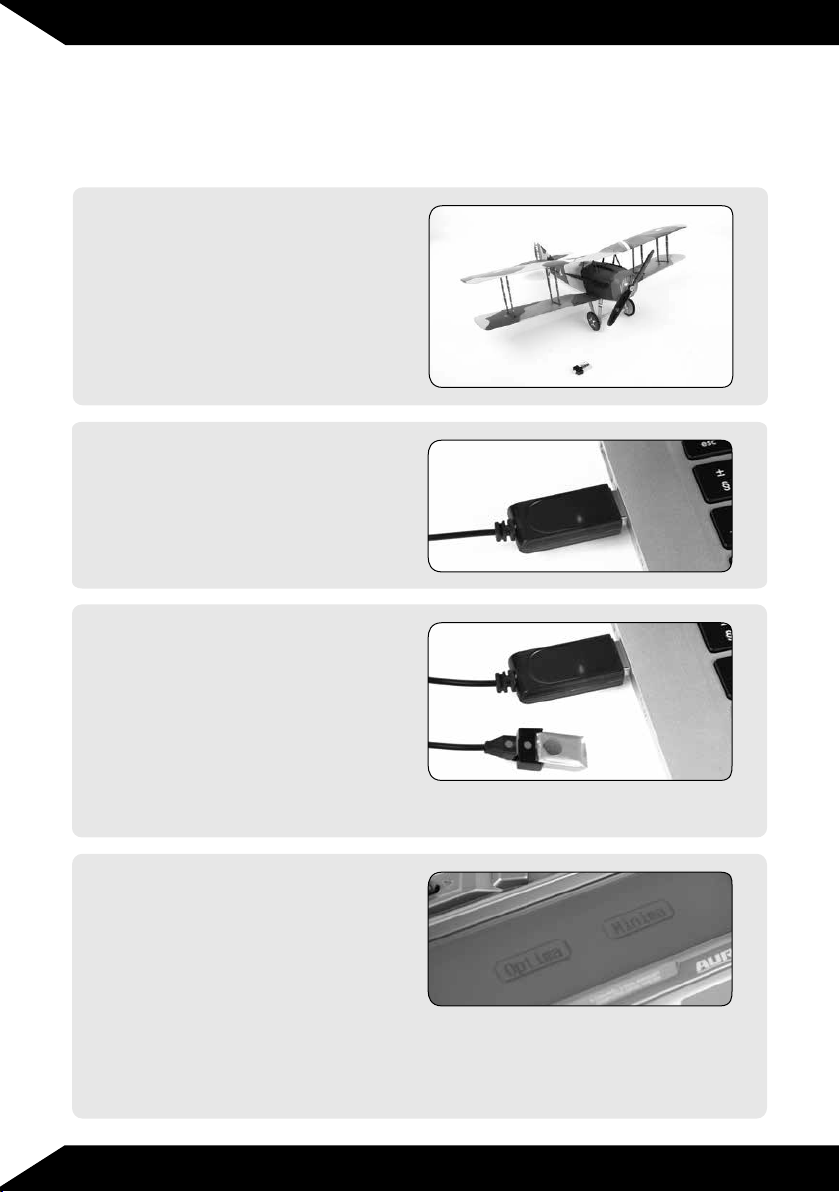
Carefully remove the transit tape
1
and the foam retainers, gently lift
the components from the box and
ensure you have the following:
• 100% Factory assembled SPAD
S.XIII
• 70mAh 3.7V 1S Li-Po battery
• USB charger
Plug the supplied USB charger into
2
a suitable port noting that the LED
on the charger will ash red when
connected.
Connect the battery to the charge
3
lead making sure to align the red
dots. Note that the ashing LED will
now glow solid bright red. Note that
a discharged battery will be charged
in 30 to 50 minutes and can be
seen to be fully charged when the
red LED dims signicantly. When this
happens the battery is ready to use
and can be disconnected from the charge lead.
Pair your chosen Hitec air
4
transmitter to the SPAD’s 3-in-1
control unit. Start by following the
pair/binding instructions supplied
with your Hitec air transmitter
making sure to select the Minima
receiver option when prompted.
Having put your transmitter into
pair/bind mode, connect the battery to your SPAD to power it ON. Pairing will
now commence, the process being complete when the rudder and elevator
move back and forth briey. Follow your transmitter’s instruction manual for
guidance on exiting the pairing process.
Full manual available to download from: www.Ares-RC.com
Page 7
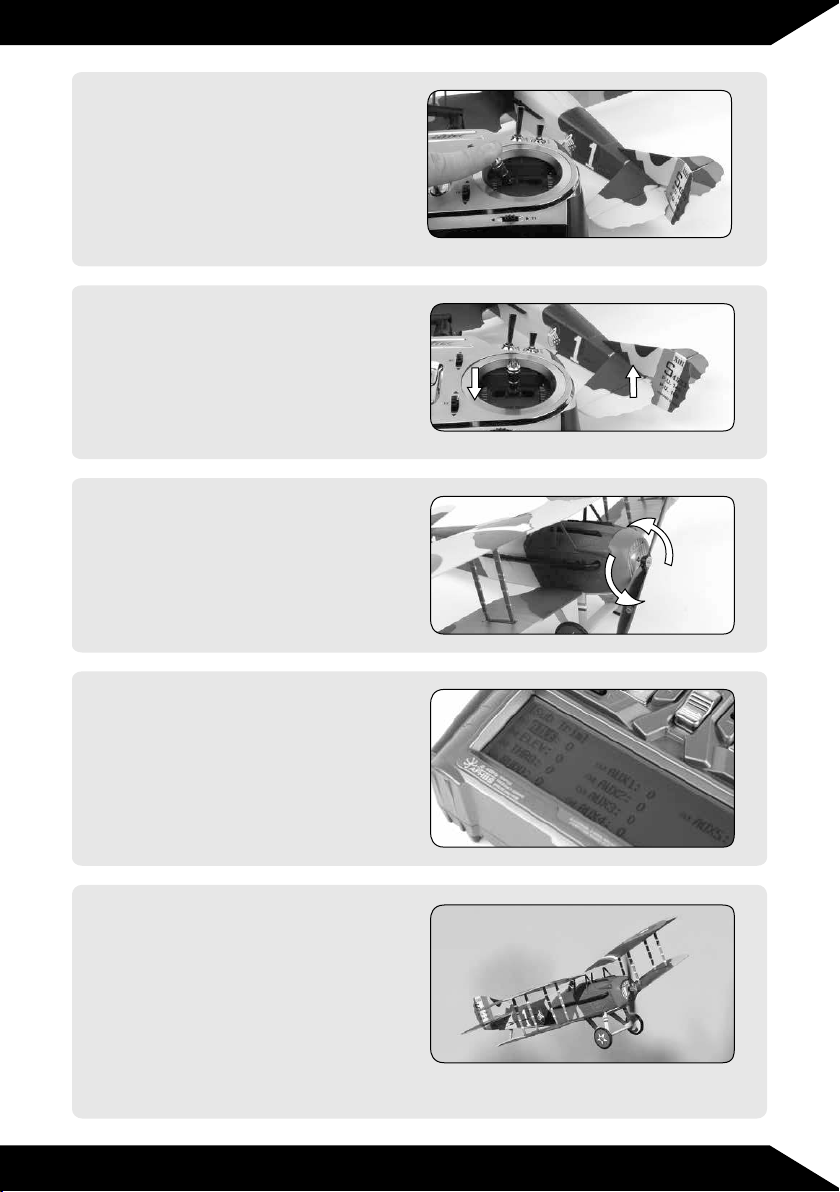
With the model in front of you,
5
facing away, move the aileron
rudder stick to the left and check
that the rudder moves left in
response. Right aileron stick will
move the rudder to the right.
Pull the elevator stick back and
6
check that the elevator moves in an
upward direction. Push the elevator
stick forward and check that the
elevator moves in a downward
direction.
With the propeller clear of
7
obstructions and the model
restrained, open the throttle
slowly and check that it turns in
an anticlockwise direction when
viewed from the front.
Mode 2 Transmitter Shown
Mode 2 Transmitter Shown
Check that the elevator and
8
rudder are centered and adjust as
necessary using the trim buttons
or the subtrim function on your
computer radio.
Your SPAD is now ready to y.
9
Choose a at-calm day for the rst
ight or use a suitable indoor venue
(a sports hall is ideal) that’s free
of obstructions. Note that it’s not
necessary to y the SPAD at full
throttle, indeed scale ight and
extended duration are possible at
much lower throttle settings. We
hope you have many enjoyable ights with with your model.
Full manual available to download from: www.Ares-RC.com
Page 8

PARTS LIST
AZS1509 Motor with Pinion Gear
AZS1511 Gearbox with Shaft
AZS1512 Propeller Shaft with Gear
AZSB1803 70mAh 1-Cell / 1S 3.7V 10C LiPo Battery, Ultra-Micro Connector
AZSA1806 3-Channel, 3-in-1 Control Unit; Rx / 2 Servo / ESC
AZSA1838 Hitec Red 4-Ch Tx with 100mA Charger
AZSA3202 Wing Set with Decals
AZSA3203 Tail Set with Decals
AZSA3204 Fuselage with Decals
AZSA3205 Main Landing Gear Set
AZSA3206 Pushrod Set
AZSA3207 Wing Strut Set
AZSA3208 Decal Set
AZSA3209 4.7 x 2.75 (120 x 70mm) Micro Scale Propeller with Logo
Full manual available to download from: www.Ares-RC.com
 Loading...