

Page 1
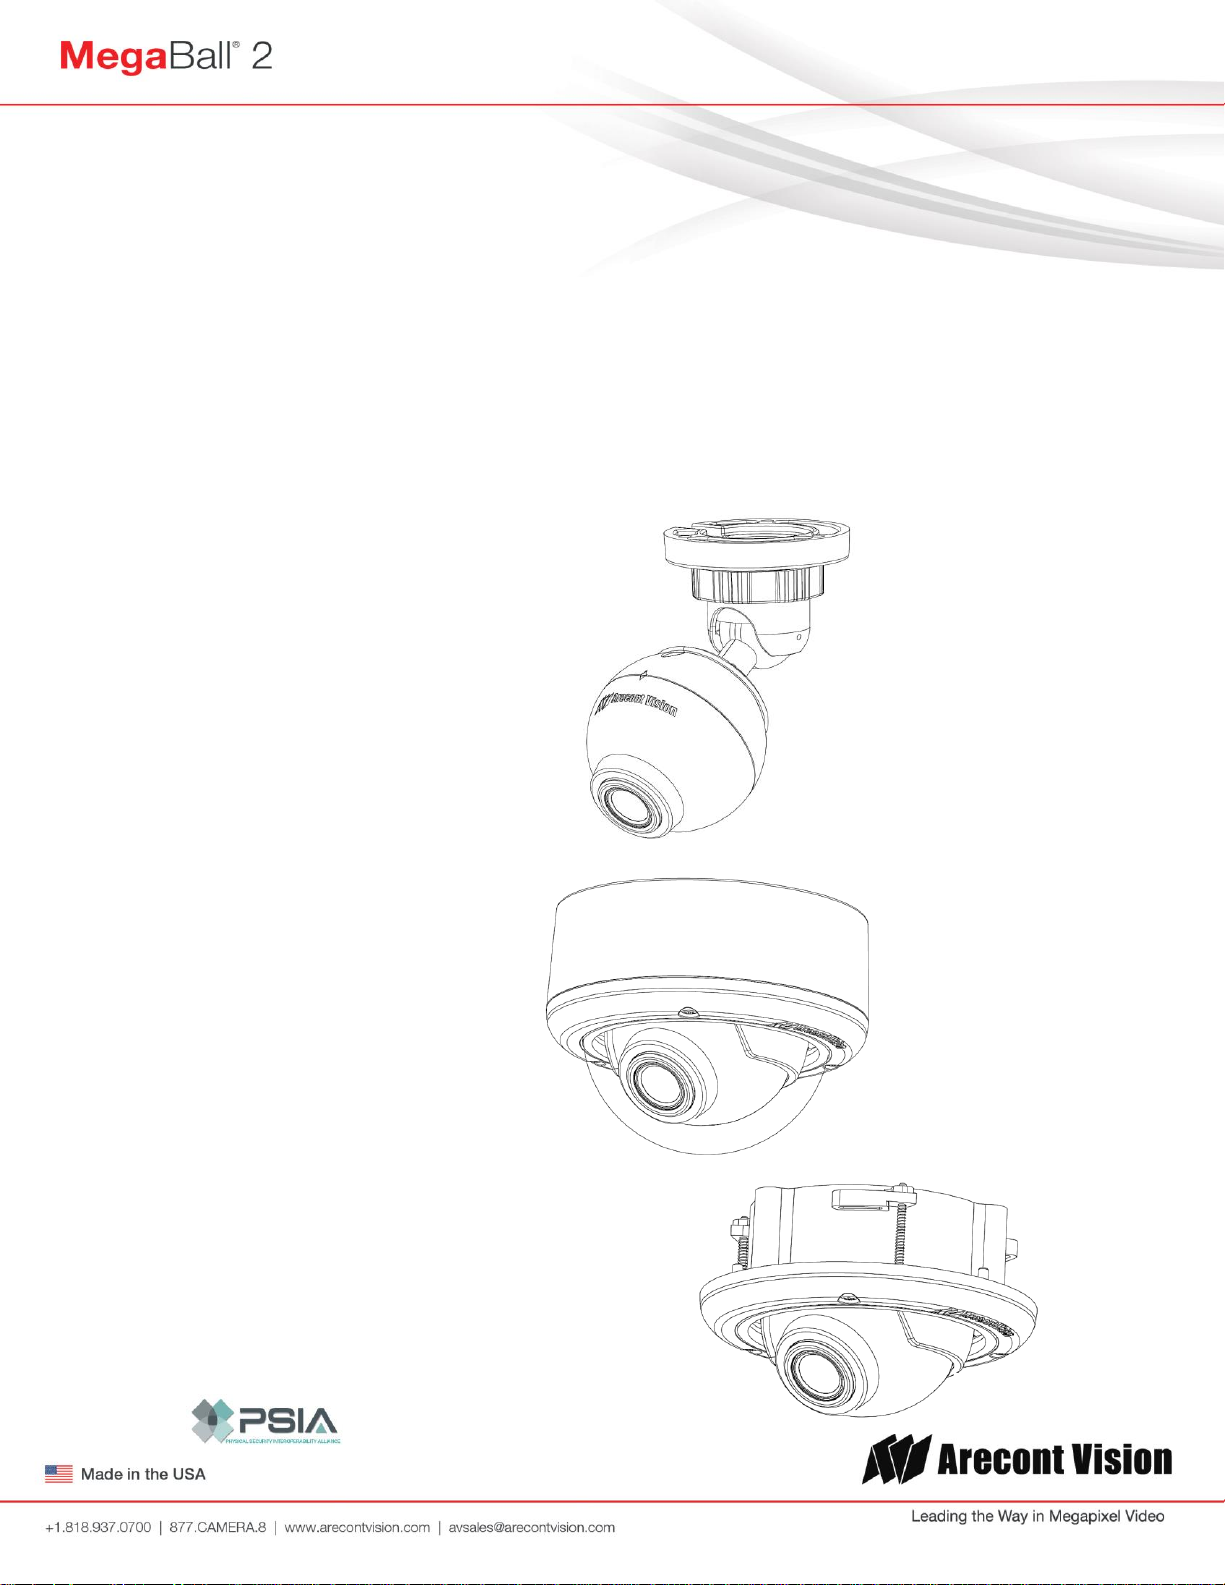
-W Models
-D Models
-D Models (In-ceiling)
Installation Manual
MegaBall® 2 PM Models
(Remote Zoom, Remote Focus, P-iris)
AV2245PM-W
AV2246PM-W
AV3245PM-W
AV3246PM-W
AV5245PM-W
AV2245PM-D
AV2245PM-D-LG
AV2246PM-D
AV2246PM-D-LG
AV3245PM-D
AV3245PM-D-LG
AV3246PM-D
AV3246PM-D-LG
AV5245PM-D
AV5245PM-D-LG
Page 2
Arecont Vision MegaBall® 2 Installation Manual
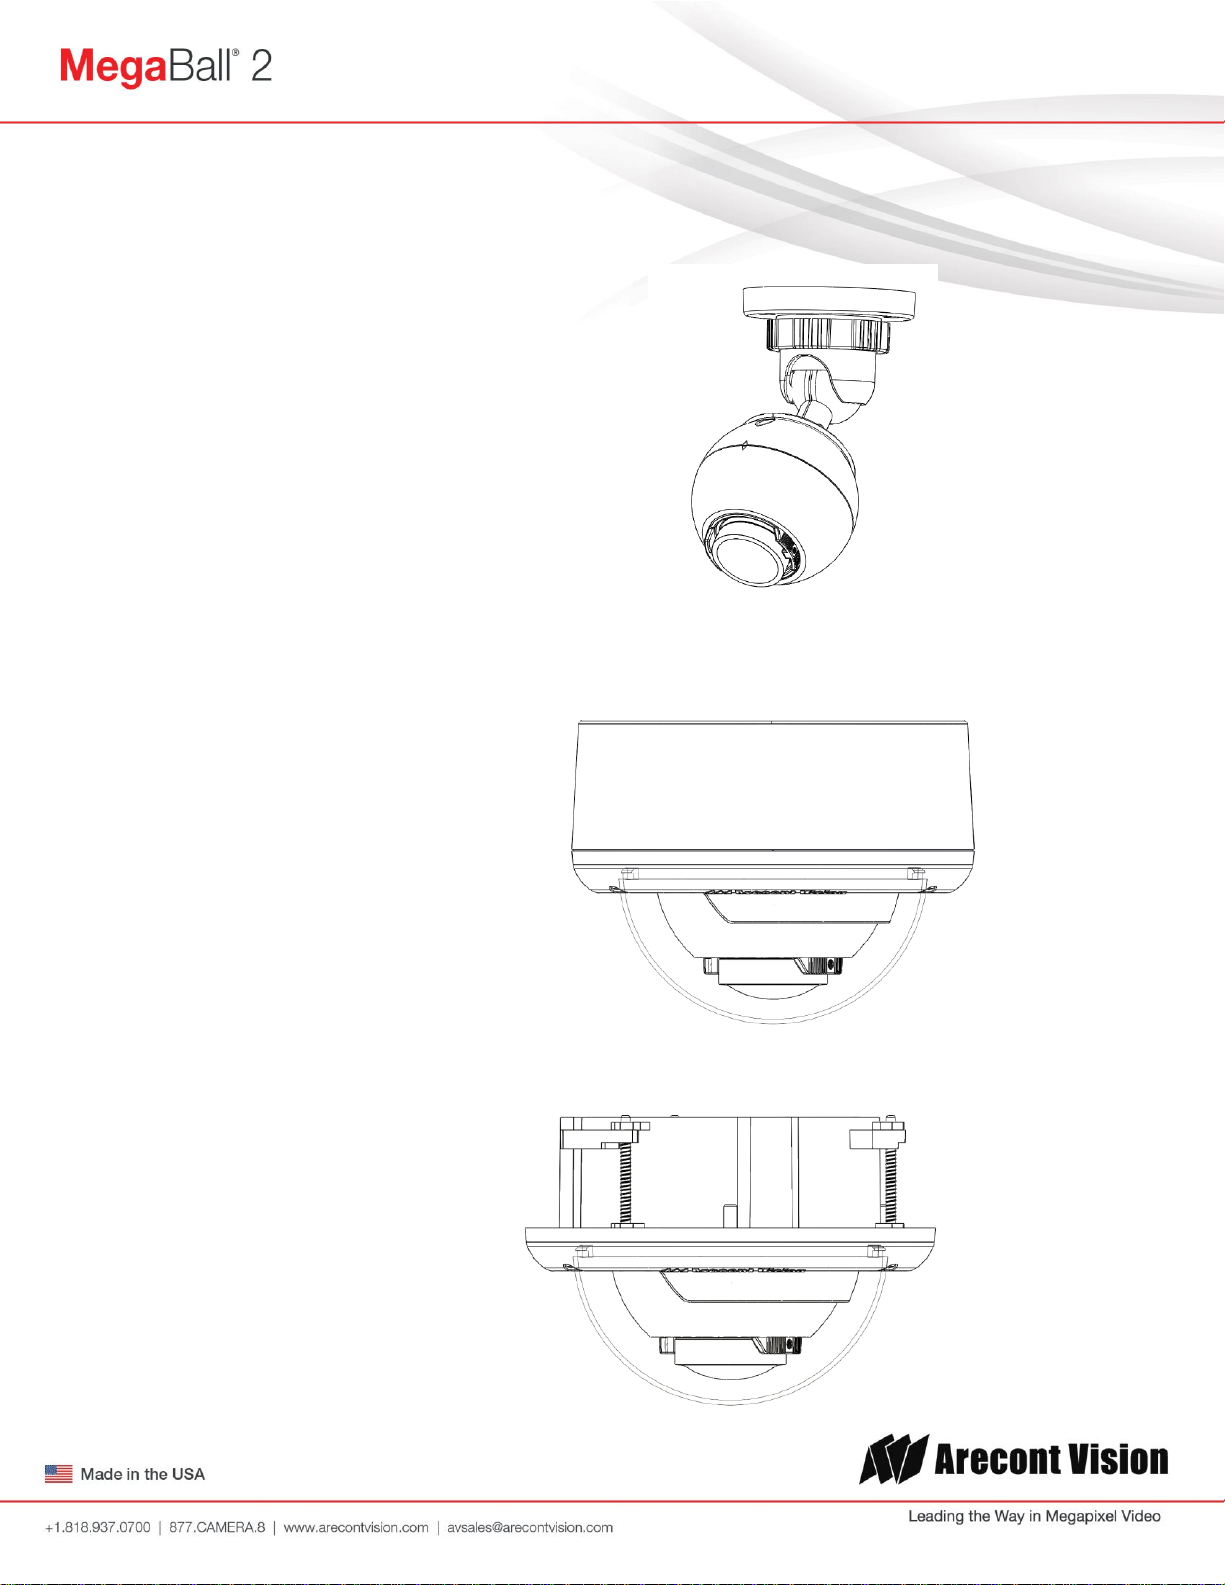
-W Models
-D Models
-D Models (In-ceiling)
MegaBall® 2 Panomorph Models
AV5245DN-01-W
AV5245DN-01-WA
AV5245DN-01-D
AV5245DN-01-DA
AV5245DN-01-D-LG
AV5245DN-01-DA-LG
Page | 2 support@arecontvision.com
Page 3
Arecont Vision MegaBall® 2 Installation Manual
MegaBall™ 2 Installation
Contents
Package Contents ................................................................................................................................................... 4
Notes: ........................................................................................................................................................................ 5
Warranty Information .............................................................................................................................................. 5
Install MegaBall™ 2 Wall Mount Camera (-W Models) ..................................................................................... 6
Install MegaBall™ 2 Dome Version (-D Models) ................................................................................................ 7
Software Installation.............................................................................................................................................. 15
Wall Mount (D4S-WMT-B or D4S-WMT) Installation Instructions (Sold Separately) ................................. 16
Junction Box Adapter (SV-JBA) Installation Instruction (Sold Separately) .................................................. 17
Electrical Box Adapter (SV-EBA) Installation Instructions (Sold Separately) .............................................. 18
LED Indicators ....................................................................................................................................................... 19
Support ................................................................................................................................................................... 20
Mounting Template ............................................................................................................................................... 21
Page | 3 support@arecontvision.com
Page 4
Arecont Vision MegaBall® 2 Installation Manual
D A C
B
G F E
C A D
B
H
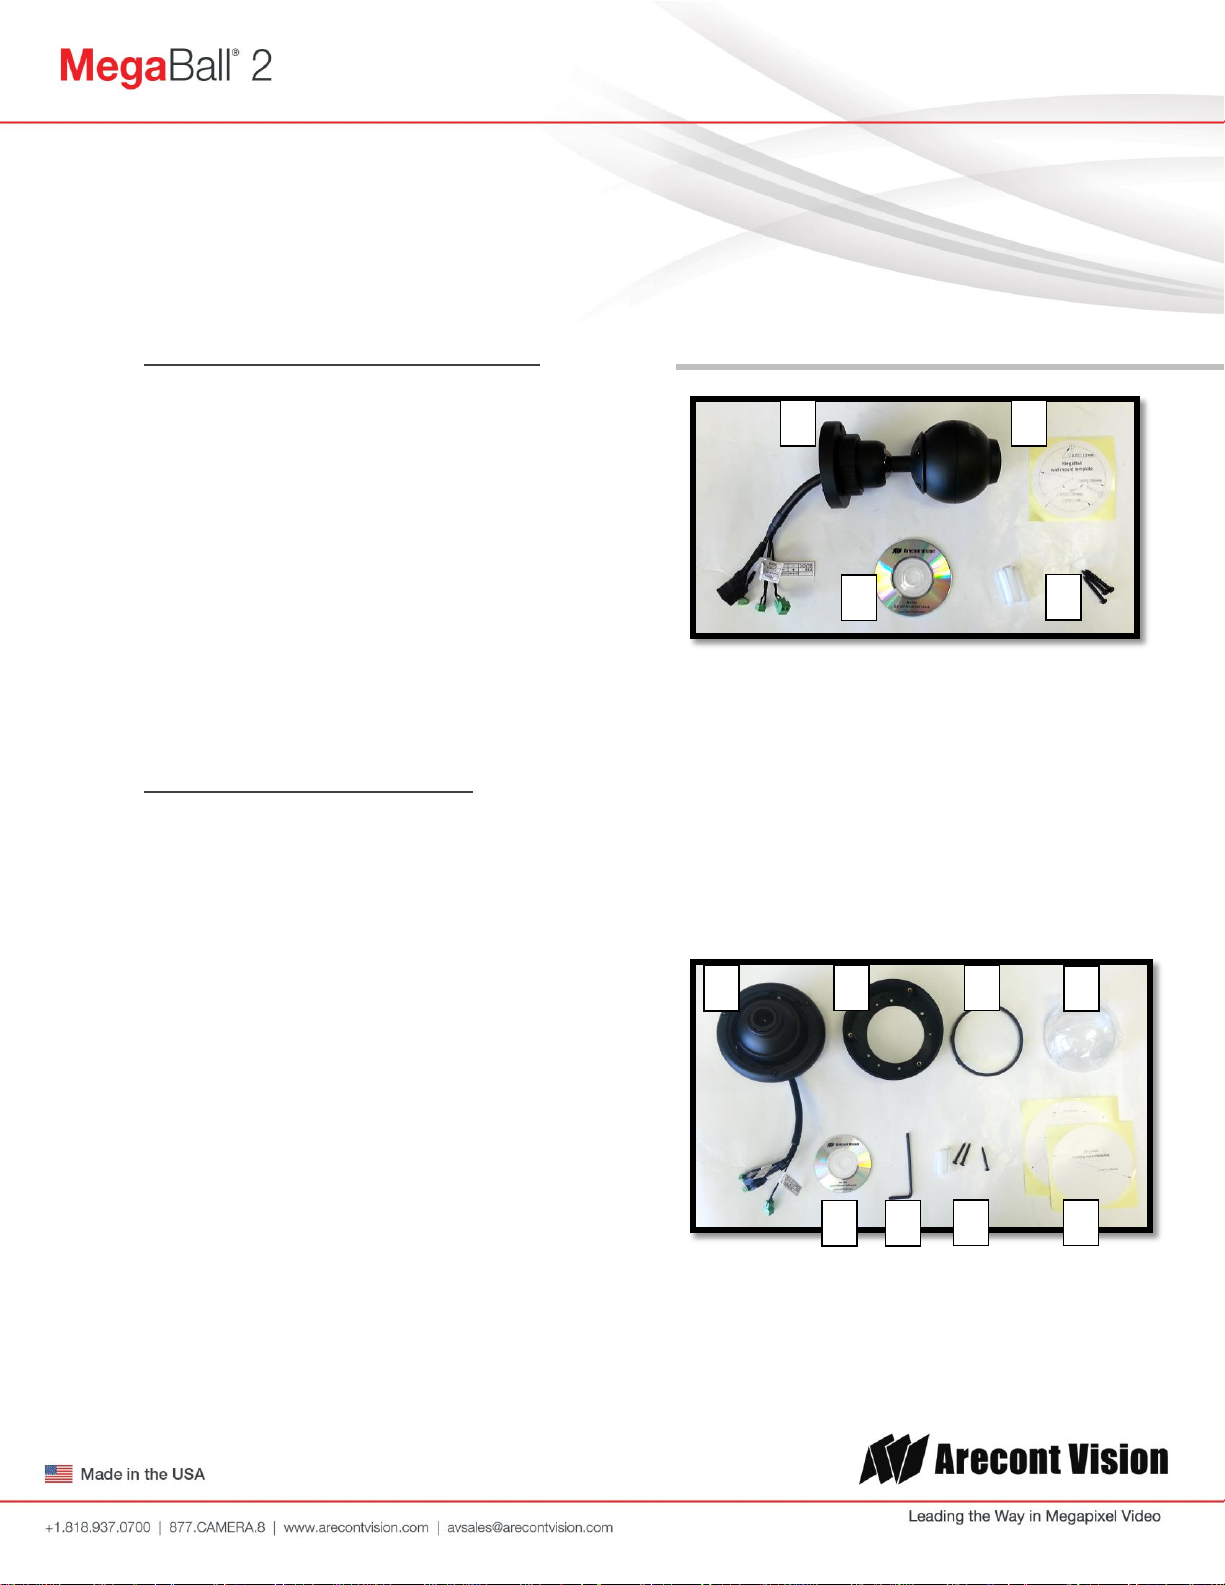
Package Contents
MegaBall™ 2 Wall Mount Version (-W)
A. Arecont Vision MegaBall™ 2 camera with
wall mount (indoor use only)
B. Mounting template
C. CD with AV100 software and user manuals
(license key required for recording)
D. Pack of three (3) screws and three (3)
anchors
NOTE: Anchors and screws are good to be
used for concrete, wall block and red bricks.
NOTE: Screws by themselves can be used in
wood.
MegaBall™2 Dome Version (-D)
A. Arecont Vision MegaBall™ 2 camera with
in-ceiling mount (indoor use only)
B. Surface mount (preassembled on dome)
C. O-ring (preassembled on bezel)
D. Dome cover (Bubble)
E. CD with AV100 software and user manuals
(license key required for recording)
F. Security L-Key
G. Pack of three (3) screws and three (3)
anchors
Image 1-1
NOTE: Anchors and screws are good to be
used for concrete, wall block and red bricks.
NOTE: Screws by themselves can be used in
wood.
H. Mounting template
Page | 4 support@arecontvision.com
Image 1-2
Page 5
Notes:
1. Camera Operating Temperature -5°C (23°F) to +50°C (122°F)
2. Wiring methods shall be in accordance with the National Electrical Code/NFPA 70/ANSI, and
with all local codes and authorities having jurisdiction. Wiring should be UL Listed and/or
Recognized wire suitable for the application.
3. Always use hardware e.g. screws, anchors, bolts, locking nuts etc. which are compatible with
mounting surface and of sufficient length and construction to insure a secure mount.
Warranty Information
3 Year Limited Warranty
ARECONT VISION warrants to Purchaser (and only Purchaser) (the “Limited Warranty”), that: (a) each Product shall be free
from material defects in material and workmanship for a period of thirty-six (36) months from the date of shipment (the
“Warranty Period”); (b) during the Warranty Period, the Products will materially conform with the specification in the applicable
documentation; (c) all licensed programs accompanying the Product (the “Licensed Programs”) will materially conform with
applicable specifications. Notwithstanding the preceding provisions, ARECONT VISION shall have no obligation or
responsibility with respect to any Product that (i) has been modified or altered without ARECONT VISION’s written
authorization; (ii) has not been used in accordance with applicable documentation; (iii) has been subjected to unusual stress,
neglect, misuse, abuse, improper storage, testing or connection; or unauthorized repair; or (iv) is no longer covered under the
Warranty Period. ARECONT VISION MAKE NO WARRANTIES OR CONDITIONS, EXPRESS, IMPLIED, STATUTORY OR
OTHERWISE, OTHER THAN THE EXPRESS LIMITED WARRANTIES MADE BY ARECONT VISION ABOVE, AND
ARECONT VISION HEREBY SPECIFICALLY DISCLAIMS ALL OTHER EXPRESS, STATUTORY AND IMPLIED
WARRANTIES AND CONDITIONS, INCLUDING THE IMPLIED WARRANTIES OF MERCHANTABILITY, FITNESS FOR A
PARTICULAR PURPOSE, NON-INFRINGEMENT AND THE IMPLIED CONDITION OF SATISFACTORY QUALITY. ALL
LICENSED PROGRAMS ARE LICENSED ON AN “AS IS” BASIS WITHOUT WARRANTY. ARECONT VISION DOES NOT
WARRANT THAT (I) THE OPERATION OF THE PRODUCTS OR PARTS WILL BE UNINTERRUPTED OR ERROR FREE;
(II) THE PRODUCTS OR PARTS AND DOCUMENTATION WILL MEET THE END USERS’ REQUIREMENTS; (III) THE
PRODUCTS OR PARTS WILL OPERATE IN COMBINATIONS AND CONFIGURATIONS SELECTED BY THE END USER;
OTHER THAN COMBINATIONS AND CONFIGURATIONS WITH PARTS OR OTHER PRODUCTS AUTHORIZED BY
ARECONT VISION OR (IV) THAT ALL LICENSED PROGRAM ERRORS WILL BE CORRECTED.
For RMA and Advance Replacement information visit ArecontVision.com
Page 6
Arecont Vision MegaBall® 2 Installation Manual
Digital In
Alarm Out
Auxiliary Power
PoE RJ45
90
°
360
°
360
°
Bracket Ring
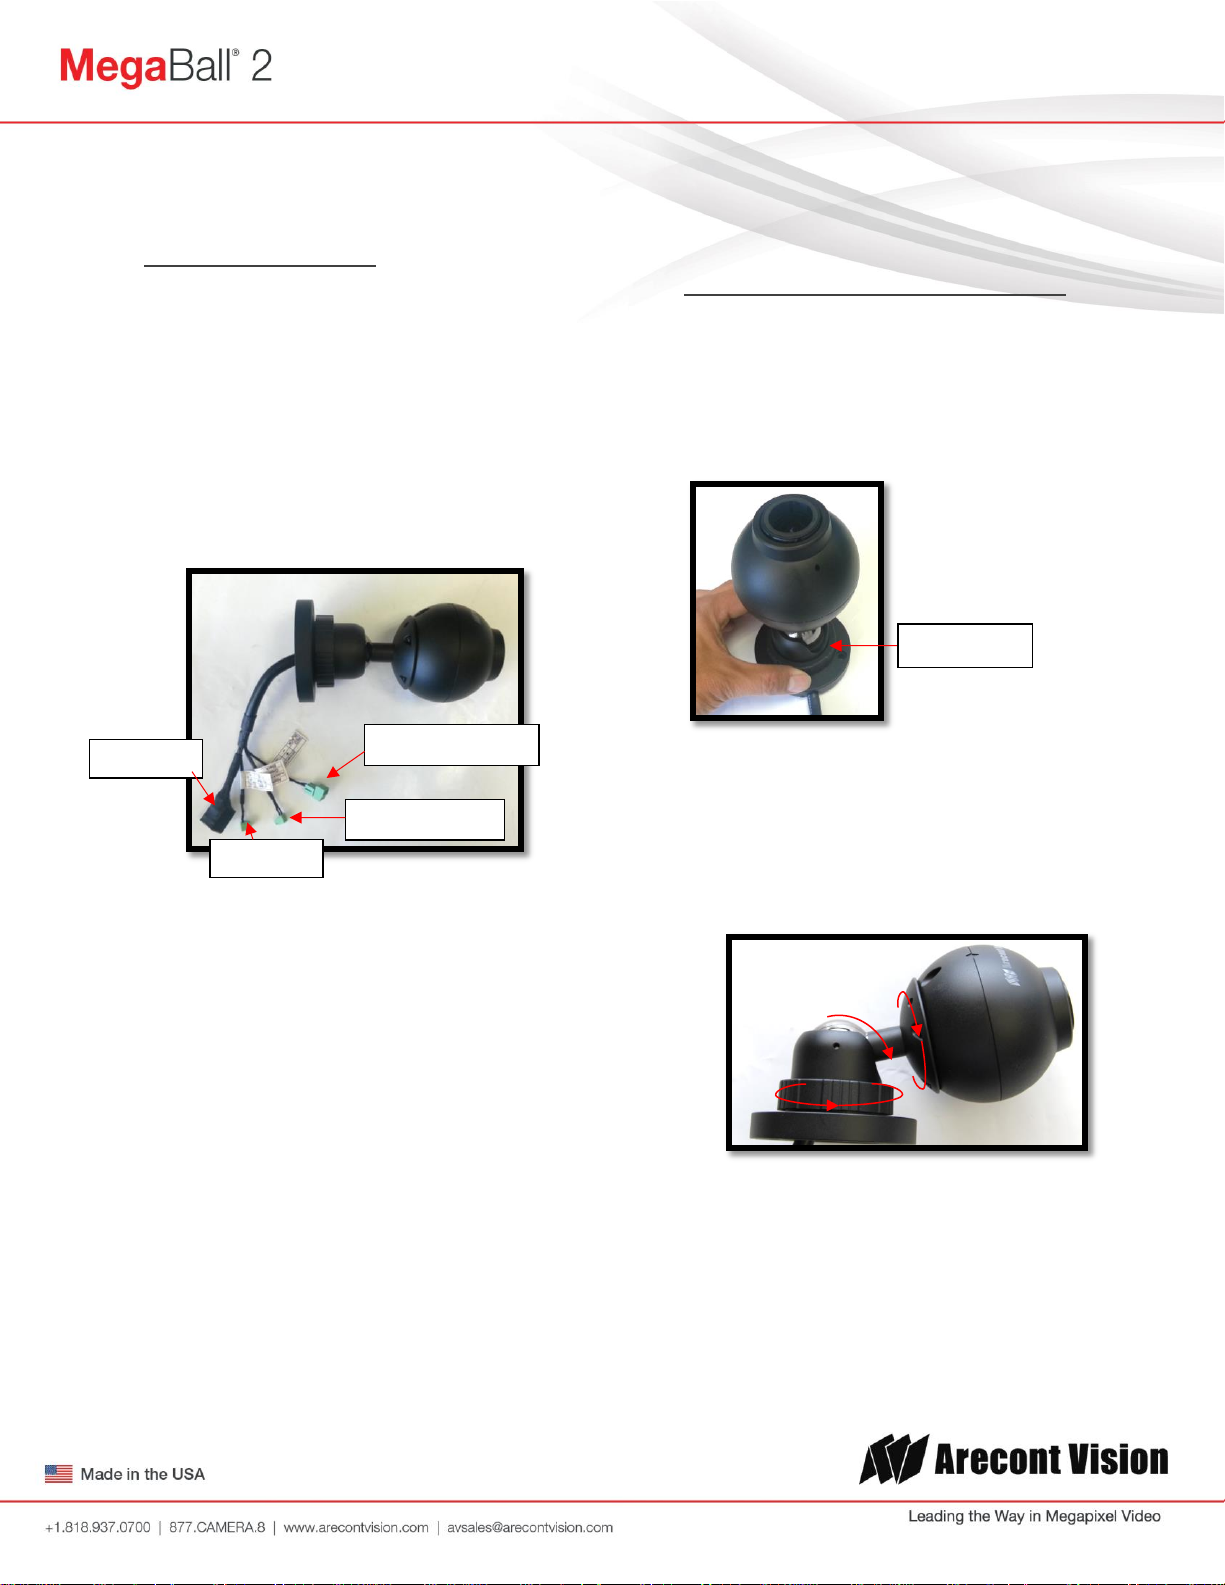
Install MegaBall™ 2 Wall Mount Camera (-W Models)
Mounting the Camera:
1. Remove the camera and hardware from the
box.
2. Using the mounting template, prepare the
mounting surface for camera installation.
3. Plug the Ethernet cable into the MegaBall™ 2
PoE female RJ45 connector. (Image 2)
NOTE: If the camera will be powered via PoE,
please skip to step 5.
6. To adjust the camera tilt, pan or z-axis (yaw),
Adjusting the Tilt, Pan, Z-Axis (yaw):
loosen the ring on the wall mount bracket as
shown in Image 3 then adjust as necessary and
retighten the ring.
Image 2
4. If the camera will be powered by an AC 24V
or DC 12-48V power supply, connect
external power with pigtail cable connector.
NOTE 1: Ensure that the polarity of the DC
input on the camera matches the way that
the wires are installed in the connector
shown in Image 2.
NOTE 2: AC power does not have polarity.
5. Align the holes on the camera wall mount
with the prepared holes on the mounting
surface. Attach the camera to the mounting
surface with the wood screws or any other
hardware suitable for the mounting surface.
Image 3
NOTE: The 3-axis bracket allows 360°
camera body rotation, 90° tilt and 360°
bracket rotation for easy installation in any
location. (Image 4)
Image 4
CAUTION: Adjusting the camera without
loosening the bracket ring may result in
scratches on the bracket joint. Incorrect
installation practices are not covered under
warranty!
Page | 6 support@arecontvision.com
Page 7
Digital In
Alarm Out
Auxiliary Power
PoE RJ45
Screws
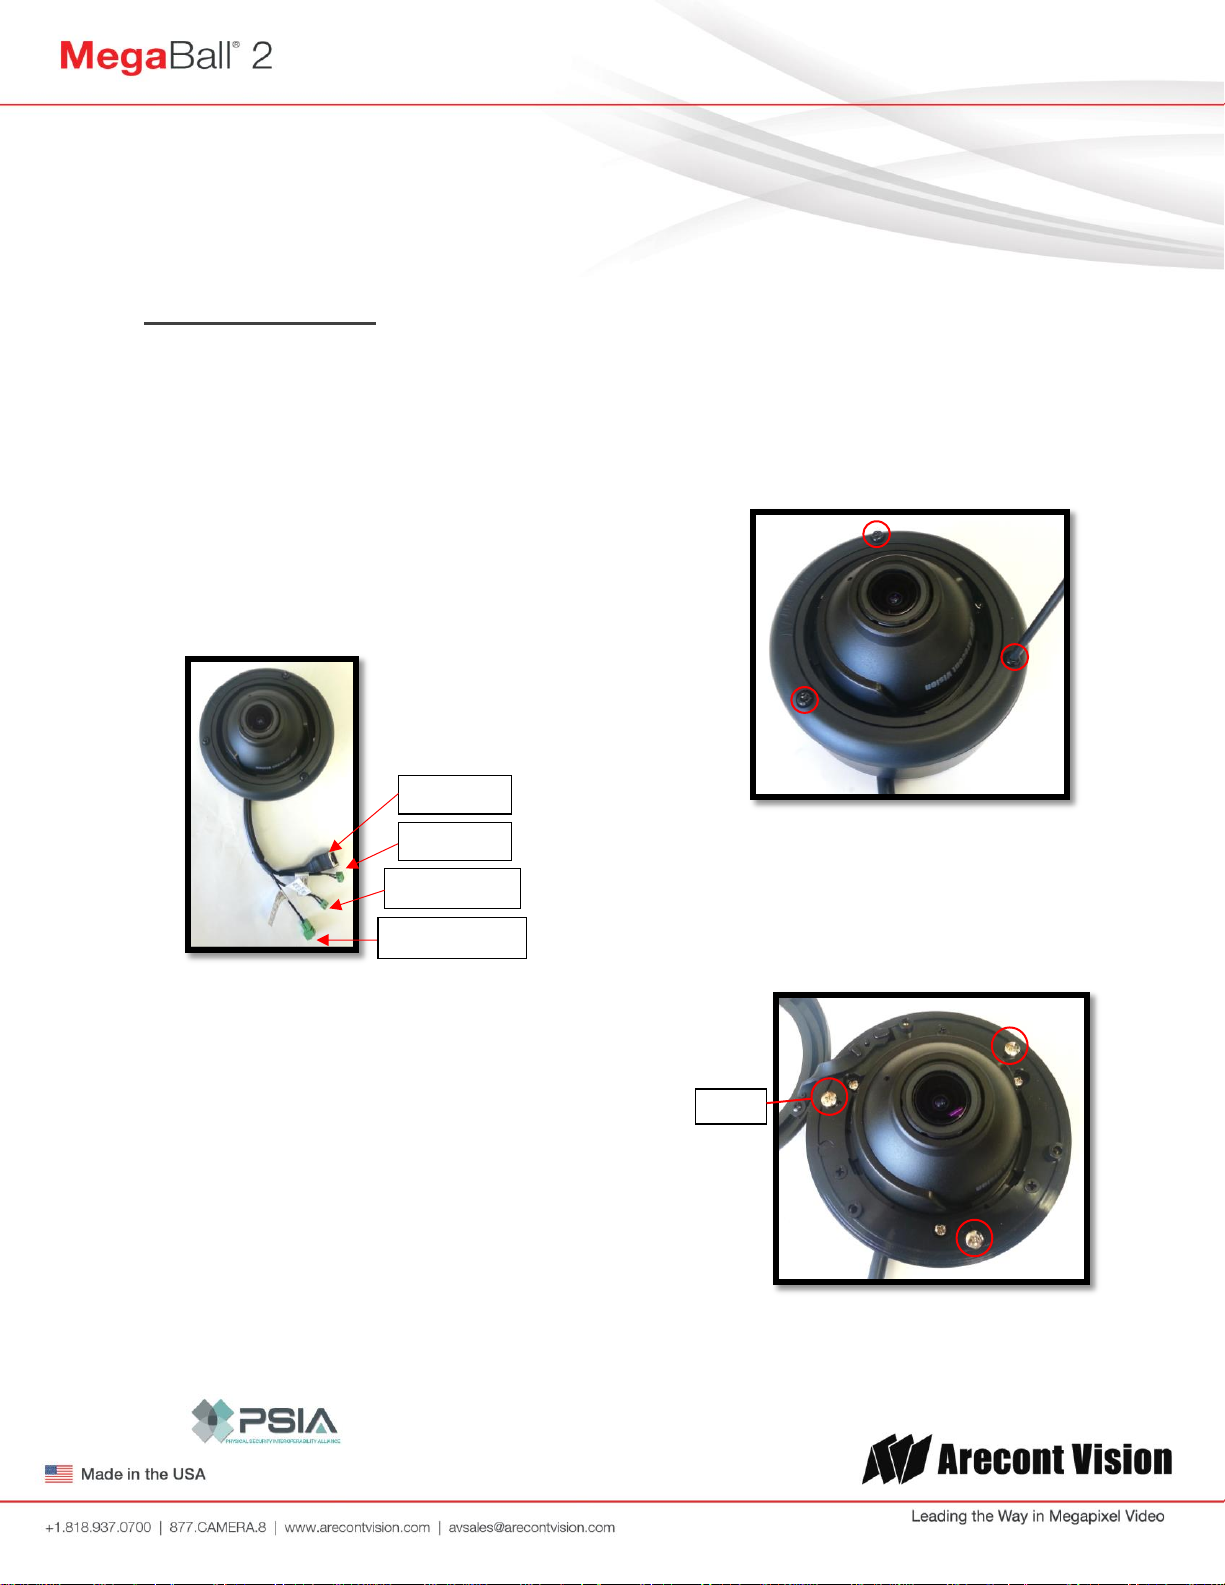
Install MegaBall™ 2 Dome Version (-D Models)
Mounting the Camera:
1. Remove the camera and hardware from the
box.
2. Using the mounting template, prepare the
mounting surface for camera installation.
3. Plug Ethernet cable into the MegaBall™ 2
PoE female RJ45 connector. (Image 5)
NOTE: If the camera will be powered via
PoE, please skip to step 5.
5. Using the provided Security L-key (Image
1F), loosen the three (3) screws securing
the dome cover (Image 6). Remove the
vandal resistant dome cover.
NOTE: Do not remove the screws from the
dome cover.
Image 5
4. If the camera will be powered by an AC 24V
or DC 12-48V power supply, connect
auxiliary power to terminal block on pigtail
cable connector.
NOTE 1: Ensure that the polarity of the DC
input on the camera matches the way that
the wires are installed in the connector
shown in Image 5.
NOTE 2: AC power does not have polarity.
Image 6
6. Loosen the three (3) machine screws
(Image 7) and remove the in-ceiling mount
camera from the surface mount housing.
Image 7
Page 8

Arecont Vision MegaBall® 2 Installation Manual
Lever
Screw
Tilt 90
°
Support
Arm
Set Screw
Camera Body
Rotate 360
°
Camera Sleeve
Rotate 360
°
In-ceiling Mount Installation (Optional)
7. Using the mounting template, cut a hole in
the surface for mounting.
8. Insert the in-ceiling mount camera into the
hole.
9. Tighten the “lever screws” until the flush
mount is snug, as shown in Image 8. The
“Support Arm” will ride down the screw to
compress the mounting surface.
NOTE: Do not over-torque the lever screws.
Adjusting the Tilt, Pan, Z-Axis (Yaw):
12. To adjust the camera tilt, pan or z-axis
(yaw), loosen the 3 set screws on the inceiling mount as shown in Image 9. Then
adjust as necessary and retighten the 3 set
screws.
Image 8
Surface mount installation
10. Align the holes in the surface mount with the
prepared holes on the mounting surface
with the wood screws or any optional
hardware suitable for the mounting surface.
11. Attach the in-ceiling camera to the surface
mount, using the three machine screws as
shown on Image 7.
Page | 8 support@arecontvision.com
Image 9
NOTE : The 3-axis in-ceiling camera allows
360° camera body rotation, 90° tilt, and
360° camera sleeve rotation for easy
installation in any location as shown in
Image 10.
Image 10
Page 9

Arecont Vision MegaBall® 2 Installation Manual
Focus
Ring
Unsymmetrical Ellipse Image
Focus
Ring
Front
Shell
Adjusting focus on Panomorph lens (DN-01
models only)
13. Loosen two set screws on focus ring by
provided security L-key (Image 1-2F on
Page 4) as shown in image 11
Image 11
14. Loosen two set screws on the front shell of
Megaball 2 camera by provided security Lkey (Image 1-2F on Page 4) as shown in
image 12
Image 12
15. To focus AV5245DN-01 camera, rotate
focus ring as needed to get best focus
position as shown in Image 13.
Image 13
NOTE: Ellipse maybe not symmetrical at best
focus position as shown in Image 14
Image 14
16. Rotate lens as needed to get ellipse
symmetrical as shown in Image 15.
Page | 9 support@arecontvision.com
Page 10

Arecont Vision MegaBall® 2 Installation Manual
Lens
Symmetrical Ellipse Image
19. Run the Immervision demo viewer. (Image
17, found on the CD).
Image 15
NOTE: To get properly dewarping image from
ImmerVision Enables® software, Ellipse needs
to be symmetrical as shown in Image 16.
Image 16
17. Tighten two set screws on focus ring by
provided security L-key (Image 1-2F on
Page 4) as shown in image 11
18. Tighten two set screws on the front shell of
Megaball 2 camera by provided security Lkey (Image 1-2F on Page 4) as shown in
image 12
Image 17
20. Choose Arecont from camera list as shown
in image 18.
Image 18
21. Choose A8TRT lens option as shown in
image 19.
Dewarping from Immervsion Demo viewer
(DN-01 models)
Page | 10 support@arecontvision.com
Image 19
Page 11

Arecont Vision MegaBall® 2 Installation Manual
Camera installed on table
Camera installed on ceiling
Camera installed on wall
360° view
180° view
22. Choose camera installation method as
shown in image 20.
Page | 11 support@arecontvision.com
Image 20
Page 12

Arecont Vision MegaBall® 2 Installation Manual
Video Management Systems
Version
Milestone
Corporate 6.1
Enterprise 8.5e
Professional 8.5e
Expert 6.1
Express 1.5e
Essential 2.5e
Genetec
Security Center 5.4
Exacq
Exacq Vision 5.7
Axxon
Axxon Next
Luxriot
VMS 2.4
March Networks
Command 1.6
Nice
Nice Vision 2.7
NUUO
Crystal
QNAP
VioStor 5.0
Salient
4.3.1
Video Insight
VMS 5.5
NOTE: Arecont Vision AV5245DN-01 models use Immervision A8TRT Panomorph lens and can be
dewarped by Arecont Vision certified video management systems as shown in Table 1
Table 1
NOTE: Immervision Demo Viewer only supports JPEG format not H.264 at a maximum frame rate of 7
fps.
NOTE: By using Arecont Vision certified video management systems, the AV5245DN-01 frame rate can
reach 14 fps in both H.264 and JPEG formats.
Page | 12 support@arecontvision.com
Page 13

Drift Pin
Dome Cover (Bubble) Installation
(Optional):
23. Remove the O-ring (Image 1D on Page 4)
from the bezel by pushing on the 4 drift pins
on the back of bezel shown in Image 21.
24. Attach the provided dome cover (Image 1D
on Page 4) to the bezel as shown in Image
22.
Image 21
Image 22
25. Remove the protective film from the bubble.
NOTE: Take precaution not to scratch the
bubble.
26. Secure the dome cover to the camera using
the provided Security L-Key (Image 1F on
Page 4)
Adjusting the Remote Focus and Zoom:
(PM models only)
27. To adjust focus or zoom, open the camera
web interface and click the “Focus” tab as
shown in image 23.
28. To manually adjust zoom, click the “+20”,
“+5”, “+1”, “-20”, “-5”, “-1” buttons to zoom in
and out, adjusting the field of view.
NOTE 1: “+20” zooms in 20x further than “+1”
NOTE 2: If the “Enable Auto Focus after zoom”
option is checked as shown in image 23, the
focus will automatically be adjusted when zoom
is changed.
29. Set up a focus area (if necessary) by
drawing a rectangle with the mouse (by leftclicking and dragging the mouse to a
desired zoom size) shown in Image 23.
30. To automatically adjust focus, choose “Full-
range Focusing” or “Fast Focusing”
depending on the image clarity as shown in
image 23.
31. If the image is completely out of focus,
choose “Full-range Focusing” to scan the
full focus range and find the best focus
position.
32. If the image is slightly of out of focus,
choose “Short-rang Focusing” to fine tune
and quickly get a precise focus position to
save time.
33. 31. To manually focus, click the “+20”, “+5”,
“+1”, “-20”, “-5”, “-1” buttons to fine tune the
focus.
Page 14

Arecont Vision MegaBall® 2 Installation Manual
Image 23
Adjusting P-Iris: ( PM models only)
Note: If “Enable P-Iris” is unchecked, the iris
will be fully open to the maximum. It may
result in less sharpness and artificial color
under strong light condition.
Image 24
Page | 14 support@arecontvision.com
Page 15

Arecont Vision MegaBall® 2 Installation Manual
Electrical
Characteristics:
Min
Max
Camera
Input voltage (V)
(measured between
+ and – terminals)
ON
2.9
6.3
IR & DN
Versions
OFF 0 1.3
Output current (mA)
(measured between
+ and – terminals)
Applied Voltage
Rage: 0 - 80V
ON - 50
DN
version
Only
OFF - 0.1
Yellow
Digital IN +
Red
Digital IN –
Green
Digital OUT +
Black
Digital OUT -
Optional: Connecting Alarm I/O:
34. To use the Alarm I/O, connect the alarm I/O
to the pigtail cable connector as shown in
Image 2.
NOTE: Table 2 shows the electrical
characteristics and Table 3 shows cable color
for digital I/O.
Table 2
NOTE: Both the input and the output are
electrically isolated from the rest of the
camera’s electrical circuitry via general-purpose
photo couplers. The input is additionally
protected with a serial 250 Ohm resistor and a
debouncing circuit. Duration of any input signal
should be at least 5ms to comply with the
requirements of the debouncing circuit.
Table 3
Software Installation
35. Install the AV100 or AV200 application
manager Software found on the CD.
NOTE: you can download latest version AV100
and AV200 and installation manual on website
http://www.arecontvision.com/softwares.php
Page | 15 support@arecontvision.com
Page 16

B C A
Wall Mount (D4S-WMT-B or D4S-WMT) Installation
Instructions (Sold Separately)
Inside the box:
A. Wall mount ( Fits ¾” NPT Standard)
B. Pack of three (3) machine screws
C. Pack of four (4) screws and four (4)
anchors
NOTE: Anchors and screws are good to be
used for concrete, wall block and red bricks.
NOTE: Screws by themselves can be used
in wood.
D. Mounting template
Image 26
NOTE: D4S-WMT-B color is black and D4SWMT color is light grey.
Not included but needed:
#2 Phillips screw driver
Image 25
1. Remove wall mount and hardware from the
box.
2. Using the mounting template, prepare the
mounting provisions for camera
installation.
4. Run Ethernet cable through the wall mount
5. Attach wall mount to the wall using screws
or any optional hardware suitable for the
mounting surface.
6. Connect Ethernet cable with Megaball
pigtail cable as shown on Image 27
Image 27
7. For installation of the camera, please
reference “Mounting the Camera”.
3. Attach surface mount (Image 1B on Page
4) to wall mount as shown in Image 26
using three machine screws provided.
Page 17

B C A D E
Conduit hole
Junction Box Adapter (SV-JBA) Installation Instruction
(Sold Separately)
Inside the box:
A. Junction Box Adapter
B. Pack of four (4) machine screws
C. One double-sided hex key
D. Pack of four (4) screws and four (4)
anchors
NOTE: Anchors and screws are good to be
used for concrete, wall block and red bricks.
NOTE: Screws by themselves can be used
in wood.
E. Mounting template
Image 29
Not included but needed:
#2 Phillips screwdriver
Wall Mount, MD-WMT
¾” NPT Conduit (if necessary)
Image 28
1. Remove junction box adapter and hardware
from the box
2. Remove the conduit plug by first removing
the socket set screw using the provided hex
key (C) as shown on Image 29.
3. Attach the junction box adapter to the wall
using screws or any optional hardware
suitable for the mounting surface.
Image 30
4. Attach the wall mount to junction box
adapter then attach cap to the wall mount
as shown in Image 30.
5. Connect ¾” NPT Conduit to the junction box
adapter.
6. Run Ethernet cable and outside power
cable (if necessary) through the Junction
Box Adapter and Wall Mount.
7. For installation of the camera, please
reference “Mounting the Camera.”
Page 18

D4S-WMT
Bracket holes
A
Electrical Box Adapter (SV-EBA) Installation Instructions
(Sold Separately)
Inside the box:
A. Electrical Box Adapter
B. Pack of four (4) machine screws
Image 32-1 Single gang box
Image 31
Not included but needed:
#2 Phillips head screwdriver
Common electrical box, such as single
gang box, double gang box, or square
electrical boxes shown in Image 32-1~4.
1. Remove the electrical box adapter and
hardware from the box.
2. Attach the wall mount bracket to the
electrical box adapter.
3. Attach adapter to electrical box.
Image 32-2 Double gang box
Image 32-3 Square box
Image 32-4 Square box
Page 19

Arecont Vision MegaBall® 2 Installation Manual
LED
Status
Description
Green
Flashing
Camera has been
accessed. Normal
operation.
Solid
N/A
None
No Connection.
LED Indicators
Page | 19 support@arecontvision.com
Page 20

Arecont Vision MegaBall® 2 Installation Manual
Support
1. Arecont Vision FAQ Page Located at ArecontVision.com
2. Check the following before you call:
Restore camera to factory default with AV100, AV200 or the camera webpage.
Upgrade to the latest firmware by visiting ArecontVision.com.
Isolate the camera on a dedicated network and test with AV100 or AV200.
Swap the “troubled” camera with a known good camera to see if the problem
follows the camera or stays at the location.
3. Contact Arecont Vision Technical Support one of three ways:
1. Online Portal : Support.ArecontVision.com
2. Phone : 1.818.937.0700 (option #1)
3. Email : support@arecontvision.com
Page | 20 support@arecontvision.com
Page 21

Arecont Vision MegaBall® 2 Installation Manual
Revised 5.13
Mounting Template
MegaBall Dome ( In-ceiling) (-D) MegaBall Dome Surface mount (-D)
MegaBall Wall Mount (-W)
Page | 21 support@arecontvision.com
 Loading...