

MA-XL1
Lecture Capture Station
User’s Manual (concise)
Please read through this manual before using this product, in order to use safely and
utilize well the product.
使用说明书 ( 简易版 )
为了您能够更安全舒适地使用本产品,请在使用本产品前请仔细阅读本说明书。
L
R
IC ID:25103-MAXL1
FCC ID:2ABGQ-MA-XL1
ENGLISH
Lecture Capture Station
MA-XL1
User’s Manual (concise)
Thank you for purchasing this Lecture Capture Station.
This is the basic manual on the product. Visit our website to get the detailed manuals
(Safety Guide, Operating Guide) and the latest information on the product.
Check them before using the product, for safe use and utilization of the product.
Our website: Please see the attached sheet
!
WARNING
• Before using this product, be sure to read all manuals for the product. After
reading them, store them in a safe place for future reference.
• Heed all the warnings and cautions in the manuals or on the product.
• Follow all the instructions in the manuals or on the product.
01
ENGLISH
Contents
(Page no.)
First of all
Graphical symbols explanation
Important Safety Instructions
Disposal of Old Equipment and Batteries Only for European Union
and countries with recycling systems
Note for the battery symbol (bottom symbol)
About Electro-Magnetic Interference
Package accessories
Placement
Product connection
Connecting the power supply
Product setup
Connection
Basic operations
Turning on the power
Turning o the power
Specications
02
02
03
03
04
04
05
06
07
08
09
09
11
11
11
12
Manufacturing year and month
14
First of all
Graphical symbols explanation
The following entries and graphical symbols are used for the manuals and the product
as follows, for safety purpose. Know their meanings beforehand and heed them.
!
WARNING
!
CAUTION
NOTICE
This entry warns of a risk of
serious personal injury or even
death.
This entry warns of a risk of
personalinjury or physical
damage.
This entry notices of fear of
causing trouble.
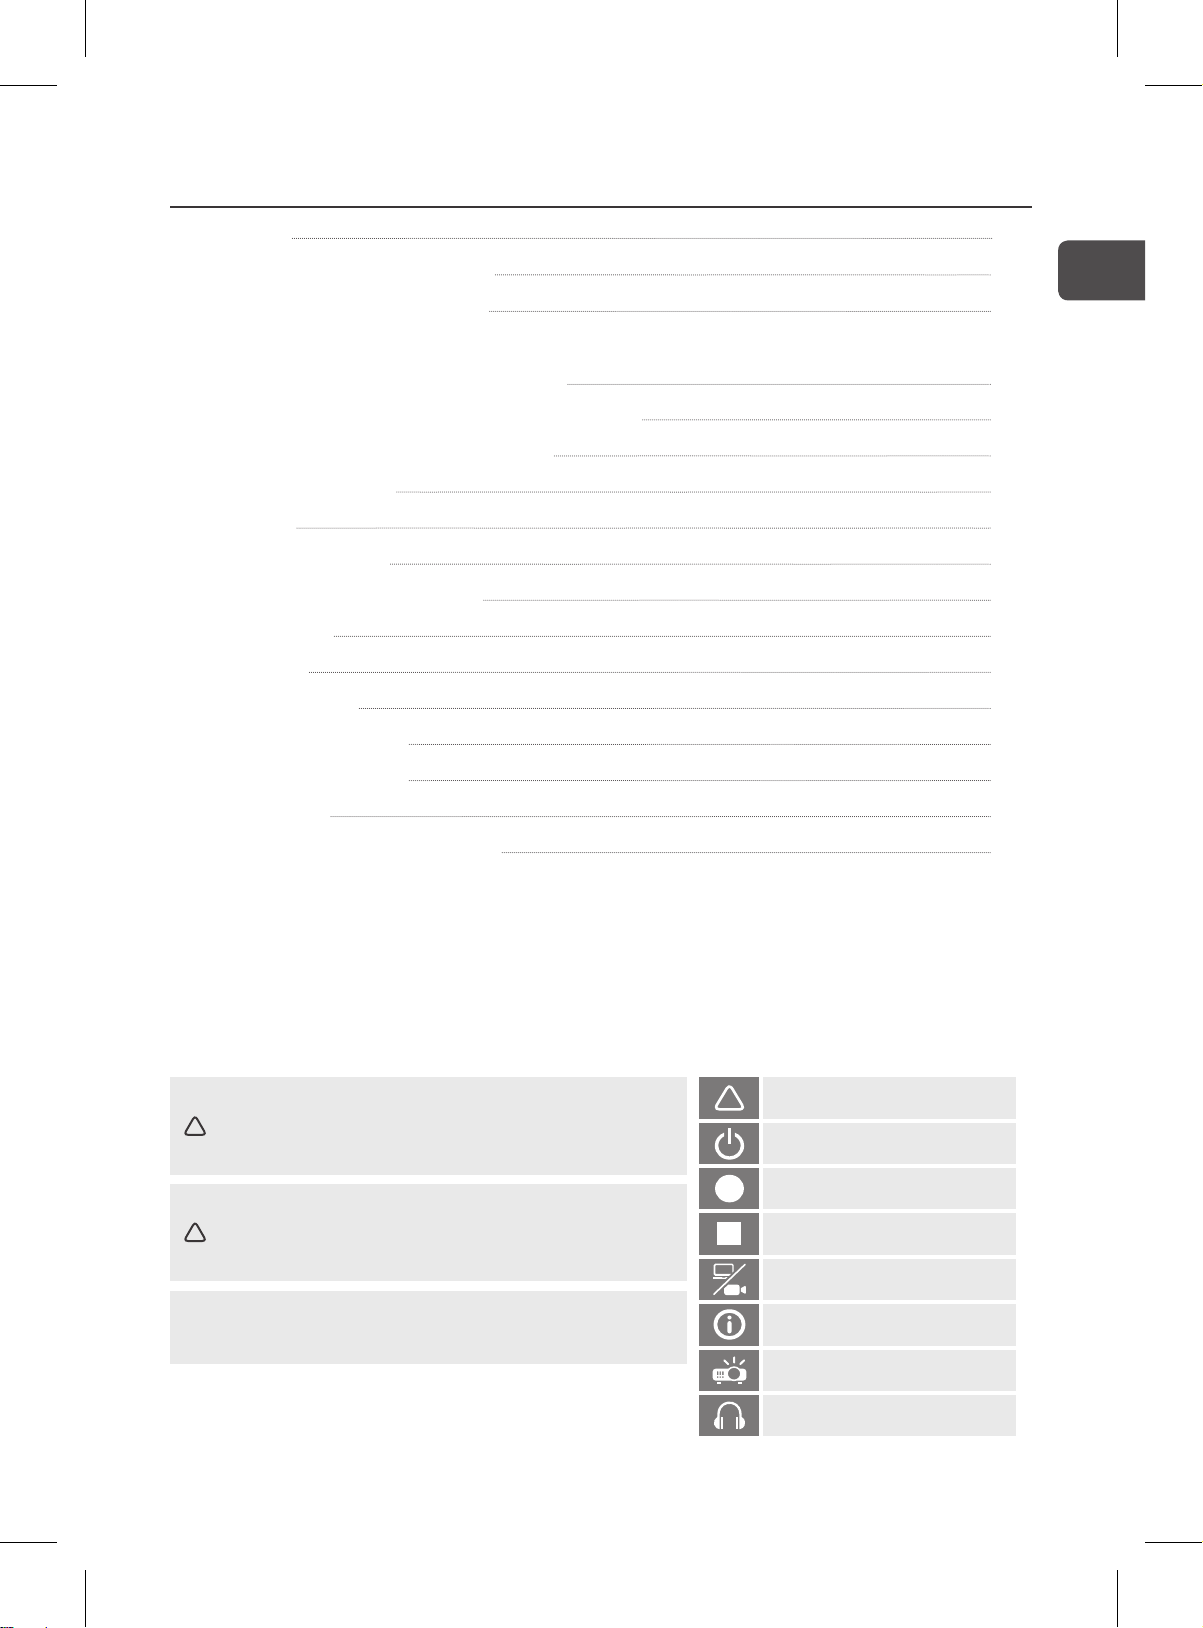
Warning / Caution
!
Turns the power on/o
Starts recording
Stops recording
Switches channel
Information
Projector power on/o
Audio output
02
ENGLISH
Important Safety Instructions
The followings are important instructions for safely using the product. Be sure to follow
them when handling the product. The manufacturer assumes no responsibility for any
damage caused by mishandling that is beyond normal usage dened in these manuals
of this product.
!
WARNING
• Never use the product in or after an abnormality (for example, giving o smoke, smelling
strange, nding a foreign object inside, and so on.) If an abnormality should occur,
unplug the product urgently.
• This product is suitable for adults who have the ability to operate this machine. Situate
the product away from children and pets.
• Keep small parts away from children and pets. If swallowed, consult a physician
immediately for emergency treatment.
• Do not use the product during electrical storms.
• Unplug the product from the power outlet if the product is not being used.
• Do not open or remove any portion of the product, unless the manuals direct it. For
internal maintenance, leave it to your dealer or their service personnel.
• Use only the accessories specied or recommended by the manufacturer.
• Do not modify the product or accessories.
• Do not let any things or any liquids enter to the inside of the product.
• Do not get the product wet.
• Do not place the product where any oils, such as cooking or machine oil, are used. Oil
may harm the product, resulting in malfunction, or falling from the mounted position.
• Do not apply a shock or pressure to this product.
- Do not place the product on an unstable place such as the uneven sur
leaned table.
- Ensure the product is stable. Place the product so that it does not protrude from the
surface where the product is placed on.
- Place your hands on the grip on the bottom of the product when carrying it.
- Remove all the attachments including the power cord and cables, from the main device
when carrying it.
• Do not approach the exhaust vents, while the product is on.
face or the
Disposal of Old Equipment and Batteries Only for European Union
and countries with recycling systems
The above mark is in compliance with the Waste Electrical and Electronic Equipment
Directive 2012/19/EU (WEEE). The mark indicates the requirement NOT to dispose
the equipment including any spent or discarded batteries as unsorted municipal waste,
but use the return and collection systems available. If the batteries or accumulators
included with this equipment display the chemical symbol Hg, Cd, or Pb, then it means
that the battery has a heavy metal content of more than 0.0005% Mercury, or more
than 0.002% Cadmium or more than, 0.004% Lead.
03
ENGLISH
Note for the battery symbol (bottom symbol)
This symbol might be used in combination with a chemical symbol. In this case it
complies with the requirement set by the Directive for the chemical involved.
About Electro-Magnetic Interference
This is a Class A product. In a domestic environment this device may cause radio
interference in which case the user may be required to take adequate measures.
This device may cause interference if used in residential areas. Such use must be
avoided unless the user takes special measures to reduce electromagnetic emissions to
prevent interference to the reception of radio and television broadcasts.
Hereby, Maxell, Ltd., declares that the radio equipment type Lecture Capture Station is
in compliance with Directive 2014/53/EU.
The full text of the EU declaration of conformity is available at the following internet
address:
http://www.maxell.eu/uploads/docs/PJ-DoC.pdf
!
CAUTION
– the ventilation should not be impeded by covering the ventilation openings with items,
such as newspapers, table-cloths, curtains, etc.:
– no naked ame sources, such as lighted candles, should be placed on the apparatus;
– attention should be drawn to the environmental aspects of battery disposal;
– the use of apparatus in tropical climates.
the instructions for use shall state that the apparatus shall not be exposed to dripping
or splashing and that no objects lled with liquids, such as vases, shall be placed on the
apparatus.
04

ENGLISH
L
R
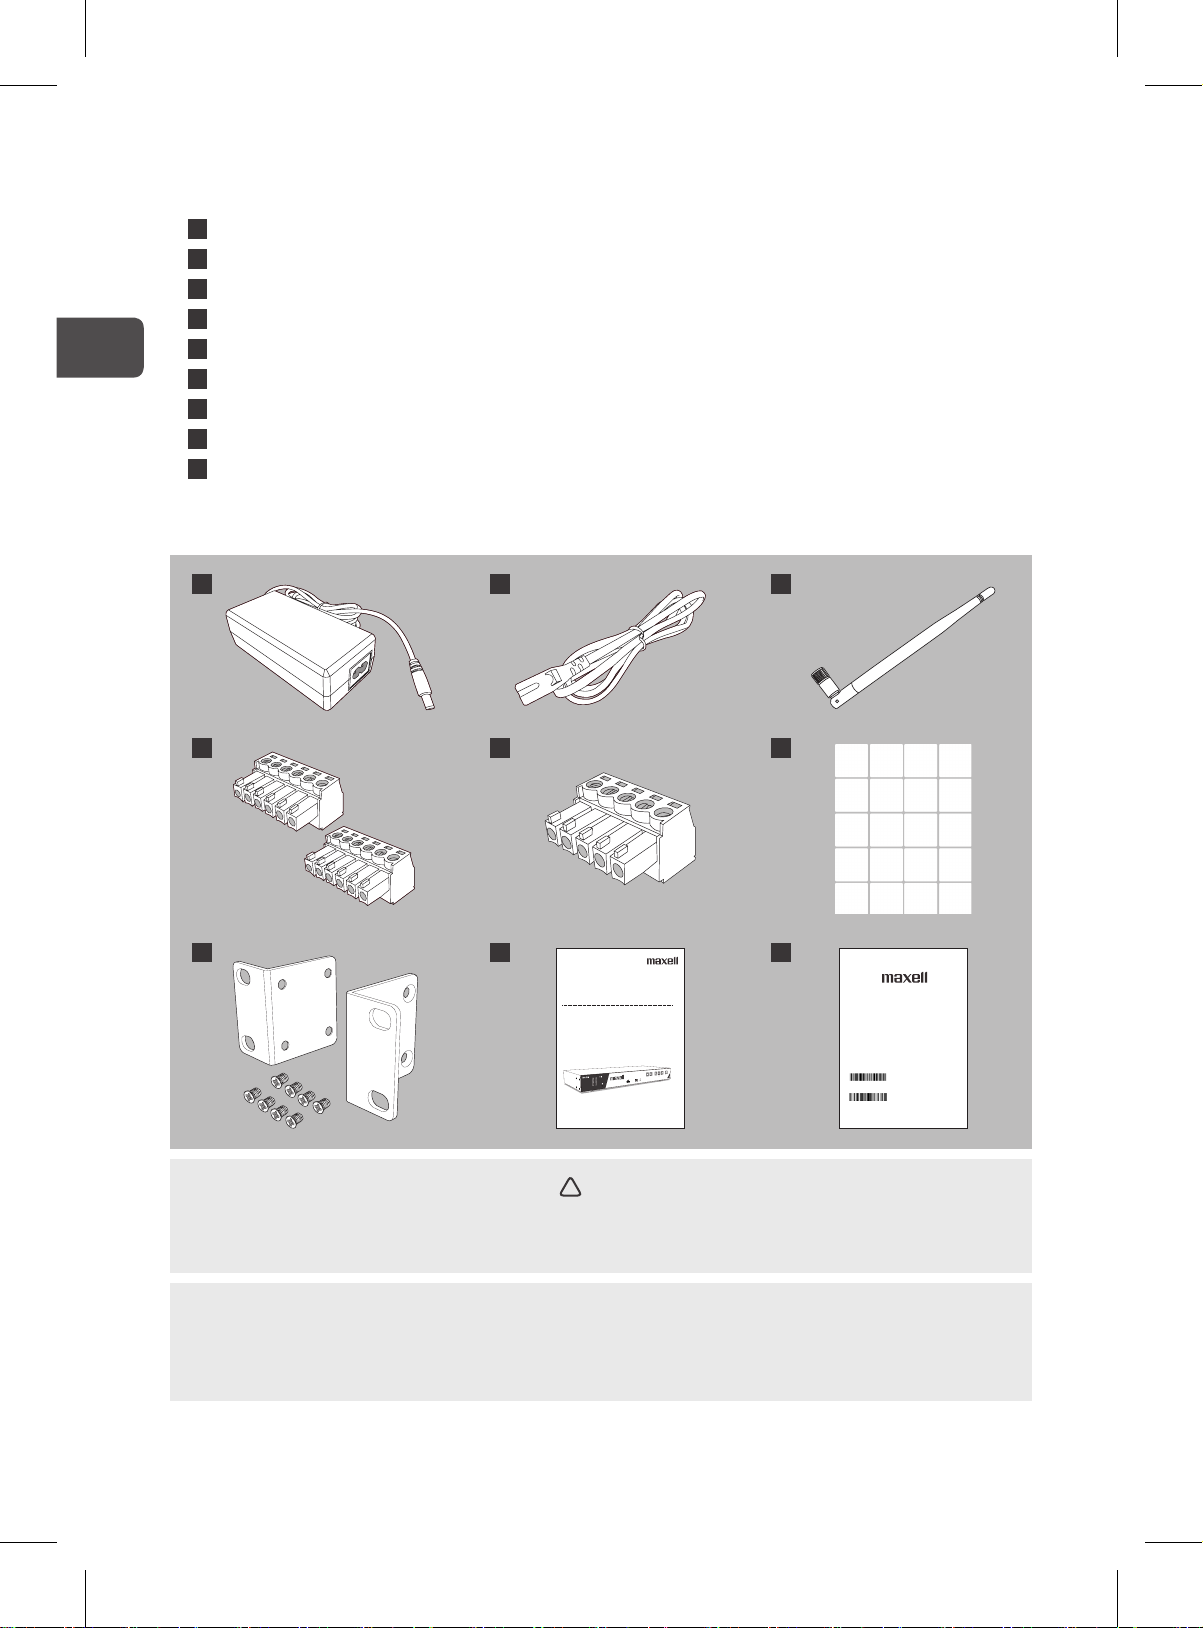
Package Accessories
Your product should come with the items shown below. Check that all the items are
included. Contact your dealer immediately if any items are missing.
1
Power adaptor
2
Power cord *
3
Bluetooth Antenna
4
Balance line connector (2 units)
5
DIDO connector
6
USB number keyboard stickers
7
Rack mount bracket (1 pair) + M4 x 6mm screw (8 units)
8
User’s manual (concise)**
9
URL sheet
* The number of power cords varies depending on the region.
** This concise is a basic manual. For details, consult the “Operating Guide” from our
website before using. (1)
31 2
4
5
6
97 8
Lecture Capture Station
MA-XL1
User’s Manual (concise)
Please read through this manual before using this product, in order to use safely and
utilize well the product.
使用说明书( 简易版 )
为了您能够更安全舒适地使用本产品,请在使用本产品前请仔细阅读本说明书。
!
WARNING
http://biz.maxell.com/en/display_equipment/
(ENGLISH)
Thank you for purchasing this Lecture Capture Station.
Before using this product, be sure to read all manuals for this product.
Please check the above web address where you may nd the latest information for this product.
(简体中文)
承蒙您购买本智能录播一体机,谨向您表示衷心的感谢。
在使用本产品前,请仔细阅读本产品之所有说明书。
欢迎访问上述网站,以取得本产品之最新信息。
2021MAXL00
QR92741
• Keep small parts away from children and pets. Take care not to put in the mouth. If
swallowed, consult a physician immediately for emergency treatment.
NOTICE
• Keep the original packing materials for future reshipment. Be sure to use the original
packing materials when moving the product.
Printed in Taiwan
05
ENGLISH
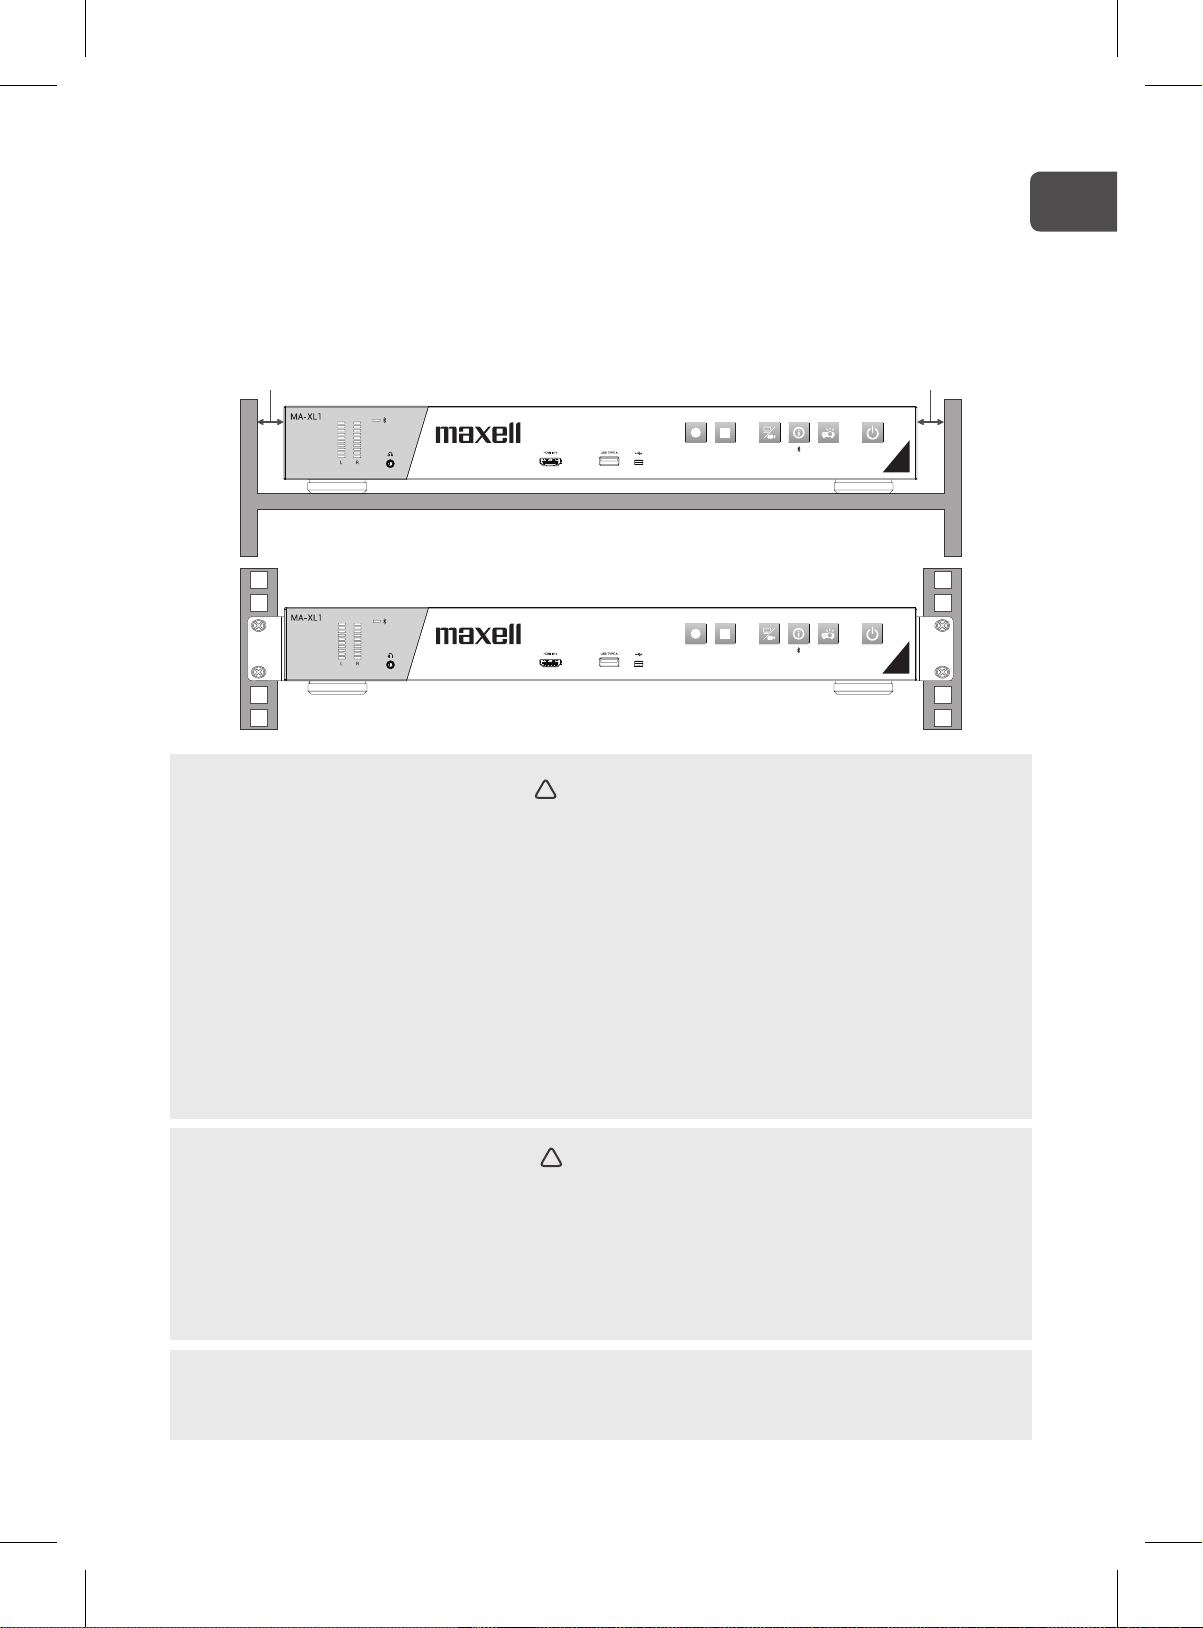
Placement
Please set this product to level. This product can be mounted into a rack (for 19-inch
rack) with the
provided “rack mount bracket”. When attaching the rack mount bracket to the main
unit, be sure to use the provided screws. For details, consult the Operating Guide.
Please follow the manual of the rack to mount.
Please take a distance of more than 2 cm between the product and the wall.
2 cm or greater2 cm or greater
(1)
!
WARNING
• Install the product where you can access the power outlet easily.
• Do not install the product near thermally conductive or ammable things.
• Do not place the product in a place where it may get wet.
• Do not place the product where any oils, such as cooking or machine oil, are used. Oil
may harm the product, resulting in malfunction, or falling from the mounted position.
• Install the product in a stable horizontal position.
- Do not put the product on its side, front or rear position
- Do not attach nor place anything on the product unless otherwise specied in the manual.
• Do not block the intake vents and exhaust vents of the product. If the intake vents and
exhaust vents of the product are blocked, the accumulated inside heat may cause re.
• When attaching the rack mount to the main unit, be sure to use the provided screws.
Using other screws may cause failure, re, or electric shock.
!
CAUTION
• Place the product in a cool place with sucient ventilation.
- Do not stop up, block nor cover the product’s vent holes.
- Do not place the product at places that are exposed to magnetic elds, doing so can
cause the cooling fans inside the product to malfunction.
• Avoid placing the product in smoky, humid or dusty place.
- Do not place the product near humidiers.
NOTICE
• Do not place the product in a place where radio interference may be caused.
06
ENGLISH
Product connection
Before connecting the product to a device, consult the manual of the device to conrm
that the device is suitable for connecting with this product and prepare the required
accessories, such as a cable in accord with the signal of the device.
Consult your dealer when the required accessory did not come with this product or the
accessory is damaged.
After making sure that this product and the devices are turned off, perform the
connection, according to the following instructions.
For details, consult the Operating Guide. (1)
!
WARNING
• Use only the appropriate accessories. Otherwise it could cause a re or damage the product
and devices.
- Use only the accessories specied or recommended by this product’s manufacturer. It
may be regulated under some standards.
- Neither disassemble nor modify this product and the accessories.
- Do not use the damaged accessory. Be careful not to damage the accessories. Route a
cable so that it is neither stepped on nor pinched.
!
CAUTION
• Before connecting this product to a network system, be sure to obtain the consent of the
administrator of the network.
• Do not connect the WAN/LAN port to any network that might have the excessive voltage.
• If you use the product connected to the network, there is a risk of information leakage via
the product. Also, since there is a fear of illegal operation, please be sure to perform
network security measures including the following countermeasures under the responsibility
of the customer.
- Use the product on a network that is secured with a rewall etc.
- When using the product on a system to which a PC is connected, it checks and remov
infections of computer viruses and malicious programs on a regular basis.
- Change the password of admin / director / video manager, and limit the users who can
login. For details, consult the Operating Guide. (1)
- Do not leak video data, authentication information (user name, password), various ser
information, etc. on the network.
- Do not install the product or its cable in places where it can be easily change connection.
es
ver
NOTICE
• Do not turn on or o this product while connected to a device in operation, unless that is
directed in the manual of the device.
• Some input ports are selectable in the use. For details, consult the Operating Guide. (1)
• Be careful not to mistakenly connect a connector to a wrong port.
07
ENGLISH
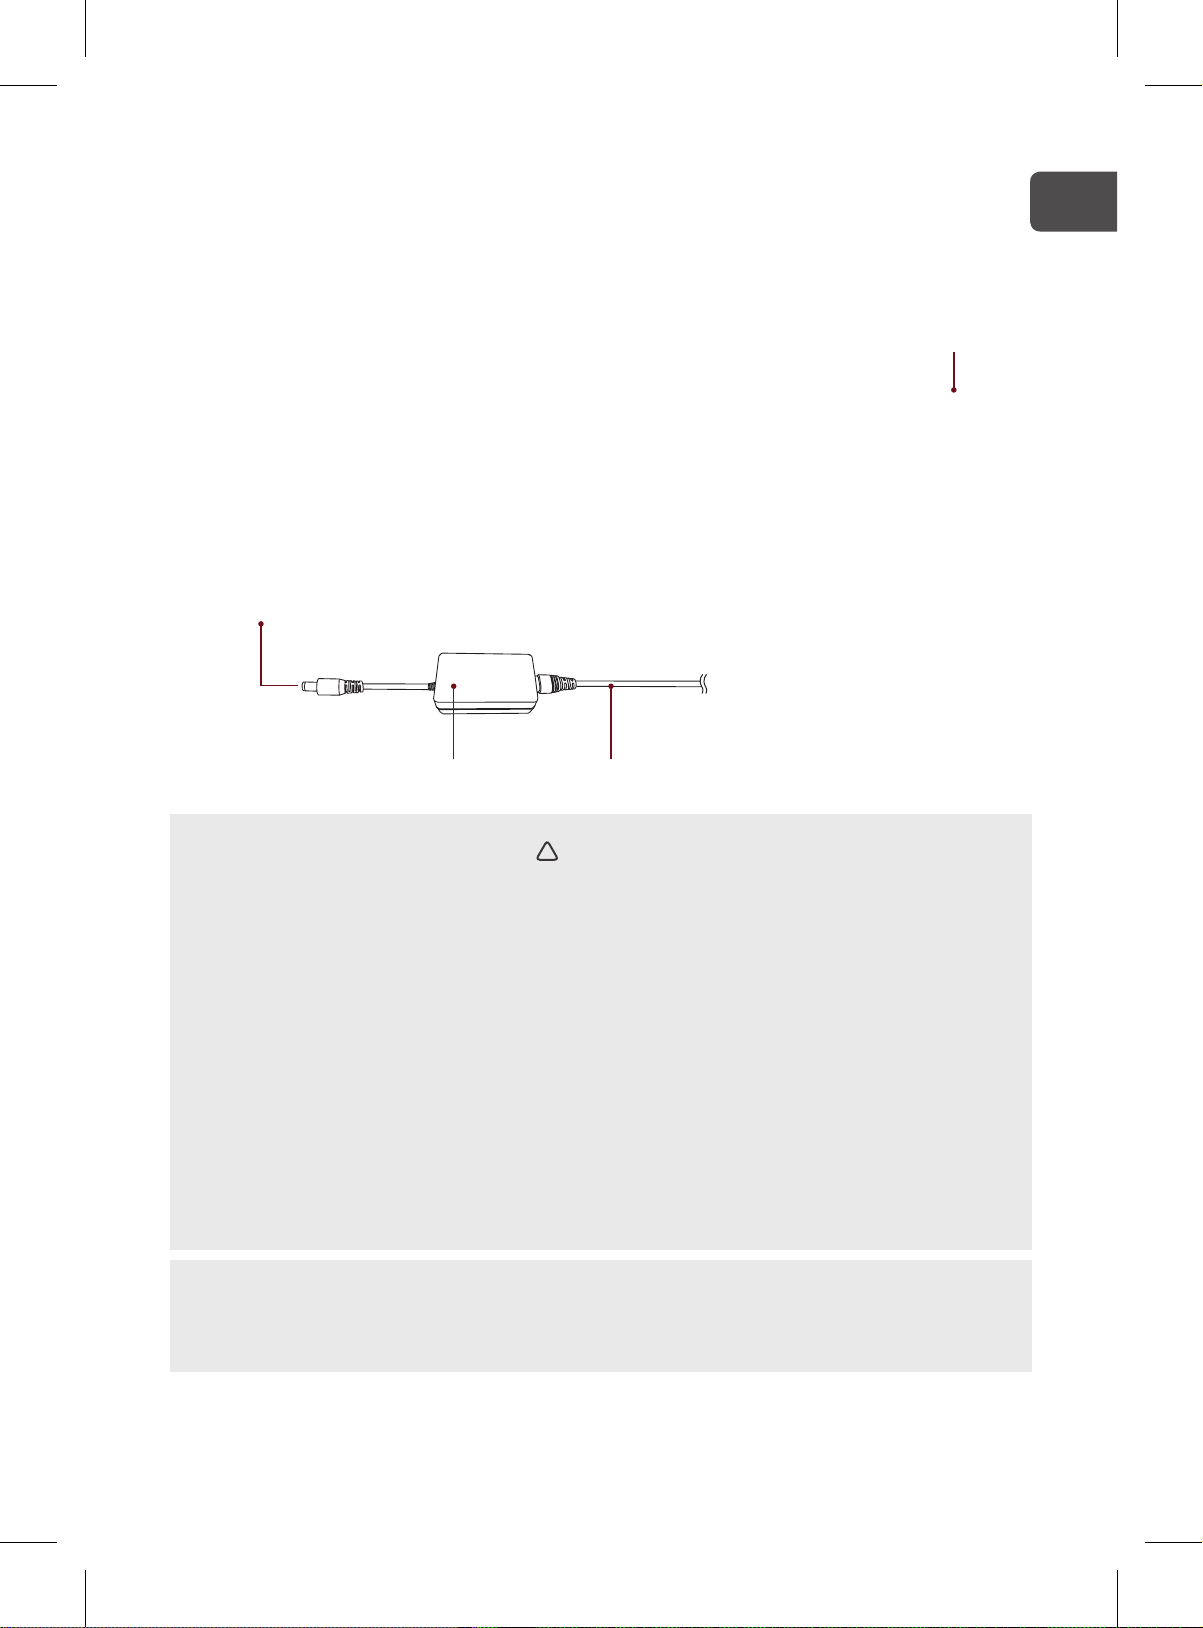
Connecting the power supply
1. Connect the power cord to the Power adaptor.
2. Put the DC plug of the power adaptor into the DC 24V connector of the product.
3. Firmly plug the power cord’s plug into the outlet. In a couple of seconds after the
power supply connection, the POWER indicator lights up in steady red.
Power button / indicator
DC plug
Power adaptor Power cord
!
WARNING
• Use extra caution when connecting the power cord, as incorrect or faulty connections may
result in re and/or electrical shock.
- Do not touch the power cord with a wet hand.
- Only use the Power cord and the Power adaptor that came with the product. If it is
damaged, consult your dealer to get a new one. Never modify the power cord and the
Power adaptor.
- Only plug the power cord into an outlet whose voltage is matched to the power cord. The
power outlet should be close to the product and easily accessible. Remo
for complete separation.
- Do not distribute the power supply to multiple devices. Doing so may o
and connectors, loosen the connection, or result in re, electric shock or other accidents.
- Connect the terminal for the AC inlet of power adaptor to the power outlet of the building
using an appropriate power cord (bundled).
- When multiple power cords are included, please use the power cord that matches the
outlet shape.
NOTICE
• This power adaptor is also designed for IT power systems with a phase-to-phase voltage of
220 to 240 V.
ve the power cord
verload the outlet
08
ENGLISH
Product setup
The input port assignment must be set up from web browser by the administrator. For
details, consult the Operating Guide.
(1)
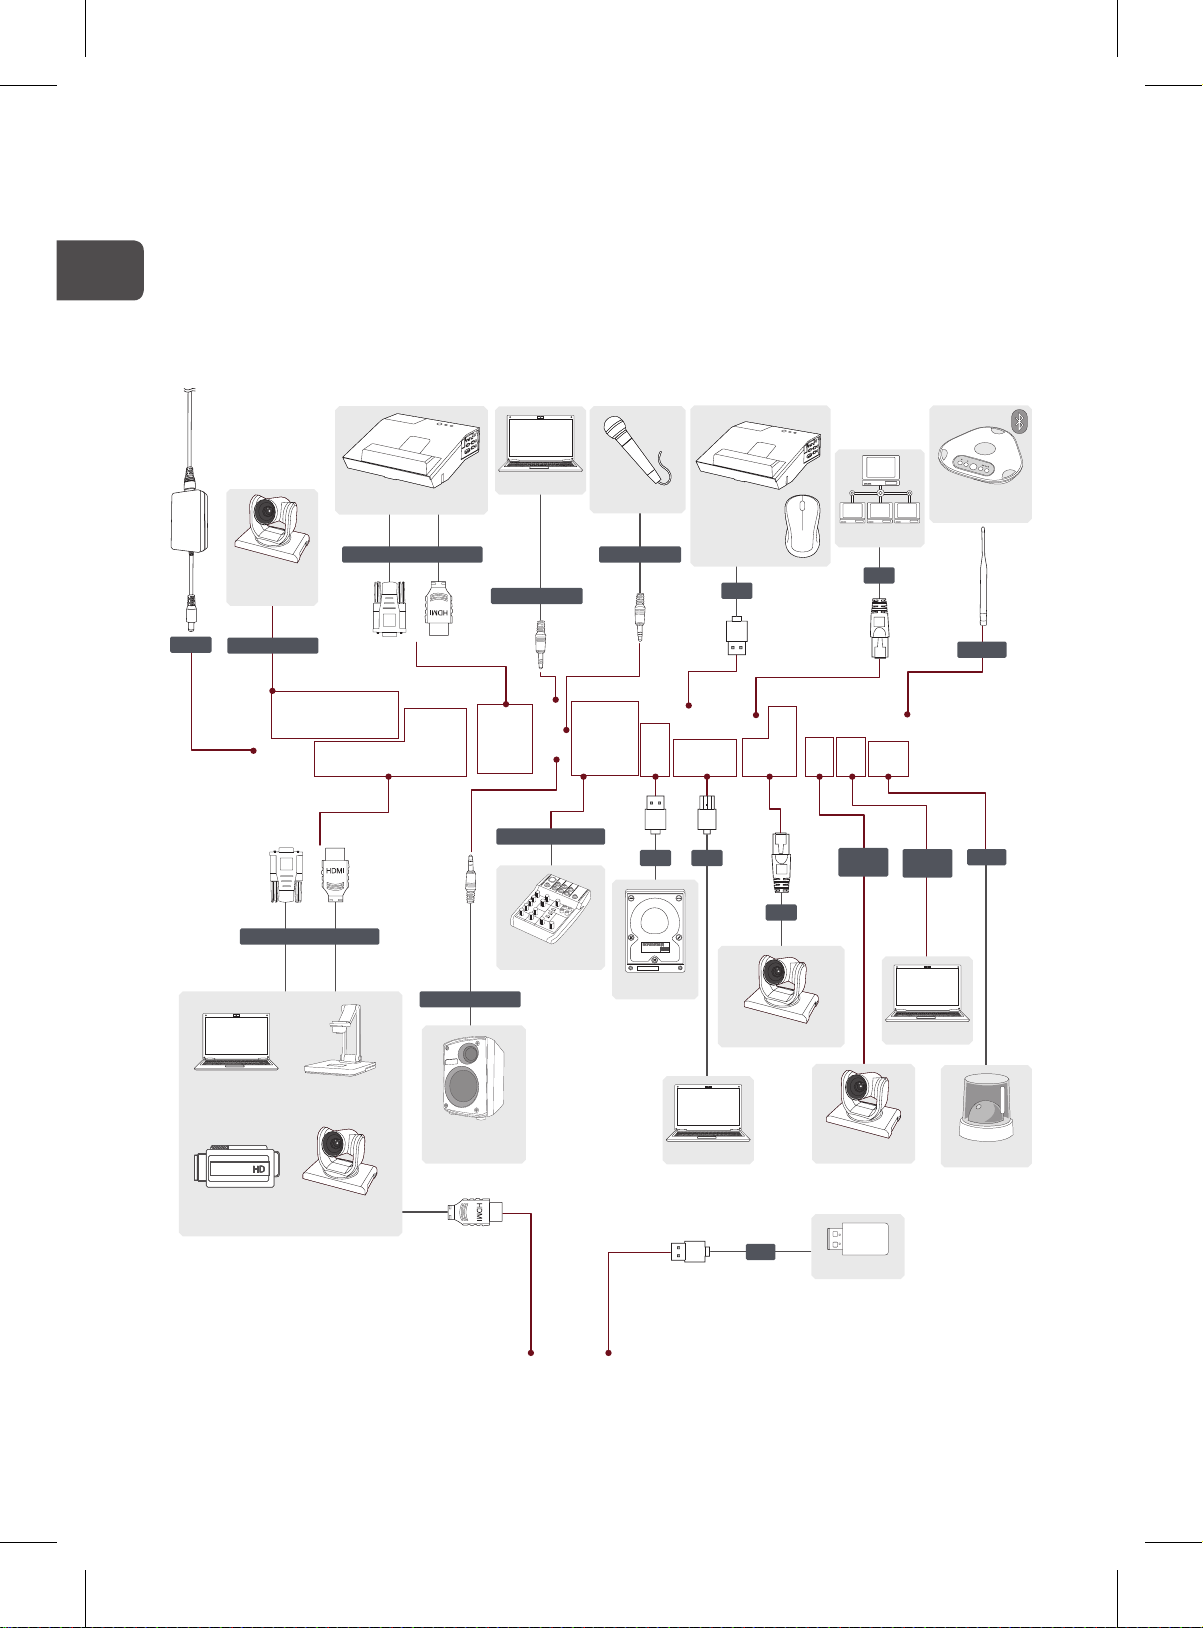
Connection
Please turn o this product when hook up other devices. For how to turn o the power,
consult the "Turn o the power".
Consult the below wiring schematic.
Power
HD-SDI
camera
Video input SDI
Video input VGA / HDMI
Projector
Line audio output
Computer
Line audio input
Audio input/output
Audio mixer
Microphone
Mic audio inputVideo output VGA / HDMI
USB
Hard drive
Projector /
Mouse
USB
USB
Network camera
LAN
Network
WAN
RS-232
out
speakerphone
RS-232
in
Computer
Bluetooth
Antenna
DI/DO
Document camComputer
DV PTZ camera
Speaker with
an amplier
(continued on next page)
09
Computer
USB
PTZ camera
USB drive
I/O devices

ENGLISH
Connection (continued)
!
CAUTION
• Consult the administrator of Network before connecting to WAN/LAN port.
• Do not connect the LAN port to any network that might have the excessive voltage.
• Incorrect connection may cause the malfunction. Please connect cables with care.
• Turn o the speaker and this product at connection to avoid unexpected large volume ow.
• Adjust volume with care when using an amplied speaker.
NOTICE
• Before connecting, consult the manual of device that is using with this product.
• The Length of LAN cable must be equal or less than 100m. When the length is over 100m,
it may cause the quality loss on the image/sound or malfunction on network
communication.
• The Length of BNC cable must be equal or less than 100m.
• Use RJ-45 connector when connecting to WAN/LAN port.
• For details, consult the Operating Guide. (1)
RSS-Gen Issue 4 8.4
This device complies with Industry Canadaʼs licence-exempt RSSs. Operation is subject to the following two conditions:
(1) This device may not cause interference; and (2) This device must accept any interference, including interference that
may cause undesired operation of the device.
Le présent appareil est conforme aux CNR d'Industrie Canada applicables aux appareils radio exempts de licence.
L'exploitation est autorisée aux deux conditions suivantes: (1) l'appareil ne doit pas produire de brouillage, et (2)
l'utilisateur de l'appareil doit accepter tout brouillage radioélectrique subi, même si le brouillage est susceptible d'en
compromettre le fonctionnement.
Industry Canada ICES-003 Compliance Label:
CAN ICES-3 (*)/NMB-3(*)
* Insert either “A” or “B” but not both to identify the applicable Class of ITE.
15.19 (All FCC application)
This device complies with Part 15 of the FCC Rules.
Operation is subject to the following two conditions: (1) this device may not cause harmful interference, and (2) this device
must accept any interference received, including interference that may cause undesired operation.
15.105 (Part 15B unintentional radiator / including composite device)
digital device or peripheral, the instructions furnished the user shall include the following or similar statement, placed in a prominent
location in the text of the manual:
This equipment has been tested and found to comply with the limits for a Class A digital device, pursuant to part 15 of the
FCC Rules. These limits are designed to provide reasonable protection against harmful interference when the equipment is operated
in a commercial environment. This equipment generates, uses, and can radiate radio frequency energy and, if not installed and used
in accordance with the instruction manual, may cause harmful interference to radio communications. Operation of this equipment in a
residential area is likely to cause harmful interference in which case the user will be required to correct the interference at his own
expense.
15.21 (All FCC application)
Any changes or modifications not expressly approved by the party responsible for compliance could void the authority to operate
equipment.
This device and its antenna must not be co-located or operating in conjunction with any other antenna or transmitter.
For product available in the USA/Canada market, only channel 1~11 can be operated. Selection of other channels is not
possible.
10

ENGLISH
Basic operations
Turning on the power
1. Make sure that the Power adaptor and power cord is rmly and correctly connected
to the product and the outlet.
2. Make sure that the POWER indicator is lighted in steady red.
3. Press the (power) button on the product.
Power button / indicator
Press the power button to start automatically.
When the power button is pressed, the power indicator lights red and green alternately.
When startup is completed, the indicator lights in steady green.
NOTICE
• Turn on any connected devices prior to the product.
• After turning o the power, if the indicator is light in red it is possible to turn on the power.
Turning o the power
1. Press the POWER button on the product. The message “Shutdown?” appears on the
screen for about 10 seconds.
2. Press the POWER button again while the message appears. the POWER indicator will
begin blinking in red. Then the POWER indicator will stop blinking and light in steady
red when shutdown completed.
!
WARNING
• Remove the power cord for complete separation.
• Turn o any connected devices prior to the product power o.
11
Power button / indicator

ENGLISH
Specications
Item Specication
Product Name Lecture Capture Station
Model Name MA-XL1
Dimension
Weight (mass) Approx. 3.0 kg
Approx. 430 mm(W) x 60 mm(H) x 206 mm(D)
(without rackmount)
Approx. 480 mm(W) x 60 mm(H) x 206 mm(D)
(with rackmount)
Power Requirement
Power Consumption (Max.) 60W (Max.)
Operating Temperature / Humidity 0ºC ~ 40ºC / 10% ~ 90% RH
WAN, LAN 10 / 100 / 1000Mbps
Ports
DC : 24V/2.5A
AC : 100~240V/1.5A
Front audio output .............
SDI IN 1 ...................................................
SDI IN 2 ...................................................
SDI IN 3 ...................................................
HDMI IN 1 ......................................
HDMI IN 2 ......................................
HDMI IN 3 ......................................
HDMI IN 4 ......................................
COMPUTER IN ........................
MONITOR OUT .......................
HDMI OUT ......................................
AUDIO IN .........................
MIC IN .............................
AUDIO OUT ......................
AUDIO IN(L,R) ...................
AUDIO OUT(L,R) ................
USB TYPE A ...........................................
USB TYPE A(INTERACTIVE) .....................
USB TYPE B 1 ........................................
USB TYPE B 2 ........................................
WAN ........................................................
LAN 1 ......................................................
LAN 2 ......................................................
LAN 3 ......................................................
CONTROL 1 .................................
CONTROL 2 .................................
DIDO .................................
Bluetooth antenna .....................................
3.5 mm (stereo) mini jack x1
BNC jack x1
BNC jack x1
BNC jack x1
HDMI connector x1
HDMI connector x1
HDMI connector x1
HDMI connector x1
D-sub 15 pin mini jack x1
D-sub 15 pin mini jack x1
HDMI connector x1
3.5 mm (stereo) mini jack x1
3.5 mm (stereo) mini jack x1
3.5 mm (stereo) mini jack x1
detachable terminal block x1
detachable terminal block x1
USB Type A x3
USB Type A x1
USB Type B x1
USB Type B x1
RJ45 jack x1
RJ45 jack x1
RJ45 jack x1
RJ45 jack x1
Mini DIN 8 pin jack x1
Mini DIN 8 pin jack x1
detachable terminal block x1
SMA jack x1
(continued on next page)
12
ENGLISH
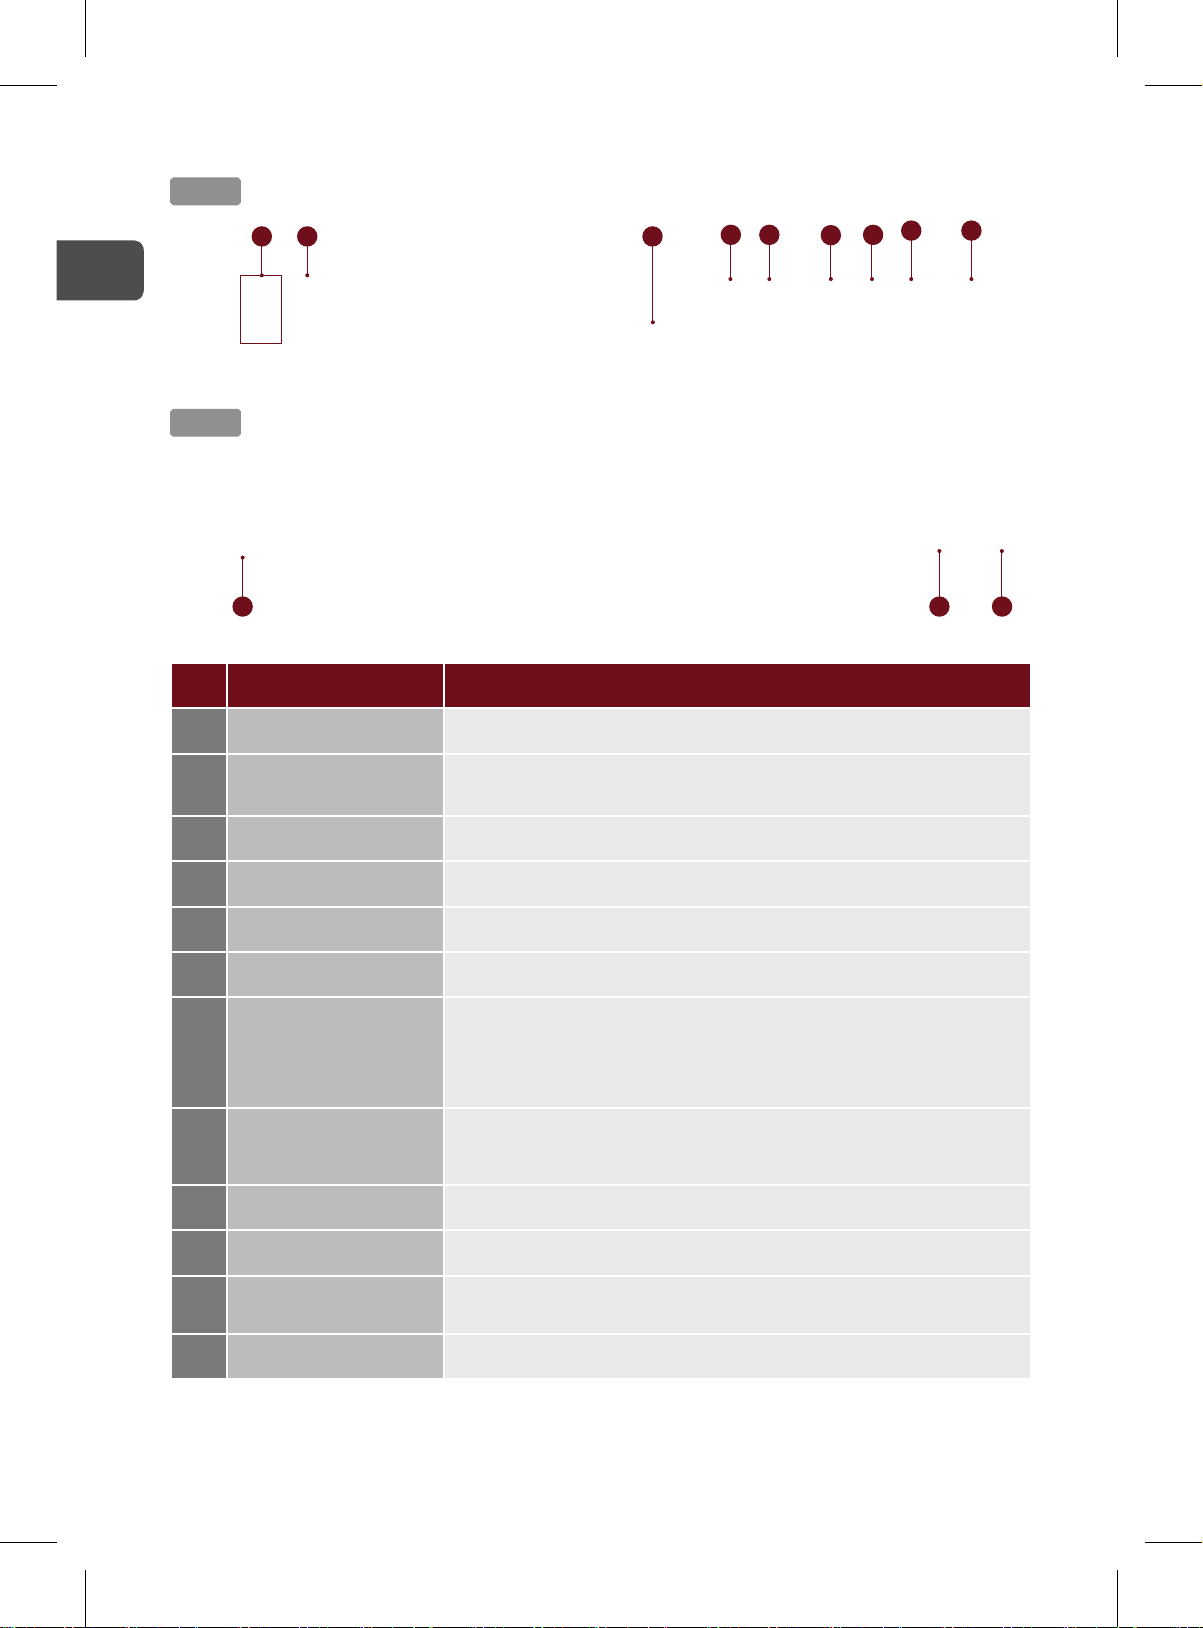
Specications (continued)
Front
1
2
3
4 5 6
7
Back
10 11 12
No. Name Brief introduction
1 Audio volume meter Display audio level
Bluetooth pairing
2
indicator
Show Bluetooth connection status
98
3 USB indicator Show front USB storage status
4 Recording start button Recording start and pause
5 Recording stop button Recording stop
6 Video switch button Video source switch; cycling switch for each assigned source
Short push: Information list appears and USB mouse control
7 Information button
switch back from PC to the product
Long push: Approx. 2 sec. Bluetooth pairing start
8 Projector power button
Power on / o button of PJLink compatible projector or Hitachi
/ Maxell projector.
9 Main power button Power on / o button for MA-XL1
10 Power connector DC : 24V / 2.5A
11 Reset button
Press about 15 seconds to Reset all settings to factory
default value
12 Security bar Security bar
13

ENGLISH
Manufacturing year and month
The manufacturing year and month of this product is indicated as follows in the serial
number of the rating label on the product.
Example:
T 9 A W 0 0 0 0 0 1
Manufacturing month: A=January, B=February, ... L=December
Manufacturing year: 9=2019, 0=2020, 1=2021, ...
NOTICE
• The information in this manual is subject to change without notice.
• The illustrations shown in this manual are example only. Your product may dier from the
illustrations.
• The reproduction, transfer or copy of all or any part of this document is not permitted
without express written consent.
14
简体中文
智能录播一体机
MA-XL1
使用说明书 ( 简易版 )
承蒙您购买本产品,谨向您表示衷心的感谢。
本说明书仅对基础使用进行说明,请访问我们的网站取得本产品之详细说明书 ( 操作指南及安全指
南 ),了解本产品的最新信息。
为了您能够更安全舒适地使用本产品,请在使用本产品前仔细阅读所有说明书。
欢迎访问我们的网站:网址请参阅附件
警 告
!
• 使用本产品前,务必阅读本产品的所有说明书。阅读后,请妥善保管以备日后参考。
• 请阅读说明书中或产品上的警告和注意事项。
• 请遵守说明书中或产品上的所有说明。
01

简体中文
目 录
(页码)
首要
条目与图示符号解释
安全指示要点
关于废弃电气和电子设备
电池标志要点
关于电磁干扰
物品清单
布置
连接各个设备
连接电源
设定
连接
基本操作
开启电源
关闭电源
规格
制造年月
02
02
03
03
03
04
05
06
07
08
09
09
11
11
11
12
14
首要
条目与图示符号解释
以下条目和图示符号均用于安全目的,在本说明书和本产品中的使用如下。请预先了解这些条目和
图示符号的含义,并予以留意。
!
!
警 告
注 意
通 告
本符号用于警告有严重人身伤害甚至
死亡的危险。
本符号用于警告有人身伤害或是物质
受损的危险。
本条目用于告知可能会导致故障。
02
警告 / 注意
!
开启 / 关闭电源
启动录像
停止录像
频道切换
信息
开启 / 关闭投影机电源
音频输出

简体中文
安全指示要点
以下是关于安全使用本产品的重要指示。在操作本产品时,请务必始终按照这些指示。对于因超出
此产品说明书所述的正常使用范围之外的不当操作而引起的任何损失,生产商恕不承担责任。
警 告
!
• 请勿在异常 ( 例如 : 冒烟、异昧、内部有液体或异物、破裂等 ) 发生时或发生之后使用本产品。如果发
生异常现象,应立即拔下本产品之电源插头。
• 本产品仅限具备能力操作本产品之成人使用,请将本产品放置在远离儿童和宠物的地方。
• 请将小零件放置在远离儿童和宠物的地方。如果吞下,立即咨询医生以进行紧急治疗。
• 请勿在雷电情况下使用本产品。
• 如果当前不使用本产品,请将本产品插头从电源插座上拔下。
• 请勿擅自打开或拆卸本产品的任何部分,除非本说明书有所指示。内部维护应交给您的经销商或其服务
人员。
• 请使用制造商指定或推荐的附件。
• 请勿擅自己改装本产品及其附件。
• 请勿使任何物体或液体进入本产品内部。
• 请勿弄湿本产品。
• 请勿将本产品放置在使用任何油品(如烹饪油或机油)的地方。油品可能会损坏本产品,导致故障或从
安装位置掉落。
• 请勿敲击或挤压本产品。
- 请勿将本产品放置在不平稳的地方,例如不平坦的表面或倾斜的桌面等。
- 请勿不平稳地放置本产品。放置本产品时,请勿使本产品超出其放置的表面。
- 搬运本产品时,请将手放在产品底部。
- 搬运本产品时,应拆下本产品上的所有附件,包括电源线和电缆。
• 本产品运作时,请勿靠近出风口。
关于废弃电气和电子设备
标志符合废电机电子设备指令
2012/19/EU(WEEE)
损坏电池或蓄电池在内的设备当作一般城市废物来处理,而是要使用可用的回收和采集系统。如果
该设备包含的电池或蓄电池显示了化学符号
高于
0. 002%
镉或高于
0. 004%
铅的重金属成分。
Hg 、Cd 或Pb
的规范。标志要求,不要将包括废旧电池、
,表示电池含有高于
0. 0005%
汞、
电池标志要点
本标志可与化学标志结合使用。在这种情况下,它符合有关化学品的指令规定要求。
03

简体中文
关于电磁干扰
这是A类产品。 在家庭环境中,本设备可能引起无线电干扰,在这种情况下,可能要求用户采取
适当的措施。
如果在住宅区使用,本设备可能会造成干扰。 除非用户采取特殊措施减少电磁辐射以防止干扰无
线电和电视广播的接收,否则必须避免于住宅区使用。
因此,
Maxell,Ltd.
2014/53/EU
。
公司声明无线电设备类型
Lecture Capture Station
符合指令
欧盟符合性声明的全文可在以下网址获取:
http://www.maxell.eu/uploads/docs/PJ-DoC.pdf
注 意
!
- 不得用报纸、桌布、窗帘等物品盖住通风口。
- 不得在设备上放置裸露火源,如点燃的蜡烛。
- 应注意电池处理的环境方面规定。
- 在热带气候中使用设备。
- 说明书中应描述设备不可暴露在滴水或溅水的环境中,且不得在设备上放置装有液体的物体,
如花瓶。
04
简体中文
L
R
物品清单
请小心打开包装,并检查是否包含下列所有物品。如果缺少任何物品,请立即与本产品销售商联系。
1
电源适配器
2
电源线
3
蓝牙天线
4
平衡音频线连接器 (2个)
5
DIDO
6
USB
7
机柜支架 ( 一对 )+
8
使用说明书 ( 简易版 )
9
URL
电源线的数量因地区而异。
*
本说明书仅对基础使用进行说明,使用前请访问我们的网站并阅读本产品之”操作指南”
**
*
连接器
数字键盘贴纸
说明页
M4 x 6mm
**
螺丝钉 (8个)
(1)
2
4
5
31
6
97 8
Lecture Capture Station
MA-XL1
User’s Manual (concise)
Please read through this manual before using this product, in order to use safely and
utilize well the product.
使用说明书( 简易版 )
为了您能够更安全舒适地使用本产品,请在使用本产品前请仔细阅读本说明书。
http://biz.maxell.com/en/display_equipment/
(ENGLISH)
Thank you for purchasing this Lecture Capture Station.
Before using this product, be sure to read all manuals for this product.
Please check the above web address where you may nd the latest information for this product.
(简体中文)
承蒙您购买本智能录播一体机,谨向您表示衷心的感谢。
在使用本产品前,请仔细阅读本产品之所有说明书。
欢迎访问上述网站,以取得本产品之最新信息。
2021MAXL00
QR92741
Printed in Taiwan
警 告
!
• 请将小零件放置在远离儿童和宠物的地方。注意勿将小零件放入嘴巴,如果不小心吞下,请立即咨询医
生以进行紧急治疗。
通 告
• 请妥善保管员包装材料以便将来重新包装。搬运本产品时,请务必使用原包装材料,搬运时请小心避
免碰撞。
05

简体中文
布置
请将本产品平放安装。
本产品可利用”机柜支架”安装在机柜中,将机柜支架安装到本产品时,请务必使用本产品提供的螺
丝钉详细说明请参阅操作指南。
请参考机柜之手册进行安装。
请在本产品和墙壁之间保持2厘米以上的空间。
1)
(
以上
2 cm
警 告
!
• 将产品安装在容易连接电源插座的位置。
• 请勿将本产品安装在导热或易燃物品附近。
• 请勿将本产品安装在任何可能受潮的地方。
• 请勿将本产品放置在使用任何油品(如烹饪油或机油)的地方。油品可能会损坏本产品,导致故障或从
安装位置掉落。
• 将本产品安装在稳定的水平位置。
- 请勿将本产品之正面、背面或侧面朝下放置。
- 除非手册中另有说明,否则请勿在本产品上粘贴或放置任何物品。
• 请勿将任何物品放在进风口和排风口附近。否则可能导致高温并引发火灾或冒烟。
• 将机柜支架安装到本产品时,请务必使用本产品提供的螺丝钉,使用其他螺丝钉可能会导致故障,火灾
或触电。
2 cm
以上
!
注 意
• 请将本产品放在凉爽的地方,并确保有充足的通风。
- 请勿堵住、堵塞或以其他方式遮盖本产品的通风口。
- 请勿将本产品放置在暴露于磁场的地方,否则将导致产品内部的冷却风扇发生故障。
• 请避免将本产品放在多烟、潮湿或多尘的地方。
- 请勿将本产品放在加湿器附近。
通 告
• 请勿将本产品放置在可能会导致无线电干扰的地方。
06

简体中文
连接各个设备
将本产品连接至设备前,请阅读该设备的说明书确认其可以与本产品连接,并准备好所需配件,如
与设备信号相匹配的电缆等。
如果本产品未附带所需配件或配件损坏,请咨询经销商。
确保本产品和设备的电源已关闭,并请按照以下说明执行连接。
请参考本产品之详细操作指南。
• 请使用适宜的配件,否则会导致火灾或设备和本产品损坏。
- 请使用本产品制造商指定或推荐的配件。如果本产品没有配套提供所需的配件或配件损坏,请咨询
您的经销商。可能会按照某些标准进行管理。
- 请勿拆卸或改动本产品和配件。
- 不要使用己损坏的配件。小心不要损坏配件。应确保电缆的铺设路线不会被踩到或压到。
• 将本产品连接至网络前,务必获得网络管理员的同意
• 请勿将
• 如果您将本产品连接到网络,则存在透过本产品泄漏信息的风险。此外,由于担心非法操作,使用者必
- 在具有防火墙等保护措施的网络上使用本产品
- 利用PC连接并使用本产品时,请定期检查并清除PC内的病毒感染和恶意程序。
- 更改
- 请勿泄露网络上的视频数据,验证信息(用户名,密码),与各种服务器信息等。
- 请勿将本产品或其网络电缆安装在容易被更换连接的位置。
WAN/LAN
须负担网路安全责任,请务必执行包括以下对策在内的网络安全措施。
admin / director / video manager
南。
(1)
端口连接到任何有可能产生过高电压的网络。
(1)
!
警 告
注 意
!
的密码,并限制可以登录的用户。详细信息请参阅操作指
通 告
• 本产品连接至运行中的设备時,如果该设备的说明书未予说明,请勿打开或关闭本产品电源。
• 部分输入接口必须在特定条件下方可使用,请参考本产品之详细操作指南。
• 小心不要将连接器连接至错误的端口。
(1)
07

简体中文
连接电源
将电源线与电源适配器连接
1.
将电源适配器的DC直流电源端子插入本产品之
2.
将电源线插头牢牢插入插座。插入电源插头数秒钟后,电源指示灯将亮起呈稳定的红色。
3.
DC plug
Power adaptor Power cord
DC 24V
电源插孔。
电源按钮 / 指示灯
警 告
!
• 连接电源线时,请格外小心,因为不正确或不妥当的连接可能会导致火灾和 / 或电击。
- 切勿用湿手触摸电源线。
- 只能使用本产品附带的电源线与电源适配器。如果电源线与电源适配器损坏,请与经销商联系,重
新换正确的电源线与电源适配器。切勿改动电源线与电源适配器。
- 只能将电源线插入电压与电源线中相符的插座。电源插座应该位于本产品附近以便使用。若要彻底
分开,请拔下电源线。
- 不要把电源分配给多个设备。这样做可能会使插座和连接器过载,使连接松动,或造成火灾、触电
与其他事故。
- 使用适当的电源线将本产品附带的电源适配器的AC端子连接到建筑物的电源插座。
- 如果本产品包装盒内附带多根电源线,请使用与插座形状相匹配的电源线。
通 告
• 本产品附带的电源适配器设计用于相间电压为
220-240V的IT
供电系统。
08

简体中文
设定
本产品之输入端口分配必须由管理员在
请参考本产品之详细操作指南。
(1)
浏览器中进行设置。
Web
连接
连接其他设备时,请确保本产品的电源已关闭。
请参考本说明书之关闭电源章节。
请参考以下接线示意图。
电 脑
装置音频输入
Line
电 源
HD-SDI
摄像机
视频输入
SDI
投影机
VGA / HDMI
视频输出
麦克风
装置音频输入
Mic
投影机 /
鼠标
USB
蓝牙麦克风
区域网络
WAN
天线
VGA / HDMI
实物展台电 脑
DV PTZ
视频输入
摄像机
Line
装置音频输出
喇叭
音频输入 / 输出
混音器
USB
硬盘
USB
电 脑
LAN
网络摄像机
USB
PTZ
USB
RS-232
输出控制
摄像机
硬盘
RS-232
输入控制
电 脑
I/O
DI/DO
装置
( 下一页继续 )
09

简体中文
连接(续)
!
• 将本产品连接至网络前,务必获得网络管理员的同意。
• 请勿将
• 连接错误可能导致故障。 请小心连接电缆。
• 连接前请先关闭音箱和本产品电源,以避免意外声响。
• 使用放大音箱时请注意调节音量。
• 在连接之前,请阅读用在本产品上的设备说明书。
•
•
• 连接到
• 请参考本产品之详细操作指南。
WAN/LAN
电缆的长度必须等于或小于
LAN
或网络通信出现故障。
电缆的长度必须等于或小于
BNC
WAN / LAN
端口连接到任何有可能产生过高电压的网络。
通 告
米。电缆长度超过
100
米。
100
端口时请使用
RJ-45
连接器。
注 意
米时,可能会导致视频 / 音频质量下降
100
10

简体中文
基本操作
开启电源
电源线须正确、牢固地与本产品、电源适配器和电源插座相连接。
1.
请确认电源指示灯亮起呈稳定的红色。
2.
按下本产品的 ( 开启 / 关闭电源 ) 按钮。
3.
电源按钮 / 指示灯
按下电源按钮本产品将自动启动。
电源启动过程指示灯将呈红灯和绿灯交替闪烁。当电源完成开启时,指示灯将停止交替闪烁,呈稳
定的绿色。
通 告
• 开启本产品电源之前,请先开启与本产品连接的其他装置的电源。
• 关闭电源后,若电源指示灯已呈稳定的红色,则可以再次打开电源。
关闭电源
按下本产品的 ( 开启 / 关闭电源 ) 按钮。”关机 ?” 的确认信息将显示约10秒时间。
1.
当讯息出现时,请再按一次 ( 开启 / 关闭电源 ) 按钮。电源关闭时指示灯将呈红灯和绿灯交替
2.
闪烁。当电源完成关闭时,指示灯将停止交替闪烁,呈稳定的红色。
电源按钮 / 指示灯
警 告
!
• 拔下电源线插头以完全断开电源。
• 在关闭本产品电源之前,请先关闭与本产品连接的其他装置的电源。
11

简体中文
规格
项目 规格
品名 智能录播一体机
型号
外形尺寸
重量(净重) 约
电源
功率 ( 最大值 )
使用温度 / 湿度范围
WAN, LAN 10 / 100 / 1000Mbps
端口
MA-XL1
約
430 mm
約
480 mm
3.0 kg
直流
交流
60W (Max.)
0ºC ~ 40ºC / 10% ~ 90% RH
前置
audio output ............................
SDI IN 1 ................................................................
SDI IN 2 ................................................................
SDI IN 3 ................................................................
HDMI IN 1 ...................................................
HDMI IN 2 ...................................................
HDMI IN 3 ...................................................
HDMI IN 4 ...................................................
COMPUTER IN .....................................
MONITOR OUT ....................................
HDMI OUT ...................................................
AUDIO IN ......................................
MIC IN ..........................................
AUDIO OUT ...................................
AUDIO IN(L,R) ................................................
AUDIO OUT(L,R) .............................................
USB TYPE A ........................................................
USB TYPE A(INTERACTIVE) ..................................
USB TYPE B 1 .....................................................
USB TYPE B 2 .....................................................
WAN .....................................................................
LAN 1 ...................................................................
LAN 2 ...................................................................
LAN 3 ...................................................................
CONTROL 1 .............................................
CONTROL 2 .............................................
DIDO .............................................................
Bluetooth antenna ..................................................
(宽)
(宽)
DC : 24V/2.5A
AC : 100~240V/1.5A
x 60 mm
x 60 mm
(高)
(高)
x 206 mm
x 206 mm
3.5 mm (stereo) mini jack x1
3.5 mm (stereo) mini jack x1
3.5 mm (stereo) mini jack x1
3.5 mm (stereo) mini jack x1
( 深 ) ( 不含机柜支架 )
( 深 ) ( 含机柜支架 )
BNC jack x1
BNC jack x1
BNC jack x1
HDMI connector x1
HDMI connector x1
HDMI connector x1
HDMI connector x1
D-sub 15 pin mini jack x1
D-sub 15 pin mini jack x1
HDMI connector x1
可拆卸接线端子
可拆卸接线端子
USB Type A x3
USB Type A x1
USB Type B x1
USB Type B x1
RJ45 jack x1
RJ45 jack x1
RJ45 jack x1
RJ45 jack x1
Mini DIN 8 pin jack x1
Mini DIN 8 pin jack x1
可拆卸接线端子
SMA jack x1
x1
x1
x1
( 下一页继续 )
12

简体中文
规格(续)
Front
1
2
3
4 5 6
7
Back
10 11 12
No.
音量条 显示音量
1
名称 功能简介
98
蓝牙配对指示灯 显示蓝牙连接状态
2
3 USB
4
5
6
7
8
9
10 DC
11
12
指示灯 显示前置
启动录像按钮 开始 / 暂停录像工作
停止录像按钮 停止录像工作
频道切换按钮 影像来源切换 ; 根据设定之影像频道循环切换
显示信息窗口,同时会将
信息按钮
短按 :
长按 :
2
投影机开启 / 关闭按钮 开启 / 关闭
电源按钮 开启 / 关闭
直流电源输入 直流
DC : 24V / 2.5A
重置按纽 长按15秒可将
安全条 连接商用防盗链或防盗锁
装置读写状态
USB
秒钟將开始蓝牙装置配对
兼容投影机或
PJLink
MA-XL1
电源
MA-XL1
回复至出厂设定状态
鼠标控制权从计算机切换回本产
USB
Hitachi/Maxell
投影机电源
品
13

简体中文
制造年月
本产品的制造年份和月份在产品标签的序列号码表示如下。
范例 :
T 9 A W 0 0 0 0 0 1
制造月份 :
制造年份 :
• 本说明书如有更改,恕不另行通知。
• 本说明书中显示的插图仅为示意图, 您的产品可能与插图有所不同。
• 未经明确的书面同意,不得重印、转让或复制本文件的全部或任何部分。
一月
A=
9=2019, 0=2020, 1=2021, ...
, B=
二月
, ... L=
十二月
通 告
14

Lecture Capture Station
MA-XL1
User’s Manual (concise) - Supplement
Connection
Power
HD-SDI
camera
Video input SDI
Video input VGA / HDMI
Projector
Line audio output
Computer
Line audio input
Audio input/output
Audio mixer
Microphone
Mic audio inputVideo output VGA / HDMI
USB
Hard drive
Projector /
Mouse
USB
USB
Network camera
LAN
Network
WAN
RS-232
out
speakerphone
RS-232
in
Computer
Bluetooth
Antenna
DI/DO
Document camComputer
DV PTZ camera
Speaker with
an amplier
(continued on next page)
Computer
USB
PTZ camera
USB drive
I/O devices

Dimensions

About license etc.
• HDMI, the HDMI logo, and High-Denition Multimedia Interface are trademarks or
registered trademarks of HDMI Licensing Administrator, Inc. in the United States and/
or other countries.
• THIS PRODUCT IS LICENSED UNDER THE AVC PATENT PORTFOLIO LICENSE FOR THE
PERSONAL USE OF A CONSUMER OR OTHER USES IN WHICH IT DOES NOT RECEIVE
REMUNERATION TO (i) ENCODE VIDEO IN COMPLIANCE WITH THE AVC STANDARD
("AVC VIDEO") AND/OR (ii) DECODE AVC VIDEO THAT WAS ENCODED BY A
CONSUMER ENGAGED IN A PERSONAL ACTIVITY AND/OR WAS OBTAINED FROM A
VIDEO PROVIDER LICENSED TO PROVIDE AVC VIDEO. NO LICENSE IS GRANTED OR
SHALL BE IMPLIED FOR ANY OTHER USE. ADDITIONAL INFORMATION MAY BE
OBTAINED FROM MPEG LA, L.L.C. SEE HTTP://WWW.MPEGLA.COM

License agreement of each software
(continued on next page)

License agreement of each software (continued)
(continued on next page)

License agreement of each software (continued)
(continued on next page)
 Loading...