


LS-2
Media Station
User Manual English
AREC Inc.© All Rights Reserved 2019. l www.arec.com
All information contained in this document is Proprietary

Table of Contents
LS-2 User Manual
Introduction
Specifications
Package Contents
Product Appearance
Connection
Front Panel Buttons and Indicators
External Control via USB Numeric Keypad
Getting start
Overview of the Web Interface
Chapter 1 Administrator
1.1 Media I/O
1.1.1 Video inputs
1.1.1.1 Content / Cam 1
1.1.1.2 Advanced conguration
1.1.2 Network device manager
1.1.3 PTZ control port
1.1.4 Audio
1.1.5 Display
1.2 Video
1.2.1 Recording
1.2.2 Streaming
1.2.3 Content
1.2.4 Theme
1.3 Storage
1.4 Scheduler
1.5 Upload
1.6 System
1.6.1 System settings
1.6.2 Network
1.6.3 Firmware
1.6.4 Conguration
1.7 Account
Chapter 2 Director
2.1 Local Director
4
4
4
5
6
7
8
8
8
9
9
10
10
11
12
13
13
14
14
15
16
19
19
21
22
25
26
27
28
29
29
30
31
31

Table of Contents
LS-2 User Manual
2.1.1 Preview
2.1.2 Toolbar
2.1.2.1 Theme and Display
2.1.2.2 Recording, Streaming control and Snapshot
2.1.2.3 Playback Video
2.1.2.4 Settings
2.1.2.5 Others
Chapter 3 Video Manager
3.1 Video Management
3.1.1 Upload the recording
3.1.2 Download the recording
3.1.3 Delete the recording
3.1.4 Playback the recording
3.1.5 Edit the recording information
3.1.6 Edit the bookmark information
3.2 Snapshot Management
3.2.1 Upload the photo
3.2.2 Download the photo
3.2.3 Delete the photo
3.2.4 Preview the photo
Table of On Screen Disaplay Icons
31
32
32
33
34
36
37
38
38
39
39
39
40
40
41
41
42
42
42
43
44
LS-2 User Manual
Introduction
Featuring a compact and stand-alone design, AREC LS-2 Media Station consists of diverse features and functionality,
including multi-signals capturing, recording synchronously, codec, streaming online, live broadcasting, and web-based
monitor page, providing complete presentation or lecture capture solution.
Specifications
Product Name Media Station
Model Name LS-2
Dimension 354mm(L) x 188.2mm(W) x 46mm(H)
Weight 1420g
Power Requirement 12V/2A
Power Consumption (Max.) 24W (Max.)
Operating Temperature / Humidity 0ºC ~ 40ºC / 90%
Insert 1 IP CAM to LAN port or insert 2 video signals (either HDMI or VGA input).
Maximum normal load description
Using external USB flash to record the transcoded video/audio. And output the
transcoded video/audio to both HDMI and VGA port.
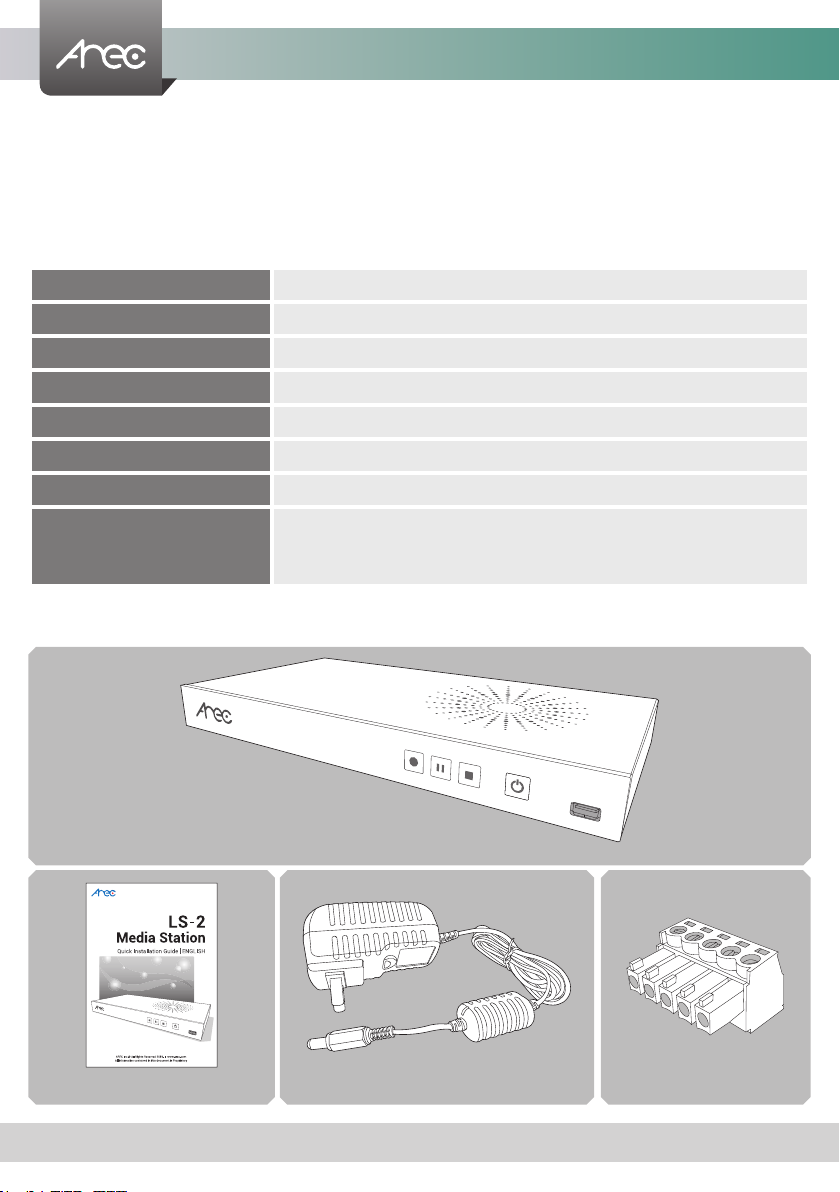
Package Contents
AREC LS-2 Media Station
Quick Installation Guide Terminal BlockPower Adapter
4www.arec.com
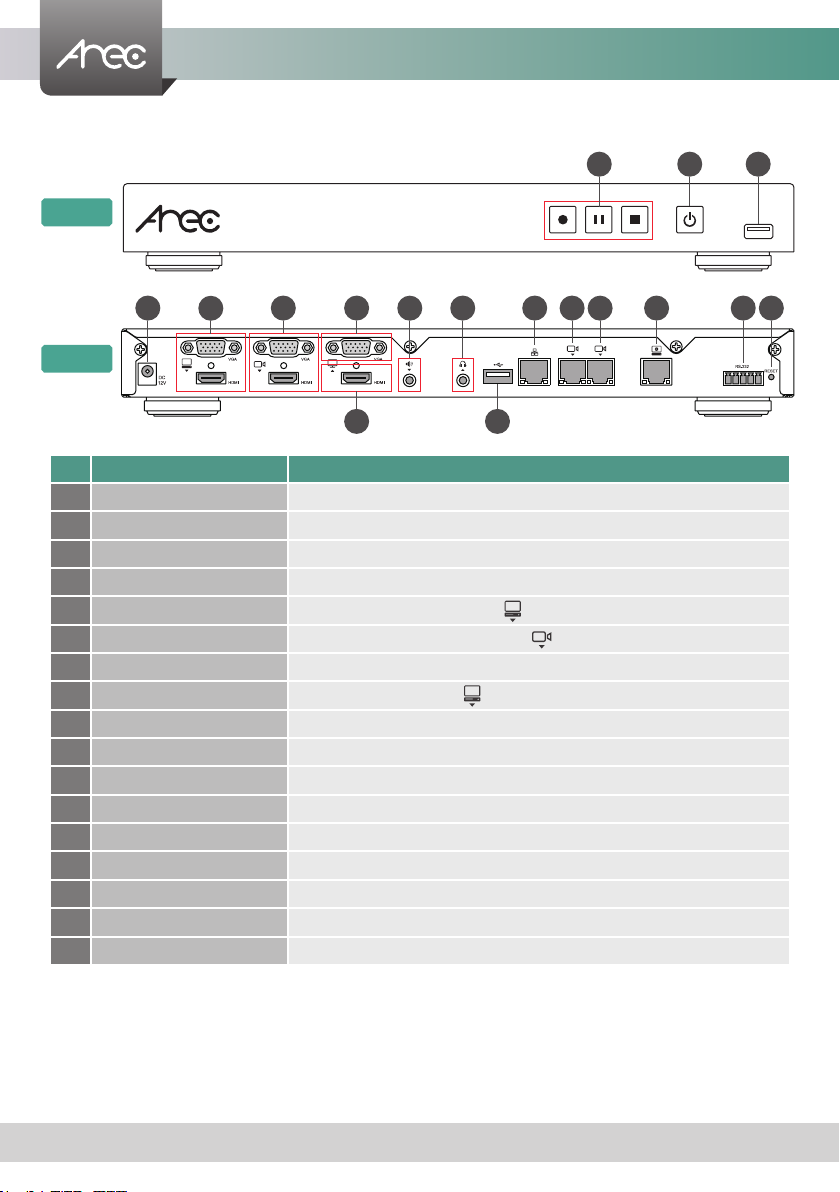
Product Appearance
Front
LS-2 User Manual
1
2 3
4
5
6
8 16 17
10
9
14
1512 13
Back
7
No. Name Brief introduction
1 Record function keys Control the Record, Pause, Stop function
2 Power Power on/off the device
3 Front USB port For external USB storage device* Firmware update through USB disk
4 Power port 12V / 2A
5 Video input VGA / HDMI input source for PC [ ]
6 Video input VGA / HDMI input source for camera [ ]
7 Video output HDMI preview output
8 Video output VGA loop thru from input [ ]
9 Audio input Line audio input
10 Audio output Line audio output
11 Back USB port USB interface for camera control over RS-232
12 Network port RJ-45 Ethernet connector for network connection
13 Network camera input 1 RJ-45 Ethernet connector for network camera input source
14 Network camera input 2 RJ-45 Ethernet connector for network camera input source
15 Setting port RJ-45 Ethernet connector for device conguration and control
16 RS-232 Captive screw connector for control over RS-232
17 Reset button Restoring devices to its factory default state
NOTE: The LS-2 can detect and record to USB storage devices using FAT32, NTFS le systems.
11
5www.arec.com

Connection
Power
Video input VGA / HDMI
TV
projector
Video output VGA / HDMI
Audio input
Speaker
Audio output
USB
LS-2 User Manual
AREC
Network Camera
Setting PC
RS-232
Ethernet
document cam
notebook
DV
amplier RS-232
projector
USB keyboard USB drive
network
USB
6www.arec.com
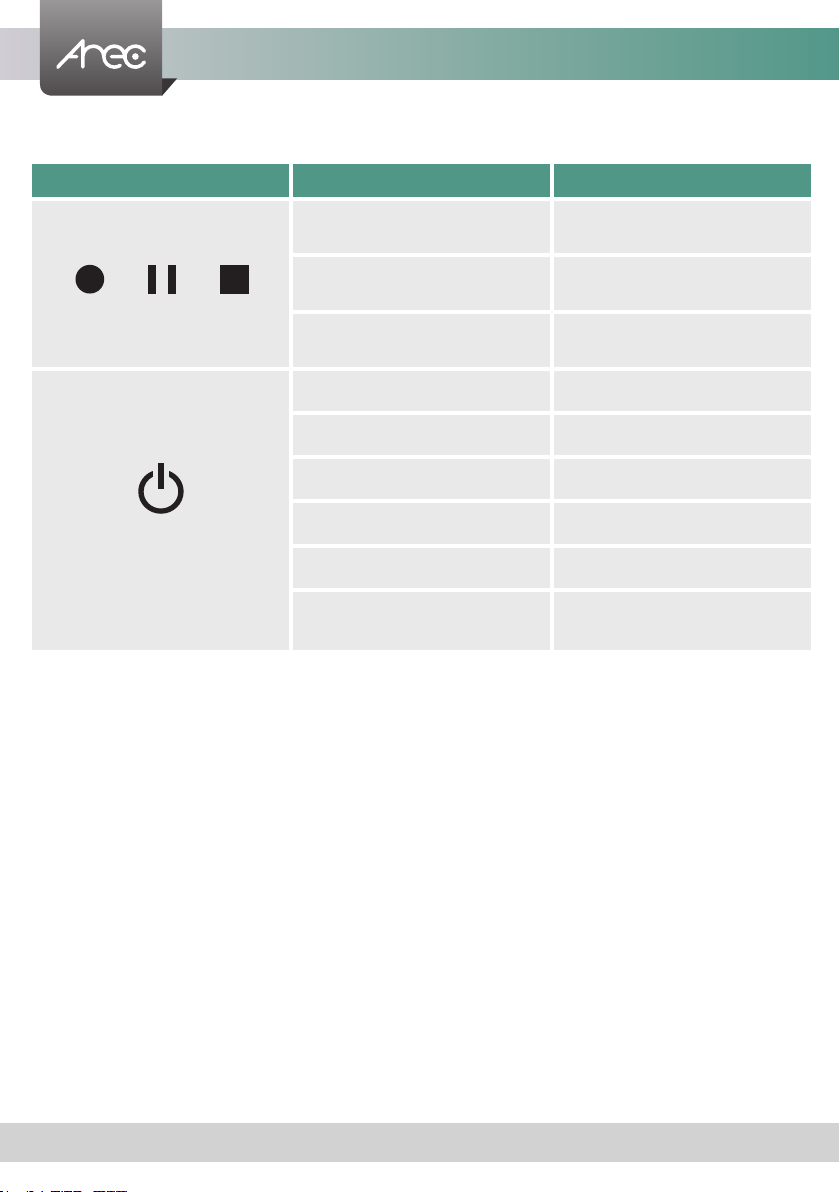
Front Panel Buttons and Indicators
Button Display method of indicator Product status
LS-2 User Manual
Record / Pause / Stop
Power
Record button glows red
continuously.
Record button flashes red rapidly. Recording is paused.
Record button flashes red slowly. Recording is being nalized.
Solid red. Device is powered, yet not booted up.
Green and red light flash alternately. Device is booting up.
Solid green. Boot up completed.
Fast flashing red. Device is shutting down.
Fast flashing green. Firmware updating.
Slow flashing red.
Recording in progress.
Fan is abnormal.
Storage is abnormal.
7www.arec.com

LS-2 User Manual
External Control via USB Keypad
Insert the keyboard into the Media Station's USB hole, let USB numeric keypad as function keys to control the Media Station.
Button Brief introduction Button Brief introduction
1 Theme 1 Backspace All input volume mute/unmute
2 Theme 2 - All input volume down
3 Theme 3 + All input volume up
4 Theme 4 Enter Record
5 Theme 5 ESC Power off
6 Theme 6 Z • z Change Background
7 Theme 7 X • x Change Layout
8 Theme 8 C • c Change Overlay
9 Theme 9 V • v Live streaming on/off
/ Pause B • b Playback last record video
* Stop A • a All output volume up
0 Change Display S • s All output volume down
. Snapshot D • d All output volume mute/unmute
Getting start
Connect PC to the setting port of Media Station with standard network cable. Open up the browser, and input 192.168.11.254
in the browser page. Log in Administrator with default username admin and password admin, then entering the LS-2
system Administrator webpages.
Overview of the Web Interface
LS-2 web interface has three user types, which are described in detail in the following chapters :
To setup the device, log in Administrator with default username admin and password
Administrator
Video Manager
admin, then entering System Administrator webpages. The admin account provides the
user all three type of privileges.
If you only need to access to the recordings, log in Video Manager with default username
video and password video.Log in with Administrator account, can switch to Administrator
page.
8www.arec.com
LS-2 User Manual
Chapter 1 Administrator
The Administrator web pages provide a system administration interface of the LS-2: it can perform Media I/O, Video,
Storage,Scheduler,Account, Upload, System settings and conrm operations. The Media I/O settings make sure each input
source are properly connected, and adjust the audio volume. The Video setting pages congure the recording, streaming, and
other functions which dene the content being recorded. System are pages contain basic settings and information of this
device.Click icon can switch to Video Manager page.
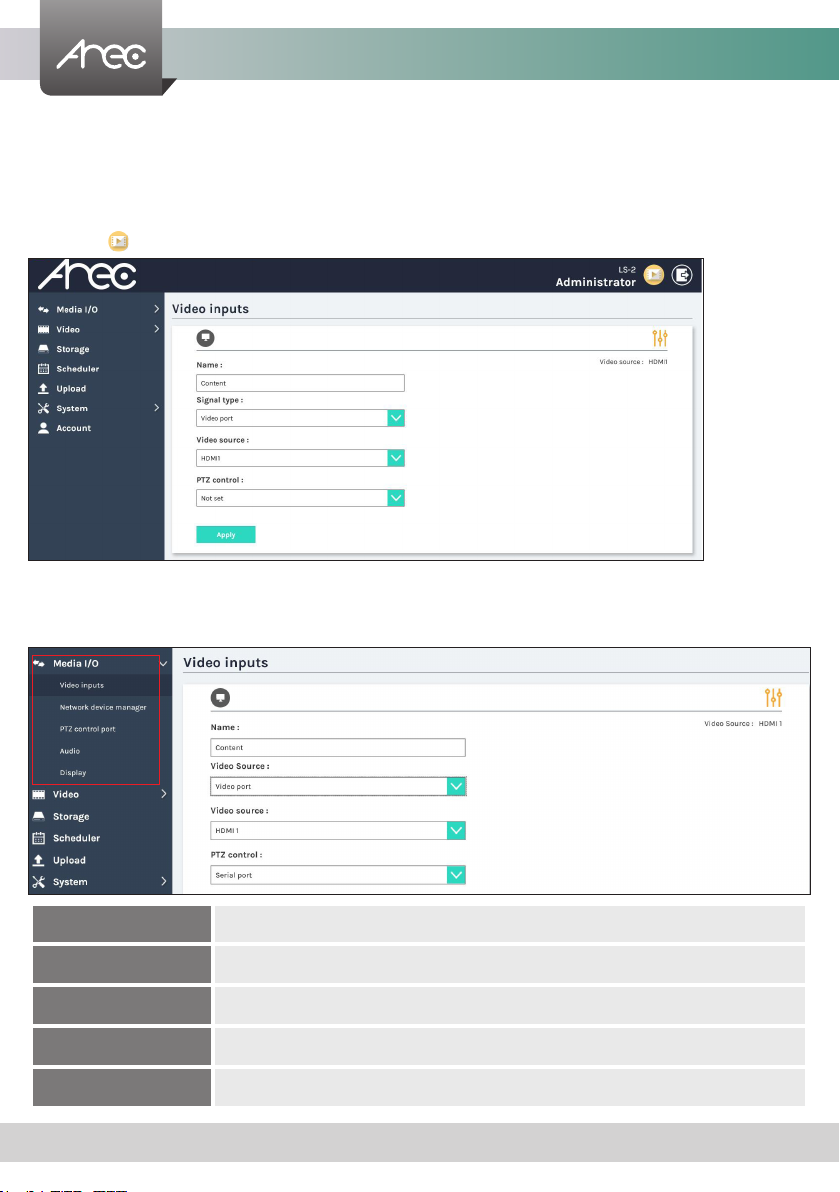
1.1 Media I/O
The pages within Media I/O include the following :
Video inputs Select the signal type, video source and PTZ control method for each input.
Network device manager List out all the connected network cameras and Auto-Tracking Mount.
PTZ control port Set LS-2 back USB-to-RS-232 serial port to drive PTZ cameras.
Audio Adjust the volume and select the audio input source.
Display Set the LS-2 on screen display language, video output settings and color adjustment.
9www.arec.com

LS-2 User Manual
1.1.1 Video inputs
The LS-2 is capable to process up to four video inputs. The name of these inputs are user configurable; by default are
Content and Cam 1.
1.1.1.1 Content / Cam 1
Video Source can be choose from Network Camera, Encoder or Video port. The last option is available only for the rst
two video inputs.
Select Video source: The LS-2 provides VGA and HDMI input options for video port. If only one of
Video port
Network Camera
Encoder
PTZ control : The LS-2 is highly integrated with PTZ cameras and provides two control methods, Over IP or via Serial port.
Serial port
Over IP
Auto-Tracking
Mount
those is connected, the system would detect and automatically switch to source of signal. If both
options are connected, select one in between.
Select IP address: Select from the camera ip address drop list of those available.
Note: A login authentication with the camera might be required. See Media I/O\ Camera manager for
more details.
Select Protocol: The available options are RTP, RTSP, or RTMP. Enter the primary and secondary url/
port number.
Select this option when the appointed camera uses RS-232 PTZ control protocol. Then complete the
Serial port selection from drop list Port 1~4. See Media I/O\ PTZ control port for more details.
The option is available when the specied signal type is a network camera. Select this option if that
camera supports networking PTZ control.
Select IP address: Select from the TP-100 ip address drop list of those available.
Select Tracking mode: off / Auto-Tracking / Auto-Tracking (pan only), the default is the AutoTracking.
Note: A login authentication with the TP-100 might be required. See Media I/O\ Network device
manager for more details.
1
10www.arec.com
LS-2 User Manual
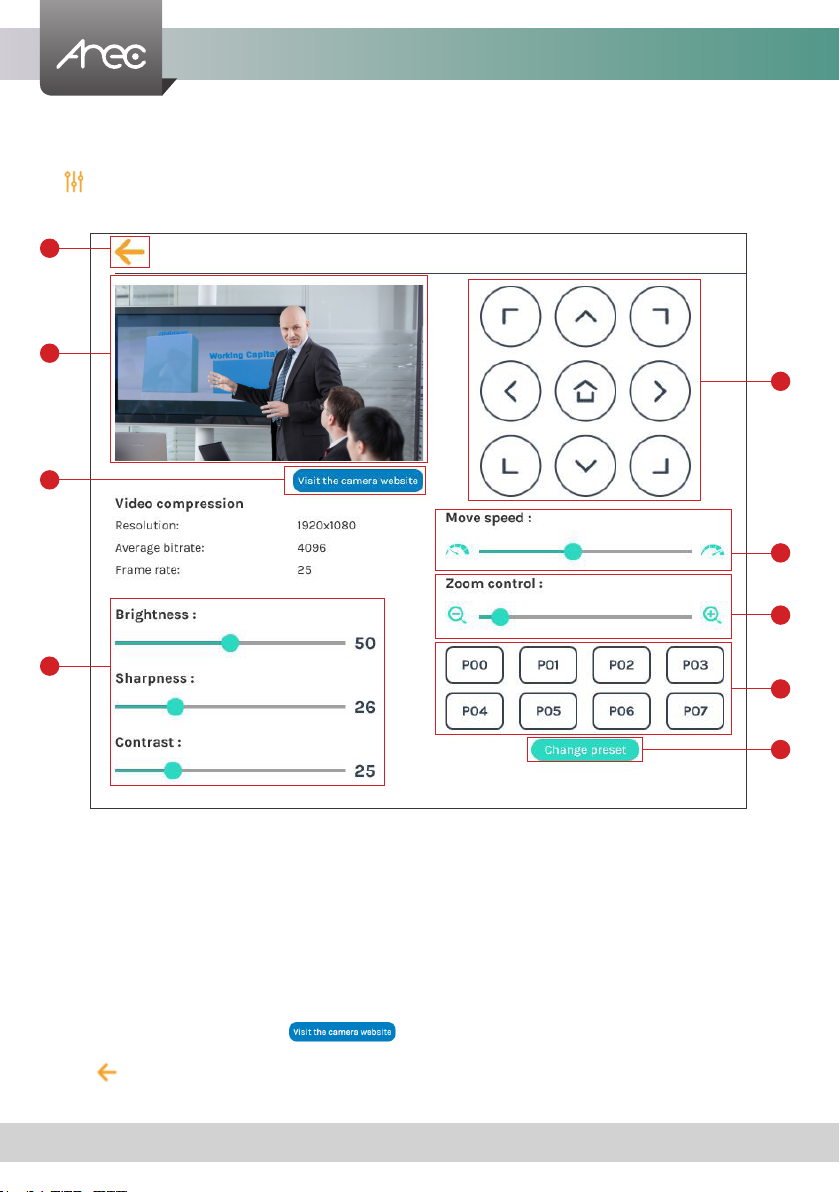
1.1.1.2 Advanced conguration
A preview use and further conguration of the video input is provided. After the video input setting is successfully applied,
click to enter the advanced conguration page. In the case of a PTZ camera, the direction control panel, zoom in/out
control bar, and up to 8 preset positions are enabled.
9
1
2
8
3
4
7
5
6
1. The video input preview.
2. Direction control panel: Click the arrow buttons to move the camera.
3. Movement speed: Move leftward or rightward to set slower or faster the camera is moving.
4. Zoom in/out: Click the buttons or drag on the control bar.
5. Preset positions: Click the buttons to command that the camera go to the preset position.
6. Change preset: Click the button to modify the preset positions. Select any of the P00~P07, move the camera to the
desired position by using the direction control panel or using the zoom in/out control. Click Save button to complete
the change or click Cancel button to give it up.
Note: If you use AREC CI-xxx network camera with TP-100, you can change preset of TP-100's Home.
7. Brightness, sharpness, and contrast: Slide the adjust bar leftward or rightward to change the camera image settings.
8. Visit the camera website: Click this button to enter the webcam management web site, input the
verication code as prompted.
9. Click button at upper left corner to return to the last page.
11www.arec.com
LS-2 User Manual
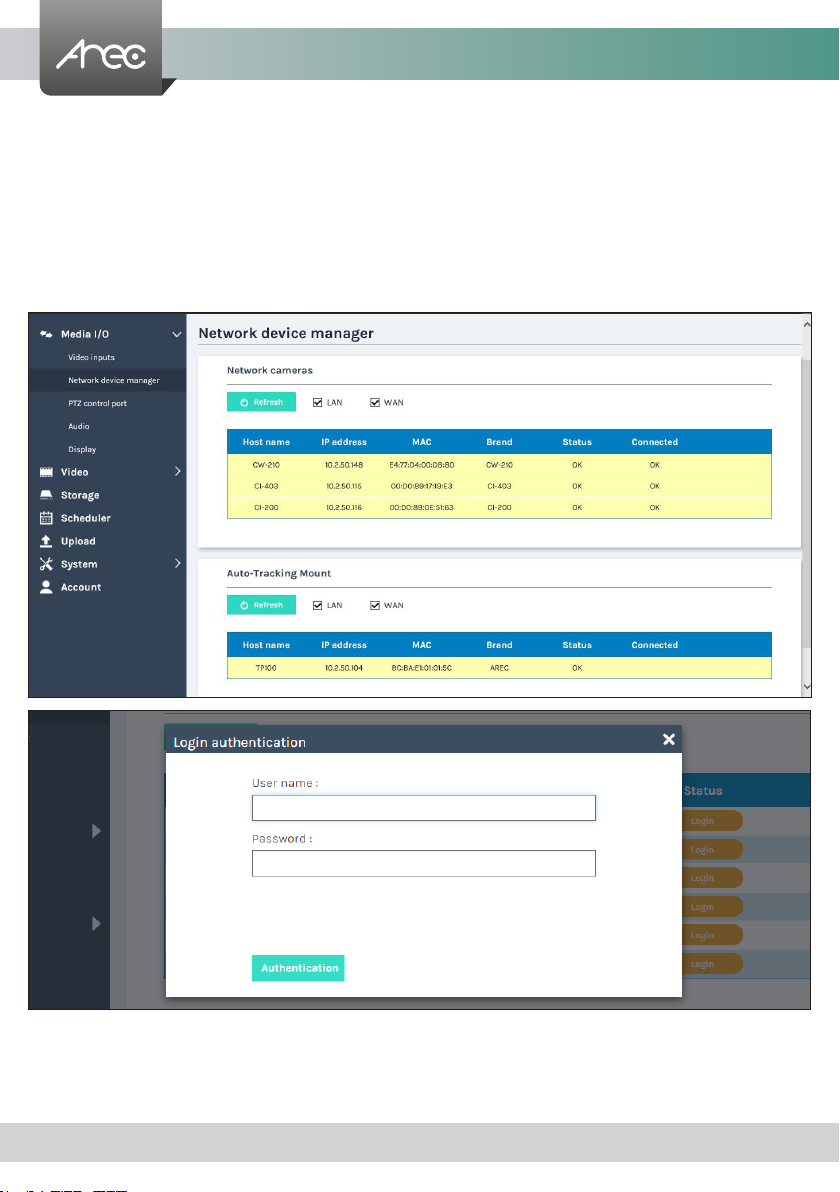
1.1.2 Network device manager
The system automatically scans and lists the network cameras and Auto-Tracking Mount connected to the Media Station
once entering the [ Network device manager ] page. You may click Refresh button to scan again. Click Login button and the
login authentication dialog pop out.
Enter the username and password of the camera or Auto-Tracking Mount to complete the authentication. Take AREC
network camera for example,enter the default username and password admin/ admin. The status then changes to OK, which
indicates it is available for video input selection.
Note : If you fail to nd your camera by clicking on “Refresh”, please select “Signal type” to “Encoder” in the “Video Inputs” and ll in your camera
information.
12www.arec.com
LS-2 User Manual
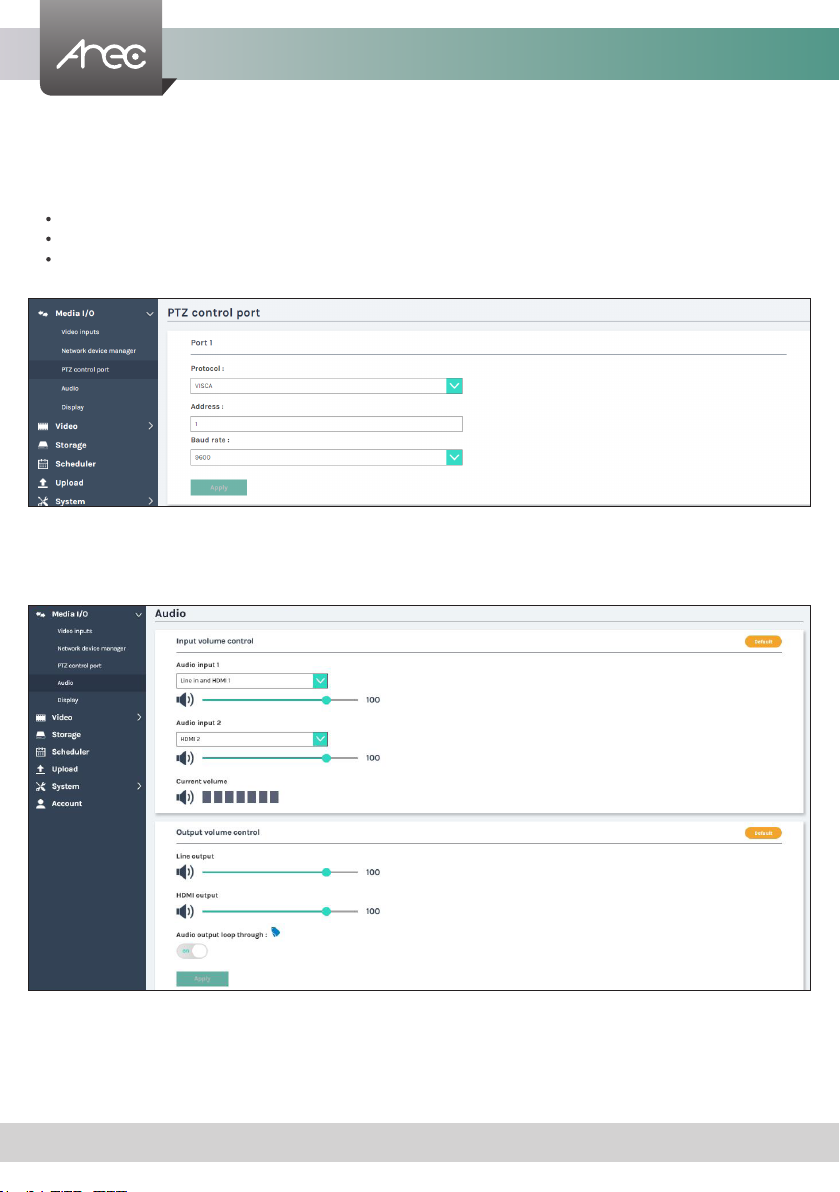
1.1.3 PTZ control port
The LS-2 facilitate the web-based users control PTZ cameras using RS-232 protocol. Connect an USB-to-RS-232 adapter to
the LS-2 back USB port in advance. Before making any changes to this page, please get to know about the RS-232 settings
of the desired PTZ camera. The following congurations must be identical to the external device settings.
Protocol : Available options are VISCA, PELCO-D, and PELCO-P;
Address : Set according to the camera address for RS-232 communication. VISCA: 1-7, PELCO D/P: 1-255;
Baud rate : 2400, 4800, 9600, and 115200
Note: Support USB to RS-232 serial port adapter with chip PL2303 or FT4232H.
1.1.4 Audio
Adjust volume and select the audio input source.
Input volume control - Users can select the sound source from the drop-down menu of Audio input 1 or Audio input 2. Tune
the recorded volume from each audio input. Congurable range of sound input is 0-125. The nearby
volume meter indicates the encoded audio current volume.
Output volume control - Adjust the Line output or HDMI output volume.
Set Audio output loop through on/ off.
13www.arec.com
LS-2 User Manual
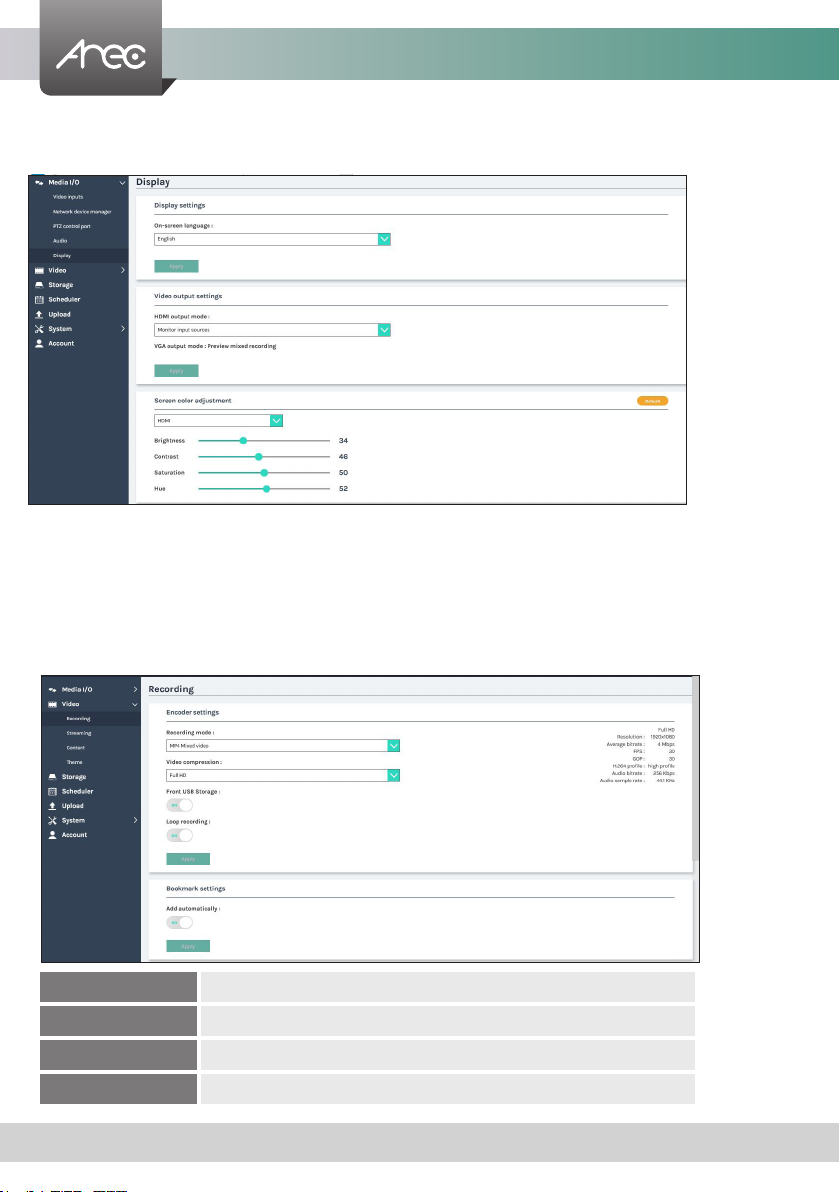
1.1.5 Display
Set the LS-2 on screen display language, video output settings and color adjustment.
On-screen language: Change the GUI language.
Video output settings: Setting the HDMI display Monitor input sources or Preview mixed recording
Screen color adjustment(HDMI and VGA): Change the Brightness, Contrast, Saturation and Hue
1.2 Video
The pages within Video construct a collection of settings that denes the operating characteristics for a streaming/recording,
include:
Recording Congure Encoder settings and Bookmark settings for recording.
Streaming Congure Encoder settings for streaming.
Content Edit the information of the content that will be recorded.
Theme Set the overlay les, background images and theme types.
14www.arec.com

LS-2 User Manual
1.2.1 Recording
Set up the Encoder settings and Bookmark settings for recording.
Encoder settings
Recording mode: Available options are MP4 Mixed video and MP4 Mixed video/ Original source.
Video compression : There are 7 preset recording video compression proles for different resolution and bitrate. Select
one to see the option details on the right side. You may customize your own user dened option.
Front USB recording : Set ON/OFF to enable/disable LS-2 front USB recording function. Make sure the front USB drive
connected can be normally read and written and have enough space for the recorded les.
Loop recording : Set ON/OFF to enable/disable LS-2 local storage recording rule.
Click Apply button at the bottom corner when nished to apply the settings.
Profile name Video Resolution/ Bitrate Application description
Full HD 1080p/ 4Mbps Dynamic scene and large local hard disk recording.
Internet Full HD 1080p/ 3Mbps General scene and medium local hard disk recording.
HD 720p/ 2Mbps Static scene and small local hard disk recording.
Internet HD 720p/ 1.5Mbps Live broadcasting through the Internet.
SD 480p/ 800kbps Static scene for live broadcasting through the Internet.
Mobile SD 480p/ 500kbps Live broadcasting for portable mobile devices watching.
Click button to open customization window as
shown below, and click Save button to make the option
changed.
User dened
15www.arec.com

LS-2 User Manual
Bookmark settings- Set ON/OFF to enable add bookmark automatically.
Click Apply button at the bottom corner when nished to apply the settings.
Add prex to video lename: Use this description is added to the Video lename as a prex string for Download and Upload.
Audio shift- Adjust the delay of sound after video transmission. Synchronize the video and audio with consistency.
1.2.2 Streaming
AREC Media Station support two streaming address with same video compression. The page provides user to change
streaming settings. It is essential that the congurations follow the streaming protocol and recommended settings your
server system supports.
16www.arec.com

LS-2 User Manual
Video compression prole — There are 7 streaming video compression proles for different resolution and bitrate. Select
one to see the option details on the right side. You may customize your own user dened option. Click button to open
customization window as shown below, and click Save button to make the option changed.
Click Apply button at the bottom corner when nished to apply the settings.
Note: The resolution for streaming cannot be larger than that for recording.
Live streaming : Select OFF/ Together with recording/ Streaming always/ Enable streaming button to setting live streaming
ability.
Together with recording : Streaming and recording simultaneously
Streaming always : LS-2 always streaming
Enable streaming button : Enable streaming On/Off button on GUI
Click button to open customization window as shown below, RTMP username/password and test for Wowza. Click Save
button to make the option change.
URL — The available protocol on the LS-2 are RTP and RTMP, the URL format is as follows :
RTMP
RTP
In the protocol setting eld, copy and paste the Server or Stream URL and Stream name provided by you CDN
or server administrator in the format rtmp://serverurl/streamname.
Enter the destination IP address and the port number where the streaming is played in the format
rtp://@ip:port.
For example, rtp://@226.10.24.32:7000
17www.arec.com

LS-2 User Manual
Followings are some popular examples for streaming settings.
Streaming to Facebook Live
Copy the contents of the Single Field, Server or Stream URL, and paste in the LS-2 streaming protocol setting eld.
Streaming to Ustream
Combine the contents of both elds: RTMP URL and Stream Key, insert a slash between them. Paste this string into the
LS-2 streaming protocol setting eld. For example: rtmp:1.15059865.fme.stream.tv/ustreamVideo/15059865/5gmbz4RCa2
Hgt9SwtCYuCct6qS137Nar
Streaming to YouTube Live
Combine the contents of both elds: Primary Server URL and
Stream Name, insert a slash between them. Paste this string
into the LS-2 streaming protocol setting eld.
Streaming to a media player on a PC in the same LAN with the
LS-2
Enter the destination IP address and the port number where the
streaming is played in the format rtp://@ip:port.
Unicast: For a single point connection, the destination IP must
be set to the location where the stream is played.
Multicast: The destination IP must be multicast IP address
where it can be shared with multiple viewers.
The LS-2 use IP address: 239.0.0.1 and port number: 5004 as
the stream default. The available range of port number is 1024
to 65535.
To view the stream from a media player, open the URL in a
media player, such as:
18www.arec.com

LS-2 User Manual
1.2.3 Content
The LS-2 contains up to 13 user-congurable elements for describing content. These elements and texts will be saved in
the recording data of the newly created content. Enter text in the content settings elds if desired. Click Apply button at the
bottom corner when nished to apply the settings.
Note: These updates do not apply to the existing recordings. To edit the existing recording information, see Video Manager.
1.2.4 Theme
LS-2 by factory default provides three overlays, three backgrounds and four themes.
Overlay : Select and delete the overlay. Click [ ] button and select the desired le in the Open dialog box. The le name
would appears with the newly uploaded image. Click Apply button at the bottom corner to apply the settings, or
click [ ] Cancel to give it up.
Delete
Note: The overlay le must be in PNG format, maximum size 1920px*1080px.
Note: The user can use the mouse to drag the order of the display.
19www.arec.com

LS-2 User Manual
Background : Select and delete the background. Click [ ] button and select the desired le in the Open dialog box. The le
name would appears with the newly uploaded image. Click Apply button at the bottom corner to apply the
settings, or click [ ] Cancel to give it up.
Theme : Theme is integrated with "Overlay”, “Background” and “Layout”. LS-2 by factory default provides four themes by
different types of overlays, backgrounds and layouts. Click [ ] to set the theme type. Input the theme name, and
select the desired type of overlay, layout and background. Click Apply button at the bottom corner to apply the
settings.
Note: The user can use the mouse to drag the order of the display.
Note: The background le must be in PNG format, maximum size 1920px*1080px.
Note: The user can use the mouse to drag the order of the display.
Delete
20www.arec.com

LS-2 User Manual
1.3 Storage
The recording les produced by the LS-2 are stored on its own internal drive. This page provides user to set local storage
drive or USB and reveals the disk information in the lower section.
Record disk settingsLocal storage: The internal drive of LS-2 is preset for storing the recorded les.
Click Apply after setup is completed. New setting takes effective from next recording being created.
Disk information- Displays disk information, available storage space and total capacity. Click “Format” to clean up the
internal storage drive. A dialog box opens asking you to conrm the disk formatting. Click Conrm to permanently delete all
recording packages.
21www.arec.com

LS-2 User Manual
1.4 Scheduler
The Schedule Settings page allows the administrator privileges to choose how to obtain presentation schedules and, if
appropriate, import calendars or connect to Google Calendar. Start video recording automatically at the date and time
specied in a calendar schedule.
Available options are Manual Calendar import, and Periodic Calendar import.
Manual Calendar import : Importing iCalendar les manually
Periodic Calendar import : Importing iCalendar les automatically
Disable Recording functions if Schedule Record is on
a. Local director : record button
b. Front Panel (record/pause/stop)
c. USB Keyboard (record/pause/stop)
d. Front USB recording off
22www.arec.com

LS-2 User Manual
Recording interruption : Manually stop current schedule
Click Open Scheduled Events page.
Manual Calendar import
1. Click Import. An Open window opens.
2. Locate and select the iCalendar le for import. The le must have a .ics le extension.
3. Click Open. The Open window closes and the le name is displayed within the Manual Calendar Import panel area. The
Import button is active.
4. Click Apply. The event schedule is added and appears in the calendar on the Scheduled Events page.
23www.arec.com

LS-2 User Manual
Periodic Calendar import
1. Enter the iCalendar URL in this eld.
2. Click Apply. The event schedule is added and appears in the calendar on the Scheduled Events page.
Note: iCalendar Schedule can not be set to cycle, only accept single. Cannot set more than 2 pens to start at the same time.
When setting the time overlap, the start time whichever is earlier.
24www.arec.com

LS-2 User Manual
1.5 Upload
The LS-2 is able to automatically upload recordings from its internal drive to a network server. In this page, user can
congure the upload destination and tests the connection.
Auto upload- Select from the drop-down list. Start uploading "after recording is completed”, or turn “OFF” the function.
Followings to be congured according to the upload destination.
Mode: Select network server type (FTP, SFTP).
IP address, port, Congure these elds according to the upload destination.
Folder: Enter the folder name of the upload destination.
Authentication: Congure this section according to the upload destination authentication method.
Connection test- Click the Connection test button to validate upload settings.
Click Apply after setup is completed. New setting is effective from next recording being created.
The upload status/result of the corresponding recordings is denoted in the Video Manager web pages.
25www.arec.com

LS-2 User Manual
1.6 System
The pages within System include the following:
System settings Contains device identication, date and time conguration, and booting settings.
Network The device IP assignment in the networking.
Firmware
Conguration Export / Import the conguration.
Displays the current rmware version, and provides web-based user a way to update rmware for the
device.
26www.arec.com

1.6.1 System settings
The basic information and initial date/time of this device are congured here.
LS-2
LS-2
LS-2
LS-2 User Manual
Device identication – Set the name (device description) for this device.
Date and Time – Set the device date, time, and time zone manually/ be synchronized to PC, or with an external NTP (network
Boot image – Change the boot screen image. The boot screen is the image you will see when you boot up the device.
Power – Choose how to turn on the device.
Note: The boot screen le must be in PNG format, maximum size 1920x1080px.
time protocol) server.
Click Browse button and select the desired le in the Open dialog box. The le name would appears with the
newly uploaded image. Click Apply button at the bottom corner to apply the settings, or click
to give it up.
Cancel
27www.arec.com

LS-2 User Manual
1.6.2 Network
By default LS-2 uses DHCP to obtain an IP Address via a router or any DHCP server. To use a static IP address for your
device, congure the network settings in this webpage.
IP assignment – Select DHCP to have IP address be allocated by a router or any DHCP server being connected; or Select
Click Apply at lower right corner, click Conrm in popup dialog box.
Note: The system will automatically reboot to complete the network settings. Login the updated IP address after the system
restarts.
Static IP and enter the required network settings including IP address / subnet mask / default gateway/ DNS
server.
28www.arec.com

LS-2 User Manual
1.6.3 Firmware
This page displays the device rmware version. To update the rmware, click “Update" and a dialog box opens asking you to
select the le. Select the desired le and click “Open”, the dialog box closes and the le name appears underneath. Click “Apply”
to start rmware update. Click “Cancel” if the uploaded le is no longer wanted.
Note: System will reboot automatically when the firmware update is completed. It might takes a few minutes. Do not
shutdown/ power off the system during rmware updating.
Service data : Export the log le to your computer or upload it to the Customer Service Server. Input the le name, and then
click “Export” or “Upload”.
Note : The length of the string is 0~16 characters, allowing letters, numbers, symbols 11(~!@$%^&*-+_).
Reset : Reset to factory default. Check if you want to keep your network settings, and click “Reset”.The dialog pop out and
ask you “System will reboot after updating, continue?
” Click “Conrm” to start reset.
1.6.4 Conguration
You can export or import the conguration in this page:
Export : Select the conguration to export and click “Export”.
Import : Click “Import”to load a conguration.
29www.arec.com

LS-2 User Manual
1.7 Account
Users can set the system account password etc.
Changing username and password with Administration/ Online Director / Video Manager :
(1) New User: Enter a user login name that you want.
(2) New Password: Enter the user login password that you want.
(3) Conrm Password: Requires you to enter your password again for conrmation.
(4) Click Apply.
30www.arec.com

LS-2 User Manual
Chapter 2 Director
2.1 Local Director
The LS-2 Local Director operates on the screen after the USB port is connected to the mouse or projector. GUI allow user to
control recording and have a live stream view on the display. Before the recording process the director control panel makes it
easy to apply layout, select background, and control the audio recorded.
10.2.50.152
2.1.1 Preview
This section briefly introduces the names of the various function buttons, and the functions will be introduced in the next
section.
10.2.50.152
Minimum Stream Status Snaoshot
Maximum Record Timer Playback
Overlay Streaming On/Off Settings
Layout Record IP Address
Background Pause Audio Volume
Theme Stop Display
10.2.50.152
31www.arec.com

LS-2 User Manual
2.1.2 Toolbar
Here will introduce the function of all buttons. We divide the function into many small parts to introduce it for easy reading.
2.1.2.1 Theme and Display
There are ve buttons for quickly switching recording overlay, layout, background, theme and display.
Note: Overlay, Layout, Background and Theme cannot be switched during recording.
Name : Overlay
Function : Change Overlay
Brief introduction :
Name : Layout
Function : Change Layout
Brief introduction :
Name : Background
Function : Change Background
Brief introduction :
Name : Theme
Function : Change Theme
Brief introduction :
Name : Display
Function : Change Content / Cam 1 / Mixed video cycling
Brief introduction : Switch image sources to monitor individual image inputs.
The video output settings display Monitor input sources or Preview mixed recording, please
refer to 1.1.5 Display
32www.arec.com

2.1.2.2 Recording, Streaming control and Snapshot
1. There are four buttons for quickly control video recording
Name Function Description
LS-2 User Manual
Status Streaming status
Timer Record timer Timer change to red while recording
Streaming Streaming On/Off
Record Video recording
Pause Pause recording
Stop Stop to end a recording -
Status change to red while LS-2 live
broadcast
When administrator streaming
setting : Enable streaming button
The Record button is red to indicate
active recording
The preview video are suspended.
To resume recording, click Record.
Snapshot Screen shot of the preview.
When not recording, the picture will
be placed in the snapshot folder of
the internal drive or front USB, and
will appear in the Video Manger.
When recording, the picture will
be placed in the data set of the
video(see 3.1.4 NO.6), and when the
snapshot is taken, the bookmark
will be automatically added.
33www.arec.com

2. video recording
Limitation
1. Video length(Max.) : 8hr
2. If Front USB is FAT32, USB record size only 4 GB space time.
Rule
1. Loop recording off
a. Front USB recording off : If internal drive < 8hr : max = internal
drive, show the dialog
b. Front USB recording on and internal drive < USB
• If internal hard drive < 8hr : max = internal drive, show the
dialog
2. Loop recording off
c. Front USB recording on and internal drive > USB
• If USB < 8hr : max = USB, show the dialog
3. Loop recording on (internal drive = 8hr)
a. Front USB recording on and internal drive > USB
• If USB < 8hr : max = USB, show the dialog
LS-2 User Manual
2.1.2.3 Playback Video
Video list Dialog
d
Show all videos saved in hard drive,three videos in one page.
a.Date of video
a
b
c
b.Start-End time of video
c.Total time of video
d.File list page up
e.File list page down
e
f.Video list pages,click to jump to different video list page.
f
34www.arec.com

Playback mode functions
Name Function Description
LS-2 User Manual
Play/ Pause Play/Pause video
Show playback progress in bar
Time bar
Time
00:00:00
Information
00:00:02
Audio On/Off Mute or resume playback audio -
Volume bar
Bookmark Bookmark of video (The dialog will be introduced below.)
Switch sources Change playback source -
Mixed video Playback Mixed video -
Content Playback Content video -
Total recording time & current
playback time
Show playback volume level
While the video is playing, click to pause and click
again to resume
Click any point on the bar will jump to
correspondent time
-
Click any point on the bar will adjust to
correspondent volume level
Cam 1 Playback Cam 1 video -
Exit Exit the playback mode -
35www.arec.com

LS-2 User Manual
Bookmark
Show all Bookmark list attached with this playback
video,three Bookmark item in one page.
a
b
c
e
2.1.2.4 Settings
1. Information
a. Show device information:Hostname/ Device description/ IP address/ Model/ Version/ Brand
b. Projector calibration: Some of the iFPD need to be calibrated before use. Using mouse control to
click icon to start calibration. First appears the Touch Module list, select one and the calibration page
will show. Using pen or nger to click on the center of the dot one by one. Totally 5 dots and each dot
remain 30 seconds for time out.
a. Bookmark Title
b. Time Point
c. Bookmark list page up
d. Bookmark list page down
d
e. Bookmark list pages,click to jump to different video list
page.
2. Audio In / Out
a
b
c
Audio Input Volume Control
a. Line/ HDMI 1/ Line + HDMI 1 : Mute/ Down/ Up
b. HDMI 2 : Mute/ Down/ Up
c. Encoder: Mute/ Down/ Up
d. Default (Volume only)
d
36www.arec.com

Audio Output Volume Control
a. Line : Mute/ Down/ Up
a
b
c
b. HDMI : Mute/ Down/ Up
d
c. Audio output loop through : On/Off
Note :
Audio Loop-through Off : Local audio output does not include local
audio input (Audio 1, Audio 2)
d. Default (Volume only)
2.1.2.5 Others
Name Function Description
IP Address Device WAN IP Address
10.2.50.152
LS-2 User Manual
Audio Volume
Audio volume meter
37www.arec.com
LS-2 User Manual
Chapter 3 Video Manager
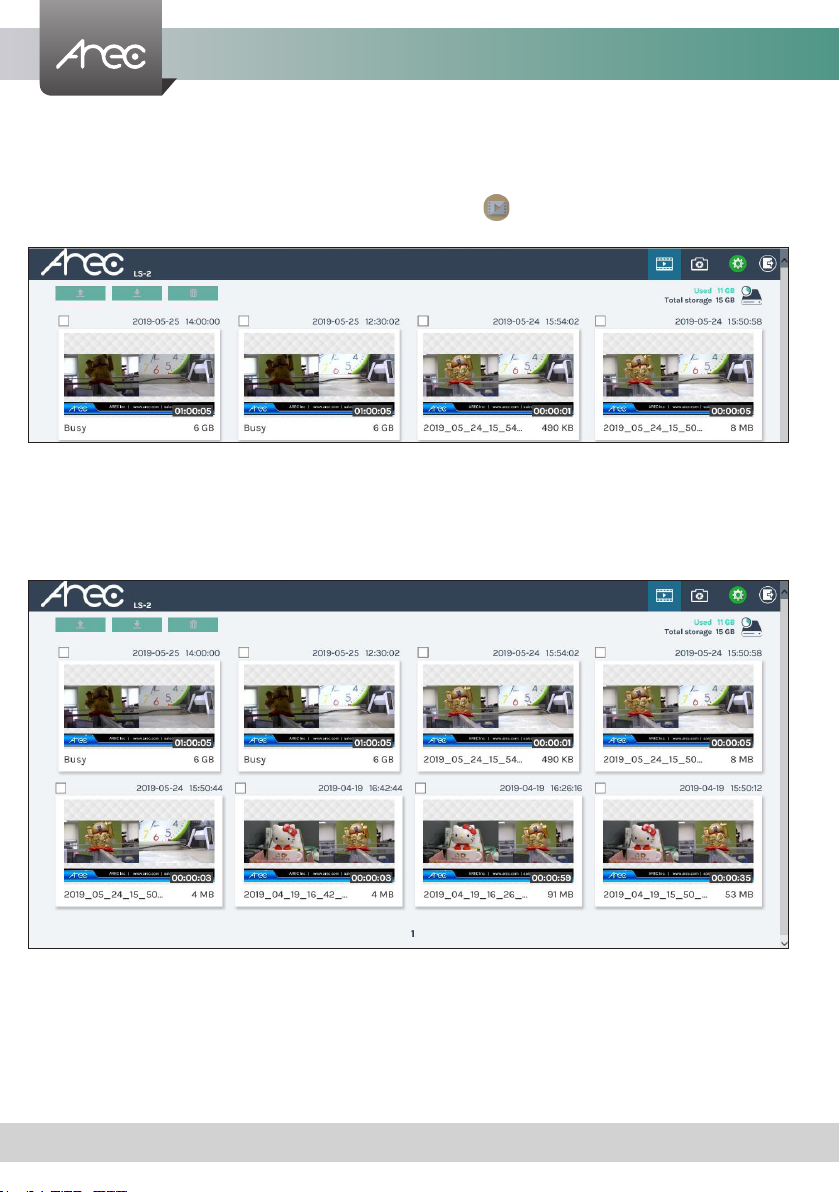
The LS-2 embedded Video Manager provides access to recordings produced by LS-2 itself and stored in the internal -storage
drive or USB. The video and Snapshot lists are in descending order by the time of occurrence.
Entering the Video Manager webpage via [Administrator] by clicking the button; or log in Video Manager from the initial
login page with default username video and password video.
3.1 Video Management
The Video Manager includes the following features:upload, download, delete, playback the recording and edit the recording
information.
38www.arec.com

LS-2 User Manual
3.1.1 Upload the recording
Select the desired recording and click to add it in the upload queue. The upload destination is pre-congured by system
administrator. See Administrator\ Upload for more details. The LS-2 arranges the upload sequence automatically and
indicates the upload status/result on the corresponding recordings. The following indicators are used:
Icon Upload Status
The recording package are uploaded successfully.
The recording upload is failed.
The recording is in the upload queue.
The recording is uploading at this moment.
3.1.2 Download the recording
Select the desired recording and click . Select Save if offered the choice to Open or to Save the package. The recording
packages are downloaded to your computer included mp4 file and dataset file. These are typically saved to the default
download location used by your browser.
The recording package may contain more than one .mp4 files if that is recorded in MP4 Mixed video/ Original source
recording mode.
To separately download the les in the recording packages, click on the recording thumbnail and access those in the Content
information page.
3.1.3 Delete the recording
Recording packages can be deleted manually to make room for new recordings.
Select the recording and click . A confirmation dialog box opens asking you to confirm the deletion. Click Confirm
to permanently remove the recording packages. The list may not update immediately. Refresh the list by reloading this
webpage.
39www.arec.com

LS-2 User Manual
3.1.4 Playback the recording
Click on the desired recording and you will be directed to the content information page. Use the player controls at the bottom
of the window to watch the video.
There might be more than one les listed under the window if the content is recorded in MP4 Mixed video/ Original source
recording mode. Select the video for playback by clicking on the image of the desired one.
The le size being download is shown within the button.
The title used for Mixed video is “Movie”, and those for Original source(s) are the name of the corresponding video input(s);
by default are Content and Cam 1. To separately download MP4 Mixed video/ Original source les, select the desired le and
click Download.
1
2
3
4
5
6
7
8
1. Title of the video le being played
2. Recording date and time
3. Edit the content elds
4. Playback window
5. Playback controls
6. Video les and data set (les containing metadata, thumbnail images,
and bookmarks.)
7. HTML le and thumbnail images
8. Download button
3.1.5 Edit the recording information
If you require to edit the information of a recording, click on the desired recording and you will be directed to the content
information page. Replace the existing text or enter new information in the content elds. Click APPLY to save the changes.
40www.arec.com

LS-2 User Manual
3.1.6 Edit the bookmark information
If you require to edit the bookmark of a recording, click on the desired recording and you will be directed to the Bookmark
page.
1. Edit the bookmark title.
2. Delete the bookmark
3. Add new bookmark with title.
3.2 Snapshot Management
The Snapshot Manager includes the following features:upload, download, delete, preview.
41www.arec.com

LS-2 User Manual
3.2.1 Upload the photo
Select the desired photo folder and click to add it in the upload queue. The upload destination is pre-congured by
system administrator. See Administrator\ Upload for more details. The LS-200 arranges the upload sequence automatically
and indicates the upload status/result on the corresponding folders. The following indicators are used:
Icon Upload Status
The le package are uploaded successfully.
The le upload is failed.
The le is in the upload queue.
le
The
is uploading at this moment.
3.2.2 Download the photo
Select the desired photo folder and click . Select Save if offered the choice to Open or to Save the package. The photo
packages are downloaded to your computer. These are typically saved to the default download location used by your
browser.
To separately download the photo in the folder, click on the folder thumbnail.
3.2.3 Delete the photo
Photo packages can be deleted manually to make room for new photos.
Select the folder and click . A confirmation dialog box opens asking you to confirm the deletion. Click Confirm to
permanently remove the photo packages. The list may not update immediately. Refresh the list by reloading this webpage.
42www.arec.com

3.2.4 Preview the photo
Click on the desired photo folder and you will be directed to the photo list page.
Click on the desired photo to preview the photo.
LS-2 User Manual
43www.arec.com

LS-2 User Manual
Table of On Screen Display Icons
The LS-2 provides HDMI or VGA output for recording monitoring. On screen display there are event icons and sometimes the
error operation warnings.
Disk full Network connection failure Front USB drive mount Live Streaming Error
Front USB recording error Operation is denied Front USB recording Disk failure
Input no video
44www.arec.com

LS-2 User Manual
Recording is paused Firmware updating
Firmware update failure Fan failure
Shutdown conrmation
45www.arec.com
AREC Inc.© All Rights Reserved 2019. l www.arec.com
All information contained in this document is Proprietary
Made in Taiwan
Date : 2019.6.1
Version : 2.6
AREC have the right to change or improve product specications, without obligation to notify any user.
Go to www.arec.com get the latest information related to the product or additional information.
 Loading...